RouteFinder SOHO Security Appliance - RF820 & RF820-AP RF830 & RF830-AP
←
→
Page content transcription
If your browser does not render page correctly, please read the page content below

®
 RouteFinder
SOHO Security Appliance

           RF820 & RF820-AP
           RF830 & RF830-AP

        Quick Start Guide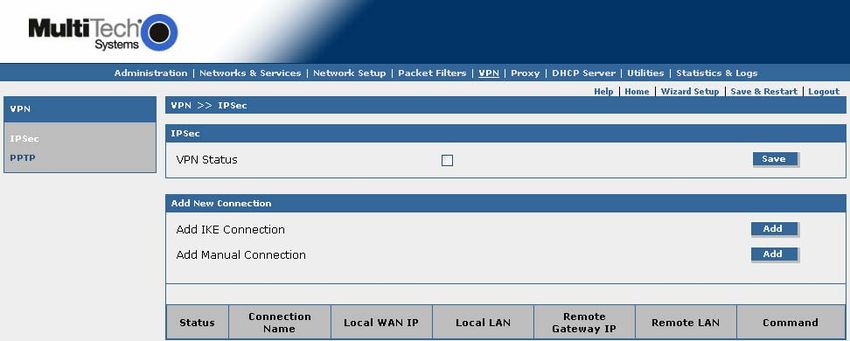
Quick Start Guide
RouteFinder SOHO Security Appliance
RF820 & RF820-AP
RF830 & RF830-AP
Document Product Number 82100048L, Revision D

Copyright
This publication may not be reproduced, in whole or in part, without prior expressed written permission
from Multi-Tech Systems, Inc. All rights reserved.
                                         Copyright © 2006-2007
Multi-Tech Systems, Inc. makes no representations or warranties with respect to the contents hereof
and specifically disclaims any implied warranty of merchantability or fitness for any particular purpose.
Furthermore, Multi-Tech Systems, Inc. reserves the right to revise this publication and to make changes
from time to time in the content hereof without obligation of Multi-Tech Systems, Inc. to notify any
person or organization of such revisions or changes.

Revision       Date              Description
    A          04/20/06          Initial release. Software version 1.00
    B          01/09/07          Software version 1.30
    C          04/05/07          Updated Technical Support contact list
    D          10/23/07          Software version 1.40. Save and Restart functionality changed.

Patents
This device is covered by one or more of the following U.S. Patent Numbers: 6,219,708; 5,301,274;
5,309,562; 5,355,365; 5,355,653; 5,452,289; 5,453.986.

Trademarks
RouteFinder, Multi-Tech and the Multi-Tech logo are registered trademarks of Multi-Tech System, Inc.
Windows is a registered trademark of Microsoft. All other trademarked products mentioned in this
manual are owned by their respective companies.

World Headquarters
Multi-Tech Systems, Inc.
2205 Woodale Drive
Mounds View, Minnesota 55112
Phone: 763-785-3500 or 800-328-9717
Fax: 763-785-9874
Internet Address: http://www.multitech.com

Technical Support
Country                        By Email                        By Phone
Europe, Middle East, Africa    support@multitech.co.uk         +(44) 118 959 7774
U.S., Canada, all others       support@multitech.com           (800) 972-2439 or +763-717-5863

Multi-Tech Systems, Inc. RF820/RF820-AP & RF830/RF830-AP Quick Start Guide                             3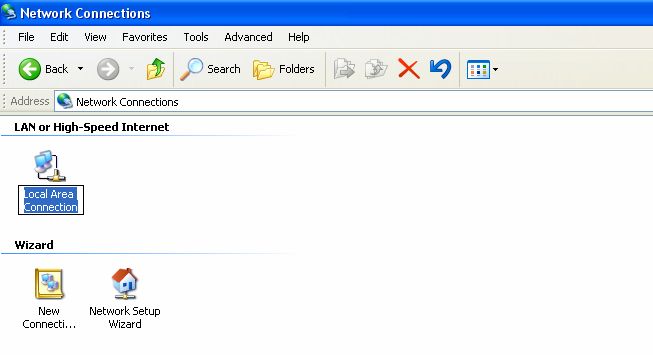
Contents
Chapter 1 – Introduction and Description............................................5
    RouteFinder Ship Kit Contents ...........................................................5
    RouteFinder Documentation...............................................................5
    Telecom Warnings for the Modem......................................................6
    RF820/RF820-AP Front Panel ...........................................................6
    RF830/RF830-AP Front Panel ...........................................................6
    RF820 Back Panel..............................................................................7
    RF820-AP Back Panel........................................................................7
    RF830 Back Panel..............................................................................7
    RF830-AP Back Panel........................................................................7
    Typical Applications ............................................................................8

Chapter 2 – Installation..........................................................................9
    Cabling Your RF820 RouteFinder ......................................................9
    Cabling the RF820-AP........................................................................9
    Cabling Your RF830 RouteFinder ....................................................10
    Cabling the RF830-AP......................................................................10
    The RF820-AP and RF830-AP Antenna...........................................11
    Setting up a Workstation and Starting the RouteFinder ...................12
    Open a Web Browser .......................................................................14
    Login.................................................................................................14
    Web Management Software Opens..................................................15
    Navigating Through the Software Screen.........................................15
    Menu Bar ..........................................................................................15
    Sub-Menus .......................................................................................16

Chapter 3 – Configuration ...................................................................17
    Using the Setup Wizard to Configure the RouteFinder.....................17
    RF820/RF820-AP and RF830/RF830-AP Wizard Setup ..................18
    Save & Restart Button Under Menu Bar...........................................22

4          Multi-Tech Systems, Inc. RF820/RF820-AP & RF830/RF830-AP Quick Start Guide
Chapter 1 – Introduction and Description
Chapter 1 – Introduction and
Description
Welcome to the world of Internet security. Your Multi-Tech RouteFinder SOHO security
appliances, models RF820 and RF830, and RouteFinder SOHO wireless security appliances,
models RF820-AP and RF830-AP, are ideal for the small office or home office (SOHO) that
need secure access to a corporate LAN.
In addition to providing a WAN Ethernet port(s) for DSL or cable broadband Internet access,
these devices also offer both client-to-LAN and LAN-to-LAN VPN connectivity based on the
IPSec or PPTP protocols. The RouteFinder supports up to 15 VPN tunnels and provides
168-bit 3DES and AES encryption to ensure that your information remains private. In addition,
it offers secure Internet firewall services.
RouteFinder Ship Kit Contents
The RouteFinder shipping box contains the following items:
• One SOHO RouteFinder
• Power Supply
• 2.4 GHz 5dBi SWI-Reverse-F Swivel Access Point Antenna (Included with the wireless
models only)
• Ethernet cable (included with the RF830 model)
• This Quick Start Guide
• IPSec VPN Client 30-day evaluation software on CD (not the full working version).
• One RouteFinder CD which contains RouteFinder documentation and Adobe Acrobat
Reader.
If any of the items is missing or damaged, please contact Multi-Tech Systems, Inc.
RouteFinder Documentation
The Quick Start Guide
The Quick Start Guide is a shorter version of this User Guide. It is included in printed form with
your RouteFinder. The guide provides the necessary information for a qualified person to
unpack, connect, and configure the device for proper operation.
The User Guide
The User Guide can be downloaded from the RouteFinder CD by clicking Install Manuals on
the Installation screen or downloading the file from the Multi-Tech Web site at:
http://www.multitech.com.
Adobe Acrobat Reader
Adobe Acrobat Reader is a free program for viewing PDF formatted documents. It can be
installed from the CD (click on Install Manuals and select Install Adobe Acrobat Reader).
Multi-Tech Systems, Inc. RF820/RF820-AP & RF830/RF830-AP Quick Start Guide 5Chapter 1 – Introduction and Description
Telecom Warnings for the Modem
1. Never install telephone wiring during a lightning storm.
2. This product must be disconnected from the telephone network interface when
servicing.
3. This product is to be used with UL and cUL listed computers.
4. Never touch uninsulated telephone wires or terminals unless the telephone line has
been disconnected at the network interface.
5. Use caution when installing or modifying telephone lines.
6. Avoid using a telephone during an electrical storm. There may be a remote risk of
electrical shock from lightening.
7. Do not use the telephone to report a gas leak in the vicinity of the leak.
8. To reduce the risk of fire, use only No. 26 AWG or larger telecommunications line cord.
9. Never install telephone jacks in a wet location unless the jack is specifically designed for
wet locations.
RF820/RF820-AP Front Panel
RF830/RF830-AP Front Panel
LEDs Description
Power Lights when power is being supplied to the RouteFinder.
Status When functioning normally, the LED blinks. The LED is a solid light
when the RouteFinder is booting up, saving the configuration, restarting,
or updating the firmware.
Serial DCD (RF820s only) Lights when Serial port is connected to a remote site.
Serial RXD (RF820s only) Blinks when Serial port is receiving or transmitting data.
LAN10 /100M Lights when a successful connection to the 100BaseT LAN is
established. Off when connected to the 10BaseT.
LAN Link / ACT Lights when the LAN port has a valid Ethernet connection.
Blinks when it is receiving or transmitting data.
WAN 10 /100M Lights when a successful connection to the 100BaseT WAN is
established. Off when connected to the 10BaseT.
WAN Link / ACT Lights when the WAN port has a valid Internet connection.
Blinks when it is receiving or transmitting data.
6 Multi-Tech Systems, Inc. RF820/RF820-AP & RF830/RF830-AP Quick Start GuideChapter 1 – Introduction and Description
RF820 Back Panel
RF820-AP Back Panel
RF830 Back Panel
RF830-AP Back Panel
Connector Description
Antenna Connector Connector for the 2.4 GHz 5dBi SWI-Reverse-F antenna. The
antenna must be connected before the RouteFinder is operational.
WAN WAN (10/100BaseT) port connects the DSL modem or cable modem.
The RF820s have one WAN port; the RF830s have two WAN ports.
LAN Ports There are 4 LAN ports. You can connect to PCs, FTP servers,
printers, or other devices you want to put on your network.
Reset The Reset button resets the RouteFinder to its factory defaults. Press
and hold the button until the Status LED goes off (at least 8 to 10
seconds), and then release it. Do not press this button unless you
want to restore all settings to the factory defaults.
Serial (RF820s only) Serial port connects to a standard modem (optional).
12VDC Power The power port connects the AC power adapter.
Multi-Tech Systems, Inc. RF820/RF820-AP & RF830/RF830-AP Quick Start Guide 7Chapter 1 – Introduction and Description
Typical Applications
Remote User. The client-to-LAN
application replaces traditional
dial-in remote access by allowing
a remote user to connect to the
corporate LAN through a secure
tunnel over the Internet. The
advantage is that a remote user
can make a local call to an
Internet Service Provider, without
sacrificing the company’s security,
as opposed to a long distance call
to the corporate remote access
server.
Branch Office. The LAN-to-LAN
application sends network traffic
over the branch office Internet
connection instead of relying on
dedicated leased line connections.
This can save thousands of
dollars in line costs and reduce
overall hardware and
management expenses.
Firewall Security. As businesses
shift from dial-up or leased line
connections to always-on
broadband Internet connections,
the network becomes more
vulnerable to Internet hackers.
The RouteFinder provides a full-
featured firewall based on Stateful
Packet Inspection technology and
NAT protocol to provide security
from intruders attempting to
access the office LAN.
Load-Balancing. Load Balancing
distributes LAN-to-LAN traffic over
two WAN links. This allows for the
amount of traffic on each line to be
based on a specified weighed
value so that communication can
be made faster and more reliable.
Failover. If one port were to go
down, the RouteFinder appliance
would automatically re-route all
Internet and VPN traffic to the
other connection. The second
WAN port greatly enhances
performance and system uptime.
8 Multi-Tech Systems, Inc. RF820/RF820-AP & RF830/RF830-AP Quick Start GuideChapter 2 – Installation
Chapter 2 – Installation
Cabling Your RF820 RouteFinder
Your RouteFinder requires making the appropriate connections to PCs, a cable or xDSL
modem, an analog modem or ISDN TA (RF820 only), and AC power.
After your device is properly cabled, it must be configured. See Chapter 3 for basic directions.
For advanced configurations, see the User Guide.
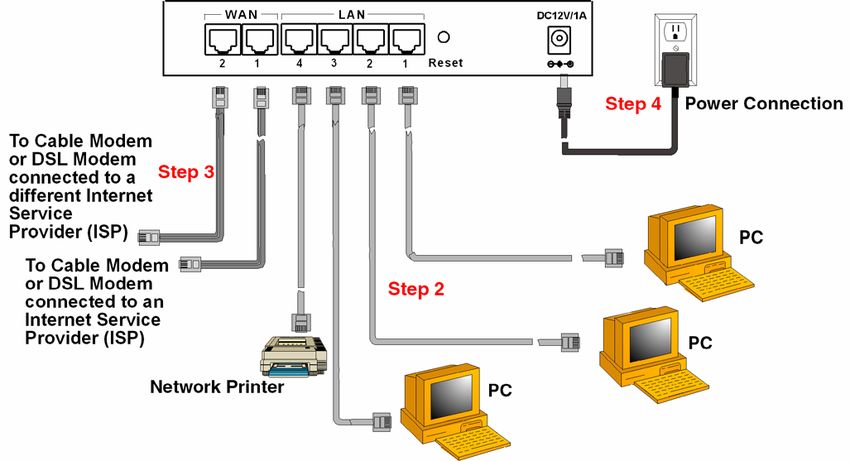
1. Turn the power off on all network devices (PCs, cable modems, DSL modems, analog
modems, ISDN TAs, and the router).
2. Plug one end of a RJ-45 cable into the Ethernet port on the PC and other into one of the
LAN port on the RouteFinder. (If you have more than one PC, connect the others in the
same way to the other LAN ports).
3. If using an analog modem, connect it to the RF820’s serial port.
4. Connect a network cable from the DSL or cable modem to the RouteFinder WAN port.
5. Connect the provided power supply cable to the 12VDC power port on the back of the
RouteFinder, and plug the other end of the power supply into an AC power outlet.
Cabling the RF820-AP
Use the cabling procedures above and attach the wireless antenna. See the Back Panel
section earlier in this chapter for the location of the antenna connector.
Note: The antenna must be attached in order for the RouteFinder to be operational.
Multi-Tech Systems, Inc. RF820/RF820-AP & RF830/RF830-AP Quick Start Guide 9Chapter 2 – Installation
Cabling Your RF830 RouteFinder
1. Turn the power off on all network devices (PCs, cable modems, DSL modems, analog
modems, ISDN TAs, and the router).
2. Plug one end of a RJ-45 cable into the Ethernet port on the PC and other into one of the
LAN port on the RouteFinder. (If you have more than one PC, connect the others in the
same way to the other LAN ports).
3. Connect a network cable from the DSL or cable modem to the WAN port on the
RouteFinder. A second WAN port is provided for connecting a second DSL modem or
cable modem that uses a different Internet Service Provider (ISP). This gives you the
option to switch from one ISP to another in case one provider is not available.
4. Connect the provided power supply cable to the 12VDC power port on the back of the
RouteFinder, and plug the other end of the power supply into an AC power outlet.
Cabling the RF830-AP
Use the cabling procedures above and attach the wireless antenna. See the Back Panel
section earlier in this chapter for the location of the antenna connector.
Note: The antenna must be attached in order for the RouteFinder to be operational.
10 Multi-Tech Systems, Inc. RF820/RF820-AP & RF830/RF830-AP Quick Start GuideChapter 2 – Installation
The RF820-AP and RF830-AP Antenna
Your ship kit for the wireless RouteFinders (RF820-AP and RF830-AP) includes a 2.4 GHz
5dBi SWI-Reverse-F Swivel Antenna.
Important Notes:
• The antenna for this product must be a reverse polarity SMA antenna.
• The antenna must be attached in order for the RouteFinder to be operational.
Antenna Electrical Characteristics
Frequency: 2400 to 2500 MHZ
Gain: 4.5dBi (nominal)
VSWR: ≤2
Polarization: Linear, Vertical
Maximum Power: 20W
Impedance: 50 Ω
Connector: RP-SMA Plug
Reverse Polarity Meets FCC Part 15.203 Requirements
See the User Guide for the antenna's environmental and mechanical specifications.
Multi-Tech Systems, Inc. RF820/RF820-AP & RF830/RF830-AP Quick Start Guide 11Chapter 2 – Installation
Setting up a Workstation and Starting the
RouteFinder
This section of the Quick Start Guide covers the steps for setting up TCP/IP communication on
the PC(s) connected to the RouteFinder, starting up the RouteFinder, and opening the
RouteFinder Web Management program.
Establish TCP/IP Communication
Notes:
z The RouteFinders have built-in DHCP server functionality, so you can set the PC to
obtain a dynamic IP address.
z The following directions are for Windows 2000+ / XP operating systems.
Obtain a Dynamic IP Address
To obtain a dynamic IP address so it can be assigned to the Ethernet port:
1. Make the RouteFinder connections as described on the previous two pages.
2. Click Start | Settings | Control Panel. Double-click the Network Connections icon.
3. The Network Connections screen displays. Right-click the Local Area Connection
icon and choose Properties from the drop down list.
12 Multi-Tech Systems, Inc. RF820/RF820-AP & RF830/RF830-AP Quick Start GuideChapter 2 – Installation
4. The Local Area Connection 5. Once you click the Properties button, the
Properties dialog box displays. following screen displays. To have your
• Select Internet Protocol DCHP client obtain a dynamic IP address,
[TCP/IP]. click the button for Obtain an IP address
automatically.
• Click the Properties button.
6. Close out of the Control Panel.
7. Repeat these steps for each PC on your network.
To Set a Fixed IP Address
To set a Fixed IP Address, check Specify an IP address instead of Obtain an IP
address automatically. Then click OK.
1. Enter the workstation IP address as 192.168.2.x. Note that the x in the address
stands for numbers 101 and up.
2. Enter the Subnet mask as 255.255.255.0
3. Enter the Default gateway as 192.168.2.1
4. Close out of the Control Panel.
5. Repeat these steps for each PC on your network.
Multi-Tech Systems, Inc. RF820/RF820-AP & RF830/RF830-AP Quick Start Guide 13Chapter 2 – Installation
Open a Web Browser
Note: Be sure that the RouteFinder is cabled and that the power is connected. See the
cabling drawings at the beginning of this chapter.
Bring up a Web browser on the PC.
• Type the default gateway address line:
http://192.168.2.1
• Press Enter.
Note: Make sure your PC’s address is on the same network as the router’s address.
IPCONFIG is a tool for finding out a PC’s IP configuration (the default gateway and
the MAC address).
Login
The Login screen for the RouteFinder software displays.
• Type admin (admin is the default user name) in the user name box.
• Type admin in the password box.
• Click Login.
Note: The User name and Password entries are case-sensitive (both must be
typed in lower-case). The password can be up to 12 characters. Later, you will
want to change the password from the default (admin) to something else (see
the User Guide). If Windows displays the AutoComplete screen, you may want
to click No to tell Windows OS to not remember the password for security
reasons.
Password Caution: Use a safe password! Your first name spelled backwards is
not a sufficiently safe password; a password such as xfT35$4 is better. It is
recommended that you change the default password. Create your own
password.
14 Multi-Tech Systems, Inc. RF820/RF820-AP & RF830/RF830-AP Quick Start GuideChapter 2 – Installation
Web Management Software Opens
This is the Home screen from which you can access all setup functions.
Note: Only the top portion of the Home screen is shown here.
Navigating Through the Software Screen
Before using the software, you may find the following information about navigating through
the screens and the structuring of the menus helpful.
Menu Other
Bar Options
Sub Screen
Menu Name
Input
Area
Menu Bar
See menu categories and their submenus listed on the next page.
Multi-Tech Systems, Inc. RF820/RF820-AP & RF830/RF830-AP Quick Start Guide 15Chapter 2 – Installation
Sub-Menus
Each Menu Bar selection has its own sub-menu, which displays on the left side of the screen.
When you click one of the Main Menu choices, the first screen listed in the sub-menu displays.
You can choose other sub-menu options/screens by clicking on your sub-menu choice.
This is an example of the Administration sub-menu. It displays when you click
Administration.
Table of Menus and Sub-Menus
Administration Networks & Services Network Setup Packet Filters VPN
System Setup Network Configuration IP Settings Packet Filter Rules IPSec
Administrative Service Configuration Wireless LAN Advanced Filters PPTP
Access WLAN Security ICMP
System Logs WLAN Client Filter Packet Filter Log
Remote Syslog Advanced IP Settings
SNTP Client Load Balancing
Tools (RF830/RF830-AP only)
Factory Defaults PPP Cellular/Analog Backup
(RF820/RF820-AP only)
Dynamic DNS
Static Routes
IP Masquerading
SNAT
DNAT
Proxy DHCP Server Utilities Statistics & Logs
HTTP Proxy LAN Backup System Information
Custom LAN Subnet Settings Firmware Upgrade Network Interface Details
Filters LAN Fixed Addresses Packet Filter Log
DNS Proxy These menu options: IPSec Live Log
Wireless LAN: PPTP Live Log
WLAN Subnet Settings DHCP Server Live Log
WLAN Fixed Addresses PPP Cellular/Analog Log
display when you go to (RF820/RF820-AP
Network Setup > only)
Wireless LAN and select WLAN Client Live Log
Independent Subnet. Log Traces
16 Multi-Tech Systems, Inc. RF820/RF820-AP & RF830/RF830-AP Quick Start GuideChapter 3 – Configuration
Chapter 3 – Configuration
Using the Setup Wizard to Configure the RouteFinder
Using the Wizard Setup is a quick way to enter the basic configuration parameters to allow
communication between the LAN workstation(s) and the Internet as shown in the example
below.
Important Note: An initial configuration must be completed for each type of RouteFinder
functions: firewall configuration, LAN-to-LAN configuration, a LAN-to-Remote Client
configuration.
RouteFinder Initial Configuration
Multi-Tech Systems, Inc. RF820/RF820-AP & RF830/RF830-AP Quick Start Guide 17Chapter 3 – Configuration
RF820/RF820-AP and RF830/RF830-AP Wizard Setup
Click the Wizard Setup button located under the Menu Bar. The following screen displays.
Use the same directions for the RF820/RF820-AP and RF830/RF830-AP.
Screen Notes:
• PPP Client for Cellular/Analog Modem Backup is available only on the
RF820/RF820-AP.
• The RF830/RF830-AP has two WAN ports; the RF820/RF820-AP has only one.
A section labeled WAN 2 displays on the RF830/RF830-AP Wizard Setup screen.
• A section labeled WLAN (inset shown on the right) displays after you select
Independent Subnet on the Network Setup > Wireless LAN screen.
18 Multi-Tech Systems, Inc. RF820/RF820-AP & RF830/RF830-AP Quick Start GuideChapter 3 – Configuration
LAN Settings
IP Address – 192.168.2.1 defaults into this field.
Subnet Mask – 255.255.255.0 default into the fields.
These should be acceptable for your site.
ISP Settings
WAN 1
Select the way the IP Address should be assigned for the WAN link.
The default is DHCP Client. The screen displays the input fields for this default.
The input fields change when you select Static IP or PPPoE.
• WAN 1 DHCP Client Choice
DHCP (Dynamic Host Configuration Protocol) is a protocol that allows
individual devices on an IP network to get their own network configuration
information (IP address, subnet mask, broadcast address, etc.) from a DHCP
server.
Present Status: If the DHCP client is not enabled, the following message
displays: Present Status: IP address is not obtained from DHCP server. If
DHCP client is enabled, and if the IP address has been assigned by the DHCP
server, then the following values will display:
Assigned IP Address
Mask
DHCP Server Address
DNS Address
Gateway Address
Renew Time
The time that the DHCP client should begin to contact its server to renew
the lease it has obtained.
Expiry Time
Expiry time is the time that the DHCP client must stop using the lease if it
has not been able to contact a server in order to renew.
Use Peer DNS IP Address
Check this box if you want the DNS server addresses from the peer
(DHCP server) is to be obtained.
Note: The DNS address obtained from the DHCP server will be displayed
on the Network Setup > Interface screen.
Primary DNS
In this field, enter a primary domain server name (DNS). DNS (Domain
Naming System) allows you to enter a name (i.e., mydomain.com) to be
used in place of the computer's numeric IP address.
Secondary DNS
In this field, enter a secondary domain server name.
Multi-Tech Systems, Inc. RF820/RF820-AP & RF830/RF830-AP Quick Start Guide 19Chapter 3 – Configuration
• WAN 1 Static IP Choice
If you choose Static IP for WAN 1, the IP Address (default is 192.168.100.1)
and the Subnet Mask (default is 255.255.255.0) fields displays.
Enter the Default Gateway, the Primary DNS address and the Secondary
DNS address for the IP address provided.
• WAN 1 PPPoE Choice
PPPoE (Point-to-Point over Ethernet) is a specification for connecting multiple
computer users on an Ethernet local area network to a remote site through
DSL or cable modems or wireless connection to the Internet. The following
fields display when you select PPPoE:
User Name
Enter the user name give by the ISP.
Example: user1@xyz.com or user 1
20 Multi-Tech Systems, Inc. RF820/RF820-AP & RF830/RF830-AP Quick Start GuideChapter 3 – Configuration
Password
Enter the user’s password.
These characters are not allowed: .
The maximum number of allowed is 18.
Retype Password
Retype the password to confirm the one entered above. Passwords must
match. If you receive an error, enter password in both fields again.
Idle Time
This option is available only when the Connection Type is Trigger on
Demand. Specify the inactivity time (in seconds) after which the PPPoE
link should be brought down.
Connection Type
Specify the type of connection for the link. Options are:
Always Connect: The link will always be established. It is not dependent
on whether or not there is data or a traffic flow through the RouteFinder.
Default is Always Connect.
Trigger on Demand: The link will be established only when there is data
or a traffic flow through the RouteFinder.
Dynamic IP Address from ISP
Check the box to Enable the Dynamic IP address to be provided by the
ISP. If enabled, the IP address obtained from the ISP is dynamic. If
disabled, enter the IP address and subnet mask from the ISP in the
following Fixed Address fields:
IP Address
Net Mask
Note: If the ISP does not support the Fixed Address option, then the
RouteFinder will accept the dynamic IP address provided by the ISP.
Accept DNS Address from Peer
Check this box if you want the DNS server address to be obtained from
the peer (the ISP). The DNS address obtained from the ISP will be
displayed on the Network Setup > Interface screen. The details of the
address/subnet mask obtained from the ISP are displayed as the Present
Status on this screen.
MTU
A Maximum Transmission Unit (MTU) is the size (in bytes) of the largest
packet that can be passed onwards. To read more about MTU, see the
following Web site:
The default for this field is 1412, which should be acceptable for most
applications.
http://en.wikipedia.org/wiki/Maximum_transmission_unit
Also see the hyperlinked references listed on this Web site.
Primary DNS
In this field, enter a primary domain server name (DNS). DNS (Domain
Naming System) allows you to enter a name (i.e., mydomain.com) to be
used in place of the computer's numeric IP address.
Secondary DNS
If a secondary domain server name is configured, enter its name here.
The servers are consulted in the order in which they are configured.
Multi-Tech Systems, Inc. RF820/RF820-AP & RF830/RF830-AP Quick Start Guide 21Chapter 3 – Configuration
PPP Client for Cellular/Analog Modem Backup (RF820/RF820-AP Only)
The PPP link is used as a backup link to the WAN interface. If the Internet Keep-alive
URLs (see below) are not reachable through the WAN Ethernet interface, the PPP
backup link automatically comes up and the system regains its connection to the ISP.
The PPP dial backup settings are:
Status
Check this box to enable PPP Dial Backup on WAN interface.
User Name
Enter the user name to authenticate the RouteFinder with the ISP.
Password (Optional)
Enter the user password. These special characters cannot be used: .
Baud Rate
Select the serial baud rate from the drop down box.
Local IP Status
Check this box to enable support for negotiating an IP address with the ISP.
Local IP Address
Enter the IP address from which the RouteFinder can negotiate for an IP address
from the ISP.
Dial Number
Enter the PSTN number to be dialed.
Note: When the backup link comes up or goes down, an email alert is sent to the
administrator.
Administrative Access HTTP Port
Select the HTTP port for administrative access. The default is port 80. The port
number should be between 1 and 65535. Well known ports and ports used by the
firewall are not allowed.
Admin Password
Change administrator’s Password. Enter the password and a confirmation of the
password. These characters are not allowed: . Also, spaces are not allowed.
Save or Reset
Click Save at the bottom of the screen to save these entries. Use Reset if you want
to change the entries you have just made.
SAVE & RESTART BUTTON UNDER MENU BAR
Save to Flash Memory – If a connection is established, then the settings have been
entered correctly and your basic configuration is now complete. Now, you must save your
settings to the Flash Memory; this saves the current settings in the flash prom and prevents
settings from getting lost at the next power up.
Restart – This is optional. You do not have to restart the RouteFinder after saving to the
flash memory.
22 Multi-Tech Systems, Inc. RF820/RF820-AP & RF830/RF830-AP Quick Start Guide82100048L
You can also read