SIMPLE, NONSTOP INSULIN DELIVERY FOR PEOPLE WITH DIABETES WHO INSIST LIFE STILL COMES FIRST - K tie R.
←
→
Page content transcription
If your browser does not render page correctly, please read the page content below

*Up to 72 hours of insulin delivery
SIMPLE, NONSTOP INSULIN
DELIVERY FOR PEOPLE WITH
DIABETES WHO INSIST LIFE
STILL COMES FIRST.

                                                      PODDER™ RESOURCE GUIDE
                                    Omnipod® System

       Katie R.
                               TM

                  SINCE 2015
Nathaniel P.
                        TM

           SINCE 2014
TABLE OF CONTENTS

GET TO KNOW THE OMNIPOD® SYSTEM
    INTRODUCTION . . . . . . . . . . . . . . . . . . . . . . . . . . . . . . . . . . . . . . . . . . . . . . . . . . . . . . . . . . . . . . . . . . . . . . . . . . . . . . .2
           Welcome. . . . . . . . . . . . . . . . . . . . . . . . . . . . . . . . . . . . . . . . . . . . . . . . . . . . . . . . . . . . . . . . . . . . . . . . . . . . . . . . . . . . . . . . . . . . . . . . . . . . . . . . . . 2
           Supply List and Reorder . . . . . . . . . . . . . . . . . . . . . . . . . . . . . . . . . . . . . . . . . . . . . . . . . . . . . . . . . . . . . . . . . . . . . . . . . . . . . . . . . . . . . . . . . . 3
           The Pod. . . . . . . . . . . . . . . . . . . . . . . . . . . . . . . . . . . . . . . . . . . . . . . . . . . . . . . . . . . . . . . . . . . . . . . . . . . . . . . . . . . . . . . . . . . . . . . . . . . . . . . . . . . 4
           The Personal Diabetes Manager (PDM) . . . . . . . . . . . . . . . . . . . . . . . . . . . . . . . . . . . . . . . . . . . . . . . . . . . . . . . . . . . . . . . . . . . . . . . . . . 5
           Basal/Bolus . . . . . . . . . . . . . . . . . . . . . . . . . . . . . . . . . . . . . . . . . . . . . . . . . . . . . . . . . . . . . . . . . . . . . . . . . . . . . . . . . . . . . . . . . . . . . . . . . . . . . . 6
           Your Personal Pod Settings . . . . . . . . . . . . . . . . . . . . . . . . . . . . . . . . . . . . . . . . . . . . . . . . . . . . . . . . . . . . . . . . . . . . . . . . . . . . . . . . . . . . . . . 7
           Counting Carbohydrates . . . . . . . . . . . . . . . . . . . . . . . . . . . . . . . . . . . . . . . . . . . . . . . . . . . . . . . . . . . . . . . . . . . . . . . . . . . . . . . . . . . . . . . . . . 8

    OMNIPOD® SYSTEM INSTRUCTIONS . . . . . . . . . . . . . . . . . . . . . . . . . . . . . . . . . . . . . . . . . . . . . . . . . . . . 10
           How to Change the Pod . . . . . . . . . . . . . . . . . . . . . . . . . . . . . . . . . . . . . . . . . . . . . . . . . . . . . . . . . . . . . . . . . . . . . . . . . . . . . . . . . . . . . . . . .10
           Activate a New Pod . . . . . . . . . . . . . . . . . . . . . . . . . . . . . . . . . . . . . . . . . . . . . . . . . . . . . . . . . . . . . . . . . . . . . . . . . . . . . . . . . . . . . . . . . . . . . . 11
           Pod Placement/Prep/Tips . . . . . . . . . . . . . . . . . . . . . . . . . . . . . . . . . . . . . . . . . . . . . . . . . . . . . . . . . . . . . . . . . . . . . . . . . . . . . . . . . . . . . . .14
           Additional Notes . . . . . . . . . . . . . . . . . . . . . . . . . . . . . . . . . . . . . . . . . . . . . . . . . . . . . . . . . . . . . . . . . . . . . . . . . . . . . . . . . . . . . . . . . . . . . . . . .16
           Checking Blood Glucose. . . . . . . . . . . . . . . . . . . . . . . . . . . . . . . . . . . . . . . . . . . . . . . . . . . . . . . . . . . . . . . . . . . . . . . . . . . . . . . . . . . . . . . . .17
           Delivering a Bolus . . . . . . . . . . . . . . . . . . . . . . . . . . . . . . . . . . . . . . . . . . . . . . . . . . . . . . . . . . . . . . . . . . . . . . . . . . . . . . . . . . . . . . . . . . . . . . 20
           How to Suspend Insulin Delivery . . . . . . . . . . . . . . . . . . . . . . . . . . . . . . . . . . . . . . . . . . . . . . . . . . . . . . . . . . . . . . . . . . . . . . . . . . . . . . . . .21
           Important Tips and Reminders . . . . . . . . . . . . . . . . . . . . . . . . . . . . . . . . . . . . . . . . . . . . . . . . . . . . . . . . . . . . . . . . . . . . . . . . . . . . . . . . . . 22

    OMNIPOD® SYSTEM ADVANCED FEATURES . . . . . . . . . . . . . . . . . . . . . . . . . . . . . . . . . . . . . . . . . . . . 24
           Advanced Features: Bolus . . . . . . . . . . . . . . . . . . . . . . . . . . . . . . . . . . . . . . . . . . . . . . . . . . . . . . . . . . . . . . . . . . . . . . . . . . . . . . . . . . . . . . 24
           Advanced Features: Basal . . . . . . . . . . . . . . . . . . . . . . . . . . . . . . . . . . . . . . . . . . . . . . . . . . . . . . . . . . . . . . . . . . . . . . . . . . . . . . . . . . . . . . 25
           Advanced Features: Presets . . . . . . . . . . . . . . . . . . . . . . . . . . . . . . . . . . . . . . . . . . . . . . . . . . . . . . . . . . . . . . . . . . . . . . . . . . . . . . . . . . . . 26

    TROUBLESHOOTING . . . . . . . . . . . . . . . . . . . . . . . . . . . . . . . . . . . . . . . . . . . . . . . . . . . . . . . . . . . . . . . . . . . . . . . 28
           Hypoglycemia. . . . . . . . . . . . . . . . . . . . . . . . . . . . . . . . . . . . . . . . . . . . . . . . . . . . . . . . . . . . . . . . . . . . . . . . . . . . . . . . . . . . . . . . . . . . . . . . . . . 28
           Sick Day Management . . . . . . . . . . . . . . . . . . . . . . . . . . . . . . . . . . . . . . . . . . . . . . . . . . . . . . . . . . . . . . . . . . . . . . . . . . . . . . . . . . . . . . . . . . 29
           Hyperglycemia . . . . . . . . . . . . . . . . . . . . . . . . . . . . . . . . . . . . . . . . . . . . . . . . . . . . . . . . . . . . . . . . . . . . . . . . . . . . . . . . . . . . . . . . . . . . . . . . . . 30
           Customizing Reminders and Alerts. . . . . . . . . . . . . . . . . . . . . . . . . . . . . . . . . . . . . . . . . . . . . . . . . . . . . . . . . . . . . . . . . . . . . . . . . . . . . . 32
           Making the Most of Your PDM . . . . . . . . . . . . . . . . . . . . . . . . . . . . . . . . . . . . . . . . . . . . . . . . . . . . . . . . . . . . . . . . . . . . . . . . . . . . . . . . . . 34

    INSULET PROVIDED GLOOKO . . . . . . . . . . . . . . . . . . . . . . . . . . . . . . . . . . . . . . . . . . . . . . . . . . . . . . . . . . . . 36
    ADDITIONAL NOTES . . . . . . . . . . . . . . . . . . . . . . . . . . . . . . . . . . . . . . . . . . . . . . . . . . . . . . . . . . . . . . . . . . . . . . . . 38

This Resource Guide is intended to be used in conjunction with your Diabetes Management Plan, input from your
healthcare provider, and the Omnipod® Insulin Management System User Guide. PDM imagery is for illustrative purposes
only and should not be considered suggestions for user settings.

Refer to the Omnipod® Insulin Management System User Guide for complete information on how to use the Omnipod®
System, and for all related warnings and cautions. The Omnipod® Insulin Management System User Guide is available
online at myomnipod.com or by calling Customer Care (24 hours/7 days), at 800.591.3455.

           Caution: Consult User Guide.

This Resource Guide is for PDM model UST400. The PDM model number is written on the back cover of each PDM.

Contact your local Omnipod® System representative or visit myomnipod.com for more information.

                                                                                                                                                                                                                                            1
INTRODUCTION | Welcome

          WHAT’S DIFFERENT ABOUT THE POD?
          SIMPLE.
          Omnipod® System is a simple system consisting of just 2 parts—the tubeless Pod and the
          handheld Personal Diabetes Manager (PDM) that you keep nearby to wirelessly program
          your insulin delivery**. Made to be convenient and discreet, the Pod can provide up to
          3 days of continuous insulin delivery* and can be worn anywhere you would give yourself a
          shot. Wear what you want, and do what you want. Omnipod® System helps simplify insulin
          delivery, so you can live your life and manage diabetes around it. That’s just part of what
          makes so many people passionate Podders™.

          Preparing to start on Omnipod® System.
          This Resource Guide will lead you through some of the key functions you may need to
          perform with the Omnipod® Insulin Management System.
          Have questions?
          We’re here to help with our 24/7 Customer Care

          Customer Care: 1.800.591.3455
          From outside the US: 1.978.600.7850
          myomnipod.com

          In an emergency, you should call your healthcare provider
          as well as an emergency contact.

          Healthcare provider name                                                                                      Healthcare provider number

          Emergency contact name                                                                                        Emergency contact number

          Local Omnipod® System Representative                                                                          Representative contact number

    Medical Advice Disclaimer
    Always consult with your healthcare provider to determine the appropriate settings for you.
    HEALTH CARE AND TREATMENT ARE COMPLEX SUBJECTS REQUIRING THE SERVICES OF QUALIFIED HEALTH CARE PROVIDERS. THIS RESOURCE
    GUIDE IS INFORMATIONAL AND NOT INTENDED AS MEDICAL OR HEALTH CARE ADVICE OR RECOMMENDATIONS TO BE USED FOR DIAGNOSIS,
    TREATMENT OR FOR ANY OTHER INDIVIDUAL NEEDS. THIS RESOURCE GUIDE IS NOT A SUBSTITUTE FOR MEDICAL OR HEALTH CARE ADVICE,
    RECOMMENDATIONS AND/OR SERVICES FROM A QUALIFIED HEALTH CARE PROVIDER. THIS RESOURCE GUIDE MAY NOT BE RELIED UPON IN ANY
    WAY IN CONNECTION WITH YOUR PERSONAL HEALTH CARE, RELATED DECISIONS AND TREATMENT. ALL SUCH DECISIONS AND TREATMENT SHOULD
    BE DISCUSSED WITH A QUALIFIED HEALTH CARE PROVIDER WHO IS FAMILIAR WITH YOUR INDIVIDUAL NEEDS.
    * Up to 72 hours of insulin delivery
    **At start up the PDM and Pod should be adjacent and touching, either in or out of tray to ensure proper communication during priming. At least 5 feet (1.5 meters) during
       normal operation

2
INTRODUCTION | Supply list and reorder

                                                                                                          INTRODUCTION
SUPPLIES/REORDER
You should have the following supplies on hand at all times:
 + Several new, sealed Pods                      + Lancing device and lancets

 +E
   xtra, new PDM batteries (at least two        + Glucose tablets or another fast-acting
   AAA alkaline)                                    source of carbohydrate

 + A vial of rapid-acting U-100 insulin          + Alcohol prep swabs

 +S
   yringes or pens/needles for                  + Glucagon emergency kit and written
   injecting insulin                                instructions for giving an injection if you

 + Instructions from your healthcare               are unconscious

   provider about how much insulin to inject     + Additional blood glucose meter
   if delivery from the Pod is interrupted       + Phone numbers for your healthcare              .
 + Blood glucose test strips                        provider and/or doctor in case of an          .

 + Ketone test strips                               emergency

Reorder Tips
 + It is a good idea to call your Omnipod®      + Be sure to inform your distributor of any
   System supplier (Insulet or other vendor)       changes in your insurance coverage.
   when you open your last box of 10             + If you have forgotten where your reorder
   Pods. This helps ensure you will have           is coming from, you can find out in the
   enough supplies in the event additional         following ways:
   authorizations are needed from your             – Check the shipping label on your last Pod
   insurance.                                        shipment
 + If your reorder is coming direct from          – Call your insurance and ask who
   Insulet, you may be eligible for our              submitted the most recent claim for Pods
   Autoship program which automatically            – Call Customer Care
   ships your Pods approximately every 90
                                                Important Reorder Contacts:
   days. You can call Customer Care to
                                                 + Customer Care:
   inquire about enrollment.
                                                   1.800.591.3455 ext. 2
 + If your reorder is coming from an Insulet
                                                 + Your Current Distributor
   authorized distributor, please call them
   direct to inquire about shipping schedules
   and options.                                    Distributor                    Phone

   Caution: Consult User Guide.

                                                                                                      3
INTRODUCTION | The Pod

    THE POD
    A small, lightweight Pod that’s easy to apply and wear daily.

                  TOP

                                                         Viewing Window

                                                         Fill Port
                  BOTTOM

                                                         Adhesive Backing

                                                         Needle Cap

4
INTRODUCTION | The PDM

                                                                                                   INTRODUCTION
THE PDM
A wireless Personal Diabetes Manager (PDM) that’s easy to use.

                                                                 USB Port

                                                                 Color LCD Screen

  Soft Key Labels
  Soft Keys
  Home/Power                                                     User Info/Support
                                                                 Up/Down Controller

                                                                 Test Strip Port with Light

     MAIN MENU ITEMS
     Bolus: Deliver bolus doses to cover       My records: Review insulin delivery, blood
     carbohydrates and/or correct high blood   glucose history, alarm history, carbohydrate
     glucose (BG) levels.                      history, and personal user information.
     More actions:                             Settings:
       + Change the Pod                         + Enter, edit, and name basal programs
       + Add BG readings                        + Program temp basal, carbohydrate, and
       + Assign/edit BG tags                       bolus presets

       + Food library                           + Customize system settings

     Temp basal: Adjust insulin delivery for   Suspend: Temporarily suspend, cancel, or
     exercise or illness according to your     resume insulin delivery programs
     Diabetes Management Plan. This menu
     item is present only if the Temp basal
     option is turned on.

                                                                                               5
INTRODUCTION | Basal/Bolus

    BASAL INSULIN DELIVERY
    What is a basal rate?
    Your body needs a small amount of insulin that’s      programming your PDM to deliver the basal rates
    constantly delivered throughout the day, called       that are determined by your healthcare provider. If
    basal insulin. The exact amount of insulin your       you need to adjust your settings, you have up to 24
    body needs changes often depending on:                time intervals per basal program. You can have up to
                                                          7 basal programs.*
      + What you’re doing throughout the day
      + How stressed you are
                                                                Insulin Delivery with a Pump vs Normal Insulin Release**
                                                                                                                                            †

      + When you eat                                                        B           L            D
                                                                                BOLUS       BOLUS        BOLUS

      + When you’re sick
                                                              Insulin

    Omnipod System lets you
                   ®                                          Levels
                                                                                                                             BASAL

    personalize your basal rates.
                                                                                  Noon                           Midnight
    When you first set up your Omnipod® System,                                                               Rapid-acting Insulin
                                                                                                              Diagram of Natural Insulin Release
    a Certified Pod Trainer will assist you in

    DELIVERING BOLUS INSULIN DOSES
    What is a bolus dose?                                 Omnipod® System will help to
    A bolus is an extra dose of insulin, delivered when   deliver your bolus doses.
    needed to: match the carbohydrates in a meal or       A Certified Pod Trainer will assist you in programming
    snack and/or to lower your blood glucose when it      your PDM to deliver the bolus doses that are
    gets too high. There are two types of bolus doses:    determined by your healthcare provider when you first
      + Meal bolus                                        set up your Omnipod® System. As your insulin needs
        With Omnipod® System, you can deliver             change, you can later adjust these settings.
        either a normal or an extended meal bolus.
                                                          Calculate bolus insulin doses.
        – A normal meal bolus usually delivers
          enough insulin for a meal or snack you are      Omnipod® System also features a Suggested
          about to eat                                    Bolus Calculator to help you deliver an accurate
                                                          bolus dose. The calculator uses your current blood
        – An extended meal bolus delivers insulin         glucose, carbs entered, and your insulin on board
          over a longer period of time. When you          (IOB) to determine a suggested bolus dose.
          eat foods high in fat and/or protein or are
          eating over a long period of time, such as
          at a party, you might need an extended
          meal bolus.                                              Caution: Consult User Guide.
                                                          For more information about the Suggested Bolus Calculator, see Chapter 4,
      + Correction bolus                                  Understanding and Delivering Bolus Doses, in your Omnipod® Insulin Management
                                                          System User Guide.
        A correction bolus can be delivered with          *Be sure to check with your healthcare provider before adjusting these settings.
        or without a meal bolus if you need to lower      ©2002 by the American Diabetes Association®
                                                          †

                                                          Smart pumping for people with diabetes
        your blood glucose level.                         Reprinted with permission from the American Diabetes Association®

6
INTRODUCTION | Your personal Pod settings

                                                                                                                                       INTRODUCTION
YOUR PERSONAL OMNIPOD® SYSTEM SETTINGS
It is always a good idea to keep a copy of your Omnipod® System settings handy in the
event you have to set up another PDM.
Your healthcare provider will provide you with your initial start rates as well as any future changes.
       CAUTION: Do not attempt to start or make any changes to your PDM settings without formal instruction from your
       healthcare provider.

         Date ____________________________

         1.    Maximum Basal Rate                ______U/h

         2.    Basal 1                           12:00 AM to ______         ______U/hr

                                                 ______ to ______           ______U/hr

                                                 ______ to ______           ______U/hr

                                                 ______ to ______           ______U/hr

         3.    Temporary Basal Rate                          %                       U/h                Off

         4.    BG Sounds                         On                         Off

         5.    BG Goal Limits                    Lower Limit _______mg/dL

                                                 Upper Limit _______mg/dL

         6.    Suggested Bolus Calculator        On                         Off

         7.    Target BG                         12:00 AM to ______         Target ________    Correct Above ______mg/dL

                                                 ______ to ______           Target ________    Correct Above ______mg/dL

                                                 ______ to ______           Target ________    Correct Above ______mg/dL

         8.    Min BG – for bolus calculations                              ______ mg/dL

         9.    Insulin to Carb Ratio             12:00 AM to ______         ______g/carb

                                                 ______ to ______           ______g/carb

                                                 ______ to ______           ______g/carb

                                                 ______ to ______           ______g/carb
                                                                        1 unit of insulin decreases BG by
         10. Correction Factor                   12:00 AM to ______     ______mg/dL

                                                 ______ to ______           ______mg/dL

                                                 ______ to ______           ______mg/dL

                                                 ______ to ______           ______mg/dL

         11.   Reverse Correction                On                         Off

         12.   Duration of Insulin Action        ______ hours

         13.   Bolus Increment                   0.05 U                     0.10 U             0.50 U            1.00 U

         14. Maximum Bolus                       ______U

         15.   Extended Bolus                                %                       Units              Off

         16.   Low Volume Reservoir Alert        ______U

         17.   Expiration Alert                  ______hours

                                                                                                                                   7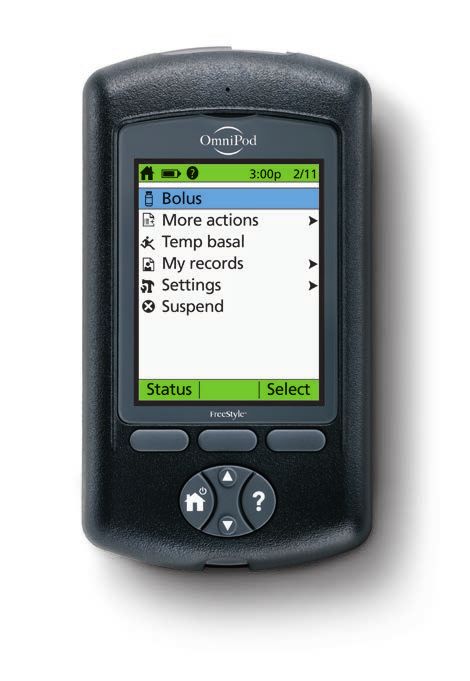
INTRODUCTION | Counting carbohydrates

    WHY CARBOHYDRATES MATTER
    Carbohydrates are important because they provide                                     glucose levels. Nearly 100% of digestible starches
    us with energy and essential vitamins and minerals.                                  and sugars become glucose soon after eating.
    Proteins and fats also contain calories, vitamins,                                   Glucose is then released into the blood stream
    and minerals, but do not contain carbohydrates                                       to provide immediate energy needs, or stored in
    unless the food is a mixed item like a casserole.                                    the muscle or liver as glycogen. Excess glucose is
    Carbohydrates are the primary foods that affect                                      converted to fat for storage.

    Impact on blood glucose levels.

    Proteins and fats take longer to digest and are                                      brown rice, or whole wheat bread. Choosing
    slower to affect your blood glucose. Higher                                          less processed, whole grain products is not only
    consumption of protein or fat at meals can delay                                     more nutritious, but the fiber can have a favorable
    glucose absorption and create higher blood                                           affect on your blood glucose and digestive health.
    glucose levels later. The section “Omnipod® System                                   Simple carbohydrates include table sugar,
    Advanced Features” will teach you more about                                         honey, syrups, regular soda, fruit juice, jellies and
    bolusing for certain meals with the Omnipod®                                         candies. These foods are digested easier and
    Insulin Management System.                                                           are absorbed into your blood stream faster than
    Complex carbohydrates include starchy foods                                          complex carbohydrates.
    and foods with fiber like whole grain pasta, beans,

    Making Healthy Food Choices. American Diabetes Association website. http://www.diabetes.org/food-and-fitness/food/what-can-i-eat/understanding-
    carbohydrates/types-of-carbohydrates.html. Updated March 9, 2015. Accessed June 21, 2017
    Beaser RS. Joslin’s Diabetes Deskbook: A guide for primary care providers. 3rd ed. Boston, MA. Joslin Diabetes Center; 2014
    Making Healthy Food Choices. American Diabetes Association website. http://www.diabetes.org/food-and-fitness/food/what-can-i-eat/making-healthy-food-
    choices/. Accessed June 21, 2017

8
INTRODUCTION | Counting carbohydrates
INTRODUCTION
Check the label.
The two key pieces of information on the nutrition facts label for carb counting are the serving
size and total carbohydrates.
For more detailed label information, visit the Taking a Closer Look at Labels at http://www.
diabetes.org/food-and-fitness/food/what-can-i-eat/food-tips/taking-a-closer-look-at-labels.html.
Nutrition Facts
Serving Size: The portion for which nutritional facts are calculated. 8 servings per container
Serving size 2/3 cup (55g)
Total Carbohydrates: Includes grams of sugar, sugar alcohol, Amount per serving
starch, and dietary fiber.
Calories 230
% Daily Value*
Total Fat 8g 10%
Saturated Fat 1g 5%
Fiber: If there are more than 5 grams of fiber in a serving, subtract Trans Fat 0g
half of the grams of fiber from the total carbs and use the adjusted Cholesterol 0 mg 0%
Sodium 160 mg 7%
number as the food’s total carb count. Total Carbohydrate 37g 13%
Dietary Fiber 4g 14%
Total Sugars 12g
Added Sugars: Sugars that are either added during processing Includes 10g Added Sugars 20%
Protein 3g
or packaging.
Vitamin D 2mcg 10%
Calcium 260mg 20%
Iron 8mg 45%
Potassium 235mg 6%
* The % Daily Value (DV) tells you how much a nutrient in a
serving of food contributes to a daily diet. 2,000 calories
a day is used for general nutrition advice
Source: US Food and Drug Administration Website
Know your favorites.
For a more extensive list, visit the USDA Food Composition Databases
https://ndb.nal.usda.gov/ndb/search/list.
Food Carbohydrate Food Carbohydrate
Food Serving Size Food Serving Size
Category Grams Category Grams
White or wheat bread 2 slices (2 oz) 25 - 30 Apple 1 small (4 oz) 17
Hotdog or hamburger bun 1 whole (2 oz) 25 Banana 1 small (6") 23
Bagel 1 whole (3-4 oz) 52 Watermelon 1 cup 12
Breads Dinner roll whole wheat 1 roll (1 oz) 15 Fruit and Strawberries 1 cup halves 12
Saltine crackers 5 crackers 11 Fruit Juices Grapes 1 cup 27
Flour tortilla 1 tortilla (8" dia.) 25 Canned fruits (in juice) 1 cup 28
Corn tortilla 1 tortilla (6" dia.) 13 Apple, orange, grapefruit or pineapple juice 1/2 cup (4 oz) 15
White or brown rice cooked 2/3 cup 30 Cranberry, grape or prune juice 1/2 cup (4 oz) 20
Pasta cooked 1 cup 38 Milk and Low-Fat Milk (fat-free, 2%, whole) 1 cup (8 oz) 12
Cereals/ Dry cereal (Plain Cheerios) 1 cup 20 Milk Plain low-fat yogurt 1 cup (8 oz) 16
Grains/Pasta
Instant oatmeal - reg cooked with water 1 packet 20 Products Plain low-fat greek yogurt 1 cup (8 oz) 8
Grits cooked with water 1 cup 32 Regular soda 1 can (12 oz) 38
Corn 1 cup 35 Vanilla Ice cream (regular) 1/2 cup 15 - 20
Mashed potatoes 1 cup 35 Sweets, Vanilla wafers 8 cookies 22
Starchy Desserts &
Vegetables Baked potato 3-4" diameter 1 large (10 oz) 64 Graham crackers 8 crackers (1 oz) 27
Snacks
Mixed vegetables 1 cup 15 Popcorn (regular, microwave) 1 cup popped 5
Cooked black beans 1/2 cup 20 Potato chips (plain, lightly salted) 1 oz (15 chips) 15
Dried beans, Cooked peas 1/2 cup 12
Peas, Lentil Cooked chickpeas 1/2 cup 16
Cooked lentils 1/2 cup 20
9OMNIPOD® SYSTEM INSTRUCTIONS | How to change the Pod
HOW TO CHANGE THE POD
You may need to change the Pod:
+ When the reservoir is low or empty, or the Pod is nearing expiration
+ In response to an alarm
+ If the Pod/cannula has become dislodged
+ If you have a blood glucose reading of 250 mg/dL or more and ketones are present
+ If you experience unexpected elevated blood glucose levels
+ As directed by your healthcare provider
+ If a Pod is active and fails to beep
3:00p 5/15 3:00p 5/15
Bolus Change pod
More actions Add BG reading
Temp basal Assign/Edit BG tags
My records View food library
Settings
Suspend
Status Select Back Select
1. Turn on the PDM. Press the Home/ 2. Select Change Pod.
Power button, then select More
actions.
3:00p 5/15
Pod3:00p
deactivated.
5/15 3:00p 5/15
Press “ConfiRemove
rm” to and discard Last BG 150 mg/dL
the pod, and then press
begin the pod change 2:51p today
process. “Next.” Last bolus 5.00 u
3:00p today
This will deactivate your
current pod.
IOB 5.00 u
No active pod.
Would you like to
Next activate a pod now?
Back Confirm No Yes
3. Press Confirm to deactivate the Pod. 4. Press Yes to activate a new Pod. Follow
Gently remove the deactivated Pod by the steps on pages 11 and 12 in this
slowly peeling back the adhesive. (Our guide to fill a new Pod with insulin. As
Podders™ have reported commercial you proceed, if the PDM screen times
solvent or baby oil can be helpful to out, press and hold the Home/Power
soften the adhesive if necessary.) button to turn it back on.
If the PDM screen times out during the process, press and hold the Home/Power button to continue.
10OMNIPOD® SYSTEM INSTRUCTIONS | Activate a new Pod
ACTIVATE A NEW POD
+ Assemble the following supplies:
– Vial of insulin at room temperature (U-100,
rapid-acting), See The Omnipod® System User
Guide for insulins tested and found to be safe for
use with the Omnipod® Insulin Management System
– One sealed Pod
– PDM
OMNIPOD® SYSTEM INSTRUCTIONS
– Alcohol prep swab
+ Wash your hands.
1. Fill the Pod
1.1 + R
emove the Pod from its 1.2 + R
emove the protective cap. 1.3 + D
raw air into the fill syringe
sterile packaging. equal to the amount of insulin
indicated in your Diabetes
+ Use the alcohol prep swab to Management Plan.
clean the top of the insulin vial.
+ Depress air into the vial
+ Assemble the fill syringe of insulin.
by twisting the needle onto
the syringe. + Turn the vial and syringe
upside down.
+ Withdraw insulin from the vial
and fill the syringe with the
amount of insulin determined
with your healthcare provider;
fill at least to the MIN line.
WARNING: + Remove any air bubbles from
the syringe.
+ NEVER inject air into the fill port. Doing so may result in unintended or interrupted insulin delivery
+ NEVER use a Pod if you hear a crackling noise or feel resistance when you depress the plunger.
These conditions can result in interrupted insulin delivery
CAUTION:
Do not use any other type of needle or filling device besides the fill syringe provided with each Pod.
11OMNIPOD® SYSTEM INSTRUCTIONS | Activate a new Pod
3:00p 5/15
Fill a new pod with
insulin.
After filling pod, listen
for 2 beeps, then press
“Next.”
NOTE: Do not remove
needle cap at this time.
Cancel Next
1.4 + Insert the needle straight 1.5 + Return to the PDM. If the PDM
down into the fill port on screen times out, press and hold
the underside of the Pod. the Home/Power button to turn it
To ensure proper fill, do not back on. Place the PDM next to the
insert fill syringe at an angle Pod so they are touching.
into the fill port.
+ Press Next.
+ Completely empty the syringe
into the Pod.
+ The PDM establishes a
one-to-one relationship with the
+ The Pod will beep twice, Pod, which will prevent it from
indicating that the Omnipod® communicating with any other
System is ready to proceed. Pod while this Pod is active.
Once the Pod successfully
completes its priming and safety
checks, the PDM will beep.
2. Apply the Pod
3:00p 5/15
Prepare infusion site.
Remove pod’s needle
cap.
If cannula sticks out
as shown below, press
“Discard”
Discard Next
2.1 + Select the infusion site, being 2. + For optimal adhesion, always 2.3 + Remove Pod’s the needle
careful to avoid areas where clean the site thoroughly with cap.
the Pod will be affected by an alcohol swab to remove all
folds of skin. Refer to the body oils and lotions, which may
figures on page 14 of this loosen the Pod’s adhesive. Let
resource guide for sites your the site air-dry completely; do
healthcare provider may not blow on the site to dry it.
recommend and placement
tips.
If the PDM screen times out during the process, press and hold the Home/Power button to continue.
12OMNIPOD® SYSTEM INSTRUCTIONS | Activate a new Pod
3:00p 5/15
Remove pod’s adhesive
backing
If pod is wet or dirty, or
adhesive is folded, press
“Discard.”
If pod OK, apply to site.
OMNIPOD® SYSTEM INSTRUCTIONS
Back Discard Next
2.4 + Carefully remove white paper 2.5 + Remove and discard the 2.6 + Apply the Pod to the selected site.
backing from the adhesive, white paper backing from
ensuring the adhesive is clean the adhesive.
+ Run your finger around the
adhesive to secure it.
and intact.
+ Press Next on the PDM.
+ To facilitate insertion, place one
hand over the Pod and make
a wide pinch around the skin
surrounding the viewing window;
this step is critical if the insertion
site does not have much
fatty tissue.
3. Press start
3:00p 5/15 3:00p 5/15 3:00p 5/15
Press “Start” to insert Pod is active. Reminder:
cannula and begin basal
delivery. “basal 1” has been Always check BG after a
programmed. pod change.
Check infusion site and
cannula. Check infusion site and
ensure cannula is
Is cannula properly properly inserted.
inserted?
Start No Yes OK
3.1 + The Pod automatically inserts 3.2 + Once complete, the PDM 3.3 + The PDM will generate
the cannula and delivers a indicates that the Pod is active an automatic reminder to
prime bolus to fill the cannula and asks you to check the check your blood glucose
with insulin. It takes a few infusion site. 1.5 hours after each Pod
seconds to complete this change.
process. Release the skin
+ Look through the Pod’s viewing
window, if properly inserted, press
after the cannula inserts.
Yes. Press No if you see a problem
with the cannula.
WARNING:
+ The PDM will generate an automatic reminder to check your blood glucose 1.5 hours after each Pod change. If the cannula is not
properly inserted, hyperglycemia may result. Verify there is no wetness or scent of insulin, which may indicate the cannula has dislodged.
+ NEVER inject insulin (or anything else) into the fill port while the Pod is on your body. Doing so may result in unintended or
interrupted insulin delivery.
+Verify cannula does not extend beyond adhesive backing once needle cap is removed.
If the PDM screen times out during the process, press and hold the Home/Power button to continue.
13OMNIPOD® SYSTEM INSTRUCTIONS | Pod placement/prep/tips
MAKING OMNIPOD® SYSTEM
A PERFECT FIT IN YOUR WORLD
It’s easy to find a place for your Pod. And your Pod is tubeless and lightweight, so you can
wear it with freedom.
Where to wear your Pod.
It’s important to choose a new area every time when placing your Pod to avoid site overuse, which
could result in variable absorption. The new area should be at least 1 inch away from the previous
one, 2 inches away from the navel and not over a mole, scar, or tattoo, where insulin absorption may
be reduced. Be sure to put your Pod somewhere you’ll be comfortable—avoid sites where belts,
waistbands, or tight clothing may rub against, disturb, or dislodge the Pod.
Arm
Abdomen Back
Buttock
Arm
Thigh Leg
Buttock
Leg Leg
Front Back Front Back
How to place your Pod. Pinching up
This step is important if
Arm and leg your Pod location is very
Position the Pod vertically or at a slight angle. lean or doesn’t have much
Back, abdomen, and buttocks fatty tissue. Place your hand
Position the Pod horizontally or at a slight angle. over the Pod and make a
wide pinch around your skin
surrounding the viewing
window. Then press the
Start button on the PDM.
You can let go when the
cannula inserts.
WARNING:
Occlusions may result in lean areas if you do not use this technique.
14OMNIPOD® SYSTEM INSTRUCTIONS | Pod placement/prep/tips
FEEL COMFORTABLE AND CONFIDENT
How to secure and remove your Pod.
Below are more ways to help secure and remove your Pod.* These tips from Podders™, nurses,
and doctors can help you stay tube and worry-free.
Prepping for your Pod.
Remember to stay cool and be cool (dry and not sweating) when it’s time to change your Pod.
OMNIPOD® SYSTEM INSTRUCTIONS
Here are more potential sticking points:
Trouble
Problem Solutions
with…
Oily skin Residue from soap, lotion, shampoo or conditioner Clean the area thoroughly with alcohol before applying
can prevent your Pod from staying secure. your Pod—and be sure to let your skin air-dry.
Damp skin Dampness gets in the way of adhesion. Towel off and allow your skin to air-dry; do not blow on it.
Body hair A lot of hair will prevent the Pod from Clip or shave the area with a razor to create a smooth
sticking securely. surface for your Pod to stick to. Do this 24 hours before
putting on your Pod to prevent irritation.
Helpful Products
Experienced Podders™ have reported using the following products to help with comfortable Pod wear.
Preparing your skin Holding the Pod in place
+ BD Alcohol Swab - www.bd.com Keep your Pod even more secure with tapes
+ Hibiclens - www.amazon.com and bands.
+ Mefix® 2" Tape: www.amazon.com
Helping the Pod stick + 3M™ Coban™ Self-Adherent Wrap: www.3m.com
Adhesives and more. + Bands 4 Life Arm and Thigh Bands:
+ Bard® Protective Barrier Film: www.bands4life.net
www.bardmedical.com
+ Torbot Skin Tac™: www.torbot.com Removing your Pod gently
+ AllKare® Wipe: www.convatec.com Use a soft touch with moisturizers and removers.
+ Mastisol®: www.amazon.com +B aby Oil/Baby Oil Gel: www.johnsonsbaby.com
+ Hollister Medical Adhesive: www.amazon.com + UNI-SOLVE◊ Adhesive Remover: www.amazon.com
+ Detachol®: www.amazon.com
Protecting your skin + Torbot TacAway Adhesive Remover: www.amazon.com
Prevent irritation with barriers and banners.
(After removing your Pod, clean area with warm,
+ Bard® Protective Barrier Film: soapy water and rinse well to remove any residue
www.bardmedical.com still on your skin.)
+ Torbot Skin Tac™: www.torbot.com *Insulet has not tested any of these products to work with the Pod and does not endorse the use of
+ AllKare® Wipe: www.convatec.com these products with the Pod. These recommendations have been shared with Insulet by other Insulet
Podders™ whose needs, preferences and situations may differ from yours. Consult with your healthcare
+ Hollister Skin Gel Protective Dressing Wipes: provider prior to the use of any of these products with the Pod.
www.amazon.com
+ 3M™ Cavilon™ No String Barrier Film:
www.3m.com
All trademarks used herein are the property of their respective owners.
15ADDITIONAL NOTES 16
OMNIPOD® SYSTEM INSTRUCTIONS | Checking blood glucose

CHECKING YOUR BLOOD GLUCOSE LEVELS
How often do I need to check my glucose?
You can use the built-in FreeStyle blood glucose meter to check
your blood glucose levels as often as you need to. However, you may
want to check your blood glucose levels at least a few times a day,
in particular:
  + When you feel symptoms like weakness, sweating,

                                                                                                                                                     OMNIPOD® SYSTEM INSTRUCTIONS
    nervousness, headaches, or confusion
  + When you have delayed a meal after taking insulin
  + When your healthcare provider advises you to do so

How do I check my blood glucose levels
with FreeStyle and Omnipod® System?
Checking your blood glucose levels with the FreeStyle meter requires
just a small amount of blood—only 0.3 microliters. However the
first step involves knowing the anatomy of your lancing device.
NOTE: to make sure your results are accurate, be sure to wash your hands and the test
site with soap and water. Make sure all cream and lotion is removed and dry thoroughly.

Freestyle Lancing Device II

                                                                     Depth Setting Dial

                                                                     Depth Setting Indicator Window

                                                                     Lancet Device Cap

                                                                     Lancing Button

                                                                     Cocking/Release Slider

     WARNING:
     Measurements obtained from alternate site testing should not be used to calculate insulin doses with Omnipod® Insulin Management System.

    Caution: Consult User Guide.

                                                                                                                                                17
OMNIPOD® SYSTEM INSTRUCTIONS | Checking blood glucose
Prepare your lancing device in 3 easy steps.
1. Snap off the cap of the lancing device at an angle, and
insert a new lancet firmly into the white holder cup. This action
may cock the device, which is fine.
2. With one hand, hold the lancet in place while twisting off
the rounded top with your other hand. Then replace the cap
until it snaps back into place. Make sure you do not touch the
exposed needle.
3. Set the Depth Setting; the lancing device offers 9 different
settings (including half settings). Level 1 is the shallowest depth;
Level 5 is the deepest. Use a lower number to lance. Pull back
the the grey slider until it clicks. (You may have already cocked the
device in step 1)
You’re now ready to test!
Lancing device depicted is representive only. Please follow the instructions included with your specific
lancing device.
Testing your blood glucose level. Top
1. Insert your test strip and set the code1,2,3
a. Insert a new test strip into the test strip port at the bottom of the
PDM until it stops. Make sure you insert only the top end of the strip.
+ To help you see the test strip port in reduced lighting, press
the middle soft key labeled Light. To turn the light off, press
Bottom
Light again.
b. The PDM will display a code number once you insert the strip. 3:00p 5/15
This code must match the code on the side of the vial to ensure Enter code. WARNING:
The code number
test accuracy. To change this code, just press the Up/Down on the screen must
Controller to change the numbers until they match. match the code
number on the side
16 of your test strip vial.
They must always
match or your results
will be inaccurate.
Light
1. From some PDM screens, you cannot access the FreeStyle blood glucose meter. For example, you cannot use the meter while you are activating a Pod or when an
alert, alarm, or communication error screen is displayed. In these cases, if you insert a test strip, the PDM beeps to alert you.
2. If you do not start the test within 2 minutes, the PDM powers off. To restart the PDM, take out the unused strip and reinsert it, or simply press and hold the Power
button to turn on the PDM.
3. If you need to adjust the code number after the PDM has moved to the next screen, just press Up/Down Controller buttons. The code screen reappears and you can
adjust the number. The code number remains on the PDM screen for your reference until you have completed the BG test.
18OMNIPOD® SYSTEM INSTRUCTIONS | Checking blood glucose
2. Get your sample and fill the test strip
Tip: Before you lance, you’ll want to stimulate the blood flow by
lowering your hand to waist level and gently massaging your finger.
3. Lance the site
a. Hold the lancing device firmly against the side of your fingertip.
b. Press the lancing button.
c. Squeeze your finger, if needed, until a blood drop forms.
4. Return to your PDM, be sure your screen reads “Apply a blood
OMNIPOD® SYSTEM INSTRUCTIONS
sample to the strip”.
Bring the strip to the blood at a slight angle.
What if my levels are too low or high?
“LOW” or “HIGH” blood glucose readings can indicate a potentially serious condition requiring immediate
medical attention. If you get either a “LOW treat your low BG” reading or a “HIGH check for ketones”
reading, first check and see if you feel hypoglycemic or hyperglycemic symptoms. If you do not, retest and
perform a control solution test to ensure the Omnipod® System is working properly. If not, or if you feel any
symptoms related to hypoglycemia or hyperglycemia, follow your healthcare provider’s recommendation.
Test Strip Do’s and Don’ts
DO: DON’T:
+ Only use FreeStyle test strips and FreeStyle + Test your blood glucose while your PDM is
Control Solution with the PDM (Other brands may connected via USB to a computer. This could
produce inaccurate results) result in a shock.
+ Match the code on the PDM to the side of the vial + Press the strip against the test site
+ Use a slight angle to bring the test strip to + Scrape the blood onto the strip
the blood
+ Apply blood to the flat side of the strip
+ Use only one edge of the strip per test
+ Apply blood to the strip when it is out of the meter
+ Add more blood to the strip if the PDM doesn’t
+ Put blood or other foreign objects into the test
display “Checking”
strip port
+ Only use each strip once
+ Pull strip away before you hear 1 beep or see
+ Throw away the used lancet in a puncture-resistant “Checking” on the screen
container and wash hands thoroughly
+ Use strips beyond the expiration date printed on
the package, as this may cause inaccurate results.
WARNING:
Measurements obtained from alternate site testing should not be used to calculate insulin doses with Omnipod® Insulin Management System.
Caution: Consult User Guide.
For more information about blood glucose testing, control solution testing, manual blood glucose test entry and the Suggested Bolus Calculator, see
Chapter 7, Checking Your Blood Glucose, in your Omnipod® Insulin Management System User Guide.
19OMNIPOD® SYSTEM INSTRUCTIONS | Delivering a bolus
DELIVERING A BOLUS
3:00p 5/15 3:00p 5/15 3:00p 5/15
150
Apply a blood sample Are you going to eat
to the strip. now?
mg/dL
Calibration code: 16 Calibration code: 16 Discard
Light Done Tag Next Cancel No Yes
1. Wash the finger with soap and water or an 2. When blood glucose reading appears, 3. If eating now, press Yes.
alcohol wipe and dry it completely. Prick press Next to continue. OR
finger with the lancing device. Press Light If not eating, press No.
to illuminate the test strip in low-light
situations. Apply blood sample to test strip.
3:00p
3:00p 5/15
5/15
3:00p 5/15 3:00p 5/15
bolus: 3.00
Suggested bolus: 5.00U
U
Enter carbs. Use these values for Carbs: 60 g
bolus calculations? Meal: (60/15)=
3:00p 2/11 4.00U
BG: 150mg/dL
Correction:
Suggested bolus: 5.00
Insulin onU
board
BG: 150mg/dL Carbs: 60 g (150-100)/50= 1.00U
Carbs: 60 g BG: 150 mg/dL 5.00
Insulin on board:U -0.00U
0g Insulin on board:
b Total:
0.00U 5.00U
5.00 U
Back Extend Close
Enter
Back Enter Back Confirm Back Extend Enter
4. If eating, press the Up/Down Controller 5. Review the BG and carb values to make 6. Press the User Info/Support button
button to enter the correct number of sure they are correct, then press Confirm. to view how the suggested bolus is
carbs, then press Enter. calculated. Then press Close.
3:00p 5/15 3:00p 5/15 3:00p 5/15
Suggested bolus: 5.00 U Start bolus?
Carbs: 60g
BG: 150mg/dL Delivering bolus
Insulin on board: 0.00U 5.00 U
5.00 U
5.00 U
Back Extend Enter Back Confirm Cancel
7. Press Enter to accept the suggested 8. Press Confirm to start the bolus. 9. The PDM screen will indicate when bolus
bolus. delivery has begun. If necessary, you
OR may press Cancel to stop a bolus while
Press Extend and follow on-screen it is being delivered. You do not need
instructions to deliver a portion/percentage to remain near the PDM during delivery.
of the bolus immediately and the rest over Delivery time varies based on the size
a set period of time. Only use the Extend of the bolus dose. Once bolus delivery
option when directed by your healthcare begins, you may press and hold the
provider. If extended boluses are not Home/Power button to turn off the
part of your Diabetes Management Plan, PDM screen.
the Extend option will not appear on
the screen.
The values shown here are for illustrative purposes only. Actual screens may vary based on user settings. Consult with your healthcare provider before using these
advanced features. Your healthcare provider can also provide you with your own personalized recommendations.
20OMNIPOD® SYSTEM INSTRUCTIONS | Suspend insulin delivery
HOW TO SUSPEND INSULIN DELIVERY
Sometimes you may need to briefly stop insulin delivery (for example, when editing an active basal
program or changing the time or date).
3:00p 5/15 3:00p 5/15 3:00p 5/15
Bolus Suspend insulin delivery. Suspend ALL delivery
More actions Set advisory for:
Temp basal Enter duration:
My records 0.5 hr
OMNIPOD® SYSTEM INSTRUCTIONS
Settings 0.5 hr
Suspend
Status Select Back Enter Back Confirm
1. Turn on the PDM. Press the Home/ 2. Enter the length of time the suspension 3. Press Confirm.
Power button, then select Suspend. should last (minimum 0.5 hour, maximum
2.0 hours), then press Enter.
50+U 3:00p 5/15 3:00p 5/15
Last BG 65 mg/dL End of insulin suspend.
2:45p today
Last bolus 1.00 u Press “OK” to resume
12:00p today basal rate delivery.
IOB 0.00 u
INSULIN SUSPENDED
Pod exp 1:48p 5/18
Home OK
4. The Status screen indicates that insulin 5. The Pod will beep every 15 minutes until
delivery has been suspended. the end of the suspension period. At
the end of the suspension period, a Pod
advisory alarm will occur. At this time, turn
the PDM on and press OK to resume the
active basal program.
WARNING:
Insulin delivery will not resume until you press OK. If you do not press OK to resume insulin delivery, you could develop hyperglycemia (high blood glucose).
The values shown here are for illustrative purposes only. Actual screens may vary based on user settings. Consult with your healthcare provider before using these
advanced features. Your healthcare provider can also provide you with your own personalized recommendations.
21OMNIPOD® SYSTEM INSTRUCTIONS | Important tips and reminders
Important PDM Tips and Reminders. Important reminder
These tips are intended for use only with the PDM UST400 model. The PDM
model number is found on the back of the PDM next to the REF symbol.
How to view insulin records.
3:00p 5/15 3:00p 5/15 3:00p 5/15
Insulin totals: today
Bolus Insulin delivery
More actions BG history Bolus (52%) 23.90U
Temp basal Alarm history Basal (48%) 22.30U
My records Carb history Total daily 46.20U During the activation
Settings All history and priming of the Pod,
Suspend My info
the PDM and the Pod
should be adjacent and
touching. Please refer
Status Select Back Select Back Bolus Basal
to the Omnipod® Insulin
1. On home screen, select 2. Select Insulin delivery. 3. PDM provides summary of today’s Management System
My records. information including total boluses, User Guide for a full set
total basal, and total daily doses. of instructions.
Use Up/Down Controller
buttons to view the summary for
previous days.
How to view multiple-day BG trends.
3:00p 5/15 3:00p 5/15 3:00p 5/15 3:00p 5/15
1-day (n=7) today 7 day (n=52)
Bolus Insulin delivery
Avg Reads/day: 7
More actions BG history Avg BG: 110 mg/dL
Temp basal Alarm history Min/max: 38/152 mg/dL Avg BG: 135: mg/dL
Min/Max: 38/350 mg/dL
My records Carb history
Settings All history BG goal: 80-140 mg/dL
Within goal: 57% BG goal: 80-140 mg/dL
Suspend My info
Above goal: 29% Within goal: 48%
Below goal: 14% Above goal: 33%
Below goal: 19%
Status Select Back Select Back Trends List Back 14 day Graph
1. On home screen, select 2. Select BG history. 3. Press Trends to show 4. Continue pressing the
My records. BG data for past 7 days. Middle Soft Key to show
trends for previous 14, 30,
60, and 90 days.
How to change existing basal rate.
NOTE: Insulin delivery must be suspended before changing basal rates.
3:00p 5/15 3:00p 5/15 3:00p 5/15 3:00p 5/15
Bolus Basal Programs Basal programs: Enter start time for this
basal Segment.
More actions Presets basal 1
Temp basal System setup basal 2
Afternoon
My records Vibration Weekend
Settings [add new] 3:00 PM
Resume
Status Select Back Select Back Enable Select Back Next
1. On home screen, select 2. Select Basal Programs. 3. Select basal program to 4. Enter start time, then
Settings. be edited. On next screen, press Next and repeat
select segment to be edited, for end time.
then press Edit.
3:00p 5/15 3:00p 5/15 3:00p 5/15 3:00p 5/15
Segment: 3:00p-12:00a Save basal segment? Weekend: Press “Save” to update
Segment U/hr “Weekend.”
Enter basal rate. Start: 3:00p
[add new] 1.00
End: 12:00a 12:00a - 8:00a 0.60
0.75 U/hr Duration: 9.0 hr 8:00a - 3:00p 0.80 0.50
Rate: 0.75 U/hr 3:00p - 12:00a 0.75
0.00
12a 6a 12p 6p 12a
Daily basal: 17.15 U
Back Enter Back Confirm Cancel New Save Cancel Save List
5. Enter basal rate for edited 6. Review the settings on the 7. Press Save. 8. Press Save. For additional
segment, then press Enter. confirmation screen carefully. edits, repeat steps 3-8.
If the settings are correct,
press Confirm. Caution: Consult User Guide. NOTE: Remember to resume insulin delivery.
The values shown here are for illustrative purposes only. Actual screens may vary based on user settings. Consult with your healthcare provider before using these
advanced features. Your healthcare provider can also provide you with your own personalized recommendations.
22OMNIPOD® SYSTEM INSTRUCTIONS | Important tips and reminders
How to change correction factors.
3:00p 5/15 3:00p 5/15 3:00p 5/15 3:00p 5/15
Bolus Basal Programs Date/time Bolus calc: On
More actions Presets Bolus/basal/calcs Ratios/factors/targets
Temp basal System setup Alerts/reminders Temp basal: Off
My records Vibration BG meter Extended: Off
Settings PDM options Bolus increment: 0.10U
Suspend Diagnostics Max bolus: 10.00U
Max basal: 3.00U/hr
Status Select Back Select Back Select Back Select
1. On home screen, 2. Select System setup. 3. Select Bolus/basal/calcs. 4. Select Ratios/factors/
select Settings. targets. NOTE: Bolus
calcs must be “on.”
OMNIPOD® SYSTEM INSTRUCTIONS
3:00p 5/15 3:00p 5/15 3:00p 5/15 3:00p 5/15
Review all settings Correction factor: Segment: 12:00p-12:00a Save Correct Factor
Enter correction factor. segment?
Target BG Segment mg/dL per U
1 unit of insulin Start: 12:00p
Min BG for calcs: [add new]
decreases BG by: End: 12:00a
70 mg/dL 12:00a - 12:00a 50
IC ratio 60 mg/dL Duration: 12 hr
Correction factor Factor: 60mg/dL
Reverse correction: On
Insulin action: 4.0hr
Edit
Back Select Back New Select Back Next Back Confirm
5. Select Correction 6. Select Add New or 7. Enter the correction factor, 8. Review the settings on the
factor. choose Segment and then press Next. confirmation screen carefully.
hit Edit. If the settings are correct,
On next screen, enter press Confirm.
start time, then press Repeat steps 6-8 to add or
Next and repeat for edit segments (up to 8 total
end time. segments), then press Done,
then Save.
How to change IC ratio or insulin action (duration).
3:00p 5/15 3:00p 5/15 3:00p 5/15 3:00p 5/15
Bolus Basal Programs Date/time Bolus calc: On
More actions Presets Bolus/basal/calcs Ratios/factors/targets
Temp basal System setup Alerts/reminders Temp basal: Off
My records Vibration BG meter Extended: Off
Settings PDM options Bolus increment: 0.10U
Suspend Diagnostics Max bolus: 10.00U
Max basal: 3.00U/hr
Status Select Back Select Back Select Back Select
1. On home screen, select 2. Select System setup. 3. Select Bolus/basal/calcs. 4. Select Ratios/factors/
Settings. targets. NOTE: Bolus calcs
must be “on.”
To Change IC Ratio To Change Insulin Action
3:00p 5/15 3:00p 5/15 3:00p 5/15 3:00p 5/15 3:00p 5/15 3:00p 5/15
Review all settings Insulin to carb (IC) ratio: Segment 12:00a-12:00a Save IC Ratio segment? Review all settings Enter duration of insulin
Target BG Segment g carb/U Enter IC ratio. 1 unit of Target BG action.
insulin covers: Start: 12:00a
Min BG for calcs: [add new] Min BG for calcs:
End: 12:00a
70 mg/dL 12:00a - 12:00a 15 70 mg/dL
IC ratio 20 g carb Duration: 24 hr IC ratio 4.0 hr
Correction factor IC Ratio: 20 g carb/U Correction factor
Reverse correction: On Reverse correction: On
Insulin action: 4.0hr Insulin action: 4.0hr
Edit
Back Select Back New Done Back Next Back Confirm Back Select Back Enter
A. Select IC ratio. B. Select Add New or C. Enter IC ratio, D. Review the settings A. Select Insulin B. Use Up/Down
choose Segment then press Next. on the confirmation action. Controller
and hit Edit. screen carefully. If the buttons to change
On next screen, settings are correct, duration of
enter start time press Confirm. On insulin action,
then press Next following screens, then press Enter.
and repeat for press Done, then
end time. press Save.
The values shown here are for illustrative purposes only. Actual screens may vary based on user settings. Consult with your healthcare provider before using these
advanced features. Your healthcare provider can also provide you with your own personalized recommendations.
23ADVANCED FEATURES | Bolus
OMNIPOD® SYSTEM ADVANCED FEATURES
How to use the Extended Bolus Feature.
When to use:
This feature is most commonly used for high-fat and/or high-protein meals such as pizza, cheeseburgers,
or fried chicken when the digestion of carbohydrates could be delayed.
3:00p 5/15 3:00p 5/15 3:00p 5/15 3:00p 5/15
Bolus Enter current BG. Are you going to Enter carb value for the
Important Reminders: More actions eat now? foods you are about
to eat.
Temp basal
Extended Bolus and My records
Temporary Basal must be Settings 150 mg/dL 30 g
selected in % or U/h in System Suspend Use for bolus calcs?
Setup>Bolus/basal/calcs. Each
example is shown with the PDM
set to %. Status Select Back No Yes Back No Yes Back Enter
Once you have set an Extended 1. From the home 2. Check or manually 3. Press Yes. (Only 4. Enter the grams
Bolus or Temp Basal you screen, select enter your current meal boluses can of carbs you are
can cancel it from the Home Bolus. blood glucose, be extended.) about to eat, then
Screen>Suspend/Cancel. then press Yes. press Enter.
3:00p 5/15 3:00p 5/15 3:00p 5/15 3:00p 5/15
Use these values for Suggested bolus: 3.00 U Enter amount of meal Extended bolus: 1.00 U
bolus calculations? Carbs: 30 g bolus to deliver now. Extend for how long?
BG: 150 mg/dL Meal: 2.00 U
Correction: 1.00 U
BG: 150 mg/dL 3.00 U 50% 2.0 hr
Carbs: 30 g
Back Confirm Back Extend Enter Back Enter Back Enter
5. Review the values 6. A suggested bolus 7. Enter amount 8. Enter the duration
on the confirmation will appear on of meal bolus of time to extend
screen carefully. If the screen. to deliver now, your bolus, then
values are correct, Press Extend. then press Enter. press Enter.
press Confirm.
3:00p 5/15
Start bolus?
Now: 2.00 U Correction boluses will
(50%) always be delivered
Ext: 1.00 U
(50%,2.0 hr) “Now” and cannot be
Total: 3.00 U extended with the
meal bolus.
Back Confirm
Kelly L.
9. A final confirmation
will show the entire
breakdown of the
SINCE 2014 extended bolus.
Press Confirm.
WARNING:
When using the extended bolus function the user should check their blood glucose levels more frequently to avoid hypoglycemia or hyperglycemia.
The values shown here are for illustrative purposes only. Actual screens may vary based on user settings. Consult with your healthcare provider before using these
advanced features. Your healthcare provider can also provide you with your own personalized recommendations.
24ADVANCED FEATURES | Basal
How to set a Temporary Basal Rate.
When to use:
A temporary basal rate lets you adjust your background insulin for a predetermined period of time. This feature
is best used to account for a temporary change in a daily routine, such as physical activity or times of illness.
Temporary basal rates can be set for durations of 30 minutes to 12 hours; once the time limit is reached, the
Pod returns to the active basal program.
3:00p 5/15 3:00p 5/15 3:00p 5/15 3:00p 5/15 3:00p 5/15
Bolus Would you like to Enter temp basal Enter duration for temp Start temp basal
increase or decrease decrease. basal decrease. decrease?
More actions
Temp basal your basal rate? 10%
My records Increase LESS basal insulin
Settings Decrease 10% 2.0 hr for
Time period:
2.0 hr
Suspend LESS 3:00p-5:00p
basal insulin
Status Select Back Next Back Enter Back Enter Back Confirm
1. From the home screen, 2. Based on your situation, 3. Enter the % or U/h 4. Enter the duration for 5. A summary of your
select Temp basal. select increase or change for the temp the temporary basal temporary basal details
decrease, then press basal, press Enter. in increments of 30 will appear on the
Next. minutes, press Enter. screen for review.
Press Confirm.
How to create additional Basal Programs.
When to use:
Please consult with your healthcare provider prior to creating additional basal programs. Different basal
programs are commonly used for entire days out of your common routine (e.g. weekends vs. work days.)
3:00p 5/15 3:00p 5/15 3:00p 5/15 3:00p 5/15 3:00p 5/15
Bolus Basal Programs Basal programs: Edit name. basal 2:
basal 2
ADVANCED FEATURES
More actions Presets basal 1
Temp basal System setup [add new] Enter basal rate that
starts at midnight
My records Vibration
Settings 0.80 U/hr
Suspend
Status Select Back Select Back New Back Next Back Next
1. From the home screen, 2. Select Basal 3. Select [add new], then 4. You may rename your 5. Enter the first new basal
select Settings. Programs. press New. selection or keep rate provided by your
the default name (for healthcare provider,
example, “basal 2”). then press Next.
Press Next.
3:00p 5/15 3:00p 5/15 3:00p 5/15
Save basal segment? basal 2: Press “Save” to add
“basal 2” to your basal
Important Reminders:
Segment U/hr
Start: 12:00 AM program list.
[add new]
End: 12:00 AM 12:00a - 12:00a 0.80
1.00 To enable your new basal program you
Duration: 24.0 hr must first suspend your pump. Then go
0.50
Rate: 0.80 U/hr to Settings>Basal Programs. Select the
0.00 new program that you just created,
12a 6a 12p 6p 12a
Press Enable to view and confirm the
Daily basal: 19.20 U Daily basal: 19.20 U new program, then press Enable to
Back Confirm Cancel New Done Cancel Save List send the program to the Pod.
6. Review the settings on 7. Press New if you have 8. Press Save.
the confirmation screen more basal segments;
carefully. If the settings otherwise press Done.
are correct, press
Confirm.
The values shown here are for illustrative purposes only. Actual screens may vary based on user settings. Consult with your healthcare provider before using these
advanced features. Your healthcare provider can also provide you with your own personalized recommendations.
25ADVANCED FEATURES | Presets
OMNIPOD® SYSTEM ADVANCED FEATURES
How to use the Temp Basal Presets.
When to use:
Best used for “temporary” routine activities, such as an exercise class that occurs twice a week. The PDM
can store up to 7 temporary basal presets. You will be able to access your temp basal presets when you
select Temp Basal from your home screen.
3:00p 5/15 3:00p 5/15 3:00p 5/15 3:00p 5/15
Important Reminders: Bolus Basal Programs Temp basal presets Temp basal presets:
More actions Presets Carb presets [add new]
Temp basal System setup Bolus presets
Presets are a quick way to My records Vibration
get many of your Pod actions Settings
complete. If you find yourself Suspend
eating the same foods, or setting
the same temp basal rates,
Presets can be a real time saver.
Status Select Back Select Back Select Back New
On any preset you will have the
option to rename your entry for 1. From the home 2. Select Presets. 3. Select Temp 4. Select [add new]
even more personalization. screen, select basal presets. press New.
Settings.
3:00p 5/15 3:00p 5/15 3:00p 5/15 3:00p 5/15
Edit name. Would you like to Enter change for Enter duration for
Exercise increase or decrease Exercise. Exercise.
your basal rate?
Increase Change: 15% less
Decrease 15% 1.0 hr
LESS
basal insulin
Back Save Back Next Back Next Back Next
5. Keep default name 6. Indicate whether 7. Enter the % or 8. Enter duration for
or rename, for you want to U/h change for the the temp basal
example Exercise. increase or temp basal preset, preset, then press
Press Save decrease your basal then press Next. Next.
rate, then press
Next.
3:00p 5/15
Exercise
Change: 15% less
Duration: 1.0 hr
Back Save
Frank C.
9. A summary of the
temp basal preset
you just created will
SINCE BEFORE
HE COULD EVEN WALK
appear on the screen,
then press Save.
The values shown here are for illustrative purposes only. Actual screens may vary based on user settings. Consult with your healthcare provider before using these
advanced features. Your healthcare provider can also provide you with your own personalized recommendations.
26ADVANCED FEATURES | Presets
How to use the Carbohydrate Presets.
When to use:
Best used for easy access to favorite food items, snacks, or meals that you eat frequently. You will be able to
access your carb preset during the bolus calculator process.
3:00p 5/15 3:00p 5/15 3:00p 5/15 3:00p 5/15 3:00p 5/15 3:00p 5/15
Bolus Basal Programs Temp basal presets Carb presets: Edit name. Enter carbs.
More actions Presets Carb presets Favorites carb preset 1
Temp basal System setup Bolus presets Snacks
My records Vibration Meals 15 g
Settings
Suspend
Status Select Back Select Back Select Back Select Back Next Back Next
1. From the home 2. Select Presets. 3. Select Carb 4. Select Favorites, 5. Keep default 6. Enter the amount
screen, select presets. Snacks, or Meals. name, or rename. of carbs in grams,
Settings. Press Next. additional nutrition
info is optional, then
press Next.
How to use the Bolus Presets.
When to use:
Bolus presets can only be used if your bolus calculator is OFF. This feature is best for those utilizing set
bolus amounts at their meals. You will be able to access your bolus preset when you select Bolus from
the home screen.
3:00p 5/15 3:00p 5/15 3:00p 5/15 3:00p 5/15 3:00p 5/15 3:00p 5/15
Bolus Basal Programs Temp basal presets Bolus presets: Edit name. Enter bolus preset
More actions Presets Carb presets [add new] bolus 1 amount
ADVANCED FEATURES
Temp basal System setup Bolus presets
My records Vibration
Settings 1.50 U
Suspend
Status Select Back Select Back Select Back New Back Next Back Next
1. From the home 2. Select Presets. 3. Select Bolus 4. Select [add new], 5. Keep default 6. Enter bolus
screen, select presets. then press New. name, or rename. preset amount,
Settings. Press Next. then press Next.
3:00p 5/15
bolus 1
Amount: 1.50 U
Back Save
7. A summary of the
bolus preset you just
created will appear
on the screen,
then press Save.
The values shown here are for illustrative purposes only. Actual screens may vary based on user settings. Consult with your healthcare provider before using these
advanced features. Your healthcare provider can also provide you with your own personalized recommendations.
27You can also read