Symprex Email Signature Manager - User's Guide Version 6.2.1. Copyright 2014 Symprex Limited. All Rights Reserved.
←
→
Page content transcription
If your browser does not render page correctly, please read the page content below

Symprex Email Signature Manager

                                       User's Guide

                                                 Version 6.2.1.

         Copyright © 2014 Symprex Limited. All Rights Reserved.
Contents

    Chapter 1    1 Introduction

                 2 System Requirements

                 3 Installing Email Signature Manager

                 3     Upgrading Email Signature Manager

                 5 Email Signature Manager Overview

                 8 Getting Started

    Chapter 2   10 Tutorial

                10 Main Application Window

                13     File Page

                13 Options Dialog

                14 Creating and Editing Templates

                17     Signatures

                20     Disclaimers

                21     Campaigns

                23     Stationery

                24     Dynamic Fields

                25     Conditional Statements

                27     Template Design Guidance

                30 Test Signatures

                31 Manage Deployment

                34     Send On Behalf

                35     Global Client Settings

                37 Status Monitor

                38     Status Monitor Cleanup

                39 Deployment Options

                42     OWA Page

                45     Advanced Page

                47 Office 365 Options

2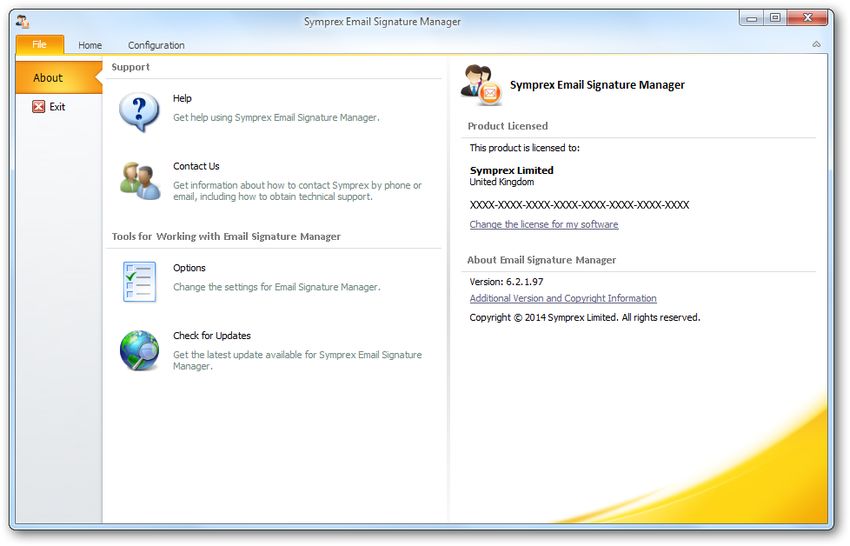
Contents

            50     Office 365 Connectivity Test

            50 Blackberry Options

            52 Settings Database

            53 Import Database

            54 Manage Data Sources

            56     Configure a Custom Data Sources

            59 Domain Configuration

            60 Configure Service

            63     Manage Service

            64     Manage Schedule

            65 Transport Agent Rules

            66     Manage Transport Agent Rule

Chapter 3   68 Deployment

            69 Creating the Shared Folder

            70 Deployment via Logon Script

            71 Deployment via Group Policy

            72 Deployment via the Email Signature Manager Service

            72     Permissions for the Service Account on Exchange Server 2013

            73     Permissions for the Service Account on Exchange Server 2010

            73     Permissions for the Service Account on Exchange Server 2007

            74     Permissions for the Service Account on Exchange Server 2003

            75     Exchange Server 2010 and 2013 Client Throttling Policies

            75 Using Microsoft SQL Server

            77 Command Line Arguments for sign.exe

            77 Save and Load Connection Settings

            78 Deployment via the Email Signature Manager Transport Agent

            79     Installing the Transport Agent

            80     Configuring the Transport Agent

                                                                                 3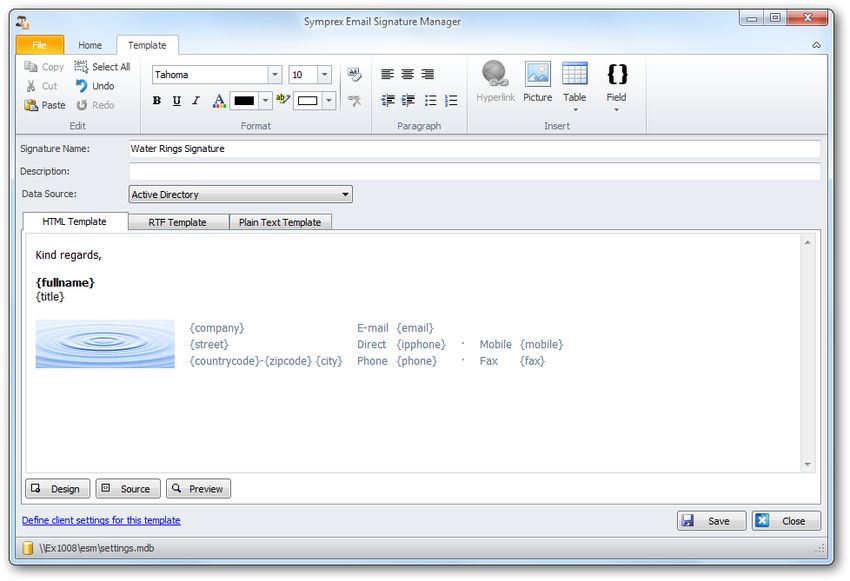
Contents

    Chapter 4   84 Appendices

                84 Template Fields

    Chapter 5   86 Licensing

                86 License Dialog

                86 Manual License Dialog

                87 Proxy Details Dialog

                88 Upgrade License Dialog

    Chapter 6   90 Copyright

    Chapter 7   91 Contacting Symprex

4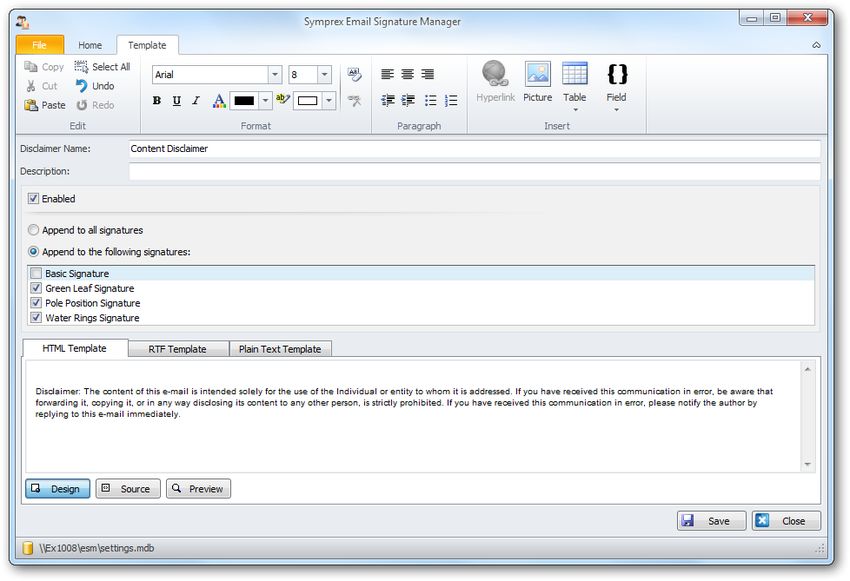
Introduction                                                                                      1
Symprex Email Signature Manager is the perfect solution for ensuring professional email communication
across your organization with consistent signatures, mail format and contact information.

Benefits

Some of the most important benefits of Email Signature Manager are:

  Helps to ensure professional email communication.
  Standardized, identical and consistent email signatures for everyone.
  Correct and up-to-date contact information in emails.
  Signatures are visible to users when composing emails.
  Signatures are applied to emails sent from mobile devices.
  Helps improve professional organization image and branding.
  Minimum administration hassle for everyone.
  No software required to install on Exchange server or workstations.
  Emails are not intercepted, re-routed or interfered with from source to destination.
  Users do not have to do anything to use deployed signatures.

Features

Some of the most important features of Email Signature Manager are:

  Deploy identical signatures to Outlook, OWA and other email clients.
  Works with Android, Blackberry, iPhone, iPad, and Windows Mobile devices.
  Built-in disclaimer and campaign support.
  Powerful WYSIWYG template designer.
  Supports HTML, RTF and Plain Text email formats.
  HTML designer offers color-coded HTML source editing.
  Merge signatures with contact information from Active Directory.
  Merge signatures with contact information from virtually any type of database.
  Powerful test module with full preview in all formats.
  Test signatures before deployment in preview and in actual email clients.
  Flexible deployment of signatures to groups and individual users.
  Supports nested sub-groups when determining user group membership.
  Simple deployment via logon script command-line utility or Active Directory.
  Status monitor to verify deployment status to every individual user.
  Signatures work both when on-line and off-line.

Getting Started

This introduction will take you through the system requirements, an overview of Email Signature Manager,
how to install the software, and how to get started using the software, which will show you how to deploy
your first signature in minutes.

About Symprex

Symprex is one of the leading companies in the world for add-on solutions for Microsoft Outlook and
Exchange Server. See Symprex.com for more information about Symprex and the solutions we offer.

Chapter 1 Introduction                                                                                      1
Introduction                                                       1
    System Requirements
    Symprex Email Signature Manager minimum system requirements are:

      Supported email clients:
        Android, iPhone, iPad and Windows Mobile
        Blackberry
        Microsoft Office 365
        Microsoft Office 365 Outlook Web App
        Microsoft Outlook 2003 SP2
        Microsoft Outlook 2007 SP2
        Microsoft Outlook 2010
        Microsoft Outlook 2013
        Microsoft Outlook Web Access 2003
        Microsoft Outlook Web Access 2007
        Microsoft Outlook Web App 2010
        Microsoft Outlook Web App 2013

      Operating system software:
       Microsoft Windows XP SP3 (x86 only)
       Microsoft Windows Vista SP2
       Microsoft Windows 7
       Microsoft Windows 8
       Microsoft Windows 8.1
       Microsoft Windows Server 2003 SP2
       Microsoft Windows Server 2003 R2 SP2
       Microsoft Windows Server 2008
       Microsoft Windows Server 2008 R2
       Microsoft Windows Server 2012
       Microsoft Windows Server 2012 R2
       Microsoft Windows Small Business Server 2008
       Microsoft Windows Small Business Server 2011

      Framework software:
        For the Management software and Deployment Service:
            .NET Framework 3.5 SP1
            .NET Framework 4.0
            .NET Framework 4.5

       For the Deployment Utility (sign.exe ):
           .NET Framework 2.0
           .NET Framework 3.5 SP1
           .NET Framework 4.0
           .NET Framework 4.5

      System hardware:
        CPU and memory requirements for operating system

2   Chapter 1 Introduction
Introduction                                                                                         1
    60 MB free hard-disk space
    1024 x 768 screen resolution

Installing Email Signature Manager
Symprex Email Signature Manager is designed to be very easy to install. Simply run the setup program
and follow the instructions given. If you have a previous version installed, please review the section on
upgrading.

To test signatures directly in Outlook and OWA, it is recommended that the following software is also
installed locally on the machine where Email Signature Manager is installed and used:

  Microsoft Office 2003, 2007, 2010 or 2013
  Internet Explorer with access to OWA

Note that Email Signature Manager offers exact previews of signatures within the application itself without
Outlook or OWA using the Test Signatures dialog.

Upgrading Email Signature Manager
If you have a previous version of Email Signature Manager installed on your system, the following
instructions should be followed to upgrade it.

Upgrading Version 5.x and Later

If you are using version 5.x or later, the installers for Email Signature Manager, the Deployment Service
and the Transport Agent will automatically upgrade your existing installation. After installation, you should
complete the steps in the Common Upgrade Tasks set out below.

Note If you are using the Email Signature Manager Transport Agent, the previous v5.x installers for
2007/10 and 2013 have been unified into a single installer that supports all Exchange Server versions. This
new installer will upgrade all previous v5.x versions.

Upgrading Version 4.x and Earlier

If you are using version 4.x or earlier, you should upgrade following these steps:

1. Start your current version and determine the database you are using.

        When using the Email Signature Manager database, settings.mdb , the database should be
    located in a shared folder (e.g. \\SERVER\SIGNMGR$\\settings.mdb ). If the database you are using
    is located on the local computer and shared from the installation folder, it is strongly recommended
    that it is moved to a separate shared folder. It is recommended to make a backup of your existing
    settings.mdb database before the upgrade is performed.

       When using Microsoft SQL Server for the database, it is recommended to make a backup of the
    database before the upgrade is performed.

Chapter 1 Introduction                                                                                          3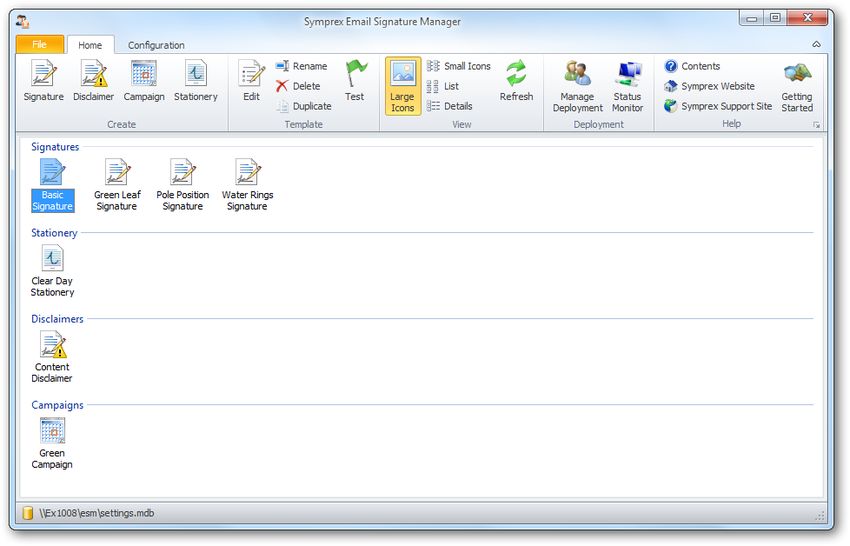
Introduction                                                                                         1
    2. Uninstall the current version using the Windows Control Panel. When prompted, you can elect to keep
       or remove the current database and settings. If you keep the current database and settings, this does
       not interfere with installing version 5.x or later.

    3. Install the new version of Email Signature Manager and then complete the steps in the Common
       Upgrade Tasks set out below.

    Note The default installation location for version 4.x and earlier was C:\Program Files\Symprex\Mail
    Signature Manager . In version 5.x it is C:\Program Files\Symprex\Email Signature Manager .

    Common Upgrade Tasks

    Once installation of the new version is complete, start the Email Signature Manager application. If you
    have upgraded from version 4.x or earlier, you will need to select your previous settings database; refer
    to the Settings Database dialog. When the settings database is opened for the first time, it will be
    automatically upgraded to the new version.

    Finally, the deployment command line tool, sign.exe , needs to be updated depending on how
    deployment is implemented in your organization.

      If you are using a logon script, the tools located in the shared folder can simply be overwritten with the
      new version; refer to the section on creating the shared folder for more details.
      If you are deploying using the MSI package via group policy, it will be necessary to update the existing
      policy to uninstall the original version and to install the new version; refer to the section on deployment
      via group policy for further details.

    Note Version 5.x accepts the same command line arguments as previous versions, except the verbose
    argument has been replaced with the showwindow argument; refer to the section on command line
    arguments. Hence, there is no generally need to change any scripts to use new parameters.

4   Chapter 1 Introduction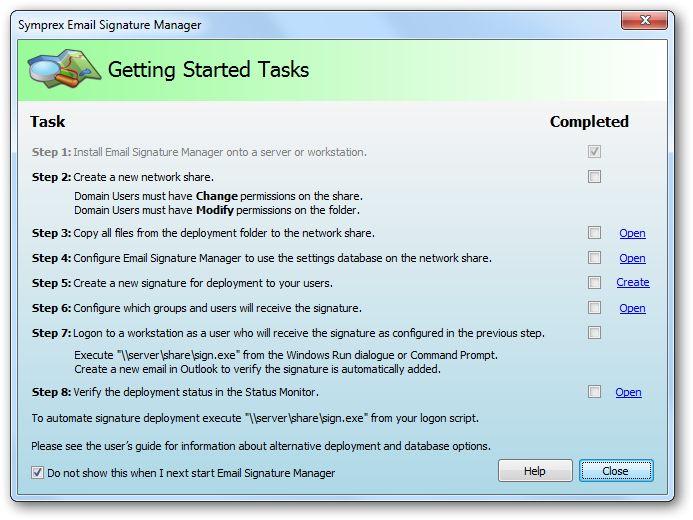
Introduction                                                                                       1
Email Signature Manager Overview
The Symprex Email Signature Manager main application window is illustrated below:

Email Signature Manager is designed in accordance with the current guidelines for Windows applications.
The application window is divided into the top ribbon for accessing all of the commands, a work area in
the middle, which used to manage and edit templates, and a status bar at the bottom. The basic elements
in the user interface work in the same way as in most other Windows applications.

One Single Administration Module

One of the great advantages of Email Signature Manager is that all aspects of the product are managed
from within the graphical user interface of the main application. This is where you for example create,
design and test your signature templates, define data sources, manage deployment to groups and users,
and verify deployment statuses in the status monitor.

Another advantage is that you do not have to install any software on your Exchange Server or
workstations for Email Signature Manager to work. Deployment is seamlessly performed with a small
command-line utility that is run as part of each user’s logon script, or via Active Directory Group Policy
(MSI). This means the solution is simple and without risk to Exchange Server stability or performance. For
organizations with users who do not log on to the domain, a service is available, which can deploy
signatures to OWA and mobile devices from one central location.

With Email Signature Manager signatures will simply, automatically be available to all your users, and

Chapter 1 Introduction                                                                                       5
Introduction                                                                                         1
    email settings such as default signatures and default fonts will also automatically be configured.

    Powerful Built-in Template Editor

    Email Signature Manager offers a powerful built-in template editor that is available when you edit a
    template. This is illustrated below:

    A template consists of the following information:

      Basic properties, such as name, description and default data source
      HTML, RTF and Plain Text templates with dynamic fields
      Optional client settings, such as default fonts and other settings

    The dynamic fields in templates are replaced with real data when signatures are deployed.

    HTML Template

    When designing HTML templates, you can work in WYSIWYG design mode and in syntax color-coded
    source mode, and switch to preview in preview mode. The syntax color-coded source mode is illustrated
    below:

6   Chapter 1 Introduction
Introduction 1 You can copy/paste between the HTML editor in Email Signature Manager and an external HTML editor if you prefer to design the templates in an external editor, such as Microsoft FrontPage or Microsoft Expression Web. RTF and Plain Text Templates Rich Text Format (RTF) and Plain Text templates are designed in WYSIWYG mode. You can copy/paste between the editors in Email Signature Manager and external editors if you prefer to design these types of templates in another editor. Client Settings A signature can optionally include a set of client settings. The client settings that can be configured are illustrated below: Chapter 1 Introduction 7
Introduction                                                                                       1

    Client Settings can also be defined on a global level so that they are applied automatically when any
    signature is installed.

    Getting Started
    The Getting Started dialog is appears automatically when Symprex Email Signature Manager is started, or
    it can be opened by clicking the Getting Started button in the Help group of the Home ribbon on the
    main application window. The steps listed guide you through the required configuration to deploy
    signatures to your users for the first time.

    Note These steps assume that you wish to use the built-in database and deployment using a logon script.
    There are a number of alternatives; please refer to the chapter on deployment for further details.

8   Chapter 1 Introduction
Introduction 1 As you complete each step, you can tick the Completed checkbox to remind you of the progress you have made. Once you have successfully deployed signatures to your users, you can prevent the dialog from appearing automatically by selecting the Do not show this when I next start Email Signature Manager option. For further details on how to complete each step, please refer to the following sections of this manual: Step 2 and 3: Creating the Shared Central Folder Step 4: The Settings Database dialog Step 5: Creating and Editing Templates Step 6: The Manage Deployment dialog Step 8: The Status Monitor dialog Chapter 1 Introduction 9
Tutorial                                                                                              2
     Symprex Email Signature Manager is started by clicking its icon in the program group. When first started,
     an evaluation license will be automatically granted that will allow you to evaluate the software for a limited
     number of users for a limited amount of time. Once you have purchased an appropriate license, you will
     need to apply it to fully enable the application and remove the evaluation restrictions; please refer to the
     chapter on licensing for further information.

     Main Application Window
     The main application window has several areas, as shown below:

     The ribbon at the top of the window provides access to all of the functions in the application. The ribbon
     can be collapsed by clicking the arrow in the top right-corner to provide more space for the main content
     of the window. The buttons in the ribbon will be available according to the current selection in the main
     window. The settings database to which the application is connected is displayed in the status bar at the
     bottom of the window. Further details and options about the application can be found by clicking the File
     button, which will display the File page.

     The main area of the window displays the template browser, which displays the templates defined in the
     database. The list can be viewed in one of four modes; click the appropriate button in the View group in
     the Home ribbon to change the view. To create a new template, click the appropriate button in the Create
     group in the Home ribbon. With an existing template selected, you can:

       Click the Edit button in the Template group in the ribbon to edit the selected template, or
       Click the Rename button in the Template group in the ribbon to rename the selected template, or

10   Chapter 2 Tutorial
Tutorial 2 Click the Delete button in the Template group in the ribbon to perm a nently delete the selected template, or Click the Duplicate button in the Template group in the ribbon to create an identical duplicate the selected template. Note The commands are also available in the context menu, which is opened by right-clicking on the appropriate template as illustrated below: Please see this topic for further information about creating and editing templates. Once you have created your templates, they can be tested by clicking the Test button in the Template group in the Home ribbon to open the Test Signatures dialog. The deployment of your templates is managed using the tools in the Deployment group in the ribbon: The Manage Deployment button will open the Manage Deployment dialog, which is used to configure which users in your organization receive which signatures. The Status Monitor button will open the Status Monitor dialog, which is used to monitor the deployment of signatures to the users in your organization. To change the overall configuration of the application, click the Configuration ribbon. Note When a template is being modified, the Configuration ribbon is not available. Within the Settings group are the following buttons: The Deployment Options button will open the Deployment Options dialog, which is used to configure system-wide settings for the deployment of signatures to your users. The Office 365 Options button will open the Office 365 Options dialog, which is used to configure Office 365 signature deployment. Chapter 2 Tutorial 11
Tutorial                                                                                         2
       The Blackberry Options button will open the Blackberry Options dialog, which is used to configure
       Blackberry signature deployment.
       The Configure Service button will open the Configure Service dialog, which is used to configure and
       manage the Email Signature Manager Deployment Service.

     Within the Mobile Devices group are the following buttons:

       The Transport Agent Rules button will open the Transport Agent Rules dialog, which is used to
       configure the rules applied by the Email Signature Manager Transport Agent when processing e-mails.

     Within the Settings Database group are the following buttons:

       The Settings Database button will open the Settings Database dialog, which is used to select the
       settings database to which the application is connected.
       The Import Database button will open the Import Database dialog, which is used to import data from
       another database in to the current settings database.
       The Load Connection Settings button is used to load the settings for connecting to a database from
       an existing configuration file; please see this topic for further information.
       The Save Connection Settings button is used to save the settings for connecting to the current settings
       database to a configuration file; please see this topic for further information.

     Within the Tools group are the following buttons:

       The Define Data Sources button will open the Manage Data Sources dialog, which is used to configure
       the custom data sources used to provide data to your templates.
       The Domain Configuration button will open the Domain Configuration dialog, which is used to
       configure how users and groups are found in your local domain.

12   Chapter 2 Tutorial
Tutorial 2 File Page The File Page is displayed by the clicking the File button in the ribbon of the main application window. The left side of the window has various options for working with Symprex Email Signature Manager. Help: Opens the application help on the Introduction page. Contact Us: Opens the Support Centre on the Symprex website. Options: Opens the Options dialog to configure application settings. Check for Updates: Checks for updates to Email Signature Manager The right side of the window displays information about your license and details for Email Signature Manager, such as the version number. This information can be useful if you need to contact Symprex for technical assistance. Options Dialog The options dialog is opened by selecting the File page in the main application window and clicking the Options button. Chapter 2 Tutorial 13
Tutorial                                                                                          2

     The following settings can be modified:

     Language: Allows you to specify the language used by the application. This will default to your current
     Windows language (if available) or you can choose a specific language from the drop-down list.
     Form Layout Data: Clicking the Reset Form Layout Data will reset the size and position of all windows
     within the application to their defaults.
     Color Scheme: Allows you to choose the color scheme for the main application window.

     To accept the changes you have made, click the OK button. Otherwise, click the Cancel button to close the
     dialog.

     Creating and Editing Templates
     Signatures can help to make your emails look professional, convey your brand, and to identify who you
     are. Signatures configured for deployment to Microsoft Outlook, OWA and mobile devices are
     automatically added to the end of new emails you compose. By designing and deploying signatures from
     a central point, you can achieve a consistent appearance for all emails from your organization. Symprex
     Email Signature Manager offers four different types of templates to accomplish this:

14   Chapter 2 Tutorial
Tutorial 2
Icon Type Description
Signature Signatures normally include graphics such as a logo to convey corporate identity
and branding, and include fields to merge contact information from Active
Directory or another data source. Disclaimers and campaigns can be appended to
any signature.
Disclaimer Disclaimers are normally of a legal nature and will be appended to designated
signatures. Separating disclaimers from signatures makes it easy to maintain the
same disclaimer on many different signatures.
Campaign Campaigns are normally used to include graphics or text, for example news or
sales promotions, and will be appended to designated signatures. Campaigns can
be scheduled to run within a certain time frame.
Stationery Stationery can be used to set background images. Note that stationery only works
in Outlook and only when creating new email in HTML format.
Templates are created and managed from the main application window. When designing a template, the
main part of the application window displays the template editor and the Template ribbon:
All templates share two common properties:
The name of the template, used to uniquely identify each template. Template names cannot be blank or
duplicated.
Chapter 2 Tutorial 15Tutorial 2
A description of the template, which is an optional field describing the template.
Depending on the type of the template, other properties are also available. These are discussed in the
separate topics for each template type.
All templates in Email Signature Manager have three separate components:
The HTML Template, which defines the content appended to emails authored in HTML, including those
authored through OWA.
The RTF Template, which defines the content appended to emails authored in Rich Text Format.
The Plain Text Template, which defines the content appended to emails authored in plain text.
Each component can contain fields (identified by {} braces), which are dynamically replaced by the
appropriate information from the selected data source when the template is deployed to each user. This
means that templates are dynamic and their content can be tailored to suit your organization. Prior to
deployment, you can test how your templates will appear for any user in your organization using the Test
Signatures dialog.
Please refer to the working with fields topic for detailed information on how to use fields in your
templates.
All templates are designed in a WYSIWYG editor. For the HTML component of each template, the source
can be modified directly to provide fine control over the content by clicking the Source button:
16 Chapter 2 TutorialTutorial 2
The Template ribbon offers various commands whilst designing your templates:
The Edit group contains the standard commands for working with the clipboard and content of the
template.
The Format group contains commands to adjust the formatting of the text (HTML and RTF templates
only).
The Paragraph group contains commands to adjust the style of the text (HTML and RTF templates
only).
The Insert group contains commands to insert Hyperlinks, Pictures, Tables and Fields.
When you have finished designing your template, you can:
Click the Save button to save the changes to your template.
Click the Close button to close the template and return to the template browser; you will be prompted
to save if you have made any changes.
It is recommended that you read the section of design guidance before authoring your templates to
ensure you achieve the best results.
Signatures
A signature is the basic template used to sign your emails. The design of each signature should generally
contain information about the author of the email and the organization. Legal information can be
appended to signatures using disclaimers and news and marketing information can be appended using
campaigns.
To create a new signature, click the Signature button in the Create group of the Home ribbon on the
main application window.
To edit an existing signature, you can either:
o Select the signature in the template browser on the main application window and click the Edit button
in the Template group of the Home ribbon, or
o Double-click the signature in the template browser, or
o Right-click the signature in the template browser and select Edit from the context menu.
When you create or edit a signature, the template editor will be opened:
Chapter 2 Tutorial 17Tutorial 2
Signatures can have the following properties configured:
Name (mandatory): The unique name of the signature.
Description: A description of the signature.
Data Source: The data source from which the user data will be merged for the signature. By default,
this will be Active Directory but can be set to any custom data source.
Client Settings for the template can be defined by clicking the Define client settings for this template
link.
Note The client settings defined for the template will be applied when the signature is installed as the
default signature for new emails for a user unless global client settings take precedence. Please review the
section on deployment for further details.
To save the changes and continue editing the signature, click the Save button.
To close the editor and return to the template browser, click the Close button; you will be prompted to
save if you have made any changes.
Client Settings
The Client Settings dialog is opened by clicking the Define client settings for this template link when
editing a signature.
18 Chapter 2 TutorialTutorial 2 Client settings are used to configure email preferences for writing emails in Microsoft Outlook. Note Global client settings can also be specified in the Manage Deployment dialog which, depending on how they are configured, can override the settings defined in a template. The following settings can be configured for the message format: Set format for outgoing mail: Specifies the format to be used for writing outgoing email. This can be either HTML, Rich Text or Plain Text. Set editor for mail: Determines if Microsoft Word is used to edit email messages. Note The "Send Pictures" option is now configured through the Deployment Options dialog. Note The "Editor for mail" option only has effect in Microsoft Outlook 2003; in Outlook 2007 and later, Word is always used for editing emails. The following settings can be configured for the message font: The Compose font; specifies the font and color that will be used when a user creates a new email. The Reply/Forward font; specifies the font and color that will be used when a user replies to an email. Plain Text font; specifies the font that will be used to compose emails in plain text format. Chapter 2 Tutorial 19
Tutorial                                                                                          2
     To accept the changes you have made, click the OK button. Otherwise, click the Cancel button to close the
     dialog.

     Disclaimers
     Disclaimers are generally used to add legal information to the end of the designated signatures; for
     example, this can be to give details of your organization's email policy.

       To create a new disclaimer, click the Disclaimer button in the Create group of the Home ribbon on
       the main application window.
       To edit an existing disclaimer, you can either:
       o Select the disclaimer in the template browser on the main application window and click the Edit
         button in the Template group of the Home ribbon, or
       o Double-click the disclaimer in the template browser, or
       o Right-click the disclaimer in the template browser and select Edit from the context menu.

     When you create or edit a disclaimer, the template editor will be opened:

     Disclaimers can have the following properties configured:

       Name (mandatory): The unique name of the disclaimer.
       Description: A description of the disclaimer.

20   Chapter 2 Tutorial
Tutorial 2
Enabled: Determines if the disclaimer is currently enabled. When enabled, the disclaimer is appended
to the designated signatures.
Append to all signatures: When selected, specifies that the disclaimer is appended to a ll signatures.
Append to the following signatures: When selected, the disclaimer is only appended to the
signatures selected in the list.
Note The fields in the disclaimer will be merged using the data source from the parent signature at the
point of deployment.
To save the changes and continue editing the disclaimer, click the Save button.
To close the editor and return to the template browser, click the Close button; you will be prompted to
save if you have made any changes.
Campaigns
Campaigns are generally used to add news and marketing information to the end of the designated
signatures; for example, to tell recipients of emails from your organization about a forthcoming
promotion.
To create a new campaign, click the Campaign button in the Create group of the Home ribbon on the
main application window.
To edit an existing campaign, you can either:
o Select the campaign in the template browser on the main application window and click the Edit
button in the Template group of the Home ribbon, or
o Double-click the campaign in the template browser, or
o Right-click the campaign in the template browser and select Edit from the context menu.
When you create or edit a campaign, the template editor will be opened:
Chapter 2 Tutorial 21Tutorial 2
Campaigns can have the following properties configured:
Name (mandatory): The unique name of the campaign.
Description: A description of the campaign.
Enabled: Determines if the campaign is currently enabled. When enabled, the campaign is appended to
the designated signatures.
Start Date: Optionally specifies the date from which the campaign will be appended to the designated
signatures.
End Date: Optionally specifies the date until which the campaign will be appended to the designated
signatures.
Append to all signatures: When selected, specifies that the campaign is appended to a ll signatures.
Append to the following signatures: When selected, the campaign is only appended to the signatures
selected in the list.
Note The fields in the campaign will be merged using the data source from the parent signature at the
point of deployment.
To save the changes and continue editing the campaign, click the Save button.
To close the editor and return to the template browser, click the Close button; you will be prompted to
save if you have made any changes.
22 Chapter 2 TutorialTutorial 2
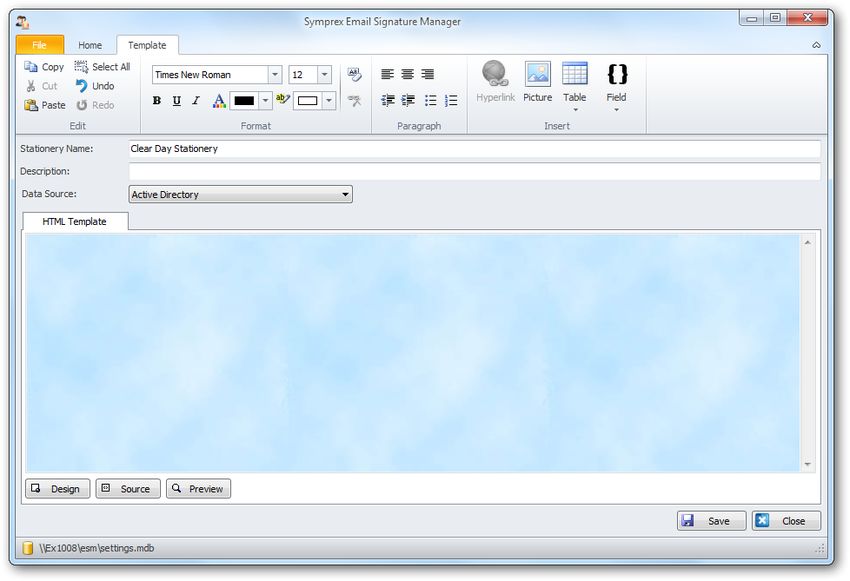
Stationery
Stationery can be used to set background images.
To create new stationery, click the Stationery button in the Create group of the Home ribbon on the
main application window.
To edit existing stationery, you can either:
o Select the stationery in the template browser on the main application window and click the Edit
button in the Template group of the Home ribbon, or
o Double-click the stationery in the template browser, or
o Right-click the stationery in the template browser and select Edit from the context menu.
When you create or edit stationery, the template editor will be opened:
Stationery can have the following properties configured:
Name (mandatory): The unique name of the stationery.
Description: A description of the stationery.
Note Stationery can only be applied to HTML messages authored in Microsoft Outlook. Hence, the RTF
Template and Plain Text Template tabs are not available for stationery.
To save the changes and continue editing the stationery, click the Save button.
Chapter 2 Tutorial 23Tutorial 2
To close the editor and return to the template browser, click the Close button; you will prompted if
changes have been made.
Dynamic Fields
Dynamic Fields is a very powerful feature in Symprex Email Signature Manager. Each component (HTML,
Rich Text and Plain Text) of a template is essentially the final content that will be deployed but instead of
actual user information, field markers (dynamic fields) are inserted where the real user information will be
inserted (or m erged). This is illustrated in the simple signature below:
In this example, most of the content will be populated dynamically at the point of deployment. For
example, the {fullname} field will be replaced by the user's full name from the data source for the
template (the data source is normally Active Directory but custom data sources can be configured). The
deployed signature would appear something like the following example:
This examples demonstrates basic use of simple fields in signatures; a full list of the available fields is
listed in the appendix.
Formatting a Field Value in Upper, Lower or Title Case
Field values can be formatted to be in upper, lower or title case as follows:
Upper Case: Add the :U suffix to the field name, for example {fullname:U}
Lower Case: Add the :L suffix to the field name, for example {fullname:L}
Title Case: Add the :T suffix to the field name, for example {fullname:T}
Use any Active Directory Property Value
The pre-defined fields available in Email Signature Manager are the most commonly used fields for
signatures. However, it is possible to obtain the value of a ny Active Directory property by using the
24 Chapter 2 TutorialTutorial 2
following syntax:
{#propertyname}
where propertyname is the name of the property. If the property has multiple values, a specific value can
be obtained using the following syntax:
{#propertyname(index)}
where (index) is the is 1-based index of the value to be used. A list of some Active Directory fields that
can be useful in signatures can be found here.
Conditional Statements
Conditional Statements is a very powerful feature in Symprex Email Signature Manager. They allow you to
include or exclude part of a template based on whether or not there is data in a specific field. A common
use of this feature is to avoid labels in front of empty fields.
If Conditional Statement
The $if conditional statement allows you to specify that the enclosed block of content should only be
included if the specific field contains data.
The syntax for the $if conditional statement is:
{$if field}content to include when field contains data{$}
Example:
{$if mobile}Mobile: {mobile}{$}
Ifno Conditional Statement
The $ifno conditional statement allows you to specify that the enclosed block of content should only be
included if the specific field contains no data or is null.
The syntax for the $ifno conditional statement is:
{$ifno field}content to include when field contains no data{$}
Example:
{$ifno mobile}Mobile: N/A{$}
Else Conditional Statement
The $if and $ifno statements can be combined with the $else statement to test for the inverse
condition. This simplifies conditional statements as there is no need to define both $if and $ifno
statements to test for a field value containing data or being empty.
Chapter 2 Tutorial 25Tutorial 2
The syntax for the $else conditional statement is:
{$if field}content to include when field contains data{$else}content to include when field contains n
Example:
Mobile: {$if mobile}{mobile}{else}N/A{$}
Testing if Field Is Equal To a Specific Value
The $if can be used to test if a field value is equal to a specific value by using the = operand and using
the following syntax:
{$if field="value"}content to include when field is equal to the specified value{$}
Example:
Country: {$if countrycode="GB"}Great Britain{$else}Somewhere else{$}
The comparison is case insensitive.
Testing if Field Is Not Equal To a Specific Value
The $if can be used to test if a field value is not equal to a specific value by using the operand and
using the following syntax:
{$if field"value"}content to include when field is not equal to the specified value{$}
Example:
Country: {$if countrycode"US"}Not the United States{$else}The United States{$}
The comparison is case insensitive.
Testing if Field Is Like a Specific Value
The $if can be used to test if a field value is like a specific value by using the % operand and using the
following syntax:
{$if field%"value"}content to include when field is like the specified value{$}
The tested value can include the following wildcards:
* matches zero or more characters.
? matches any single character.
# matches any single digit.
26 Chapter 2 TutorialTutorial 2
Example:
Area Code: {$if phone%"0208*"}Outer London{$else}Somewhere else{$}
The comparison is case insensitive.
Additional Notes on Conditional Statements
When the "Remove trailing spaces from field values" option is enabled (configured through the
Deployment Options dialog), any trailing spaces in field values will be removed before evaluating
conditional statements. Field values that only contain one or more spaces will be trimmed to an empty
value; this is desirable as such fields would generally be considered empty in relation to signatures.
When using conditional statements in HTML templates care needs to be taken to ensure that the correct
HTML tags are either included or excluded in the conditional statement. This can be verified by checking
the Source for the template in the template browser.
Avoiding Blank Lines
To avoid a blank line when a conditional statement that evaluates to false includes a whole full line,
include the line break within the conditional statement. For example this template would result in a blank
line between name and phone in signatures for users that do not have a mobile number:
{fullname}
{$if mobile}Mobile: {mobile}{$}
Phone: {phone}
To avoid the potentially empty line, the signature should be rewritten like this:
{fullname}
{$if mobile}Mobile: {mobile}
{$}Phone: {phone}
Note In HTML templates, you may need to either include or exclude line break tags (i.e. ) inside the
end of the conditional statement to achieve the desired effect. When using paragraph tags (i.e. ... ), ensure that the tags will not become unbalanced by getting excluded by the conditional statement.
Template Design Guidance
To ensure that your signatures appear as expected when applied to emails, please read the following
sections providing guidance on various aspects of template design.
Styling Templates
When authoring templates in HTML, it is important to avoid using CSS to apply styles within the template
content. This is because when templates are deployed to Outlook and OWA, or injected into emails by the
Transport Agent, it is not possible to merge CSS styles that may be present in an email with those in the
template. This is also true when campaigns and disclaimers are appended to signatures. Therefore, all
styles within your HTML templates should be applied inline, for example:
Your text here
Chapter 2 Tutorial 27Tutorial 2
The best method to produce a clean template is to first complete the content of the template without any
styles, and then applying the styles (such as bold, italic etc.) to each line as required. It also recommended
to avoid pasting into the HTML WYSIWYG editor from other HTML editors, such as Microsoft Word. The
reason for this these editors do not produce particularly clean HTML suitable for use in templates, which
can lead to formatting problems.
Including Graphics
There are two different ways to include graphics, such as a logo, in HTML email messages and this also
applies to HTML signature templates. Graphics, or more precisely images, can either be linked or
embedded. This section explains the difference between the methods, the advantages and disadvantages
to each method, and how to link or embed images.
Linked or Embedded
Linked images are not a part of the message itself, but are normally placed on a public web server, and
then referenced in the message body with an tag, as in this example:
The advantages of linked images are a small message size and a low risk of interception by antivirus and
anti-spam filters. The disadvantages are that the recipient may not see linked images when viewing the
message off-line, and that some email clients may block image download by default (please see
additional notes on Microsoft Outlook 2003 below).
Unlike linked images, embedded images are part of the message itself. Embedded images are included
as embedded attachments, and then referenced in the message body with an tag, but with an
image identifier, known as the "Content Id", instead of a link, as in this example:
Note You cannot explicitly create cid references. Microsoft Outlook will do this when configured to
embed images, or when an image is stored in a local network location.
The advantages and disadvantages to using embedded images are exactly opposite to using linked
images. The message size is (potentially much) larger and the risk of interception by antivirus and anti-
spam filters is higher. On the other hand, the recipient will normally see embedded images even when
viewing email off-line, and image download blocking issues do not normally apply to embedded images.
How to Include Linked Images
To include linked images, simply insert the image HTTP link in the HTML for the template. Unless the Send
pictures from the Internet option in Microsoft Outlook is enabled, the picture will not be embedded in the
email. You can control this particular Outlook setting via the signature client settings or global client
settings in Email Signature Manager, or via Group Policies (GPO).
How to Include Embedded Images
To include embedded images, you can insert the image HTML link using the file name of the image on a
28 Chapter 2 TutorialTutorial 2 local disk or network share. Microsoft Outlook will automatically recognize that the image is stored locally and embed the image in the email. Alternatively, when the Send pictures from the Internet option is enabled, pictures will always be embedded. However, using this approach will result in all images in an email to be embedded, i.e. also images that the user has added to the email. Note Embedded images cannot be used in OWA signatures; OWA signatures m ust used linked images. Linked Images in Microsoft Outlook By default, Microsoft Outlook 2003 and higher block the automatic download of images from the Internet, i.e. the download of linked images. A recipient using Outlook 2003 or higher will see the message and message formatting, but must manually activate the download of pictures. This applies to linked images only; embedded images will be shown automatically. Outlook 2003 can be configured to automatically download images as follows: In the Tools menu, click Options. Select the Security tab and click the Change Automatic Download Settings... button. Adjust the settings as required. Outlook 2007 can be configured to automatically download images as follows: In the Tools menu, click the Trust Center... button. Select the Automatic Download page. Adjust the settings as required. Outlook 2010 can be configured to automatically download images as follows: On the File page, click Options. Select the Trust Center page and click the Trust Center Settings... button. Select the Automatic Download page. Adjust the settings as required. Outlook 2003 and Outlook 2007 can be configured to automatically download images in email from a specific sender or domain as follows: On the Tools menu, click Options. Select the Preferences tab and click the Junk E-mail button. Select the Safe Senders tab and add the email addresses and domains to be trusted. Outlook 2010 can be configured to automatically download images in email from a specific sender or domain as follows: In the Delete group of the Home page of the ribbon, click the Junk drop-down menu and select Junk E-mail Options... Select the Safe Senders tab and add the email addresses and domains to be trusted. Chapter 2 Tutorial 29
Tutorial                                                                                            2
     Note By default, email from Contacts is automatically trusted so images will be automatically downloaded.

     Test Signatures
     The Test Signatures dialog is opened by clicking the Test button in the Templates group of the Home
     ribbon on the main application window.

     This dialog allows you to test how your signatures will look when deployed to your users in the preview
     window, but also directly in Outlook, OWA, Office 365 and on Blackberry devices.

       To preview a signature, select it from the list on the left side of the dialog (the preview automatically
       updates when a new signature is selected).
       The preview will be populated using the data source defined for the signature; see creating and editing
       signatures for details on how to change the data source.
       The preview will be populated using the data for the selected user. Click the ellipses ("...") button next
       to Test User to select a different user from Active Directory, and then click the Refresh button to see
       how the signature will be generated for that user.
       Alternatively, you can enter the account name for a user in the Test User box and click the Refresh
       button; the specified user will be loaded from Active Directory and the signature preview generated.
       The user can be specified using either the plain account name (e.g. "john.doe"), the DOMAIN\Account
       format (e.g. "MYDOMAIN\john.doe") or the account@domain format (e.g. "john.doe@mydomain.com").
       By default, the configured campaign(s) will be appended to the signature preview (see creating and
       editing campaigns for further details). To see how a specific campaign will look, select it from the
       Append Campaign list and click the Refresh button.
       By default, the configured disclaimer(s) will be appended to the signature preview (see creating and
       editing disclaimers for further details). To see how a specific disclaimer will look, select it from the
       Append Disclaimer list and click the Refresh button.

30   Chapter 2 Tutorial
Tutorial 2 The current preview (i.e. the exact contents of the previewed signature, as currently displayed in the dialog) can be installed to a number of the supported platforms for the currently logged on user to see how it will look. To install to Outlook, click the Install to Outlook button. You will be prompted to confirm this action before the preview is deployed to Outlook as the default signature for new and reply/forwarded emails . Any client settings defined in the signature will also be applied and the deployment will use the settings configured in the Deployment Options dialog. To install to OWA on the local domain, click the Install to OWA button. You will be prompted to confirm this action before the preview is deployed as the default OWA signature. The deployment will use the settings configured in the Deployment Options dialog. To install to Office 365, click the Install to Office 365 button. You will be prompted to confirm this action before the preview is deployed to Office 365 . This option is not available unless deployment to Office 365 has been configured using the Office 365 Options dialog and the current user must have an Office 365 hosted email account for the deployment to succeed. To install to Blackberry, click the Install to Blackberry button. You will be prompted to confirm this action before the preview is deployed to the Blackberry Enterprise Server database . This option is not available unless deployment to Blackberry has been configured using the Blackberry Options dialog and the current user must have a Blackberry device configured for the deployment to succeed. Note Closing the dialog will not undo any test deployment of the previewed signature. Once testing has been completed, click the Close button to close the dialog. Manage Deployment The Manage Deployment dialog is opened by clicking the Manage Deployment button in the Deployment group of the Home ribbon on the main application window. Chapter 2 Tutorial 31
Tutorial                                                                                              2

     Deployment of signatures to the users in your organization can be configured either by group
     membership (i.e. users will receive the signatures for the group to which they belong) or individually (i.e.
     per-user). The Group Deployment page manages the Active Directory groups for which deployment has
     been configured and the User Deployment page manages the individual Active Directory users for which
     deployment has been configured.

     Important If deployment for a user has been specified both by membership of one or more groups, and
     individually, then the individual deployment settings will take precedence.

     Important If deployment for a user has been specified by membership of more than one group, the
     deployment settings from the first group (of which the user is a member) in the list will take precedence.

     The Group Deployment and User Deployment pages work in an identical manner:

       The list of objects (i.e. groups or users, as appropriate to the selected page) is displayed on the left of

32   Chapter 2 Tutorial
Tutorial 2 the page; selecting an object will display the deployment settings on the right of the page. To refresh the list of objects, click the Refresh button. To add a new object, click the Add... button; you will be presented with a new dialog to select the group or user to be added from Active Directory. To remove the selected object, click the Remove button. To change the selected object whilst preserving the deployment configuration, click the Change... button; you will be presented with a new dialog to select the group or user to replace the selected object. To ensure that deployment is valid, click the Validate button; this will start a process that verifies each group and user can be loaded from Active Directory, and updates them as appropriate. If a certain object cannot be found, the icon for that object is updated to show that it is no longer valid; if this happens, either remove the object or replace it with a new object. With an object selected, the following options are available to specify how signatures are deployed to that object: Outlook Signatures: Select the signatures that you wish to be installed to Microsoft Outlook for the group/user. The selected signatures will then be available for the user to choose within Outlook for signing emails. Default Signature - New Messages: Select the signature that will be set as the default signature for signing new emails. The default can be set to none by selecting "" or it can be left unchanged by selecting "". Default Signature - Replies and Forwards: Select the signature that will be set as the default signature for replying and forwarding emails. The default can be set to none by selecting "" or it can be left unchanged by selecting "". Outlook Stationery - Outgoing Messages: Select the stationery that will be set as the default stationery for outgoing messages. The stationery can be set to none by selecting "" or it can be left unchanged by selecting "". OWA Signature - Outgoing Messages: Select the signature that will be set as the default signature for outgoing messages authored in OWA (Outlook Web App/Outlook Web Access). The signature can be set to none by selecting "" or it can be left unchanged by selecting "". Mobile Device Signature - Outgoing Messages: Select the signature that will be set as the default signature for outgoing messages on mobile devices. The signature can be set to none by selecting "" or it can be left unchanged by selecting "". When a Group is selected, it can be moved up or down using the arrow buttons at the top of the list. The order of the groups controls the precedence that will be used when determining deployment settings based on group membership. Note: The Mobile Device Signature specifies the signature that is deployed to the Blackberry Enterprise Server database (if you have configured Blackberry deployment) and the signature that is used by the Transport Agent to inject signatures into emails sent from your users' mobile devices (if you have the Transport Agent configured). The Client Settings page can be used to configure global client settings. When the deployment has been configured as required, click the Save button to save your changes. Click the Close button to close the dialog; if you have made any changes, you will be prompted to save before the dialog is closed. Chapter 2 Tutorial 33
Tutorial                                                                                           2
     Send On Behalf
     Send on Behalf settings are used to deploy additional Outlook signatures to users who send emails on
     behalf of other users within your organization.

     The users who will receive send on behalf signatures during deployment are shown in the Users/Groups
     list on the left-hand side of the tab; users can be specified either individually or by group membership.
     The list can be modified using the buttons beneath it:

       To add a new user or group, click the Add... button; you will be presented with a new dialog to select
       the appropriate object from Active Directory.
       To remove the selected user or group, click the Remove button.
       To change the selected user or group whilst preserving the send on behalf configuration, click the
       Change... button; you will be presented with a new dialog to select the replacement object from Active
       Directory.

34   Chapter 2 Tutorial
Tutorial 2 The selected user or group can be moved up or down using the arrow buttons at the top of the list. The order (of the users and groups) controls the precedence that will be used when determining the send-on-behalf signatures received by each user. The right-hand side of the tab is used to configure the send on behalf signatures that each user and group will receive. The Send on Behalf of list defines the users and groups for which signatures will be deployed to the selected object. The list can be modified using the buttons beneath it: To add a new send on behalf of user or group, click the Add... button; you will be presented with a new dialog to select the appropriate object from Active Directory. To remove the selected send on behalf of user or group, click the Remove button. To change the selected send on behalf of user or group whilst preserving the signature configuration, click the Change... button; you will be presented with a new dialog to select the replacement object from Active Directory The Signatures to Deploy list defines which signatures will be deployed for the selected send on behalf of user or group; simply check each signature that should be deployed. The signatures can be specified either separately for each send on behalf of user and group, or can be specified for a ll of the send on behalf of users and groups (for the user or group selected in the left-hand list) by selecting the Deploy the same signature to all send on behalf users option. For example, the configuration shown above defines that all users in the Secreta ries group will have the G reen Lea f Signa ture deployed with the details for Bra ndon Mitchell, G eorge Sm ith, and Leo Hunter. Global Client Settings Global client settings are used to configure email preferences for all of the users in your organization when writing emails in Microsoft Outlook. Chapter 2 Tutorial 35
Tutorial                                                                                              2

     Select the Enable global client settings option to configure the client settings that will be applied to all
     users when templates are deployed.

     If you wish to apply the global settings ignoring any settings made in your templates, select the Make
     global client settings override client settings in templates option. When this setting is not selected,
     any settings found in your templates will be applied, and when no template settings are found, the global
     settings will be applied.

     The following settings can be configured for the message format:

       Set format for outgoing mail: Specifies the format to be used for writing outgoing email. This can be
       either HTML, Rich Text or Plain Text.
       Set editor for mail: Determines if Microsoft Word is used to edit email messages

     Note The "Send Pictures" option is now configured through the Deployment Options dialog.

36   Chapter 2 Tutorial
Tutorial 2 Note The "Editor for mail" option only has an effect in Microsoft Outlook 2003; in Outlook 2007 and later, Word is always used for editing emails. The following settings can be configured for the message font: The Compose font; specifies the font and color that will be used when a user creates a new email. The Reply/Forward font; specifies the font and color that will be used when a user replies to an email. Plain Text font; specifies the font that will be used to compose emails in plain text format. The global client settings will be applied to each user when signatures are deployed. Status Monitor The Status Monitor dialog is opened by clicking the Status Monitor button in the Deployment group of the Home ribbon on the main application window. Whenever signatures are deployed to a user (using either the command line tool or the Email Signature Manager Deployment Service), the results are written to the Status Monitor; this allows deployment to be monitored and verified remotely. The left side of the dialog lists all of the users to which signatures have been deployed, together with an overall status describing the result: OK indicates that the deployment was successful. Error indicates that an error occurred during the deployment. Skipped indicates that no signature deployment was configured for the user (in the Manage Deployment dialog). Chapter 2 Tutorial 37
You can also read