THE STRAHAN (CHICAGO) MODEL - Kurt Heinking, DO, FAAO AAO Convocation 2019 Copyright 2019 CCOM - Find a Physician
←
→
Page content transcription
If your browser does not render page correctly, please read the page content below

THE STRAHAN (CHICAGO)
                    MODEL
                      Kurt Heinking, DO, FAAO
                      AAO Convocation 2019

Copyright 2019 CCOM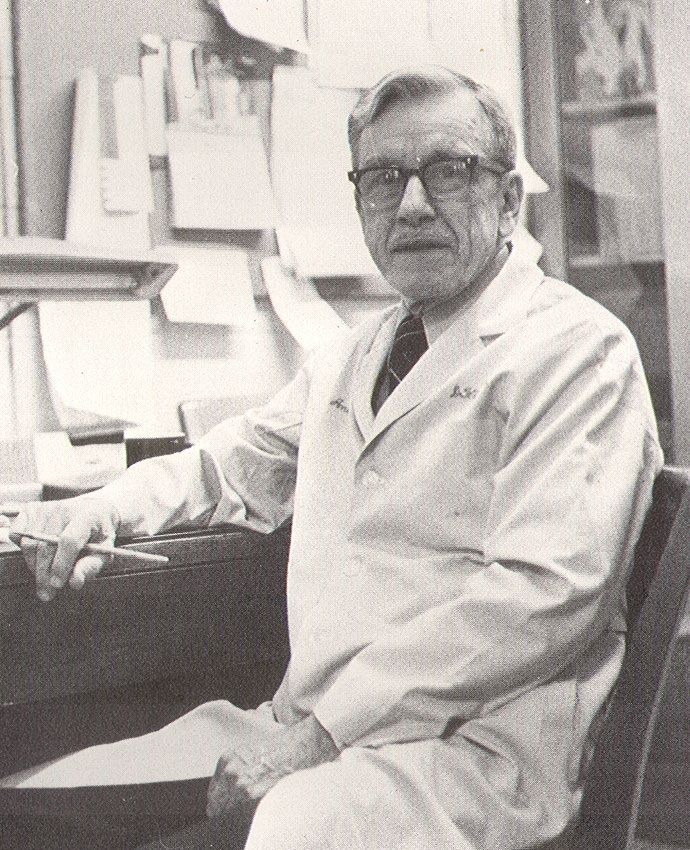
OBJECTIVES

• Learn the diagnostic and therapeutic approach of the Chicago model as described by
  Frazier Strachan, DO.
• Differentiate this model from other models
• Enhance your palpatory skills for tissue texture changes and motion restrictions
• Diagnose significant somatic dysfunction on your partner
• Apply manipulative techniques to the determined diagnosis
• Consider how to apply this model and techniques to clinical patient presentations

W. FRASER STRACHAN, D.O. ‘30
THE EVOLUTION OF “THE CHICAGO MODEL”
          FROM 1900-TODAY
• Dr. Littlejohn introduced holistic approach to the CCOM curriculum
• Dr. Fryette emphasized spinal segmental disfunction and facilitated segment(s)
• Dr. Larson coined tissue texture change as the cornerstone of diagnosis
• Dr. Strachan stressed the importance of understanding anatomy to obtain precise localization
• Dr. Walton developed HVLA technique approaches based upon the above
• Dr. Kappler integrated indirect approaches for articular, muscular, and cranial dysfunction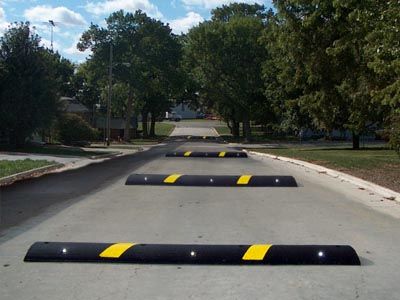
GENERAL CONCEPTS: DIAGNOSIS &
         TREATMENT
APPROACH TO DIAGNOSIS
Begins with T.A.R.t.
Accurate palpation for Tissue texture changes requires anatomical
knowledge.
Asymmetry of position is not only evaluated from the structural
exam
Motion restriction can be diagnosed with "long lever" or "short
lever" approaches
tenderness: determine what tissue or structure is the pain sensitive
one. Is it the joint or something else?
Why is the Dysfunction there?WHAT IS UNIQUE ABOUT CHICAGO STYLE
DIAGNOSIS ?
• Particular attention is paid to tissue texture
abnormality and restriction of motion
• The concept of “end-feel” is important!
• Less attention to asymmetry and tenderness
• CCOM approach: diagnose and treat motion
restrictionTREATMENT CONSIDERATIONS • Is the patient an appropriate candidate for OMT including HVLA technique? • Is the patients condition one that OMT might help or hurt? • What is the risk / benefit ratio? • If the patient has an adverse reaction to the treatment, how will you deal with this? • Is this the first visit or first time receiving OMT? • What is your GOAL of the treatment? • What is the patient’s GOAL of the treatment?
TREATMENT CONSIDERATIONS

• Your treatment is only as effective as your diagnosis.
• Determine which plane of motion is most restricted and adjust your technique accordingly.
• Use the least amount of force that is necessary.
• Maintain localization throughout the procedure.
CHICAGO APPROACH TO TREATMENT

• Historically, CCOM technique approaches centered around soft tissue, articulatory, and HVLA .
• Additional modalities were introduced in the 1980’s
   • Dr. Ann Habenicht: Cranial
   • Dr. John Hohner: Myofascial
   • Dr. Dan Davison: MET
   • Dr. Robert Kappler: Indirect techniques
   • Dr. Kurt Heinking: CS, FPR, Still

   • Less emphasis placed on: LAS / BLT Techniques, Biodynamics, Functional, Visceral, FDM
PRINCIPLES OF HVLA
• Initial Positioning
• Balance and Control
• Fulcrum
• Localization
    • Engagement of the restrictive barriers
    • Accumulation of forces
    • “Joint play” (John Mc. Mennell)

• Final corrective force
    • Proper velocity, amplitude and duration
    • Don’t make up for bad localization with MORE force!!

• Re-assess
TREATMENT – THE THRUST
• Choice of force vector
• Short Lever – Force applied directly at level of dysfunction
• Long Lever – Forces directed from a distance to the level of
dysfunction
• Maintain localization throughout the thrust
• Balance and control
• No “backing off” or “winding up”
• Apply HVLA thrust
• Minimal force through a short distance
• Rapid acceleration and short duration without hesitationGOALS OF TREATMENT • Decrease Pain • Improve mobility, range of motion • Decrease muscle tension • Improve blood flow • Improve Tissue oxygenation • Improve postural balance
WHAT HAPPENS IF THE PATIENT
“EXPLODES” AFTER A TREATMENT?”

                • Post-treatment instructions
                • Communication
                • Acknowledge them and listen
                  to them
                • See them soon
                • Treat with Indirect
                • Provide reassurance
                • Give instructions
                • Be empathetic
APPROACH: CENTRAL PERIPHERAL • Start with thoracics
THORACIC SPINE BASIC PRINCIPLES

• Patient seated
• Palpate for TT change
  • Over the rib angles
  • Over the transverse process,
    and spinous process areas
• Which segment(s) is most
  significant?
• Diagnose prominence or
  absence of the spinous
  processes*
• Diagnose segmental motion
THE SPINOUS PROCESS DIAGNOSE PROMINENCE OR ABSENCE OF THE SPINOUS PROCESSES Speed bump? (flexed) Pot Hole? (extended)
PHYSIOLOGIC MOTION OF THE THORACIC
                  SPINE
• Is it a group or single segment?

• Type I (group):
   • Neutral, sidebending causes
     rotation into convexity.
   • Stand the patient up and re-
     assess!

• Type II (single segment):
   • Non-neutral (flexed or
     extended)
   • Rotation and sidebending to
     the same side.
   • Segment rotates into concavity.
DIAGNOSIS: KAPPLER’S COROLLARY
• “I made a corollary to the Muscle
Energy diagnostic model”
• Concept: When the barrier is
engaged, motion restriction is far
more apparent.DR. KAPPLER’S COROLLARY Ex) T3 flexed, rotated and sidebent left Place the hands over the shoulder girdle with the thumbs contacting the transverse process of T3. Have the patient flex their head and neck, then attempt to rotate T3 to the right and to the left. Now, have the patient extend their neck, and passively attempt to rotate T3 to the right and to the left. Concept: When the barrier is engaged, motion restriction is far more apparent.
THORACIC TREATMENT: KNEE IN THE BACK

• Dysfunction: T4 on T5 extended, side bent right and rotated
  right; T4ERSR. This technique is useful for extended
  dysfunctions from T2 through T12.
• Objective: Improve flexion, rotation left, and sidebending left,
  of T4 on T5.
• Discussion: For EXTENDED thoracic dysfunctions, the knee is
  positioned on the posterior transverse process of the superior
  segment of the dysfunction. (“X marks the spot”)
• Patient Position: Seated.
• Physician Position: Standing behind the patient.
• The final corrective force is applied as a quick thrust
  directed upward and laterally with the physician’s knee
  (plantar flexing the right foot and ankle) combined with
  increasing the amount of traction through the back of your
  hands and forearms (through the patient's axilla). The forces
  from above and below must meet at the dysfunctional
  segment.
TREATMENT CONSIDERATIONS

• Localization in 3 planes adds precision and decreases the amount of force necessary
APPROACH: CENTRAL PERIPHERAL • Start with thoracics • Move to cervicals
THE TYPICAL CERVICAL SEGMENTS
             C2-7
CERVICAL VERTEBRAE (C2-7) • These cervical vertebrae have modified transverse processes, with only tubercles on which muscles attach. • The facets lie in a plane whose surface points toward the eye (450) • The bone between the facets, which we palpate, is called the articular pillar.
TYPICAL CERVICAL SEGMENTAL DIAGNOSIS

      • Fryette Type II motion, yet Fryette found that it
        didn’t matter if it was F/ E / or N.
      • Rule: Sidebending and rotation to the same side.
      • It is not uncommon to find sidebending and
        rotation to opposite sides, especially post-
        traumatic.
      • Much controversy in biomechanics
DIAGNOSIS OF TYPICAL CERVICAL C2-7 • Lateral translation test
DIAGNOSIS OF TYPICAL CERVICAL C2-7

• Rotation in the plane of the
  facets
DIAGNOSIS OF TYPICAL CERVICAL C2-7
    USING KAPPLER’S COROLLARY

  Flexion then Translate   Extension then Translate
DIAGNOSTIC CONSIDERATIONS
ANTERIOR VS. POSTERIOR “COMPONENT”
Anterior Component Posterior component
• Facet locked open • Facet locked closed
• Tissue Texture change opposite the side • Tissue Texture change on the side of
of rotation and sidebending the rotation and sidebending
What is the “Component”?ANTERIOR COMPONENT
TREATMENT OF TYPICAL CERVICAL C2-7

                                • Example: C5FRS right; C5 on C6 flexed (forward
• HVLA manipulative treatment     bent), rotated right, sidebent right (tissue texture
                                  change, motion restriction, and tenderness on the
                                  right) - also called a “posterior C5 right.”

                                • Objective: Improve left rotation, sidebending and
                                  extension at C5-6.

                                • Discussion: The most common error in this
                                  technique is to lose localization as the head and neck
                                  are rotated. It is important to sense your way into the
                                  barrier prior to applying corrective forces. If well
                                  localized, only minimal corrective force is necessary.
                                  The physician must control the head at all times.

                                • Patient Position: Lying supine.

                                • Physician Position: Standing at the head of the
                                  table.
LOCALIZATION Force follows the plane of Orientation of cervical the facets C2-C7 facets: 45 degrees upward
ROTATION AND SIDEBENDING TO THE
           SAME SIDE
HVLA OF TYPICAL CERVICAL C2-7 • Procedure: 1. Palpate for tissue texture abnormality over the posterior component (C5 right). Place the lateral aspect of your right index finger over the posterior component. Your right thumb should point towards the patient’s eye. 2. Your left hand (passive) cradles the left side of the patient’s head maintaining comfortable control of the head and neck throughout the procedure. 3. With your right hand introduce segmental anterior translation/an “extension break” of the neck at the C5 on C6 level. 4. Maintain this extension break over the index finger of your right hand. 5. While maintaining this extension break, rotate the head and neck to the left (down to and including C5) until the restrictive barrier is reached. Sidebending left is achieved by keeping the patient’s left temple close to the table. Caution - lifting the head away from the table will introduce sidebending in the wrong direction. 6. It may be necessary to move your body slightly to the right side of the able to keep yourself “behind your work”, which provides more comfort and control. 7. The final corrective force is a quick, gentle, short rotational force through your right hand directed anteriorly and superiorly toward the eye. Do not apply excessive force to the cervical spine. Be very gentle and specific. 8. Reassess.
WHAT IF SB AND ROTATION OCCUR IN OPPOSITE
               DIRECTIONS?

                      • C3F R right SB left
                      • Atypical, but occurs
                      • Lift head to sidebend right and
                        rotate left
                      • Maintain segmental extension
                        break.

                      • Nice Mustache!
APPROACH: CENTRAL PERIPHERAL • Start with thoracics • Move to cervicals • Upper extremities
STERNOCLAVICULAR JOINT
Typical movement
• AP Axis
• Elevation of the lateral clavicle
depression of the medial clavicle
• Depression of the lateral clavicle
elevation of the medial clavicle
• Vertical Axis
• Forward motion of the lateral clavicle
backward glide of the medial clavicle
• Backward motion of the lateral clavicle
forward glide of the medial clavicleSTERNOCLAVICULAR JOINT
Mechanics of lesion
• Upward Displacement of the Clavicle
• Downward force on the lateral clavicle
upward displacement of medial clavicle (ex:
tackle in football)
• Anterior Displacement of the Clavicle
• Posterior force on the distal clavicle forward
displacement of the medial clavicle (ex: forward
fall)DIAGNOSIS OF THE
STERNOCLAVICULAR JOINT
Evaluation of motion: patient supine
• Superior/inferior: • Anterior/posterior:
• When the patient shrugs his shoulders, • When the patient reaches for the
the medial clavicle should move ceiling, the medial clavicle should move
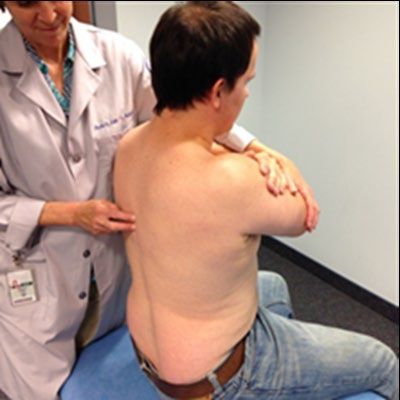
inferiorly posteriorlyTREATMENT OF A SUPERIOR
STERNOCLAVICULAR DYSFUNCTION
“The joint is commonly restricted also in attempted separation of the joint
surfaces by traction in the long axis of the clavicle. This indicates an element of
impaction as a part of the lesion.” E. Fraser Strachan, D.O.
Example: superior dysfunction of the right SC joint
Objective: Improve abduction, extension, and internal
rotation.
Patient Position: Seated.
Physician Position: Standing behind patient.
Procedure:
• Slightly rotate the trunk in the opposite direction to
disengage the joint.
• With the right hand, apply traction through the long
axis of the clavicle. Then circumduct clavicle,
emphasizing upward movement of the lateral end.
• With the left hand, exert downward pressure in the
middle of the clavicle, creating a fulcrum.TREATMENT OF A SUPERIOR
STERNOCLAVICULAR DYSFUNCTION:
ALTERNATIVE POSITION
• Patient supine
• Traction on the right arm,
elevates distal clavicle.
• Inferior directed HVLA force
on superior sterno-clavicular
joint.STERNO-CLAVICULAR: ANTERIOR SOMATIC
DYSFUNCTION
Dysfunction Diagnosis
• Sternal end of clavicle:
Anterior
• Shoulder is restricted in
horizontal flexion
• Sternal end of the clavicle
should move posteriorly
when the supine patient
reaches for the ceilingTREATMENT OF A ANTERIOR
STERNOCLAVICULAR DYSFUNCTION
Example: anterior dysfunction of the right SC joint
Objective: Improve horizontal flexion at the shoulder
Patient Position: Supine.
Physician Position: Standing on the side of
dysfunction.
Procedure:
• With the right hand, apply downward and lateral
pressure on the medial 1/3 of the clavicle
• With the left hand, apply lateral traction and an
anterior force at the shoulder
-William J. Walton, DO, FAAOALTERNATIVE POSITION
• Treatment of an anterior
displacement of the sternal
end of the clavicle
• Requires some dis-impaction
(traction) of the joint.
E. Fraser Strachan, DOAPPROACH: CENTRAL PERIPHERAL • Start with thoracics • Move to cervicals • Upper extremities • Upper lumbars
DIAGNOSIS SINGLE SEGMENT: L-SPINE, PRONE
                 APPROACH

• Patient is lying prone.
• Palpate for tissue texture changes.
• Grasp the trunk and contact the
  transverse processes with your
  thumbs. (Short Lever)
• Apply segmental lateral translation
  to introduce sidebending.
• Apply segmental rotation.
• Place thumb over the spinous
  process and apply a springing force
  to diagnose flexion and extension.
CHECKING “FRS-PSOAS” COMPLEX Checking for L1,2FRS Checking psoas tension
EVALUATE L5

• L5 can have atypical
  mechanics.
• Consider facet tropism
• Consider spondylolisthesis
• Consider disc protrusions and
  facet DJD.
• Goal: Do not “brutalize” L5!
  Take pressure off it.
TREATMENT OF LUMBAR TYPE II
          DYSFUNCTIONS

• CCOM has always taught that
  side lumbar technique for Type
  II dysfunctions emphasizes
  sidebending.
• The posterior component
  (closed side) goes down. The
  anterior component (open side)
  is up.
• The thrust is on the ilium
  (bottom) bringing the bottom
  segment around to meet the
  upper segment.
• Many schools teach that
  posterior component goes up.
• They are localizing to the top
  segment.                         L3 FRS left
HVLA ON SIDE: TREATMENT LUMBAR
SPINE
Dysfunction: Lumbar type II somatic dysfunction.
L2 rotated left, sidebent left and flexed; L2FRSL.
Objective: To improve the ability of L2 to rotate and
sidebend right and extend.
Discussion:
• “two wrench system” to loosen a bolt/nut –Dr.
Kappler comparison to this technique.
• The Chicago side lumbar technique for type II
dysfunctions emphasizes sidebending.
• The posterior component (“facet closed”) is
placed down.
• The bottom of the spine is stretched out; the
upper side is compressed.
• Prior to the thrust ask the patient to turn their head toward the ceiling. To further localize from below, rolling the patient’s
hips toward the table is often useful. The final corrective force is a combined vector force in an anterior and cephalad
direction, dropping your weight downward onto your contact. This directed force is on the patient’s pelvis with your left
forearm, emphasizing right sidebending of the lumbar spine.APPROACH: CENTRAL PERIPHERAL • Start with thoracics • Move to cervicals • Upper extremities • Upper lumbars • Sacrum
HVLA ON SIDE: TREATMENT LUMBAR
                                   SPINE

• Patient Position: Lying on left side facing the physician
  (dysfunctional side, the left side in this case, must be down)
  with pillow(s) supporting head. It is crucial (especially in
  women with a wider pelvis) that in the side lying position,
  the left side of the lumbar spine is stretched, so it is in
  contact with the table.

• The terminal objective of this positioning is simply to “stretch
  out the bottom and compress the top”, achieving right lumbar
  sidebending.

• To engage the flexion barrier from above, flex the patient’s
  torso down to the level of the dysfunction.
                                                                                           L2 ERS Left

                                                                     •       The final corrective force is toward you,
                                                                     downward into the table, and toward the patient’s head
                                                                     (anterior and cephalad). This directed force is on the
                                                                     patient’s pelvis with your left forearm, emphasizing right
                                                                             sidebending of the lumbar spine.
ANTERIOR SACRUM DIAGNOSIS
ANTERIOR SACRUM HVLA
Dysfunction: Right anterior sacrum (sacrum rotated left on the left oblique axis,
   restriction of the right sacroiliac joint, superior pole).
Procedure:
Place the fingertips of your right hand in the right sacral sulcus to monitor localization
   of forces at the right sacroiliac joint.
With your left hand, grasp under the patient’s ankles, flexing their knees and hips until
   motion is appreciated (and localized to) the right sacroiliac joint.
Drop the patient’s right leg off the front of the table. This results in proper sidebending
   of the SI joint.
Place your left forearm posterior to the patient’s right iliac crest.
While monitoring the sacroiliac joint with your left hand, place your right forearm in
   the patient’s right axilla and rotate their torso posteriorly until you appreciate
   motion at the SI joint. Your right arm is now a holding force.
With your left forearm roll the patient’s lower torso toward you so that your body
   weight is above the patient’s pelvis. The table must be low enough to accomplish
   this.
The final corrective force is a thrust through your left forearm directed anteriorly down
   the patient’s leg (toward the floor), moving the innominate anteriorly and inferiorly
   to approximate with the anterior sacrum.
Reassess motion.
POSTERIOR SACRUM DIAGNOSIS
POSTERIOR SACRUM HVLA
 Dysfunction:
 Right posterior sacrum (sacrum rotated right on the right oblique axis,
       restriction of the right sacroiliac joint, inferior pole).
Procedure:
•Move the patient’s upper torso away from you to introduce the proper
sidebending. Leave the patient’s legs in the middle of the table. The patient’s left
shoulder should be positioned lying in the
midline of the table.
•Have the patient place their hands behind their neck, and interlace their
fingers.
•Take your cephalad hand and insert it through the triangle formed by the
patients right arm. The dorsum of your cephalad hand should rest on the
patient’s sternum.
•Place your caudad hand over the patient’s right iliac crest stabilizing the pelvis.
•Rotate the patient’s torso to the left with your cephalad arm by pivoting the
patient on their left shoulder. Make sure to keep the patient’s left shoulder in
the middle of the table throughout this arc of motion. Do not flex the patient’s       Move ilium posterior to
torso.                                                                                 meet sacrum
•As the patient’s torso is rolled toward you, take up all the slack in the tissues
until localization is felt down at the sacrum. The final corrective force is a quick
thrust posteriorly on the ilium, moving the ilium to approximate with the
posterior right sacrum.
•Reassess motion.
APPROACH: CENTRAL PERIPHERAL • Start with thoracics • Move to cervicals • Upper extremities • Upper lumbars • Sacrum • Lower extremities
THE TIBIO-TALAR JOINT

• The tibia can move anterior or
  posterior on the talus.
• An anterior tibia on talus
  causes restricted ankle
  plantar- flexion.
• A posterior tibia on talus
  causes restricted ankle dorsi-
  flexion.
TREATMENT: HVLA OF TIBIO-TALAR JOINT
            ANTERIOR TIBIA ON TALUS
Dysfunction: Restricted ankle motion/dorsiflexion of the left foot and ankle.

• 1. The physician grasps the patient’s foot with their
  left hand, applying plantar flexion and traction.
• 2. The physician’s right hand contacts the distal tibia.
  The first metacarpal phalangeal joint is firmly placed
  against the tibia.
• 3. While maintaining a slight traction force through
  the foot to disengage the tibial-talar joint, a
  downward and posteriorly directed HVLA force is
  applied to the distal tibia.
• 4. Reassess ankle motion.
TREATMENT: HVLA OF TIBIO-TALAR JOINT
POSTERIOR TIBIA ON TALUS
Dysfunction: Restricted ankle motion/dorsiflexion of the left foot and ankle.
Procedure:
• 1. The physician grasps the patient’s foot by placing the middle
finger of his left hand in contact with the talus.
• 2.Now interlace your fingers over the dorsum of the foot allowing
your thumbs to project under the plantar surface of the foot.
• 3.The physician then applies a slight traction force through the
foot to disengage the tibial-talar joint.
• 4. The foot and ankle are moved through short arcs of motion
(primarily inversion/eversion with variable amounts of
dorsiflexion) until a restrictive barrier is found. Typically,
eversion and dorsiflexion tend to localize the restrictive barrier.
• 5. While maintaining the barrier localization with traction,
eversion and dorsiflexion, the patient is asked to relax and the
physician applies a short, quick, high velocity, low-amplitude
“tug” causing a brief gapping of the joint.TALAR TUG: ALTERNATIVE HOLD P. Gunnar Brolinson, D.O.
ALTERNATIVE HVLA OF TIBIO-TALAR JOINT
              POSTERIOR TIBIA ON TALUS
   Dysfunction: Restricted ankle motion/plantar-
  flexion of the left foot and ankle                                          Posterior Tibia on Talus HVLA

Procedure:
1. The physician grasps the patient’s foot with their left hand cupping the
   calcaneus. The right hand contacts the dorsum of the foot, applying
   plantar flexion and traction.

2. The physician’s right hand, primarily the first metacarpal phalangeal
   joint is firmly placed against the talus.

3. While maintaining a slight traction force through the foot to disengage
   the tibial-talar joint, a downward and posteriorly directed HVLA force
   is applied to the talus to have it meet the posterior tibia.

4. Reassess ankle motion.
SUMMARY • Diagnostic emphasis on motion restriction and tissue texture change • Treatment approach: central to peripheral • Localization in diagnosis is paramount to effective treatment
You can also read