THERMOMIX TM31 - Thermomix Basics
←
→
Page content transcription
If your browser does not render page correctly, please read the page content below

THERMOMIX TM31
INSTRUCTION MANUAL Retain for future reference!


TABLE OF
CONTENTS

Note: all handling instructions apply for
Thermomix TM31-1C with 220 … 240 V and
Thermomix TM31-4C with 110 … 127 V

Notes for your safety...................................................................................... 5
Technical data................................................................................................. 8
Introduction/Customer service.................................................................. 9

Your Thermomix TM31.................................................................................. 10

Before you start............................................................................................... 12
How to insert the mixing bowl correctly............................................................. 12
How to remove the mixing knife......................................................................... 13
How to insert the mixing knife............................................................................ 14

Accessories........................................................................................................ 15
Mixing bowl, mixing bowl base........................................................................... 15
Mixing bowl lid, measuring cup.......................................................................... 16
Simmering basket................................................................................................ 17
Spatula ................................................................................................................. 18
Stirring attachment (butterfly)........................................................................... 19
Varoma................................................................................................................. 20
How to combine the Varoma parts .................................................................... 20
How to use the Varoma correctly........................................................................ 21
Practical work with the Varoma ........................................................................ 24

Working with the Thermomix TM31........................................................ 25
Starting the Thermomix TM31 .......................................................................... 25
Explanation of symbols on control panel .......................................................... 26
Multi-function display......................................................................................... 27
Weighing and adding with the tare button......................................................... 27
Further information about weighing................................................................. 28
Timer buttons and timer display........................................................................ 29

                                                                                                                               Table of contents   3
TABLE OF CONTENTS

Adjustment of preset time.................................................................................. 30
Temperature buttons and illuminated temperature indicators........................ 30
Indicator for remaining heat............................................................................... 31
Soft start............................................................................................................... 31
Gentle heating setting.......................................................................................... 31
Varoma temperature setting .............................................................................. 32
Speed selector ..................................................................................................... 32
Gentle stir setting ............................................................................................... 32
Stirring................................................................................................................ 32
Mixing/blending................................................................................................. 33
Mixing/blending of hot food .............................................................................. 33
Turbo button ....................................................................................................... 33
Clockwise/counter-clockwise operation............................................................ 34
Dough mode........................................................................................................ 34

Things to remember......................................................................................                35
Sleep mode ..........................................................................................................   35
Electronic motor protection ...............................................................................             35
First time use and high loads .............................................................................             35

Cleaning............................................................................................................ 36
How to clean the mixing bowl and its lid........................................................... 36
How to clean the mixing knife ............................................................................ 37
How to clean the Varoma .................................................................................... 37
How to clean the main appliance ....................................................................... 38
Additional information for cleaning .................................................................. 38

Notes for your own recipes ......................................................................... 39
Troubleshooting............................................................................................. 40
Legal regulations/Copyright ....................................................................... 41
Warranty/Customer service....................................................................... 42

4     Table of contents
NOTES FOR
YOUR SAFETY
The Thermomix TM31 is intended for domestic food use Danger of electric shock
or similar areas of application. It complies with the most
advanced safety standards. For your own safety, read this • Disconnect the appliance from mains power s upply
instruction manual carefully before using your Thermomix before cleaning and if appliance is not used for a pro-
TM31 for the first time and be sure to take particular note longed period of time.
of the following. • Do not immerse the Thermomix TM31 in water. Clean
with a damp cloth only. No water or dirt must be allowed
Retain instruction manual for future reference. This in- to enter the housing. This includes all food debris whether
struction manual is part of the Thermomix TM31. There- liquid or solid.
fore always include this instruction manual to the appliance • Inspect your appliance, its accessories including the
when a third person uses it. mixing bowl and the connecting cable regularly for
possible damage. Damaged parts can impair safety. If
The Thermomix TM31 is not intended for use by persons damage does occur, do not use the appliance and con-
with reduced physical, sensory or mental capabilities, tact Vorwerk customer service or an authorised Vorwerk
or lack of experience and knowledge, unless they have repairer.
been given supervision or instruction concerning use of • The Thermomix TM31 may only be repaired by the
the appliance by a person responsible for their safety. responsible Vorwerk customer service or an authorised
Vorwerk repairer. This also applies in the case of damage
Always take care and be mindful that children are not to the connecting cable which may only be replaced by
close by when cooking with Thermomix. the Vorwerk customer service or an authorised Vorwerk
Children should be supervised to ensure that they do not repairer. Improper repair works or improper handling
play with the appliance. may result in serious risks for the user.
The Thermomix TM31 complies with the safety standards
of the country in which it was sold by an authorised Vorwerk
organisation. Compliance with the local safety standards
Danger of injury from sharp
cannot be guaranteed should the Thermomix TM31 be mixing knife
used in any other country. Vorwerk therefore accepts no
• Do not touch the blades of mixing knife. They are very
liability for any damages that may be arise as a consequence.
sharp. Hold upper part of mixing knife when removing
or re-inserting it.
Notes for your safety 5
NOTES FOR YOUR SAFETY
Danger of scalding by splashing Danger of scalding by hot steam
hot food and hot c
ondensed water
• Place a maximum filling quantity of 2 litres of food into • Mind hot steam escapes at the sides and from the top of
mixing bowl. Varoma lid during operation.
• Observe the fill level marks of mixing bowl. • Touch only the handles at both sides of Varoma.
• Use Thermomix TM31 only with correctly fitted, clean • Never use Varoma without Varoma lid.
sealing ring of mixing bowl lid. Inspect the sealing ring • Hold Varoma lid in such a way that the rising steam or
regularly for possible damage. In case of a damage or hot dripping liquid cannot come into contact with you
leakage exchange the sealing ring immediately, at the when taking it off.
latest every 2 years. • Mind hot steam which will continue to rise up out of
• Only open the mixing bowl lid after the processed food opening of mixing bowl lid when removing the entire
stops moving. This is especially important if you are Varoma.
using high speed levels above speed 5. • Keep children away from Thermomix TM31 when using
• Never try to open mixing bowl lid by force. Only open Varoma and warn them about the danger of hot steam
the mixing bowl lid after the speed selector is pointing to and hot condensed water.
open lid position. • Never overfill the simmering basket. Content must never
• Never turn the speed selector rapidly to the OPEN Posi- protrude over the top rim of the simmering basket.
tion when mixing hot food at higher speed levels from 4 Ensure that the hole in the mixing bowl lid remains free
and above. Always move to speed level 1 and then wait for of food. If the hole in the mixing bowl lid is blocked with
at least 3 seconds before moving it to the OPEN position. food and the heating is active, an overpressure can build
• Never use the turbo button or abruptly increase the up in the mixing bowl and the hot contents might escape
speed when processing hot food (Temperature above explosively. In this case there is a high risk of burns and
60°C), especially if it has not been heated in the injuries.
Thermomix TM31. Never hold the measuring cup when • Ensure that some slots of the Varoma dish and tray remain
processing hot food. free of food to avoid an uncontrolled escape of steam.
• Mind single spots of hot food escaping from o pening of
mixing bowl lid. Place the measuring cup correctly into
the opening leaving it in place especially when process-
ing hot food (e.g. jam, soup) at medium (3–6) and higher
Danger of injury by contact with
(7–10, Turbo) speed levels. hot parts
• When processing hot food (for temperatures above 60 °C)
• Keep the appliance always out of children’s reach and
do not touch the measuring cup or press the Turbo button.
warn children that the mixing bowl and Varoma will
• Do not use Varoma temperature to heat up or cook
heat up.
large quantities of food.
• Use only low speed levels ( –2) when selecting Varoma
temperature. Higher speed levels can lead to splashing
of hot food or frothing up of liquid.
• Be sure to place the Thermomix TM31 on a clean, solid,
even and non-heatable surface, particularly when using
the Varoma.
• Be sure to position the Varoma correctly onto mixing
bowl and appliance.
6 Notes for your Safety
Danger of injury by usage of not Risk of damage
intended items or equipment
• By hot steam: Ensure a sufficient distance above
• Use only parts provided with the Thermomix TM31 Thermomix TM31 and Varoma i.e. below (suspended
(page 10–11) or original spare parts from Vorwerk cupboards, shelving) and around them to prevent damage
Thermomix. from hot escaping steam.
• Never use the Thermomix TM31 in combination with • By external heat source: Keep a sufficient distance
parts or equipment not provided by Vorwerk Thermomix. between the Thermomix TM31 and external heat sources
• Use only the Thermomix TM31 measuring cup to close such as radiators, hot plates, ovens, hobs, etc.
the opening in the mixing bowl lid. Do not cover mixing Do not place the Thermomix or its connecting cable on
bowl lid with towels or similar items. any heat source (e. g. hot plates, cooking elements, stove
• Use only the Thermomix TM31 spatula with safety disk or oven) because unintended turning on may cause
for stirring food in mixing bowl. Never use other items damage to the appliance.
such as spoons, cooking spoons or any other tools for • By leaking out food: Ensure sealing ring of mixing
stirring. These might get caught in the rotating mixing knife is fitted to the knife bearing. If there is no sealing
knife, possibly resulting in injury. ring the food to be mixed or cooked may leak out and
• Lock the mixing bowl lid before inserting the Thermomix damage the appliance.
TM31 spatula through the opening in the mixing bowl lid. • By insufficient cooling of Thermomix TM31:
Ensure ventilation openings on both sides of the appliance
are always free from splashes of fat, food leftovers or
suchlike and not covered. Otherwise damage of the
Property damage appliance may occur.
• By improper use: Use Thermomix TM31 only with
Thermomix TM31 can move alternating current and a mains power supply duly
installed by a specialist. The mains power supply voltage
• Place your Thermomix TM31 on a clean, solid, even
and mains frequency must correspond with the type
and non-heatable surface so that it cannot slip. Keep
plate (on the bottom of the main appliance).
Thermomix TM31 in a sufficient distance from the edge
of this surface to prevent it from falling down. When
preparing dough or chopping food, an imbalance can
develop in the mixing bowl which, under certain circum-
stances, may cause the whole appliance to move. Do
not, therefore, leave the appliance unattended while it is
operating as it might fall from the work surface.
Notes for your safety 7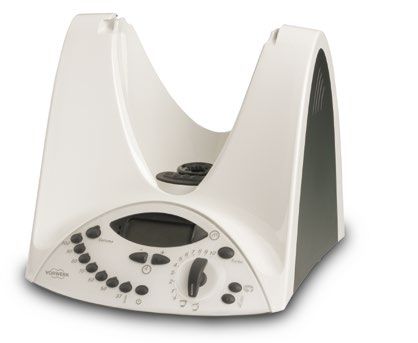
TECHNICAL
DATA

Symbol of conformity/
Mark of conformity

                                   R33534

Motor                    Maintenance-free Vorwerk reluctance motor 500 W rated power.
                         Speed continuously adjustable from 100 to 10,200 revolutions per minute
                         (Gentle stir 40 rpm).
                         Special speed setting (alternating mode) for dough preparation.
                         Electronic motor protection to prevent overload.

Heating system           1,000 W power consumption.
                         Protected against overheating.

Integrated scales        Measuring range from 5 to 100 g in 5 g increments;
                         100 to 2,000 g in 10 g increments (to max. 6 kg).

Housing                  High-quality plastic material.

Mixing bowl              Stainless steel, with heating system and temperature sensor integrated.
                         Maximum capacity 2 litres.

Connected load           Only for 220 … 240 V 50/60 Hz or 110 … 127 V 60 Hz alternating voltage
                         (see country details).
                         Maximum power consumption 1,500 W.
                         Pull-out connecting cable, 1 m long.

Country details          Canada                  Mexico            Taiwan
Motor                      400 W                   500 W             500 W
Heating system             900 W                 1,000 W           1,000 W
Max. power consumption   1,300 W                 1,500 W           1,500 W
Voltage                    120 V                   127 V             110 V

Dimensions and weight    excl. Varoma            Varoma
Thermomix TM31           height    30.0     cm   height 11.8 cm
                         width     28.5     cm   width  38.5 cm
                         depth     28.5     cm   depth  27.5 cm
                         weight     6.3     kg   weight  0.8 kg

8   Technical Data
INTRODUCTION/
CUSTOMER SERVICE
Dear Customer, If you have any questions or difficulties please do
not hesitate to contact:
Congratulations on having chosen the
Thermomix TM31! Your Thermomix TM31 advisor:
During a Thermomix TM31 demonstration, you experienced Name
and tested with your five senses the benefits of your new Telephone
Thermomix. An experienced Thermomix advisor helped Fax
you optimize the usage of all possible functions to your Mobile phone
individual needs. Email
Now you are ready to start taking advantage of your own Thermomix customer service: see page 42.
Thermomix. Preparing tasty and healthy food becomes
fast and easy. Vorwerk International Strecker & Co.
Cooking with Thermomix saves you time for other activities. Verenastrasse 39
8832 Wollerau
This instruction manual will familiarize you step by step Switzerland
with your new Thermomix. Please read it carefully. With
each step you will experience that we have considered This instruction manual is available in further
your interests and needs when we designed this high languages at www.thermomix.com
quality product.
The easy to understand step by step design of our recipes
will enable you to prepare your meals and dishes with
great success.
We wish you, your family and your friends a lot of fun with
your new Thermomix!
Vorwerk Thermomix
Version: 20120816/230_120
Introduction/Customer Service 9
YOUR
THERMOMIX TM31
                                                                               2

After opening the packaging please check that all Thermomix TM31
components are included. These are:
• Thermomix TM31 including mixing bowl and lid with sealing ring
• Simmering basket
• Stirring attachment (butterfly whisk)
• Measuring cup
• Spatula
• Varoma
• Recipe Cookbook
• Instruction Manual

   1

                                                                   3

                                                                       4

                                                                           5

10 Your Thermomix TM31
9
6
7
8
10 11 12
1 Main appliance
2 Mixing bowl
3 Mixing bowl base
13
4 Sealing ring for mixing knife
5 Mixing knife
14
9 Mixing bowl lid
10 Stirring attachment (butterfly)
11 Spatula with safety disk Varoma
12 Simmering basket 6 Varoma lid
13 Measuring cup 7 Varoma tray
14 Sealing ring for mixing bowl lid 8 Varoma dish
Your Thermomix TM31 11BEFORE
YOU START
Congratulations on purchasing the
Thermomix TM31!
Before using your Thermomix TM31 for the first time attend a demonstration
with a qualified Thermomix advisor. Familiarize yourself with using your
Thermomix TM31.
1
Before you start
Make sure to place your Thermomix TM31 on a clean, solid and even surface
so that it cannot slip. Keep your Thermomix TM31 in a permanent position
in your kitchen, so that you can operate it easily. Clean your Thermomix TM31
thoroughly before using it for the first time. Follow the instructions in the
chapter on cleaning (page 36).
2
How to insert the mixing bowl correctly
Before inserting the mixing bowl please always ensure that the speed selector
has been set to 1 . Insert the mixing bowl with the handle pointing to the
front and push it gently into position 2 – the grooves on the sides of the bowl
slide down the ridges on the shoulders of the appliance.
3
The mixing bowl has been inserted correctly if its handle is at the front, as
shown in picture 2 , and if the bowl itself is securely fixed in the appliance. To
close the mixing bowl correctly press the mixing bowl lid v ertically onto the
mixing bowl 3 . The a rrow must point to the handle of the TM31 bowl. Then
turn the lid in a clockwise direction 4 until you hear it “click” into place,
make sure to turn it all the way to the stop. Turn speed selector to closed lid
position ; otherw ise, the Thermomix TM31 cannot be switched on.
4
12 Before you startCAUTION
Danger of scalding by splashing hot food
Never try to open mixing bowl lid by force. Only open the mixing bowl lid after
the speed selector is pointing to open lid position and the food or liquid in the
TM bowl has stopped moving.
5
How to remove the mixing knife
To remove the mixing knife: Hold the mixing bowl with one hand, with
your other hand turn the mixing bowl base 30 degrees clockwise and pull
the mixing bowl base off downwards 5 . Carefully hold the upper part of
the mixing knife and remove it together with its sealing ring 6 .
6
CAUTION
Danger of injury from sharp mixing knife
Do not touch the blades of mixing knife. They are very sharp. Hold upper
part of mixing knife when removing or re-inserting it.
IMPORTANT:
Take precautions to prevent the mixing knife from falling out accidentally.
Before you start 13BEFORE YOU START
How to insert the mixing knife
To re-insert the mixing knife, follow the ‘removal’ steps in the reverse order.
Put the mixing knife back into the mixing bowl 1 by pushing it through the
opening in the bottom of the bowl 2 .
1
NOTICE
Risk of damage by leaking out food
Ensure sealing ring of mixing knife is fitted to the knife bearing. If there is
no sealing ring the food to be mixed or cooked may leak out and damage
the appliance.
Now re-fit the mixing bowl base from below onto the mixing knife. Push the
mixing knife through the opening in the bottom of the mixing bowl with one
hand. With your other hand hold the mixing bowl and turn (at the same time)
the mixing bowl base 30 degrees counter-clockwise to lock 3 .
2
3
14 Before you startACCESSORIES
Before you start using your Thermomix TM31 we would like to present its
accessories in more detail. They are proof of a well thought out design. Every
part has been designed intelligently and serves several purposes.
2.0 litre
Mixing bowl 1.5 litre
On the inside and on the outside of the mixing bowl there are marks indicating
the filling level 4 . Each mark corresponds to 0.5 litre. The mixing bowl has a 1.0 litre
maximum capacity of 2 litres 5 .
4 0.5 litre
CAUTION
Danger of scalding by splashing hot food
• Place a maximum filling quantity of 2 litres of food and/or liquid into
mixing bowl.
• Observe the fill level marks of mixing bowl.
maximum
capacity
of mixing
Mixing bowl base bowl
The mixing bowl base 6 is used to fasten and loosen the mixing knife within
the mixing bowl. The whole mixing bowl may be placed on any work surface.
There is no need to place a mat under the bowl. 5
IMPORTANT:
The mixing bowl base must be turned as far as it will go and locked. Never
place the bowl onto the appliance without first locking the mixing knife
and mixing bowl base in place. Failure to fit the mixing bowl base and mixing
knife correctly may result in damage to other parts of the Thermomix.
6
Accessories 15ACCESSORIES
Mixing bowl lid
The mixing bowl lid is used to close the mixing bowl. For safety reasons your
Thermomix TM31 will not start working unless the lid has been positioned and
locked correctly. Never try to force the lid open when the appliance is locked.
Take care to insert the sealing ring for the lid correctly. Put the lid upside down
1
on your work surface and position the ring onto the lid by pushing it into the
three hinges whereupon you can hear a “click” 1 . The sealing ring prevents
liquid or food from escaping between the mixing bowl and the lid.
CAUTION
Danger of scalding by splashing hot food
Use Thermomix TM31 only with correctly fitted, clean sealing ring of mixing
bowl lid. Inspect the sealing ring regularly. Should damage or leakage occur
2
replace immediately, at the latest every 2 years.
When cleaning the mixing bowl lid, remove the sealing ring and clean it separately.
Measuring cup
CAUTION
Danger of scalding by splashing hot food
• Be aware that single spots of hot food may escape from the opening of
mixing bowl lid. Place the measuring cup correctly into the opening
leaving it in place especially when processing hot food (e.g. jam, soup) at
medium (3–6) and higher (7–10, Turbo) speed levels.
• Do not cover mixing bowl lid with towels or similar items.
• Always place the measuring cup correctly in the mixing bowl lid and
ensure that it is not being pushed up by the contents of the simmering
basket. If the hole in the mixing bowl lid is blocked with food and the
heating is active, an overpressure can build up in the mixing bowl and
the hot contents might escape explosively. In this case there is a high risk
of burns and injuries.
The measuring cup is a multi-purpose item: it is a closing cap for the opening in
the lid to avoid heat loss and it prevents food to be mixed or cooked from escaping.
The measuring cup can be used to measure ingredients. A measuring cup filled
to the brim holds 100 ml, and a half-filled measuring cup (middle notch) 50 ml.
Place the measuring cup into the opening in the lid with its opening showing
upwards 2 .
16 AccessoriesOnly when using the butterfly whisk: position the measuring cup with the
opening pointing downwards. If you wish to add some liquid there is no need
to remove the measuring cup. Simply pour the liquid onto the lid. It will
gradually trickle into the mixing bowl.
To add ingredients through the opening in the lid lift the measuring cup and
add them into the mixing bowl.
3
Simmering basket
The simmering basket for the Thermomix TM31 is made of high-quality plastic.
Like the measuring cup, the basket is a multi-purpose item:
• Filtering of fruit and vegetable juices. Chop and make a puree in the
Thermomix TM31, then insert the simmering basket into the mixing bowl
4
and use it as a filter when pouring the juice out. When pouring the juice
use the spatula to hold the simmering basket 3 .
• Delicate food such as meatballs or fishballs that are not suited to be prepared
in the mixing bowl as a whole should be put into the simmering b asket. Here
they can be stewed or steamed.
• For cooking side dishes (e.g. rice, potatoes).
Removing the simmering basket is effortless: place the hook of the spatula
into the notch of the simmering basket 4 and lift the basket 5 . The spatula 5
can be removed at any time.
• The feet at the bottom of the simmering basket 6 allow liquid to drip off the
food in the basket.
• In case of reducing liquid in food (e.g. tomato sauce) put the simmering
basket as cover onto the lid 7 instead of the measuring cup.
CAUTION
Never overfill the simmering basket. Content must never protude over the 6
top rim of the simmering basket. Ensure that the hole in the mixing bowl lid
remains free of food. If the hole in the mixing bowl lid is blocked with food
and the heating is active, an overpressure can build up in the mixing bowl
and the hot contents might escape explosively. In this case there is a high
risk of burns and injuries.
7
Accessories 17ACCESSORIES
Spatula
The spatula 1 is another example of the intelligent design of the Thermomix.
• The Thermomix TM31 spatula is the only instrument you may use to mix or
stir the ingredients in the mixing bowl 2 . Push it from above into the bowl
through the opening in the lid. The safety disk ensures that the spatula is not
caught by the mixing knife. This means that you can use the spatula during
1
chopping, cooking or simmering.
• The spatula should be used to scrape all ingredients from the mixing bowl.
The tip of the spatula is shaped to fit exactly between the mixing knife
assembly and the wall of the mixing bowl.
• The spatula has a specially shaped safety disk to make sure that it does not
roll off the work top.
• When filtering fruit or vegetable juices use the spatula to hold the simmering
basket in place.
• Removing the simmering basket is effortless with the spatula (see page 17, 2
photo 4).
CAUTION
Danger of injury by usage of not intended items
• Use only the spatula with safety disk (provided with the Thermomix TM31)
for stirring food in mixing bowl.
• Lock the mixing bowl lid before inserting the spatula through the opening
in the mixing bowl lid.
• Never use other items such as spoons, cooking spoons or any other tools
for stirring. These might get caught by the rotating mixing knife, possibly
resulting in injury.
18 AccessoriesStirring attachment (butterfly)
• The butterfly 3 (here positioned on mixing knife 4 ) will help you to achieve
best results when whipping cream or beating egg whites. It is also the perfect
utensil for the preparation of creamy puddings or cream mixtures.
• When boiling milk or preparing puddings or sauces the butterfly allows a
constant movement of ingredients. This will prevent the food from sticking.
3
It is easy to insert and remove the butterfly: Insert the butterfly as shown in
the picture 5 . Its ball-shaped end ensures that it can be removed easily.
To remove the butterfly hold the ball-shaped end and pull it out with rotations
in both directions.
CAUTION
• Only switch on speed after the butterfly has been positioned into place.
4
• Do not select a speed higher than level 4 when the butterfly is fitted.
• Never use the spatula when the butterfly is f itted.
• Do not add ingredients that might damage or block the butterfly when the
mixing knife is in motion and the butterfly is fitted.
5
Accessories 19ACCESSORIES
Varoma
The Varoma 1 consists of three parts 2 :
• Varoma dish (bottom)
• Varoma tray (middle)
• Varoma lid (top)
All parts are made of high-quality, food compatible plastic.
1
NOTICE
• Always store the Varoma with its lid closed 1 .
• Use Varoma only with Thermomix TM31 (not suitable for microwave,
oven or other appliances).
2
How to combine the Varoma parts
You can use your Varoma in either of the following two combinations:
Combination 1:
Varoma dish plus Varoma tray and lid 2 .
Use this combination for cooking different foods, e.g. vegetables with meat or
fish, or a larger amount of the same food, e.g. yeast dumplings.
3
Combination 2:
Varoma dish plus Varoma lid 3 .
Use this combination for cooking large amounts of the same food, e.g. vegetables,
potatoes or large pieces of meat or sausages.
CAUTION
Danger of scalding by hot steam and hot condensed water
Never use Varoma without Varoma lid.
IMPORTANT:
If Varoma lid is not positioned properly, the steam will escape and the
food inside the V
aroma will not cook properly.
20 AccessoriesHow to use the Varoma correctly
Your Varoma is an accessory designed for the Thermomix TM31 and can only
be used with the TM31. Before you can start steam cooking with the Varoma
you will need to set up your Thermomix TM31 c orrectly.
Step 1: Set up Thermomix TM31.
4
Place the mixing bowl into position. Pour at least 0.5 litre (500 g) of water into
mixing bowl for up to 30 minutes steam cooking. If you steam cook with
simmering basket, insert the simmering basket and fill it with ingredients, e.g.
potatoes or rice. Close the mixing bowl with mixing bowl lid and lock it.
For a flavoursome variation you can use a vegetable broth or water-wine-mix
instead of water.
Step 2: Filling the Varoma. 5
Place Varoma lid upside down on your work surface 4 and position
Varoma dish on top – it fits precisely into the groove.
Now loosely fill Varoma dish with food 5 . Make sure that some slots remain
open so that the steam can spread evenly. As you fill the Varoma, put food
requiring longer cooking at the bottom, and food requiring shorter cooking at
the top.
Varoma lid underneath Varoma dish will stop the liquid from washed
vegetables, ripe fruit, raw meat or fish from wetting your work surface.
CAUTION
Danger of scalding by hot steam and hot condensed water
• Ensure that opening of mixing bowl lid and some slots of Varoma
dish and tray remain free, otherwise there can be uncontrolled escape
of steam.
• Be sure to position the Varoma correctly onto mixing bowl and
appliance.
Accessories 21ACCESSORIES
When using the Varoma tray, insert it into the Varoma dish. Make sure
Varoma tray is positioned loosely and evenly. Then place food onto it 1 .
Place Varoma upright into position onto locked mixing bowl lid (without the
measuring cup) in such a way that it sits well 2 .
Place the Varoma lid on top. It should be positioned loosely and evenly so
that it seals the Varoma well, allowing no steam to escape.
1
IMPORTANT:
Never leave the measuring cup in the mixing bowl lid when using the
Varoma. If Varoma lid is not positioned properly, not enough steam will
stay in the Varoma. This will slow down the cooking process.
CAUTION
2
Danger of scalding by hot steam and hot condensed water
• Mind hot steam escapes at the sides and from the top of Varoma lid
during operation.
• Keep children away from Thermomix TM31 when using Varoma and
warn them about the danger of hot steam and hot condensed water.
Danger of scalding by splashing hot food
• Use only low speed levels ( – 2) when selecting Varoma temperature.
Higher speed levels can lead to splashing hot food or liquid to froth up.
Step 3: Steam cooking with Varoma 3
All you need to do is select the time and Varoma temperature on the control
panel. The steam cooking process begins when you turn the speed selector 3
to a low speed setting ( – 2). The timer starts to count down. Water or water-
based liquid in the mixing bowl heats up to over 100°C, developing hot steam.
The steam rises through the opening in the mixing bowl lid of the Thermomix
TM31 into the Varoma. The food is cooked gently in the hot steam. Please
note that the maximum Varoma temperature is 120°C, depending on what
ingredients you are using, e.g. oil.
22 AccessoriesCAUTION
Danger of scalding by hot steam and hot condensed water
• Touch only the handles at both sides of Varoma.
• Hold Varoma lid in such a way that the rising steam or hot dripping
liquid cannot come into contact with you when taking it off.
• Mind hot steam which will continue to rise up out of opening of mixing
bowl lid when removing the entire Varoma. 4
When the ingredients are cooked or if you want to check whether they are
cooked, turn speed selector to closed or open lid position ( / ). In order
to open the Varoma, slightly incline the Varoma lid carefully to the front so
that the steam can escape on the back 4 . Take care to let the condensation
water drip into the Varoma dish and tray by holding the Varoma lid above
them.
Then carefully remove the Varoma lid and place it upside down onto the work
surface. Lift the Varoma dish and tray up, wait some seconds so that the
condensed water drips onto mixing bowl lid. Then place Varoma dish and
tray onto Varoma lid.
Accessories 23ACCESSORIES
Practical work with the Varoma
This description explains clearly how easy it is to use the Varoma. Observe
the following basic rules for using the Varoma:
• Place enough water in the mixing bowl.
IMPORTANT: 1
30 minutes steam cooking requires 0.5 litre (500 g) of water, for every
additional 15 minutes an a
dditional 250 g.
• The bottom of the Varoma dish and tray are both designed with an even
pattern of small slots to guarantee an even distribution of steam in the
Varoma. The food should always be positioned so that as many slots as
possible remain “free”. Laying the food in “loosely” is usually enough to
ensure this.
• You can cook foods of different consistency and hardness at the same time.
Place food requiring longer cooking at the bottom and food requiring less
cooking at the top, e.g. vegetables in the Varoma dish and fish on the
Varoma tray.
• The vegetables will be evenly cooked if you cut them into similar-sized pieces.
The cooking times stated are approximate. Cooking time varies depending
on quality, ripeness and size of the ingredients as well as your personal
preferences.
• Grease the Varoma dish and tray to make sure that ingredients such as meat,
fish or dough do not stick.
• Do not thicken your sauces and soups until the steam cooking process is
finished. Thickeners may stop steam from forming evenly in the mixing bowl
and slow down the overall cooking process.
• You can also turn the Varoma lid upside down and use it as a drip collector
for the Varoma dish and the Varoma tray 1 . It can also be used as a tray
to serve food directly from the Varoma.
24 AccessoriesWORKING WITH THE
THERMOMIX TM31
NOTICE
Thermomix TM31 can move
Place your Thermomix TM31 on a clean, solid, even and non-heatable
surface so that it cannot slip. Keep a sufficient distance from the edge of
this surface to prevent Thermomix TM31 from falling down.
2
Risk of damage by hot steam
Ensure a sufficient distance above Thermomix TM31 and Varoma
(suspended cupboards, shelving) and around them to prevent damage from
hot escaping steam.
Find a permanent place in your kitchen for your Thermomix TM31 right from
the start so that it is ready at hand whenever you need it.
Starting the Thermomix TM31
Pull the electric cable lightly from the housing and connect it to the mains
supply. You can choose whatever length of cable you need, up to 1 m. If you do
not need the whole length of the cable the remaining length can be kept inside
the Thermomix TM31 avoiding any tiresome “spaghetti” of cables! Make sure
that there is no strain on the cable so that the scales work properly. Do not
place the appliance on the cable. If you do, the appliance will not sit firmly on
the surface and the scales will not weigh accurately. Now the appliance is
operable and the display shows the timer mode 2 .
The appliance is activated or switched into sleep mode by pushing the button.
Before you start using your Thermomix TM31 consider the following tips to
make your work easier:
A safety device is provided which prevents the Thermomix TM31 from operating
if the mixing bowl has not been inserted properly and the lid has not been
correctly locked (speed selector is blocked). Likewise, a safety device prevents
the lid from opening while the appliance is operating.
Working with the Thermomix TM31 25WORKING WITH THE THERMOMIX TM31
The electronic scales work within a temperature range between –20°C and
+50°C (4°F and +122°F). If the appliance has been transported in winter and
the temperature falls below –20°C (–4°F) wait until the Thermomix TM31 has
reached room temperature again. In this way, the integrated scales will work
perfectly. If you do not need your Thermomix TM31 for a prolonged period of
time please disconnect it from mains supply as you do with most electric appli-
ances (economizing on power consumption; see also: “Sleep mode”, page 35).
NOTICE
Risk of damage by insufficient cooling of Thermomix TM31:
Ensure ventilation openings on both sides of the appliance 1 are always
1
free from splashes of fat, food leftovers or suchlike and not covered.
Otherwise damage of the appliance may occur.
Explanation of symbols on control panel
Timer buttons Button for dough mode Closed lid
Temperature buttons Tare button for scales Open lid
Gentle stir setting Button for clockwise/ Sleep mode button
counter-clockwise operation
26 Working with the Thermomix TM31Multi-function display
In the centre at the top of the control panel there is a digital display.
This display provides the following information:
• Weighing mode
• Timer mode
• Counter-clockwise operation has been chosen
2
• Thermomix in dough mode
The symbols and are displayed to indicate if the appliance is in
weighing or timer mode.
The latter two operating modes as well are indicated by their respective
symbols ( or ).
3
Weighing and adding with the tare button
The integrated scales allow you to weigh all ingredients directly in the mixing
bowl and in the Varoma. Please observe the following sequence of steps:
Step 1: Insert mixing bowl. The display will show the timer 00:00 2 .
Step 2: Press tare button. Wait for the tone “beep” and the display will show
the scales 0.000 3 . 4
IMPORTANT:
When pressing the tare button do not touch the Thermomix or lean
anything against it.
Step 3: Put in the first ingredient (2.0 kg max.) and check the quantity on
the display 4 .
Step 4: If you wish to add more ingredients push the tare button again and
add the next ingredient.
Repeat these steps as often as required to the maximum weight (6 kg).
The variation for up to 2 kg is +/–30 g.
Working with the Thermomix TM31 27WORKING WITH THE THERMOMIX TM31
Further information about weighing
The tare function works from 5 g to 6.0 kg in steps of 3 times 2 kg. When
weighing and adding ingredients with the help of the tare function always add
ingredients slowly because two to three seconds are needed before the scales
show the correct weight.
If you remove an ingredient from the mixing bowl after you have pressed the
1
tare button, the information on picture 1 will appear on the display.
When adding ingredients with the help of the tare function do not add more
than 2.0 kg at a time. If you add more than 2.0 kg at a time the display will
start flashing, indicating an overload 2 .
Always press the tare button first before weighing or using the tare function.
This will increase the accuracy of the scales. Please be careful not to move the
appliance during the weighing process. 2
After pressing the tare button the Thermomix remains in the weighing mode
for 5 minutes unless another button is pushed or the speed selector is turned.
After these 5 minutes the Thermomix returns to the timer mode. When the
tare button is pressed once more the 5 minutes start again.
The display provides you with valuable information when weighing or adding
ingredients. Remember to observe the maximum of 2.0 kg per adding process.
28 Working with the Thermomix TM31Timer buttons and timer display
Observe the following sequence of steps if you wish to prepare or heat food in
your Thermomix TM31:
Step 1: Select a time
Use the timer buttons to preset an o perating time of up to 60 minutes 3 .
Press the + to increase time and the – button to reduce it. To change time
gradually, press the button briefly. Press and hold the + button to increment
the timer display rapidly, e.g. 4 .
3
Time selection:
0–1 minute in increments of 1 second
1–10 minutes in increments of 30 seconds
10–60 minutes in increments of 1 minute
When the display is in the zero setting you can preset the time directly to
1 minute by briefly pressing the – button; therefore you do not have to count up
in increments of 1 second. Then proceed as indicated above. 4
Press both buttons simultaneously to set the displayed time to 00:00 3 .
Step 2: Select a temperature (see page 30 ff.)
Select the appropriate temperature if the food should be heated or cooked.
If not proceed with step 3.
Step 3: Turn the speed selector (see page 32 ff.)
After the speed selector has been turned, the preset time is counted backwards
in steps of one second, until 00:00 is reached.
When the appliance is in cold mixing mode the mixing speed switches off after
the preset time has expired. A buzzer will sound to indicate that the job has
been completed.
When the appliance is in heating or cooking mode the mixing knife will
continue to rotate in the gentle stir setting after the preset time has expired.
To switch off the buzzer turn the speed selector back to / .
IMPORTANT:
Heating and cooking are only possible if a time period has been preset.
Working with the Thermomix TM31 29WORKING WITH THE THERMOMIX TM31
Adjustment of preset time
The preset time can be changed at any time during preparation.
Press the – button to reduce the time, press the + button to increase it. If the
speed selector gets turned to / before the preset time has expired, for
example in order to add another ingredient, the display will flash, indicating
the current time, until the speed selector is turned. Food preparation can
thus be continued without difficulty. If you wish again to stop the mixing pro-
1
cedure altogether before the preset time has expired, press both timer but-
tons simultaneously. This will stop the display flashing and you may reset the
time. If no time has been preset and the speed selector is activated the appli-
ance will automatically stop after a maximum time of 60 minutes. After this
time, a buzzer will sound.
Temperature buttons and illuminated
temperature indicators
The temperature buttons can be used to set a temperature between 37°C and
100°C (99°F and 212°F). Each button has a coloured indicator lamp 1 which
will flash after the respective button has been pressed:
37°C (99°F)...................................................... = green
50°C and 60°C (122°F and 140°F)................. = yellow
70°C and 80°C (158°F and 176°F)................ = orange
90°C, 100°C and
Varoma (194°F and 212°F).................................. = red
The illuminated temperature indicators are points of reference. When the
preset temperature has been reached during cooking the indicator lamp stops
flashing and changes to continuous mode. The illuminated indicators show the
temperature that has been reached during the heating process. For example, if
a temperature of 90°C (194°F) is set the related light will start flashing. As the
Thermomix heats up the lights for 37°C, 50°C, 60°C, 70°C and 80°C (99, 122,
140, 158 and 176°F, respectively) light up one after the other until 90°C (194°F)
is reached. At this point this light changes from flashing to continuous mode.
The illuminated temperature indicators are approximate values.
Always ensure that none of the coloured indicator lights is flashing if you do
not wish to heat or cook food. Otherwise, switch off the heating function by
pressing the button. This will prevent unwanted heating of ingredients in
the mixing bowl if a time has been preset.
30 Working with the Thermomix TM31Indicator for remaining heat
If the mixing bowl is re-inserted into the appliance while it is still warm the
relevant light will show its remaining temperature (only 1 lamp in continuous
mode, e.g. 2 remaining heat 60°C). No temperature for warming up, cooking
and steam-cooking can be set unless a time has been preset. Therefore please
always proceed as follows:
Always start by setting a time, then choose the temperature, followed by speed
2
selection.
Soft start (above 60°C/140°F)
If the turbo button is pressed or the speed selector actuated while the
temperature in the mixing bowl is 60°C (140°F) or above 2 , the electronic
system prevents the food from escaping by delaying the speed increase.
This soft start only works if the food has been heated up or cooked in the
Thermomix TM31. Then the temperature sensor can measure the actual
temperature correctly and control soft start accordingly. If using the
Thermomix TM31 to process food that has not been heated or cooked in
the appliance (e.g. preparing a gravy from hot meat juices) you should only
increase the speed slowly and gradually.
CAUTION
Danger of scalding by splashing hot food
Never use the turbo button or abruptly increase the speed when processing
hot food (Temperature above 60°C), especially if it has not been heated in
the Thermomix TM31. Never hold the measuring cup when processing hot
food.
Gentle heating setting
Speeds 2 and 3 are designed as gentle heating setting. When these speeds are
selected the temperature will rise slowly leading to gentle c ooking of the food.
Working with the Thermomix TM31 31WORKING WITH THE THERMOMIX TM31
Varoma temperature setting
If the Varoma temperature setting 1 is selected, temperatures of up to
120°C (248°F) may be reached, depending on what ingredients you are using,
e.g. oil. During 15 minutes at Varoma temperature setting 250 g water or
water-based liquids evaporate. This temperature setting is used for steam
cooking (see page 21 ff.) and sautéing ingredients.
NOTICE
Never heat up the mixing bowl when empty. 1
Speed selector
Turn the speed selector to start the Thermomix TM31. The following speeds
are available:
2
Designation Speed level Revolution/min.
Gentle stir 40
Stirring 1–3 100–500
Mixing/blending 4–10 1,100–10,200
Turbo mixing Turbo 10,200
Gentle stir setting
The gentle stir setting 2 can be selected using the speed selector. At this
setting, the food is stirred slowly in the same way as if you periodically stirred
some food in a sauce-pan. If this setting is selected, the food is not chopped
and large chunks remain.
Stirring
Use the lower speeds 1–3 for gentle mild stirring. This lower speed range is
ideally suited for delicious stews!
32 Working with the Thermomix TM31Mixing/blending
Use the speed range from 4 to 10 3 for coarse, fine and very fine chopping,
mixing and blending. Always be sure to put the speed selector slowly to its
desired position with the measuring cup inserted. This will prevent the food to
be chopped from escaping.
Mixing/blending of hot food
3
Always move the speed selector to position 1 first 4 and then wait for
3 seconds 5 before moving it to the OPEN position 6 .
····
···
····
CAUTION
Danger of scalding by splashing hot food
Never turn the speed selector rapidly to the OPEN Position when mixing
hot food at higher speed levels from 4 and above. Always move to speed
level 1 and then wait for at least 3 seconds before moving it to the OPEN 4
position.
Turbo button
Use the turbo button 7 to operate the Thermomix TM31 at maximum speed.
The turbo function only works as long as this button is pressed and held.
5
3 Sec
It is also useful for an “alternating” mode. If, for example, you wish to coarsely
chop a large quantity of food, press the turbo button 3 or 4 times (repeat as
necessary). In this way, the food will be chopped evenly.
The turbo function is available when the speed selector is set to or to speed
level 4 or above. When the speed selector is set to the timer is activated.
Turbo function is not available if the dough mode is activated.
CAUTION
6
Danger of scalding by splashing hot food
Never use the turbo button or abruptly increase the speed when processing
hot food (Temperature above 60°C), especially if it has not been heated in the
Thermomix TM31. Never hold the measuring cup when processing hot food.
7
Working with the Thermomix TM31 33WORKING WITH THE THERMOMIX TM31
Clockwise/counter-clockwise operation
Press the button on the control panel 1 to reverse the rotating direction
of the mixing knife from clockwise to counter-clockwise. Pressing button is
possible at any speed selection and . 1
Counter-clockwise operation is indicated by the symbol on the display.
To switch off counter-clock-wise operation just press the button again.
Counter-clockwise operation is intended for gently stirring delicate food
which is not to be chopped.
2
Dough mode
Use dough mode 2 to make heavy yeast dough or bread dough. To activate the
dough mode set the speed selector to and press the button on the control
panel.
This will start the alternating operation to process the dough evenly in the
mixing bowl. This is an imitation of a special kneading procedure used in the
baking trade to achieve a high-quality dough.
Dough mode is only available if the mixing bowl has cooled down after cooking
to a temperature below 60°C (140°F). If the temperature is higher, a buzzer
will sound. To prevent accidental heating of bread dough the electronic system
blocks the heating system, Turbo button and counter-clockwise/clock-wise
button when dough mode has been selected.
NOTICE
Thermomix TM31 can move
Place your Thermomix TM31 on a clean, solid, even and non-heatable
surface so that it cannot slip. Keep a sufficient distance from the edge of
this surface to prevent Thermomix TM31 from falling down.
When preparing dough or chopping food, an imbalance can develop in the
mixing bowl which, under certain circumstances, may cause the whole
appliance to move. Do not, therefore, leave the appliance unattended while
it is operating as it might fall from the work surface.
34 Working with the Thermomix TM31THINGS
TO REMEMBER
Sleep mode First time use and high loads
If the Thermomix TM31 is connected to mains supply but When the appliance is used for the first time it may smell.
not used (speed selector is set to ) it will automatically If the motor is subjected to a high load during food
switch to standby (sleep mode) after approx. 15 minutes. preparation, the motor may overheat and start smelling,
The display will be blank. To re-activate the appliance in addition to the possibility of an automatic switch-off
press any button on the control panel. To switch the of the appliance. This is completely harmless and after the
Thermomix TM31 to sleep mode press and hold the cooling-down time indicated above, the appliance will
button for approx. 2 seconds until “OFF” appears on the again be in perfect working order.
display. The appliance can now be re-activated only by
a short press on the button. In sleep mode, power
consumption of the Thermomix TM31 is less than 1 W.
If you do not use the Thermomix TM31 for a prolonged
period of time disconnect it from mains power supply.
Electronic motor protection
All recipes in the Thermomix TM31 cookbook have been
developed in such a way that the motor protection will not
activate if all instructions are observed.
But even if quantities are exceeded, the motor is protected
by an automatic switch-off function. In such cases, the
display will show the error message “LOAd”. If the motor
has turned off:
• Put the speed selector to .
• Remove the mixing bowl from the appliance.
• Reduce the quantity contained in the bowl and/or add
some liquid.
• Wait for approx. 5 minutes (cooling down time).
• Re-insert the mixing bowl.
• Re-start the Thermomix TM31 by means of the speed
selector.
• If the error message “LOAd” is still displayed after the
cooling time please call our customer service.
Things to remember 35CLEANING
As with all kitchen appliances or tableware you should clean all parts of your
Thermomix TM31 – especially the mixing knife, the mixing bowl, the mixing
bowl lid and its sealing ring – thoroughly before using it for the first time and
after every usage.
How to clean the mixing bowl and its lid 1
Take apart the mixing bowl and mixing knife as well as mixing bowl lid and its
sealing ring (refer to pages 13, 14, 16).
CAUTION
Danger of injury from sharp mixing knife
Do not touch the blades of mixing knife. They are very sharp. Hold upper
part of mixing knife when removing or re-inserting it.
Now, clean the inside and outside of the mixing bowl (without the mixing
knife) 1 , either in hot water with cleansing agent and a soft cloth or in the
dishwasher; the mixing knife, spatula, butterfly, simmering basket, measuring
cup, mixing bowl lid and Varoma can be cleaned in the same way.
If food is sticking in the mixing bowl use a special cleansing agent for stainless
steel.
Ensure that the contact pins at the bottom of the mixing bowl are always
clean and dry. If necessary wipe them off. We recommend that you dismantle
the mixing bowl for cleaning, especially when you clean it in the dishwasher.
IMPORTANT:
Never use pointed or sharp objects for cleaning as this may damage
functional parts or affect the safety of the appliance.
36 CleaningHow to clean the mixing knife
To clean the mixing knife hold it under running water with the mixing knife
pointing upwards, as shown in picture 2 . In order to facilitate the cleaning,
use a brush or clean it in the dishwasher.
IMPORTANT: 2
Do not leave the mixing knife in dish water for a long time as this may
damage the gasket system of the knife bearing.
Carefully re-assemble the mixing bowl and mixing knife (incl. sealing ring).
How to clean the Varoma
3
To clean the Varoma wash dish, tray and lid carefully in warm, soapy water
or in the dishwasher.
Use a soft, clean cloth and gentle cleansing agents for cleaning 3 . Avoid using
sharp objects or metal scouring pads, as these will cause scratches.
IMPORTANT:
All components are dishwasher-safe. Place plastic parts, in particular
the mixing bowl lid, into the top rack of the dishwasher in order to avoid
deformation resulting from exposure to higher temperatures.
Some foodstuffs such as curry, carrot juice, and those with citric acid
content may cause staining. Wipe such substances off the mixing bowl
lid, its sealing ring, the spatula, the simmering basket and all Varoma
parts as quickly as possible. Any residual staining will disappear in time
and does not affect your health or how the parts function.
Cleaning 37CLEANING
How to clean the main appliance
Disconnect the appliance from mains power supply before cleaning.
WARNING
Danger of electric shock
• Disconnect the appliance from mains power supply before cleaning and 1
if appliance is not used for a prolonged period of time.
• Do not immerse the Thermomix TM31 in water. Clean with a damp cloth
only. No water or dirt must be allowed to enter the housing.
Wipe the main appliance with a damp soft cloth and a gentle cleansing agent 1 .
Use water sparingly to prevent moisture from entering the appliance.
Additional information for cleaning
Some of the plastic parts may become slightly discoloured but this does not
affect your health or how the parts function.
If the mixing bowl with mixing knife, mixing bowl lid and measuring cup are
only slightly soiled it is sufficient to perform a short mixing operation to clean
them. Therefore place approx. 1 litre water and a few drops of cleansing agent
into mixing bowl, select speed 5 or 6 and press the button several times.
Follow this operation by thoroughly rinsing with water and if necessary use a
soft cloth as well.
To improve ventilation during storage, do not close the mixing bowl with the
measuring cup.
38 CleaningYou can also read