TT-AV Sync Sensor (T7670) Installation and User Guide
←
→
Page content transcription
If your browser does not render page correctly, please read the page content below
TT-AV Sync Sensor (T7670) Installation
and User Guide
Thought Technology Ltd.
2180 Belgrave Ave. • Montreal, Que. Canada H4A 2L8
Phone 514.489.8251 • Fax 514.489.8255
www.thoughttechnology.com
TT AV Sync Sensor– Installation and User Guide 2

WARNING

   Photosensitivity
   Due to the slight risk of inducing photosensitive epileptic seizures, Thought
   Technology advises clinicians to proceed with caution when using repetitive EP/ERP
   visual stimuli protocols with BioGraph Infiniti 5.0 (Protocol Generator
   algorithm/Evoked Potential screen instrument) and the TT-AV Sync sensor. In most
   cases, if a seizure due to photosensitivity is likely, it will occur straightaway. If a
   seizure appears to be starting, the visual stimulus should be stopped immediately.
   For more information, please refer to guidelines provided by an organization such as
   the National Society for Epilepsy (UK), Epilepsy Foundation (USA), or Epilepsy
   Canada.

   Manual # SA7673 Rev. 5.0

TT AV Sync Sensor– Installation and User Guide                                           3

TT AV Sync Sensor– Installation and User Guide 4

Table Of Contents
WARNING....................................................................................................................... 3

FUNCTIONAL DESCRIPTION........................................................................................ 7
  SENSOR COMPONENTS .................................................................................................................. 7
PC REQUIREMENTS ..................................................................................................... 7

SETUP INSTRUCTIONS ................................................................................................ 8
  STEP 1. INSTALLING THE AV SYNC TEST AND CALIBRATION SCREENS .......................................... 8
  STEP 2. CONNECTING THE SENSOR ................................................................................................ 8
  STEP 3. SETTING SOUND DEFAULTS ............................................................................................. 10
  STEP 4. INITIAL SETTINGS CONFIGURATION ................................................................................. 13
ADVANCED CALIBRATION......................................................................................... 16
   AUDIO INTENSITY CALIBRATION ................................................................................................ 16
   VIDEO LUMINOSITY CALIBRATION ............................................................................................. 16
NOTES.......................................................................................................................... 17

DEVICE SPECIFICATIONS .......................................................................................... 18

PLACING ORDERS...................................................................................................... 19

TECHNICAL SUPPORT ............................................................................................... 19

WARRANTY.................................................................................................................. 19

RETURNING EQUIPMENT........................................................................................... 20

REPAIR RETURN FORM ............................................................................................. 21

TT AV Sync Sensor– Installation and User Guide                                                                                        5

TT AV Sync Sensor– Installation and User Guide 6

Functional Description
   The TT-AV Sync sensor provides accurate stimuli timing required during evoked
   potential, slow cortical potential and reaction time protocols. It detects changes in
   light emitted from a LCD or CRT monitor as well as the presence of audio signal
   output. It produces highly accurate, time-locked trigger signals which can be read by
   software through the ProComp 5, ProComp Infiniti and FlexComp Infiniti encoders.
   The sensor is connected to a PC which generates the audio and visual stimuli. For
   sound stimuli, the TT-AV Sync operates as a secondary sound device and plays the
   audio events generated by the PC.

Sensor components
  Included in the TT-AV Sync sensor kit (T7670) are the following:
    •   TT-AV Sync sensor

    •   Fiber optic cable kit (SA7671) – shown
        right. This brings video input to the
        sensor from a computer monitor. The
        cable is specially prepared and should
        never be cut (see section entitled Notes
        for more information). This kit is also
        available separately.

    •   USB cable. For connection of the
        sensor to a computer USB port.                     Fiber optic cable kit (SA7671)

    •   Sensor cables. Connects the sensor to the encoder. Two lengths are provided
        although only one cable is needed for operation.

    •   Headphones. These plug directly into the sensor to deliver audio stimuli to the
        subject.

PC requirements
   The following are particular to the use of the AV Sync sensor, and should be
   considered in addition to those of BioGraph Infiniti.

        -   The use of the AV Sync sensor requires at least BioGraph v4.0 (and may
            require a later version depending on the biofeedback screens employed).
        -   For visual stimuli protocols, the use of two monitors (with the Windows
            Desktop in dual monitor configuration) is recommended
        -   Second monitor type: CRT is recommended if maximum timing accuracy and
            precise luminosity are required. When using an LCD monitor for visual

TT AV Sync Sensor– Installation and User Guide                                              7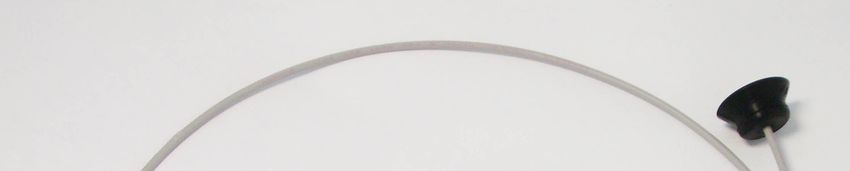
stimuli, it is recommended that the maximum brightness and contrast settings
            always be used.
        -   Video card: hardware memory should be a minimum of 64 MB; 128 MB or
            more is recommended (performance depends on size of bitmap images
            selected as visual stimuli in BioGraph Infiniti).
        -   PC must support Microsoft DirectX (DirectDraw, DirectSound). The
            necessary version is installed with BioGraph Infiniti.

Setup Instructions
    Ensure that the above PC requirements are met, then follow these steps:

    1. Install the AV Sync test and calibration screens, as per the following section,

    2. Connect AV Sync as described in Connecting the sensor,

    3. Configure audio settings as described in Setting sound defaults,

    4. Perform audio and video calibration using BioGraph Infiniti, as described in Initial
       settings configuration.

Step 1. Installing the AV Sync test and calibration screens
   If not yet done, insert the CD entitled TT-AV Sync Sensor – Screens for Testing and
   Calibration and follow the onscreen instructions.

   You will be asked to select your encoder from a list including FlexComp Infiniti,
   ProComp Infiniti and ProComp5 Infiniti. If you use more than one of these encoders,
   you may install only one of the choices. The tests are the same for all encoder types.

   AV Sync is not compatible with ProComp 2 or any TTL encoder other than those
   mentioned above.

Step 2. Connecting the sensor
                                                                 Fiber optic cable kit
        Secondary audio jack
                        jack
                                                                 Video only              Sensor cable
              Headphone jack

             USB cable to PC
                                                                 Mixed
                                                                 Audio only
                                                                 o
                                                                                }        connection to
                                                                                         ProComp or
                                                                                         FlexComp
                                                                                         encoder

TT AV Sync Sensor– Installation and User Guide                                                 8
1. Connect the sensor to the PC using a USB cable. This powers the sensor and
carries sound signals from the PC to the sensor. We recommend that you
consistently use the same USB port on your PC.
Note: If this is the first time you have connected the sensor to a particular USB port, this step will
cause automatic installation of the default drivers.
2. Plug headphones into the headphone jack. These are used to provide audio stimuli
to the subject.
For additional monitoring, the secondary audio jack can be used. Connect a second
pair of headphones or the PC speakers to the secondary jack. In both cases, the
use of non-powered headphones or speakers is recommended.
3. Connect the fiber optic screen attachment as
follows (AV Sync is best used on the second
monitor of a dual monitor configuration):
a) Attach the long strip of the hook-and-loop
fastener to the back of your computer monitor
(shown right).
b) Thread the fiber optic cable through the
grommets on the short strip (shown below).
c) Clean the computer monitor with an appropriate product or a soft cloth
dampened with plain water (always with the monitor turned off).
d) Slightly moisten the suction cup (distilled or
natural source water is recommended) and
attach it to the monitor (shown right).
Standard placement is halfway between top
and bottom of the monitor, along its leftmost
edge. You can later adjust the location of the
fiber optic cable using the AV Sync Test –
Video 1 screen in BioGraph Infiniti.
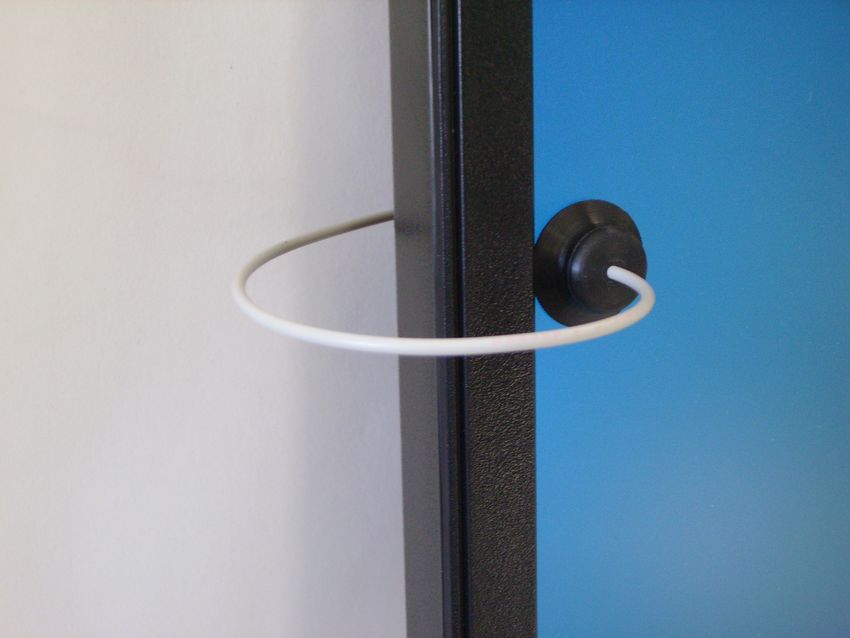
e) Connect the hook-and-loop on the fiber cable to the hook-and-loop strip on the
back of the monitor. Adjust cable length as desired. Radius of curvature should
be no smaller than the one shown above.
TT AV Sync Sensor– Installation and User Guide 9
4. Insert the other end of the fiber optic cable into the AV Sync sensor.

5. Connect the AV Sync sensor to the encoder using a sensor cable.
    Depending on the type of stimulus, you can choose Video only, Audio only, or
    Mixed. The Mixed output is useful for protocols in which stimuli can be either audio,
    video or both. In certain cases however, using the mixed output with audio-only
    protocols can lead to false triggers (caused by the video input from the fiber optic).
    In general, this connection should match the protocol type being used.

    Note: The AV Sync sensor is accurate to within 1 sample, and can be connected to any encoder
          input with 256 Hz sampling (maximum error 3.91 milliseconds) or 2048 Hz sampling (maximum
          error 0.49 milliseconds). This sensor and any associated sensors (depending on the
          application), must always be connected to encoder inputs with the same sampling rate.
          Associated sensors include the EEG-Z (SA9305Z) and EEG-Z3 (SA7680Z) for evoked and
          slow cortical potential averaging, and the push-button switch (SA7660) for reaction time
          measurements.

Step 3. Setting sound defaults
  The first time you connect the AV Sync sensor to any given USB port on the PC, the
  system will automatically install the correct device driver. (If you connect to a different
  USB port, the system reinstalls the driver and this procedure must be followed again;
  for this reason, we recommend always using the same USB port.)
  Once the device driver has been installed, MS Windows recognizes the AV Sync
  sensor as a sound device. Before you use the AV Sync sensor for the first time, you
  must set the sound defaults.

   WINDOWS XP:
   1. Do one of the following:

         •   Click the Start button. From Settings select
             Control Panel. In Control Panel, double-
             click Sounds and Audio Devices.
         •   Or, in the Taskbar Tray, right-click the
             Speaker icon, and select Adjust Audio
             Properties (shown above right).

    2. In Sounds and Audio Devices do the
       following:

         •   Click the Audio tab.

         •   In Sound playback, select USB audio
             CODEC as the default device (shown right).
             This is the AV Sync sound device driver.

TT AV Sync Sensor– Installation and User Guide                                                   10
• Click the Volume button for the Sound playback Default device.
• Set both the Speaker and the Wave volumes to maximum and close the
volume dialog box.
• Set the default device back to the original PC sound card. This should be
done wherever the USB audio Codec is selected as the default device. This
is normally in the following areas:
i. Audio Tab – Sound playback and Sound recording
ii. Voice Tab – Voice playback and Voice recording
Note: The previous steps ensure that AV Sync plays and triggers on audio stimuli, while
allowing regular PC and BioGraph feedback audio to be played through the original PC
sound card (and hence speakers or headphones connected to the PC audio jacks).
Windows will retain these settings as long as you continue to use the same USB port.
Important: The speaker volume also controls the output of the audio stimuli. This setting can be
lowered but there is a level below which the AV Sync will no longer produce timing
triggers. If software volume control is desired, it is recommended that this level be found
during a session test (see section entitled Audio Triggering Verification). For best
results set these volumes to maximum and use a headset or speakers with adjustable
volume control.
• To finish editing settings and keep your changes, press Apply, then OK.
TT AV Sync Sensor– Installation and User Guide 11WINDOWS VISTA:
1. Do one of the following:
• Click the Start button. Select Control
Panel. In Control Panel, click Sounds.
• Or, in the Taskbar Tray, right-click the
Speaker icon, and select Playback Devices
(shown right).
2. In Sounds window, do the following:
1
• Click the Playback tab.
• Select Speakers - USB audio CODEC
(shown right, arrow 2). This is the AV Sync 2
sound device driver.
• Click the Properties button.
• Select the Levels tab. Set the volume level
to maximum (shown below) and click OK.
• Select the original PC sound card, this should be called Speakers, followed
by the name of your PC sound card (shown above right, arrow 1). Click the
Set Default button. Afterwards, the icon for this device should have a green
check mark next to it. This means your original PC sound card is now the
default sound device, as it should be.
TT AV Sync Sensor– Installation and User Guide 12Note: The previous steps ensure that AV Sync plays and triggers on audio stimuli, while
allowing regular PC and BioGraph feedback audio to be played through the original PC
sound card (and hence speakers or headphones connected to the PC audio jacks).
Windows will retain these settings as long as you continue to use the same USB port.
Important: The speaker volume also controls the output of the audio stimuli. This setting can be
lowered but there is a level below which the AV Sync will no longer produce timing
triggers. If software volume control is desired, it is recommended that this level be found
during a session test (see section entitled Audio Triggering Verification). For best
results set these volumes to maximum and use a headset or speakers with adjustable
volume control.
• To finish editing settings and keep your changes, click OK.
Step 4. Initial settings configuration
Variations in video and audio settings (monitor brightness or playback volume, for
example) could potentially disable the AV Sync sensor's operation. Furthermore,
incorrect video settings could introduce undesirable timing delays. For these
reasons, we recommend briefly testing the AV Sync sensor prior to first use. It
should be tested again if audio or video settings are modified.
These tests can be performed using the AV Sync test files for BioGraph Infiniti, and
after connecting and configuring AV Sync as described above.
AV Sync test files
FlexComp Infiniti Channel set: FI – AV Sync Test
ProComp Infiniti Channel set: PI – AV Sync Test
ProComp5 Infiniti Channel set: P5 – AV Sync Test
Screens: AV Sync Test – Video 1
AV Sync Test – Video 2
AV Sync Test – Audio
Video triggering verification
As ambient lighting may interfere with this verification, it is recommended that the
following video tests be performed with minimal ambient lighting. In some cases, it
may be required to turn off all ambient lighting. These video tests serve to verify the
limits of operation of the sensor. Ambient lighting should not affect normal operation
of AV Sync, although shining direct light on the fiber optic cable and suction cup
TT AV Sync Sensor– Installation and User Guide 13should be avoided. For more information on proper usage of the fiber optic cable,
see the Notes section of this document.
1. Begin a recording session in BioGraph Infiniti using the appropriate channel set
and the AV Sync Test – Video 1 screen.
• Follow the on-screen instructions. This test will help to adjust the position
of the fiber optic cable on the monitor to ensure proper operation.
2. Begin a recording session in BioGraph Infiniti using the appropriate channel set
and the AV Sync Test – Video 2 screen.
• Follow the on-screen instructions. This test will serve to find the limits of
the brightness and contrast settings to ensure proper operation.
Audio triggering verification
Below a certain software volume setting, the AV Sync will stop producing triggers for
audio stimuli. To find the minimum setting, follow these steps:
WINDOWS XP
1. Do one of the following:
• Click the Start button, and from Settings select Control Panel. When
Control Panel opens, double-click Sounds and Audio Devices.
• Or, in the Taskbar Tray, right-click the
Speaker icon, and select Adjust Audio
Properties (shown right)
2. In Sounds and Audio Devices do the following:
• Click the Audio tab.
• Switch the Sound playback default
device to USB audio CODEC (shown
right). This is the AV Sync sound device
driver.
• Click the Volume button for the Sound
playback Default device.
• Leave the Volume control open, and
ensure that the status bar indicates USB
Audio codec.
TT AV Sync Sensor– Installation and User Guide 14• Switch the Sound playback default device back to the original PC sound
device
• Click OK to close the Sounds and Audio Devices dialog box (the Volume
control window should remain open).
3. Begin a recording session in BioGraph Infiniti using the appropriate channel set
and AV Sync Test – Audio screen.
• Follow the on-screen instructions.
• Use the USB Audio CODEC Volume control to adjust the Speaker volume as
per the instructions to find the minimum acceptable volume.
• Make a note of this minimum setting and ensure that the volume is always
set a little bit above this level.
• For most applications, it is recommended that the volume be set to maximum
and that a headset with adjustable volume control is used.
WINDOWS VISTA
1. Do one of the following:
• Click the Start button. Select Control Panel.
In Control Panel, click Sounds.
• Or, in the Taskbar Tray, right-click the
Speaker icon, and select Playback Devices
(shown above right).
2. In Sounds window, do the following: 1
• Click the Playback tab.
• Select Speakers - USB audio CODEC 2
(shown right, arrow 2). This is the AV Sync
sound device driver.
• Click the Properties button.
• Select the Levels tab..
TT AV Sync Sensor– Installation and User Guide 153. Begin a recording session in BioGraph Infiniti using the appropriate channel set
and AV Sync Test – Audio screen.
• Follow the on-screen instructions.
• Use the Speakers Properties – Levels control to adjust the Speaker volume
as per the instructions to find the minimum acceptable volume.
• Make a note of this minimum setting and ensure that the volume is always
set a little bit above this level.
• For most applications, it is recommended that the volume be set to maximum
and that a headset with adjustable volume control is used.
Advanced calibration
Audio intensity calibration
The AV Sync and associated software features for audio stimuli presentation, do not
provide a means to set audio intensity level. If an exact level of intensity is required
for audio stimuli protocol, an off-the-shelf decibel (dB) meter can be purchased from
an electronics store and used to calibrate the AV Sync audio output. The procedure
outlined above in section Audio triggering verification can be used to adjust the
audio volume to the desired level on the dB meter.
This method can also be used simply to control the audio stimuli volume during a
session. As mentioned above, knowledge of the minimum functional volume is
important to ensure proper operation.
Video luminosity calibration
Similarly, if an exact level of luminosity is required in a visual stimuli protocol, an off-
the-shelf light meter can be purchased and used to calibrate the output of the
monitor being used. Brightness and contrast settings can be adjusted to achieve
the desired luminosity reading on the meter. When changing these settings, ensure
that they remain within the functional boundary determined by the Video triggering
verification outlined above.
TT AV Sync Sensor– Installation and User Guide 16Notes
• Never cut the fiber optic cable. The ends should never be modified in any way.
• Avoid shining bright light directly on the fiber optic cable and suction cup during
use; it may cause false triggering or cessation of operation.
• Avoid sharp bends in the fiber optic cable (less than 4’’ bend diameter).
• Clean your monitor regularly, as the suction cup can leave a small residue on the
surface.
• BioGraph will give messages indicating the status of AV Sync. This includes the
connection status, the default audio device status and some other information.
These messages all relate to topics covered in this manual. If any of them seem
unclear, please contact technical support.
• Replay mode in BioGraph Infiniti does not require the AV Sync to be connected.
When replaying audio protocols without AV Sync, the left speaker will play the
audio stimulus while the right will play a loud tone. This tone is the audio timing
control tone. Set the balance completely to the left to eliminate this tone during
playback.
• Multiple screens designed for use with AV Sync should not be loaded within
BioGraph at the same time. Ideally, only the screen used to run a live session
with AV Sync should be loaded on its own.
• Disconnecting the AV Sync during a recording session may cause BioGraph
Infiniti to crash or hang. Refrain from disconnecting AV Sync during a live
session.
• Important note about visual stimuli presented in full screen mode: When an
application is playing a video in full screen mode and another application is
selected, Windows XP will automatically minimize the full screen video (even if
the application selected is in the primary monitor and the full screen video is in
the secondary). When this video is part of an AV Sync visual protocol in
BioGraph Infiniti, this behaviour can cause premature termination of the protocol
(in the worst case) and false triggers in the session (in the best case). BioGraph
Infiniti has been designed to automatically correct for this behaviour by forcing
the full screen video back into maximized state. It will also automatically place a
rejection segment in the session at the time of the error. This will continue until
focus is returned to BioGraph Infiniti. When this happens, the best thing to do is
use Alt-Tab to return to BioGraph Infiniti. The user can also minimize the
programs that have taken focus. Selecting BioGraph from the taskbar will not
correct the problem. It is recommended when running sessions with AV Sync to
close all other programs other then BioGraph Infiniti, and to disable any
background software that may begin running sporadically and spontaneously
(e.g. screen saver, instant messenger, etc).
TT AV Sync Sensor– Installation and User Guide 17Device Specifications
Specification Value
Audio detection accuracyPlacing Orders Outside USA Tel: 1-514-489-8251 Fax: 1-514-489-8255 In USA Toll-Free Tel:1-800-361-3651 E-Mail: mail@thoughttechnology.com Or contact your local authorized distributor. Technical Support Outside USA Tel: 1-514-489-8251 Fax: 1-514-489-8255 In USA Toll-Free Tel:1-800-361-3651 E-Mail: techsupport@thoughttechnology.com Or contact your local authorized distributor. Warranty The AV Sync sensor is guaranteed to be free from defects in material and workmanship for 1 year from the date of purchase. In the unlikely event that repair is necessary, contact Thought Technology Ltd. to receive a Return Authorization number. Then send the unit back by a traceable method. Thought Technology will not be responsible for items not received. We will repair or replace your unit(s) that are still under warranty free of charge. This warranty does not apply to damage incurred through accident, alteration, or abuse. TT AV Sync Sensor– Installation and User Guide 19
Returning Equipment

       Be sure to contact us for a return authorization number (RA) before returning any
                                           equipment!

   1. Send the unit(s) postage prepaid and insured, with proof of purchase to one of
      the addresses below.

   2. If you are shipping from outside Canada and the USA to Canada, label the
      package ‘Goods to be repaired - Made in Canada’ to avoid unnecessary
      customs charges. All customs and duties charges will be billed to you if incurred
      by sending the unit without this label or to the wrong address.

   3. Provide a detailed description of the problem you are experiencing and your
      telephone/fax number (see form on the last page of this manual).

   In the USA, ship insured to:

                Thought Technology Ltd.
                Cimetra LLC
                20 Gateway Drive
                Plattsburgh, New York
                12901, USA
   In Canada and all other countries, contact your dealer or ship insured to:

                Thought Technology Ltd.
                2180 Belgrave Avenue
                Montreal, Quebec
                Canada H4A 2L8

   Contact information for service

                                          Canada and International +1 514 489-8251

                                          USA 1-800-361- 3651

                                         service@thoughttechnology.com

TT AV Sync Sensor– Installation and User Guide                                         20
Repair Return Form
Be sure to contact us for authorization before returning any equipment!
Remove this sheet and include with returned unit(s).
Include copy of original invoice and return to the address in the Returning Equipment section.
Name
Company
Address
Phone No.
Fax No.
Date Purchased
From Whom
Model Name
Serial Number
Problem
TT AV Sync Sensor– Installation and User Guide 21You can also read