Use offense to inform defense. Find flaws before the bad guys do - SANS.org
←
→
Page content transcription
If your browser does not render page correctly, please read the page content below
Use offense to inform defense.
Find flaws before the bad guys do.

                           Copyright SANS Institute
                           Author Retains Full Rights
  This paper is from the SANS Penetration Testing site. Reposting is not permited without express written permission.

Interested in learning more?
Check out the list of upcoming events offering
"Web App Penetration Testing and Ethical Hacking (SEC542)"
at https://pen-testing.sans.org/events/
WAR PI
                        GIAC (GCIH) Gold Certification

                  Author:!Scott!Christie,!scottochristie@gmail.com!
                            Advisor:!Christopher!Walker!

                           Accepted:!December!10th,!2013!
                                         !

                                        Abstract!
Somewhere!between!the!portability!of!a!smartphone!and!configurability!of!a!laptop!
lies!the!Raspberry!Pi!with!its!capabilities!as!a!powerful!and!portable!WiNFi!scanning!
device.!This!device!runs!contemporary!wireless!analysis!tools!and!supports!most!
industry!used!accessories!including!external!WiNFi!adaptors!and!GPS!receivers.!
When!compared!to!dedicated!wireless!analysis!devices,!like!those!from!Fluke!
Networks!and!Metageek’s!WiNSpy,!the!Raspberry!Pi!solution!is!affordable!and!
customizable!to!most!environments.!

!                                                          !
                             [VERSION!1!November!2013]!
!                                                          !
War-Pi! 2
!

1. Introduction
1.1. Why the Pi
       Wardriving requires a computer system with the proper tools installed and a Wi-
Fi receiver. Locating Wi-Fi access points has evolved from lugging large computers
around in cars, to wardriving apps on smartphones such as WiGLE Wi-Fi Service for
Android devices (WiGLE, 2013). However, power and configurability are sometimes lost
with the increase of portability and smaller size. With the configurability of a laptop, and
the portability of smartphone, the Raspberry Pi platform is a powerful wireless sniffing
device in a small package (Upton, Halfacree, 2012).

       The Raspberry Pi can be configured to run Linux and most applications, yet is
small enough to fit in a pocket. This device runs most USB devices (it has 2 USB ports)
and draws power from a micro USB charger or a battery. Also, the Raspberry Pi is an
affordable platform costing around $35.00 (Raspeberrypi.org, 2013).

       With the right devices and some setup, the Raspberry Pi is an excellent wireless
analysis tool. The system can also be configured to begin scanning for wireless at boot
without user action, enabling use as an appliance. The hardware will maintain relevance
as long the Raspberry Pi Foundation keep building the devices, but the techniques will
carry on as long as Wi-Fi is still the standard for wireless networking. With tools and
functionally equivalent to a laptop, this device is easily carried in a small bag, mounted
on a bicycle, or even strapped on a dog for a walk. This is no longer wardriving - this is
war-walking, biking, dogging, etc.

1.2. Why the Pi
       Wardriving with the Raspberry Pi is not just about security, but also threat
management. Three important reasons to utilize the Raspberry Pi for wireless analysis
are:

           ● Regulatory compliance requiring wireless scans (e.g. PCI)

           ● Identifying unaffiliated APs to prevent access to unauthorized networks

           ● Monitoring wireless access point connections to verify clients

Author!Name,!email@address!                   !                                                !
War-Pi! 3
!
       First, there is a need to scan within a corporate environment for unauthorized or
misconfigured access points. If a network is supposed to be secured, a rogue access point
(malicious or not) creates an entry point for unauthorized devices and users.
Misconfigured access points can also open the network or prevent access for users in a
particular area. The PCI Data Security Standard 2.0 specifically calls out this risk in
section 11.1:

       Test for the presence of wireless access points and detect unauthorized wireless
access points on a quarterly basis.

And again in subsection 11.1.b:

Verify that the methodology is adequate to detect and identify any unauthorized wireless
access points, including at least the following: (PCI Security Standards Council, 2010).

           ● WLAN cards inserted into system components

           ● Portable wireless devices connected to system components (for example,
       by USB, etc.)

           ● Wireless devices attached to a network port or network device

       Scanning the physical corporate area with a Raspberry Pi is an effective method
to locate rogue and misconfigured access points. These access points can later be
removed or properly configured.

       Reports generated during wireless assessments can be provided to PCI auditors as
evidence and artifacts of meeting PCI section 11.1. However, it is still up to the PCI-QSA
to determine if the performed assessment was appropriately completed and acceptable.

       Another scenario for using such a device is to scan the area for neighboring
unaffiliated access points. This is good to see what other Wi-Fi exists in the area, identify
crowded channels, and observe possible risks. One such risk is if an office is located near
a Starbucks, McDonalds, or other provider of “Free Wi-Fi”. If an employee has
connected to a network like this before, their device may remember the network and try
to reconnect. Also, employees may find these networks and try to connect in an attempt
to take online activities off the company network. If other networks are found, measures

Author!Name,!email@address!                   !                                                 !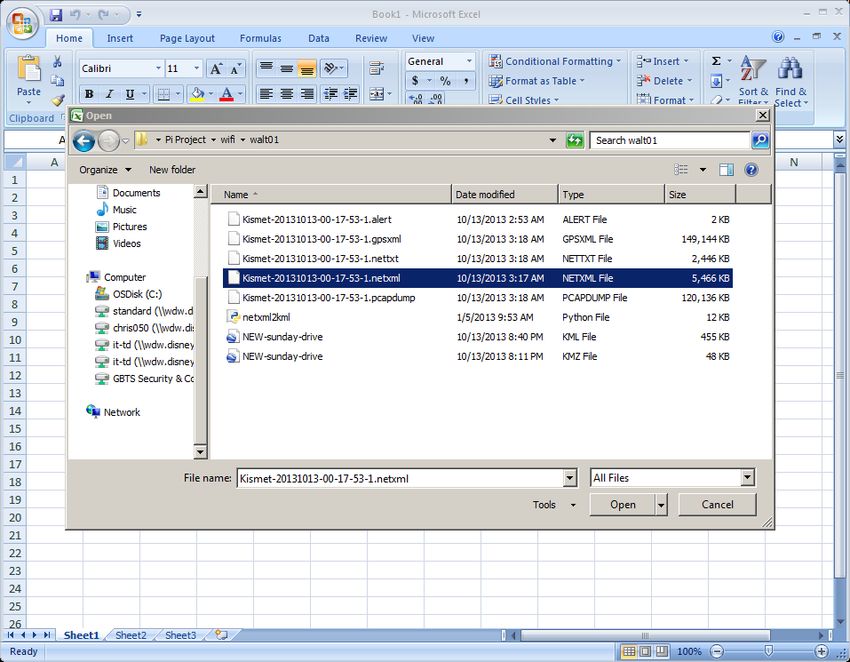
War-Pi! 4
!
can be taken via policy or other network controls to limit the effect of Wi-Fi networks
outside of work premises.

        One last scenario of many, for using a Wi-Fi analysis to is to monitor local
wireless traffic. Using this tool you will be able to see not only what access points exist,
but what is connecting to them. Tools on the Raspberry Pi solution will detect
connections to an access point, identify the manufacturer of the wireless adapter, and
maybe even read some of the network traffic from the device. This will help to find
tablets, Xboxes, personal laptops, or other unauthorized parasitic devices that misuse the
corporate network.

        The reasons to use such a device are limited only by the imagination its users,
whatever their motives. This only lends itself to the Raspberry Pi’s strength - its
configurability. The system can be built and rebuilt to meet the specific needs of the
security tester.

2. Configuring and Running a Raspberry Pi for Wireless
   Analysis
2.1. Parts and Equipment
        Unlike dedicated hardware or smart phones, the hardware is configurable to need
and availability. While there is little that should be modified on the Raspberry Pi itself,
the other elements like the Wi-Fi adapter and GPS receiver can be any compatible device.
Compatible parts are interchangeable with no further configuration. A different Wi-Fi
adapter, GPS receiver, and even a different Raspberry Pi all work off the same OS install.
For a list of compatible devices, read http://elinux.org/RPi_VerifiedPeripherals
(eLinux.org, 2013).

        Below is a list of suggested parts and equipment required for this setup. A few
known and easily obtainable working parts are listed, but pieces can change depending on
availability and need. Switch out pieces with what will work (check for drivers), what is
available, and what meets the needs of the project.

            ● Raspberry Pi Model B 512MB RAM

Author!Name,!email@address!                    !                                               !
War-Pi! 5
!
● Raspberry Pi enclosure
● SD memory card 4GB or bigger
● USB wireless network adapter capable of packet injection (Alfa Network
AWUS051NH)
● USB GPS receiver (GlobalSat BU-353S4 USB GPS Navigation Receiver)
● USB power adapter and micro USB cable
● Battery pack with USB ports (ZAGGsparq 6000)
● Network cable (CAT5)
● Access to a physical network switch/router
● Computer (preferably Linux) with a SD card reader/writer
Figure'2.1+1:'Parts'used'in'example'build'
!
Author!Name,!email@address! ! !War-Pi! 6
!
2.2. Install OS (Raspbian) and Connect
There are several operating systems for the Raspberry Pi (Raspberry Pi , 2013).
Some come with Kismet and related tools pre-installed. For the purpose of this exercise
and build, start with the base Raspbian image. The current version of Raspbian at the
time of his writing is 2013-09-25-wheezy-raspbian.zip. Make sure to download the latest
Raspbian image, adjust the following instructions accordingly, and test the commands in
the event applications or methods change.
Download the Raspbian image from http://www.raspberrypi.org/downloads and
extract the compressed file to your local hard drive. The .img file is a bit-by-bit copy of a
disk image. Copying the .img file to the SD card will not work. Use the Linux dd
command to transfer the disk image onto the SD card. For example, if the Raspbian
image is “2013-09-25-wheezy-raspbian.zip” and the SD card is mounted at “/dev/sdb”
use the command:
sudo dd if=2013-09-25-wheezy-raspbian.img of=/dev/sdb
bs=4M
If using Windows, unzip the downloaded file and use Win32DiskImager to write the
image to the SD card. The Win32Diskimager software is found at
http://sourceforge.net/projects/win32diskimager/ .
Figure'2.2+1:'Win32'Disk'Imager'writing'to'SD'card
Once the image is transferred to the SD card, insert the SD card into the
Raspberry Pi, connect the network cable to your local network, and attach the power
Author!Name,!email@address! ! !War-Pi! 7
!
supply. After a few minutes, you should be able to remotely connect to the Raspberry Pi
by SSH.
Consult the local router or switch device to find the IP address of the Raspberry Pi
on the local network. From a Windows system connect using an SSH connection
software like Putty. From Linux, connect to the Raspberry Pi with the command:
ssh root@x.x.x.x
(use the IP address or URL of the device in place of the x’s)
Log into the system with the default username of “pi” and the password “raspberry”.
(Golden, 2013)
2.3. Initial Configuration of System
Bring up the Raspi-config tool with the command:
sudo raspi-config
Figure'2.3+1:'Raspi+config'main'menu'
!
Use this tool to immediately expand the file system to use the entire memory card
since copying the OS image file to the disk will set up partitions on a small portion of the
SD card. To utilize the space on 8 GB, 16 GB, or larger cards the file system will need
Author!Name,!email@address! ! !War-Pi! 8
!
expansion. This can also be done with partition editor software like Gparted. However, it
is easier to use the built in Raspi-config tool.
Change the user password. This is very important. Every version of this operating
system comes with a default username and password. If an unauthorized user comes
across the install, they will try the default username and password. Change the password
and change it often.
Adjust internationalization options to your locale, spelled “internationalization”.
This will help with keyboard layout, time zone, and language options. The default
localization options are set to en-GB. Unless operating in England, or have a compatible
keyboard, some of the key strokes may be off.
Finally, change the hostname (under “Advanced Options”). Name the device to be
unique and not immediately identifiable if trying to be covert. The device can later be
renamed to blend into the network or masquerade as another system. Once all the
changes are in, exit Raspi-config and reboot the Raspberry Pi.
When you log back into the system via SSH run the following commands to
update the OS and software to the latest versions:
sudo apt-get update
sudo apt-get upgrade
Configure the SSH server to generate new keys with the command:
sudo dpkg-reconfigure openssh-server
Then setup SSH to start at boot:
update-rc.d ssh enable
After the update and upgrade the Raspberry Pi is fresh to use as a base for next
batch of software tools to be installed install. This might be a good time for another
system reboot and attach the Wi-Fi adapter and the GPS device. Reboot with the
command:
sudo shutdown “now” –r
Author!Name,!email@address! ! !War-Pi! 9
!
2.4. Install and Configure GPSD
This step is optional. Current versions of Kismet will pull data from compatible
GPS receivers natively or pull data from the GPSD application. Installing GPSD is still
recommended to test the GPS receiver or just in case Kismet does not support the
available GPS Receiver. Either way, the purpose of utilizing the GPS receiver is to add
longitude and latitude data to the wireless scan for location purposes.
Run the following command on the Raspberry Pi: (Norris, 2013).
sudo apt-get install gpsd gpsd-clients
Make sure the Wi-Fi adapter and GPS device are connected, then enter the
following command:
lsusb
This will list the USB devices attached to the system. make sure the GPS device is
listed. Next, run the following command to discover where the GPS device is attached
dmesg | grep tty
Somewhere in the returned information “ttyUSB0” or similar should be printed.
This is the location of the GPS device and should be noted for future use.
Run the following command to configure the GPSD software:
sudo dpkg-reconfigure gpsd
Navigate through the questions and answer as follows changing the
“/dev/ttyUSB0” answer to the location of the GPS device as discovered previous.
“Start gpsd automatically”
Yes
“Should gpsd handle attached USB GPS receivers automatically?”
Yes
“Device the GPS receiver is attached to:”
/dev/ttyUSB0
Author!Name,!email@address! ! !War-Pi! 10
!
“Options to GPSD”
/dev/ttyUSB0
“gpsd control socket path:”
-leave default-
After the configuration changes are completed, reboot the Raspberry Pi and
GPSD will now automatically start as a service when the system starts up. To verify,
make sure the GPS device is attached with the GPS device located near a window to
receive a signal and run the command:
cgps -s
Figure'2.4+1:'CGPS'output'
!
If the program times out, wait a few minutes for the GPS device to find a few
satellites and try again. If all is well. GPS locational data will be presented on the screen.
Press Ctrl+c to quit the CGPS application.
2.5. Install and Configure Kismet
Kismet is available for easy download and install in Raspbian repositories;
however the version in the repositories is an older version. At the time of this writing the
Author!Name,!email@address! ! !War-Pi! 11
!
latest version available is 2013-03-R1b. Find the latest version at
http://www.kismetwireless.net/code/ (Kismet, 2013). Please note, the following
packages, commands, and methods are valid as of November 2013. Please verify and
update commands and packages as needed. To get the latest version on the Raspberry Pi,
download the source code with the command:
wget http://www.kismetwireless.net/code/kismet-2013-
03-R1b.tar.gz
Before the code is compiled and installed, there are a few dependencies required.
Download and install these dependencies with the following command: (Linux.die.net,
2013).
sudo apt-get install screen ncurses-dev libpcap-dev
tcpdump libnl-dev wireshark
Now extract the source code from the .tar.gz file with the command:
tar xfvz kismet-2013-03-R1b.tar.gz
Navigate to the newly extracted directory with:
cd kismet-2013-03-R1b
To prepare the code to compile and installation run:
./configure
Then make and install Kismet with:
make
Then
sudo make suidinstall
The make process will take a while. Expect to wait an hour or so for the make and
install to complete. After the installation is complete, the configuration file still needs
editing to work properly.
If it is not already attached, plugin the USB Wi-Fi device (the Raspberry Pi may
reboot because of the power change) and run the command:
Author!Name,!email@address! ! !War-Pi! 12
!
ifconfig
Note the network device identifier. It will probably be “wlan0”. This will be
important in configuring Kismet.
To edit the Kismet configuration file enter the following: (Weiss, 2006)
sudo nano /usr/local/etc/kismet.conf
Navigate down the document and file the line:
#ncsource=wlan0
Uncomment this line (remove the #), and change “wlan0” to the device identifier
discovered using the ifconfig command if necessary.
Navigate further down to the GPS section. These controls will allow for GPS data
to tie to wireless scan data. Find the first GPS option and edit the appropriate lines to
match the following:
# Do we have a GPS?
gps=true
If GPSD is installed find the following lines and uncomment the appropriate lines
to match the following:
# Do we use a locally serial attached GPS, or use a gpsd server, or
# use a fixed virtual gps?
# (Pick only one)
gpstype=gpsd
# Host:port that GPSD is running on. This can be localhost OR remote!
gpshost=localhost:2947
If using Kismet to communicate directly to the GPS device without GPSD, first
comment out the following lines to read:
#gpstype=gpsd
# Host:port that GPSD is running on. This can be localhost OR remote!
Author!Name,!email@address! ! !War-Pi! 13
!
#gpshost=localhost:2947
Then uncomment and change the following options. Enter the correct location for
the GPS device as found in previous steps.
gpstype=serial
# What serial device do we look for the GPS on?
gpsdevice=/dev/ttyUSB0
Press Ctrl+x to end editing the file and press Y to accept and save the modified
buffer. Press Enter again to confirm the name of the file.
2.6. Running Kismet
2.6.1. Manually Starting up Kismet
Verify the USB Wi-Fi and GPS devices are attached and startup Kismet with:
sudo kismet
Sudo permissions are required to start Kismet as it will need system level controls
over the devices. This will pop up a warning about Kismet running as root. Select “OK”
to continue startup.
The next set of windows ask about the server side of Kismet. At the popup asking,
“Automatically start Kismet server?” select “Yes.” Next prompt asks about startup
options. Keep the default settings and select “Start.”
When the server starts, the Kismet Server Console will display a rapidly moving
list of “INFO” and “ERROR” lines. This information is useful, but not in this format.
Select the “Close Console Window” option at the bottom of the screen to see the Kismet
client screen.
Author!Name,!email@address! ! !War-Pi! 14
!
Figure'2.6+1:'Kismet'console'window'
!
The Kismet client main screen will display information including found networks,
GPS data, packet counts, and lots more. Navigate through the menu so sort networks or
take a deeper look into specific networks to see the connected clients.
Figure'2.6+2:'Kismet'client'main'screen'
Author!Name,!email@address! ! !War-Pi! 15
!
!
To quit Kismet, navigate to the Kismet menu and select “Quit”. A “Stop Kismet
Server” prompt will ask to kill the server shutting it down completely or run it in the
background. By running the Kismet server in the background, the SSH connection can
disconnect and the server will still collect data. This is a good way to take the device out
and about sniffing for access points.
Figure'2.6+3:'Quit'Kismet'
!
To start Kismet as a headless process not requiring the client interface run the
command:
sudo kismet_server --daemonize
With Kismet server daemonized, SSH sessions can disconnect and let the
application keep running without navigating the Kismet menus. The Kismet client can
later reconnect to the server to view the information and properly stop the server.
2.6.2. Automatically Starting up Kismet as a Service
In the field, there may be no way to connect the Raspberry Pi to a network in
order to open an SSH session and start Kismet. Starting Kismet as a service at boot will
allow wireless data collection to begin when the Raspberry Pi is turned on. This will
Author!Name,!email@address! ! !War-Pi! 16
!
effectively turn the Raspberry Pi build into a wireless analysis appliance. It is
recommended to attempt to start Kismet manually first to verify the system and setup,
and then make changes to automate the Kismet startup.
First designate a folder to collect the output files Kismet creates. By default,
Kismet writes these files to the root folder of the user starting up the application. If it is
the system starting up the application, Kismet will write the files to the root folder of the
operating system. This is not desirable as the kismet files will clutter the system root
folder.
Navigate to the system root folder with the command:
cd /
Create a new folder named “kismet” with the command:
sudo mkdir kismet
Once the folder is created, change the Kismet configuration file to write the
output to new folder. Edit the configuration file with the command:
sudo nano /usr/local/etc/kismet.conf
Navigate down to the lines:
# Prefix of where we log (as used in the logtemplate later)
# logprefix=/some/path/to/logs
Uncomment and change the “logprefix” line or add the following line underneath
to read
logprefix=/kismet
Press Ctrl+x to end editing the file and press Y to accept and save the modified
buffer. Press Enter again to confirm the name of the file. Now all the kismet files going
forward will write to the new kismet folder. Since this new folder is at the root of the
system, sudo permissions are required when working with these files.
To tell the OS to run the application at boot, edit the rc.local file in the /etc folder
with the command:
Author!Name,!email@address! ! !War-Pi! 17
!
sudo nano /etc/rc.local
Add the following lines at the end of the file, but just before the “exit 0” line:
#start Kismet
/usr/local/bin/kismet_server --daemonize
Press Ctrl+x to end editing the file and press Y to accept and save the modified
buffer. Press Enter again to confirm the name of the file.
At next system reboot, Kismet Server will start if no errors are encountered and
begin writing files to the /kismet folder. Test this by rebooting the system with:
sudo shutdown “now” -r
Log back into the system and view running processes with the command:
top
“Kismet_server” should be listed probably towards the top of the list. Press Ctrl+c
to quit Top.
Another way to verify is to connect to the running Kismet Server with the
command:
sudo kismet
Also, verify files are writing to the designated folder with the command:
ls /kismet
2.7. Backing Up the System
Back up the system. This is not only to protect the data, but for rapid
redeployment. SD cards will fail, especially when the device is powered on and off like
an appliance. The system can last for a long time without disk corruption, but it will
eventually happen. When it does, having a backup will save time and frustration.
Also, should the need arise to deploy a fleet of these devices, time is saved from
cloning the image as opposed to building each device from scratch. Each unit deployed
might need a minor personalization tweak to identify which system recorded the logs.
Author!Name,!email@address! ! !War-Pi! 18
!
However, the image can be written to another disk, using different (but the same type) of
hardware, and still run without modification.
On a Linux system insert the SD card and open a command prompt. Enter the
following to use the dd command to make an image of the SD card:
sudo dd if=/dev/sdb of=imagename.img bs=4M
(Be sure to change /dev/sdb to match appropriate mount location)
This process takes a while and will take longer with larger SD cards. Be patient as
this process is still shorter than rebuilding from scratch. Redeploy the image onto the
same or different (but the same size) SD card in the same way the original OS was
written to the SD card.
2.8. Driving, Walking, Biking, Dogging, Etc.
One of the several excellent features of the Raspberry Pi is the low power
consumption required to run the device. The Raspberry Pi is powered off the 5V coming
from the Micro USB port. The other side of the USB cable can plug into a cell phone
power adapter, a desktop/laptop USB port, or a battery (Sjohelid, 2013).
Travel Batteries
Travel batteries with USB charging ports, can make a great portable power supply
for the Raspberry Pi. Battery usability will vary depending on capacity, output, CPU
utilization of the Raspberry Pi, and extra devices attached to the Pi. Sometimes there is a
little trial and error selecting the correct battery for the project especially if a particular
form factor is required. Usually the battery will run out before the application crashes or
storage space fills up. However, early tests running wireless scans with a Raspberry Pi
configuration described earlier ran for over six hours. For a list of compatible battery
packs and power supplies, read http://elinux.org/RPi_VerifiedPeripherals (eLinux.org,
2013).
When the system in running and recording data---move. Ride, walk, or run around
the target area. A planned path will save time and energy. For example, think about the
target area and what needs to be accomplished. Is the concern about what can be seen
from within the office or if the network office can be seen from the outside? Does the
Author!Name,!email@address! ! !War-Pi! 19
!
entire property need to be assessed or just areas where customers visit? Once there is a
physical area scope, design a path accommodating the mode of transportation (streets,
sidewalks, pet friendly, etc.) and will keep the Raspberry Pi device within range of any
access points. Range will vary by antenna, but a 50 ft radius for access points is a good
rule of thumb. For more information about the act of war driving, read
https://wigle.net/wiki/index.cgi?Cardinal_Rules_Of_Wardriving_FAQ (WiGLE Wiki,
2013).
While in motion, slower physical speeds will allow for more data capture as the
device passes by wireless access points. The longer the device sits in one location, the
more packets it can collect, and tell more about the network. However, the required data
captured will have to weigh against the time allowed to perform the scan. If the target
area is large, the allotted time for the scan short, or the battery capacity small, then speed
is required to cover the desired area. Riding in a car will pick up a lot of information, but
walking the same path will pick up much more. A balance must be struck between the
desired level if information gathered and time allotted to gather the data. This is more of
an art than design in finding the sweet spot of efficient data collection.
If GPS data for mapping is required, keep in mind the GPS device will probably
not perform properly indoors. The GPS receiver should have a clear view of the sky to
determine its location. Carrying the device inside a backpack or thin plastic container will
not cause an issue. Tall buildings, lots of foliage, and generally being indoors will cause
interference and throw off GPS data points. If the desired scanning path leads indoors,
step outside every so often to allow the GPS receiver to get a lock and create an accurate
data point. For more information about GPS tips and methodologies for war driving, read
https://wigle.net/wiki/index.cgi?Cardinal_Rules_Of_Wardriving_FAQ (WiGLE Wiki,
2013).
If the Wi-Fi adapter in use allows for choice of antenna, consider the goal of the
wireless scan before heading out to scan. If the desired outcome is to find all the Wi-Fi
hotspots in the area, use an omnidirectional antenna. If trying to focus on one smaller
area, consider a directional or yagi antenna. Also, the size of the antenna should weigh in
against the portability and concealability concerns. Short antennas can fit in a bag, while
Author!Name,!email@address! ! !War-Pi! 20
!
yagi antennas are a little more difficult to hide. Find more information about Wi-Fi
antennas at http://www.wardriving.com/antenna.php (WarDriving.com, 2013).
As for lugging the system around, the Raspberry Pi size is a great advantage over
traditional laptops. As mentioned earlier, the small size of the Raspberry Pi lends itself to
fit many different enclosures. The parts can be held together with a rubber band and
thrown into a backpack, or placed in a custom designed enclosure. However assembled
and carried, be mindful of your target location. Sometimes a bunch of wires hanging out
of a backpack connected to a ziptied device can raise eyebrows with security officers.
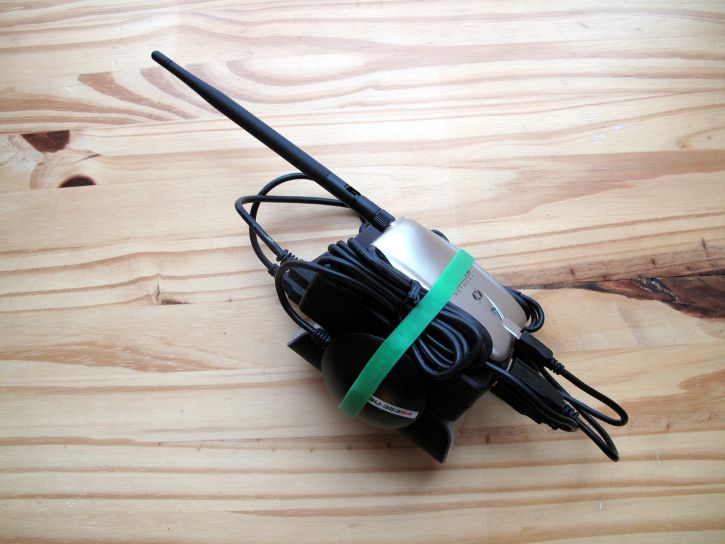
Figure'2.8+1:'Assembled'example'device
3. Review the Data
3.1. Read the Text Files
Kismet will create multiple files for the scanning session. These will include
.alert, .gpsxml, .nettxt, .netxml, and .pcapdump files by default. The output folder and file
types are configurable in the kismet.conf file. View the .nettxt ,or any other of the files,
with the “less” command (Haines, Schearer, Thornton, 2008).
Author!Name,!email@address! ! !War-Pi! 21
!
Figure'3.1+1:'List'of'files'written'by'Kismet'
!
The following command will use “less” to open the .nettxt created during the
example session for viewing:
less Kismet-20130803-19-09-59-1.netxml
This text file contains loads of information Kismet discovered in a nice human-
readable format. This information found will include found SSIDs, manufacturer of the
access point, longitude and latitude where discovered, and even clients attached to the
network.
Author!Name,!email@address! ! !War-Pi! 22
!
Figure'3.1+2:'Using'Less'to'read'.nettxt'file'
!
Key things to look for, if not just looking to see what is out there, are anomalies.
If scoping out the known environment, look for things that stand out. Things like
misspelled SSIDs, unknown SSIDs, APs set to incorrect channels, or APs without the
proper security enabled. All these could be signs of vulnerabilities on the network and
should be further investigated.
3.2. Mapping the Data
To improve the visualization of the collected information, the netxml document
can be converted to a .kml file format readable by Google Maps, Google Earth, or
Marble. There are several conversion methods available online (or roll thine own).
One such method is the python script netxml2kml (Salecker, P., 2013). Download
the script file with the command:
wget
http://files.salecker.org/netxml2kml/netxml2kml.py.txt
Depending on which folder the file is downloaded to, the sudo command might be
needed before the wget command. After the download completes change the file
extension from a .txt to a .py with the command:
Author!Name,!email@address! ! !War-Pi! 23
!
mv netxml2kml.py.txt netxml2kml.py
Again, sudo might be necessary.
Run the script with the command:
sudo python netxml2kml.py --kmz --kml -o NEW-FILENAME
KISMET_FILE.netxml
(change “NEW-FILENAME and KISMET_FILE to the relevant file names)
Figure'3.2+1:'Converting'file'from'.netxml'to'.kml'and'.kmz'
!
The script will display the networks converted to the new file format and return to
the regular prompt when finished. Load the newly created .kml into Google Maps,
Google Earth or Marble for a map visualization of the found networks.
Author!Name,!email@address! ! !War-Pi! 24
!
Figure'3.2+2:'Viewing'.kml'file'with'Google'Earth'application'
!
Key things to look for on the map are similar to those previously mentioned, but
now it is easier to see location of where the device was detected. On a map it is easy to
find a potentially misplaced device, or see if signals are detectable where they should not
be. The map can visualize if an office network is detectable from the parking lot, or what
other signals are detectable at a given location (Spiderlabs.com, 2013).
3.3. Parsing the Information in Excel
Kismet generates a wealth of information; almost an embarrassment of riches.
Even the human readable .nettxt file can be overwhelming. To get the desired
information in a comfortable format, use an application like Kismet Log Viewer found at
http://klv.professionallyevil.com/index.php (Professionallyevil.com, 2013) or Excel to
parse and structure the data into a meaningful format. While using Excel on a Windows
machine strays from the topic of the Raspberry Pi, it does demonstrate the use of the
system and relevance to enterprise environments.
Begin by starting Excel and open a collected .netxml file. When navigating to the
file make sure Excel is looking for “All Files” and not “All Excel Files”.
Author!Name,!email@address! ! !War-Pi! 25
!
Figure'3.3+1:'Opening'.netxml'in'Excel'
!
A warning will pop-up citing the file is in a different format than specified by the
extension. Click “Yes” to continue opening the file.
The following popup asks how to open the .xml file. Select to “Use the XML
Source task pane” and click “OK” to continue.
Figure'3.3+2:'Select'"Use'the'XML'Source'task'pane"'
!
There may be one more pop-up explaining, “The specified XML source does not
refer to a schema,” and, ”Excel will create a schema based on the XML source data.”
Click “OK” to continue.
Author!Name,!email@address! ! !War-Pi! 26
!
Excel will open a seemingly blank workbook with a side panel labeled “XML
Source.” The side panel is an outline of the XML hierarchy of the opened netxml file.
Scrolling down this window shows just how much information Kismet collects, and
emphasizes the importance of filtering out the desired information for the assessment.
Figure'3.3+3:'XML'Source'side'panel'
!
Select the desired data points from the XML Source window and drag them into
separate cells in row 1 of the spreadsheet. Some data points include GPS data, radio
frequency, packets collected, and more. Choose information that is relevant and useful,
else the content becomes meaningless and unreadable with too much data. Commonly
useful data points are:
• detection-run > wireless-network > number
• detection-run > wireless-network > SSID > essid >
• detection-run > wireless-network > SSID > essid > cloaked
Author!Name,!email@address! ! !War-Pi! 27
!
• detection-run > wireless-network > SSID > encryption
• detection-run > wireless-network > SSID > type
• detection-run > wireless-network > SSID > info
• detection-run > wireless-network > BSSID
• detection-run > wireless-network > type
Once the selected data points are in place in the spreadsheet, click on the
“Refresh” icon in the Design tab’s External Table Data section. This will populate the
table with data from the .netxml file in the content relevant to the assessment.
Figure'3.3+4:'Data'imported'into'Excel'
!
What to look for in the spreadsheet depends on the purpose of the assessment.
Open networks are easier to find by sorting by “encryption” status. Sorting by “channel”
can find the less crowded or over crowded channels. “Hidden” or non broadcasting
SSIDs are easily identified by sorting by “cloaked.” Other data points will reveal more
information about the detected network, but stay focused to the purpose of the assessment
or the desired content will be lost in a sea of data.
Author!Name,!email@address! ! !War-Pi! 28
!
4. Conclusion
The desire and use of wireless networking is expanding. This is seen every day
with new offerings of “Free Wi-Fi” at business like restaurants, hotels, theme parks, and
bus stations. This increase in wireless also grows in the home and office environments
with the expanding user base of portable electronics like laptops, tablets, and smart
phones. As wireless networks become more common, so will networking problems and
security issues.
Private users and companies have to worry about who else can listen in on the
wireless communications and what can they hear. Wireless network assessments are vital
in securing the wireless infrastructure. Assuming the access point is configured correctly
is not enough diligence to protect private and corporate information. Even with a properly
configured and hardened network, a rogue or unauthorized access point to a different
network can be a threat to the end user. Since there are no wires, the potential threat is
invisible.
This is why a method is needed to see what cannot be seen, or at least a tool to
visualize potential threats. Several technical solutions exist for the task of wireless
analysis and penetration testing, but few offer the configurability and form factor of the
Raspberry Pi computer. Installing a fully functional Linux operating system interfacing
with commonly found hardware add-ons creates a powerful wardriving device.
As a wireless analysis solution, the Raspberry Pi can meet the needs of private
and corporate security initiatives. The configurability of hardware and software can meet
the technical requirements for most assessments. The price of the system can range
depending on the selected add-ons, but still fall in a very acceptable range for most
businesses and personal users. The tool is affordable, the techniques are laid out, and the
methodology is established. All the assessor needs to do now is turn it on and go for a
walk, ride, drive, etc.
Author!Name,!email@address! ! !War-Pi! 29
!
5. References
eLinux.org. (2013). RPi VerifiedPeripherals - eLinux.org. Retrieved November 24,
2013, from http://elinux.org/RPi_VerifiedPeripherals
Golden, R. (2013). Raspberry Pi networking cookbook: An epic collection of practical
and engaging recipes for the Raspberry Pi. Birmingham: Packt Pub.
Haines, B., Schearer, M. J., & Thornton, F. (2008). Kismet hacking. Burlington, MA:
Syngress Pub.
Kismet. (2013). Retrieved September 11, 2013, from
http://www.kismetwireless.net/index.shtml
Linux.die.net. (2013). apt-get(8) - Linux man page. (n.d.). Retrieved November 24, 2013,
from http://linux.die.net/man/8/apt-get
Norris, D. (2013). Raspberry Pi: Projects for the evil genius. New York: McGraw Hill
Education.
PCI Security Standards Council. (2010). PCI DSS v2.0. Wakefield, MA
Professionallyevil.com. (2013). Professionally Evil - Secure Ideas. Retrieved November
24, 2013, from http://klv.professionallyevil.com/index.php.
Raspberrypi.org. (2013). Raspberry Pi | An ARM GNU/Linux box for $25. Take a byte!
(2013). Retrieved August 18, 2013, from http://www.raspberrypi.org
Salecker, P. (2013). Salecker.org. Retrieved August 18, 2013, from
http://www.salecker.org/.
Sjohelid, S. (2013). Raspberry Pi for Secret Agents. Birmingham: Packt Publishing,
Limited.
Upton, E., & Halfacree, G. (2012). Raspberry Pi user guide. Chichester, England: John
Wiley & Sons.
Spiderlabs.com. (2013). Wardrive, Raspberry Pi Style! - SpiderLabs Anterior. Retrieved
November 24, 2013, from http://blog.spiderlabs.com/2012/12/wardrive-raspberry-
pi-style.html
Wardriving.com. (2013). WarDriving.com - Equipment - Antennas. (n.d.).
Retrieved November 24, 2013, from http://www.wardriving.com/antenna.php
Weiss, A. (2006, March 30). Introduction to Kismet. Retrieved August 18, 2013 from
http://www.wi-fiplanet.com/tutorials/article.php/3595531
Author!Name,!email@address! ! !War-Pi! 30
!
WiGLE.NET. (2013). WiGLE - Wireless Geographic Logging Engine - Plotting WiFi on
Maps. Retrieved September 11, 2013, from https://wigle.net/
WiGLE.NET. (2013). WiGLE Wiki: Cardinal Rules Of Wardriving FAQ.
Retrieved November 24, 2013 from
https://wigle.net/wiki/index.cgi?Cardinal_Rules_Of_Wardriving_FAQ
Author!Name,!email@address! ! !Last Updated: July 10th, 2019
Upcoming SANS Penetration Testing
SANS Columbia 2019 Columbia, MD Jul 15, 2019 - Jul 20, 2019 Live Event
SANS Rocky Mountain 2019 Denver, CO Jul 15, 2019 - Jul 20, 2019 Live Event
SANS Pen Test Hackfest Europe Summit & Training 2019 Berlin, Germany Jul 22, 2019 - Jul 28, 2019 Live Event
SANS San Francisco Summer 2019 San Francisco, CA Jul 22, 2019 - Jul 27, 2019 Live Event
SANS Boston Summer 2019 Boston, MA Jul 29, 2019 - Aug 03, 2019 Live Event
SANS July Malaysia 2019 Kuala Lumpur, Malaysia Jul 29, 2019 - Aug 03, 2019 Live Event
Mentor Session - SEC504 Oklahoma City, OK Aug 03, 2019 - Aug 31, 2019 Mentor
SANS Crystal City 2019 Arlington, VA Aug 05, 2019 - Aug 10, 2019 Live Event
SANS Melbourne 2019 Melbourne, Australia Aug 05, 2019 - Aug 10, 2019 Live Event
SANS London August 2019 London, United Aug 05, 2019 - Aug 10, 2019 Live Event
Kingdom
Supply Chain Cybersecurity Summit & Training 2019 Arlington, VA Aug 12, 2019 - Aug 19, 2019 Live Event
SANS Prague August 2019 Prague, Czech Republic Aug 12, 2019 - Aug 17, 2019 Live Event
SANS Minneapolis 2019 Minneapolis, MN Aug 12, 2019 - Aug 17, 2019 Live Event
SANS vLive - SEC504: Hacker Tools, Techniques, Exploits, and SEC504 - 201908, Aug 13, 2019 - Sep 19, 2019 vLive
Incident Handling
SANS Amsterdam August 2019 Amsterdam, Netherlands Aug 19, 2019 - Aug 24, 2019 Live Event
SANS Virginia Beach 2019 Virginia Beach, VA Aug 19, 2019 - Aug 30, 2019 Live Event
SANS Chicago 2019 Chicago, IL Aug 19, 2019 - Aug 24, 2019 Live Event
Mentor Session - SEC504 Washington, DC Aug 21, 2019 - Oct 09, 2019 Mentor
SANS Tampa-Clearwater 2019 Clearwater, FL Aug 25, 2019 - Aug 30, 2019 Live Event
SANS New York City 2019 New York, NY Aug 25, 2019 - Aug 30, 2019 Live Event
SANS Hyderabad 2019 Hyderabad, India Aug 26, 2019 - Aug 31, 2019 Live Event
SANS Copenhagen August 2019 Copenhagen, Denmark Aug 26, 2019 - Aug 31, 2019 Live Event
Mentor Session @work - SEC504 Alexandria, VA Aug 27, 2019 - Sep 05, 2019 Mentor
Mentor Session - SEC560 Daytona Beach, FL Aug 29, 2019 - Oct 31, 2019 Mentor
SANS Canberra Spring 2019 Canberra, Australia Sep 02, 2019 - Sep 21, 2019 Live Event
SANS Philippines 2019 Manila, Philippines Sep 02, 2019 - Sep 07, 2019 Live Event
SANS Munich September 2019 Munich, Germany Sep 02, 2019 - Sep 07, 2019 Live Event
SANS Brussels September 2019 Brussels, Belgium Sep 02, 2019 - Sep 07, 2019 Live Event
Mentor Session - SEC542 Kansas City, MO Sep 07, 2019 - Oct 05, 2019 Mentor
SANS Network Security 2019 Las Vegas, NV Sep 09, 2019 - Sep 16, 2019 Live Event
Network Security 2019 - SEC504: Hacker Tools, Techniques, Las Vegas, NV Sep 09, 2019 - Sep 14, 2019 vLive
Exploits, and Incident HandlingYou can also read