User Guide - Lenovo Legion Tower 5i (26L, 6) - CNET Content Solutions
←
→
Page content transcription
If your browser does not render page correctly, please read the page content below

User Guide

Lenovo Legion Tower 5i (26L, 6)
Read this first

Before using this documentation and the product it supports, ensure that you read and understand the
following:
• Safety and Warranty Guide
• Generic Safety and Compliance Notices
• Setup Guide

First Edition (March 2021)

© Copyright Lenovo 2021.
LIMITED AND RESTRICTED RIGHTS NOTICE: If data or software is delivered pursuant to a General Services
Administration “GSA” contract, use, reproduction, or disclosure is subject to restrictions set forth in Contract No. GS-
35F-05925.
Contents

About this documentation . . . . . . . . iii                                       Reset your computer . . . . . . .       .   .   .   .   20
                                                                                   Use advanced options . . . . . .        .   .   .   .   20
Chapter 1. Meet your computer . . . . . 1                                          Windows automatic recovery. . . .       .   .   .   .   20
Front . . . . . . . . .       .   .   .   .   .   .   .   .   .   .   .    1       Create and use a recovery USB device    .   .   .   .   20
Top . . . . . . . . .         .   .   .   .   .   .   .   .   .   .   .    2       Update the device driver . . . . .      .   .   .   .   21
Rear . . . . . . . . .        .   .   .   .   .   .   .   .   .   .   .    3
Features and specifications   .   .   .   .   .   .   .   .   .   .   .    4   Chapter 5. CRU replacement . . . . . 23
USB specifications . . .      .   .   .   .   .   .   .   .   .   .   .    4   CRU list . . . . . . . . . . . . . . . .            .   .   23
                                                                               Remove or replace a CRU . . . . . . . . .           .   .   24
Chapter 2. Get started with your                                                  Power cord . . . . . . . . . . . . .             .   .   24
computer . . . . . . . . . . . . . . . . . 7                                      Left side cover and right side cover . . .       .   .   24
Access networks . . . . . . . . . . . . . . . 7                                   Front bezel . . . . . . . . . . . . .            .   .   25
    Connect to the wired Ethernet . . . . . . . . 7                               Wire cover (for selected models) . . . .         .   .   26
    Connect to Wi-Fi networks. . . . . . . . . . 7                                3.5-inch storage drive . . . . . . . .           .   .   27
                                                                                  Storage drive tray . . . . . . . . . .           .   .   28
Chapter 3. Explore your computer . . . 9
                                                                                  Memory module . . . . . . . . . . .              .   .   29
Lenovo Vantage. . . . . . . . . . . . .                       . . . 9
                                                                                  M.2 solid-state drive . . . . . . . . .          .   .   30
Set the power plan . . . . . . . . . . .                      . . . 9
                                                                                  Microprocessor heatsink and fan assembly
Transfer data . . . . . . . . . . . . . .                     . . 10              (for selected models) . . . . . . . . .          .   .   30
     Connect to a Bluetooth-enabled device (for                                   Water cooling system (for selected models)       .   .   32
     selected models) . . . . . . . . . .                     . .         10
                                                                                  Coin-cell battery . . . . . . . . . . .          .   .   35
Lock the computer . . . . . . . . . . .                       . .         10
                                                                                  Power supply assembly . . . . . . . .            .   .   35
Purchase accessories . . . . . . . . . .                      . .         11
                                                                               Chapter 6. Help and support . . . . . 39
Chapter 4. Troubleshooting,
                                                                               Self-help resources . . . . . . . .     .   .   .   .   .   39
diagnostics, and recovery . . . . . . . 13
                                                                               Call Lenovo . . . . . . . . . . .       .   .   .   .   .   40
Basic procedure for resolving computer
problems . . . . . . . . . . . . . . . .                          .       13        Before you contact Lenovo . . .    .   .   .   .   .   40
Troubleshooting . . . . . . . . . . . . .                         .       13        Lenovo Customer Support Center .   .   .   .   .   .   40
    Startup problems . . . . . . . . . . .                        .       14   Purchase additional services. . . . .   .   .   .   .   .   41
    Audio problems . . . . . . . . . . . .                        .       15
                                                                               Appendix A. Accessibility and
    Network problems . . . . . . . . . . .                        .       15
                                                                               ergonomic information . . . . . . . . 43
    Performance problems . . . . . . . . .                        .       18
    Storage drive problems . . . . . . . . .                      .       19   Appendix B. Compliance
    Software problems . . . . . . . . . . .                       .       19   information . . . . . . . . . . . . . . . 47
Recovery . . . . . . . . . . . . . . . .                          .       19
    Restore system files and settings to an earlier                            Appendix C. Notices and
    point . . . . . . . . . . . . . . . .                         .       19   trademarks . . . . . . . . . . . . . . . 51
    Restore your files from a backup . . . . .                    .       19

© Copyright Lenovo 2021                                                                                                                     i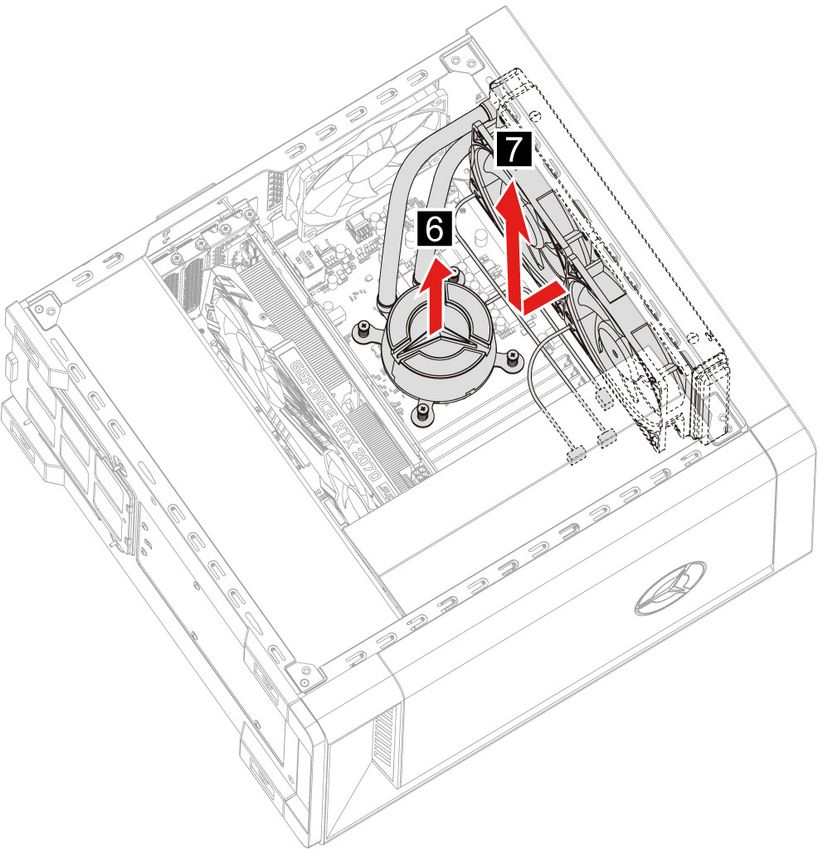
ii User Guide

About this documentation
• Depending on the model, some optional accessories, features, and software programs might not be
  available on your computer.
• Depending on the version of the operating systems and programs, some user interface instructions might
  not be applicable to your computer.
• Documentation content is subject to change without notice. Lenovo makes constant improvements to the
  documentation of your computer, including this User Guide. To get the latest documentation, go to:
  https://pcsupport.lenovo.com
• Microsoft® makes periodic feature changes to the Windows® operating system through Windows Update.
  As a result, some information in this documentation might become outdated. Refer to Microsoft resources
  for the latest information.
• This guide applies to the Lenovo product models listed below. Illustrations in this guide may look slightly
  different from your product model.

    Model name                                         Machine types (MT)

    Legion T5 26IOB6                                   90RS, 90RT

© Copyright Lenovo 2021                                                                                         iii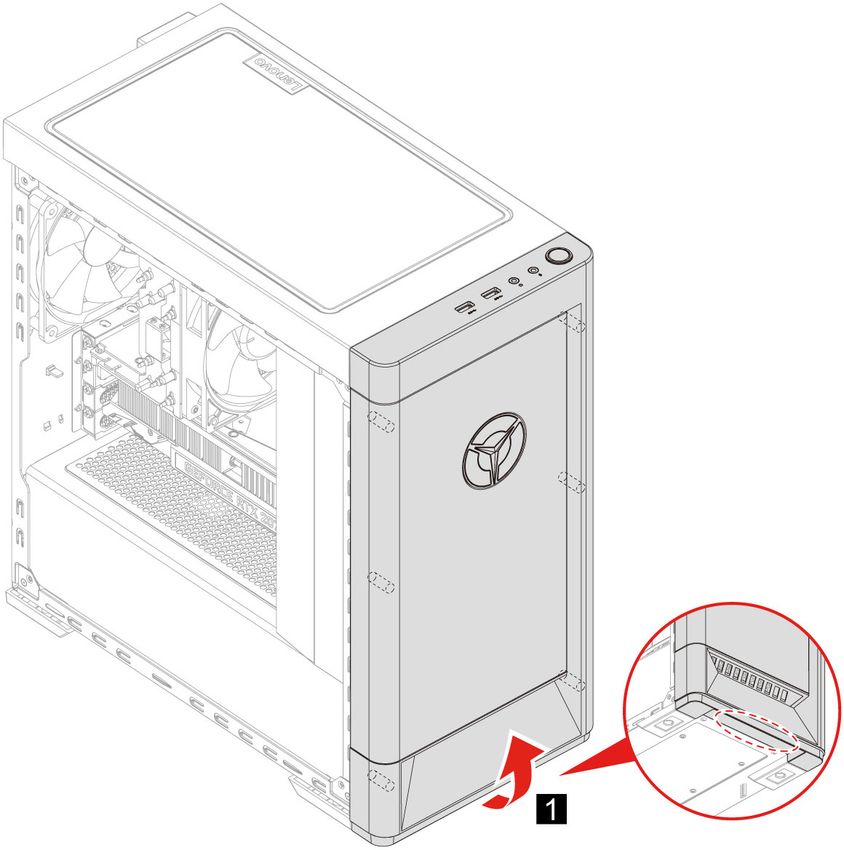
iv User Guide

Chapter 1. Meet your computer

Front

 1. Lenovo Legion logo LED indicator

© Copyright Lenovo 2021                1
Top

    1. USB 3.2 connectors Gen 1 (2)     2. Headphone connector

    3. Microphone connector             4. Power button

Related topics
•     “USB specifications” on page 4.

2      User Guide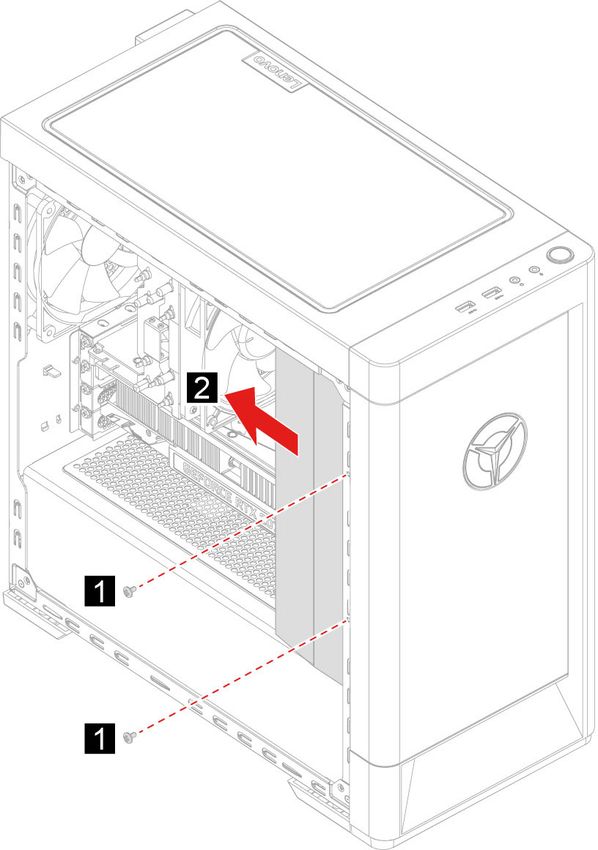
Rear

    1. USB 3.2 connectors Gen 1 (2)                2. USB-C® connector
    3. USB 2.0 connectors (2)                      4. Ethernet connector

    5. Audio connectors                            6. PCI-Express card area

    7. Security-lock slot                          8. Power cord connector

Related topics
•     “USB specifications” on page 4.
•     “Connect to the wired Ethernet” on page 7.
•     “Lock the computer” on page 10.

                                                                              Chapter 1. Meet your computer   3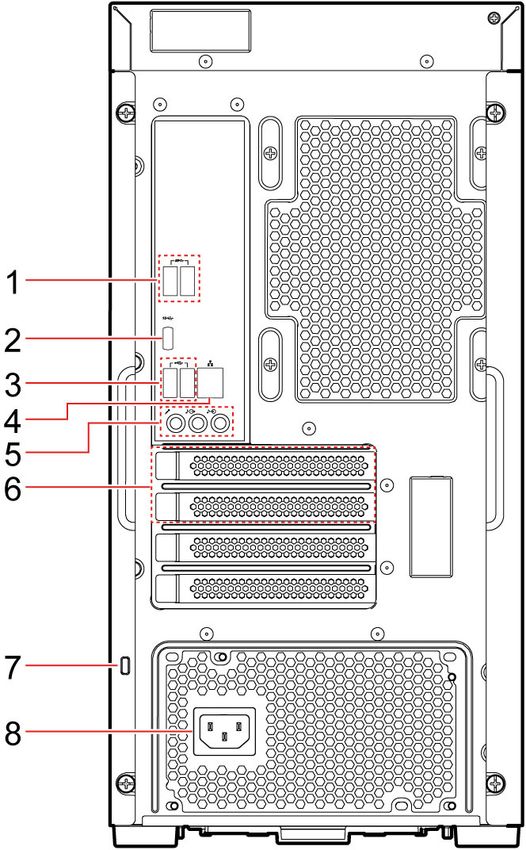
Features and specifications
For detailed specifications of your computer, go to https://psref.lenovo.com.

                                   1. Right-click the Start button to open the Start context menu.
 Hardware configuration            2. Click Device Manager. Type the administrator password or provide
                                      confirmation if prompted.

                                  • 350-watt voltage-sensing power supply
                                  • 400-watt voltage-sensing power supply
 Power supply
                                  • 550-watt voltage-sensing power supply
                                  • 650–watt voltage-sensing power supply

                                  To view the microprocessor information of your computer, right-click the Start
 Microprocessor
                                  button and then click System.

 Memory                           Double data rate 4 (DDR4) unbuffered dual in-line memory module (UDIMM)

                                  To view the storage drive capacity of your computer, right-click the Start button to
                                  open the Start context menu and then click Disk Management.
 Storage device
                                  Note: The storage drive capacity indicated by the system is less than the nominal
                                  capacity.

                                  • 4 SATA3 Port
                                  • 4 DDR4 UDIMM slots
 Expansion                        • PCI-Express slots: PCIEx16 (1), PCIEx4 (1)
                                  • 3 M.2 solid-state drive slot (1 for WIFI, 2 for PCIEx4 SSD)
                                  • 2 Storage drive bays (3.5–inch)

                                  • Bluetooth
 Network features                 • Gigabit Ethernet LAN
                                  • Wireless LAN

USB specifications
Note: Depending on the model, some USB connectors might not be available on your computer.

4   User Guide
Connector name Description
Connect USB-compatible devices, such as a USB
keyboard, USB mouse, USB storage device, or USB
printer.
• USB 2.0 connector
• USB 3.2 connector Gen 1
• USB 3.2 connector Gen 2
• Charge USB-C compatible devices with the output
voltage and current of 5 V and 3 A.
• Connect to an external display:
– USB-C to VGA: 1900 x 1200 pixels, 60 Hz
– USB-C to DP: 3840 x 2160 pixels, 60 Hz
• Connect to USB-C accessories to help expand your
• USB-C (3.2 Gen 1) connector computer functionality. To purchase USB-C
• USB-C (3.2 Gen 2) connector accessories, go to https://www.lenovo.com/accessories.
• Thunderbolt 3 connector (USB-C)
• Thunderbolt 4 connector (USB-C)
Statement on USB transfer rate
Depending on many factors such as the processing capability of the host and peripheral devices, file
attributes, and other factors related to system configuration and operating environments, the actual transfer
rate using the various USB connectors on this device will vary and will be slower than the data rate listed
below for each corresponding device.
USB device Data rate (Gbit/s)
3.2 Gen 1 / 3.1 Gen 1 5
3.2 Gen 2 / 3.1 Gen 2 10
3.2 Gen 2 × 2 20
Thunderbolt 3 (USB-C) 40
Thunderbolt 4 (USB-C) 40
Chapter 1. Meet your computer 56 User Guide
Chapter 2. Get started with your computer

Access networks
This section helps you access networks through connecting to a wired or wireless network.

Connect to the wired Ethernet
Connect your computer to a local network through the Ethernet connector on your computer with an
Ethernet cable.

Connect to Wi-Fi networks
Click the network icon in the Windows notification area, and then select a network for connection. Provide
required information, if needed.

© Copyright Lenovo 2021                                                                                      7
8 User Guide
Chapter 3. Explore your computer

Lenovo Vantage

The preinstalled Lenovo Vantage is a customized one-stop solution to help you maintain your computer with
automated updates and fixes, configure hardware settings, and get personalized support.

Access Lenovo Vantage
Open the Start menu and click Lenovo Vantage. You also can type Lenovo Vantage in the search box.

To download the latest version of Lenovo Vantage, go to Microsoft Store and search by the app name.

Key features
Lenovo Vantage enables you to:
• Know the device status easily and customize device settings.
• Download and install UEFI BIOS, firmware and driver updates to keep your computer up-to-date.
• Monitor your computer health, and secure your computer against outside threats.
• Scan your computer hardware and diagnose hardware problems.
• Look up warranty status (online).
• Access User Guide and helpful articles.

Notes:
• The available features vary depending on the computer model.
• Lenovo Vantage makes periodic updates of the features to keep improving your experience with your
  computer. The description of features might be different from that on your actual user interface.

Set the power plan
For ENERGY STAR® compliant computers, the following power plan takes effect when your computers have
been idle for a specified duration:
• turn off the display: After 10 minutes
• put the computer to sleep: After 25 minutes

To awaken the computer from Sleep mode, press any key on your keyboard.

To reset the power plan to achieve the best balance between performance and power saving:
 1. Go to Control Panel and view by large icons or small icons.
 2. Click Power Options, and then choose or customize a power plan of your preference.

© Copyright Lenovo 2021                                                                                 9
Transfer data
Quickly share your files using the built-in Bluetooth technology among devices with the same features. You
also can install a disc or media card to transfer data.

Connect to a Bluetooth-enabled device (for selected models)
You can connect all types of Bluetooth-enabled devices to your computer, such as a keyboard, a mouse, a
smartphone, or speakers. To ensure that the connection is successful, place the devices 10 meters (33 feet),
at most, from the computer.

 1. Click the action center icon   in the Windows notification area. Enable the Bluetooth feature.
 2. Click Add Bluetooth or other device ➙ Bluetooth.
 3. Select a Bluetooth device, and then follow the on-screen instructions.

Lock the computer
Note: Lenovo makes no comments, judgments, or warranties about the function, quality, or performance of
the locking device and security feature. You can purchase computer locks from Lenovo.

10   User Guide
Kensington-style cable lock
Lock your computer to a desk, table, or other fixtures through a Kensington-style cable lock.

Purchase accessories
Lenovo has a number of hardware accessories and upgrades to help expand the capabilities of your
computer. Options include memory modules, storage devices, network cards, power adapters, keyboards,
mice, and more.

To shop at Lenovo, go to https://www.lenovo.com/accessories.

                                                                            Chapter 3. Explore your computer   11
12 User Guide
Chapter 4. Troubleshooting, diagnostics, and recovery
This chapter provides solutions to resolve computer problems. Use the basic procedure as a starting point
for resolving computer problems.

Basic procedure for resolving computer problems

Prerequisite
Before you start, read Generic Safety and Compliance Notices, and print the following instructions.
 1. Check that:
     a. The cables for all connected devices are connected correctly and securely.
     b. All components have been reassembled correctly.
     c. All connected devices that require ac power are connected to properly grounded and working
        electrical outlets.
     d. All connected devices are enabled in UEFI BIOS.
 2. Use an antivirus program (if any) to see if the computer has been infected by a virus. If the program
    detects a virus, remove the virus.
 3. See Chapter 4 “Troubleshooting, diagnostics, and recovery” on page 13 to resolve the problem you are
    experiencing, run the diagnostic program, and recover your operating system.
 4. If the problem persists, contact Lenovo. See Chapter 6 “Help and support” on page 39.

Troubleshooting
Use the troubleshooting information to find solutions to problems that have definite symptoms.

© Copyright Lenovo 2021                                                                                     13
Startup problems
Problem Solution
• Ensure that the power cord is correctly connected to the rear of the
computer and to a working electrical outlet.
• If the computer has a secondary power switch on the rear of the
The computer does not start up when you
computer, ensure that it is switched on.
press the power button.
• The power indicator on the front of the computer is on.
• The computer voltage matches the voltage available at the
electrical outlet for your country or region.
• Ensure that all storage drive signal cables and power cables are
connected correctly.
• Ensure that the storage drive the computer starts up from is listed
as the first startup device in UEFI BIOS.
• In rare cases, the storage drive with the operating system might get
The operating system does not start up from
corrupted or damaged. In such cases, you might need to replace
the correct storage drive or fails to start up
the storage drive.
• If the computer is installed with an Optane memory:
– Ensure that the Optane memory is not removed.
– Ensure that the Optane memory is not damaged. Check the
Optane memory using diagnostic tools.
The computer beeps multiple times before
Ensure that no keys are stuck.
the operating system starts up.
14 User GuideAudio problems
Problem Solution
• If you are using powered external speakers that have an On/Off
control, ensure that:
– The On/Off control is set to the On position.
– The speaker power cable is connected to a properly grounded,
functional ac electrical outlet.
• If your external speakers have a volume control, ensure that the
volume is not set too low.
• Click the volume icon in the Windows notification area on the
taskbar. Check the speaker and volume settings. Do not mute the
speaker or set the volume at a very low level.
• If your computer has a front audio panel, ensure that the volume is
not set too low.
The audio cannot be heard on the Windows® • Ensure that your external speakers (and headphones, if used) are
operating system. connected to the correct audio connector on the computer. Most
speaker cables are color-coded to match the audio connector.
Note: When external-speaker or headphone cables are connected
to the audio connector, the internal speaker, if present, is disabled.
In most cases, if an audio adapter is installed in one of the
expansion slots, the audio function built into the system board is
disabled. Therefore, you must use the audio connectors on the
audio adapter.
• Ensure that the program you are running is designed for use in the
Microsoft Windows operating system. If the program is designed to
run in DOS, the program does not use the Windows sound feature.
The program must be configured to use SoundBlaster Pro or
SoundBlaster emulation.
• Ensure that the audio device drivers are correctly installed.
The sound does not come from the headset Select the headset or headphones as the default audio output device
or headphones. in advanced sound settings.
• Ensure that the speaker cable is inserted completely into the
connector on the computer.
• Ensure that the cable that connects the left speaker to the right
speaker is securely connected.
The sound comes from one of the external • Ensure that the balance settings are set correctly.
speakers.
1. Right-click the volume icon in the Windows notification area
on the taskbar. Then, click Open Volume Mixer and select the
desired speaker.
2. Click the speaker icon on top of the volume control, and then
click the Levels tab.
Network problems
Note: The Wi-Fi® and Bluetooth features are optional.
Chapter 4. Troubleshooting, diagnostics, and recovery 15Problem Solution
• Connect the cable from the Ethernet connector to the RJ45
connector of the hub.
• Enable the Ethernet LAN feature in UEFI BIOS.
• Enable the Ethernet LAN adapter.
1. Go to Control Panel and view by large icons or small icons.
2. Click Network and Sharing Center ➙ Change adapter
settings.
The computer cannot connect to an Ethernet 3. Right-click the Ethernet LAN adapter icon and click Enable.
LAN.
• Update or reinstall the Ethernet LAN driver.
• Install all networking software that is necessary for your network
environment. Check with your LAN administrator for the necessary
networking software.
• Set the same duplex for the switch port and the adapter. If you
configured the adapter for full duplex, ensure that the switch port is
also configured for full duplex. Setting a wrong duplex mode might
degrade performance, cause data loss, or result in lost
connections.
When a Gigabit Ethernet model computer is Connect the network cable to the Ethernet connector using Category
used at a speed of 1000 Mbps, the Ethernet 5 wiring and a 100 BASE-T hub/switch (not 100 BASE-X).
LAN connection fails or errors occur.
The Wake On LAN (WOL) feature does not
Enable the Wake On LAN feature in UEFI BIOS.
work.
• Enable the Wi-Fi feature in UEFI BIOS.
• Enable all Wi-Fi devices.
1. Right-click the Start button to open the Start context menu.
2. Click Device Manager. Type the administrator password or
provide confirmation, if prompted.
3. Expand Network adapters to display all network devices.
The Wi-Fi feature does not work.
4. Right-click each Wi-Fi device, and then click Enable device.
• Enable the Wi-Fi feature in Windows Settings.
1. Open the Start menu.
2. Click Settings ➙ Network & Internet ➙ Wi-Fi.
3. Enable the Wi-Fi feature.
• Update or reinstall the Wi-Fi driver.
16 User GuideProblem Solution
• Enable the Bluetooth feature in UEFI BIOS.
• Enable all Bluetooth devices.
1. Right-click the Start button to open the Start context menu.
2. Click Device Manager. Type the administrator password or
provide confirmation if prompted.
3. Expand Bluetooth to display all Bluetooth devices. Right-click
each Bluetooth device, and then click Enable device.
The Bluetooth feature does not work. 4. Expand Network adapters to display all network devices.
Right-click each Bluetooth device, and then click Enable
device.
• Turn on the Bluetooth radio.
1. Open the Start menu.
2. Click Settings ➙ Devices ➙ Bluetooth & other devices.
3. Turn on the Bluetooth switch to enable the Bluetooth feature.
• Update or reinstall the Bluetooth driver.
Sound does not come from the Bluetooth Select the Bluetooth headset or headphones as the default audio
headset or headphones. output device in advanced sound settings.
Chapter 4. Troubleshooting, diagnostics, and recovery 17Performance problems
Problem Solution
Note: Depending on the volume of the storage drives and amount of
data stored on the storage drives, the disk-defragmentation process
might take up to several hours.
1. Close any open programs and windows.
2. Open the Start menu.
Excessive fragmented files exist on the 3. Click Windows System ➙ File Explorer ➙ This PC.
storage drives.
4. Right-click your C drive and then click Properties.
5. Click the Tools tab.
6. Click Optimize. Select the drive as desired, and then click
Optimize.
7. Follow the on-screen instructions.
• Clean out your Inbox, Sent Items, and Deleted Items folders from
your e-mail application.
• Clean up your C drive.
1. Open the Start menu.
2. Click Windows System ➙ File Explorer ➙ This PC.
3. Right-click your C drive and then click Properties.
4. Check the amount of free space, and then click Disk Cleanup.
5. A list of unnecessary file categories is displayed. Select the
category you want to delete, and then click OK.
The free storage drive space is insufficient.
• Disable some Windows features or remove some unnecessary
programs.
1. Go to Control Panel and view by large icons or small icons.
2. Click Programs and Features.
3. Do one of the following:
– To disable some Windows features, click Turn Windows
features on or off. Follow the on-screen instructions.
– To remove some unnecessary programs, select the
program you want to remove, and then click Uninstall/
Change or Uninstall.
• Right-click a blank area on the taskbar and open Task Manager.
The free memory space is insufficient. Then, end some tasks you are not performing.
• Install additional memory modules.
18 User GuideStorage drive problems
Problem Solution
• Ensure that the signal cables and power cables for all the storage
drives are connected correctly.
• Ensure that the computer is configured correctly to support the
storage drives.
Some or all storage drives are missing from – If the computer is installed with SATA storage drives, ensure
the BIOS menu. that the SATA storage drive enablement module (one to five
storage drives) is installed.
– If the computer is installed with SAS storage drives, ensure that
the SAS storage drive enablement module (one to five storage
drives) or the LSI MegaRAID SAS adapter is installed.
Software problems
Problem Solution
1. Check whether the problem is caused by a program.
a. Ensure that the software is compatible with the computer.
Refer to the information supplied with the software for more
information.
b. Verify that other software works correctly on the computer.
c. Verify that the software you are using works on another
computer.
Some programs do not work as expected.
2. If the problem is caused by a program:
• Refer to the printed documentation that comes with the
program or the help system of the program.
• Update the program.
• Uninstall the program and then reinstall it. To download a
program that is preinstalled on your computer, go to https://
pcsupport.lenovo.com and follow the on-screen instructions.
Recovery
This section introduces the recovery information of the Windows 10 operating system. Ensure that you read
and follow the on-screen recovery instructions. The data on your computer might be deleted during the
recovery process. To avoid data loss, make a backup copy of all the data that you want to keep.
Restore system files and settings to an earlier point
1. Go to Control Panel and view by large icons or small icons.
2. Click Recovery ➙ Open System Restore. Then, follow the on-screen instructions.
Restore your files from a backup
Note: If you use the File History tool to restore your files from a backup, ensure that you backed up your
data earlier with the tool.
1. Go to Control Panel and view by large icons or small icons.
2. Click File History ➙ Restore personal files. Then, follow the on-screen instructions.
Chapter 4. Troubleshooting, diagnostics, and recovery 19Reset your computer
In the resetting process, you can choose to keep your files or remove them when you reinstall the operating
system.
Note: The items in the graphical user interface (GUI) might change without notice.
1. Open the Start menu, and then click Settings ➙ Update & Security ➙ Recovery.
2. In the Reset this PC section, click Get started.
3. Follow the on-screen instructions to reset your computer.
Use advanced options
1. Open the Start menu, and then click Settings ➙ Update & Security ➙ Recovery.
2. In the Advanced startup section, click Restart now ➙ Troubleshoot ➙ Advanced options.
3. Select a preferred option, and then follow the on-screen instructions.
Windows automatic recovery
Note: Ensure that your computer is connected to ac power during the recovery process.
The Windows recovery environment on your computer operates independently from the Windows 10
operating system. It enables you to recover or repair the operating system even if the Windows 10 operating
system fails to start.
After two consecutive failed boot attempts, the Windows recovery environment starts automatically. Then,
you can choose repair and recovery options by following the on-screen instructions.
Create and use a recovery USB device
It is recommended that you create a recovery USB drive as early as possible as a backup for the Windows
recovery programs. With the recovery USB drive, you can troubleshoot and fix the problems even if the
preinstalled Windows recovery programs are damaged.
Create a recovery USB drive
Attention: The creation process deletes anything stored on the USB drive. To avoid data loss, make a
backup copy of all the data that you want to keep.
1. Ensure that your computer is connected to ac power.
2. Prepare a USB drive with at least 16 GB of storage capacity. The actual USB capacity required depends
on the size of the recovery image.
3. Connect the prepared USB drive to the computer.
4. Type recovery in the search box. Then, click Create a recovery drive.
5. Click Yes in the User Account Control window to allow the Recovery Media Creator program to start.
6. In the Recovery Drive window, follow the on-screen instructions to create a recovery USB drive.
Use the recovery USB drive
If you cannot start your computer, go to Chapter 6 “Help and support” on page 39 first to try to solve the
problem by yourself. If you still cannot start your computer, use the recovery USB drive to recover your
computer.
1. Ensure that your computer is connected to ac power.
2. Connect the recovery USB drive to the computer.
20 User Guide3. Turn on or restart the computer. When the logo screen is displayed, press F12. The Boot Menu window
opens.
4. Select the recovery USB drive as the boot device. Then, follow the on-screen instructions to complete
the process.
Update the device driver
Attention: Reinstalling device drivers will change the current configuration of the computer.
You should download the latest driver for a component when you notice poor performance from that
component or when you added a component. This action might eliminate the driver as the potential cause of
a problem. Download and install the latest driver by one of the following methods:
• From Lenovo Vantage:
Open Lenovo Vantage to check the available update packages. If the latest UEFI BIOS update package is
available, follow the on-screen instructions to download and install the package.
• From the Lenovo Support Web site:
Go to https://pcsupport.lenovo.com and select the entry for your computer. Then, follow the on-screen
instructions to download and install necessary drivers and software.
Chapter 4. Troubleshooting, diagnostics, and recovery 2122 User Guide
Chapter 5. CRU replacement
Customer Replaceable Units (CRUs) are parts that can be upgraded or replaced by the customer. Lenovo
computers contain the following types of CRUs:
• Self-service CRUs: Refer to parts that can be installed or replaced easily by customer themselves or by
  trained service technicians at an additional cost.
• Optional-service CRUs: Refer to parts that can be installed or replaced by customers with a greater skill
  level. Trained service technicians can also provide service to install or replace the parts under the type of
  warranty designated for the customer’s machine.

If you intend on installing the CRU, Lenovo will ship the CRU to you. CRU information and replacement
instructions are shipped with your product and are available from Lenovo at any time upon request. You
might be required to return the defective part that is replaced by the CRU. When return is required: (1) return
instructions, a prepaid shipping label, and a container will be included with the replacement CRU; and (2) you
might be charged for the replacement CRU if Lenovo does not receive the defective CRU within thirty (30)
days of your receipt of the replacement CRU. For full details, see the Lenovo Limited Warranty
documentation at:
https://www.lenovo.com/warranty/llw_02

CRU list
The following is the CRU list of your computer.

Self-service CRUs
• Left side cover
• Right side cover
• Front bezel
• Memory modules
• 3.5-inch storage drive
• Storage drive bracket
• Storage drive tray
• Power cord
• Keyboard
• Mouse
• Optional optical disk drive
• Thumbscrew kit

Optional-service CRUs
• Wire cover *
• Coin-cell battery
• M.2 solid-state drive
• Microprocessor heatsink and fan assembly *
• Water cooling system *
• Power supply assembly

© Copyright Lenovo 2021                                                                                      23
* for selected models

Remove or replace a CRU
This section provides instructions on how to remove or replace a CRU.

Power cord

Prerequisite
Before you start, read Generic Safety and Compliance Notices, and print the following instructions.

Before you remove the power cord, turn off the computer and wait several minutes until the computer is cool.

Replacement procedure
 1. Turn off the computer and remove all connected devices.
 2. Unplug the power cord from the outlet.
 3. Disconnect the power cord from the computer.

 4. Perform the removal procedure in reverse to reinstall a new CRU.

Left side cover and right side cover

Prerequisite
Before you start, read Generic Safety and Compliance Notices, and print the following instructions.

24   User Guide
Before you open the computer cover, turn off the computer and wait several minutes until the computer is
cool.

Replacement procedure
 1. Remove the power cord. See “Power cord” on page 24.
 2. Unlock any locking device that secures the computer cover.
 3. Remove the screws from the rear of the computer case.
 4. Remove the left side cover and right side cover.

 5. Perform the removal procedure in reverse to reinstall a new CRU.

Front bezel

Prerequisite
Before you start, read Generic Safety and Compliance Notices, and print the following instructions.

Before you open the computer cover, turn off the computer and wait several minutes until the computer is
cool.

Replacement procedure
 1. Remove the power cord. See “Power cord” on page 24.
 2. Remove the left side cover and right side cover. See “Left side cover and right side cover” on page 24.
 3. Disconnect the front bezel power cable from the system board.

                                                                                Chapter 5. CRU replacement   25
4. Pull the front bezel from the groove on the bottom of the computer and then remove the front bezel. 5. Perform the removal procedure in reverse to reinstall a new CRU. Wire cover (for selected models) Prerequisite Before you start, read Generic Safety and Compliance Notices, and print the following instructions. Before you open the computer cover, turn off the computer and wait several minutes until the computer is cool. Replacement procedure 1. Remove the power cord. See “Power cord” on page 24. 2. Remove the left side cover and right side cover. See “Left side cover and right side cover” on page 24. 26 User Guide
3. Remove the wire cover.

 4. Perform the removal procedure in reverse to reinstall a new CRU.

3.5-inch storage drive

Prerequisite
Before you start, read Generic Safety and Compliance Notices, and print the following instructions.

Attention: The internal storage drive is sensitive. Inappropriate handling might cause damage and
permanent loss of data. When handling the internal storage drive, observe the following guidelines:
• Replace the internal storage drive only for upgrade or repair. The internal storage drive is not designed for
  frequent changes or replacement.
• Before replacing the internal storage drive, make a backup copy of all the data that you want to keep.
• Do not touch the contact edge of the internal storage drive. Otherwise, the internal storage drive might get
  damaged.
• Do not apply pressure to the internal storage drive.
• Do not make the internal storage drive subject to physical shocks or vibration. Put the internal storage
  drive on a soft material, such as cloth, to absorb physical shocks.

Replacement procedure
 1. Remove the power cord. See “Power cord” on page 24.
 2. Remove the right side cover. See “Left side cover and right side cover” on page 24.
 3. Disconnect the signal cable and the power cable from the storage drive.
 4. Press in on both sides of the storage drive bracket handle.

                                                                                  Chapter 5. CRU replacement   27
5. Remove the storage drive and bracket.
6. Bend the storage drive bracket to release the screws.
7. Remove the 3.5-inch storage drive from the storage drive bracket.
8. Perform the removal procedure in reverse to reinstall a new CRU.
Storage drive tray
Prerequisite
Before you start, read Generic Safety and Compliance Notices, and print the following instructions.
Replacement procedure
1. Remove the power cord. See “Power cord” on page 24.
2. Remove the right side cover. See “Left side cover and right side cover” on page 24.
3. Remove the 3.5-inch storage drive and bracket. See “3.5-inch storage drive” on page 27.
4. Place a soft, clean towel or cloth on the desk or surface. Hold the sides of your computer and gently lay
it down so that the left side cover is against the surface and the right side cover is facing up.
5. Remove the screws from the bottom of the computer case.
28 User Guide6. Remove the storage drive tray.
7. Perform the removal procedure in reverse to reinstall a new CRU.
Memory module
Prerequisite
Before you start, read Generic Safety and Compliance Notices, and print the following instructions.
Replacement procedure
1. Remove the power cord. See “Power cord” on page 24.
2. Remove the left side cover. See “Left side cover and right side cover” on page 24.
3. Disengage the tabs on the memory modules.
4. Remove the memory module.
5. Perform the removal procedure in reverse to reinstall a new CRU.
Chapter 5. CRU replacement 29M.2 solid-state drive
Prerequisite
Before you start, read Generic Safety and Compliance Notices, and print the following instructions.
Attention: The internal storage drive is sensitive. Inappropriate handling might cause damage and
permanent loss of data. When handling the internal storage drive, observe the following guidelines:
• Replace the internal storage drive only for upgrade or repair. The internal storage drive is not designed for
frequent changes or replacement.
• Before replacing the internal storage drive, make a backup copy of all the data that you want to keep.
• Do not touch the contact edge of the internal storage drive. Otherwise, the internal storage drive might get
damaged.
Replacement procedure
1. Remove the power cord. See “Power cord” on page 24.
2. Remove the left side cover. See “Left side cover and right side cover” on page 24.
3. Remove the microprocessor heatsink and fan assembly. See “Microprocessor heatsink and fan
assembly (for selected models)” on page 30.
4. Loosen the screw holding the M.2 heatsink.
Note: Do not touch the thermal paste while handling the heatsink.
5. Remove the M.2 mounting screw holding the M.2 solid-state drive in place.
6. Remove the M.2 heatsink.
7. Remove the M.2 solid-state drive from the M.2 slot.
8. Perform the removal procedure in reverse to reinstall a new CRU.
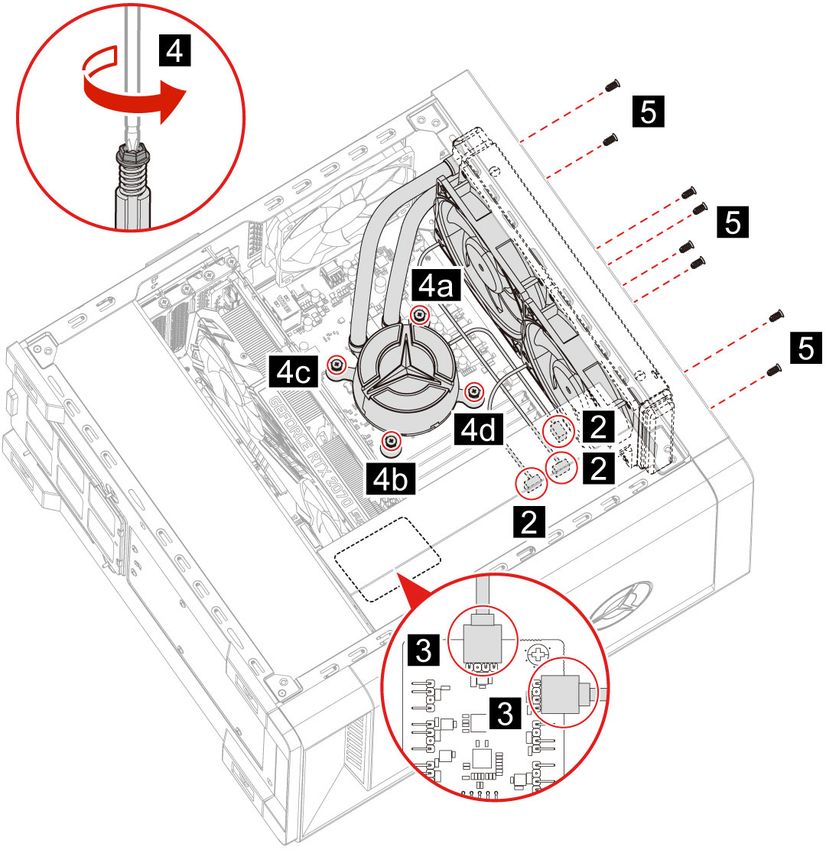
Microprocessor heatsink and fan assembly (for selected models)
Prerequisite
Before you start, read Generic Safety and Compliance Notices, and print the following instructions.
30 User GuideThe heatsink might be very hot. Before you open the computer cover, turn off the computer and wait several
minutes until the computer is cool.
Notes:
• The microprocessor heatsink and fan assembly included with your computer will be one of the three
models illustrated below. Follow the same procedures for each model.
• Any warranty replacements will only cover the specific model of heatsink and fan included with your
computer. The images provided are for reference only.
Replacement procedure
1. Remove the power cord. See “Power cord” on page 24.
2. Remove the left side cover. See “Left side cover and right side cover” on page 24.
3. Remove the fan power cable from the system board.
4. Unscrew the heatsink mounting screws.
Note: Carefully remove the screws from the system board to avoid any possible damage to the system
board. The screws cannot be removed from the heatsink.
5. Remove the heatsink and fan.
Notes:
• Do not touch the thermal paste while handling the heatsink.
• You may have to gently twist the heatsink to free it from the microprocessor.
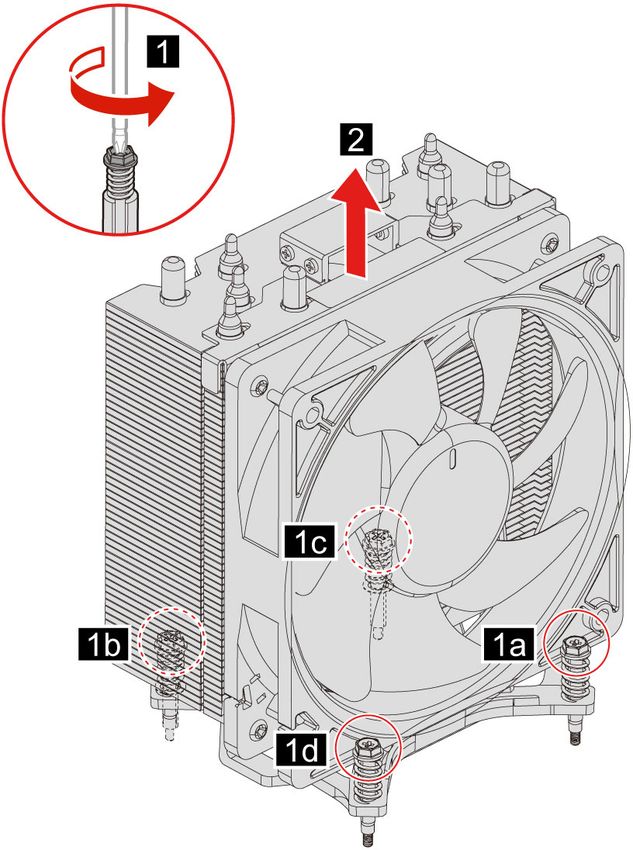
Chapter 5. CRU replacement 316. Perform the removal procedure in reverse to reinstall a new CRU. Water cooling system (for selected models) Prerequisite Before you start, read Generic Safety and Compliance Notices, and print the following instructions. 32 User Guide
The water cooling system might be very hot. Before you open the computer cover, turn off the computer and
wait several minutes until the computer is cool.

Note: The images provided are for reference only. The water cooling system provided with your computer
may differ in appearance.

Replacement procedure
 1. Remove the power cord. See “Power cord” on page 24.
 2. Remove the left side cover and right side cover. See “Left side cover and right side cover” on page 24.
 3. Remove the wire cover. See “Wire cover (for selected models)” on page 26.
 4. Remove the top cover.

 5. Remove the power cable from the system board.
 6. Remove the controller cables from the RGB board.
 7. Unscrew the pump mounting screws.

    Note: Carefully remove the screws from the system board to avoid any possible damage to the system
    board. The screws cannot be removed from the pump.

                                                                                Chapter 5. CRU replacement   33
8. Remove the fan mounting screws.
9. Remove the water cooling system.
Notes:
• Do not touch the thermal paste while handling the pump.
• You may have to gently twist the pump to free it from the microprocessor.
10. Perform the removal procedure in reverse to reinstall a new CRU.
34 User GuideCoin-cell battery
Prerequisite
Before you start, read Generic Safety and Compliance Notices, and print the following instructions.
DANGER
If the coin-cell battery is incorrectly replaced, there is danger of an explosion. The coin-cell battery
contains a small amount of harmful substance. To avoid possible injury:
• Replace only with a battery type recommended by Lenovo.
• Keep the battery away from fire.
• Do not expose it to excessive heat.
• Do not expose it to water or rain.
• Do not short-circuit it.
• Do not drop, crush, puncture the battery, or subject it to strong forces. Battery abuse or
mishandling can cause the battery to overheat, which can cause gasses or flame to "vent" from
the battery or coin-cell battery.
Note: To dispose of the coin-cell battery, refer to the “Lithium coin-cell battery notice” in the Safety and
Warranty Guide.
Your computer has a special type of memory that maintains the date, time, and settings for built-in features,
such as parallel connector assignments (configurations). A coin-cell battery keeps this information active
when you turn off the computer.
The coin-cell battery normally requires no charging or maintenance throughout its life; however, no coin-cell
battery lasts forever. If the coin-cell battery fails, the date and time information is lost. An error message is
displayed when you turn on the computer.
Replacement procedure
1. Remove the power cord. See “Power cord” on page 24.
2. Remove the left side cover. See “Left side cover and right side cover” on page 24.
3. Disengage the latch to eject the battery.
4. Perform the removal procedure in reverse to reinstall a new CRU.
Power supply assembly
Prerequisite
Before you start, read Generic Safety and Compliance Notices, and print the following instructions.
Chapter 5. CRU replacement 35The power supply might be very hot. Before you open the computer cover, turn off the computer and wait
several minutes until the computer is cool.
Replacement procedure
1. Remove the power cord. See “Power cord” on page 24.
2. Remove the left side cover and right side cover. See “Left side cover and right side cover” on page 24.
3. Remove the power cables from the system board.
4. Place a soft, clean towel or cloth on the desk or surface. Hold the sides of your computer and gently lay
it down so that the left side cover is against the surface and the right side cover is facing up.
5. Remove the screws from the bottom of the computer case.
6. Remove the mounting bracket.
7. Remove the power supply assembly mounting screws from the rear of the computer case.
36 User Guide8. Remove the power supply assembly.
9. Perform the removal procedure in reverse to reinstall a new CRU.
Chapter 5. CRU replacement 3738 User Guide
Chapter 6. Help and support

Self-help resources
Use the following self-help resources to learn more about the computer and troubleshoot problems.

 Resources                                                How to access?
 Use Lenovo Vantage to:
 • Configure device settings.
 • Download and install UEFI BIOS, drivers and firmware
   updates.
                                                          • Open the Start menu and click Lenovo Vantage.
 • Secure your computer from outside threats.
                                                          • Use Windows Search.
 • Diagnose hardware problems.
 • Check the computer warranty status.
 • Access User Guide and helpful articles.

 Product documentation:
 • Safety and Warranty Guide
 • Generic Safety and Compliance Notices                  Go to https://pcsupport.lenovo.com. Then, follow the on-
                                                          screen instructions to filter out the documentation you
 • Setup Guide                                            want.
 • This User Guide
 • Regulatory Notice

 Lenovo Support Web site with the latest support
 information of the following:
 • Drivers and software
 • Diagnostic solutions                                   https://pcsupport.lenovo.com
 • Product and service warranty
 • Product and parts details
 • Knowledge base and frequently asked questions

                                                          • Open the Start menu and click Get Help or Tips.
                                                          • Use Windows Search or the Cortana® personal
 Windows help information                                   assistant.
                                                          • Microsoft support Web site:
                                                            https://support.microsoft.com

© Copyright Lenovo 2021                                                                                              39
Call Lenovo
If you have tried to correct the problem yourself and still need help, you can call Lenovo Customer Support
Center.
Before you contact Lenovo
Prepare the following before you contact Lenovo:
1. Record the problem symptoms and details:
• What is the problem? Is it continuous or intermittent?
• Any error message or error code?
• What operating system are you using? Which version?
• Which software applications were running at the time of the problem?
• Can the problem be reproduced? If so, how?
2. Record the system information:
• Product name
• Machine type and serial number
The following illustration shows where to find the machine type and serial number of your computer.
Lenovo Customer Support Center
During the warranty period, you can call Lenovo Customer Support Center for help.
Telephone numbers
For a list of the Lenovo Support phone numbers for your country or region, go to:
https://pcsupport.lenovo.com/supportphonelist
40 User GuideNote: Phone numbers are subject to change without notice. If the number for your country or region is not
provided, contact your Lenovo reseller or Lenovo marketing representative.
Services available during the warranty period
• Problem determination - Trained personnel are available to assist you with determining if you have a
hardware problem and deciding what action is necessary to fix the problem.
• Lenovo hardware repair - If the problem is determined to be caused by Lenovo hardware under warranty,
trained service personnel are available to provide the applicable level of service.
• Engineering change management - Occasionally, there might be changes that are required after a product
has been sold. Lenovo or your reseller, if authorized by Lenovo, will make selected Engineering Changes
(ECs) that apply to your hardware available.
Services not covered
• Replacement or use of parts not manufactured for or by Lenovo or nonwarranted parts
• Identification of software problem sources
• Configuration of UEFI BIOS as part of an installation or upgrade
• Changes, modifications, or upgrades to device drivers
• Installation and maintenance of network operating systems (NOS)
• Installation and maintenance of programs
For the terms and conditions of the Lenovo Limited Warranty that apply to your Lenovo hardware product,
see “Warranty information” in the Safety and Warranty Guide that comes with your computer.
Purchase additional services
During and after the warranty period, you can purchase additional services from Lenovo at:
https://pcsupport.lenovo.com/warrantyupgrade
Service availability and service name might vary by country or region.
Chapter 6. Help and support 4142 User Guide
Appendix A. Accessibility and ergonomic information
This chapter provides information about accessibility and ergonomics.

Accessibility information
Lenovo is committed to providing users who have hearing, vision, and mobility limitations with greater
access to information and technology. This section provides information about the ways these users can get
the most out of their computer experience. You also can get the most up-to-date accessibility information
from the following Web site:
https://www.lenovo.com/accessibility

Keyboard shortcuts
The following list contains keyboard shortcuts that can help make your computer easier to use.

Note: Depending on your keyboard, some of the following keyboard shortcuts might not be available.
• Windows logo key + U: Open Ease of Access Center
• Right Shift for eight seconds: Turn on or turn off Filter Keys
• Shift five times: Turn on or turn off Sticky Keys
• Num Lock for five seconds: Turn on or turn off Toggle Keys
• Left Alt+Left Shift+Num Lock: Turn on or turn off Mouse Keys
• Left Alt+Left Shift+PrtScn (or PrtSc): Turn on or turn off High Contrast

For more information, go to https://windows.microsoft.com, and then search using any of the following
keywords: keyboard shortcuts, key combinations, shortcut keys.

Ease of Access Center
Ease of Access Center on the Windows operating system enables you to configure your computers to suit
their physical and cognitive needs.

To access Ease of Access Center:
 1. Go to Control Panel and view by Category.
 2. Click Ease of Access ➙ Ease of Access Center.
 3. Choose the appropriate tool by following the on-screen instructions.

Ease of Access Center mainly includes the following tools:
• Magnifier
   Magnifier is a useful utility that enlarges the entire screen or part of the screen so that you can see the
   items better.
• Narrator
   Narrator is a screen reader that reads what is displayed on the screen aloud and describes events such as
   error messages.
• On-Screen Keyboard
   If you prefer to type or enter data into your computer using a mouse, joystick, or other pointing device
   instead of a physical keyboard, you can use On-Screen Keyboard. On-Screen Keyboard displays a visual

© Copyright Lenovo 2021                                                                                          43
keyboard with all the standard keys. You can select keys using the mouse or another pointing device, or
     you can tap to select the keys if your computer supports multi-touch screen.
• High Contrast
     High Contrast is a feature that heightens the color contrast of some text and images on your screen. As a
     result, those items are more distinct and easier to identify.
• Personalized keyboard
     Adjust keyboard settings to make your keyboard easier to use. For example, you can use your keyboard
     to control the pointer and make the keyboard easier to type certain key combinations.
• Personalized mouse
     Adjust mouse settings to make your mouse easier to use. For example, you can change the pointer
     appearance and make your mouse easier to manage windows.

Speech Recognition
Speech Recognition enables you to control your computer by voice.

You can use verbal instructions to control the keyboard and mouse. With verbal instructions, you can start
programs, open menus, click objects on the screen, dictate text into documents, and write and send e-mails.

To use Speech Recognition:
 1. Go to Control Panel and view by Category.
 2. Click Ease of Access ➙ Speech Recognition.
 3. Follow the on-screen instructions.

Screen-reader technologies
Screen-reader technologies are primarily focused on software program interfaces, help systems, and various
online documents. For additional information about screen readers, see the following:
• Use PDFs with screen readers:
     https://www.adobe.com/accessibility.html?promoid=DJGVE
• Use the JAWS screen reader:
     https://www.freedomscientific.com/Products/Blindness/JAWS
• Use the NVDA screen reader:
     https://www.nvaccess.org/

Screen resolution
You can make the text and images on your screen easier to read by adjusting the screen resolution of your
computer.

To adjust the screen resolution:
 1. Right-click an empty area of the desktop and then click Display settings ➙ Display.
 2. Follow the on-screen instructions.

Note: Setting a resolution too low might prevent some items from fitting on the screen.

Customizable item size
You can make the items on your screen easier to read by changing the item size.
• To change the item size temporarily, use the Magnifier tool in Ease of Access Center.
• To change the item size permanently:

44     User Guide
– Change the size of all the items on your screen.
1. Right-click an empty area of the desktop and then click Display settings ➙ Display.
2. Change the item size by following the on-screen instructions. For some applications, your
configuration might not take effect until you sign out and then sign in again.
– Change the size of the items on a Web page.
Press and hold Ctrl, and then press the plus-sign key (+) to enlarge or the minus-sign key (–) to reduce
the text size.
– Change the size of the items on the desktop or a window.
Note: This function might not work on some windows.
If your mouse has a wheel, press and hold Ctrl, and then scroll the wheel to change the item size.
Industry-standard connectors
Your computer provides industry-standard connectors that enable you to connect assistive devices.
Documentation in accessible formats
Lenovo provides electronic documentation in accessible formats, such as properly tagged PDF files or
HyperText Markup Language (HTML) files. Lenovo electronic documentation is developed to ensure that
visually impaired users can read the documentation through a screen reader. Each image in the
documentation also includes adequate alternative text so that visually impaired users can understand the
image when they use a screen reader.
Ergonomic information
Good ergonomic practice is important to get the most from your personal computer and to avoid discomfort.
Arrange your workplace and the equipment you use to suit your individual needs and the kind of work that
you perform. In addition, use healthy work habits to maximize your performance and comfort when using
your computer.
Working in the virtual office might mean adapting to frequent changes in your environment. Adapting to the
surrounding light sources, active seating, and the placement of your computer hardware, can help you
improve your performance and achieve greater comfort.
This example shows someone in a conventional setting. Even when not in such a setting, you can follow
many of these tips. Develop good habits, and they will serve you well.
General posture: Make minor modifications in your working posture to deter the onset of discomfort caused
by long periods of working in the same position. Frequent short breaks from your work also help to prevent
minor discomfort associated with your working posture.
Appendix A. Accessibility and ergonomic information 45Display: Position the display to maintain a comfortable viewing distance of 510 mm to 760 mm (20 inches to 30 inches). Avoid glare or reflections on the display from overhead lighting or outside sources of light. Keep the display screen clean and set the brightness to levels that enable you to see the screen clearly. Press the brightness control keys to adjust display brightness. Head position: Keep your head and neck in a comfortable and neutral (vertical, or upright) position. Chair: Use a chair that gives you good back support and seat height adjustment. Use chair adjustments to best suit your comfort posture. Arm and hand position: If available, use chair arm rests or an area on your working surface to provide weight support for your arms. Keep your forearms, wrists, and hands in a relaxed and neutral (horizontal) position. Type with a soft touch without pounding the keys. Leg position: Keep your thighs parallel to the floor and your feet flat on the floor or on a footrest. 46 User Guide
Appendix B. Compliance information
Note: For more compliance information, refer to Generic Safety and Compliance Notices at https://
pcsupport.lenovo.com.

Federal Communications Commission (FCC) Supplier’s Declaration of
Conformity
The following information refers to Legion T5 26IOB6, machine types: 90RS, 90RT.

This equipment has been tested and found to comply with the limits for a Class B digital device, pursuant to
Part 15 of the FCC Rules. These limits are designed to provide reasonable protection against harmful
interference in a residential installation. This equipment generates, uses, and can radiate radio frequency
energy and, if not installed and used in accordance with the instructions, may cause harmful interference to
radio communications. However, there is no guarantee that interference will not occur in a particular
installation. If this equipment does cause harmful interference to radio or television reception, which can be
determined by turning the equipment off and on, the user is encouraged to try to correct the interference by
one or more of the following measures:
• Reorient or relocate the receiving antenna.
• Increase the separation between the equipment and receiver.
• Connect the equipment into an outlet on a circuit different from that to which the receiver is connected.
• Consult an authorized dealer or service representative for help.

Lenovo is not responsible for any radio or television interference caused by using other than recommended
cables and connectors or by unauthorized changes or modifications to this equipment. Unauthorized
changes or modifications could void the user’s authority to operate the equipment.

This device complies with Part 15 of the FCC Rules. Operation is subject to the following two conditions: (1)
this device may not cause harmful interference, and (2) this device must accept any interference received,
including interference that may cause undesired operation.
   Responsible Party:
   Lenovo (United States) Incorporated
   7001 Development Drive
   Morrisville, NC 27560
   Email: FCC@lenovo.com

Operating environment

Temperature
• Operating: From 10°C (50°F) to 35°C (95°F)
• Storage or transportation:
   – For common desktop computers: From -40°C (-40°F) to 55°C (131°F)
   – For all-in-one desktop computers: From -20°C (-4°F) to 55°C (131°F)

© Copyright Lenovo 2021                                                                                      47
Note: If your computer is stored or transported in temperatures less than 10°C (50°F), allow the computer to
rise slowly to an optimal operating temperature before use. This process might take up to two hours. Using
the computer in a lower operating temperature might result in irreparable damage to your computer.

Relative humidity
• Operating: 35%-80% (non-condensing)
• Storage: 20%–93% (non-condensing)

Atmospheric pressure
86 kPa to 106 kPa

Korea SAR statement

무선설비 전파 혼신 (사용주파수 2400∼2483.5 , 5725∼5825 무선제품해당)
해당 무선설비가 전파혼신 가능성이 있으므로 인명안전과 관련된 서비스는 할 수 없음

SAR 정보
본 장치는 전파 노출에 대한 가이드라인을 충족합니다.

본 장치는 무선 송수신기 입니다. 본 장치는 국제 가이드라인으로 권장되는 전파 노출에 대한 제한을 초과하지
않도록 설계되었습니다. 장치 액세서리 및 최신 부품을 사용할 경우 SAR 값이 달라질 수 있 습니다. SAR 값은
국가 보고 및 테스트 요구 사항과 네트워크 대역에 따라 다를 수 있습니다. 본 장치 는 사람의 신체에서 20mm
이상의 거리에서 사용할 수 있습니다.

Enable or disable the ErP LPS compliance mode
Lenovo computers meet the eco-design requirements of the ErP Lot 3 regulation. For more information, go
to:
https://www.lenovo.com/us/en/compliance/eco-declaration

You can enable the ErP LPS compliance mode to reduce the consumption of electricity when the computer
is off or in sleep mode.

To enable or disable the ErP LPS compliance mode:
 1. Restart the computer. When the logo screen is displayed, press F1 or Fn+F1.
 2. Select Power ➙ Enhanced Power Saving Mode and press Enter.
 3. Depending on whether you select Enabled or Disabled, do one of the following:
     • If you select Enabled, press Enter. Then, select Power ➙ Automatic Power On and press Enter.
       Check whether the Wake on LAN feature is disabled automatically. If no, disable it.
     • If you select Disabled, press Enter. Then, go to the next step.
 4. Press F10 or Fn+F10 to save the changes and exit.

When the ErP LPS compliance mode is enabled, you can wake up the computer by doing one of the
following:
• Press the power button.
• Enable the Wake Up on Alarm feature to make the computer wake up at a set time.

To meet the off mode requirement of ErP compliance, you need to disable the Fast Startup function.

48   User Guide
You can also read