User Manual Navigation software for the Fiat AVN - UK English November 2016, ver. 1.0 - Fiat Navigation
←
→
Page content transcription
If your browser does not render page correctly, please read the page content below
User Manual
Navigation software for the Fiat AVN
                     UK English
               November 2016, ver. 1.0
Thank you for choosing the Fiat AVN as your navigator. Start using Fiat AVN right away. This
document is the detailed description of the navigation software. You can easily discover Fiat AVN
while you are using it; however, we still recommend that you read this manual to fully understand
the screens and features.

Latest Map Guarantee
When you start using the product, you have 1 year to download the latest available map free of
charge.

                                               2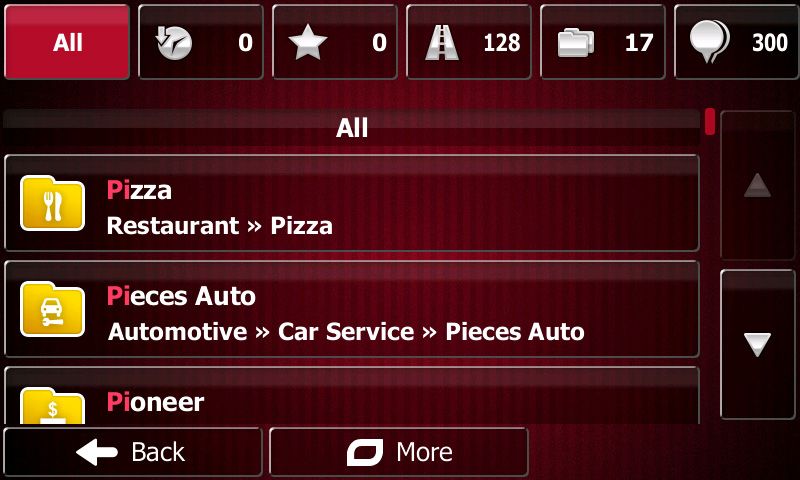
Table of contents
1 Warnings and Safety information ......................................................................................... 6
2 Getting started ......................................................................................................................... 7
   2.1 Navigation menu ...............................................................................................................................8
   2.2 Buttons and other controls on the screen .........................................................................................9
       2.2.1 Using keyboards..................................................................................................................................... 10
       2.2.2 Beyond single screen tap........................................................................................................................ 11
   2.3 Map screen .....................................................................................................................................11
       2.3.1 Navigating on the map ........................................................................................................................... 11
       2.3.2 Position markers..................................................................................................................................... 13
           2.3.2.1 Vehimarker and Lock-on-Road ........................................................................................................................ 13
           2.3.2.2 Selected map location (Cursor) and selected map object ................................................................................ 13
       2.3.3 Objects on the map................................................................................................................................. 14
           2.3.3.1 Streets and roads ............................................................................................................................................. 14
           2.3.3.2 Turn preview and Next street ........................................................................................................................... 14
           2.3.3.3 Lane information and Signposts ...................................................................................................................... 15
           2.3.3.4 Junction view ................................................................................................................................................... 16
           2.3.3.5 Motorway exit services .................................................................................................................................... 16
           2.3.3.6 3D object types ................................................................................................................................................ 17
           2.3.3.7 Elements of the active route ............................................................................................................................. 17
       2.3.4 Manipulating the map ............................................................................................................................ 18
       2.3.5 Quick menu ............................................................................................................................................ 19
       2.3.6 Checking the details of the current position (Where Am I?).................................................................. 21
3 On-road navigation ............................................................................................................... 23
   3.1 Selecting the destination of a route ................................................................................................23
       3.1.1 Combined Search ................................................................................................................................... 23
           3.1.1.1 Combined Search - Navigating to a recent destination (History) .................................................................... 26
           3.1.1.2 Combined Search - Navigating to a Favourite destination .............................................................................. 27
           3.1.1.3 Combined Search - Navigating to an address .................................................................................................. 28
           3.1.1.4 Combined Search - Navigating to an intersection ........................................................................................... 28
           3.1.1.5 Combined Search - Navigating to a Place of Interest ...................................................................................... 29
           3.1.1.6 Combined Search - Navigating to a Place of Interest by its category.............................................................. 31
       3.1.2 Entering an address or a part of the address ........................................................................................... 32
           3.1.2.1 Entering an address ......................................................................................................................................... 32
           3.1.2.2 Entering the midpoint of a street as the destination ......................................................................................... 34
           3.1.2.3 Selecting an intersection as the destination ..................................................................................................... 36
           3.1.2.4 Selecting a city/town centre as the destination ................................................................................................ 37
           3.1.2.5 Entering an address with a postal code ........................................................................................................... 39
           3.1.2.6 Tips on entering addresses quickly .................................................................................................................. 41
       3.1.3 Selecting the destination from the Places of Interest ............................................................................. 41
           3.1.3.1 Quick search for a Place of Interest ................................................................................................................ 41
           3.1.3.2 Searching for a Place of Interest using preset categories ................................................................................ 43

                                                                                      3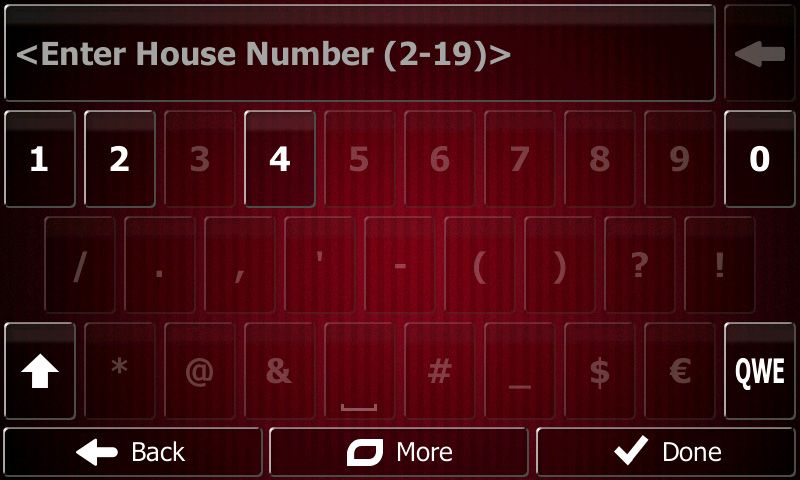
3.1.3.3 Searching for a Place of Interest by category .................................................................................................. 45
          3.1.3.4 Searching for a Place of Interest by name ....................................................................................................... 48
          3.1.3.5 Selecting nearby assistance from 'Where Am I?' ............................................................................................. 50
      3.1.4 Selecting a map location as the destination ............................................................................................ 52
      3.1.5 Selecting the destination from your Favourites...................................................................................... 53
      3.1.6 Selecting one of the most likely destinations (Smart History) ............................................................... 54
      3.1.7 Selecting a recent destination from the History ..................................................................................... 55
      3.1.8 Entering the coordinate of the destination ............................................................................................. 56
      3.1.9 Building a route from the list of destinations (Create Route) ................................................................ 57
  3.2 Viewing the entire route on the map ...............................................................................................58
  3.3 Checking route parameters and accessing route related functions................................................58
  3.4 Modifying the route ........................................................................................................................59
      3.4.1 Selecting a new destination when already having a route: New Route, Waypoint or Final Destination 60
      3.4.2 Setting a new starting position for the route .......................................................................................... 60
      3.4.3 Editing the list of destinations (Edit Route) ........................................................................................... 62
      3.4.4 Pausing the active route ......................................................................................................................... 62
      3.4.5 Cancelling the active route ..................................................................................................................... 63
      3.4.6 Checking route alternatives when planning the route ............................................................................ 63
      3.4.7 Checking route alternatives for an existing route ................................................................................... 64
      3.4.8 Changing the vehicle used in route planning ......................................................................................... 66
      3.4.9 Changing the road types used in route planning .................................................................................... 66
  3.5 Saving a location as a Favourite destination .................................................................................67
      3.5.1 Editing the details of a Favourite destination ......................................................................................... 68
  3.6 Saving a map location as an alert point .........................................................................................69
  3.7 Editing an alert point......................................................................................................................69
  3.8 Watching the simulation of the route ..............................................................................................70
4 Off-road navigation............................................................................................................... 72
  4.1 Selecting the destination of the route .............................................................................................72
  4.2 Navigating in off-road mode...........................................................................................................72
5 Reference Guide .................................................................................................................... 73
  5.1 Concepts .........................................................................................................................................73
      5.1.1 Smart Zoom ........................................................................................................................................... 73
      5.1.2 Daytime and night colour themes .......................................................................................................... 73
      5.1.3 Tunnel view ........................................................................................................................................... 73
      5.1.4 Route calculation and recalculation ....................................................................................................... 74
      5.1.5 Green routing ......................................................................................................................................... 76
      5.1.6 Road safety cameras and other proximity alert points ........................................................................... 76
      5.1.7 Speed limit warning ............................................................................................................................... 77
      5.1.8 GPS position quality indicator ............................................................................................................... 77
      5.1.9 Historical traffic ..................................................................................................................................... 78
  5.2 'More' menu ....................................................................................................................................78

                                                                               4
5.3 Settings menu ..................................................................................................................................79
       5.3.1 Sound and Warnings .............................................................................................................................. 81
       5.3.2 Customise Quick menu .......................................................................................................................... 83
       5.3.3 Route settings ......................................................................................................................................... 83
       5.3.4 User profiles ........................................................................................................................................... 87
       5.3.5 Map settings ........................................................................................................................................... 87
       5.3.6 Visual guidance settings......................................................................................................................... 88
       5.3.7 Display settings ...................................................................................................................................... 90
       5.3.8 Regional settings .................................................................................................................................... 90
       5.3.9 Trip monitor settings .............................................................................................................................. 90
       5.3.10 Log collection settings ......................................................................................................................... 91
6 Glossary .................................................................................................................................. 92
7 Copyright note ....................................................................................................................... 94

                                                                                5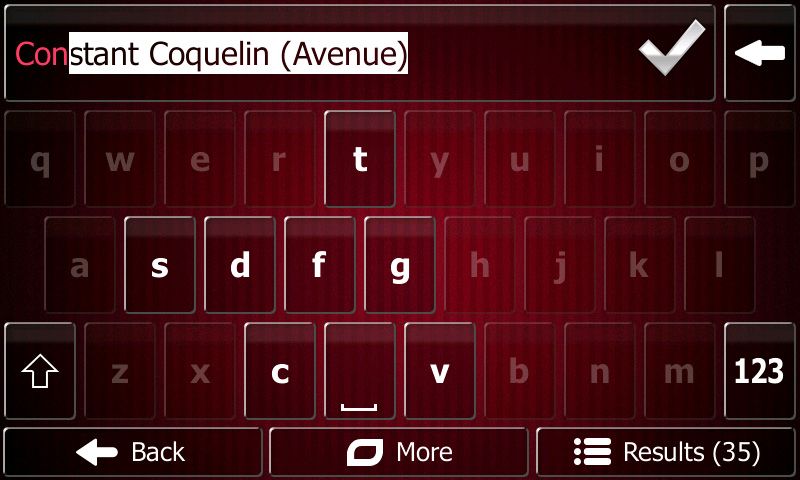
1 Warnings and Safety information
The navigation system helps you find your way to your destination with the built-in GPS receiver.
Fiat AVN does not transmit your GPS position; others cannot track you.
If you accept it when first using the application, Fiat AVN collects usage information and GPS logs
that may be used for improving the application and the quality and coverage of maps. The data is
processed anonymously; no one will be able to track any personal information. If you change your
mind later, you can enable or disable the log collection in Settings (page 91).
It is important that you look at the display only when it is safe to do so. If you are the driver of the
vehicle, we recommend that you operate Fiat AVN before you start your journey. Plan the route before
your departure and stop if you need to change the route.
You must obey the traffic signs and follow the road geometry. If you deviate from the
recommended route, Fiat AVN changes the instructions accordingly.
Never place Fiat AVN where it obstructs the driver's view, where it is in the deployment zone of an
airbag or where it might cause injuries in an accident.

                                                   6
2 Getting started
Fiat AVN is optimised for in-car use. You can use it easily by tapping the screen buttons and the
map with your fingertips.
When using the navigation software for the first time, an initial setup process starts automatically. Do
as follows:

  1.   Select the written language of the application interface. Later you can change it in Regional
       settings (page 90).

  2.   Read the End User Licence Agreement. Tap                            to continue.

  3.   You are now asked whether you allow the software to collect usage information and GPS logs
       that may be used for improving the application and the quality and coverage of maps. Tap

                             to allow the anonymous statistics or disable this function. Later you can
       turn them on or off individually in Log collection settings (page 91).

  4.   The Configuration wizard starts. Tap                       to continue.
  5.   Select the language and speaker used for voice guidance messages. Later you can change it
       in Sound and Warnings settings (page 90).

  6.   If needed, modify the time format and unit settings. Later you can change them in Regional
       settings (page 90).

                                                   7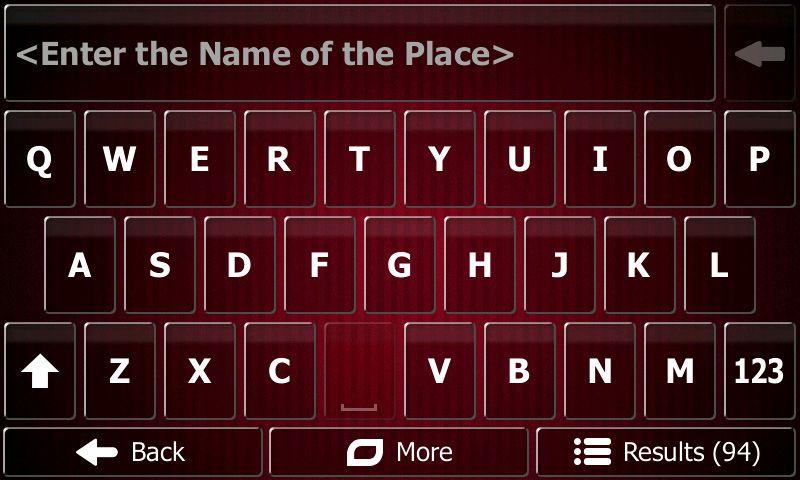
7.   If needed, modify the default route planning options. Later you can change them in Route
       settings (page 83).

  8.   The initial setup is now complete. The Configuration wizard can be restarted later from the
       Settings menu (page 79).

After the initial setup, the Navigation menu appears and you can start using Fiat AVN.

2.1 Navigation menu
You can reach all parts of Fiat AVN from the Navigation menu.

You have the following options:

   •   Tap                         to select your destination by entering an address or selecting a place
       of interest, a location on the map or one of your Favourite destinations. You can also look up
       your recent destinations from the Smart History, enter a coordinate or use the location saved in
       a photo.

   •   Tap                          to display the route parameters and the route in its full length on the
       map. You can also perform route-related actions such as editing or cancelling your route,
       setting a start point for the route, picking route alternatives, avoiding parts of the route,
       simulating navigation or adding the destination to your Favourites.

   •   Tap                        to simulate demo routes or to run some additional applications.

   •   Tap        to customise the way the navigation software works.

   •   Tap                      to start navigating on the map. The button itself is a miniature live
       map that shows your current position, the recommended route and the surrounding map area.
       Tap the button to enlarge the map to the full screen.

   •   Tap        to stop navigation and exit the software.

                                                     8
2.2 Buttons and other controls on the screen
When you are using Fiat AVN, you usually tap buttons on the touch screen.
You only need to confirm selections or changes if the application needs to restart, it needs to perform
a major reconfiguration, or you are about to lose some of your data or settings. Otherwise, Fiat AVN
saves your selections and applies the new settings without confirmation as soon as you use the
controls.

  Type              Example                     Description                       How to use it
Button                                  Tap it to initiate a function, to Tap it once.
                                        open a new screen, or to set
                                        a parameter.

Button                                  Some buttons display the         Tap it once.
with value                              current value of a field or
                                        setting. Tap the button to
                                        change the value. After the
                                        change, the new value is
                                        shown on the button.

Icon                                                                     Some icons also function as a
                                        Shows status information.
                                                                         button. Tap them once.

List                                    When you need to select          Grab the list anywhere and
                                        from several options, they       slide your finger up or down.
                                        appear in a list.                Depending on the speed of the
                                                                         sliding, the list will scroll fast or
                                                                         slow, only a bit or till the end.
                                                                         Alternatively, move between

                                                                         pages with the            and

                                                                                buttons and tap the
                                                                         value that you want.

Radio                                   When there are only a few      Tap one of the buttons to
button                                  choices, radio buttons may     select a new value.
                                        be used instead of lists. Only
                                        one value can be selected.

Switch                                  When there are only two    Tap it to turn the switch on or
                                        choices, a checkmark shows off.
                                        whether the feature is
                                        enabled.

Slider                                  When a feature can be set to         •   Drag the handle to
                                        different values in a range,             move the slider to its
                                        Fiat AVN shows an indicator              new position.
                                        on a gauge that displays and
                                        sets the value.                      •   Tap the slider where
                                                                                 you want the handle to
                                                                                 appear; the thumb
                                                                                 jumps there.

                                                   9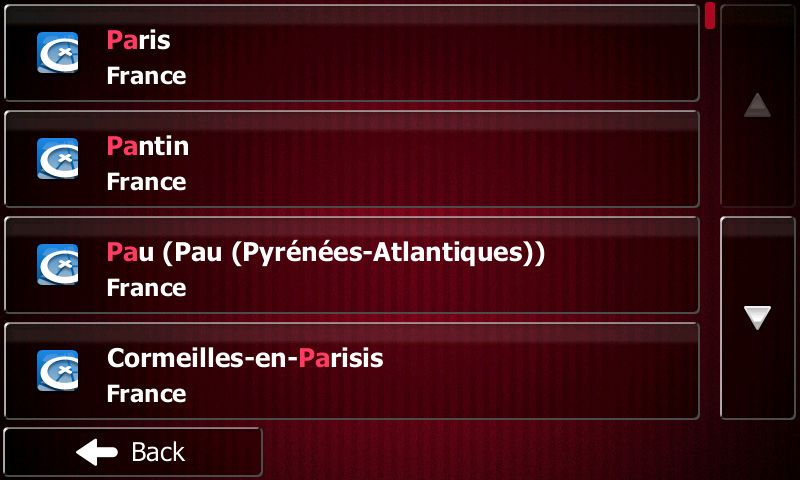
Each key is a touch screen
Virtual                                Alphabetic and alphanumeric
keyboard                               keyboards to enter text and button.
                                       numbers.

 2.2.1 Using keyboards
You only need to enter letters or numbers when you cannot avoid it. You can type with your fingertips
on the full-screen keyboards and you can switch between various keyboard layouts, for example
English, Greek or numerical.

             Task                                              Instruction
Switching to another keyboard
layout, for example from an
English keyboard to a Greek      Tap the                         button and select the new keyboard
keyboard                         layout from the list.

Correcting your entry on the
keyboard
                                 Tap         to remove the unneeded character(s).
                                 Tap and hold the button to delete several characters or the entire
                                 input string.

Entering a space, for example
between a first name and a
family name or in multi-word     Tap the         button at the bottom centre of the screen.
street names
Entering upper and lower case
                                 When entering a text, the first character appears in upper case while
letters

                                 the rest of the text is in lower case. Tap      to enter an upper
                                 case letter or tap twice to turn on Caps Lock. Tap again and lower
                                 case letters return.

Entering numbers and symbols

                                 Tap        to switch to a keyboard offering numeric and symbol
                                 characters.

Finalising the keyboard entry
(accepting the suggested
                                 Tap        .
search result)
Finalising the keyboard entry
(opening the list of search
results)                         Tap                       .

Finalising the keyboard entry
(saving your input)
                                 Tap                       .

Cancelling the keyboard entry
(returning to the previous
                                 Tap                       .
screen)

                                                  10
2.2.2 Beyond single screen tap
You usually need to tap the screen only once. However, some useful features can be accessed with
combined touch screen tapping. Those are the following:
Action Details
Tapping and
Tap and keep pressing the following buttons to reach extra functions:
holding the screen
• Tap and hold on list and menu screens: the Map
screen appears.
• Tap and hold any of the , , , , , and
buttons on the Map screen: you can rotate, tilt or scale the map
continuously.
• Tap and hold on keyboard screens: you can delete several
characters quickly.
• Tap and hold or in long lists: you can scroll pages
continuously.
You need to drag and drop the screen only in cases like:
Gestures
(drag&drop) • Moving the handle on a slider.
• Scrolling the list: grab the list anywhere and slide your finger up or down.
Depending on the speed of the sliding, the list will scroll fast or slow, only
a bit or till the end.
• Moving the map in map browsing mode: grab the map, and move it in the
desired direction.
2.3 Map screen
2.3.1 Navigating on the map
The Map screen is the most frequently used screen of Fiat AVN.
A small live map is displayed on the Navigation menu, as a part of the button.
11To enlarge this small map and open the Map screen, tap .
This map shows the current position (the Vehimarker, a blue arrow by default), the recommended
route (an orange line), and the surrounding map area.
When there is no GPS position, the Vehimarker is transparent. It shows your last known position.
You see coloured dots circling around a satellite symbol in the top left corner. The more green dots
you see, the closer you are to get the valid GPS position.
When GPS position is available, the Vehimarker is displayed in full colour, now showing your current
position.
There are screen buttons and data fields on the screen to help you navigate. During navigation, the
screen shows route information.
The button gives quick access to frequently used functions. You can change the available
functions in Settings.
By default, only one data field is displayed in the bottom right corner. Tap this field to see all route
data fields. Tap any of the data fields to suppress others and display only the selected one.
The data fields are different when you are navigating an active route and when you have no specified
destination (the orange line is not displayed).
Default data fields when cruising without a destination (tap and hold any of the fields to change its
value):
Field Description
Shows your current speed given by the GPS receiver.
Shows the speed limit of the current road if the map contains it.
12Shows the current time corrected with time zone offset. The accurate time
comes from the GPS satellites, and the time zone information comes from the
map or it can be set manually in Regional settings.
(The current time is always displayed in the top left corner of menu screens.)
Default data fields when navigating a route (tap and hold any of the fields to change its value):
Field Description
Shows the distance you need to travel on the route before reaching your final
destination.
Shows the time needed to reach the final destination of the route based on
information available for the remaining segments of the route.
The calculation cannot take into account traffic jams and other possible delays.
Historical traffic data can also be taken into account if data is available.
Shows the estimated arrival time at the final destination of the route based on
information available for the remaining segments of the route.
The calculation cannot take into account traffic jams and other possible delays.
Historical traffic data can also be taken into account if data is available.
2.3.2 Position markers
2.3.2.1 Vehimarker and Lock-on-Road
When your GPS position is available, Fiat AVN marks your current position with the
Vehimarker. By default, this marker is a blue arrow, but you can change this icon in Settings.
When on-road navigation is selected, the Vehimarker may not show your exact GPS position and
heading. If roads are near, it is aligned to the nearest road to suppress GPS position errors, and the
direction of the icon is aligned to the direction of the road.
If you select off-road navigation: The Vehimarker is at your exact GPS position. The direction of the
icon shows your current heading.
2.3.2.2 Selected map location (Cursor) and selected map object
You can mark a map location in the following ways:
• Tap the map when navigating,
• Tap the map when you are asked to confirm the destination at the end of a search, or
• Tap the map in Find on Map (page 52)
When a map location is selected, the Cursor appears at the selected point on the map. The Cursor is
displayed with a radiating red dot ( ) to make it visible at all zoom levels.
13The location of the Cursor can be used as the destination of the route, a new alert point, you can
search for Places around it, or you can save this location as one of your Favourite destinations.
You can also select some of the objects on the map. If you tap the map at the icon of a Place of
Interest or an alert point, the object will be selected (you see a red circling border around the object),
and you can get information about this object or use it as a route point.
2.3.3 Objects on the map
2.3.3.1 Streets and roads
Fiat AVN shows the streets in a way that is similar to how the paper road maps show them. Their
width and colours correspond to their importance: you can easily tell a motorway from a small
street.
2.3.3.2 Turn preview and Next street
When navigating a route, the top section of the Map screen shows information about the next route
event (manoeuvre) and the next street or the next city/town.
There is a field in the top left corner that displays the next manoeuvre. Both the type of the event
(turn, roundabout, exiting motorway, etc.) and its distance from the current position are displayed.
A smaller icon shows the type of the second next manoeuvre if it is near the first one. Otherwise, only
the next manoeuvre is displayed.
Most of these icons are very intuitive. The following table lists some of the frequently shown route
events. The same symbols are used in both fields:
Icon Description
Turn left.
Turn right.
Turn back.
14Bear right.
Turn sharp left.
Keep left.
Continue straight in the intersection.
Go left on the roundabout, 3rd exit (next manoeuvre).
Enter roundabout (second next manoeuvre).
Enter motorway.
Exit motorway.
Board ferry.
Leave ferry.
Approaching a waypoint.
Approaching the destination.
2.3.3.3 Lane information and Signposts
When navigating on multilane roads, it is important to take the appropriate lane in order to follow the
recommended route. If lane information is available in the map data, Fiat AVN displays the lanes
and their directions using small arrows at the bottom of the map. Highlighted arrows represent the
lanes and direction you need to take.
Where additional information is available, signposts substitute arrows. Signposts are displayed at the
top of the map. The colour and style of the signposts are similar to the real ones you can see above
road or by the roadside. They show the available destinations and the number of the road the lane
leads to.
All signposts look similar when cruising (when there is no recommended route). When navigating a
route, only the signpost that points to the lane(s) to be taken is displayed in vivid colours; all others
are darker.
15If you want to hide the currently displayed signposts, tap any of them and the normal Map screen
returns until new signpost information is received.
2.3.3.4 Junction view
If you are approaching a motorway exit or a complex intersection and the needed information exists,
the map is replaced with a 3D view of the junction. The lanes you need to take are displayed with
arrows. At the top of the screen road signs show you additional information.
If you want to hide the currently displayed junction, tap the picture and the Map screen returns.
2.3.3.5 Motorway exit services
You may need a petrol station or a restaurant during your journey. This feature displays a new button
on the map when you are driving on motorways.
Tap this button to open a panel with the details of the next few exits or service stations.
Tap any of them to display the exit area on the map. You can now easily add this exit as a waypoint to
your route if needed.
If you want to display other types of Places for the exits, you can change the icons in Visual Guidance
settings (page 88).
162.3.3.6 3D object types
Fiat AVN supports the following 3D object types:
Type Description
3D terrain 3D terrain map data shows changes in terrain, elevations or depressions in the land
when you view the map in 2D, and use it to plot the route map in 3D when you
navigate. Hills and mountains are shown in the background of the 3D map, and
illustrated by colour and shading on the 2D map.
Elevated roads
Complex intersections and vertically isolated roads (such as overpasses or bridges)
are displayed in 3D.
3D landmarks Landmarks are 3D artistic or block representations of prominent or well-known
objects.
2.3.3.7 Elements of the active route
Fiat AVN shows the route in the following way:
Symbol Name Description
Current GPS position
Your current position displayed on the map. If roads are near, it is
and Start point aligned to the nearest road.
Normally if GPS position is available, the route starts from the
current position. If there is no valid GPS position, Fiat AVN uses
the last known position as the start point.
Waypoint
An intermediate destination of the route before reaching the final
(intermediate
destination.
destination)
Destination (end point) The final destination of the route.
Route colour
The route always stands out with its colour on the map, both in
daytime and in night colour mode.
Streets and roads that You can choose whether you want to use or avoid certain road
are excluded from the types (page 83. However, when Fiat AVN cannot avoid such
navigation roads, the route will include them and it will show them in a
colour that is different from the route colour.
172.3.4 Manipulating the map
Tap the map anywhere to browse it during navigation. The map stops following the current position
(the Vehimarker, a blue arrow by default, is not locked in a fix position on the screen any more) and
control buttons appear to help you modify the map view.
Action Button(s) Description
Moving the No buttons
You can move the map in any direction: tap and hold the map,
map with
and move your finger towards the direction you want to move
drag&drop
the map.
Zooming in
Changes how much of the map is displayed on the screen.
and out
, Fiat AVN uses high-quality vector maps that let you
examine the map at various zoom levels, always with optimised
content. It always displays street names and other text with the
same font size, never upside-down, and you only see the
streets and objects that you need.
Map scaling has a limit in 3D map view mode. If you zoom out
further, the map switches to 2D view mode.
Tap the button once to modify the view in large steps, or tap
and hold the button to modify it continuously and smoothly.
Tilting up and
Changes the vertical view angle of the map in 3D mode.
down
, Tap the button once to modify the view in large steps, or tap
and hold the button to modify it continuously and smoothly.
Rotating left
Changes the horizontal view angle of the map.
and right
, Tap the button once to modify the view in large steps, or tap
and hold the button to modify it continuously and smoothly.
2D or 3D view
Tap this button to switch between the 3D perspective and 2D
top-down map view modes.
,
Compass in
The direction of the compass shows North. Tap the button to
2D map view
switch to North-up view, and then tap again to rotate the map in
mode ,
the previous direction.
Compass in
The direction of the compass shows North. Tap the button to
3D map view
switch to North-up view, and then tap again to rotate the map in
mode ,
the previous direction.
18Location
Tap this button to open a new screen with information about the
information selected map point, the Cursor.
Return to
Tap this button to move the map back to follow the current GPS
normal
position. Automatic map rotation is also re-enabled.
navigation
The map manipulation buttons disappear and navigation
continues.
Additional
Tap this button to open a list of additional features like saving
options
the Cursor as a Favourite destination, or searching for Places
around the Cursor.
Select
Tap this button to select the Cursor as a new destination. The
destination
route is automatically calculated.
2.3.5 Quick menu
The Quick menu is a selection of controls and functions that are frequently needed during navigation.
It can be opened directly from the Map screen by tapping .
The menu will close after a few seconds of inactivity or if you tap .
The menu will also close if you initiate simple controls like muting the device. In other cases tapping a
button will open a new screen with options.
Most of these functions are shortcuts. They are accessible from the menu system.
There are more functions available than the number of buttons in the menu. In Settings, you can
choose the function of each button (page 83). The following options are available:
Button Description Shortcut for
Master Volume
This slider adjusts the sound volume of the device. All More / Settings / Sound
slider
sounds of the application are affected. and Warnings / Volume /
Master slider
This switch mutes all sounds of the application. Tap More / Settings / Sound
again to re-enable sounds. and Warnings / Volume /
, Master switch
Destination (page 23)
This button opens the Combined Search function that
allows you to search addresses, Places, Favourite and
recent destinations by name in one unified environment.
19Destination / Find Places /
This function lets you search for a Place by its name. The
search is carried out either along your route or around Quick Search (page 41)
your current location if there is no route calculated.
Find / Favourite (page 53)
This button opens the list of your Favourite destinations.
Find / History (page 55)
This button opens the History list. You can select one of
your previous destinations.
My Route / Edit Route
This button opens the route editing function.
More / Settings / Route
This button opens the route related settings.
Settings (page 83)
More / Settings / Map
This button opens the map related settings.
Settings (page 87)
Tap the Current Street
This button opens a special screen with information
about the current position and a button to search for field on the Map screen
nearby emergency or roadside assistance. For details,
see the next chapter.
My Route / Cancel Route
This button cancels the route and stops navigation. The
(page 63)
button is replaced with the next one if waypoints are
given.
n/a
This button skips the next waypoint from the route.
My Route / Overview
This button opens a 2D map scaled and positioned to
(page 58)
show the entire route.
More / Settings / Visual
This button opens the Visual Guidance settings screen.
Guidance (page 88)
My Route / Avoidances
This button lets you bypass parts of the recommended
route.
20More / Trip Monitor (page
This button opens the Trip Monitor screen where you can
manage your previously saved trip logs and track logs. 78)
Tap the top of the Map
This button opens the list of manoeuvres (the itinerary).
screen during navigation.
My Route / More / Save
With this function you can save the active route for later
Route
use.
My Route / More / Load
With this function you can replace the active route with a
previously saved route. Route
Find / Find Places (page
With this function you can search for Places of Interest in
41)
various different ways.
My Route / More /
This button opens the Map screen and starts simulating
Simulate Navigation (page
the active route.
70)
Tap the top of the Map
This button opens the GPS Information screen with
satellite position and signal strength information. screen when there is no
GPS reception
This button opens the parameters of the selected Vehicle More / Settings / Route
profile. (page 83)
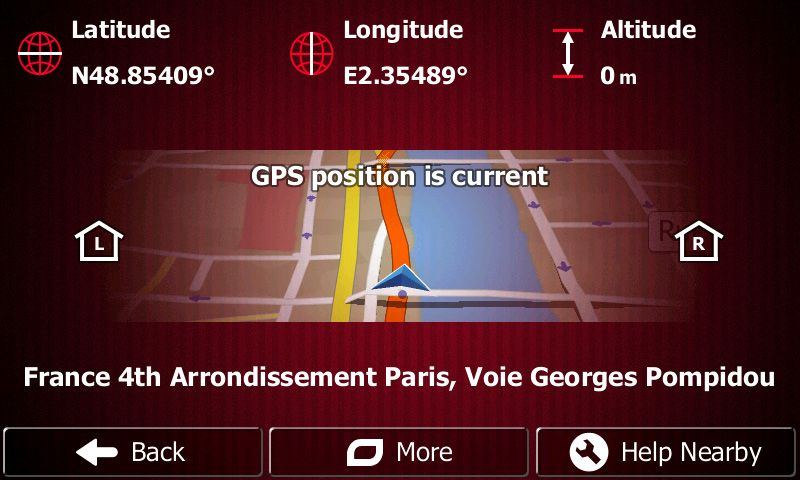
2.3.6 Checking the details of the current position (Where Am I?)
This screen contains information about the current position (or about the last known position if GPS
reception is not available) and a button to search for useful Places nearby.
You can access this screen from the map in one of the following ways:
• If the current street is displayed below the Vehimarker (the current position on the map), tap it
to open the Where Am I? screen.
21• Open the Quick menu and tap the button.
Information on this screen:
• , : Latitude and Longitude (coordinate of the current position in WGS84 format).
• : Altitude (elevation information coming from the GPS receiver - often inaccurate).
• : House number on the left.
• : House number on the right.
• In the middle of the screen you can see whether the position is current, or the time left since it
was last updated.
• Address details (when available) of the current position are displayed at the bottom.
You can also perform some actions on this screen:
Tap to save the current position as a Favourite destination.
You can also search for assistance near your current position. Tap to open a
new screen for the Quick search:
The following services can be searched around the current position or the last known position:
• : Car repair and roadside assistance services
• : Police stations
• : Medical and emergency services
• : Petrol stations
Tap any of the buttons, select a Place from the list, and navigate to it.
223 On-road navigation
When first started, Fiat AVN calculates routes using the road network of the high quality vector
maps provided with the product.
You can set up your route in different ways:
• If you need a route for immediate navigation, you can select the destination and start
navigating to it right away (normal navigation).
• You can also plan a route independently of your current GPS position or even without GPS
reception. To achieve this you need to set a new starting point in My Route / Edit Route by
tapping the flag icon at the current position. This will also turn off the GPS receiver so that the
route is not recalculated when a new position is received.
You can plan routes with multiple destinations. Select the first destination. Then select a second
destination and add it to your route to create a multi-point route. You can add as many destinations to
your route as you like.
You can also use Fiat AVN for off-road navigation. For details, see page 72.
3.1 Selecting the destination of a route
Fiat AVN offers you several ways of choosing your destination:
• Enter a full address or a part of an address, for example a street name without a house number
or the names of two intersecting streets (page 32).
• Enter an address with postal code (page 39). This way you do not need to select the name of
the city/town and the search for street names might be faster as well.
• Use a built-in Place of Interest as your destination (page 41).
• Select a location on the map with the Find on Map feature (page 52).
• Use a previously saved Favourite destination (page 53).
• Select a location from the History of previously used destinations (page 55).
• Enter the coordinate of the destination (page 56).
3.1.1 Combined Search
There are several ways to select the destination of the route. You can find buttons in the Destination
menu that initiate a separate search for addresses, places, place categories, and favourite or recent
destinations. The fastest way to search for any of these is to use the Combined Search. In this section
you can find the full description of how this feature works. The below process shows how to carry out
the search and the following subsections will help you find specific kinds of results.
1. In the Navigation menu, tap .
2. Tap the horizontal input field above the buttons. The Combined Search screen appears.
233. First you see hints on the screen showing how you can use the function. These hints are only
displayed the first time you use this screen.
4. Tap anywhere and the hints disappear. Once you get through this screen to the search results,
the hints will not appear again when you open this window later but you can see them again if
you tap the information button on the right side of the input field.
5. You can see the input field at the top of the screen. Right below that you see the search area,
the city/town around which the search is carried out. The default search area is the city/town
where you are located. For a local search, skip the next step.
6. (optional) To search in a different area, do as follows:
1. Tap . A new screen opens with a new input field. A hint bubble
explains how you can specify the new search centre.
2. Tap anywhere and the hint disappears. If you successfully select a new search area, the
hint will not appear again when you open this window later but you can see it again if
you tap the information button on the right side of the input field.
3. Start entering the name of the new city/town using the screen keyboard. You only need
to enter a few letters to get a result. If the new search area is in a different country, you
can narrow the search results if you enter one space and then a few letters of the
country of the search area.
4. The most likely result appears below the input field as you enter new letters. Tap to
select this as your new search area. If you cannot see your preferred area after a few
letters, tap and select one from the list.
247. With the proper search area displayed, you can start entering the name, address or category of
the destination you are looking for. The number shown in the button
shows how many results match the entered text. The background search is carried out while
you enter letters so this number may keep on increasing if you wait a few seconds. Keep on
entering new letters while this number is high.
8. Once the number of results is acceptable after a few seconds of searching, you can tap
to switch to the result screen.
9. The result screen also opens with hints. Tap anywhere to suppress them. Once you select a
destination, they will not appear again.
10. You see all results in the list, regardless of their type. Addresses, Places, Place categories,
Favourite and recent destinations are mixed within one list.
11. You have the following options:
• Tap the result you want to use as your destination. Scroll the list if necessary.
• To narrow the search for only one type of result (for example for Places only) you can
tap the related button at the top of the screen. See the next sections for details.
12. Once the destination is selected, a full screen map appears with the selected point in the
middle. If necessary, tap the map somewhere else to modify the destination. The Cursor
( ) appears at the new location. Tap to confirm the destination, or tap
to select a different destination.
2513. After a short summary of the route parameters, the map appears showing the entire route. The
route is automatically calculated. Tap to modify route parameters, or tap
and start your journey.
If you know that you will use this destination frequently, before tapping to
Tip! confirm the destination, put it on the list of your Favourites first: tap then
, give a name for the new Favourite, and tap to save
the location. The map with the destination returns automatically. Now you can start your
journey.
3.1.1.1 Combined Search - Navigating to a recent destination (History)
To find one of your recent destinations in Combined Search, carry out the search as described earlier.
For the input text you can use either a part of the name or a part of the address of the recent
destination. When you get to the result screen, do as follows:
1. Tap at the top of the screen.
2. The list is now filtered. What you see is the list of recent destinations with a matching name or
address.
3. Scroll down the list if necessary and then select one of the destinations from the list.
4. Once the destination is selected, a full screen map appears with the selected point in the
middle. If necessary, tap the map somewhere else to modify the destination. The Cursor
( ) appears at the new location. Tap to confirm the destination, or tap
to select a different destination.
265. After a short summary of the route parameters, the map appears showing the entire route. The
route is automatically calculated. Tap to modify route parameters, or tap
and start your journey.
Note! The alternative way to search for a recent destination is to tap the button in the Quick
menu or in the Destination menu. The rest of the procedure is similar to the above.
3.1.1.2 Combined Search - Navigating to a Favourite destination
To find one of your Favourite destinations in Combined Search, carry out the search as described
earlier. When you get to the result screen, do as follows:
1. Tap at the top of the screen.
2. The list is now filtered. What you see is the list of your Favourite destinations with a matching
name.
3. Scroll down the list if necessary and then select one of the destinations from the list.
4. Once the destination is selected, a full screen map appears with the selected point in the
middle. If necessary, tap the map somewhere else to modify the destination. The Cursor
( ) appears at the new location. Tap to confirm the destination, or tap
to select a different destination.
5. After a short summary of the route parameters, the map appears showing the entire route. The
route is automatically calculated. Tap to modify route parameters, or tap
and start your journey.
27Note! The alternative way to search for a Favourite destination is to tap the button in the
Quick menu or in the Destination menu. The rest of the procedure is similar to the above.
3.1.1.3 Combined Search - Navigating to an address
To find an address in Combined Search, carry out the search as described earlier. Use the name of
the street alone or combined with the house number as your input text. When you get to the result
screen, do as follows:
1. Tap at the top of the screen.
2. The list is now filtered. What you see is the list of matching addresses.
3. Scroll down the list if necessary and then select one of the addresses from the list.
4. Once the destination is selected, a full screen map appears with the selected point in the
middle. If necessary, tap the map somewhere else to modify the destination. The Cursor
( ) appears at the new location. Tap to confirm the destination, or tap
to select a different destination.
5. After a short summary of the route parameters, the map appears showing the entire route. The
route is automatically calculated. Tap to modify route parameters, or tap
and start your journey.
Note! The alternative way to search for an address is to tap the button in the Destination
menu. Unlike the Combined Search, this alternative search method is a structured one
where you can define the parts of the address separately.
3.1.1.4 Combined Search - Navigating to an intersection
To find an intersection in Combined Search, carry out the search as described earlier but use the '&'
sign to separate the two intersecting streets. You do not need to use spaces before and after the
separator character. For example you can use any of the following input texts to find the intersection
of Collins Street and Douglas Avenue (the more precise the input string the fewer false results are
expected):
• Collins St & Douglas Ave
• Collins & Douglas
28• Coll St & Dou Av
• Col&Doug
• C&D
• Collins St& (this one will give you all the intersections of Collins Street so that you can select
the appropriate one from the result list)
When you get to the result screen, do as follows:
1. Tap at the top of the screen.
2. The list is now filtered. What you see is the list of matching intersections.
3. Scroll down the list if necessary and then select one intersection from the list.
4. Once the destination is selected, a full screen map appears with the selected point in the
middle. If necessary, tap the map somewhere else to modify the destination. The Cursor
( ) appears at the new location. Tap to confirm the destination, or tap
to select a different destination.
5. After a short summary of the route parameters, the map appears showing the entire route. The
route is automatically calculated. Tap to modify route parameters, or tap
and start your journey.
Note! The alternative way to search for an address is to tap the button in the Destination
menu. Unlike the Combined Search, this alternative search method is a structured one
where you can define the parts of the address separately.
3.1.1.5 Combined Search - Navigating to a Place of Interest
To find a Place of Interest in Combined Search, carry out the search as described earlier. Search for a
part of its name. When you get to the result screen, do as follows:
1. Tap at the top of the screen.
2. The list is now filtered. What you see is the list of matching Places ordered by their distance
from your current location.
293. (optional) Should your product contain Places from different data providers, you can further
narrow the list by showing Places from one provider only. Look for the provider logos at the top
of the screen. Tap one of them to see Places from that provider only.
4. Scroll down the list if necessary and then select one of the Places from the list.
5. Once the destination is selected, a full screen map appears with the selected point in the
middle. If necessary, tap the map somewhere else to modify the destination. The Cursor
( ) appears at the new location. Tap to confirm the destination, or tap
to select a different destination.
6. After a short summary of the route parameters, the map appears showing the entire route. The
route is automatically calculated. Tap to modify route parameters, or tap
and start your journey.
The alternative way to search for a Place is to tap the button in the Quick menu or the
Note! button in the Destination menu. These alternatives are different from the Combined
Search. The first one is also a name search but if there is a route planned, it will not be
carried out around your current location but along the route. The Place search in the
Destination menu is a complex Place search with several options including category search
or search around the destination of the current route.
303.1.1.6 Combined Search - Navigating to a Place of Interest by its category
To find a Place of Interest in Combined Search by giving its category only, carry out the search as
described earlier. Search for a part of the category name. When you get to the result screen, do as
follows:
1. The list is ordered with Place categories at the beginning but if you want, you can filter the list
to contain Place categories only. Tap at the top of the screen to filter the list.
2. Scroll the list and select one of the categories. You get the list of Places in that category
ordered by their distance from your current position. If the selected category contains
subcategories, you will see all Places in that category mixed into one list.
3. Scroll down the list if necessary and then select one of the Places from the list.
4. Once the destination is selected, a full screen map appears with the selected point in the
middle. If necessary, tap the map somewhere else to modify the destination. The Cursor
( ) appears at the new location. Tap to confirm the destination, or tap
to select a different destination.
5. After a short summary of the route parameters, the map appears showing the entire route. The
route is automatically calculated. Tap to modify route parameters, or tap
and start your journey.
The alternative way to search for a Place category is to tap the button in the
Note!
Destination menu and then tap . This alternative is different from the Combined
Search. When you search for a Place category here, you will go through the whole Place
category tree. When you select a category, the list of its subcategories opens.
313.1.2 Entering an address or a part of the address
If you know at least a part of the address, it is the quickest way to select the destination of the route.
Using the same screen, you can find an address by entering:
• the exact address, including house number
• the centre of a city/town
• an intersection
• the midpoint of a street
• any of the above, starting the search with the postal code (page 39)
3.1.2.1 Entering an address
To enter an address as the destination, do as follows:
1. If you are on the Map screen, tap to return to the Navigation menu.
2. In the Navigation menu, tap the following buttons: , .
3. By default, Fiat AVN proposes the country and city/town where you are. If needed, tap
, enter the first few letters of the country name on the keyboard, and select
one country from the list of results.
4. If needed, select a new city/town:
a. Tap .
b. Start entering the name of the city/town on the keyboard.
c. Find the city/town you need:
• The most likely city/town name is always shown in the input field. To accept it, tap
.
32• If the desired name does not show up, the names that match the string appear in
a list after entering a couple of characters (to open the list of results before it
appears automatically, tap ). Select the city/town from the
list.
5. Enter the street name:
a. Tap .
b. Start entering the street name on the keyboard.
c. Find the street you need:
• The most likely street name is always shown in the input field. To accept it, tap
.
• If the desired name does not show up, the names that match the string appear in
a list after entering a couple of characters (to open the list of results before it
appears automatically, tap ). Select the street from the list.
6. Enter the house number:
a. Tap .
b. Enter the house number on the keyboard. (To enter letters, tap ).
c. Tap to finish entering the address. (If the entered house number
cannot be found, the midpoint of the street is selected as the destination.)
337. A full screen map appears with the selected point in the middle. If necessary, tap the map
somewhere else to modify the destination. The Cursor ( ) appears at the new location.
Tap to confirm the destination, or tap to select a
different destination.
8. After a short summary of the route parameters, the map appears showing the entire route. The
route is automatically calculated. Tap to modify route parameters, or tap
and start your journey.
3.1.2.2 Entering the midpoint of a street as the destination
You can navigate to the midpoint of a street if the house number is not available:
1. If you are on the Map screen, tap to return to the Navigation menu.
2. In the Navigation menu, tap the following buttons: , .
3. If necessary, modify the country and city/town as described earlier (page 32).
4. Enter the street name:
a. Tap .
b. Start entering the street name on the keyboard.
c. Find the street you need:
• The most likely street name is always shown in the input field. To accept it, tap
.
34You can also read