User Manual Vigilance H.265 Outdoor Bullet Camera - DCS-4712E DCS-4714E - D-Link
←
→
Page content transcription
If your browser does not render page correctly, please read the page content below
Version 1.10 | 04/21/2021

                     User Manual

Vigilance H.265 Outdoor Bullet Camera
                                  DCS-4712E
                                  DCS-4714E
                                  DCS-4718E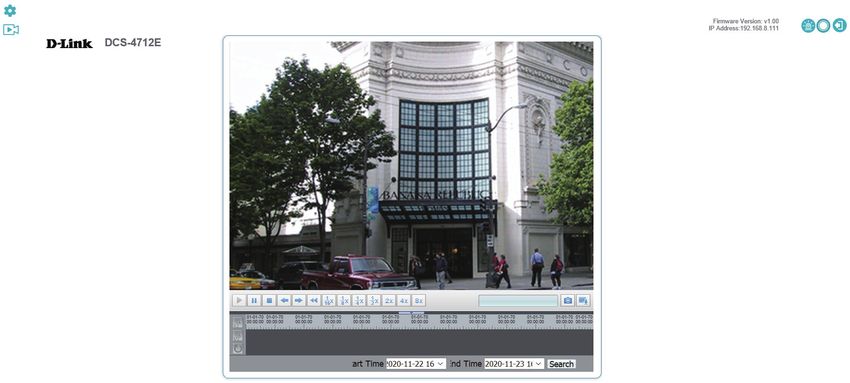
Preface
D-Link reserves the right to revise this publication and to make changes in the content hereof without obligation to notify any person or
organization of such revisions or changes. Information in this document may become obsolete as our services and websites develop and
change.

                                                   Manual Revisions
                    Revision                Date                                          Description
                      1.00               01/25/2021            Initial release

                      1.10               04/16/2021            Hardware Overview update

                                                          Trademarks
D-Link and the D-Link logo are trademarks or registered trademarks of D-Link Corporation or its subsidiaries in the United States or other
countries. All other company or product names mentioned herein are trademarks or registered trademarks of their respective companies.

Copyright © 2021 D-Link Corporation.

All rights reserved. This publication may not be reproduced, in whole or in part, without prior expressed written permission from D-Link Corporation.

D-Link Vigilance H.265 Outdoor Bullet Camera User Manual                                                                                           2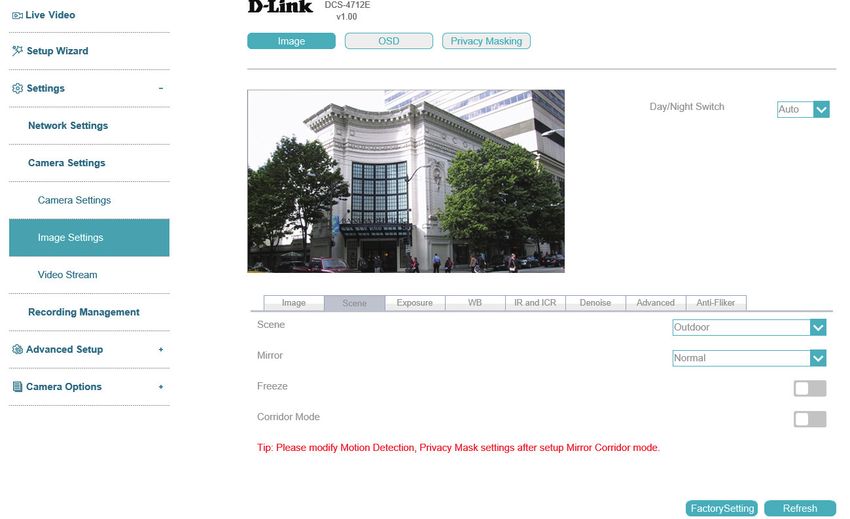
Table of Contents
    Product Overview......................................................... 4                                Advanced............................................................................51
        Package Contents.................................................................. 4                   Camera Configuration....................................................58
        Introduction............................................................................. 5          Camera Options...................................................................61
        System Requirements.......................................................... 5                        Camera Info........................................................................61
        Features..................................................................................... 6        Date and Time...................................................................62
        Hardware Overview (DCS-4712E/DCS-4714E)............ 7                                                  Administration Settings................................................63
        Hardware Overview (DCS-4718E).................................... 8                                    Camera Log........................................................................65
    Installation.................................................................... 9                         Camera Log / Alarm........................................................66
        Mounting the Camera.......................................................... 9                   Technical Specifications - DCS-4712E.......................69
        Waterproofing Your Installation.....................................11                            Technical Specifications - DCS-4714E.......................71
        Inserting the MicroSD Card..............................................14                        Technical Specifications - DCS-4718E.......................73
    Configuration.............................................................15                          Regulatory Information.............................................75
        Installing the Setup Wizard..............................................15
        Accessing the Admin Interface.......................................16
        Live Video...............................................................................17
        Playback..................................................................................18
          Controlling the Playback...............................................19
        Setup Wizard.........................................................................21
          Network Setup Wizard...................................................22
          Motion Detection Setup Wizard.................................28
        Settings...................................................................................33
          Network Settings ............................................................33
          Camera Settings...............................................................38
        Advanced Setup...................................................................51

D-Link Vigilance H.265 Outdoor Bullet Camera User Manual                                                                                                                                            3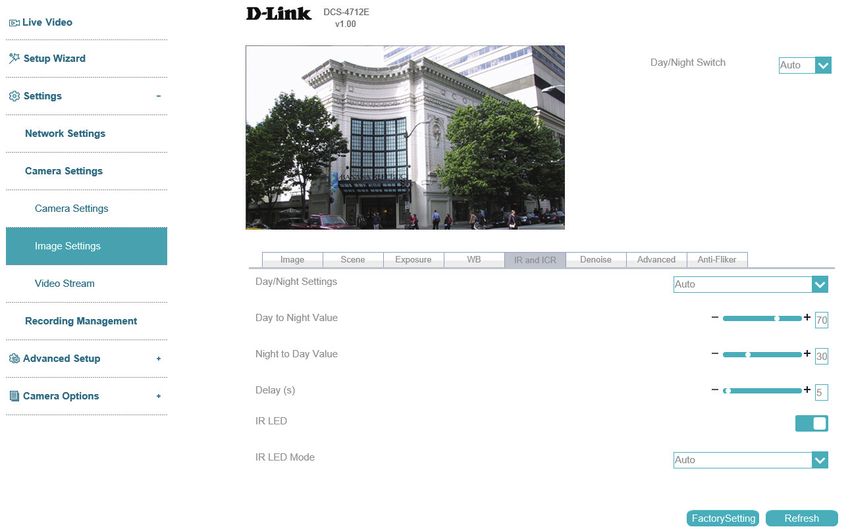
Section 1: Product Overview

                                                 Product Overview
                                                      Package Contents

                      Vigilance H.265 Outdoor Bullet Camera

                      Cable Waterproofing Connector

                      Mounting Kit
                      • Allen Key
                      • Alignment Sticker

                      Documentation

    If any of the above items are missing, please contact your reseller.

    Safety Notice: Installation and servicing should be done by certified technicians to conform with all local codes and prevent voiding
    your warranty.

D-Link Vigilance H.265 Outdoor Bullet Camera User Manual                                                                                    4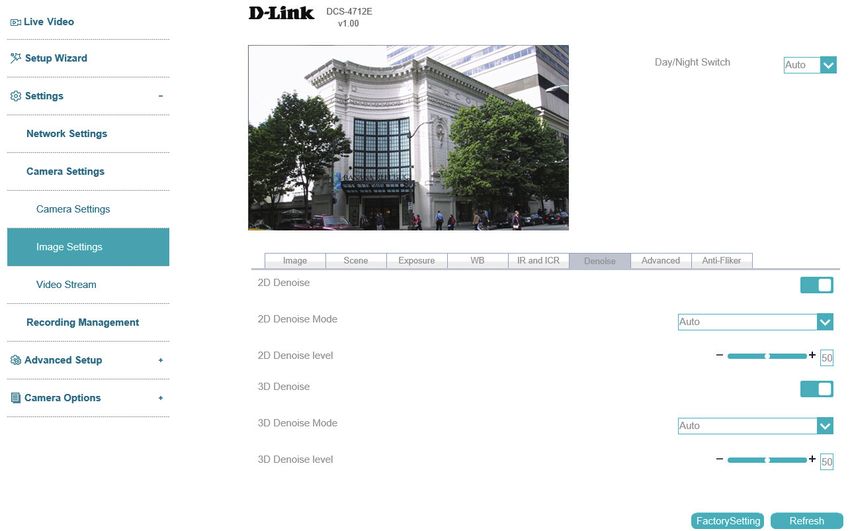
Section 1: Product Overview

                                                              Introduction
The Vigilance H.265 2/4/8 Megapixel Outdoor Bullet Camera is a professional surveillance and security solution for small, medium, and large
enterprises. It uses a full-HD progressive scan CMOS sensor to deliver low-noise video and low-light capability ideal for surveillance applications. It
offers a complete surveillance solution featuring a built-in IR cut filter and IR LEDs effective up to 30 meters with built-in smart IR function, avoiding
overexposure of near objects at night, allowing it to stream simultaneous real-time full-HD resolution video 24/7. In addition, the IP66 certified
weatherproof housing make this camera ideal for both indoor and outdoor applications.

To maximize bandwidth efficiency and improve image quality, it provides real-time video compression using H.265, H.264, and MJPEG codecs for
simultaneous video streaming and recording. It also incorporates Power over Ethernet (PoE), allowing it to be easily installed in a variety of locations,
especially with D-Link Surveillance Switches.

This camera can be accessed remotely, controlled, and configured from any computer over your local network or through the Internet via a web
browser. The simple installation and intuitive web-based interface offer easy configuration across the full range of its advanced feature set and
make it an ideal choice for a dependable and cost-effective surveillance solution with easy clutter-free installation.

                                                    System Requirements
•      Computer running Microsoft Windows® 10
•      Internet Explorer 11, Google Chrome or Firefox (MJPEG only)

D-Link Vigilance H.265 Outdoor Bullet Camera User Manual                                                                                                5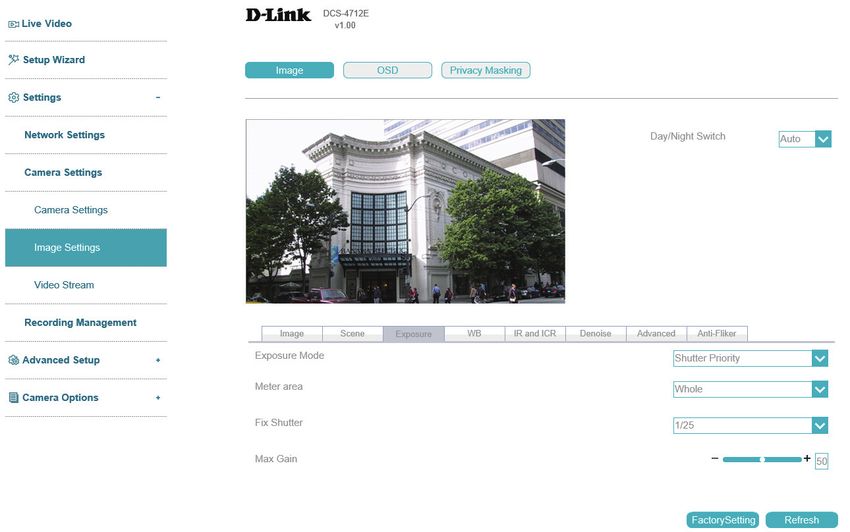
Section 1: Product Overview

                                                                Features
H.265/H.64 Compression
This camera supports the H.265 and H.264 compression algorithms to bring out the best combination of performance, quality, bandwidth, and
storage space.

Better Night Vision
Supports night vision technology from Sony which optimizes the display for increased image quality in low-light environments.

microSD Card
The camera comes equipped with an optional microSD card slot for local storage. Recordings can be saved to the microSD card.

IR LEDs for Day and Night Functionality
The built-in infrared LEDs enable night time viewing of up to 30 meters. With built-in smart IR function, it can avoid overexposure of near objects
at night.

IP66 Weatherproof and Vandal-Proof Housing
This camera uses IP66 weatherproof housing, allowing you to rest assured that in the toughest of conditions, it will continue to provide round-the-
clock surveillance.

PoE (Power over Ethernet) for Flexible Installation
Your camera can draw all the power it needs from a PoE switch or PoE injector for a simple and clutter-free installation. You can also power it with
an optional 12 V / 1.5 A power adapter.

Remote Monitoring Utility
The D-Link D-ViewCam™ application adds enhanced features and functionality for the camera and allows administrators to configure and access
the camera from a separate site via Intranet or Internet. Other features include image monitoring, recording images to a hard drive, viewing up to
64 cameras on one screen, and taking snapshots.

D-Link Vigilance H.265 Outdoor Bullet Camera User Manual                                                                                          6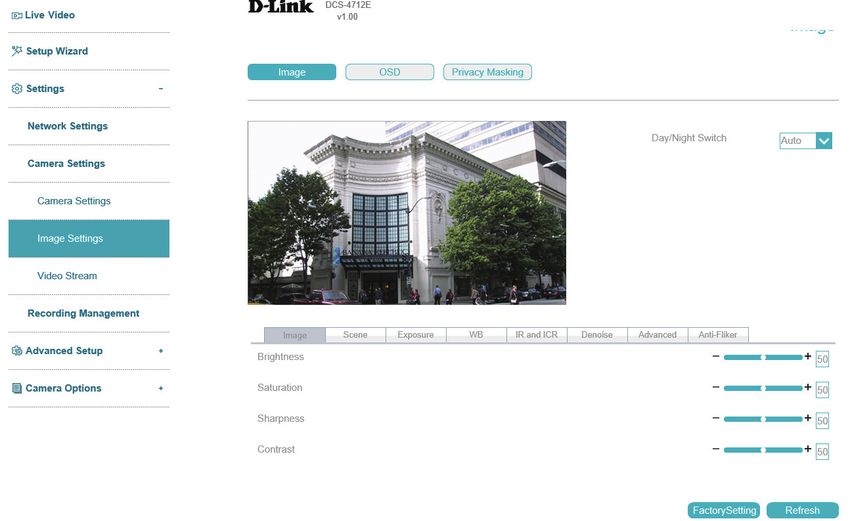
Section 1: Product Overview

                       Hardware Overview (DCS-4712E/DCS-4714E)

                                                                                      4
                                                     2      3
                                                                                      5
            1                                                                         6

            1       Camera Lens        Fixed camera lens.
                                       Loosen the screw with the included Allen key to adjust the camera angle. Tighten it to lock
            2    Adjustment Mount
                                       the camera angle.
            3       microSD Slot       Slot for a microSD card.
                                       RJ-45 connector for Ethernet. Can also be used to power the camera using Power over
            4       Ethernet Jack
                                       Ethernet (PoE).
            5     Power Connector      Connects to an optional 12 V / 1.5 A power adapter (not included).
            6       Reset Button       Press and hold for more than five seconds, then release to perform a factory reset.

D-Link Vigilance H.265 Outdoor Bullet Camera User Manual                                                                             7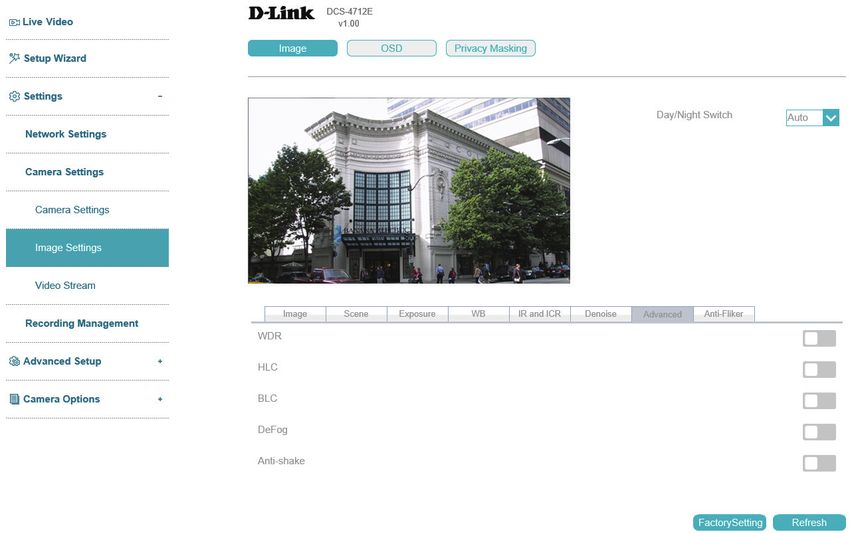
Section 1: Product Overview

                                    Hardware Overview (DCS-4718E)

                                                                                          4

                                                                                          5
           1
                                                                                          6
                                        2             3

            1       Camera Lens        Motorized vari-focal lens.
                                       Loosen the screw with the included Allen key to adjust the camera angle. Tighten it to lock
            2    Adjustment Mount
                                       the camera angle.
            4       microSD Slot       Slot for a microSD card.
                                       RJ-45 connector for Ethernet. Can also be used to power the camera using Power over
            5       Ethernet Jack
                                       Ethernet (PoE).
            6     Power Connector      Connects to an optional 12 V / 1.5 A power adapter (not included).
            7       Reset Button       Press and hold for more than five seconds, then release to perform a factory reset.

D-Link Vigilance H.265 Outdoor Bullet Camera User Manual                                                                             8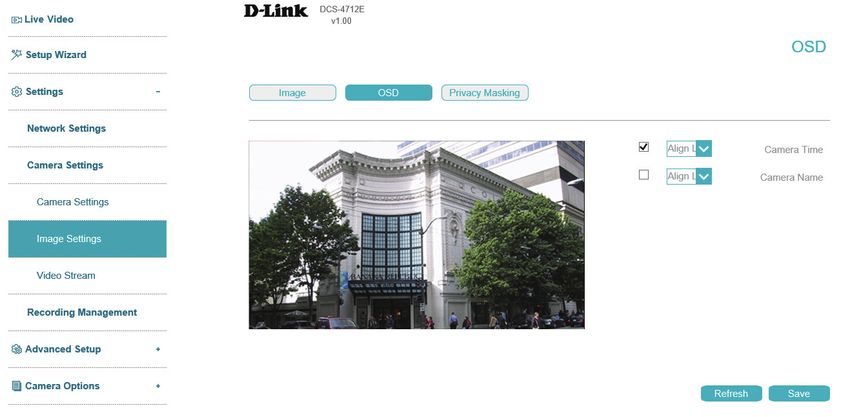
Section 2: Installation

                                                       Installation
                                               Mounting the Camera
It is highly recommended that you configure and test your camera before mounting it. Refer to "Inserting the microSD Card" on page 14 and
"Installing the Setup Wizard" on page 15 for more information.

Step 1
Place the mounting sticker where you want to position the camera.

Use a 4 mm drill bit to make the required holes approximately 30 mm deep, then insert the
wall anchors into the holes.

Step 2
If you are running the camera cables out the side of the camera, guide the camera cables
through the cable channel on the base.

Step 3
Use the screws provided to mount the camera to the wall.

D-Link Vigilance H.265 Outdoor Bullet Camera User Manual                                                                               9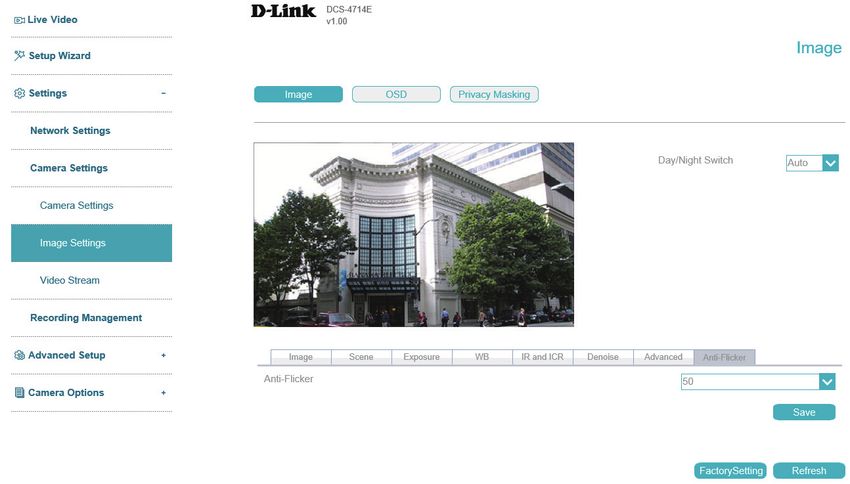
Section 2: Installation

Step 4
Connect the power and Ethernet cables, or just the Ethernet cable if you are using a PoE
connection.

Step 5
To adjust the camera’s monitoring direction, use the Allen key to turn the adjustment screw
counterclockwise to loosen it, then move the camera to the desired position and angle. When
you are finished, turn the adjustment screw clockwise to tighten it.

D-Link Vigilance H.265 Outdoor Bullet Camera User Manual                                      10
Section 2: Installation

                                       Waterproofing Your Installation
To waterproof your camera, follow the instructions below. A round Ethernet cable, a crimping tool, and RJ-45 plugs are required for this procedure.

Step 1
Place the washer around the base of the Ethernet connector as shown.

Step 2
Thread the bare Ethernet cable through the waterproof connector as shown, then crimp an
RJ-45 plug onto the cable.

D-Link Vigilance H.265 Outdoor Bullet Camera User Manual                                                                                        11
Section 2: Installation Step 3 Connect the RJ-45 plug into the Ethernet connector, then screw the waterproof connector to the Ethernet connector by turning it about a half-turn clockwise. Step 4 Screw the back part of the waterproof connector clockwise until there is a tight seal around the Ethernet cable. D-Link Vigilance H.265 Outdoor Bullet Camera User Manual 12
Section 2: Installation

Step 5
The power connector and reset button cables are not waterproof. It is recommended
to use waterproof tape to protect them. Wind the tape around each cable in an
overlapping manner to cover them.

D-Link Vigilance H.265 Outdoor Bullet Camera User Manual                            13
Section 2: Installation

                                            Inserting the MicroSD Card
You can insert an (optional) microSD card to store recordings. To insert the microSD card, first remove the screws from the small panel on the back
of the camera (for the DCS-4712E/DCS-4714E) or the bottom of the camera (for the DCS-4718E). Open the panel, insert a microSD card into the slot,
and replace the panel and the screws.

                           DCS-4712E/DCS-4714E

                                                                                DCS-4718E

D-Link Vigilance H.265 Outdoor Bullet Camera User Manual                                                                                        14
Section 3: Configuration
Configuration
Installing the Setup Wizard
1. Using a web browser, navigate to dlink.com/support/ and select your region.
2. On the next screen, enter the model number of your camera in the search bar and click Search. Click the picture of your camera. On the product
page, click the Download button next to Setup Wizard.
3. Once the executable file has finished downloading, click it and follow the instructions to install the Setup Wizard.
D-Link Vigilance H.265 Outdoor Bullet Camera User Manual 15Section 3: Configuration
Accessing the Admin Interface
1. Ensure that your camera is plugged in (either using a 12 V 1.5 A power adapter or a PoE-
enabled device) and connected to your computer with an Ethernet cable.
2. Open the Setup Wizard. It will display the MAC address and IP address of your camera.
If you have a DHCP server on your network, this will be a dynamic IP address. If your
network does not use a DHCP server, the network camera's default static IP 192.168.0.20
will be displayed. Select your camera, then click the Link button to continue.
3. If this is your first time logging in, you will be prompted to create a password, which
must be between 8 and 30 characters and must contain both letters and numbers.
Press Saves.
4. To view the camera display and configure the camera, on the main screen of the Setup
Wizard, click the Search button, then select your camera and click the Link button to
open the Web UI. Alternatively, open a web browser and type the camera's IP address
(displayed in step 2) into the URL bar and press Enter.
5. Enter the password you created, and click Login to continue.
D-Link Vigilance H.265 Outdoor Bullet Camera User Manual 16Section 3: Configuration
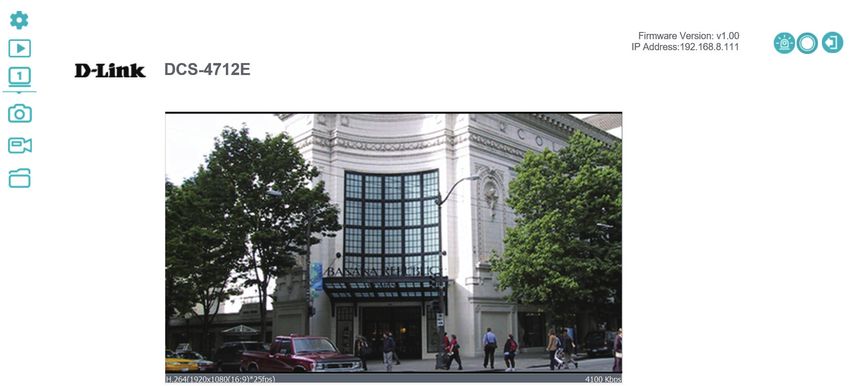
Live Video
On the Home screen, you can view the camera display and use the icons at the top of the
screen to navigate to different pages of the web UI. The icons are:
Setup: Clicking this will take you to the camera configuration
pages.
Playback: Click this to view saved recordings.
Video Stream: Select a video profile to use. For more on setting
up video profiles, refer to Video Stream on page 45.
Snapshot: This will save a snapshot to your PC using the storage
folder you have selected.
Record: This will start recording a video clip to a selected folder
on your computer.
Select a Folder: Select a storage folder to save snapshots and
video clips to.
Alarm: This will flash red when motion is detected.
Recording Status: This will turn red when the camera is recording.
Logout: Click this to log out of the web interface.
D-Link Vigilance H.265 Outdoor Bullet Camera User Manual 17Section 3: Configuration
Playback
On this page you can view recorded video stored on your camera's microSD card. Use the buttons below the image to control the playback, and
use the bar below the buttons to select which period of time you would like to view recordings from.
Displays the
video playback
Controls the
playback
Display the date
and time by
adjusting the start/
end time settings.
Use this to select
the date and
time to play the
recording from
D-Link Vigilance H.265 Outdoor Bullet Camera User Manual 18Section 3: Configuration
Controlling the Playback
1 2 3 4 5 6 7 8 9 10 11 12 13
1 Play Play the recording from the selected location.
2 Pause Pause the playback.
3 Stop Stop the playback.
4 Frame back Step back a frame
5 Frame play Step forward a frame
6 Go back Play in reverse
7 1/16x speed Play at 1/16x speed.
8 1/8x speed Play at 1/8x speed.
9 1/4x speed Play at 1/4x speed.
10 1/2x speed Play at 1/2x speed.
11 2x speed Play at 2x speed.
12 4x speed Play at 4x speed.
13 8x speed Play at 8x speed.
D-Link Vigilance H.265 Outdoor Bullet Camera User Manual 19Section 3: Configuration
14 15 16
17
18
19
20
21 22
14 Current Time Displays the current playback time.
15 Snapshot Take a snapshot of the current frame.
Display the backup file. To back up the video, click the right mouse button and select the desired date/time range
16 Backup
to back up.
17 Zoom In Narrow the range of dates being displayed.
18 Zoom Out Widen the range of dates being displayed.
19 Default Reset the zoom settings to the default view.
20 Select Date and Time Click this bar to start the playback from a particular date and time.
21 Video File Indicator A red bar indicates recording triggered by a motion alarm, a green bar indicates scheduled recording.
22 Select Time Select a range of dates and times to view in the bar above.
D-Link Vigilance H.265 Outdoor Bullet Camera User Manual 20Section 3: Configuration
Setup Wizard
On this screen you can access your camera's two Setup Wizards.
The Network Setup Wizard will walk you through configuring your camera on your local
network.
The Motion Detection Setup Wizard will walk you through setting an alarm to trigger
when a motion detection event occurs.
D-Link Vigilance H.265 Outdoor Bullet Camera User Manual 21Section 3: Configuration
Network Setup Wizard
You can use this wizard to set up your camera on your network. For more information on each
step, refer to the following pages.
Step 1: Configure LAN Settings
Step 2: Configure Dynamic DNS
Step 3: Assign a Name to the Camera
Step 4: Set your Camera’s Time Zone
D-Link Vigilance H.265 Outdoor Bullet Camera User Manual 22Section 3: Configuration
Step 1: Configure LAN Settings
DHCP Select this connection if you have a DHCP server running on your network
and would like your camera to obtain an IP address automatically.
If you choose DHCP, you do not need to fill out the IP address settings.
IP Address Enter the fixed IP address in this field.
Subnet Mask This number is used to determine if the destination is in the same subnet.
The default value is 255.255.255.0.
Default Enter the gateway used to forward frames to destinations in a different
Gateway subnet. Invalid gateway settings may cause the failure of transmissions to
a different subnet.
Default Router Enter the IP address of the default router.
Primary DNS Enter the primary domain name server for translating domain names to IP
addresses.
MTU (1280- Enter the maximum transmission unit. The default value is 1500.
1500)
D-Link Vigilance H.265 Outdoor Bullet Camera User Manual 23Section 3: Configuration
Step 2: Configure Dynamic DNS
DDNS Check this box to enable the DDNS function.
Server IP Enter your DDNS server address, or select a service from the drop-down
Address menu.
Host Name Enter the host name of the DDNS service.
User Name Enter the username or e-mail address used to connect to the DDNS service.
Password Enter the password used to connect to the DDNS service.
D-Link Vigilance H.265 Outdoor Bullet Camera User Manual 24Section 3: Configuration
Step 3: Assign a Name to the Camera
Camera Name Enter a name that will be used to identify the camera.
D-Link Vigilance H.265 Outdoor Bullet Camera User Manual 25Section 3: Configuration
Step 4: Set your Camera's Time Zone
Time Zone Select your time zone.
Daylight Toggle this to enable daylight saving time.
Savings Time
Start Time Select when daylight saving time should start.
End Time Select when daylight saving time should end.
D-Link Vigilance H.265 Outdoor Bullet Camera User Manual 26Section 3: Configuration
Step 5: Setup Complete
Review the settings you selected and click Finish to complete the setup wizard process.
D-Link Vigilance H.265 Outdoor Bullet Camera User Manual 27Section 3: Configuration
Motion Detection Setup Wizard
You can use this wizard to configure your camera's motion detection functions. For more
information on each step, refer to the following pages.
Step 1: Specify Motion Detection Settings
Step 2: Alerts and Notifications
D-Link Vigilance H.265 Outdoor Bullet Camera User Manual 28Section 3: Configuration
Step 1: Specify Motion Detection Settings
Enabled Click this to activate the motion detection alarm.
Alarm Interval Set the alarm interval in seconds.
(1-1800S)
Sensitivity Set the motion detection sensitivity. A higher number indicates greater
sensitivity.
SD Card Toggle this to record video on the inserted microSD card.
Recording
E-mail Toggle this to send snapshots via e-mail.
FTP Upload Toggle this to upload snapshots via FTP.
Show motion Toggle this to display motion detection alarms on the connected NVR.
detection on
NVR
Click the schedule at the bottom to enable motion detection on a schedule.
D-Link Vigilance H.265 Outdoor Bullet Camera User Manual 29Section 3: Configuration
Step 2: Alerts and Notifications
E-mail Check this box to configure the camera to send snapshots to an e-mail
address when a motion detection event occurs.
Server Address Enter the address of the email server.
Server Port Enter the port to use to connect to the email server.
User Name Enter the username associated with the email account.
Password Enter the password associated with the above username.
Sender E-mail Enter the email address that the email should be sent from.
Address
Recipient Enter the recipients to send the snapshot to.
E-mail Address
SSL/TLS Select the protocol to use to secure your email.
E-mail Test Click this to send a test email.
D-Link Vigilance H.265 Outdoor Bullet Camera User Manual 30Section 3: Configuration
FTP Upload Check this box to configure the camera to upload snapshots to an FTP
server when a motion detection event occurs.
Server IP Enter the address of the FTP server.
Address
Port Enter the port to use to connect to the FTP server.
Account Enter the account to use to access the FTP server.
Password Enter the password associated with the above username.
FTP Path Enter the path to the directory where you would like your snapshots to be
stored.
D-Link Vigilance H.265 Outdoor Bullet Camera User Manual 31Section 3: Configuration
Step 3: Setup Complete
Review the settings you selected and click Finish to complete the setup wizard process.
D-Link Vigilance H.265 Outdoor Bullet Camera User Manual 32Section 3: Configuration
Settings
Network Settings
LAN Settings
Use this section to configure the network connections for your camera. All relevant information must be entered accurately. Please note that PPPoE
must be disabled to make any changes on this page; refer to "PPPoE" on page 34 for more details. After making any changes, click the Save
button.
DHCP Select this if you have a DHCP server running on your network and would
like your camera to obtain an IP address automatically. If you choose DHCP,
you do not need to fill out the IP address settings.
IP Address Enter a static IP address in this field.
Subnet Mask This number is used to determine if the destination is in the same subnet.
The default is 255.255.255.0.
Default Enter the gateway used to forward frames to destinations in a different
Gateway subnet.
D-Link Vigilance H.265 Outdoor Bullet Camera User Manual 33Section 3: Configuration
PPPoE
Use this section to configure your camera's PPPoE settings. After making any changes, click the Save button to save your changes.
PPPoE Enable this setting if your network uses PPPoE.
User Name / Enter the username and password for your PPPoE account. Re-enter your
Password password in the Confirm Password field. You may obtain this information
from your ISP.
IP Address This shows your current IP address.
D-Link Vigilance H.265 Outdoor Bullet Camera User Manual 34Section 3: Configuration
HTTP and HTTPS
Use this section to configure the HTTP and HTTPS access settings for your camera. After making any changes, click the Save button to save your
changes.
Web Mode Choose whether to use HTTP or HTTPS to access your camera.
HTTP Port Select the port to use to access your camera via HTTP. The default is 80.
Certificate Displays information on your camera's HTTPS certificate. The camera's
Information default HTTPS port is 443.
D-Link Vigilance H.265 Outdoor Bullet Camera User Manual 35Section 3: Configuration
Device Port
On this page you can set the ports on which users can access the camera's features.
Control Port Set the camera's control port to be used by a connected NVR. The default
is 30001.
HTTP Port Set the camera's HTTP port. The default is 80.
RTSP Port Set the camera's RTSP port. The default is 554.
D-Link Vigilance H.265 Outdoor Bullet Camera User Manual 36Section 3: Configuration
RTSP and Multicast
Use this section to configure your camera's RTSP and multicast stream settings. After making any changes, click the Save button to save your
changes.
RTSP
RTSP Port: Set the port to use for RTSP streaming. The default is 554.
RTSP Rule This indicates the format of the RTSP path.
RTSP Example This provides an example of an RTSP path.
The camera allows you to multicast each of the available streams via a group address. Enter
the port and settings you wish to use.
Multicast
Stream ID Select an ID for the stream.
Video Port Select the port to multicast the stream over.
Video Address Enter an address for the multicast stream.
D-Link Vigilance H.265 Outdoor Bullet Camera User Manual 37Section 3: Configuration
Camera Settings
Use this section to configure the name used to identify your camera. After making any changes, click the Save button.
Camera Name Create a unique name for your camera.
D-Link Vigilance H.265 Outdoor Bullet Camera User Manual 38Section 3: Configuration
Image Settings
In this section, you may configure the video image settings for your camera. All changes in the Image Settings section will be made immediately.
For the other sections, after making any changes, click the Save button to save your changes.
Day/Night The image settings in the tabs below will change according to whether it is
Switch day or night. Select Timing to schedule this manually.
Image
Brightness Adjust the brightness from 0% to 100%.
Sharpness Adjust the image sharpness level from 0% to 100%.
Saturation Adjust the image saturation level from 0% to 100%.
Contrast Adjust the contrast level from 0% to 100%.
Scene
Scene Select either Indoor or Outdoor.
Mirror Mirror the image horizontally, vertically, or both.
Corridor Mode Toggle this to narrow the view and prioritize the center of the display. This
optimizes the display for narrow environments, such as corridors and aisles.
D-Link Vigilance H.265 Outdoor Bullet Camera User Manual 39Section 3: Configuration
Exposure
Exposure Mode Choose an appropriate mode to limit exposure from backlit subjects. Select
Shutter Priority to set the exposure time automatically and then adjust
the video gain. Select Manual to set the shutter speed manually with the
settings below.
Meter Area Select the area of the frame to use to determine the exposure.
Max Shutter Select the maximum shutter speed (in seconds) to use. Shorter shutter
speeds provide a sharper picture, but require more light.
Max Gain Set the maximum camera gain. A higher gain amplifies the value of each
pixel of the display.
WB
WB Select the White Balance mode from a variety of options. If you select
Manual, you will need to set the red and blue levels yourself.
D-Link Vigilance H.265 Outdoor Bullet Camera User Manual 40Section 3: Configuration
ICR & IR
Use this section to configure the IR LED and IR-cut removable filter behavior
for your camera.
D/N Setting Day Mode enables the IR Cut Filter and turns off the IR LEDs. Night Mode
disables the IR Cut Filter and turns on the IR LEDs. Select Auto to set the
day/night mode automatically according to the amount of light in the
environment, or Timing to set it according to a schedule.
Delay/ If Auto is selected, configure how long the camera should wait after a change
Sensitivity in lighting conditions to adjust the day/night mode, and how sensitive it
should be to changes in the environment.
IR LED Toggle this to enable or disable the IR LED.
IR LED Mode Select Manual to set the IR LED level or Auto to have the camera adjust it
automatically.
D-Link Vigilance H.265 Outdoor Bullet Camera User Manual 41Section 3: Configuration
Denoise
2D/3D Denoise Toggle this to enable 2D/3D noise reduction for the image.
2D/3D Denoise Choose whether to configure the denoise settings automatically or manually.
Mode
2D/3D Denoise Configure the amount of noise reduction to apply. When noise reduction
Level is enabled in a low-light environment with quickly moving objects, an
afterimage trail may appear. To compensate for this, select a lower strength
level or disable this function.
D-Link Vigilance H.265 Outdoor Bullet Camera User Manual 42Section 3: Configuration
Advanced
WDR Wide Dynamic Range (WDR) helps improve exposure, making it easy to see
objects in very bright or dark areas. Specify a value to determine how much
WDR to apply, or select None.
HLC Adjust for overexposure with highlight compensation (HLC). This will
detect strong light sources and compensate by reducing the brightness of
overexposed areas.
BLC Adjust the overall lighting of the image with backlight compensation (BLC).
This will add a weighted region in the center of the display and automatically
adjust the exposure level.
DeFog Defog the image to improve the display quality in environments with poor
weather conditions, such as fog or smoke.
Anti-shake Enable this to compensate for minor shaking of the camera, making the
display smoother.
Anti-Flicker
Anti-Flicker Select the frequency to use to avoid interference or distortion.
D-Link Vigilance H.265 Outdoor Bullet Camera User Manual 43Section 3: Configuration
OSD
On this page you can configure the on-screen display (OSD) by using the drop-down menus to
change the alignment and choosing what information to display.
Camera Time Display the camera time on the OSD.
Camera Name Display the camera name on the OSD.
D-Link Vigilance H.265 Outdoor Bullet Camera User Manual 44Section 3: Configuration
Privacy Masking
On this page you can draw a privacy mask on the screen. This area of the camera's display will
not be visible in the live video or video playback and cannot be recorded. In the list at the
bottom, you can select an existing mask and either Delete or Modify it.
To create a new privacy mask, select an area of the live video display and click Add.
To change the name or color of the privacy mask, click the checkbox next to it under Privacy
Masking List at the bottom of the screen and click Modify.
To clear the mask area, click the checkbox next to the desired privacy mask and click Delete.
The name and color of the mask area is changeable.
D-Link Vigilance H.265 Outdoor Bullet Camera User Manual 45Section 3: Configuration
Video Stream
You may configure up to 2 video profiles with different settings for your camera. This allows you to set different settings for recording video and for
viewing your video remotely, for example. After making any changes, click the Save button to save your changes.
Stream ID Select the stream ID to configure.
Video Select the video encoding type (H265, H264, or MJPEG).
Encoding Type
Frame Size Select the frame size and aspect ratio.
Max. Frame Set the max. frame rate.
Rate
Intra Frame Select the interval (in frames) at which the camera should record a complete
Period image frame. A shorter interval is more resource-intensive than a longer one.
Rate Control Select the bitrate type (i.e. CBR or VBR).
• VBR: Variable Bit Rate will automatically change the bit rate based on the
camera video's complexity. If the Mode is set to MJPEG, this will be the
only choice available
• CBR: Constant Bit Rate will use a fixed bit rate that you set.
Bit Rate Enter the bitrate in kbps.
D-Link Vigilance H.265 Outdoor Bullet Camera User Manual 46Section 3: Configuration
Recording Management
Your camera has a comprehensive event system that lets you configure the camera to perform certain actions when an event occurs. For
example, when motion is detected, you can have snapshots sent to an e-mail address. You can also configure the camera to take regular video
recordings according to a schedule you define.
Event Management / E-mail
Server Address Enter the address of the email server.
Server Port Enter the port to use to connect to the email server.
User Name Enter the username associated with the email account.
Password Enter the password associated with the above username.
Sender E-mail Enter the email address that the email should be sent from.
Address
Recipient Enter the recipients to send the snapshot to.
E-mail Address
SSL/TLS Select the protocol to use to secure your email.
D-Link Vigilance H.265 Outdoor Bullet Camera User Manual 47Section 3: Configuration
Event Management / FTP
FTP Upload Check this to upload recordings via FTP.
Server IP Enter the IP address of the FTP server you want to use.
Address
Port Enter the port to use to connect to the server.
User Name Enter the username for the FTP server.
Password Enter the password associated with the username above.
FTP Path Enter the path to the directory where you would like your snapshots to be
stored.
D-Link Vigilance H.265 Outdoor Bullet Camera User Manual 48Section 3: Configuration
Event Management / SD Card
On this page you can configure your camera to record video to an inserted microSD card. Click Format to format the SD card
(note that this will overwrite all current data on the card). Click Schedule Record to only save footage at set times. Click the blue
square at the bottom of the screen and then click the schedule to indicate when you would like recordings to be stored. Click
Save to save your recordings from the microSD card.
Schedule Toggle this to enable scheduled recording.
Record
Post-Event This setting allows you to set the length of time to delay before taking a
Record post-event snapshot. You can enter a value between 1 and 86400 seconds.
Record Rule Indicate whether the camera should continuously record and overwrite old
data (Cycle Store) or save video for a set number of days (Save Days). If this
option is selected, enter the number of days in the field below.
Stream Name Select the stream to record.
Scheduled Click the schedule at the bottom to specify a schedule to enable motion
Motion detection.
Detection
D-Link Vigilance H.265 Outdoor Bullet Camera User Manual 49Section 3: Configuration
Motion Alarm
On this page you can configure an alarm to trigger when motion is detected
in the camera's display. Click and drag on the screen to determine the area
to monitor for motion.
Enable Click this to activate the motion detection alarm.
Alarm Interval Set the alarm interval in seconds.
Sensitivity Set the motion detection sensitivity. A higher number indicates greater
sensitivity.
SD Card/Email/ Toggle these to send a snapshot via email or FTP or record video on the
FTP inserted microSD card. Click the blue square at the bottom of the screen for
schedule setting.
Show motion Toggle this to display motion detection alarms on the connected NVR.
detection on
NVR Click the blue square on the bottom of the screen to schedule the motion
alarm.
D-Link Vigilance H.265 Outdoor Bullet Camera User Manual 50Section 3: Configuration
Advanced Setup
Advanced
Port mapping
On this page you can configure your camera to use UPnP to automatically set up port forwarding on your router. After making any changes, click
the Save button.
Port Use this setting to configure which port to use for forwarding.
Forwarding
Map Mode Select whether to configure port forwarding automatically or manually.
If Manual is selected, in the box below, enter the desired ports for each
protocol.
D-Link Vigilance H.265 Outdoor Bullet Camera User Manual 51Section 3: Configuration
DDNS
DDNS allows you to compensate for changing IP addresses by having a URL that automatically points to the current IP address of the camera. To
do this, you will need to have an account with one of the DDNS services listed in the drop-down box on this page. After making any changes, click
the Save button.
DDNS Click here to enable DDNS.
Server Address Select your DDNS server from the drop-down menu.
Host Name Enter the host name of the DDNS service.
User Name Enter the username or email address used to connect to the DDNS server.
Password Enter the password used to connect to the DDNS service.
D-Link Vigilance H.265 Outdoor Bullet Camera User Manual 52Section 3: Configuration
SNMP
Here you can set the Simple Network Management Protocol (SNMP) settings for the camera. After making any changes, click the Save button.
Enable Enable this option to allow for SNMPv1 and SNMPv2c management of the
SNMPv1/v2c camera.
Read/Write Enter a name for the R/W community of your SNMP server.
Community
Read-Only Enter a name for the read-only community of your SNMP server.
Community
Trap Address Enter the IP address where SNMP traps should be sent.
Trap Port Enter port of the IP address to which the trap messages will be sent.
Trap Enter the SNMP trap community name.
Community
D-Link Vigilance H.265 Outdoor Bullet Camera User Manual 53Section 3: Configuration
Enable Click this to enable SNMPv3.
SNMPv3
Read Only Enter a name for the R/O community of your SNMP server.
Security Name
Security Level Select the security level used by your SNMP server.
Authentication Select the type of hash (MD5 or SHA) to use.
Type
Authentication Enter the authentication password used for your R/O SNMP server.
Password
Encryption Select the encryption algorithm used by your R/O SNMP server.
Algorithm
Encryption Select the password used for your R/O SNMP server.
Password
Write Security Enter the name for the R/W community of your SNMP server.
Name
Security Level Select the security level used by your R/W SNMP server.
D-Link Vigilance H.265 Outdoor Bullet Camera User Manual 54Section 3: Configuration
Authentication Select the type of hash (MD5 or SHA) to use.
Type
Authentication Enter the authentication password used for your R/W SNMP server.
Password
Encryption Select the encryption algorithm used by your R/W SNMP server.
Algorithm
Encryption Select the password used for your R/W SNMP server.
Password
SNMP Port Enter the SNMP port to use. The default is 161.
D-Link Vigilance H.265 Outdoor Bullet Camera User Manual 55Section 3: Configuration
QOS
Class of Service (CoS) and Quality of Service (QoS) allow you to prioritize surveillance traffic on your network to ensure that your cameras can
stream video smoothly and remain accessible even when there is heavy traffic on your network. Your network must support CoS or QoS in order
to use them. After making changes, click the Save button.
Live Video Set the priority level for live video.
Event Alarm Set the priority level for event alarms.
Command Set the priority level for command DSCP.
DSCP
D-Link Vigilance H.265 Outdoor Bullet Camera User Manual 56Section 3: Configuration
Access List
Here you can define which IP addresses are allowed to access your camera.
IP Filter Click this to enable or disable the IP filter.
Rule Type Select the type of rule to implement, Allow or Deny. Depending on the
rule, the IPs you enter will either be allowed through (meaning others will
be blocked), or they will be blocked (meaning that by default, others will be
allowed through). Click the plus (+) icon to add a new IP range to apply the
rule to.
D-Link Vigilance H.265 Outdoor Bullet Camera User Manual 57Section 3: Configuration
Camera Configuration
Factory Reset
Here you can reset the camera configuration back to the factory defaults.
Keep Network Click this to preserve your current network settings when you restore your
Setting camera to factory default settings.
Restore to Click this to restore your camera to factory default settings.
Factory Default
D-Link Vigilance H.265 Outdoor Bullet Camera User Manual 58Section 3: Configuration
Reboot Device
Here you can reboot the camera, or set a schedule to reboot the camera automatically.
Reboot Device This will restart your camera.
Schedule If you want your camera to reboot on a regular schedule, enable this option,
Reboot then select the days of the week and the time that you want the camera to
reboot and click the Save button.
D-Link Vigilance H.265 Outdoor Bullet Camera User Manual 59Section 3: Configuration
Firmware Update
Here you can check and update the camera's firmware.
Current/Latest Click this to check for the latest firmware version online.
Version
Update Now Click this to perform a firmware upgrade immediately.
Auto Check Toggle this to automatically check for new firmware versions at the time
Latest Version you specify with the drop-down menu below.
Auto Update Toggle this to automatically update to a new version when the auto check
is performed.
Below, you can schedule the automatic check/update with the drop-down
menus. Enter the time of day (in hours/minutes, from left to right) and the
day of the week to perform the check.
File Path To upgrade from a firmware file, click the folder icon, navigate to the file on
your hard drive, and click Upload.
D-Link Vigilance H.265 Outdoor Bullet Camera User Manual 60Section 3: Configuration
Camera Options
Camera Info
This page displays detailed information about your camera, the services running on your camera, and active video streams.
D-Link Vigilance H.265 Outdoor Bullet Camera User Manual 61Section 3: Configuration
Date and Time
Time Settings
This section allows you set the time zone and Daylight Saving settings for your camera.
Time Zone Select your time zone from the drop-down menu.
Daylight If your region uses Daylight Saving time, you can enable it here. Select
Savings Time Set date and time manually if you want to manually set the offset and the
period of time that the Daylight Saving correction should be used.
Start Time: If you enabled the previous option, set the date and time that Daylight
Saving should start.
End Time: Set the date and time that Daylight Saving should end.
Current PC Click Save to synchronize the camera according to your current PC time.
Time
Set Manually Enter a time and click Save to set it manually.
NTP Server Enable this option to set your camera's time using an NTP server, then
select an NTP server to use from the drop-down box.
NTP Port Enter the port to use to access the NTP server.
Check time Enter an interval (in seconds) at which to check the camera's time against
interval the NTP server.
D-Link Vigilance H.265 Outdoor Bullet Camera User Manual 62Section 3: Configuration
Administration Settings
Admin Password
Here, you may modify the administrator’s password for your camera. Click Add to add a new
user, or click the pencil icon under Operate to edit an existing user's information.
D-Link Vigilance H.265 Outdoor Bullet Camera User Manual 63Section 3: Configuration
Admin / Add or Edit User
Here, you may add user accounts for accessing the camera. User accounts are allowed to access the Live Video page, but cannot access any of the
camera's configuration pages.
User Name Enter a user name for the user you wish to create.
New/ Enter a password for the user you wish to create. Retype
Confirm the password to confirm it.
Password
Designate the new user's group. This will affect the user
Group privileges they have. This will affect the options that
appear in the Privilege menu.
Privilege Click the boxes in this menu to determine that level of
access the specified user should have to the camera's
video display and configuration options.
Notes
Enter any notes you would like to record here.
D-Link Vigilance H.265 Outdoor Bullet Camera User Manual 64Section 3: Configuration
Camera Log
This page displays a log of events, such as motion detection alarms. You may download the information by clicking Download. You may also click
Query to search for an event.
D-Link Vigilance H.265 Outdoor Bullet Camera User Manual 65Section 3: Configuration
Camera Log / Alarm
An alarm log records information about an alarm generated on a device, including the Security, Disk, and Recording alarms. Choose the Alarm
Type from the drop box, setup Start Time and End Time, and then click Query. The all alarm log will be displayed on the web, click Download to
save the logs to your PC.
D-Link Vigilance H.265 Outdoor Bullet Camera User Manual 66Section 3: Configuration Operation logs record user operations and scheduled task commands during the running of the device. Operation logs can be classified into the following types: Privilege Manager, System maintenance, Device, Recording operation, Video control, and Live video. Choose the Operation logs Type from the drop box, setup Start Time and End Time, and then click Query. The all alarm log will be displayed on the web, click Download to save the logs to your PC. D-Link Vigilance H.265 Outdoor Bullet Camera User Manual 67
Section 3: Configuration

You can collect logs about a device, which help you analyze and solve possible problems occurring on the device. The logs include overview
information, key parameters, operation logs, alarm logs, upgrade logs. Click Collect All Log and save the logs to your PC.

D-Link Vigilance H.265 Outdoor Bullet Camera User Manual                                                                               68
Appendix A: Technical Specifications

                             Technical Specifications - DCS-4712E
 Technical Specifications

 Camera
 Camera Hardware Profile         • 1/2.8” 2-megapixel progressive CMOS sensor                                            • Focal length: 2.8 m
                                 • 30 meter IR illumination distance                                                     • Aperture: F2.0
                                 • Minimum illumination:                                                                 • Angle of view:
                                     • Color: 0.05 lux @(F1.4, AGC ON)                                                       • (H) 106.8°
                                     • B/W: 0 lux @(IR LED ON)                                                               • (V) 58°
                                 • Built-in Infrared-Cut Removable (ICR) Filter module                                       • (D) 126°
                                 • 18x digital zoom
                                 • Minimum object distance 0.5 m

 Camera Housing                  • IP66 compliant weatherproof housing                                               • Wire-in bracket

 Image Features                  •   Configurable image size/quality/frame rate/bit rate                             •   Auto White Balance (AWB)
                                 •   Time stamp and text overlays                                                    •   Auto Gain Control (AGC)
                                 •   Configurable shutter speed/brightness/saturation/contrast/sharpness/3D filter   •   Wide Dynamic Range (WDR)
                                 •   Configurable motion detection area                                              •   Corridor mode
                                 •   Configurable privacy mask zones

 Video Compression               • Simultaneous H.265/H.264/MJPEG format compression                                 • JPEG for still images

 Video Resolution                • 1920 x 1080 at up to 30 fps

 External Device Interface       • 10/100 BASE-TX Fast Ethernet port                                                 • Supports 802.3af PoE
                                 • microSD card slot                                                                 • Reset button

 Network
 Network Protocols               •   IPv4                                                                            •   FTP
                                 •   HTTP/HTTPS                                                                      •   SMTP Client
                                 •   RTSP/RTP/RTCP                                                                   •   ONVIF Profile S compliant
                                 •   TCP                                                                             •   ARP
                                 •   UDP                                                                             •   ICMP
                                 •   DHCP                                                                            •   PPPoE
                                 •   DNS                                                                             •   SNMP v1/v2c/v3
                                 •   DDNS
                                 •   NTP

D-Link Vigilance H.265 Outdoor Bullet Camera User Manual                                                                                             69
Appendix A: Technical Specifications
System Management
Event Management • Motion detection • Event notification and uploading of snapshots via e-mail or FTP
• Multiple event notifications • Event video recording via microSD card, D-ViewCam, D-Link NVR or ONVIF-
compliant NAS
Remote Management • Remote management via D-ViewCam software • Configuration interface accessible via a web browser
• Remotely take snapshots/video clips and save to a local hard drive
System Requirements for Web Interface • Operating System: Microsoft Windows
• Browser: Internet Explorer 11 for full functionality, Chrome and Firefox (MJPEG
only)
D-ViewCam™ System Requirements • Operating System: Windows 10 • Protocol: Standard TCP/IP
• Browser: Internet Explorer 11
D-ViewCam™ Software Functions • Supports all management functions provided in the web interface • Remote management of up to 64 cameras
• Scheduled motion trigger or manual recording options • Viewing of up to 64 cameras on one screen
General
Weight • 500 g (1.1 lb)
External Power Adapter • 100 to 240 V AC, 50/60 Hz (Input), 12 V DC 1.5 A (Output)
Power Consumption • 8 W ± 5% (PoE)
Temperature • Operating: -30 to 50 °C (-22 to 122 °F) • Storage: -20 to 70˚ C (-4 to 158 °F)
Operating/Storage Humidity • Max. 90% non-condensing
Certifications • CE, FCC, RCM
Dimensions • 187.6 x 64 x 64 mm (7.4 x 2.5 x 2.5 in)
D-Link Vigilance H.265 Outdoor Bullet Camera User Manual 70Appendix A: Technical Specifications
Technical Specifications - DCS-4714E
Technical Specifications
Camera
Camera Hardware Profile • 1/2.8” 4-megapixel progressive CMOS sensor • Focal length: 2.8 m
• 30 meter IR illumination distance • Aperture: F2.0
• Minimum illumination: • Angle of view:
• Color: 0.05 lux @(F2.0, AGC ON) • (H) 100°
• B/W: 0 lux @(IR LED ON) • (V) 58°
• Built-in Infrared-Cut Removable (ICR) Filter module • (D) 126°
• 18x digital zoom
• Minimum object distance 0.5 m
Camera Housing • IP66 compliant weatherproof housing • Wire-in bracket
Image Features • Configurable image size/quality/frame rate/bit rate • Auto White Balance (AWB)
• Time stamp and text overlays • Auto Gain Control (AGC)
• Configurable shutter speed/brightness/saturation/contrast/sharpness/3D filter • Wide Dynamic Range (WDR)
• Configurable motion detection area • Corridor mode
• Configurable privacy mask zones
Video Compression • Simultaneous H.265/H.264/MJPEG format compression • JPEG for still images
Video Resolution • 2592 x 1520 at up to 30 fps
External Device Interface • 10/100 BASE-TX Fast Ethernet port • Supports 802.3af PoE
• microSD card slot • Reset button
Network
Network Protocols • IPv4 • FTP
• HTTP/HTTPS • SMTP Client
• RTSP/RTP/RTCP • ONVIF Profile S compliant
• TCPL • ARP
• UDP • ICMP
• DHCP • PPPoE
• DNS • SNMP v1/v2c/v3
• DDNS
• NTP
D-Link Vigilance H.265 Outdoor Bullet Camera User Manual 71Appendix A: Technical Specifications
System Management
Event Management • Motion detection • Event notification and uploading of snapshots via e-mail or FTP
• Multiple event notifications • Event video recording via microSD card, D-ViewCam, D-Link NVR or ONVIF-
compliant NAS
Remote Management • Remote management via D-ViewCam software • Configuration interface accessible via a web browser
• Remotely take snapshots/video clips and save to a local hard drive
System Requirements for Web Interface • Operating System: Microsoft Windows
• Browser: Internet Explorer 11 for full functionality, Chrome and Firefox (MJPEG
only)
D-ViewCam™ System Requirements • Operating System: Windows 10 • Protocol: Standard TCP/IP
• Browser: Internet Explorer 11
D-ViewCam™ Software Functions • Supports all management functions provided in the web interface • Remote management of up to 64 cameras
• Scheduled motion trigger or manual recording options • Viewing of up to 64 cameras on one screen
General
Weight • 500 g (1.1 lb)
External Power Adapter • 100 to 240 V AC, 50/60 Hz (Input), 12 V DC 1.5 A (Output)
Power Consumption • 8 W ± 5% (PoE)
Temperature • Operating: -30 to 50 °C (-22 to 122 °F) • Storage: -20 to 70˚ C (-4 to 158 °F)
Operating/Storage Humidity • Max. 90% non-condensing
Certifications • CE, FCC, RCM
Dimensions • 187.6 x 64 x 64 mm (7.4 x 2.5 x 2.5 in)
D-Link Vigilance H.265 Outdoor Bullet Camera User Manual 72Appendix A: Technical Specifications
Technical Specifications - DCS-4718E
Technical Specifications
Camera
Camera Hardware Profile • 1/2.5” 8-megapixel progressive CMOS sensor • Focal length: 3.3 - 12 m
• 30 meter IR illumination distance • Aperture: F1.4
• Minimum illumination: • Angle of view:
• Color: 0.02 lux @(F1.4, AGC ON) • (H) 108.6° - 35°
• B/W: 0 lux @(IR LED ON) • (V) 56° - 21°
• Built-in Infrared-Cut Removable (ICR) Filter module • (D) 125° - 42°
• 18x digital zoom
• Minimum object distance 0.5 m
Camera Housing • IP66 compliant weatherproof housing • Wire-in bracket
Image Features • Configurable image size/quality/frame rate/bit rate • Auto White Balance (AWB)
• Time stamp and text overlays • Auto Gain Control (AGC)
• Configurable shutter speed/brightness/saturation/contrast/sharpness/3D filter • Wide Dynamic Range (WDR)
• Configurable motion detection area • Corridor mode
• Configurable privacy mask zones
Video Compression • Simultaneous H.265/H.264/MJPEG format compression • JPEG for still images
Video Resolution • 3840 x 2160 at up to 20 fps
External Device Interface • 10/100 BASE-TX Fast Ethernet port • Supports 802.3af PoE
• microSD card slot • Reset button
Network
Network Protocols • IPv4 • FTP
• HTTP/HTTPS • SMTP
• RTSP/RTP/RTCP • ONVIF Profile S compliant
• TCP • ARP
• UDP • ICMP
• DHCP • PPPoE
• DNS • SNMP v1/v2c/v3
• DDNS
• NTP
D-Link Vigilance H.265 Outdoor Bullet Camera User Manual 73Appendix A: Technical Specifications
System Management
Event Management • Motion detection • Event notification and uploading of snapshots via e-mail or FTP
• Multiple event notifications • Event video recording via microSD card, D-ViewCam, D-Link NVR or ONVIF-
compliant NAS
Remote Management • Remote management via D-ViewCam software • Configuration interface accessible via a web browser
• Remotely take snapshots/video clips and save to a local hard drive
System Requirements for Web Interface • Operating System: Microsoft Windows
• Browser: Internet Explorer 11 for full functionality, Chrome and Firefox (MJPEG
only)
D-ViewCam™ System Requirements • Operating System: Windows 10 • Protocol: Standard TCP/IP
• Browser: Internet Explorer 11
D-ViewCam™ Software Functions • Supports all management functions provided in the web interface • Remote management of up to 64 cameras
• Scheduled motion trigger or manual recording options • Viewing of up to 64 cameras on one screen
General
Weight • 700 g (1.5 lb)
External Power Adapter • 100 to 240 V AC, 50/60 Hz (Input), 12 V DC 1.5 A (Output)
Power Consumption • 8 W ± 5% (PoE)
Temperature • Operating: -30 to 50 °C (-22 to 122 °F) • Storage: -20 to 70˚ C (-4 to 158 °F)
Operating/Storage Humidity • Max. 90% non-condensing
Certifications • CE, FCC, RCM
Dimensions • 232 x 74 x 80 mm (9.1 x 2.9 x 3.1 in)
D-Link Vigilance H.265 Outdoor Bullet Camera User Manual 74Appendix B - Regulatory Statements
Regulatory Information
Federal Communication Commission Interference Statement
This equipment has been tested and found to comply with the limits for a Class A digital device, pursuant to part 15 of the FCC Rules. These limits
are designed to provide reasonable protection against harmful interference when the equipment is operated in a commercial environment. This
equipment generates, uses, and can radiate radio frequency energy and, if not installed and used in accordance with the instruction manual,
may cause harmful interference to radio communications. Operation of this equipment in a residential area is likely to cause harmful interference
in which case the user will be required to correct the interference at his own expense.
Non-modification Statement
Any changes or modifications not expressly approved by the party responsible for compliance could void the user's authority to operate the
equipment.
Caution
This device complies with Part 15 of the FCC Rules. Operation is subject to the following two conditions:
(1) This device may not cause harmful interference, and (2) this device must accept any interference received, including interference that may
cause undesired operation.
Innovation, Science and Economic Development Canada (ISED) Statement:
This Class A digital apparatus complies with Canadian ICES-003.
Cet appareil numérique de la classe A est conforme à la norme NMB-003 du Canada.
CE EMI Class A Warning
This equipment is compliant with Class A of CISPR 32. In a residential environment this equipment may cause radio interference.
D-Link Vigilance H.265 Outdoor Bullet Camera User Manual 75Appendix B - Regulatory Statements
SAFETY INSTRUCTIONS
The following general safety guidelines are provided to help ensure your own personal safety and protect your product from potential damage.
Remember to consult the product user instructions for more details.
• Static electricity can be harmful to electronic components. Discharge static electricity from your body (i.e. touching grounded bare metal)
before touching the product.
• Do not attempt to service the product and never disassemble the product. For some products with a user replaceable battery, please read
and follow the instructions in the user manual.
• Do not spill food or liquid on your product and never push any objects into the openings of your product.
• Do not use this product near water, areas with high humidity, or condensation unless the product is specifically rated for outdoor application.
• Keep the product away from radiators and other heat sources.
• Always unplug the product from mains power before cleaning and use a dry lint free cloth only.
SICHERHEITSVORSCHRIFTEN
Die folgenden allgemeinen Sicherheitsvorschriften dienen als Hilfe zur Gewährleistung Ihrer eigenen Sicherheit und zum Schutz Ihres Produkts.
Weitere Details finden Sie in den Benutzeranleitungen zum Produkt.
• Statische Elektrizität kann elektronischen Komponenten schaden. Um Schäden durch statische Aufladung zu vermeiden, leiten Sie
elektrostatische Ladungen von Ihrem Körper ab,
(z. B. durch Berühren eines geerdeten blanken Metallteils), bevor Sie das Produkt berühren.
• Unterlassen Sie jeden Versuch, das Produkt zu warten, und versuchen Sie nicht, es in seine Bestandteile zu zerlegen. Für einige Produkte mit
austauschbaren Akkus lesen Sie bitte das Benutzerhandbuch und befolgen Sie die dort beschriebenen Anleitungen.
• Vermeiden Sie, dass Speisen oder Flüssigkeiten auf Ihr Produkt gelangen, und stecken Sie keine Gegenstände in die Gehäuseschlitze oder
-öffnungen Ihres Produkts.
• Verwenden Sie dieses Produkt nicht in unmittelbarer Nähe von Wasser und nicht in Bereichen mit hoher Luftfeuchtigkeit oder Kondensation,
es sei denn, es ist speziell zur Nutzung in Außenbereichen vorgesehen und eingestuft.
• Halten Sie das Produkt von Heizkörpern und anderen Quellen fern, die Wärme erzeugen.
• Trennen Sie das Produkt immer von der Stromzufuhr, bevor Sie es reinigen und verwenden Sie dazu ausschließlich ein trockenes fusselfreies
Tuch.
CONSIGNES DE SÉCURITÉ
Les consignes générales de sécurité ci-après sont fournies afin d’assurer votre sécurité personnelle et de protéger le produit d’éventuels
dommages. Veuillez consulter les consignes d’utilisation du produit pour plus de détails.
• L’électricité statique peut endommager les composants électroniques. Déchargez l’électricité statique de votre corps (en touchant un objet
en métal relié à la terre par exemple) avant de toucher le produit.
• N’essayez pas d’intervenir sur le produit et ne le démontez jamais. Pour certains produits contenant une batterie remplaçable par l’utilisateur,
D-Link Vigilance H.265 Outdoor Bullet Camera User Manual 76You can also read