Validation Authority OCSP Responder and SafeNet Luna SA Hardware Security Module (HSM) Deployment Guide - Thales
←
→
Page content transcription
If your browser does not render page correctly, please read the page content below
Validation Authority OCSP Responder and
SafeNet Luna® SA Hardware Security
Module (HSM) Deployment Guide

                                                                 Prepared by:
                                 Davin Baker – Systems Engineer, SafeNet, Inc.
           Sean Murray – Sr. Sales Engineer, Tumbleweed Communications, Inc.
                Jim Wyre – Consultative SE, Tumbleweed Communications, Inc.
Validation Authority and Hardware Security Module (HSM)
                                       Deployment Guide

                                            Table of Contents
Figures................................................................................................................................. 4
Section 1 – Introduction...................................................................................................... 5
  1.1 - Summary of Material Covered ............................................................................... 5
  1.2 - Summary of Files Included..................................................................................... 6
Section 2 – Installing the Luna HSM.................................................................................. 7
  2.1 - Installing Luna Hardware and Software ................................................................. 8
     2.1.1 - Install Client Software ..................................................................................... 8
     2.1.2 - Install the Luna SA Hardware ......................................................................... 9
  2.2 - Configuring the Luna SA Device and Network Parameters................................. 11
     2.2.1 - Connect to the Luna Device .......................................................................... 11
     2.2.2 - First Time Login and Changing Passwords................................................... 11
     2.2.3 - Configure IP and Network Parameters.......................................................... 12
     2.2.4 - Set System Date and Time............................................................................. 13
     2.2.5 - Generate a New Luna Server Certificate....................................................... 14
  2.3 – Initializing the Luna SA HSM ............................................................................. 16
     2.3.1 - Start the Initialization Process ....................................................................... 16
     2.3.2 - Login to the HSM .......................................................................................... 20
     2.3.3 - Check HSM Capabilities and Configure HSM Policies as Necessary .......... 21
  2.4 – Creating an HSM Partition................................................................................... 24
     2.4.1 - Login to the HSM .......................................................................................... 24
     2.4.2 - Initialize the Partition .................................................................................... 24
     2.4.3 - Check Partition Capabilities and Configure Partition Policies as Necessary 27
  2.5 - Configure Luna Client Software........................................................................... 30
     2.5.1 - Import Luna Appliance Server Cert onto Client (Windows) ........................ 30
     2.5.2 - Register the HSM Server Certificate with the Client .................................... 30
     2.5.3 - Create a Client Certificate (Windows) .......................................................... 31
     2.5.4 - Export a Client Certificate to a Luna Appliance (Windows) ........................ 31
     2.5.5 - Register the Client Certificate to the HSM.................................................... 32
     2.5.6 - Assign a Client to a Luna HSM Partition ...................................................... 32
     2.5.7 - Verify Your Setup ......................................................................................... 33
Section 3 – Installing VA OCSP Responder..................................................................... 34
  3.1 - Start VA 4.9 OCSP Responder EVASetup.exe.................................................... 34
  3.2 - Configuration via Admin Interface (Apache Instance) ........................................ 41
  3.3 - Generating Private Key (OCSP Signing Key)...................................................... 44
  3.4 – Installing CA Certificates .................................................................................... 47
  3.5 – Configuring Certificate Import Method............................................................... 48
  3.6 - Configure Server URLs ........................................................................................ 53
  3.7 – VA Responder Server Configuration Parameters ................................................ 54
  3.8 - Start/Stop Server................................................................................................... 55
     3.8.1 – CRL Summary .............................................................................................. 55
                                                                                                                                        2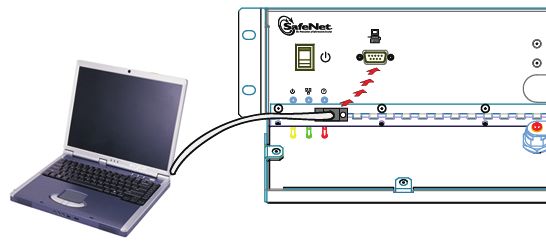
Validation Authority and Hardware Security Module (HSM)
                              Deployment Guide

3.8.2 – Server Logs ................................................................................................... 56
3.8.3 – Query Generation.......................................................................................... 57

                                                                                                                        3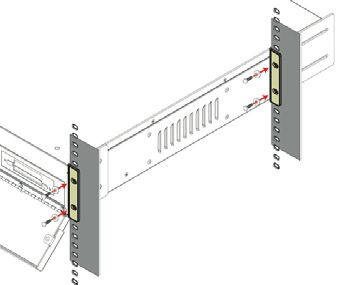
Validation Authority and Hardware Security Module (HSM)
                                      Deployment Guide

                                                         Figures
Figure 1 - Lesson Summary................................................................................................ 5
Figure 2 - Summary of files used........................................................................................ 6
Figure 3 - VA Install Screen Wizard ................................................................................ 34
Figure 4 - License Agreement........................................................................................... 35
Figure 5 - Customer Information ...................................................................................... 36
Figure 6 - Destination Folder............................................................................................ 37
Figure 7 - Specify VA Server-Port-Admin-PWD............................................................. 38
Figure 8 - Copying Files ................................................................................................... 39
Figure 9 - InstallShield Wizard Complete ........................................................................ 40
Figure 10 - SSL Alert........................................................................................................ 40
Figure 11 - VA Admin https://localhost:13333 ................................................................ 41
Figure 12 - Enter License.................................................................................................. 42
Figure 13 - License Data (Features Enabled) ................................................................... 43
Figure 14 - Custom Extensions......................................................................................... 43
Figure 15 - Key Type Selection ........................................................................................ 44
Figure 16 - Key Generation .............................................................................................. 44
Figure 17 - Generate new private key............................................................................... 45
Figure 18 - Generate Software Key and Certificate.......................................................... 45
Figure 19 - Success ........................................................................................................... 46
Figure 20 - Install Certificate............................................................................................ 47
Figure 21 - Certificate Import Method.............................................................................. 48
Figure 22 - Select Certificates........................................................................................... 49
Figure 23 - Configure VA Certificate Store ..................................................................... 50
Figure 24 - Configure CRL Imports ................................................................................. 50
Figure 25 - Configure CRL Import (LDAP)..................................................................... 51
Figure 26 - Available CRLs for Import ............................................................................ 52
Figure 27 - Configure Server URLs.................................................................................. 53
Figure 28 - Success Server URLs updated ....................................................................... 53
Figure 29 - VA Responder Server Configuration Parameters .......................................... 54
Figure 30 - Server Start/Stop ............................................................................................ 55
Figure 31 - CRL Summary ............................................................................................... 55
Figure 32 - LogsServer Logs........................................................................................ 56
Figure 33 - Query Generation ........................................................................................... 57
Figure 34 - OCSP Response ............................................................................................. 57

                                                                                                                                4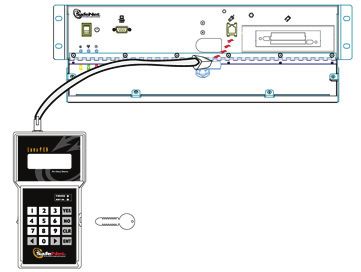
Validation Authority and Hardware Security Module (HSM)
                                Deployment Guide

Section 1 – Introduction
The purpose of this document is to offer the reader a basic installation and configuration
guide for the Tumbleweed VA 4.9 Validation Authority Server (OCSP Responder), and
the SafeNet Luna SA Hardware Security Module (HSM). The document assumes the
reader will have background knowledge of Public Key Infrastructure (PKI) terms and
concepts.

1.1 - Summary of Material Covered
 Section                         Summary of Material Covered
    1    Install SafeNet Luna SA, Ethernet-attached HSM hardware and software.
    2    Installation and configuration of the VA 4.9 Server for basic OCSP operation.
         This lesson will also include setup of smart card login for the VA Admin GUI.
    3    Requirements for VA Delegated Trust Model implementation.
Figure 1 - Lesson Summary

                                                                                             5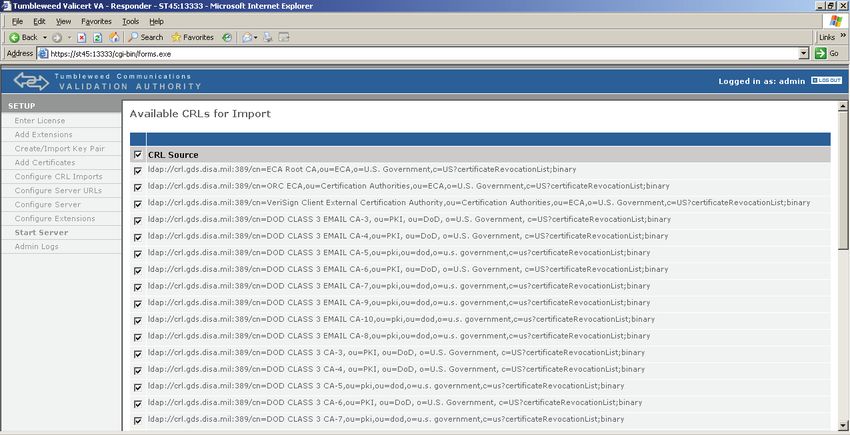
Validation Authority and Hardware Security Module (HSM)
                                 Deployment Guide

1.2 - Summary of Files Included
Summary of files used in this training course:

                   Filename                                      Description
 eva.pdf                                         VA 4.9 Server documentation
 EVASetup.exe                                    VA 4.9 Software Installer
 publisherSetup.exe                              VA 4.9 Publisher – stand-alone Publisher
                                                 that can fetch HTTP, HTTPS, LDAP, or
                                                 LDAPS CRL data and publish to VA
                                                 server.
 ocsp_responder_q4.txt                           The VA 4.9 Repeater and Responder
 ocsp_repeater_q4.txt                            servers require a software license key to
                                                 install the product. This file needs to be
                                                 opened and appropriate license cut and
                                                 pasted into the VA 4.9 Admin GUI.
 Readme.txt                                      VA 4.9 Server ReadMe document
 RELEASE_NOTES.txt                               VA 4.9 Release Notes
 DesktopValidator-win32-release-                 Desktop Validator Standard Edition
 Standard.exe                                    Version 4.9.1
 sample dv491config.txt                          Sample DV configuration file
Figure 2 - Summary of files used

                                                                                              6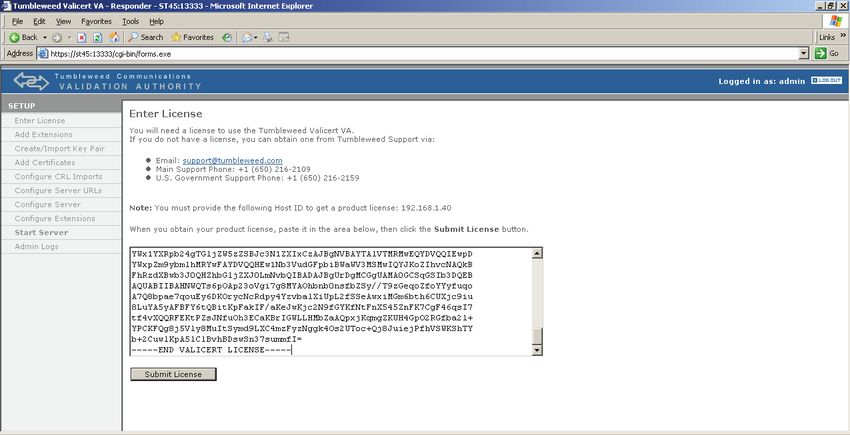
Validation Authority and Hardware Security Module (HSM)
                              Deployment Guide

Section 2 – Installing the Luna HSM
Product Highlights
  •   Most Secure
      • Keys always in Hardware
         Luna SA is a HighAssurance HSM.
      • FIPS 140-2-validated
         Luna SA is validated to FIPS 140-2 Level 2 and Level 3 to meet the
         demands of the most rigorous security policies.
      • Hardware Key Management and High-Performance Cryptographic
         Acceleration
         An integrated HSM provides secure, hardware-based storage for sensitive
         cryptographic keys and offers over 1,200 cryptographic operations per
         second (1024-bit RSA decrypt) for the most demanding applications.
      • Secure Remote Administration and Two-factor Authentication
         Luna SA features secure network administration to simplify management.
         To prevent unauthorized access, FIPS 140-2 Level 3-validated models offer
         true two-factor, trusted path, multi-person authentication of HSM
         administrative users.
  •   Ease of Deployment and Integration
      • Ethernet-attached for Easy Deployment
         Luna SA features two built-in Ethernet ports for drop-in network
         deployment, making it easy to add hardware-secured key management and
         cryptographic acceleration to your applications.
      • Unparalleled Support and Integration
         Luna SA is fully integrated with the most popular Certificate Authorities
         (CA), including Microsoft Certificate Services, Entrust Authority, VeriSign.
         Luna SA also provides SSL acceleration support for Microsoft IIS and
         Apache Web servers.
  •   High Performance and Scalability
      • Accelerate multiple SSL Web servers
         Offload computationally intensive SSL connection setups from Web servers
         with Luna SA configured for shareable hardware SSL acceleration.

                                                                                        7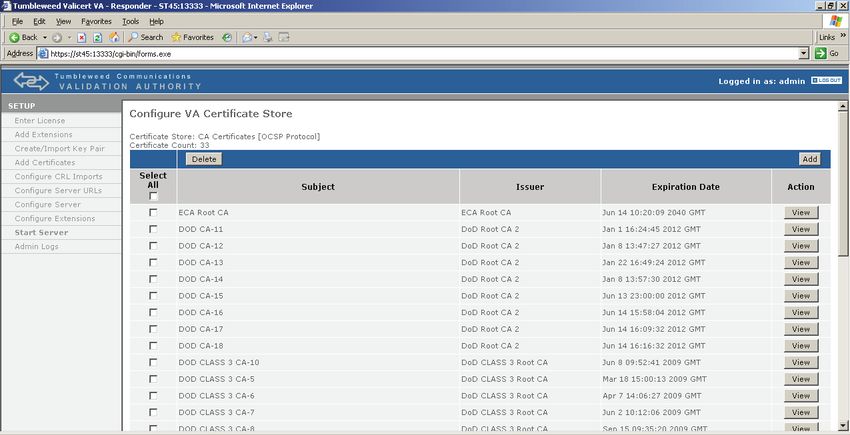
Validation Authority and Hardware Security Module (HSM)
                                Deployment Guide

2.1 - Installing Luna Hardware and Software
This section describes the installation and cabling of your Luna HSM hardware. Repeat
the steps in this chapter for each HSM to be installed.

   2.1.1 - Install Client Software
   For interactive installation, install the Luna SA client software on Windows 2000,
   Windows 2003, or Windows XP as follows:
   1. Log in to Windows as Administrator, or as a user with administrator privileges.
   2. Insert the Luna SA Client Software CD into the CD drive.
       If Autorun is enabled, the Setup program starts automatically. If Autorun is
       disabled, navigate to the CD-ROM drive using Windows Explorer and double-
       click the file setup.exe.
   3. At the Welcome screen, click Next.
   4. When prompted to install optional components, click Next to continue without
      installing the CSP or JSP.
   5. When prompted to confirm, click Yes.
   6. Another installer window appears. Accept all defaults by clicking Next.
   7. When prompted to install additional components, click No.
   8. Click Finish to complete the installation.

                                                                                        8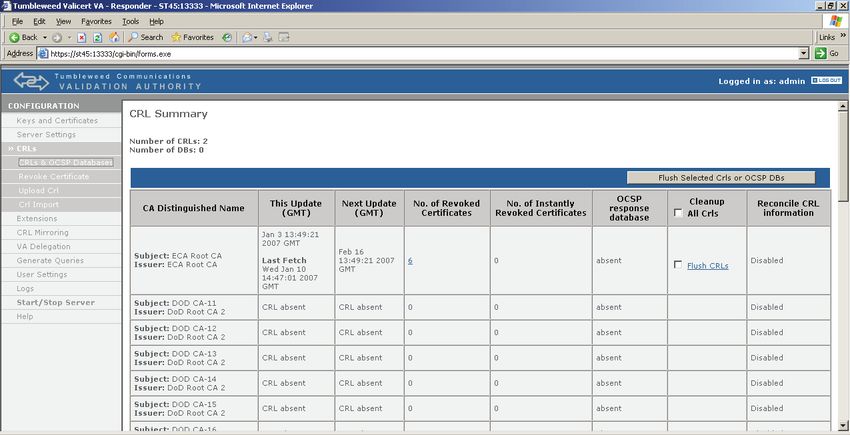
Validation Authority and Hardware Security Module (HSM)
Deployment Guide
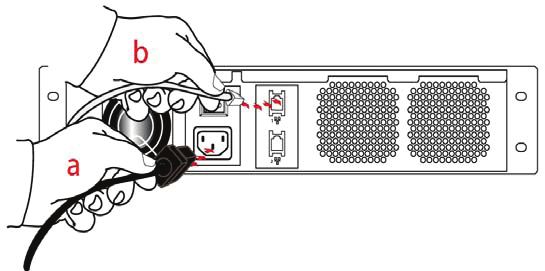
2.1.2 - Install the Luna SA Hardware
1. Install brackets if appropriate for your
equipment rack. The brackets can be
installed in different orientations and
combinations to fit various rack
configurations.
2. Mount the appliance in your equipment
rack.
3. Insert the power (a) and network (b) cables
at the rear panel.
4. Connect the Luna PED at the front panel
using the provided PED cable.
5. Set the power switch (a) on the rear panel to
the “On” position.
9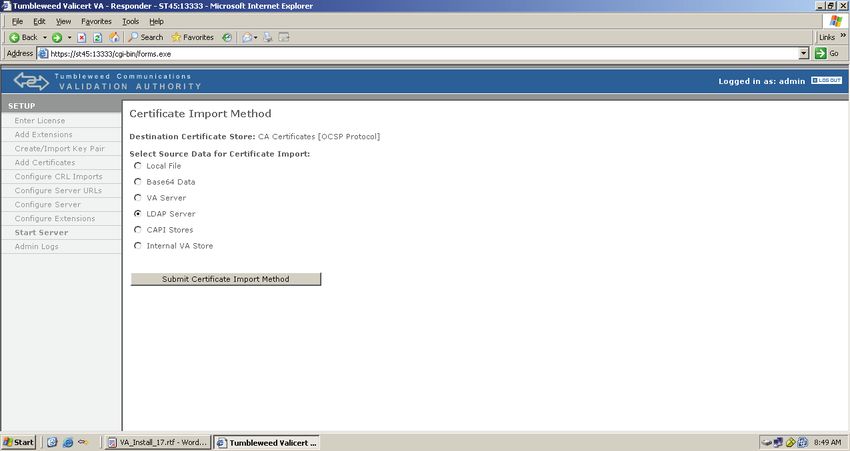
Validation Authority and Hardware Security Module (HSM)
                           Deployment Guide

6. Press and release the Start switch (b) on the
   front panel to start the system.

7. Connect a terminal to the serial connector
   on the front panel.

                                                                 10
Validation Authority and Hardware Security Module (HSM)
Deployment Guide
2.2 - Configuring the Luna SA Device and Network Parameters
This chapter describes the initial configuration of your Luna SA device.
2.2.1 - Connect to the Luna Device
1. Connect a null-modem serial cable between the serial port on the Luna SA front
panel and a dumb terminal or a PC (for example, a laptop) that will serve as the
administration computer. A standard null-modem serial cable with DB9
connectors is included with the Luna SA.
2. Use a terminal emulation package provided with your operating system. Set the
serial connection parameters:
• Serial port baud rate: 115200
• N,8,1 (no parity, 8 data-bits, one stop-bit)
• VT-100 terminal emulation
• Hardware flow control
3. When the connection is made, the Luna SA login prompt appears.
DEFAULTHOSTNAME ttyS0 login:
Notes:
• The [DEFAULTHOSTNAME] is replaced by the new hostname that you assign
to your Luna SA later in these instructions. The prompt changes the next time you
start an SCLI connection.
• You may need to press Enter several times to initiate the session.
• You must log in within two minutes of opening an administration session or the
connection will time out.
2.2.2 - First Time Login and Changing Passwords
4. At the prompt, login as admin. The initial password is chrysalis.
login as: admin
admin@’s password: chrysalis
Note: For security, you are immediately prompted to change the factory-default
password for the ‘admin’ account.
11Validation Authority and Hardware Security Module (HSM)
Deployment Guide
2.2.3 - Configure IP and Network Parameters
The following procedure assumes you are configuring the Luna SA appliance without
DNS.
1. Use the net show command to display the current settings and see how they
need to be modified for your network.
lunash:> net show
Hostname: DEFAULTHOSTNAME
Domain:
IP Address (eth0): 192.168.2.12
HW Address (eth0): 00:03:47:E7:56:1C
Mask (eth0): 255.255.255.0
Gateway (eth0): 192.168.2.1
IP Address (eth1): 192.168.10.41
HW Address (eth1): 00:00:50:0E:35:85
Mask (eth1): 255.255.255.0
Gateway (eth1): 192.168.10.100
Name Servers:
Search Domain(s):
Kernel IP Routing Table:
Destination Gateway Genmask Flags Metric Ref Use Iface
192.168.2.0 0.0.0.0 255.255.255.0 U 0 0 0 eth0
0.0.0.0 192.168.2.1 0.0.0.0 UG 0 0 0 eth0
127.0.0.0 0.0.0.0 255.0.0.0 U 0 0 0 lo
0.0.0.0 172.20.11.10 0.0.0.0 UG 0 0 0 eth0
2. Use net hostname to set the hostname of the Luna appliance (use lowercase
characters).
lunash:> net hostname myLunaHostname
Note: The net hostname command expects a single-word text string. If you supply
a name that includes a space, all text after the space is ignored.
3. Restart the syslog service to ensure that all logging after this point is recorded
against the new hostname.
lunash:> service restart syslog
Shutting down kernel logger: [ OK ]
Shutting down system logger: [ OK ]
Starting system logger: [ OK ]
Starting kernel logger: [ OK ]
Use net interface to change network configuration settings.
net -interface -static -device -ip
-netmask -
gateway
12Validation Authority and Hardware Security Module (HSM)
Deployment Guide
lunash:>network interface device eth0 -ip 192.168.0.10 -netmask
255.255.255.0 -gateway 192.168.0.254
NOTICE: The network service must be restarted for new network settings
to take effect.
If you are sure that you wish to restart the network, then type
'proceed', otherwise type 'quit'
> proceed
Proceeding...
Restarting network service...
Shutting down loopback interface: [ OK ]
Setting network parameters: [ OK ]
Bringing up loopback interface: [ OK ]
Bringing up interface eth0: [ OK ]
Command Result : 0 (Success)
4. View the new network settings with:
lunash:> net show
Hostname: DEFAULTHOSTNAME
Domain:
IP Address (eth0): 192.168.0.10
HW Address (eth0): 00:03:47:E7:56:1C
Mask (eth0): 255.255.255.0
Gateway (eth0): 192.168.0.254
IP Address (eth1): 192.168.10.50
HW Address (eth1): 00:00:50:0E:35:85
Mask (eth1): 255.255.255.0
Gateway (eth1): 192.168.10.100
Name Servers:
Search Domain(s):
Kernel IP Routing Table:
Destination Gateway Genmask Flags Metric Ref Use Iface
192.168.2.0 0.0.0.0 255.255.255.0 U 0 0 0 eth0
0.0.0.0 192.168.2.1 0.0.0.0 UG 0 0 0 eth0
127.0.0.0 0.0.0.0 255.0.0.0 U 0 0 0 lo
0.0.0.0 172.20.11.10 0.0.0.0 UG 0 0 0 eth0
5. Test your network configuration by pinging another server with the lunash net
ping command and having the other server ping this Luna
appliance.
6. Verify your client machines network configuration by attempting to ping the Luna
appliance by IP address from the Client.
2.2.4 - Set System Date and Time
Before proceeding with HSM and Partition setup, ensure that the Luna HSM Server’s
system date, time and time zone are appropriate for your network.
1. First, verify the current date and time on the HSM server to see if they need to be
changed.
13Validation Authority and Hardware Security Module (HSM)
Deployment Guide
lunash:>status date
Thu Oct 12 20:40:39 EDT 2006
or
lunash:>status zone
EDT
2. If the date, time, or time zone are incorrect for your location, change them using
the lunash sysconf command. You must set the time zone before setting the time
and date, otherwise the time zone change adjusts the time that you just set.
lunash:>sysconf -timezone -set Canada/Eastern
Timezone set to Canada/Eastern
3. Use sysconf time to set the system time and date, in
the format shown. Note that the time is set on a 24-hour clock (00:00 to 23:59).
lunash:> sysconf -time 20:45 20061012
Thu Oct 12 20:45:05 EDT 2006
4. To use ntp, add one or more servers to the Luna appliance's ntp server list, and
then activate (enable) the servers. Use the sysconf ntp command as follows:
Add servers:
lunash:> sysconf -ntp addserver
Activate servers:
lunash:> sysconf -ntp enable
Note: If you wish to use Network Time Protocol (ntp), you must set the system
time to within 20 minutes of the time given by the servers that you select. If the
difference between ntp server time and the Luna appliance time is greater than 20
minutes, the ntp daemon ignores the servers and quits.
2.2.5 - Generate a New Luna Server Certificate
Although your Luna appliance came with a server certificate, good security practice
dictates that you should generate a new one.
1. Use sysconf regenCert to generate a new Server Certificate, substituting the
appropriate IP address for your device:
14Validation Authority and Hardware Security Module (HSM)
Deployment Guide
lunash:> sysconf regenCert 192.168.0.10
CAUTION: Current Server Certificate and Private Key will be
overwritten. All clients will have to add the server again with new certificate.
Type ‘proceed’ to generate cert or ‘quit’ to cancel
> proceed
lunash:>
2. From the factory, the Network Trust Link Service (ntls) is bound to the loopback
device by default. In order to use the appliance on your network, you must bind
the ntls to one of the two Ethernet ports, ETH0 or ETH1, or to a hostname or IP
address.
lunash:>ntls bind eth0
Success: NTLS binding network device eth0 set.
NOTICE: The NTLS service must be restarted for new settings to take effect.
If you are sure that you wish to restart NTLS, then type 'proceed', otherwise
type 'quit'
> proceed
Proceeding...
Restarting NTLS service...
Stopping ntls: [ OK ]
Starting ntls: [ OK ]
Command Result : 0 (Success)
lunash:>
Note: The “Stopping ntls” operation may fail in the above example because
NTLS is not yet running on a new Luna appliance. Just ignore the message. The
service starts again, whether the stop was needed or not.
15Validation Authority and Hardware Security Module (HSM)
Deployment Guide
2.3 – Initializing the Luna SA HSM
You must initialize the HSM to set up the necessary identities, ownership, and
authentication at the HSM Server level. To initialize a Luna HSM with Trusted Path
(PED) Authentication, you must have the Luna PED (version 1.6.6 or higher) connected
and switched on, and in the “Awaiting Command” mode.
When you power on the Luna PED, the screen displays the manufacturer's name and the
PED's firmware version. It is not ready to accept commands from the Luna HSM until
you press ENT on the keypad and the display changes to "Awaiting Command" state.
Before you continue, check that you have at least two sets of PED keys prepared and
labeled as necessary.
2.3.1 - Start the Initialization Process
The hsm init command takes several options.
For a Trusted Path Luna HSM, values are supplied via Luna PED interaction. The
exception is a labelfor the HSM, which you must fill in at the command line.
1. First you must log in to the HSM with the default (gray) key.
2. Run the hsm login command.
lunash:>hsm login
Luna PED operation required to login as HSM Administrator - use gray PED key.
'hsm login' successful.
3. Run the hsm init command.
lunash:> hsm init -label myLunaHSM
The following warning appears:
WARNING: Are you sure you wish to re-initialize this HSM?
All containers/HSM Partitions and data will be erased.
Type 'proceed' to delete the container, or 'quit' to exit now
4. Type:
proceed
Luna PED operation is required to initialize HSM - use gray and blue PED keys.
The first request to appear is:
16Validation Authority and Hardware Security Module (HSM)
Deployment Guide
5. Insert the gray PED Key into the key slot on the side of Luna PED (you can use
any gray PED Key).
6. Turn it clockwise until it stops (about a quarter turn).
7. The Key In indicator lights on the Luna PED.
8. Press the ENT button on the keypad, to continue. After the gray PED Key, Luna
PED requests the first blue PED Key:
9. Remove the gray key, insert the blue HSM Admin PED Key and press ENT. A
unique HSM Admin PIN is to be imprinted on both the PED Key and the HSM.
At this time, Luna PED may continue with:
"Creating PIN... Do you wish to use a Group PED Key?"
17Validation Authority and Hardware Security Module (HSM)
Deployment Guide
10. That question only appears for PED keys which have previously been imprinted
and will not be prompted on new PED keys. If this is the first HSM you are
initializing your response should be NO if you are prompted. If this is the second
HSM you are initializing and you would like them to share a Blue HSM Admin
Key, you should respond Yes to use the value already imprinted on the Blue Key.
Next, you are asked to provide a PED PIN.
11. Enter a PIN if you wish, and press ENT to inform Luna PED that you are finished
entering PED PIN digits, or that you have decided not to use a PED PIN (no digits
entered).
12. Confirm by entering the same PIN and pressing ENT again.
You are then prompted to duplicate your PED key:
“Are you duplicating this key Y/N?”
13. It is recommended to have at least one backup set of imprinted PED Keys stored
in a safe place, in case of loss or damage to the primary keys.
a. If you respond NO, Luna PED imprints just the one blue HSM Admin key
and goes on to the next step in initialization of the HSM.
b. If you respond YES, Luna PED imprints the first blue key and then asks for
more blue PED Keys until you have imprinted (duplicated) as many as you
require.
14. Remove the imprinted blue PED key and insert a new blue HSM Admin PED Key
to be overwritten and press ENT. If the PED keys have already been imprinted,
you may be prompted to overwrite the Key before continuing. Press ENT to
continue and overwrite the key.
15. When you are done duplicating PED keys, press NO to stop the duplication press
and continue.
18Validation Authority and Hardware Security Module (HSM)
Deployment Guide
The Luna PED now prompts for an imprinted blue HSM Admin key, because you
now must use that key to log in to the HSM as Admin. Leave the blue PED Key
initialized in the previous step in place.
16. Press ENT on the PED keypad. You may also be prompted for a PED PIN, if one
was created when the blue PED Key was imprinted.
Now, you create the domain for future cloning of the HSM, or you adopt the
domain from a previous token or Luna HSM, so that the current Luna HSM (or
token) can clone with the previous. A common domain (common between HSM
and Backup Token) is required for HSM backups.
Luna PED prompts:
17. Insert a red PED Key and press ENT. If the red PED Key is blank, then Luna
PED goes ahead and imprints a domain, which is matched on the HSM. However,
if Luna PED detects that the red PED Key contains data, then Luna PED prompts
whether to keep the existing domain on the key or create a new one.
a. When the prompt “Are you creating a new domain?” appears, press Yes to
create a new cloning domain when initializing the first HSM in your
organization. To use the existing cloning domain on future HSMs, press No.
Note: This operation will overwrite the contents of the red PED key. Verify your
responses before continuing with this step.
Now you are given the opportunity to duplicate the red, domain PED Key:
19Validation Authority and Hardware Security Module (HSM)
Deployment Guide
Again, you should maintain at least one backup of each imprinted PED Key in
secure storage.
18. Remove the imprinted red PED key and insert a new red HSM Cloning Domain
PED Key to be overwritten, and press ENT. If the PED keys have already been
imprinted, you may be prompted to overwrite the Key before continuing. Press
ENT to continue and overwrite the key.
19. When you are done duplicating PED keys press NO to stop the duplication
process and continue.
When Luna PED says “Request Successful” and then goes back to “Awaiting
Command...,” initialization is finished. Turn your attention back to the lunash
prompt. When the PED activities are complete, lunash displays a “success”
message.
‘hsm init’ successful
You have initialized the HSM and created an HSM Admin identity.
2.3.2 - Login to the HSM
1. If you do not already have a connection open, connect your administration
computer to the serial Console port of the Luna appliance and open a Terminal
session, or use SSH to connect via the network.
2. To continue with configuration, you must login to the Luna HSM as HSM Admin.
Ensure that the Luna PED is connected to the PED port on your Luna appliance,
and that the PED is powered on and "Awaiting Command...”
3. At the lunash prompt, type:
lunash:> hsm login
4. The Luna PED prompts for the blue PED Key. You must provide the blue HSM
Admin PED Key that has been imprinted (initialized) for this HSM. If you had set
a PED PIN, you are prompted for that as well.
20Validation Authority and Hardware Security Module (HSM)
Deployment Guide
Note: If you fail three consecutive login attempts as HSM Admin, the HSM is
zeroized and cannot be used — it must be re-initialized. Zeroizing destroys all key
material. Please note that the Luna HSM must actually receive some information
before it logs a failed attempt, so if you forget to insert a PED Key, or forget to
turn the Key to the locked position, that is not logged as a failed attempt. Also,
when you successfully login, the counter is reset to zero.
2.3.3 - Check HSM Capabilities and Configure HSM Policies as
Necessary
HSM capabilities identify the purchased features of the product and are set at time of
manufacture. Policies represent the HSM Admin’s enabling (or restriction) of those
features.
Verify Capabilities
1. Type the hsm showPolicies command to display the current capability/policy set
for the HSM. Verify that the HSM capabilities match those outlined below under
the heading “The following capabilities describe this HSM, and cannot be altered,
except by capability updates.” If they do not, contact SafeNet Support before
proceeding.
21Validation Authority and Hardware Security Module (HSM)
Deployment Guide
lunash:> hsm -showPolicies
HSM Label: Default Label
Serial #: 121212
Firmware: 4.5.3
The following capabilities describe this HSM, and cannot be altered,
except by capability updates.
Description Value
=========== =====
Enable PIN-based authentication Disallowed
Enable PED-based authentication Allowed
Performance level 9
Enable M of N Allowed
Enable domestic mechanisms & key sizes Allowed
Enable masking Disallowed
Enable cloning Allowed
Enable special cloning certificate Disallowed
Enable full (non-backup) functionality Allowed
Enable ECC Mechanisms Disallowed
Enable non-FIPS algorithms Allowed
Enable MofN auto-activation Allowed
Enable SO reset of partition PIN Allowed
Enable network replication Allowed
Enable Korean Algorithms Disallowed
FIPS Evaluated Disallowed
Manufacturing Token Disallowed
Enable Remote Authentication Allowed
Enable offboard storage Disallowed
Enable partition groups Disallowed
The following policies are set due to current configuration of
this HSM and cannot be altered directly by the user.
Description Value
=========== =====
PED-based authentication True
Require M of N False
The following policies describe the current configuration of
this HSM and may by changed by the HSM Administrator.
Changing policies marked "destructive" will erase
partitions from the HSM.
Description Value Code Destructive
=========== ===== ==== ===========
Allow cloning On 7 Yes
Allow non-FIPS algorithms Off 12 Yes
Allow MofN auto-activation On 13 No
SO can reset partition PIN On 15 Yes
Allow network replication On 16 No
Allow Remote Authentication On 20 Yes
Force user PIN change after set/reset Off 21 No
Command Result : 0 (Success)
According to the above example, the fixed capabilities require that this HSM be
protected at FIPS 140-2 level 3, meaning that the Luna PED and PED Keys are
required for authentication.
The alterable policies have numeric codes. You can alter a policy with the hsm
changePolicy command, giving the code for the policy that is to change,
followed by the new value.
The FIPS 140-2 standard mandates a set of security factors that specify a
restricted suite of cryptographic algorithms. The Luna HSM is designed to the
22Validation Authority and Hardware Security Module (HSM)
Deployment Guide
standard, but can allow activation of additional non-FIPS-validated algorithms if
your application requires them.
Verify and Set Policies
2. Verify that the HSM policies match those shown above under the heading “The
following policies describe the current configuration of this HSM and may by
changed by the HSM Administrator.” If you need to modify a policy setting to
comply with your operational requirements use the procedure below:
lunash:> hsm -changePolicy -policy -value
The following example changes code 12 from a value of 1 (On) to 0 (Off).
lunash:> hsm -changePolicy -policy 12 -value 0
That command assigns a value of zero (0) to the “Allow non-FIPS algorithms” policy,
turning it off.
The above example is a change to a destructive policy, meaning that, if you apply this
policy, the HSM is zeroized and all contents are lost. For this reason, you are prompted to
confirm if that is what you really wish to do. You must now re-initialize the HSM.
While this is not an issue when you have just initialized an HSM, it may be a very
important consideration if your Luna system has been in a “live” or “production”
environment and the HSM contains data, keys, or certificates.
Please refer to the Luna SA Online Help System for a description of all HSM Policies and
their meanings.
3. For each policy that must be modified, use the procedure described above to set
the correct value.
4. If you have changed a destructive policy, it will now be necessary to repeat the
steps to reinitialize the HSM as described above in Start the Initialization
Process.
23Validation Authority and Hardware Security Module (HSM)
Deployment Guide
2.4 – Creating an HSM Partition
Within the HSM, separate cryptographic workspaces must be initialized and designated
for clients. A workspace, or Partition, and all its contents are protected by encryption
derived (in part) from its authentication. Only a Client that presents the proper
authentication is allowed to see the Partition and to work with its contents. This chapter
describes how to setup an HSM Partition for Trusted Path Authentication.
2.4.1 - Login to the HSM
1. If you do not already have a connection open, connect your administration
computer to the serial Console port of the Luna appliance, and open a Terminal
session, or use SSH to connect via the network.
2. To create HSM Partitions, you must login to the Luna HSM as HSM Admin.
Ensure that the Luna PED is connected to the PED port on your Luna appliance
and that the PED is powered on and "Awaiting Command..."
3. At the lunash prompt, type:
lunash:> hsm login
4. The Luna PED prompts for the blue PED Key. You must provide the blue HSM
Admin PED Key that has been imprinted (initialized) for this HSM. If you had set
a PED PIN, you are prompted for that as well.
Note: If you fail three consecutive login attempts as HSM Admin, the HSM is
zeroized and cannot be used — it must be re-initialized. To reset the Luna
appliance, so that the HSM can be re-initialized, switch the power off for 30
seconds and then restart. Zeroizing destroys all key material. Please note that the
Luna HSM must actually receive some information before it logs a failed attempt,
so if you forget to insert a PED Key, or forget to turn the Key to the locked
position, that is not logged as a failed attempt. Also, when you successfully login,
the counter is reset to zero.
2.4.2 - Initialize the Partition
Having logged in you can now use the lunash partition create command, to create an
HSM Partition. You must supply a label or name for the new Partition when you issue the
command:
1. Create and name an HSM Partition. Type:
lunash:> partition -create -name
Luna PED then requests the black Owner PED key with the message
24Validation Authority and Hardware Security Module (HSM)
Deployment Guide
Creating PIN..
Insert black PED key.
(Press ENT)
2. Insert a new black HSM Partition Owner PED key and press ENT. A unique
Partition Owner PIN is to be imprinted on both the PED key and the HSM
Partition.
Luna PED may continue with:
Creating PIN..
Do you wish to use a group PED Key Y/N
3. Decide whether this should be a group PED Key, enter YES or NO on the PED
keypad, and press ENT to confirm overwrite if prompted.
Next, you are asked to provide an optional PED PIN. The Luna PED will display the
following:
Creating PIN..
Enter new PED PIN:
0>
4. You must press ENT to inform Luna PED that you are finished entering PED PIN
digits, or that you have decided not to use a PED PIN (no digits entered).
5. When you provide a PED PIN – even if it is the null PIN (by just pressing ENT
with no digits) – Luna PED requests it a second time to ensure that you entered it
correctly. Press ENT again to confirm the PIN.
You are then prompted by the Luna PED:
Creating PIN..
Are you duplicating this PED Key Y/N?
6. Respond YES to duplicate additional black PED keys. The PED asks for more
black PED Keys, until you have imprinted (duplicated) as many as you wish and
respond NO to this question. Generate the number of PED keys specified in the
table on the appropriate Luna HSM Partition Setup Worksheet in Appendix E.
The Luna PED now generates and displays the Client Password (login secret); by which
Clients will later authenticate themselves to this HSM Partition.
Login secret value
btqx-EFGH-3456-7/K9
Please write it down.
(Press ENT)
7. You must record the Login Secret Value from the Luna PED screen for later use
with your application. Verify that you have written it down legibly as it will never
be shown again. This is the HSM Partition password, used to authenticate Client
applications that wish to use the HSM Partition on the Luna HSM. It might be
best to use a text editor, because the majority of errors tend to occur when reading
hand-written values.
25Validation Authority and Hardware Security Module (HSM)
Deployment Guide
The Luna PED times out after eight minutes. You must complete recording the password
and press the ENT button before time-out occurs.
When you press ENT on the Luna PED keypad, control returns to lunash, where a
success message is displayed:
partition create successful
At the same time, Luna PED goes back to:
Awaiting command..
26Validation Authority and Hardware Security Module (HSM)
Deployment Guide
2.4.3 - Check Partition Capabilities and Configure Partition Policies as
Necessary
Most Partition capabilities have corresponding policies that the HSM Admin or SO can
set to customize the behavior of individual partitions. The exception to this is the use of
Luna PED without challenge on a Luna device that uses Trusted Path Authentication.
Challenges (HSM Partition Passwords) are always used when the Luna device uses Luna
PED (Trusted Path Authentication).
Partition capabilities are determined by the license. Your Luna appliance is licensed with
some number of partitions of a certain type, with all those partitions having the same
capability settings. The HSM Admin can make the partitions all behave differently by
turning on and off various policy settings on each partition. By default policies are set to
the same value as the capabilities, so if the capability allows something, the
corresponding policy will be on.
Partition capabilities identify the purchased features of the product and are set at time of
manufacture. Policies represent the Partition Owner’s enabling (or restriction) of those
features.
Verify Capabilities
Type the partition -showPolicies command, to display the current
capability/policy set for the partition. Verify that the partition capabilities match those
shown below under the heading “The following capabilities describe this partition
and can never be changed.” If they do not, contact SafeNet Support before
proceeding.
27Validation Authority and Hardware Security Module (HSM)
Deployment Guide
lunash:> partition -showPolicies -partition myPartition1
Partition Name: myPartition1
Partition Num: 332211001
The following capabilities describe this partition and can never be changed.
Description Value
=========== =====
Enable private key cloning Allowed
Enable private key wrapping Disallowed
Enable private key unwrapping Allowed
Enable private key masking Disallowed
Enable secret key cloning Allowed
Enable secret key wrapping Allowed
Enable secret key unwrapping Allowed
Enable secret key masking Disallowed
Enable multipurpose keys Allowed
Enable changing key attributes Allowed
Enable PED use without challenge Allowed
Allow failed challenge responses Allowed
Enable operation without RSA blinding Allowed
Enable signing with non-local keys Allowed
Enable raw RSA operations Allowed
Max non-volatile storage space 5
Max failed user logins allowed 10
Enable high availability recovery Allowed
Enable activation Allowed
Enable auto-activation Allowed
Minimum pin length (inverted: 255 - m in) 249
Maximum pin length 255
Enable RA-type wrapping Disallowed
The following policies are set due to current configuration
of this partition and may not be altered directly by the user.
Description Value
=========== =====
Challenge for authentication not needed True
The following policies describe the current configuration of this
partition and may be changed by the HSM Security Officer.
Description Value Code
=========== ===== ====
Allow private key cloning On 0
Allow private key unwrapping On 2
Allow secret key cloning On 4
Allow secret key wrapping On 5
Allow secret key unwrapping On 6
Allow multipurpose keys On 10
Allow changing key attributes On 11
Ignore failed challenge responses On 15
Operate without RSA blinding On 16
Allow signing with non-local keys On 17
Allow raw RSA operations On 18
Max non-volatile storage space 5 19
Max failed user logins allowed 10 20
Allow high availability recovery On 21
Allow activation On 22
Allow auto-activation On 23
Minimum pin length (inverted: 255 - min) 249 25
Maximum pin length 255 26
28Validation Authority and Hardware Security Module (HSM)
Deployment Guide
Verify and Set Policies
The alterable policies have numeric codes. You can alter a policy with the partition
-changePolicy command, giving the code for the policy that is to change, followed
by the new value.
1. Verify that the partition policies match those shown below under the heading
“The following policies describe the current configuration of this partition and
may be changed by the HSM Security Officer” above. If you need to modify a
policy setting use the steps that follow.
2. To change a Partition Policy, at the lunash prompt, type:
lunash:> partition changePolicy -partition -policy
-value
For example, to change the Activation Policy for a Partition labeled
myPartition1, type:
lunash:> partition changePolicy -partition myPartition1 -policy 22 -value
1 (allows Activation mode to be on)
partition changePolicy successful
Policy allow Activation is now set to: 1
Please refer to the Luna SA Online Help System for a description of all Partition
Policies and their meanings.
3. For each policy that is to be modified, use the procedure described above to set
the correct value.
29Validation Authority and Hardware Security Module (HSM)
Deployment Guide
2.5 - Configure Luna Client Software
Before an HSM client can use the data stored in a partition, it must be configured so that
it can securely communicate with the HSM, and then it must be registered to that
partition. The following procedures outline the steps required to perform this
configuration.
2.5.1 - Import Luna Appliance Server Cert onto Client (Windows)
1. Open a command prompt window on the Client and change the directory to
c:\Program Files\LunaSA\. Securely transfer the server.pem file from the
Luna SA, using the supplied Chrysalis Transfer Program (ctp) utility.
c:\Program Files\LunaSA\ > ctp admin@:server.pem .
admin@192.168.0.10's password:
server.pem 100%
|*******************************************************| 928
00:00
Note: The dot (.) at the end of the command specifies to place the resulting file in
the current directory.
2. Verify that the Server Certificate has arrived on the Client:
c:\Program Files\LunaSA\> dir
server.pem
2.5.2 - Register the HSM Server Certificate with the Client
The supplied client-side tool vtl, located at c:\Program Files\LunaSA\, is used for
managing Luna client/server setup. The vtl command is called from the command
line or a shell prompt.
Invoke the vtl addServer command so that the client can create a secure connection
with the HSM (the server).
C:\Program Files\LunaSA > vtl addServer -n -c
30Validation Authority and Hardware Security Module (HSM)
Deployment Guide
2.5.3 - Create a Client Certificate (Windows)
Begin by creating a certificate and private key for the client using the vtl command-
line interface. Use the clients IP address, not its hostname for the name attribute. The
“-n” (name) is the only mandatory item and must be the client IP address. Additional
optional parameters can be added. Refer to the Luna SA Online Help System for full
command syntax and description.
Execute the following command to create a client certificate and private key.
c:\Program Files\LunaSA\ >vtl createCert -n
Example
C:\Program Files\LunaSA>vtl createcert -n 192.168.0.1
Private Key created and written to: C:\Program
Files\LunaSA\cert\client\192.168.0.1Key.pem
Certificate created and written to: C:\Program
Files\LunaSA\cert\client\192.168.0.1.pem
2.5.4 - Export a Client Certificate to a Luna Appliance (Windows)
Next you must send the client certificate that you just created to the Luna appliance.
Enter the following command to transfer the client certificate to the Luna appliance.
C:\Program Files\LunaSA\ > ctp .\cert\client\.pem admin@:
You are prompted for the Luna appliance admin password.
Example
c:\ Program Files\LunaSA\> ctp .\LunaSA\cert\client\192.168.0.1.pem
admin@192.168.0.10:
Note: You must use the “:” after the destination. Without the colon ctp does not
recognize the supplied destination as a remote server.
31Validation Authority and Hardware Security Module (HSM)
Deployment Guide
2.5.5 - Register the Client Certificate to the HSM
The client certificate, which has been securely transferred (ctp’d) from the client to
the HSM Server, in previous sections, must be registered by the HSM Server. To do
so, you must be connected to the HSM Server (the Luna SA) and logged in as
“admin”.
Enter the following command to register the client certificate to the HSM
lunash:> client -register -client -ip
The above can be any string that allows you to easily identify this
client—many people use the hostname, but the client -register -client MyClient –ip 192.168.0.1
Client registration successful.
The Client is now registered with the Luna SA HSM.
You can verify on the Luna SA with the client -list command.
lunash:> client -list
registered client 1: MyClient
2.5.6 - Assign a Client to a Luna HSM Partition
The final configuration step before your Client can begin using the Luna SA is to
assign the Client to a specific Partition. To do so, you must be connected to the HSM
Server and logged in as “admin”.
1. Enter the following command to register the client to a partition on the HSM. Use
the partition you created in the section Initialize the Partition.
lunash:> client assignPartition -client -partition
32Validation Authority and Hardware Security Module (HSM)
Deployment Guide
2. To verify, look at the HSM Partition assigned to the client.
lunash:> client -show -client
Example
lunash:> client assignPartition -client myClient1 -partition myPartition1
partition assign successful.
Command Result : 0 (Success)
lunash:>client -show -client myClient1
ClientID: myClient1
IPAddress: 192.168.0.1
Partitions: "myPartition1"
Command Result : 0 (Success)
The parameter is the name of the HSM Partition that was
created earlier, following configuration of the HSM.
2.5.7 - Verify Your Setup
Before beginning to use a Client application with your newly configured Luna SA,
you can verify that the foregoing setup has been properly performed.
1. On your Client computer, open a command-line console.
2. Go to the Luna directory c:\Program Files\LunaSA and type vtl verify.
The response should be similar to the following:
C:\Program Files\LunaSA>vtl verify
Slot Serial # Label
==== ======== =====
1 65003001 MyPartition1
If you receive an error message, then some part of the configuration has not been
completed properly. Retrace the procedure. At this point, the client and HSM are
configured and registered with each other. You can now begin using the Luna
HSM with your application.
33Validation Authority and Hardware Security Module (HSM)
Deployment Guide
Section 3 – Installing VA OCSP Responder
3.1 - Start VA 4.9 OCSP Responder EVASetup.exe.
Figure 3 - VA Install Screen Wizard
Click Next to begin the installation.
34Validation Authority and Hardware Security Module (HSM)
Deployment Guide
Figure 4 - License Agreement
Click Accept.
35Validation Authority and Hardware Security Module (HSM)
Deployment Guide
Figure 5 - Customer Information
Complete the dialog box shown above. The Email Address will be used by the server as
a default for administrative e-mail notification features. Click Next to continue.
36Validation Authority and Hardware Security Module (HSM)
Deployment Guide
Figure 6 - Destination Folder
Click Next to accept the default installation location.
37Validation Authority and Hardware Security Module (HSM)
Deployment Guide
Figure 7 - Specify VA Server-Port-Admin-PWD
Enter the following information:
• Enterprise VA Server: Hostname for VA Responder.
• VA Administrator Port: Port number for the VA Admin GUI to manage the server.
The port will be SSL enabled by default; so once installed, you will access this
through https://hostname:13333.
• Administrator Server User: admin – take the default, this is the primary
Administrator account added to the server. Additional accounts may be added later.
• Administration Server Password: Enter the password for this account and confirm
the password in the Confirm field.
Click Next to continue.
38Validation Authority and Hardware Security Module (HSM)
Deployment Guide
Figure 8 - Copying Files
Click Next to continue with the install.
39Validation Authority and Hardware Security Module (HSM)
Deployment Guide
Figure 9 - InstallShield Wizard Complete
Deselect View Server Readme, select Launch Administration User Interface, and
then click Finish.
Figure 10 - SSL Alert
40Validation Authority and Hardware Security Module (HSM)
Deployment Guide
3.2 - Configuration via Admin Interface (Apache Instance)
When the browser comes up, the self-signed SSL certificate is not trusted by the browser.
To accept this certificate for now, click Yes. You can create a new SSL key and
certificate request, and have the VA Admin SSL certificate issued by a Public CA or
Enterprise CA as required by local policy.
Figure 11 - VA Admin https://localhost:13333
Enter the User ID and Password specified during installation to log in to the VA Admin
GUI. Click Login.
After completing the installation and specifying the User ID and Password of the
Administrator, bring up the admin UI – https://hostname:port. The port was a parameter
specified during installation. The default port number is 13333. Select basic
authentication and log in.
41Validation Authority and Hardware Security Module (HSM)
Deployment Guide
Figure 12 - Enter License
Upon initial startup, the VA Responder will be in SETUP MODE. Click Enter License.
Open the license file provided by Tumbleweed and copy the entire content, including “-----
BEGIN VALICERT LICENSE-----” and “-----END VALICERT LICENSE----.-”
Next, paste the copied license into the GUI and click on Submit License. Be aware that
there are various Operational Modes, such as VA Responder and VA Repeater. Each
mode utilizes a different type of license, so you will want to ensure that you are utilizing
a license for an OCSP Responder.
The following graphic provides an example of what to expect after submitting your
license file. In this example, notice that the license is an evaluation license set to expire
on 12/5/07 and that the license is good for any IP address. Note that the Operation Mode
shows as Responder. You will want to verify that all the features you expected within
your own license are enabled, and then click on Next Step.
42Validation Authority and Hardware Security Module (HSM)
Deployment Guide
Figure 13 - License Data (Features Enabled)
Figure 14 - Custom Extensions
Unless you are setting up an Identrus environment or require Authenticated OCSP
Requests, you will select NO, and then click Submit.
43Validation Authority and Hardware Security Module (HSM)
Deployment Guide
3.3 - Generating Private Key (OCSP Signing Key)
Figure 15 - Key Type Selection
At a minimum, you must create an OCSP response signing key and associated certificate.
Take the default and click on Submit Key Type.
Figure 16 - Key Generation
For any install that is not using a Hardware Signing Module, you would select
Generate/Import Software Key. For integration of the VA with the SafeNet Luna SA
HSM, you should see that the PKCS#11 drivers from SafeNet were auto-detected. You
will need to select the option Generate/Import Hardware Key on Custom PKCS11
Provider, and then click Submit Key Generation Technique.
44Validation Authority and Hardware Security Module (HSM)
Deployment Guide
Figure 17 - Generate new private key
For installation of a new VA Responder, select Generate New Private Key.
Figure 18 - Generate Software Key and Certificate
In VA 4.9, the UI for creating a VA certificate (self-signed or certificate request) is
greatly improved. You have the option of simple DN Attribute entry or entering the DN
string. For the Private Key Parameters, you will need to enter the PKCS#11 Token PIN
issued by the SafeNet Luna HSM. You will then need to complete the DN information,
and click Submit Certificate Request.
45Validation Authority and Hardware Security Module (HSM)
Deployment Guide
Figure 19 - Success
Click Next Step. You have the option to view the self-signed VA certificate just created.
46Validation Authority and Hardware Security Module (HSM)
Deployment Guide
3.4 – Installing CA Certificates
Figure 20 - Install Certificate
You will need to load at least one CA Certificate that you will be providing OCSP
Validation Status for into the Mandatory Stores for CA certificates [OCSP protocol].
Accept the default and click Submit Certificate Store. On the screen that displays, you
will have various methods available to locate the CA Certificates that you wish to import
into the VA.
47Validation Authority and Hardware Security Module (HSM)
Deployment Guide
3.5 – Configuring Certificate Import Method
Figure 21 - Certificate Import Method
You can import certificates via a variety of methods, but for the quickest setup for DoD
PKI, select LDAP Server (which is the default) and click Submit Certificate Import
Method.
48You can also read