Volvo 740 & 940 Mechanical Climate Control (Standard A/C) to Electronic Climate Control conversion
←
→
Page content transcription
If your browser does not render page correctly, please read the page content below
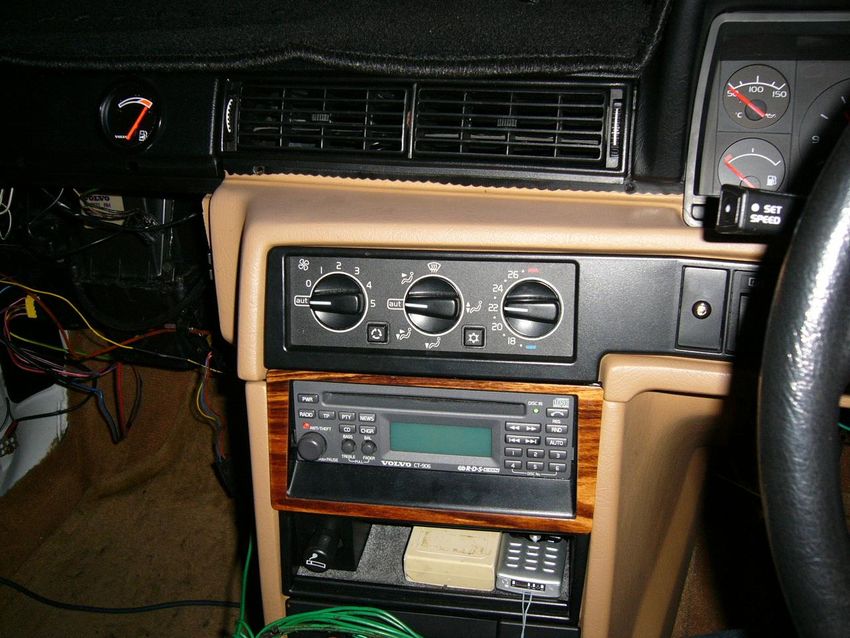
Volvo 740 & 940 Mechanical Climate Control (Standard
A/C) to Electronic Climate Control conversion

Brief History

Electronic Climate Control, or ECC, was first introduced as standard
equipment on the face-lift 760 from 1988, as well as on 780 of the same year.
From 1990 ECC was offered as an option on 740's, and it was also available as
an option on 940 right from the start in 1991 (Although actual availability
depends on market region – see below). The early 960’s up to 1994 had ECC
as standard equipment, although an interesting version of ECC without A/C
appeared on European 960’s from 1993 as another option.          From 1995 the
960 was also available with either standard A/C (which Volvo calls Mechanical
Climate Control, or MCC) or just basic heating without A/C, the ECC without
A/C option was dropped at the same time.

In the North American market (USA / Canada), ECC was not offered as an
option on their 740 & 940 at all, while ALL of the 960 & S/V90 has ECC as
standard equipment.     In Australia the 740 & 940 received ECC as standard
equipment on both Turbo and 16 Valve models from 1990 (the 8 Valve
naturally aspirated models retained MCC), and I’ve also seen late model 960
(1995 onwards) with MCC in Australia.

System Description

The most important component of the ECC is the control panel itself, which is
basically a small computer receiving inputs from 3 temperature sensors
(ambient temp. sensor near the blower fan, engine temp. sensor near the
heater matrix, interior temp. sensor hidden in the dome light), and a solar
sensor on the dash. The control panel sends output signal to the servomotor
which adjusts the hot air mixer shutter, solenoid valve to redirect vacuum for
operating the airflow distribution shutters, and the blower fan which it controls
fan speed, via a power stage which amplifies the signal.   The control panel for
ECC has 3 rotary dials, the left dial for fan speed (AUTO, then 0 to 5), middle
dial for mode (AUTO, or panel vents, floor, bi-level, defrost, and defrost /
floor), the right dial is for setting the desired temperature, either in Celsius or
Fahrenheit depending on the market.

The interior temp. sensor and ambient temp. sensor are the two primary
sensors, as the ECC compares the readings from these two sensors to the
temperature setting on the control panel to determine how much heating or
cooling is required. If either of them fails or are disconnected, the A/C button
on ECC control panel will start to flash continuously indicating a serious fault
within the system. Engine temp. sensor is just there so that when heating is
required on a cold start, it prevents the blower fan from running at full speed
until the engine's warmed up to avoid giving the occupants a blast of cold air.
The solar sensor reduces the temperature setting by up to 3 degrees Celsius
automatically on a sunny day to compensate for the extra heating from direct
sunlight. ECC also receives speed signal from the back of the speedometer,
same signal output as where cruise control system receives the speed signal,
and automatically reduces the blower fan speed when the car's cruising at
high speed, to compensate for the ram-air effect. Pretty high tech design for
late 80's electronics!

Just to avoid confusion, the earlier version of climate control found on the
early 760 up to 1987 and some 740 up to 1989 is called Automatic Climate
Control or ACC; it has a thumb-dial for temperature selection and a single
sliding bar for function & mode selection. ACC is totally different to ECC in its
design and functions.    A few people who has ACC in their car told me it’s
sometimes difficult and frustrating to get it to do what they want it to do, to
the extent they rather ditch ACC and replace it with MCC instead!       ECC is not
only more sophisticated and advanced, it can also be controlled manually just
like MCC if you don’t like what the computer is doing.

Collecting Parts

I first thought of doing this conversion on my 740 well over a year before I
actually did it. I started reading wiring diagram books and going through
parts diagram on VADIS to see if it can be done, how much work is involved
and what needs to be added or changed. I found out through VADIS that
beneath the dash, the basic components are pretty much the same between

MCC and ECC. When I was finally convinced that the conversion is possible,
I started collecting ECC parts whenever I came across them, on eBay and in
my local wrecker, which is why it took so long.       To save money I used mainly
used parts, new parts from Volvo is ridiculously expensive as most of you are
aware of. ECC control panel alone is about $1500.

The control panel is probably the most difficult to find, since the correct ECC
control panel for 740 & 940 has the face plate angled to suit the dash design
of these models. The control panel from 760, 780 and 960 have vertical face
plate, so they won’t fit 740 & 940. I spent over 6 months calling every Volvo
wrecker on the East coast of Australia to see if they have a 1990 or later 740
or 940 Turbo or 16 Valve, but I ended up getting my ECC control panel off
eBay from Germany, $130 including shipping.            Cooling fins on the power
stage are also slightly different.     If you hold the power stage with the
connectors to one side, the cooling fins on the 740, 780 & 940 ECC power
stage   runs   horizontally   while   the   760   &    960   ones   run vertically!
Electronically they are identical, but if you fit a 760 / 960 ECC power stage to
your 740 / 940 then the power stage unit may not receive proper cooling.
Solenoid valve and servomotors are a lot easier to find, because they are
interchangeable between different models.         In the case of servomotor, they
are also fitted to 740 & 940 with MCC from 1991. I bought the wiring harness
and power stage from a wrecked 780 from USA, but I later realised that wiring
harness from any ECC equipped 740, 760, 940 & 960 would’ve done the job.

The two temperature sensors on the blower housing and near the heater
matrix weren't too expensive so I bought them new from Volvo dealer, but the
interior temp. sensor and solar sensor cost a lot more so I got them used.
ECC use the blower fan with 2-pin connector which is same for 1990 and later
model with MCC, earlier models up to 1989 have a different blower fan with a
single pin connector. The early blower fan with single pin connector is no
longer available from Volvo, the later type with 2-pin connector is the official
replacement part for the earlier cars.      The blower fan motor housing on the
earlier cars needs to be modified to fit the later type blower fan, which Volvo
published detailed instructions for in the official 700 series climate control
service manual (the green manuals).
The Conversion

I started by removing everything on the dash, including instrument cluster,
radio console, old MCC control panel, glove box... etc, this took me about a
day. I actually took the whole dashboard out of my car, although looking in
retrospect I could’ve left the dashboard in the car. Taking it out does make
the next few steps a little easier. Once the dash is off, I started removing as
much wiring associated with the old MCC as I could. Most wiring came to a
few connectors around the centre console, which made removal of the old
harness and fitting of the new harness a lot easier.      I only had to splice 3
wires from the old wiring loom to the ECC wiring harness, one for the A/C
pressure switch, the other two for the fan relay which control the front
mounted auxiliary electric cooling fan. In the end all the wires matched up!
I didn't have to run any additional wires through the firewall.    But I strongly
recommend having two copies of the wiring diagram, one for your car and the
other for the donor car which you pulled the wiring from.      In my case I was
fitting ECC wiring from a 780 into my 740, and the wires were colour coded
differently! Fortunately I had a copy of both 740 and 780 wiring diagrams
handy, so I could cross-reference it and that saved a lot of head scratching.
Apart from fitting the wiring inside the car, the only other alteration to the
wiring is that you need to bypass the pressure sensor on the A/C piping which
switch on the auxiliary electric cooling fan, on models with ECC the cooling fan
is switched on directly by the ECC control panel instead.     For both MCC and
ECC, the auxiliary electric cooling fan is also switched on by a temperature
sensor in the radiator. (NOTE : This only applies to models with engine driven
radiator fan and a front mounted auxiliary electric cooling fan.      From 1992
models onwards both fans are replaced by a single large electric cooling fan
behind the radiator. I am not certain how Volvo wired that up with ECC, you’ll
need to do more research if your car has the single electric fan arrangement).

Another note here on the wiring - the dome light needs to be changed so that
you can fit the interior temp. sensor inside it. The correct type of dome light
for ECC has the two front reading lights angled at driver & front passenger,
and a hole between the reading lights which is where the temp. sensor is
mounted internally.   Physically this dome light fits the existing dome light slot
in the headlining, although it uses a different wiring connector.    It’s actually
the same type of 4-pin connector as the rear of the speedometer for late 740's
and early 940’s so they’re not hard to find.   This type of dome light can be
found in all ECC equipped cars. You will also need to run two wires and the
connector to the dome light for the interior temp. sensor, as well as a vacuum
hose which connects to the intake manifold via its own one-way check valve in
the engine bay, separate from the vacuum for the climate control system.
The purpose of this vacuum hose is that it draws air over the interior temp.
sensor so that can rapidly detects any changes in temperature.
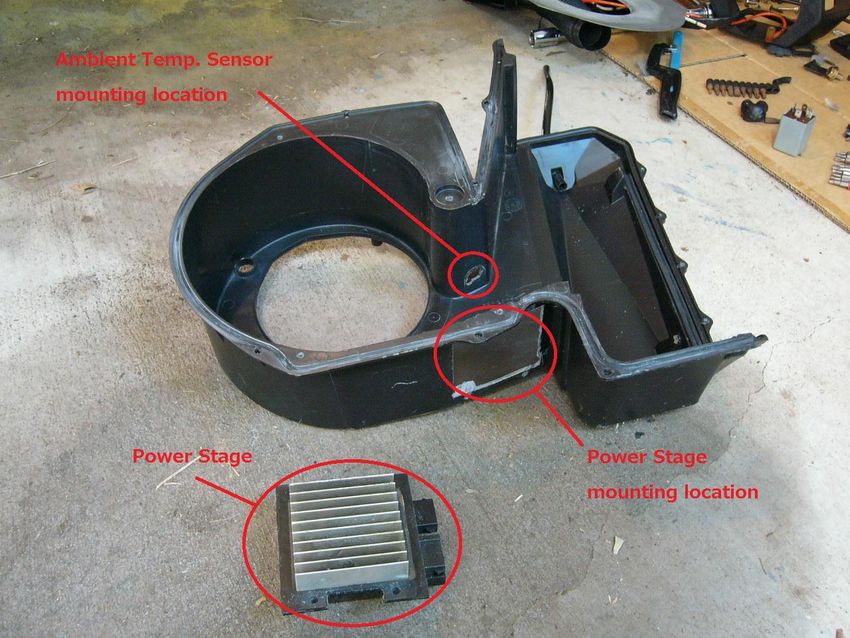
Above : This was psychologically the worst part of the conversion. I was
looking at that mess and thinking to myself "Oh my god, what have I done???
How am I going to put that all back?"

After I performed the necessary modifications to the wiring, I pulled the
blower fan housing out for modification.      Although my 1990 model has the
later 2-pin type blower fan already, I still need to modify the housing to fit the
power stage and the ambient temp. sensor.                 BE CAREFUL WHEN
EXTRACTING THE BLOWER FAN HOUSING!!!                 I cracked my blower fan
housing as I was taking it out, right at the evaporator drain spout.             I
mentioned this to my mechanic and he said it's very common, he's cracked a
few himself while taking the housing off to replace evaporators in 740 / 940's,
right at the drain spout too.   To modify for the power stage, I started from the
resistor pack mounting location for MCC, and basically enlarged it until the
power stage can fit in there.    A mini hacksaw comes in very handy here!        I
drilled then cut on the opposite side of the power stage, the side closer to the
firewall, for the mounting location of the ambient temp. sensor.

Above : Modified blower fan housing, ready to be installed. The object in the
foreground with lots of cooling fins is the power stage.   I have also drilled on
the opposite side for the ambient temp. sensor. I followed how Volvo factory
installed ECC on 740 / 940 as closely as possible.

The engine temp. sensor measures coolant temperature near the heater
matrix, and it's mounted just behind the two vacuum motors on the airflow
box, which directs the airflow. It’s a good idea to remove the airflow box first
before you drill the hole for the engine temp. sensor, since the heater matrix
is closely behind it, and you definitely don’t want to put a hole in that at the
same time! To take the airflow box out, first remove the two floor ducts
which directs air to the floor vent for rear passengers, then slide the floor duct
box out (which is held in by 1 screw) from under the airflow box, this reveals
access to a few bolts which needs to be removed too. A few vacuum hoses
needs to be disconnected but that's pretty straightforward. Drilling on the
airflow box is a little bit easier as the mounting location is already pre-marked.
Not sure if all models have the mounting location pre-marked or only on
1990+ models. With the airflow box removed it allowed me to thoroughly
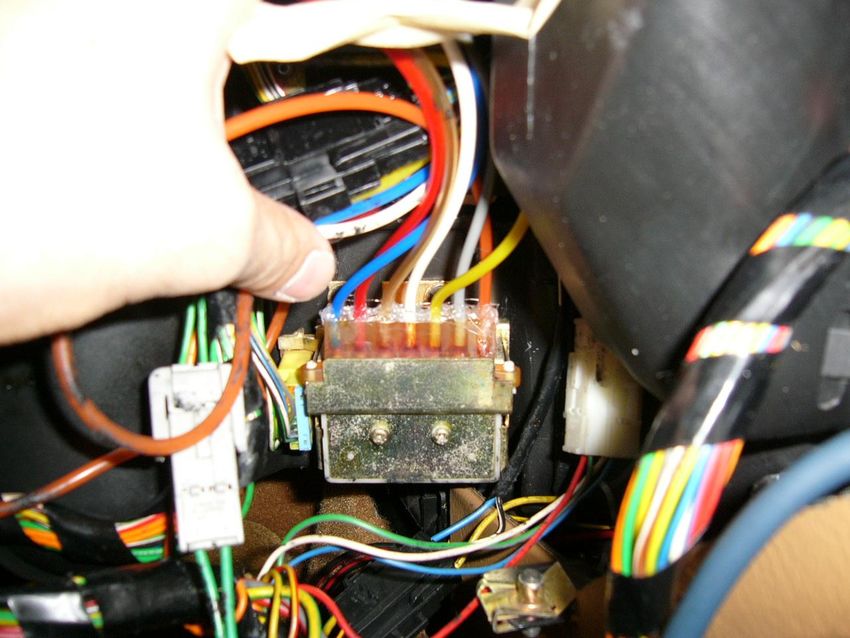
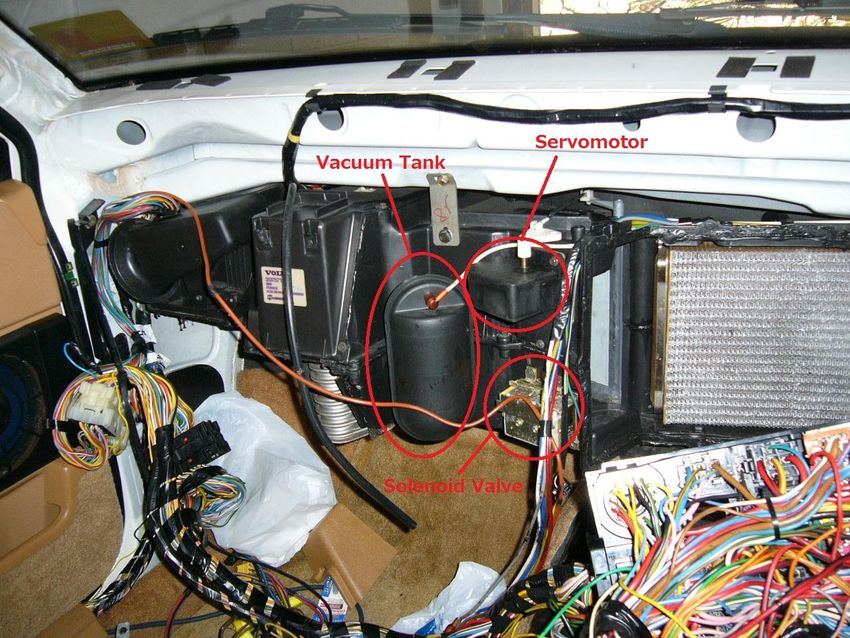
clean out all the yucky, sticky, deteriorating black foam. A lot of it blew out
through the vents a few years ago, but I vacuumed off what's left on there to
make sure I'll never see it again!

Above : Engine temp. sensor mounting hole on the airflow box, drilled and
ready to be re-installed.

The next step was fitting the servomotor and solenoid valve.       Servomotor
opens and closes the hot air mixer shutter, while solenoid valve redirects the
vacuum which controls the airflow.    If you’re doing this conversion on a 940,
or a '91+ 740 then you can forget about adding the servomotor, because your
car’s got it already! From 1991 the 740 and 940 received a minor update on
the MCC which use the same servomotor as for the ECC to control the hot air
mixer shutter. On my 1990 model however (and older models too), the hot
air mixer shutter is operated by a cable connected to the old MCC control panel,
so the cable as well as the old control arm has to go first, then a new control
arm with a metal connecting rod linking to the servomotor can be fitted.
Pulling the old control arm out turned out to be quite difficult, because it was
quite stubborn and there isn’t a lot of room to work with.           Both the
servomotor and solenoid valves are fitted onto a metal plate, which is
pop-riveted to the side of the climate control box.   I drilled on the box then
pop-riveted the metal plates in place, putting a metal washer behind the rivets
for extra support.

Above : Immediately to the right of the vacuum tank is the servomotor (top)
and the solenoid valve (bottom). Note the blower housing and airflow box is
still removed.

Once that's done, the blower fan housing and airflow box can be fitted back in
place, in preparation for the dash re-assembly. But first you need to fill the
edge of the blower fan housing with butyl before you put it back, to make sure
it doesn't leak air.   BE CAREFUL WITH BUTYL, it’s black & sticky, and it gets
everywhere, especially when getting that blower fan housing back in. I got it
on everywhere while I was putting things back, including the interior carpet
and even my Burberry shirt (Note to self : Never work on the car wearing
Burberry shirt again!). My mechanic did teach me a neat trick of getting
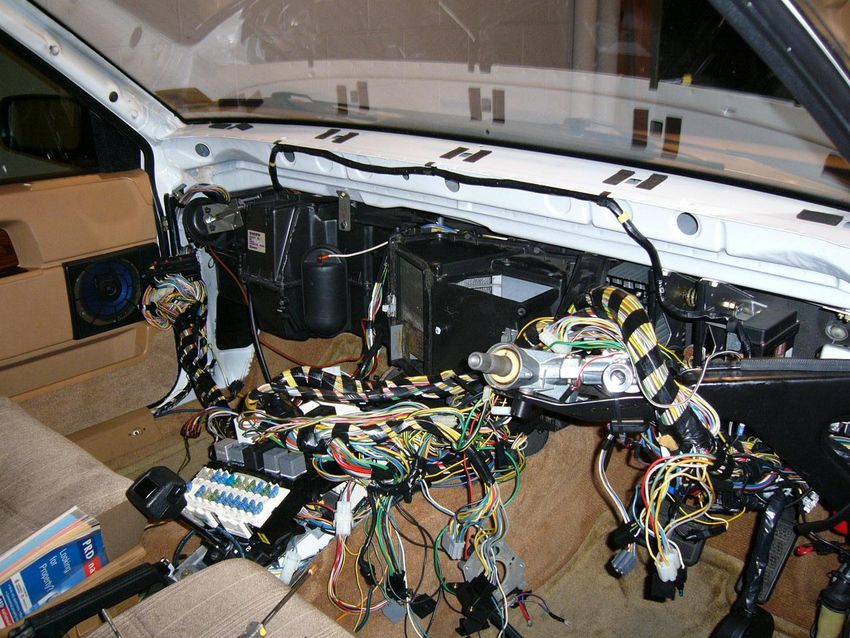
butyl off with carby cleaner, and I even got it off my Burberry shirt without
damaging or discolouring the fabric!

Before you put the dash back, if you're doing this conversion on a 1990 or
earlier 740 then you also need to drill for solar sensor mounting. On the 1990
models, mounting location is pre-drilled on the metal frame of the dash, on
the passenger side between the defroster vents and the A pillar, although it's
covered by foam & vinyl on the dash. But it does make drilling a lot easier as
you're only drilling through soft material. I'm not sure if the earlier 740's have
this mounting location pre-drilled, I have a feeling that they're not because
ECC wasn't available on 740's until 1990. On the 940's and 1991+ 740's
however, the solar sensor is mounted on the passenger side dash speaker
grille, so you don't need to drill the dash, just drill or change the speaker grille.

Above : My dash re-installed, as well as the ECC control panel.

The last part of the conversion before putting the glove box back in place, is
attaching the vacuum hose to the solenoid valve. On MCC, vacuum hoses are
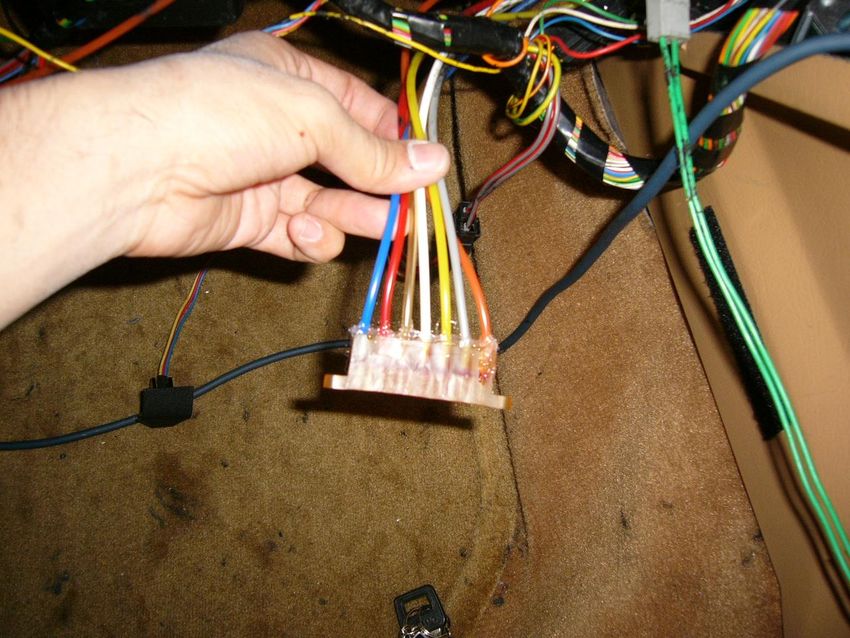
connected to the back of the control panel, where the selection is made
mechanically. On the ECC this is done electronically through the solenoid
valve. Although Volvo had designed the vacuum hoses to be firmly attached
to its connector & not to be pulled out individually, I was successful in pulling
the old vacuum hoses out of connector for the solenoid valve by carefully
inserting a very small & sharp scissors from the manicure kit and ran it
between the vacuum hose and the connector. I then cut the old connector
that goes to the MCC in my car and thoroughly cleaned the ends of the vacuum
hoses with methylated spirit before I glued the vacuum hoses to the new
connector with contact adhesive. To sure that there won’t be any vacuum
leaks, I used hot glue to seal the top of the connectors & the vacuum hoses.
Replacing the vacuum connector made the job a lot easier as the other
alternative was to remove the whole vacuum hose harness and fit the ECC
vacuum hose harness. If you do decide to change the entire harness, I would
suggest getting the harness from a 740 / 780 / 940, as I have a feeling the 760
/ 960 ones may not fit.

Above : The vacuum hose connector, with the vacuum hoses from my car
attached, sealed with hot glue.

Above : The vacuum hose plugged into the solenoid valve.

Volvo actually mentioned in the Climate Control service book that the vacuum
hoses cannot be individually from the connector. But the way I did it, the
hoses are pretty securely attached and air tight as well, so I'm pretty satisfied.
You can also read