VTUBE STUDIO - OFFICIAL DOCUMENTATION - CONTACT - GITHUB
←
→
Page content transcription
If your browser does not render page correctly, please read the page content below

DenchiSoft
Karlsruhe, Germany
vtubestudioapp@gmail.com
https://denchisoft.github.io/

                                                                  Version 1.5.2.a - 05.01.2021

VTube Studio – Official Documentation
Contact

https://discord.gg/RdaqJdu      https://twitter.com/VTubeStudio   vtubestudioapp@gmail.com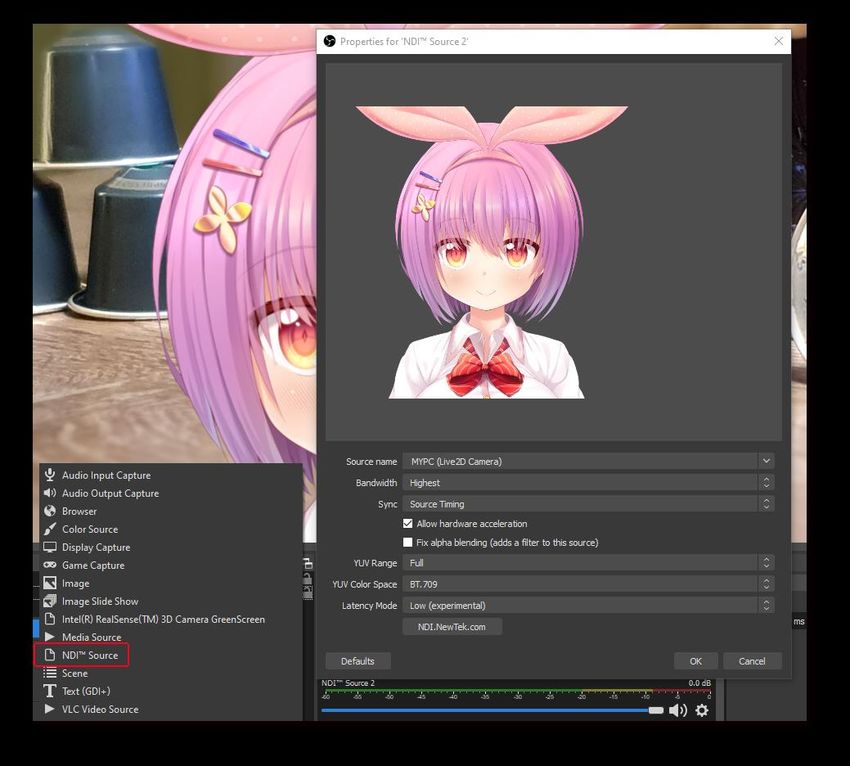
Table of Contents
1       What is VTube Studio? ..................................................................................................................................... 4
    1.1       Introduction ...................................................................................................................................................... 4
    1.2       Where to download? ........................................................................................................................................ 4
    1.3       Supported Devices ........................................................................................................................................... 5
2       Android vs. iPhone/iPad: Which is better? ....................................................................................................... 5
3       Getting Started ................................................................................................................................................. 6
4       Loading your own Models ................................................................................................................................. 8
    4.1       Preparing your Live2D model for VTube Studio ............................................................................................. 8
    4.2       Putting your Live2D Model into VTube Studio ................................................................................................ 9
    4.3       Auto-Setup ..................................................................................................................................................... 10
5       Loading your own Backgrounds ..................................................................................................................... 11
6       VTube Studio Settings .................................................................................................................................... 12
    6.1       General Settings............................................................................................................................................ 12
    6.2       Camera Settings ............................................................................................................................................ 13
    6.3       VTS Model Setting ......................................................................................................................................... 14
        6.3.1         Basic Setup ............................................................................................................................................................ 14
        6.3.2         Model Movement ................................................................................................................................................... 14
        6.3.3         Physics Settings ..................................................................................................................................................... 15
        6.3.4         VTS Parameter Setup ............................................................................................................................................ 15
        6.3.5         Supported INPUT parameters (face tracking, etc.) .............................................................................................. 16
        6.3.6         Hotkey Settings and Types .................................................................................................................................... 17
        6.3.7         Hotkey Actions ........................................................................................................................................................ 18
7       Expressions (a.k.a. „Stickers“ or „Emotes“) ................................................................................................... 19
8       Animations ...................................................................................................................................................... 21
9       Interaction between Animations, Expressions, Face Tracking, Physics, etc. ................................................. 21
10      Streaming to Mac/PC ..................................................................................................................................... 22
    10.1 Preparation on PC/Mac ................................................................................................................................ 22
    10.2 Connecting the Smartphone App ................................................................................................................. 24
    10.3 Recording with OBS (transparent background)........................................................................................... 24
    10.4 Using NDI for streaming to OBS with invisible UI (transparent background) ............................................ 26
11      Connection Issues & Troubleshooting ............................................................................................................ 27
    11.1 Possible Causes for Connection Issues ....................................................................................................... 28
    11.2 Network Lag Troubleshooting (general)....................................................................................................... 29
    11.3 Network Lag Troubleshooting (macOS and iPhone) ................................................................................... 29
12      Taking/Sharing Screenshots .......................................................................................................................... 30
13      Item System .................................................................................................................................................... 31
14      VTube Studio Files and File Format ................................................................................................................ 34
15      FAQ ................................................................................................................................................................. 34
    15.1 Can my face be accidentally revealed on stream? ..................................................................................... 34
    15.2 How do I buy VTube Studio? Why should I? Can I use it commercially?.................................................... 34
    15.3 Can I try VTube Studio before buying it?...................................................................................................... 35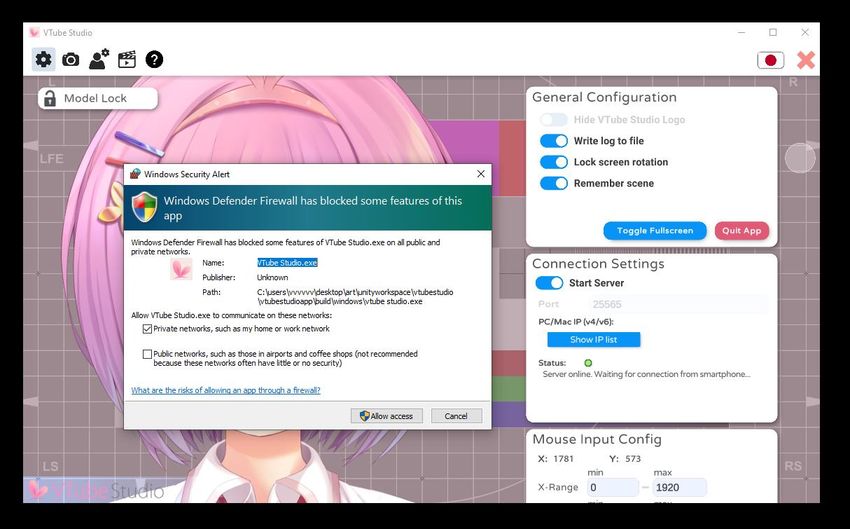
15.4 Can I use my webcam for face tracking instead of my smartphone?........................................................ 35
 15.5 How can I use VTube Studio together with my friends? ............................................................................. 35
 15.6 Can I use USB instead of WiFi to connect my smartphone? ...................................................................... 35
 15.7 What is the “Virtual Webcam” feature? ....................................................................................................... 35
 15.8 My device gets really hot! What is “Streaming Mode” in the smartphone app? ...................................... 36
 15.9 Are there differences between the macOS and Windows version? ........................................................... 36
 15.10         Why does my stream to PC/Mac lag? ...................................................................................................... 36
 15.11         Why is blinking and eye tracking not supported on Android? ................................................................ 36
 15.12         I bought the PRO version on Android. Can I transfer it to iOS? .............................................................. 37
 15.13         VTube Studio doesn’t work on my smartphone. What can I do? ........................................................... 37
 15.14         The face tracking is going crazy on my iPhone/iPad! What’s going on? ............................................... 37
 15.15         Why does my iPhone/iPad show the forward-pointing camera? ........................................................... 37
 15.16         Where can I get help/support? ................................................................................................................ 37
 15.17         How can I become a VTube Studio Partner? ........................................................................................... 37
 15.18         Can I use VTube Studio in my company? How about for TV ads? .......................................................... 37
 15.19         I can’t load my Live2D model in VTube Studio. What’s wrong? ............................................................. 38
 15.20         Does VTube Studio store/record any personal data?............................................................................. 38
 15.21         Who is using VTube Studio? I want to see some examples! .................................................................. 38
16   Privacy Policy and Licensing ........................................................................................................................... 38
17   Further Terms ................................................................................................................................................. 38

1 What is VTube Studio?
1.1 Introduction

VTube Studio is an app available for iPhone, Android, macOS and Windows. The app uses your
smartphone to track your face and animate a Live2D Cubism Model accordingly. The model is shown
directly on your phone or on your PC by streaming the face-tracking data over your local network from
your phone to your PC/Mac. Example video: https://youtu.be/mN0sJXCubQw

                    VTube Studio DOES NOT work with webcams.
                -    YOU ALWAYS NEED A SUPPORTED SMARTPHONE OR TABLET/IPAD.
                -    iPhone/iPad tracking is MUCH BETTER than Android tracking.
                -    Only Live2D models are supported, no VRM or other 2D/3D formats.

1.2 Where to download?

To run VTube Studio, you need to download the smartphone app (Android or iOS) and the desktop app
(Windows or macOS).

       •    Desktop
               o Windows:       https://denchi.itch.io/vtube-studio
               o macOS:         https://denchi.itch.io/vtube-studio
       •    Smartphone
              o iOS:            https://apps.apple.com/us/app/vtube-studio/id1511435444
              o Android:        https://play.google.com/store/apps/details?id=com.denchi.vtubestudio

The app itself is free to download. The free version has two restrictions, that can be removed by
purchasing the PRO version (~25-30 USD). With the PRO version, you can:
   •       Remove the VTube Studio watermark from the smartphone.
   •       Stream face tracking data to your PC/Mac for more than 1 minute.
   •       Use VTube Studio for any commercial purposes, including monetized streams, superchats, etc.
No other features are restricted so far. Before purchasing the PRO version, please make sure the app
works well on your device.
1.3 Supported Devices

To run VTube Studio, you need a PC (Windows 7 and up) or Mac and a smartphone/tablet that supports
the VTube Studio smartphone app. VTube Studio requires the augmented reality framework ARCore
(from Google, on Android) or ARKit (from Apple, on iOS).

Supported devices:
     •   Android
             o Any device that supports ARCore should work.
             o See https://developers.google.com/ar/discover/supported-devices
             o Some devices may not work despite ARCore being supported. When this happens, the
                camera preview will show a blue rectangle. You can try manually downgrading to older
                versions of ARCore and see if that helps, otherwise you’ll have to wait until Google fixes
                support for your device in future versions.
     •   iOS
             o Any iPhone or iPad that has FaceID
                   ▪ iPhone X, iPhone XR, iPhone XS (regular and Max), iPhone 11 (regular, Pro and Pro
                       Max),
                   ▪ iPad Pro (3rd, 4th+ generation)
             o Also supported: devices without FaceID but with the Apple A12 (or newer) Bionic Chip
                   ▪ iPhone SE 2020

2    Android vs. iPhone/iPad: Which is better?

The smartphone face tracking is provided by Google ARCore on Android and Apple ARKit on iOS. ARKit
face tracking on iOS is much more advanced when compared to ARCore on Android. This is partially due
to the supported iOS devices having specialized hardware for face tracking (TrueDepth Camera).

In short, iOS devices are much better. They provide much smoother and more detailed tracking. Newer
iPads or iPhones are generally preferable over older ones, as old ones may get warm/hot during usage
(see also FAQ). Also, some important features are not supported on Android.

    Feature                    iOS                                 Android

    Face Direction Tracking    Fully supported                     Fully supported

    Mouth Tracking             Smile + Mouth-Opening (no frown) Smile + Mouth-Opening (no frown)

    Brow Tracking              Individual brows up/down            One combined up/down value

    Eye Tracking               Fully supported                     Not supported

    Blink/Wink Tracking        Fully supported                     Not supported

    Tongue/Cheek Tracking      Fully supported                     Not supported

    Face Tracking Delay        No or very small delay              Very small or small delay

To add to that, the tracking on iOS is less shaky and needs less smoothing. This results in your model
reacting a bit faster and movement looking more natural in general. To summarize, if you want to take
advantage of high-quality face tracking, the iOS version is the way to go.
3 Getting Started
Feel free to play around a bit by yourself inside the app! It comes with a few Live2D models, but of
course you can also load your own ones (more on that later).
VTube Studio consists of the smartphone app (iOS/Android) and the PC app (Windows/macOS). They
are very similar. Let’s look at the interface of the smartphone app first.
In the first image, you can see the VTube Studio loading screen. If you want to find out the version of
the app you’re using, it’ll be shown right there.
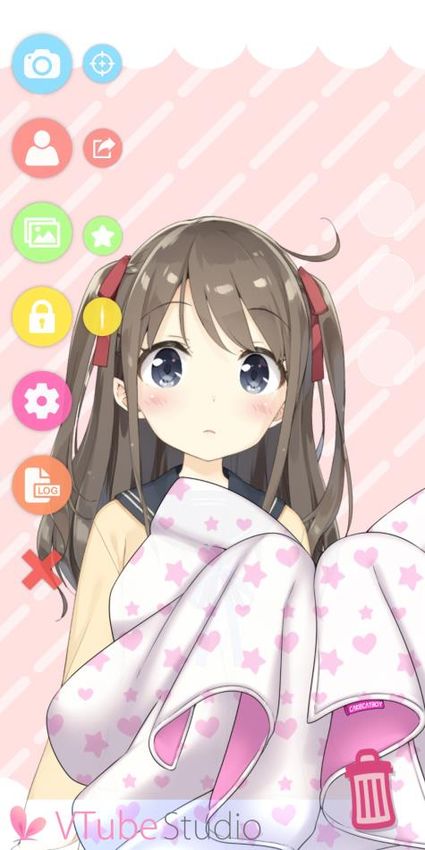
The second image shows the main menu of the app. From there, you can access the main app
functionality. From top to bottom:
• Show camera preview image (see also third image).
o The icon next to it starts the camera calibration without showing the camera preview. You
can also calibrate by clicking on the camera preview image when it’s shown.
• Show model selection bar.
o The icon next to it opens the screenshot config. Using this, you can take screenshots
directly from within the app, save them and share them on social media. Also supports
PNG screenshots with transparent background.
• Change background (shows background selection list).
o The icon next to it opens the item/prop system config to import items into the scene. See
the chapter “Item System” for more info.
• Lock model position (will make sure you can’t accidentally move the model around when
touching the screen, face tracking will still move/animate the model).
o The icon next to it locks/unlocks all items in the scene. See the chapter “Item System” for
more info.
• Show settings, including VTube Studio model and hotkey setup.
• Show logs (if you run into any issues/errors, check the log).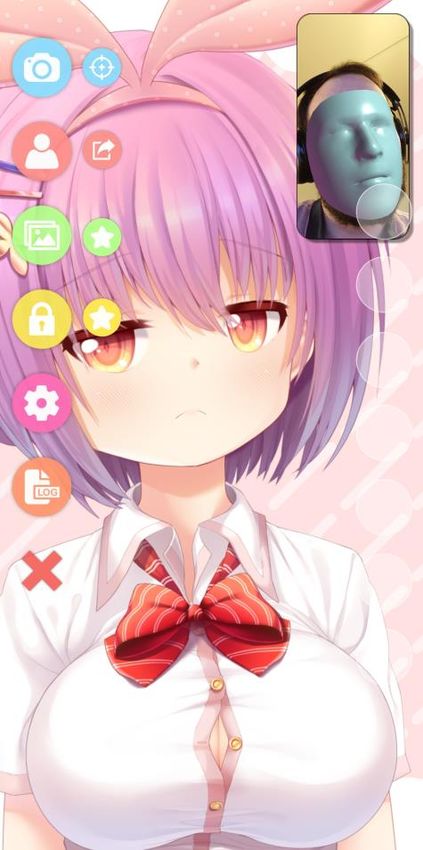
•   Hide main menu icons. Double-clicking anywhere on the screen will show the menu icons again.

Now let’s see what happens when you click the “Show model selection bar” icon.

The first item will open a guide on how to load your own models into the app (this document). The
second button will unload the model if a model is currently loaded.

The items after that are the models currently available in the app. VTube Studio comes with a couple
example models for you to play around with. After clicking a model, it’ll be loaded into the scene. If the
model is not yet configured, you’ll be asked to run the “Auto-Setup” for iOS or Android which will set the
model up based on default Live2D parameter names and value ranges. This will be covered later.

Once the model is properly configured, the model will imitate your movement and facial expressions.
You can move, rotate and scale the model with the usual touch gestures. When opening a model in the
PC app, the controls for moving/rotating/scaling will be shown on the screen.

You can close the camera preview at any time. There is no reason to keep it open. You can click the
camera preview window to calibrate the face tracking. While doing this, keep your face at a normal
distance from the camera with a neutral expression on your face. This is especially important on
Android, iOS only needs calibration to reset the face direction.
4   Loading your own Models

VTube Studio comes with a few default models. Most of them belong to Live2D Inc., so please be sure
to read the chapter “Privacy Policy and Licensing” if you want to use them in your streams.

This chapter covers how to load your own Live2D models into VTube Studio. It will be assumed that you
already have your Live2D model finished and have a basic understanding what Live2D is and how it
works (Live2D parameters, etc.)

4.1 Preparing your Live2D model for VTube Studio

There isn’t really any specific special preparation you need to do with your Live2D model so it works
with VTube Studio. As explained in the chapter “VTS Parameter Setup”, you can map any face tracking
parameter to any Live2D parameter, so you could theoretically choose parameter IDs and ranges
however you want.

However, it is recommended to adhere to the default IDs and parameter ranges (min/max). Please also
note that only the Live2D parameter IDs matter to VTube Studio, not the Live2D parameter names.

When you’re done with your model, export it via File → Export For Runtime → Export as .moc3 file
Make sure to choose the following settings:
    •   “Export Version” set to “SDK 3.0” or “SDK 3.3” or “SDK 4.0” (recommended).
    •   “Export Physics settings file (physics3.json)”. If you don’t to this, your model will not have
        physics. Always export your physics file like this and never independently from the model, as this
        is the only way to make sure the physics file is “registered” with the model (in the .model3.json
        file) so it’s usable by VTube Studio.
    •   Export Types: SDK

This will create a folder with the following files (ignore the files marked red). If your model fails to load
later in VTube Studio, make sure all files are there.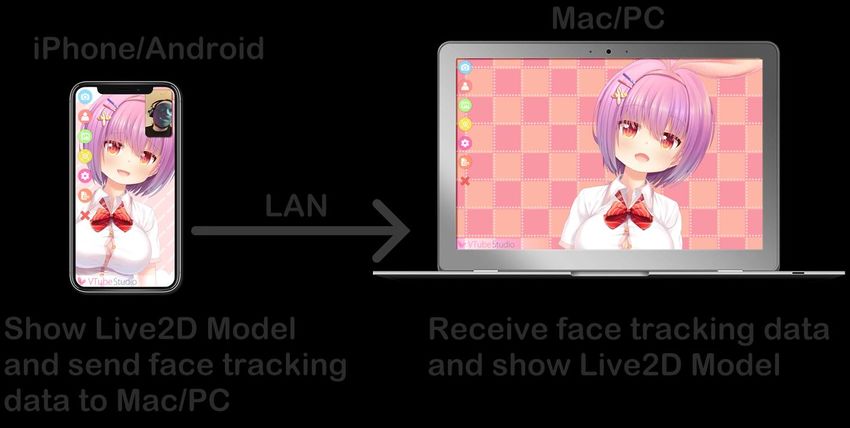
A short overview about what these files do:

   •   .model3.json
         o Main Live2D model index file.
         o Human-readable (can be opened/edited in text-editor)
         o Has references to all other files. VTube Studio looks for this file.
   •   .moc3
         o Model binary file. Has all model data, such as vertices, deformers, parameters, etc.
   •   .cdi3.json
         o Model display information file.
         o Human-readable.
   •   .physics3.json
         o Has all the information about your physics setup.
         o Human-readable.
   •   . (here: akari.4096)
         o Contains your texture(s). VTube Studio also supports models with multiple and/or large
            textures. Be advised that using large textures may lag or even crash the app on mobile.

Make sure you have all these files in a folder before you proceed. I usually call this folder _vts,
but you can choose any name.

If you want to use Live2D Animations and Live2D Expressions, put them in this folder as well or in a
subfolder (see the two folders in the screenshot above). How expressions and animations work will be
explained later. You should also add a model icon into that folder (any filename, .png or .jpg,
recommended 512x512 pixels).

4.2 Putting your Live2D Model into VTube Studio

Take your model folder and put it in the “Live2DModels”-Folder in VTube Studio. Where this folder is
located differs depending on the platform:

  Platform           Folder Location
  iOS
                     Open VTube Studio app data folder on your iPhone/iPad in iTunes (Windows or
                     macOS) or Finder (on macOS Catalina). You’ll find a Live2DModels-Folder.
                         •   Copy Live2DModels -Folder to your desktop
                         •   Put your new model folder file into that folder
                         •   Copy Live2DModels-Folder back into your iPhone/iPad (overwrite the old
                             folder)
  Android
                     /Android/data/com.denchi.vtubestudio/files/Live2DModels
  MacOS
                     VtubeStudio.app/Contents/Resources/Data/StreamingAssets/Live2DModels
  Windows
                     /Vtube Studio_Data/StreamingAssets/Live2DModels

Now start VTube Studio. When the app is started, it automatically looks for new Live2D models and
creates a VTube Studio Model (VTS Model, .vtube.json) in the same folder. This
file is human-readable and contains all information about your VTube Studio model setup.

You should now be able to see your model in the model selection bar. If not, make sure all files are
present and there are no errors in the logs.
4.3 Auto-Setup

When loading a new Live2D model, you will be asked to run the “Auto-Setup”. The Auto-Setup can be
triggered manually as well after the model is loaded.

When running the Auto-Setup for iOS or Android, VTube Studio will automatically look for default Live2D
parameters in your model. VTube Studio will assume that you have used default Live2D parameter IDs
and parameter names and set up your VTube Studio accordingly. You can learn more about the default
IDs here: https://docs.live2d.com/cubism-editor-manual/standard-parametor-list/#

If you do not use the default IDs, you will have to set your model up manually. This is explained in detail
in the chapter “VTS Parameter Setup”.

The model will be optimized for use with either Android or iOS depending on which option you choose.

Your model should now be ready to use. Of course, you may need to finetune it, but it should move
already. On iOS, you might have to open the camera preview once after installing the app before the
model will move.

The whole process is also explained in this video:
[VTube Studio] Loading your own Live2D Models -- https://www.youtube.com/watch?v=AssUd6EtFXw
5    Loading your own Backgrounds

VTube Studio comes with a few default backgrounds. Some of them are animated backgrounds that
can’t be added or removed (for example the doggo one).

The PC app also comes with a color-picker-background, pictured below. Using this background, you can
also activate “Transparent Mode”, which will enable OBS and other capture software to record your
model with a transparent background, so you don’t need to use a color key.

You can freely add backgrounds (videos or images) to VTube Studio. Be careful when using videos with
a large file size in the mobile app as they could potentially crash the app due to memory limitations.

Supported formats are:

     •   Image
            o    .jpg
            o    .png
     •   Video
            o    .mp4
            o    .webm (may not be supported on some platforms)

The backgrounds-folder can be found in the following locations. You may need to restart the app after
adding your own backgrounds.

    Platform            Folder Location
    iOS
                        Open VTube Studio app data folder on your iPhone/iPad in iTunes (Windows or
                        macOS) or Finder (on macOS Catalina). You’ll find a Backgrounds-Folder.
                           •   Copy Backgrounds-Folder to your desktop
                           •   Put your new background file into that folder
                           •   Copy Backgrounds-Folder back into your iPhone/iPad (overwrite the old
                               folder)
    Android
                        /Android/data/com.denchi.vtubestudio/files/Backgrounds
MacOS
VtubeStudio.app/Contents/Resources/Data/StreamingAssets/Backgrounds
Windows
/Vtube Studio_Data/StreamingAssets/Backgrounds
6 VTube Studio Settings
After clicking the settings icon in the main menu, the settings screen will be shown. It has several tabs,
a help icon (links to this document) and a language selector button that changes between Japanese
and English (app restart needed).
6.1 General Settings
From here, you can purchase VTube Studio PRO. On iOS, there is also a button to restore purchases on
this screen.
Furthermore, there are some general settings for hiding the VTS logo, remembering the scene (save
open background and model when restarting), etc.
Next, there’s the “Stream to PC” setup. This is for connecting your phone to your PC to stream the face
tracking data to the PC app. This will be covered in the chapter “Connecting your Smartphone to your
PC/Mac”.Finally, there’s the “Mouse Input Config”. This allows you to use the mouse/finger position as input
parameter to animate your model in addition to face tracking. You can select an X-Range and Y-Range
in pixels. This range will be mapped to [-1, 1] for X and Y. With this setting, you could for example make
your model follow your finger or mouse pointer with its eyes. This will also show mouse-clicks (right, left,
middle) that can be used to trigger hotkeys. In the smartphone app, these mouse-clicks can be
triggered by touching the screen with one finger (left-click), two fingers (right-click) and three fingers
(middle-click).
6.2 Camera Settings
This config tab will let you change settings related to rendering and the camera:
• AR Camera Config
o Change face tracking camera FPS. This does not affect the app framerate.
o Change whether the camera preview is shown. If you want to make sure your face is
never shown on your smartphone screen, you can configure that here (see third picture).
o Change whether face mask is shown over your face.
• Tracking Config
o Change behavior of model when face tracking is lost. You can either have the model
freeze in place when your face is lost or have it return to its default pose.
• Quality and Effects
o Turn on Anti-Aliasing (smoother model edges but costs performance, not recommended
on mobile)
o Change app FPS. VSync means the FPS will be synced to your display update rate. This is
recommended on PC to prevent screen-tearing.
• Record Screen
o Smartphone-only. Lets you directly record your screen including microphone sound. A
small red dot will be shown at the bottom-right while recording. Tap it to stop the
recording at any time.6.3 VTS Model Setting 6.3.1 Basic Setup Once you have loaded a model, you will be able to access the model settings in the VTS model config tab. At the top, you can enter a name for your model. This name will be shown in the model selection bar. Below that, you can see the name of the Live2D model file and the automatically created VTube Studio model file (VTS model). You can choose an icon (.jpg or .png) and default idle animation (.motion3.json) for your model. You can choose from any file inside your model folder. You can also run the auto-setup for your VTube Studio model. This will set up your model based on standard Live2D parameter names and values. For more information about these parameters, please see: https://docs.live2d.com/cubism-editor-manual/standard-parametor-list/# If you change the parameter IDs or ranges, auto-setup will not be able to set up your model and you’ll have to do it manually. Even if you use auto-setup, you may have to fine-tune your VTS model to fit your Live2D model. 6.3.2 Model Movement With the “Model Movement” settings, you can move the model left/right and closer/further away from the screen based on your head position. With the sliders, you can configure how much the model is moved.
6.3.3 Physics Settings

Here, you can boost or reduce the effect of your Live2D physics setup. You can also activate “wind”,
which will randomly apply a wind-like force to the physics system. This is experimental and may not look
good depending on how your model is set up.

6.3.4 VTS Parameter Setup

This is the most important part of your model settings. Here, you set up which face tracking parameters
control which Live2D parameters.

The general idea is:
   • You can freely map any INPUT parameter (face-tracking, mouse, etc.) to any OUTPUT parameter
      (Live2D parameter).
   • How the values are mapped can be freely configured. For example, the input parameter
      MouthOpen is within the range [0, 1], with 0 being closed and 1 being all the way open. If your
      Live2D parameter (for example named ParamMouthOpen) has the range [-10, 10], you could
      map the ranges so (IN, 0) becomes (OUT, -10) and (IN, 1) becomes (OUT, 10). Or you map it any
      other way, there are no restrictions.
   • The red dot will show where the current value is placed within the input and output range.
   • By activating “Limit Range”, you can make sure the the input or output values never exceed the
      range you set for the input or output. This will also cause the value to stop smoothly when
      approaching the limits.
   • Generally, it is recommended to only change the output range and leave the input range as is.
   • More smoothing will make the movements less shaky but will introduce lag. Experiment with the
      smoothing values until you find something that works for each parameter. On iOS, you will most
      likely need very little smoothing.
• Auto-breath will fade the output parameter up and down in a breath-like motion. No input
parameter is required when using this option. Any input will be ignored.
• Auto-blink will randomly reduce the parameter to zero. This can be combined with an input
parameter, but none is necessary.
• As input parameter, you can choose from a list of available parameters. iOS supports more face
tracking parameters than Android (see below).
• As output parameter, you can choose any Live2D parameter. Each output parameter can only be
chosen once, as otherwise you would have multiple input parameters writing to the same output
parameter.
If your model doesn’t move despite the Live2D parameter clearly moving in the VTS model
config, the cause is most likely an expression, an animation or the physics system overwriting
the value from the face tracking. This is explained in detail in the chapter:
Interaction between Animations, Expressions, Face Tracking, Physics, etc.
6.3.5 Supported INPUT parameters (face tracking, etc.)
VTube Studio currently supports the following input parameters that can be mapped to output Live2D
parameters. The iOS-only parameters are also marked accordingly in the app.
Parameter Name Explanation iOS Android Notes
FacePositionX horizontal position of face ✔️ ✔️
FacePositionY vertical position of face ✔️ ✔️
FacePositionZ distance from camera ✔️ ✔️
FaceAngleX face right/left rotation ✔️ ✔️
FaceAngleY face up/down rotation ✔️ ✔️
FaceAngleZ face lean rotation ✔️ ✔️
MouthSmile how much you’re smiling ✔️ ✔️ frown not detected
MouthOpen how open your mouth is ✔️ ✔️
Brows up/down for both brows combined ✔️ ✔️
MousePositionX x-pos. of mouse or finger within set range ✔️ ✔️
MousePositionY y-pos. of mouse or finger within set range ✔️ ✔️
TongueOut stick out your tongue ✔️ ❌
EyeOpenLeft how open your left eye is ✔️ ❌
EyeOpenRight how open your right eye is ✔️ ❌
EyeLeftX eye-tracking ✔️ ❌
EyeLeftY eye-tracking ✔️ ❌
EyeRightX eye-tracking ✔️ ❌
EyeRightY eye-tracking ✔️ ❌
CheekPuff detects when you puff out your cheeks ✔️ ❌
BrowLeftY up/down for left brow ✔️ ❌
BrowRightY up/down for right brow ✔️ ❌
FaceAngry detects angry face ✔️ ❌ EXPERIMENTAL6.3.6 Hotkey Settings and Types
In VTube Studio, you can use hotkeys to trigger various actions. When creating a new hotkey, it is saved
in the VTube Studio model configuration file. You can give hotkeys names that are also shown in the
logs when the hotkey is activated.
There are two ways to trigger hotkeys:
• Keyboard-Hotkeys (PC/Mac only)
o As the name implies, you can trigger hotkeys by pressing keys on your keyboard.
o You can set combinations of up to 2 keys.
o Keypresses are also read when the VTube Studio window is not in focus, for example
when you’re playing a game. However, this does not work on macOS.
o Also included: Mouse-Hotkeys (right/left/middle click).
• On-Screen Button Hotkeys (PC/Mac and smartphones)
o Up to 8 hotkeys can be set as on-screen buttons. They will be shown as semi-transparent
white circles on the right of the main screen (see picture 3).
o Opacity can be changed. They can also be made invisible.
o If you activate “Send hotkeys to PC”, pressing an on-screen hotkey on your smartphone
will send a signal to your PC (if connected) that the key with that ID has been pressed.
When the model you have loaded on your PC also has on-screen button hotkeys set up,
the corresponding key will be triggered.
o You do not need to have a model loaded on your smartphone to send hotkey presses to
your PC. If no model is loaded, all 8 on-screen buttons will be shown.6.3.7 Hotkey Actions
Various actions can be triggered by hotkeys:
• Play Animation (.motion3.json)
o Will play the given animation once (overwrites face tracking)
• Change Idle Animation (.motion3.json)
o Will change the currently looping idle animation. Will not be saved into the VTS model
configuration.
• Set/Unset Expression (.exp3.json)
o Toggles the given expression in the model (overwrites face tracking and animations)
o If multiple expressions set the same Live2D parameter to different values, the last
expression will decide the value.
o More on this in the chapter “Expressions”
• Remove all Expressions
o Removes all currently set expressions.
• Reload Model Texture
o Reloads the model texture. This means you can modify your model .PNG-texture outside
the app and reload it on the fly. Can be used for various cool effects during streams.
• Move Model
o Moves the model to the given position/rotation/size.
o The position for the hotkey can be set using the “Record Position” button, which will save
the current model position, rotation and size. The numbers shown are:
▪ x-pos/y-pos/size rotation7 Expressions (a.k.a. „Stickers“ or „Emotes“)
Expressions are created using the Live2D Cubism Viewer. You can download it for free as part of the
Live2D Cubism Editor: https://www.live2d.com/en/download/
Expressions allow you to set Live2D parameters to certain values using hotkeys. Using expressions, you
can for example trigger different facial expressions or costume changes.
To create expressions, first load your model into the Live2D Cubism Viewer by dragging in the
.model3.json file. Your model should now be open and ready to edit.
To create a new expression, you can now do the following:
1. Add a new expression using File → Add → Expression
2. Make sure Animation → Apply Expression is activated.
3. There should now be a folder called “Expressions” in the navigation window. Open it and click
your newly created .exp3.json file.4. Create your expression by adjusting the sliders and checkboxes for the parameters you want to
be part of the expression.
5. Fade-times are ignored by VTube Studio in the current version. Instead, a default fade-time is
used.
6. You can also right-click a parameter and set it to “Multiply”. This is not yet supported by VTube
Studio and may result in your expressions not working. Please leave it at “Additive”.
7. To save the expression, right-click your .exp3.json file and select “Save”. Save it somewhere next
to your VTS/Live2D model or in any subfolder of that folder so VTS can find it when your model is
loaded.
To set up the expressions in VTube Studio:
1. Create a new hotkey inside of VTube Studio as explained in the chapters about hotkeys.
2. Use the hotkey type “Set/Unset Expression”
3. Select your newly created expression from the list. If you can’t find it there, make sure
the .exp3.json file is in the same folder as your VTS model file or in a subfolder of it.
4. Your hotkey is now fully set up. You can use either your keyboard or the on-screen buttons to
activate and deactivate it.
When multiple hotkeys modify the same Live2D parameter, the value of the last activated
hotkey is used. When you then deactivate the “last” hotkey, the value is returned to the value
of the “previous” hotkey. When all hotkeys that modify a certain Live2D parameter are
deactivated, that parameter is returned to the value from the animation, the value from face
tracking or the default value. More on this in the chapter:
Interaction between Animations, Expressions, Face Tracking, Physics, etc.8 Animations Animations can be created with the Animator in the Live2D Cubism Editor. Once your animation is done, select File → Export for Runtime → Export motion file. This will give you .motion3.json files (Live2D animation files) that can be read by VTube Studio. Put them in the same folder as your VTS model or a subfolder. These animations can be used as looping background idle animation or one-shot animation. 9 Interaction between Animations, Expressions, Face Tracking, Physics, etc. In VTube Studio, Live2D parameters can be controlled by various entities, such as Live2D Animations, face tracking or Live2D Expressions. But what happens when animations, face tracking and expressions try to write to the same Live2D parameter at the same time? That is explained in this chapter. In VTube Studio, each Live2D parameter can be controlled by one of six “value-providers”. In order of priority (lowest to highest), they are: Priority Value-Provider Notes P0 Default Live2D parameter value Available for every Live2D parameter P1 Value from Idle Animation P2 Value from Face Tracking P3 Value from One-Time Animation As long as animation is active P4 Value from Live2D Expression As long as expression is active P5 Value from Physics System
The final value of an individual Live2D parameter in your model will be determined by the highest-
priority active value provider. For example, when a Live2D parameter called ParamA has a one-time
animation (triggered by hotkey) writing to it, any values from the face tracking or idle animation are
overwritten.

Once the one-time animation ends, control will be passed back to the active value-provider with the
next highest priority.

Specifically, this means that the face tracking would now control ParamA if ParamA is set as an output
parameter in your VTS model config. If not, ParamA will now be controlled by the idle animation. Or, if
the idle animation also does not contain ParamA, it will be set to its default value, which every Live2D
parameter has.

When control of a Live2D parameter is passed between value-providers, it is always faded smoothly and
not just set instantly to prevent any ugly jumps.

10 Streaming to Mac/PC

The main use-case of VTube Studio is to use your smartphone for face tracking, render your model in
the Mac/PC app and then use OBS (or recording similar software) to stream to YouTube or Twitch. Any
Windows/Mac recording software should work with VTube Studio.

     VTube Studio uses your local network (TCP/UDP) to send face tracking data from your
     smartphone to your PC or Mac. Depending on your home network setup, there may be
     connection issues, most frequently caused by your firewall configuration. For more info,
     check out the chapter:
                            Connection Issues & Troubleshooting

10.1 Preparation on PC/Mac

Streaming the face tracking data from your smartphone to PC/Mac is easy. First, make sure both your
smartphone and PC/Mac are on the same local network, otherwise they will not be able to see each
other.

Then, start the desktop app. In the settings, you can activate the server after choosing a port (try
leaving the default port first, 25565).
This will start the VTube Studio server on your PC on every available network device. Since your PC may
have multiple network devices, you may see multiple IPs when clicking the “Show IP list” button.
While your IPv4 shown here is typically a local, internal address and cannot be publicly
accessed over the internet, your IPv6 addresses are likely to be public addresses!
Please be careful to block them out if you post screenshots on the internet. Stay safe!
When starting the server for the first time, you may see a popup from the Windows Defender Firewall.
Make sure you click “Allow access” and “Private networks” is checked. Otherwise, your smartphone will
not be able to connect to the PC app as connections will be blocked by the firewall.
The server is now active and is listening for connections from the smartphone app. Leave it this way.10.2 Connecting the Smartphone App
Next, start the app on your smartphone. In the settings, you can manually type in the IP and port from
the desktop application or use the “Find Server” button to automatically scan for the server and use its
IP and port. This scan should not take longer than 5 seconds.
Now, click “Connect to PC”. The app will now connect to the server. If the connection is lost for some
reason, the app will try to re-establish the connection automatically.
Congratulations. You are now streaming your face tracking data to your PC. You can now open a VTS
model in the desktop application and it will use the face tracking data from the smartphone. You can
also have the same or a different model open in the smartphone app at the same time if you’d like.
You do not need to have a model open on your smartphone when streaming to PC. In fact, it is
recommended to not have one open for performance reasons. When using “Streaming Mode”,
any opened models on your smartphone will be automatically unloaded when connecting.
10.3 Recording with OBS (transparent background)
On your PC in VTube Studio, choose the Color Picker background. On Windows, you can use the
“Transparent in capture” option here, which will make the window background transparent when the
window is recorded in OBS so you don’t need to use greenscreen/chroma keying.On macOS, this feature is not supported by OBS, so choose any color you want here. You can remove that color from the video capture in OBS using a “Chroma Key” filter. Keep in mind that you can’t use that color in your Live2D model, otherwise some parts of your model may be transparent as well. Add a background in OBS, then add a capture for VTube Studio. To do that, select “Game Capture”. This supports transparent backgrounds but is only available on Windows. On macOS, this option is called “Syphon Client”, but does not work after macOS 10.14 Mojave (see https://github.com/zakk4223/SyphonInject), so you need to use a regular window capture and a chroma key filter.
Your capture is now active. On macOS, you need to add a filter to remove the green (or whatever color
you selected) background using Right Click your capture -> Filters -> Add Filter -> Chroma Key.

You can now place your character anywhere on screen by moving/scaling/rotating it in directly in VTube
Studio or in OBS.

Alternatively, you can use the Virtual Webcam feature or NDI in VTube Studio to create a webcam
stream and then directly use that in apps like Zoom, Discord, etc. (see FAQ).

10.4 Using NDI for streaming to OBS with invisible UI (transparent background)

It is recommended to use OBS “Game Capture” to record the VTS window. Alternatively, you can use the
Virtual Webcam or Newtek NDI (Network Device Interface) to create a video stream that can be used as
input for software such as OBS.

The quality and latency of NDI streams is very good. It also supports a transparent background (no
chroma/color key needed) and does not record the VTube Studio UI at all. CPU utilization of VTS may
increase when using NDI. OBS plugins exist for macOS and Windows

OBS Plugin Page: https://obsproject.com/forum/resources/obs-ndi-newtek-ndi%E2%84%A2-
integration-into-obs-studio.528/

OBS Plugin Download (Win/Mac): https://github.com/Palakis/obs-ndi/releases/tag/4.9.1
To use NDI, download the plugin from the GitHub-page linked above (.exe for Windows, .pkg for macOS)
and install it. In VTube Studio, activate the NDI toggle in the “Camera Settings” tab. It is possible but not
recommended to have NDI and the Virtual Webcam active at the same time.

In OBS, the following settings are recommended. Sometimes the NDI streams seems distorted in OBS.
If that happens, resize (per drag) the VTube Studio window until the stream “snaps back” to looking
normal.

11 Connection Issues & Troubleshooting
Under normal circumstances, there should be no connection issues. There also should be no delay and
no lag or hiccups/spikes. The streaming should be smooth and should have at most around 10
milliseconds of delay.

However, depending on your local network setup, there might be some issues. This chapter discusses
possible causes and solutions.
11.1 Possible Causes for Connection Issues
If you have trouble connecting your smartphone to the PC app (smartphone app is constantly stuck on
“Connecting…” or server scan doesn’t find anything), please work through the following list before
asking questions on the Discord.

   •   Make sure there is no firewall blocking the connection. In 90% of cases, this is what causes the
       connection problems.
            o To test this, try temporarily turning off your built-in firewall (Windows Defender) and any
               additional network security software you have. If this fixes the issue, turn them back on
               and find out how you can add exceptions for VTube Studio (“VtubeStudio.exe”). For
               Windows Defender, see the image below.
            o After downloading updates for the PC app, you may have to re-add it to the firewall
               exceptions.
   •   Make sure both devices (PC/Mac and smartphone) are on the same network.
            o This means both should be on the same WiFi. If the PC and/or smartphone are
               connected to your router via cable, that is fine too.
            o If your router has multiple WiFi networks available, make sure it is the same for your PC
               and smartphone. Also, try both networks.
   •   On Windows, make sure the used network is set to “Private” (see image below).
   •   Try turning off your Anti-Virus software temporarily.
   •   Check your router settings. Sometimes there are privacy settings activated that prevent devices
       from discovering each other.
   •   If your smartphone can’t see your PC at all, there are issues with your network setup that you’ll
       need to fix before VTube Studio can work. To test this, use a network discovery / “ping” app and
       let them run a discovery on your network.
            o Just search for “Network Scanner” on the respective smartphone app store. Any of those
               apps should work.
            o If you run into specific issues, try to Google them first before asking on Discord.
11.2 Network Lag Troubleshooting (general)
If you experience lag or short breaks/freezes when streaming to PC, work through the following list:
• First, try restarting your router. That sometimes helps.
• Are you on WiFi?
o In some extreme cases, your WiFi reception may cause lag or even very long (multiple
seconds) delays in packets being sent over your network. Make sure you use 5GHz WiFi
and not 2.4 as depending on your environment, 2.4 Ghz WiFi can have wildly unstable
latency.
o With WiFi, the latency still shouldn’t be higher than 10 milliseconds.
• If possible, use wired LAN connection instead of WiFi. This will give you a lag-free, 1-ms latency
connection. You can use wired LAN on your smartphone using an adapter such as this one for
Android (USB-C) or this one for iPhone.
• Try changing the WiFi-channel that your router uses. When there are routers nearby sending on
the same channel, this will cause lag/packet drop issues.
• If nothing helps, try out “ping” / “network analyzer” apps from your smartphone app store to
analyze the network connection between your smartphone and PC. This often helps you
understand when/why the freezes occur.
11.3 Network Lag Troubleshooting (macOS and iPhone)
If you are on macOS and iOS, there might be some other causes:
• Turn off location services, they will cause lag spikes periodically when your Mac scans your
environment for WiFi networks. To turn that off, follow this guide.
o https://osxdaily.com/2018/08/20/disable-location-services-mac/
• If you’re using WiFi, remove all unused WiFi-Networks from your list of known networks on both
iPhone and Mac to stop them from scanning for them constantly. You can follow this guide.
o https://9to5mac.com/2018/07/20/mac-how-to-forget-wireless-networks/
• When using iPhone and MacBook on WiFi: Very important to turn off AirDrop on the Macbook,
because it WILL cause massive lag spikes when the iPhone is close to the Mac. Open a console
and type:
o sudo ifconfig awdl0 down
• Later, when you’re done streaming, you can turn it back on by rebooting your Mac or typing this
in a console:
o sudo ifconfig awdl0 up
• Turning off Bluetooth on your Mac and iPhone can also help. You can follow this guide to turn of
Bluetooth on your Mac.
o https://support.apple.com/guide/mac-help/turn-bluetooth-on-or-off-blth1008/mac12 Taking/Sharing Screenshots
With VTube Studio, you can take screenshots directly from within the app, save them and share them
on social media. Screenshots are saved as .PNG file. You can also turn the background transparent so
only your model and any items in the scene are visible in the screenshot
.
On Windows and MacOS, screenshots are saved to your user’s “Pictures” folder. On smartphones,
screenshots are saved directly to the phone gallery. The app will ask for permission to use this folder.
Screenshots with transparent background are really useful for producing PNGs of your model that you
can for example use in video/stream thumbnails.
On smartphones, you can also directly share your screenshots on Twitter, Discord, etc.13 Item System
Starting with VTube Studio version 1.5.0, you can import your own props (“items”) directly into the
scene and even attach them to your Live2D model.
Items are read from the “Items” folder next to your “Live2DModels” folder. VTube Studio comes with a
few items included, but you can add your own by putting PNGs into that folder.
If you put a folder into the “Items” folder, this folder will be considered to contain the frames for an
Animated Item. PNGs you put into that folder will be read in alphabetical order and combined into an
animation that can be loaded like a regular item in VTube Studio. Keep in mind that items with many
frames may take up to a couple seconds to load.
FPS for the animated item can be set freely between 0 and 60 and once set will be remembered when
you load the item again.
It’s recommended but not required to keep frames of an animated item at the same size. The “hitbox”
(clickable part of the item) will be based on the first frame of the animated item.
.First, choose the item you’d like to add. Then choose an order. Items with a higher order are in front of
items with a lower order. The Live2D model itself is at order 0, so you can also place items behind it.
If you want the item to be able to attach to the Live2D model, make sure to select “Pin item to Live2D
model”
There is an experimental “Censor” option that applies a mosaic censor effect to the item.
If the item is animated (must be multiple PNGs in a folder in the “Items” folder), you can set the FPS
here. It’s generally recommended to keep item FPS under 45. You can put any floating point number
here, so even something like 3,7 FPS is valid.
Once the item is in the scene, you can move/scale/rotate it with the usual controls on PC/Mac and
iOS/Android. To attach an item to the model, just drop it on there.
The item will be attached to the uppermost ArtMesh in your model at the position where you
drop the item. The point of attachment will be the CENTER OF THE ITEM PNG. This can make it
a bit tricky sometimes to attach the item to the correct ArtMesh, so you may need to play
around a little bit to make it work properly. Keep in mind that this feature is in beta.Once your item is at the correct position, you can double-tap (double-click) it to lock the position. That
way, you can no longer move, scale or rotate the item until it is unlocked again. If the item is attached to
your model, it will still move according to the model movement.
If you move, scale or rotate the Live2D model itself, any locked items attached to the model will also
move, scale and rotate with it as you would expect.
To unlock locked items, choose the option from the main menu (see arrow in second image). By
pressing that button once more, all items will be locked again.
To delete items from the scene, simply drag them over the trash can icon in the bottom right. It will only
appear if you drag an item near it.
Most of the free included items/props have been provided by @cakecatboy and @7MDigital
on Twitter. They have many other great VTuber assets as well, so please make sure to follow
and thank them!!14 VTube Studio Files and File Format
All files VTube Studio generates to save your model setup and meta data are fully human-readable, not
encrypted and use a JSON format.
Currently, VTube Studio saves all model-related configuration data in a file right next to your Live2D
model. The file is called:
.vtube.json
There is no documentation available for the file format at this point, but if you’re interested, just open
them up in your favorite text editor. Most things should be relatively self-explanatory. But please be
advised that manipulating your model fines manually may result in broken files so please be careful.
15 FAQ
15.1 Can my face be accidentally revealed on stream?
No, that can’t happen. VTube Studio uses your smartphone camera just for face tracking and does not
store or transmit your face or any raw face tracking data to your PC. Only the calculated parameters are
transmitted, so at no point will any video be available on your PC.
If you also want to make sure your face is never shown on your smartphone screen, make sure to set
“Camera Preview” to “Never Show” (see chapter “Camera Settings”).
Don’t worry so much that people could see your face. You are beautiful! ♥
15.2 How do I buy VTube Studio? Why should I? Can I use it commercially?
First, download the VTube Studio app from the iPhone or Android App Store. The download itself is free.
Then go into the app settings. There’s a big button to buy the PRO version.
The PRO version gives you access to some features not available in the free version, such as being able
to stream to your PC for longer than one minute and being able to remove the VTube Studio logo in the
app.Also, you are only allowed to use VTube Studio commercially if you purchased the PRO version. This includes any kind of commercial use, including (but not limited to) monetized YouTube, Twitch, …, streams, superchats, Live2D model commissions, etc. This only applies to individual creators, smaller VTuber agencies and smaller companies in general. As a bigger company, you will need additional licensing. Please refer to the VTube Studio EULA for more information and/or contact us directly at vtubestudioapp@gmail.com 15.3 Can I try VTube Studio before buying it? You can and should! The app itself is free and has a PRO version. The free version contains all features (including loading your own models), so please try VTube Studio first before purchasing. 15.4 Can I use my webcam for face tracking instead of my smartphone? This is not currently supported and not planned in the near future. I won’t rule it out entirely, but don’t expect it anytime soon. 15.5 How can I use VTube Studio together with my friends? VTube Studio does not support loading multiple models. However, if you want to do a collaboration stream with your friends, that is possible by using Zoom/Discord/Skype/etc. group video chat. When using Discord for example, just have everyone use the Virtual Webcam feature of VTube Studio and then select that webcam as your main video chat camera in Discord. Alternatively, record using OBS and then use the OBS Virtual Webcam plugin to create a webcam stream for Discord. The person “hosting” the stream/collab can then record their Discord window using OBS, cut out everyone’s streams and use chroma key filters to remove the backgrounds. This works quite well, but you might need the high-quality 1080p video chat upgrade in Discord to get good picture quality. It is also possible to use OBS over the internet using LAN-Over-Internet tools like Zero Tier One or Hamachi (free up to 5 participants). You could start multiple instances of VTube Studio on the “host” PC and then have people connect to them. Just remember to use different ports for each instance! Disclaimer: I have not personally tested this method, but users have reported that it works. Of course, there may be network delay. 15.6 Can I use USB instead of WiFi to connect my smartphone? As long as your smartphone and PC are on the same network, the connection should work. You can connect your smartphone via USB and the use USB tethering to put them in the same network even without WiFi. 15.7 What is the “Virtual Webcam” feature? “Virtual Webcam” (available on Windows only) allows you to record the VTube Studio window (without the UI) and directly make it available as a webcam stream, making it easy to use it in Discord, Zoom, etc.
You can also read