XMLmind XML Editor - DITA Support
←
→
Page content transcription
If your browser does not render page correctly, please read the page content below
XMLmind XML Editor - DITA Support

              Hussein Shafie

              June 22, 2021

            XMLmind Software
XMLmind XML Editor - DITA Support
Table of Contents
1. About DITA support in XMLmind XML Editor ............................................................................................. 1
1.1. Lightweight DITA support .................................................................................................................... 2
2. DITA map reference ......................................................................................................................................... 3
2.1. DITA map menu .................................................................................................................................... 3
2.2. DITA map tool bar ................................................................................................................................ 6
2.3. DITA map bindings ............................................................................................................................... 8
3. DITA topic reference ........................................................................................................................................ 9
3.1. DITA topic menu ................................................................................................................................... 9
3.2. DITA topic tool bar ............................................................................................................................. 13
3.3. DITA topic bindings ............................................................................................................................ 20
3.4. Using the indexterm editor .................................................................................................................. 22
4. Useful features ................................................................................................................................................ 24
4.1. Controlling the numbering of ordered lists ......................................................................................... 24
4.2. Giving a background color to table cells ............................................................................................ 25
4.3. Fancy code blocks ............................................................................................................................... 25
4.3.1. Syntax highlighting ................................................................................................................... 27
4.4. Rich media content .............................................................................................................................. 28
5. Content inclusion ............................................................................................................................................ 36
5.1. Easy content inclusion ......................................................................................................................... 36
5.2. Content inclusion: an alternative, low-level, method .......................................................................... 38
5.3. Limitations and specificities of the implementation of transclusion in XMLmind XML Editor .......... 38
6. Preprocessing options ..................................................................................................................................... 38
iXMLmind XML Editor - DITA Support
1. About DITA support in XMLmind XML Editor
DITA 1.3 support
Out of the box, XMLmind XML Editor (XXE for short) allows to edit topics, maps and bookmaps conforming
to the DITA 1.0, 1.1, 1.2 DTD and W3C XML Schema.
As of version 7.2, XXE allows to create, edit and convert DITA documents conforming to the DITA 1.3 DTD,
W3C XML Schema or RELAX NG schema.
In fact, when XXE v7.2+ is used, DITA 1.2 documents are automatically “upgraded” to DITA 1.3. This is
caused by the fact that the following means "use latest version of the DITA DTD":
...
This should not be a problem as DITA 1.3 is a superset of DITA 1.2. However if for any reason, you prefer to
stick to DITA 1.2 elements, please download and install the XXE add-on called "Keep using DITA 1.2". This is
done using menu item Options → Install Add-ons.
Technical content only
XMLmind XML Editor only supports "Technical content elements". This includes machinery task and the task
requirements domain but excludes classification elements. Other vocabularies such as "Learning and training
elements" are not supported.
DITAVAL conditional processing profiles and subject scheme maps are also supported.
Using the DITA W3C XML Schema or RELAX NG schema rather than the DITA
DTD
By default, a DITA document created using XMLmind XML Editor (e.g. File → New) conform to the DITA
DTD and not to the W3C XML Schema or to the RELAX NG schema.
This can be easily changed by uncommenting out the alternative documents templates found in
XXE_install_dir/addon/config/dita/topic.xxe, map.xxe, bookmap.xxe, ditaval.xxe,
subjectScheme.xxe.(1). Excerpts from XXE_install_dir/addon/config/dita/topic.xxe:
(1) Or
better, by customizing the DITA configuration as explained in XMLmind XML Editor - Configuration and
Deployment.
1XMLmind XML Editor - DITA Support
XMLmind DITA Converter, a serious alternative to the DITA Open Toolkit
Unlike its competitors, XMLmind XML Editor does not leverage the DITA Open Toolkit to convert DITA
documents to formats such as XHTML, Web Help, PDF, RTF, etc. Instead XXE embeds, free, open source,
XMLmind DITA Converter.
XMLmind DITA Converter (ditac for short) has exactly the same level of DITA support as XMLmind XML
Editor.
Note that ditac has no problem processing a DITA document pointing to a RELAX NG schema, rather than to a
DTD or W3C XML Schema:
...
The processing-instruction used in the above example is the standard way to associate a
document to a RELAX NG schema. See "Associating Schemas with XML documents 1.0".
1.1. Lightweight DITA support
As of version 8.2, thanks to XMLmind DITA Converter, XMLmind XML Editor fully supports Lightweight
DITA (AKA LwDITA) support, whether XDITA (very small subset of DITA XML, plus new and
elements), HDITA (topics and maps written in HTML5) or MDITA Extended Profile (topics and
maps written in Markdown). More information in "Lightweight DITA support".
MDITA support
Out of the box, XMLmind XML Editor supports a so-called MDITA Extended Profile. However there are many
“flavors” of Markdown, that's why this Extended Profile may be customized.
This is done by defining a system property called "ditac.load.options" containing one or more
load.mdita.XXX options. These options are all documented in "MDITA support".
The "ditac.load.options" system property is best defined in a customize.xxe configuration file.
Example:
load.mdita.autolink true
More information about the configuration element and the customize.xxe configurations files
in XMLmind XML Editor - Configuration and Deployment.
Remember
MDITA support requires using Java 1.8+ to run XMLmind XML Editor.
2XMLmind XML Editor - DITA Support
2. DITA map reference
2.1. DITA map menu
When a DITA map is opened in XMLmind XML Editor, the XML menu becomes the Map menu and this menu
is populated with items which are specific to DITA maps. This reference contains a description of such menu
items.
What's described in this section also applies to DITA bookmaps.
Check map
Conditional Processing Profile
Displays a dialog box allowing to specify a conditional processing profile (a .ditaval file) which
is to be applied to the map being edited and also the medium targeted by this map. The conditional
processing profile is used by the Check Map command and also by all the Convert commands found
in the Convert Document menu.
The target medium specified in this dialog box is used only by the Check Map command. If you
specifically target a print form (PDF, PostScript, RTF, etc) for your deliverable, check Print. In any
other case, check Screen.
Figure 1. The dialog box displayed by menu item "Conditional Processing Profile"
Remember
Note that the values specified in the above dialog box are remembered for use during
subsequent editing sessions. For example, in the case of the above screenshot, if you
reopen the same map later, this map will still be filtered by print.ditaval and its
target medium will still be Print, and this even if you do not explicitly use menu
item Map → Conditional Processing Profile during the new editing session.
Check Map
Extensively check the map being edited. This task which can be lengthy is run in background. While
this task is running, a non-modal dialog box displays all the errors and warnings found in the map
being edited, its submaps and all the topics referenced by these maps. If no errors or warnings are
found, the dialog box is automatically closed. Otherwise it stays opened allowing you to review each
error or warning. After you are done, you'll have to close the dialog box by clicking Close if you want
to be able to re-run Check Map.
3XMLmind XML Editor - DITA Support
Figure 2. The dialog box displayed by menu item "Check Map"
As you can see it in the above screenshot, clicking on an underlined filename or URL opens the
corresponding topic or map in XMLmind XML Editor and selects the element having the error or a
warning.
Convert Document menu
Note
The "Convert to RTF", WML, DOCX, ODT, entries documented below are absent in
XMLmind DITA Editor. They are found only in XMLmind XML Editor.
Attention
The items of this menu are all disabled if the document being edited needs to be saved to disk.
Convert to XHTML
Convert to XHTML [one page]
Converts the document being edited to multi page or single page XHTML 1.0.
Convert to Web Help
Converts the document being edited to Web Help containing XHTML 5 pages.
Convert to HTML Help
Converts the document being edited to a .chm file. This command is disabled on platforms other than
Windows.
Requires:
4XMLmind XML Editor - DITA Support
1. Download and install Microsoft®'s HTML Help Workshop.
2. Declare the HTML Help compiler, hhc.exe, as the helper application associated to files
having a "hhp" extension. This can be specified by using the Preferences dialog box, Helper
Applications section.
Convert to Java Help
Converts the document being edited to a .jar file for use by the Java™ Help system.
Requires:
1. Download and install JavaHelp.
2. Declare the Java™ Help indexer, jhindexer (jhindexer.bat on Windows), as the helper
application associated to files having a "application/x-java-help-index" MIME type.
This can be specified by using the Preferences dialog box, Helper Applications section.
Convert to Eclipse Help
Converts the document being edited to a directory containing various files for use by the Eclipse Help
system.
Convert to EPUB
Converts the document being edited to an .epub file.
Convert to RTF (Word 2000+)
Converts the document being edited to RTF (Rich Text Format) using. The document generated by
this command can be edited and printed using Microsoft® Word 2000 and above.
Convert to WordprocessingML (Word 2003+)
Converts the document being edited to WordprocessingML. The document generated by this
command can be edited and printed using Microsoft® Word 2003 and above.
Convert to Office Open XML (Word 2007+)
Converts the document being edited to Office Open XML (.docx file) . The document generated by
this command can be edited and printed using Microsoft® Word 2007 and above.
Convert to OpenDocument (OpenOffice.org 2+)
Converts the document being edited to OpenDocument (.odt file). The document generated by this
command can be edited and printed using OpenOffice.org 2.
Convert to PDF
Convert the document being edited to PDF.
Changing the look and contents of the files generated by the Convert
Document menu
There are three ways to change the look and contents of the files generated by the items of the Convert
Document menu.
1. Specifying custom XSLT stylesheet parameters. This is done by selecting any of the items of menu
"Convert Document" and then, when the URL chooser dialog box is displayed, clicking "Document
conversion parameters" to expand the conversion parameters pane.
For example, adding parameter center with value "fig table" allows to center figures and tables in the
generated files.
The reference manual of the parameters of the XSLT stylesheets used to perform the conversion is found in
XMLmind DITA Converter Manual - XSLT stylesheets parameters. This reference manual can be directly
accessed from the "Document conversion parameters" pane.
5XMLmind XML Editor - DITA Support
2. Using menu item Options → Customize Configuration → Customize Document Conversion
Stylesheets is also a relatively simple way to influence the layout and style of the deliverable (PDF, RTF,
HTML, etc) which results from the document conversion.
The document being edited is converted to other formats by the means of XSLT stylesheets. This menu
item allows to:
• select an XSLT stylesheet other the default one,
• create a custom XSLT stylesheet on the fly,
• invoke a specialized editor —XMLmind XSL Customizer— to modify a user-created XSLT
stylesheet.
However, when the document being edited is converted to an HTML-based format (Web Help, EPUB,
HTML Help, etc), the HTML pages which are automatically generated by the aforementioned XSLT
stylesheets are styled mainly by CSS stylesheets. When this is the case, this menu item allows additionally
to:
• select a CSS stylesheet other the default one,
• create a custom CSS stylesheet on the fly,
• invoke a helper application (generally, a text editor) to modify a user-created CSS stylesheet.
3. To a lesser extent, changing the options of the XMLmind DITA Convert (ditac) preprocessor. This is done
by using Options → Customize Configuration → Preprocessing Options.
For example, selecting option group "Convert to PDF, PostScript" and then selecting "Generate as
backmatter" in the Index combobox allows to add an index at the end of the generated PDF files.
More information about this facility in Section 6. Preprocessing options.
Note that a technical writer is not expected to know which parameter, option or style is to be specified to get
the desired effect. Unless she/he is the local guru, a technical writer is expected to post a support request to the
xmleditor-support public, moderated, mailing list in order to learn this. But at least the three above facilities
allow her/him to customize her/his deliverables without having to hand edit configuration files.
2.2. DITA map tool bar
When a DITA map is opened in XMLmind XML Editor, buttons which are specific to this kind of document are
automatically added to the tool bar. This reference contains a description of such buttons.
What's described in this section also applies to DITA bookmaps.
Button Description
Insert Topicref Before Insert a topicref before selected topicref. Displays a dialog box allowing to specify
the @href attribute and/or the @navtitle of the topicref to be inserted.
Insert Topicref Into Insert a topicref as the last child of selected topicref. Displays a dialog box
allowing to specify the @href attribute and/or the @navtitle of the topicref to
be inserted.
Insert Topicref After Insert a topicref after selected topicref. Displays a dialog box allowing to specify
the @href attribute and/or the @navtitle of the topicref to be inserted.
Edit Topicref Displays a dialog box allowing to change the @href attribute and/or the
@navtitle of selected topicref.
Move Up Move selected element up, that is, swap it with its preceding sibling node.
Requires the element to be explicitly selected.
6XMLmind XML Editor - DITA Support
Button Description
Move Down Move selected element down, that is, swap it with its following sibling node.
Requires the element to be explicitly selected.
Promote Decrease the nesting level of selected topicref, possibly changing its type (e.g. a
element becomes a element).
Demote Increase the nesting level of selected topicref, possibly changing its type (e.g. a
element becomes a element).
Add reltable Displays a menu allowing to add a without or with a
after selected element.
Tip
The entries of this menu are generally disabled unless you
select the last element (or any descendant of last element) of
the map.
Reltable column Displays a menu similar to the "Table column" menu found in Table editor.
Reltable row Displays a menu similar to the "Table row" menu found in Table editor.
Show Level Displays a menu containing "Show Level 1", "Show Level 2", ..., "Show Level
9" items. "Show Level N" means: expand all the collapsible elements of the map
up to nesting level N and recursively collapse all the collapsible elements having a
nesting level greater than N.
Edit Referenced Topic Opens in read-only mode the topic or map referenced in the selected topicref.
or Map in Read-only
Mode
Edit Referenced Topic Opens in normal read-write mode the topic or map referenced in the selected
or Map topicref.
The "Edit topicref" dialog box
The following dialog box is displayed when you click the "Insert topicref Before", "Insert topicref Into",
"Insert topicref After" or the "Edit topicref" toolbar buttons. See above.
7XMLmind XML Editor - DITA Support
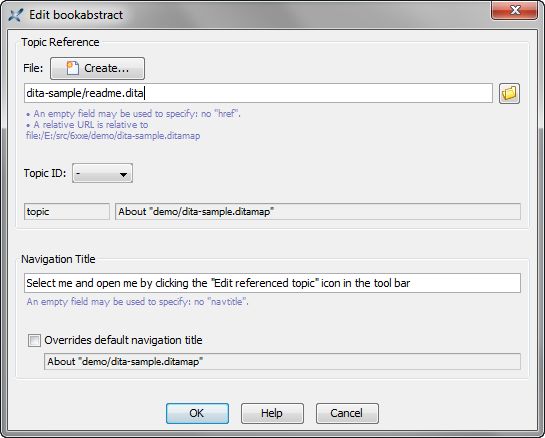
Figure 3. A "Edit topicref" dialog box used to edit a (a kind of found in the
of a )
• If you want to set the @href attribute of the edited or newly inserted :
1. Click the Browse button and use the file chooser to select a file containing one or more DITA
topics.
After the topic file is selected, the status fields of the dialog box are updated to reflect the type and
title of the first topic found in the file. The "Topic ID" combobox is updated too and contains the IDs
of all the topics found in the selected file.
2. In case the file selected in the previous step contains several topics, optionally select the ID of the
target topic. This option adds a fragment #topic_ID to the value of the @href attribute.
• If you want to set the @href attribute of the edited or newly inserted to a newly created
topic, click the Create button. This displays the same dialog box as menu item File → New. Make sure
to create a DITA topic.
• If you want to set the @navtitle attribute of the edited or newly inserted :
1. Type the title of the in the "Navigation Title" field.
2. Optionally click "Override default navigation title" if you want this title to replace
the referenced topic title in the deliverable (HTML, PDF, RTF, etc) which is to be generated out
of the DITA map. This option adds a locktitle="yes" attribute to the edited or newly inserted
.
2.3. DITA map bindings
When a DITA map is opened in XMLmind XML Editor, additional keyboard shortcuts which are specific to
this kind of document are automatically made available to the user. This reference contains a description of such
keyboard shortcuts.
What's described in this section also applies to DITA bookmaps.
8XMLmind XML Editor - DITA Support
Action Description
Up If a topicref is selected, select preceding topicref; elsewhere, default behavior.
Down If a topicref is selected, select following topicref; elsewhere, default behavior.
Enter Insert Topicref After
Shift-Enter Insert Topicref Before
Ctrl+Shift-Enter Insert Topicref Into
Esc e Edit Topicref
Alt+Shift-Up Move Up
Alt+Shift-Down Move Down
Alt+Shift-Left Promote
Alt+Shift-Right Demote
Double-click On a topicref, Edit Referenced Topic or Map; elsewhere default behavior.
Esc o Edit Referenced Topic or Map
Esc O Edit Referenced Topic or Map in Read-Only Mode
Drag Dragging selected topicref drags the value of its @href attribute. Elsewhere,
default drag behavior.
Drop Dropping a file or URL onto a topicref displays a popup menu containing Insert
Topicref Before, Insert Topicref Into, Insert Topicref After, Edit Topicref and
Cancel. Elsewhere, default drop behavior.
3. DITA topic reference
3.1. DITA topic menu
When a DITA topic (of any kind) is opened in XMLmind XML Editor, the XML menu becomes the Topic
menu and this menu is populated with items which are specific to DITA topics. This reference contains a
description of such menu items.
Paste As
Paste As
Paste from Word Processor or Browser
Import the HTML copied to the clipboard by word processors or web browsers and
intelligently paste it into the DITA topic being edited.
• Extensive efforts are made to decently support the “non-filtered HTML” copied by
MS-Word to the clipboard.
• When an application other than MS-Word is used, the quality of the result you'll get in
XXE highly depends on what has been copied to the clipboard. In all cases, XXE tries
very hard to import something simple, clean and valid at the expense of the fidelity to
the original data.
9XMLmind XML Editor - DITA Support
The pasted data replaces the text or node selection if any. When there is no selection,
XMLmind XML Editor automatically determines a valid insertion location at or following
the caret position.
If XMLmind XML Editor fails to find such valid insertion location, the rich text is
converted to valid DITA and then copied to the clipboard, overwriting the original data put
there by the third-party application. This allows to use the “normal” Paste Before, Paste or
Paste After commands to paste the data elsewhere in the document.
Tip
This menu entry allows not only to paste snippets copied from word
processors or web browsers, but also to import entire documents or
HTML pages. In order to import the entire document into XXE:
1. Open the document in the third-party application.
2. Press Ctrl-A (Select All) then press Ctrl-C (Copy) to copy it to
the clipboard.
3. Create a new topic (of any kind) in XMLmind XML Editor by using
File → New.
4. Use File → Save As to save this new document to disk.
5. Explicitly select the root element of the document, for example by
clicking on its name in the node path bar.
6. Select menu item "Paste from Word Processor or Browser" to
paste the content of the clipboard(2).
Tip
If, using MS-Word, you want to copy a piece of text rather than a
paragraph, do not include the hidden character found at the very end of a
paragraph (the paragraph mark) in your selection.
Other menu entries
The entries of this submenu allow to paste the plain text copied to the clipboard, typically
using a third-party word processor or spreadsheet, as:
• one or more paragraphs,
• OR a element,
• OR one or more list items,
• OR an itemized list,
• OR one or more table rows,
• OR a table.
The last two menu entries assume that each text line specifies a table row and that, within a
text line, the contents of the table cells are separated by tab characters.
(2)
Note that Ctrl-V, that is, the plain Edit → Paste command, would not work here.
10XMLmind XML Editor - DITA Support
Tip
If you need to paste the copied text as an ordered list, first paste this text
as an itemized list then convert the pasted list to an ordered list using Edit
→ Convert (Ctrl-T).
The following entries of this submenu allow to paste the image copied to the clipboard as:
• ,
• .
Menu entry "image" replaces the text or node selection if any. When there is no selection,
this menu entry pastes its element at caret position (just like Edit → Paste).
All the other menu entries also replace the text or node selection if any. When there is no
selection, these menu entries paste their elements at any valid position in the document
following the caret position.
Indexterm editor
Insert or Edit indexterm
If the caret is anywhere inside an element or if a single element or node is explicitly
selected anywhere inside an element, this menu item displays an editor
dialog box allowing to modify this element.
Otherwise, this menu item displays an editor dialog box allowing to create a new
element and then to insert it at caret position.
Tip
If some text has been selected, field Term of the dialog box is automatically
initialized with the text selection. Therefore the simplest way to create an
element is first to select the term in the body of the document, then
invoke Topic → Insert or Edit indexterm and finally click OK.
Moving elements
Move Up
Move selected element up, that is, swap it with its preceding sibling node. Requires the element to be
explicitly selected.
Move Down
Move selected element down, that is, swap it with its following sibling node. Requires the element to
be explicitly selected.
11XMLmind XML Editor - DITA Support
Convert Document menu
Note
The "Convert to RTF", WML, DOCX, ODT, entries documented below are absent in
XMLmind DITA Editor. They are found only in XMLmind XML Editor.
Attention
The items of this menu are all disabled if the document being edited needs to be saved to disk.
Convert to XHTML
Convert to XHTML [one page]
Converts the document being edited to multi page or single page XHTML 1.0.
Convert to Web Help
Converts the document being edited to Web Help containing XHTML 5 pages.
Convert to HTML Help
Converts the document being edited to a .chm file. This command is disabled on platforms other than
Windows.
Requires:
1. Download and install Microsoft®'s HTML Help Workshop.
2. Declare the HTML Help compiler, hhc.exe, as the helper application associated to files
having a "hhp" extension. This can be specified by using the Preferences dialog box, Helper
Applications section.
Convert to Java Help
Converts the document being edited to a .jar file for use by the Java™ Help system.
Requires:
1. Download and install JavaHelp.
2. Declare the Java™ Help indexer, jhindexer (jhindexer.bat on Windows), as the helper
application associated to files having a "application/x-java-help-index" MIME type.
This can be specified by using the Preferences dialog box, Helper Applications section.
Convert to Eclipse Help
Converts the document being edited to a directory containing various files for use by the Eclipse Help
system.
Convert to EPUB
Converts the document being edited to an .epub file.
Convert to RTF (Word 2000+)
Converts the document being edited to RTF (Rich Text Format) using. The document generated by
this command can be edited and printed using Microsoft® Word 2000 and above.
Convert to WordprocessingML (Word 2003+)
Converts the document being edited to WordprocessingML. The document generated by this
command can be edited and printed using Microsoft® Word 2003 and above.
12XMLmind XML Editor - DITA Support
Convert to Office Open XML (Word 2007+)
Converts the document being edited to Office Open XML (.docx file) . The document generated by
this command can be edited and printed using Microsoft® Word 2007 and above.
Convert to OpenDocument (OpenOffice.org 2+)
Converts the document being edited to OpenDocument (.odt file). The document generated by this
command can be edited and printed using OpenOffice.org 2.
Convert to PDF
Convert the document being edited to PDF.
3.2. DITA topic tool bar
When a DITA topic (of any kind) is opened in XMLmind XML Editor, buttons which are specific to this kind of
document are automatically added to the tool bar. This reference contains a description of such buttons.
8 11 13 15 17 19 20
1 2 3 5 7 9
10 12 14 16 18 21
4 6
1 Toggle i
2 Toggle b
3 Toggle tt
4 Convert to plain text
5 Add xref
6 Set ID
7 Demote list item
8 Promote list item
9 Change list type
10 Add list
11 Add p
12 Add list item
13 Add footnote
14 Add note
15 Add pre
16 Add image
17 Add MathML equation
18 Insert media objects
19 Add section
20 Add table
21 Table editor
Button Description
Toggle i “Toggle” element . Next to this toggle is found an arrow button displaying
a menu containing additional checkboxes for the following elements: ,
, , tm[reg].
Note
The DITA tool bar starts with a number of “text style” toggles.
These toggles emulate the behavior of the Bold, Italic,
Underline, etc, toggles found in the tool bars of almost all
13XMLmind XML Editor - DITA Support
Button Description
word-processors. More information about text style toggles in
"About text style toggles".
Figure 4. Toggles found at the beginning of the DITA tool bar
In the above screenshot, the caret is inside an element and
the user clicked the arrow button next to a “italic text style”
toggle.
Toggle b “Toggle” element . Next to this toggle is found an arrow button displaying a
menu containing additional checkboxes for the following elements: ,
, .
Toggle tt “Toggle” element . Next to this toggle is found an arrow button displaying a
menu containing additional checkboxes for the following elements: ,
, , , , , ,
,
Change case Displays a menu letting the user change the character case of selected text. If a
single node is selected, this converts the character case of all the text contained in
this node. If there is no selection of any kind, this converts the character case from
caret position to end of word, then it moves the caret to the next word.
lowercase
All characters are converted to lowercase characters. Keyboard shortcut:
Esc l.
UPPERCASE
All characters are converted to uppercase characters. Keyboard shortcut:
Esc u.
Capitalize Each Word
First character of a word is converted to an uppercase character. The
other characters are converted to lowercase characters. Keyboard
shortcut: Esc c.
Convert to plain text Convert implicit or explicit selection to plain text.
Add xref Displays a menu letting the user add a link —an element— to your DITA
topic.
xref
Converts the selection, if any, to an “internal link”; simply inserts an
empty “internal link” at caret position otherwise.
14XMLmind XML Editor - DITA Support
Button Description
xref[html]
Converts the selection, if any, to an “external link”; simply inserts
an empty “external link” at caret position otherwise. An external
link is an element with attributes @scope=external and
@format=html.
Set ID This button displays a menu having 3 entries: Set ID, Unset ID and List Anchors
and Links. This last menu entry displays a dialog box letting the user search and
select anchors (that is, any element having an ID) and links.
Figure 5. The "List Anchors and Links" dialog box
Decrease nesting level Convert a paragraph to a list item and a list item to a paragraph, the new element
having a lesser nesting level than the original one. This button automatically splits
lists when needed to.
This is the inverse command of "Increase nesting level". More Information
below.
Increase nesting level Convert a paragraph to a list item and a list item to a paragraph, the new element
having a greater nesting level than the original one. This button automatically
creates lists or merges adjacent lists when needed to.
Note that the two above buttons strictly alternate between paragraphs and list
items. This means that you'll often have to click a button twice in a row. For
example, in order to create a nested list, first click anywhere inside a list item and
then click "Increase nesting level" twice. First click converts the list item to a
plain paragraph contained in the preceding list item. Second click converts this
paragraph to the first item of a new nested list.
For the two above buttons to function, any of the following conditions should be
met:
15XMLmind XML Editor - DITA Support
Button Description
• A sequence of list items must be explicitly selected.
• A list must be explicitly selected. This is equivalent to selecting all its items.
• A sequence of blocks starting with a paragraph must be explicitly selected.
• A paragraph must be implicitly selected. In order to implicitly select a
paragraph, suffice to click anywhere inside it. However if this paragraph is
the first child of a list item, then it's the list item which is implicitly selected.
• A list item must be implicitly selected. In order to implicitly select a list item,
suffice to click anywhere inside it.
Tip
When a paragraph is to be converted to a new list using this
"Increase nesting level" button, there is a quick and simple
way to specify the kind of list to be created:
• If the paragraph is empty, simply type "*", "-", "1.",
"a.", "A.", "i.", "I.", optionally followed by space
characters, in it.
• If the paragraph is not empty, type "*", "-", "1.", "a.",
"A.", "i.", "I.", followed by at least one space character,
at the very beginning of it.
These “prefixes” are used to create respectively: ul, ul,
ol, ol[lower-alpha], ol[upper-alpha], ol[lower-roman],
ol[upper-roman], as if the "Change list type" menu below
was automatically used.
Change list type Displays a menu allowing to change the type of the current list.
Additional menu entry "Continue Numbering", which is rendered as a checkbox,
adds/removes "continue" to/from the @outputclass attribute of an ordered
list. Additional menu entry "Inherit Numbering", which is rendered as a
checkbox, adds/removes "inheritnum" to/from the @outputclass attribute
of an ordered list. More information about these values of the @outputclass
attribute in Section 4.1. Controlling the numbering of ordered lists.
The list must be explicitly or implicitly selected. In order to implicitly select a list,
suffice to click anywhere inside it.
Known problems
Except for the simplest cases, "Continue Numbering" is not correctly
rendered in the styled view of the document. For example, "Continue
Numbering" has no visual effect on elements having an
ancestor.
The reason of this limitation is that the implementation of "Continue
Numbering" leverages standard CSS counters. However, when you'll
convert your document to other formats such as HTML, PDF, DOCX,
16XMLmind XML Editor - DITA Support
Button Description
etc, there are no such limitations and "Continue Numbering" should
give you the expected results.
Add list Displays a menu allowing to select a type of list (, , ). The chosen
list is added after node selection or after caret at a location where it is valid to do
so and where it makes sense to do so (see note).
See also Section 4.1. Controlling the numbering of ordered lists.
Add Add a p after node selection or after caret at a location where it is valid to do so
and where it makes sense to do so.
Note
This command and all the following commands will never
add an element inside a , even it is valid to do so. These
commands add elements always after a . That is, a
element is always considered by these commands as being a
plain paragraph and never as being a division.
Add list item Add a list item of the right type after current list item. For this command to
work, suffice to click anywhere inside an , , , , ,
, , .
Add footnote Displays a menu allowing the user to insert a footnote () or a reference to a
footnote () at caret position or after caret at a location where
it is valid to do so.
If a reference to a footnote is already selected, the "xref[fn]" menu entry lets the
user choose the ID of the footnote to be referenced.
Add note Displays a menu allowing the user to add different kinds of admonitions after
node selection or after caret at a location where it is valid to do so.
Add pre Displays a menu allowing the user to add a , , ,
or a after node selection or after caret at a location
where it is valid to do so and where it makes sense to do so (see note).
Menu entry "Normalize Whitespace" normalizes whitespace in implicitly or
explicitly selected program listing. Normalizing whitespace means: expanding
tab characters to a number of space characters and removing the space characters
which are common to the beginning of all text lines (that is, removing the
superfluous “indentation” in the program listing, if any).
Add image Displays a menu letting the user:
• insert an or an at caret position;
• OR add a (containing an or containing a ) after node selection or after caret at a location where it is valid
to do so and where it makes sense to do so (see note);
17XMLmind XML Editor - DITA Support
Button Description
• OR add an element after node selection or after caret at a
location where it is valid to do so and where it makes sense to do so (see
note).
After using this "imagemap" menu item, right-click anywhere inside the
newly inserted element and select "Edit Image Map" from
the contextual popup menu to display an image map editor. This image map
editor allows to add “hot areas” to your image. More information in The
"Edit Image Map" dialog box.
Add MathML Displays a menu letting the user add various kinds of MathML equations after
equation node selection or after caret at a location where it is valid to do so.
Insert media object Displays a menu allowing to insert a media element at caret position.
object(audio)
An element allowing to add audio to your topic.
object(video)
An element allowing to add video to your topic.
object(youtube)
An element allowing to add a YouTube video to your topic.
xref(play)
An element containing .
Last menu item allows to insert an processing-instruction at caret
position or, if an processing-instruction is selected, to edit it.
More information about the above “media objects” in Section 4.4. Rich media
content.
Add section Add a or an after node selection or after caret at a
location where it is valid to do so and where it makes sense to do so (see note).
Add table Displays a menu allowing the user to add a or a after
node selection or after caret at a location where it is valid to do so and where it
makes sense to do so (see note).
Table editor See Table editor below. See also Section 4.2. Giving a background color to table
cells.
Table editor
This table editor may be used to edit s as well as CALS s. Most table editing
commands can be repeated by using Edit → Repeat (Ctrl-A).
Note that using this table editor, or simply saving a topic, or checking a topic for validity, guarantees that the
@cols attribute of a is up to date. That is, you may forget about the @cols attribute, XMLmind
XML Editor will always compute it for you.
Button Menu item Description
Table Insert Insert a column before column containing specified cell.
column Before
For a command Insert a column after column containing specified cell.
Insert After
in this menu
18XMLmind XML Editor - DITA Support
Button Menu item Description
to work, click Cut to the clipboard the column containing specified cell.
Cut
anywhere inside
a cell(3). Copy Copy to the clipboard the column containing specified cell.
Paste Before Paste copied or cut column before column containing specified cell.
Paste After Paste copied or cut column after column containing specified cell.
Delete Delete the column containing specified cell.
Sort Rows Sort all the rows of the table according to the string values of the cells of
the “selected column”. (The “selected column” is the column containing
specified cell.)
A dialog box is displayed allowing to specify the following sort options:
Order
Dictionary is the language-specific alphabetical order.
Example: (Charles, best, Albert) is sorted as (Albert,
best, Charles).
Numeric. The string value of a cell is expected to start with a
number. Example: (+15.0%, 1.50%, -20%) is sorted as (-20%,
1.50%, +15.0%).
Lexicographic is the order of Unicode characters. Example:
(Charles, best, Albert) is sorted as (Albert, Charles,
best).
Dictionary and Numeric orders will cause this menu item to
fail, unless the language of the table can be determined (i.e.
lookup for the @xml:lang attribute).
Direction
Ascending means: A to Z, low to high. Descending means: Z
to A, high to low.
Note that:
• Header rows (i.e. , ) are never sorted.
• The contents of row groups (i.e. ) are sorted separately.
Table row Insert Insert a row before row containing specified cell.
Before
For a command
in this menu Note
to work, click
Note that row editing commands are enabled, not
anywhere inside
only by implicitly or explicitly selecting a table
a cell(3) or cell or any of its descendants, but also by explicitly
explicitly select selecting a table row.
a row.
(3) or explicitly select a cell or an element having a cell ancestor
19XMLmind XML Editor - DITA Support
Button Menu item Description
Insert After Insert a row before row containing specified cell.
Cut Cut to the clipboard the row containing specified cell.
Copy Copy to the clipboard the row containing specified cell.
Paste Before Paste copied or cut row before row containing specified cell.
Paste After Paste copied or cut row after row containing specified cell.
Delete Delete the row containing specified cell.
Table cell Increment Increment the number of columns spanned by specified cell. Not relevant
Column Span for s.
For a command
in this menu Decrement the number of columns spanned by specified cell. Not
Decrement
to work, click relevant for s.
Column Span
anywhere inside
a cell(3). Increment Increment the number of rows spanned by specified cell. Not relevant for
s.
Row Span
Decrement Decrement the number of rows spanned by specified cell. Not relevant
Row Span for s.
Set Color Displays a dialog box allowing to give a background color to specified
cell.
Figure 6. The "Set Color" dialog box
Unlike the other entries of this menu, this entry allows to give a
background color, not only to specified cell, but also to one or more of
any of the following explicitly selected elements: ,
, , , , , ,
, .
3.3. DITA topic bindings
When a DITA topic (of any kind) is opened in XMLmind XML Editor, additional keyboard shortcuts and
additional drag and drop facilities which are specific to this kind of document are automatically made available
to the user. This reference contains a description of such user input/command bindings.
Action Description
Alt+Shift-Up Same as menu item Move Up.
20XMLmind XML Editor - DITA Support
Action Description
Alt+Shift-Down Same as menu item Move Down.
Alt+Shift-Left Same as toolbar button Decrease nesting level.
Alt+Shift-Right Same as toolbar button Increase nesting level.
Ctrl+Alt-click (Cmd Follow the link clicked upon.
+Alt-click on the Mac)
Enter Insert a newline character if possible. Otherwise, if caret is at the beginning of
a paragraph, list item or a few other kinds of block, insert same block before.
Otherwise, if caret is at the end of a block, insert same block after. Otherwise, split
block.
Del Delete selection if any. Otherwise, if caret is at the end of a paragraph, list item or
a few other kinds of block, join with following block. Otherwise, delete character
following caret.
BackSpace Delete selection if any. Otherwise, if caret is at the beginning of a paragraph, list
item or a few other kinds of block, join with preceding block. Otherwise, delete
character preceding caret.
Ctrl-Enter Add same block after the paragraph, list item or a few other kinds of block which
is the ancestor of selected node.
Drop an object. If the drop occurs above an element having an @href attribute other than an
(e.g. an ), the dropped string is considered to be an URL and is
used to change the value of the @href attribute.
Note that this kind of drop attempts to relativize the dropped URL against the
location of the drop site. For example, if you drop "file://home/john/doc/
topic1.dita" onto an contained in file "file://home/john/doc/
ref/reference2.dita", its @href is set to "../topic1.dita".
Elsewhere, normal behaviour which is:
Drop onto an element
Considers the dropped string to be the URL or the filename of a
graphics file. Displays a dialog box allowing to copy or reference this
graphics file for use by the element.
Drop elsewhere
If the object being dropped is an URL or an absolute filename, open the
corresponding document. Otherwise, displays a popup menu allowing to
paste the dropped text or XML before, into or after the drop location.
Drag one of the “handles” Resize the image, but always preserve its aspect ratio.
displayed around an
Pressing Ctrl (Cmd on the Mac) while dragging the handle allows to distort the
image. (The “handles” are
image.
displayed after clicking
on the image.)
Drag a separator found Resize the table column. More precisely this gives an appropriate proportional
between two table width (e.g. ) to all table columns.
columns.
21XMLmind XML Editor - DITA Support
3.4. Using the editor
This dialog box, displayed by menu item Topic → Insert or Edit indexterm, allows to insert or edit an
element.
We'll explain with examples how to use the editor.
• If you want to get this kind of entry in your back of the book index:
P
Pet 12
specify Term=Pet.
• Back of the book index:
P
Pet
Cat 26
specify Term=Pet, Term #2=Cat.
• Back of the book index:
P
"+" 54
specify Term="+", Sort as=plus. Without this Sort as specification, the index entry corresponding to
"+" would have been found in the Symbols category:
Symbols
"*" 53, 78
"+" 54
"-" 55, 91-95
22XMLmind XML Editor - DITA Support
...
• Back of the book index:
D
Domesticated animals 34 See also Pet
specify Term=Domesticated animals, See also=Pet.
Note that the content of the See also field must refer to an existing index entry. That's why instead of
typing "Pet", you can select this index entry by using the dialog box displayed by the Pick from list
button found at the right of the See also row.
The above dialog box supports autocompletion. Note that if, for example, you want specify compound term
"Pet Cat Siamese", you must type a space character between each simple term.
• Back of the book index:
F
Felis catus See Pet, Cat
specify Term=Felis catus, select "Redirect to the following term" then specify Redirect=Pet,
Redirect #2=Cat. (In the above example, notice that Felis catus has no associated page number.)
Like See Also, the content of the Redirect field must refer to an existing index entry. Unlike See Also, a
Redirect entry is merely a redirection to an actual index entry.
• Back of the book index:
O
Operation
Additive
"+" 87-90
1. Insert a first element at the beginning the range (this will give us page number 87).
23XMLmind XML Editor - DITA Support
In order to do that, use Topic → Insert or Edit indexterm and specify Term=Operation, Term
#2=Additive, Term #3="+", Sort as #3=plus.
Then check "Start range having the following name" and give your range an identifier by specifying
"plus_reference" in the Start range field.
2. Insert another element at the end the range (this will give us page number 90).
In order to do that, use Topic → Insert or Edit indexterm, check "End range having the following
name" and specify the same identifier, "plus_reference", in the End range field. All the other
fields must be left blank.
Note that instead of typing "plus_reference" in the End range field, you can select this identifier by
using the dialog box displayed by the Pick from list button found at the right of the End range field.
Related information
• The "Insert or Edit indexterm" menu item
4. Useful features
4.1. Controlling the numbering of ordered lists
This chapter explains how you can to control the numbering of ordered lists by the means of one or more
directives specified in the @outputclass attribute of the element.
By default, the numbering of nested ordered lists automatically alternates between the "1." and "a." formats.
If you want more control on the numbering of ordered lists, then you'll have to specify one or more of the
following directives in the @outputclass attribute of the element.
lower-alpha
upper-alpha
lower-roman
upper-roman
decimal
Specifies the style of numbering.
start(positive_integer)
Numbering begins at specified positive_integer.
continue
Numbering begins where the preceding ordered list left off.
inheritnum
Numbering inherits from outer-level ordered lists. For example, using this feature (e.g. ), the items of a list nested at level 2 are labelled
"1.A.", "1.B.", "1.C.", etc.
Restriction
• When using XMLmind XSL-FO Converter v6.0+(4) to generate RTF, WML,
DOCX or ODT, directive inheritnum is supported but with minor limitations.
(4) v6.1+ strongly recommended.
24XMLmind XML Editor - DITA Support
For example, when both start(positive_integer) and inheritnum are
specified, inheritnum is not honored.
• Directive inheritnum is not honored when generating Java Help and
HTML Help.
Example: specifies an ordered list which starts with an
"X.".
Note that it is still possible to specify any class name you want in the @outputclass attribute of the
element. Example: .
4.2. Giving a background color to table cells
This chapter explains how you can give a background color to table cells by adding a bgcolor(color)
directive to the @outputclass attribute of most table elements.
It's possible to give a background color to table cells by adding a bgcolor(color) directive, where color is
any CSS color value, to the @outputclass attribute of the following elements:
Inside a element
, , , .
Inside a element
, , , , .
Example:
C1,1
C1,2
C2,1
C2,2
Note that it is still possible to specify any class name you want in the @outputclass attribute of a table
element. Example: .
4.3. Fancy code blocks
This section explains how you can automatically add line numbers, “expand” tab characters and colorize the
source code contained in , or any other element specializing .
Adding line numbers, “expanding” tab characters and colorizing the source code contained in ,
or any other element specializing is done by adding one or more of the following classes
to the @outputclass attribute of this element:
25XMLmind XML Editor - DITA Support
line-numbers
line-numbers-N (where N is an integer > 0)
show-line-numbers
Give a number to the lines contained in the element.
By default, first line number is 1. This first line may be specified using the second form of the line-
numbers class, for example, line-numbers-100 specifies that lines are to be numbered and that
first line number is 100.
show-line-numbers, an alias for line-numbers-1, is also accepted for compatibility with the
DITA-OT.
language-L (where L is language name)
Colorize the source code contained in the element. L, a “programming language” such as c,
java, css, xml, specifies how the source code should be colorized.
More information about this feature, commonly called syntax highlighting, in next section.
tab-width-W (where W is an integer >= 0)
normalize-space
Specifies whether tab characters should be expanded to a number of space characters. W is the
maximum number of space characters for an expanded tab character, hence this value specifies the
location of “tab stops”. Examples: tab-width-4 means: expand tabs to up to 4 space characters;
tab-width-0 means: do not replace tabs by space characters.
In addition to replacing tab characters by a number of space characters, tab-width-W (where W >
0) also removes the space characters which are common to the beginning of all text lines. That is, it
removes the superfluous “indentation” in the element, if any. See example below.
Moreover tab-width-W (where W > 0) also removes the (useless) space characters found just before
newline characters.
normalize-space, an alias for tab-width-8, is also accepted for compatibility with the DITA-OT.
Remember
When the attribute of any element specializing contains class line-
numbers/line-numbers-N and/or class language-L , then class tab-width-8 is implicitly
specified too, that is, whitespace normalization is automatically performed. If this is not what
you want, please explicitly add class tab-width-0 to @outputclass.
Example: a simple C program featuring line numbering and syntax highlighting
In the following C program, lines are indented using tab characters.
1 /* Hello World */
2 #includeXMLmind XML Editor - DITA Support
1 /* Hello World */
2 #include
3
4 int main()
5 {
6 printf("Hello World\n");
7 return 0;
8 }
Example: superfluous indentation is removed by tab-width-N (where N > 0)
Attribute @outputclass implicitly also contains tab-width-8. First line " /tmp/" starts with 4 space
characters.
1 /tmp/
2 /usr/
3 bin/
4 lib/
5 local/
6 bin/
7 lib/
8 src/
9 src/
10 /var/
11
is rendered as:
1 /tmp/
2 /usr/
3 bin/
4 lib/
5 local/
6 bin/
7 lib/
8 src/
9 src/
10 /var/
11
4.3.1. Syntax highlighting
This section explains how you can automatically colorize the source code contained in , or
any other element specializing .
You can automatically colorize the source code contained in , or any other element
specializing . This feature, commonly called syntax highlighting, has been implemented using an open
source software component called "XSLT syntax highlighting".
If you want to turn on syntax highlighting in a DITA document, suffice to add attribute @outputclass to a
, or any other element specializing . The value of attribute @outputclass must
be any of: language-bourne (or -shell or -sh), language-c, language-cmake (or -make or -makefile),
language-cpp, language-csharp, language-css21 (or -css), language-delphi, language-ini,
language-java, language-javascript, language-lua, language-m2 (Modula 2), language-
27XMLmind XML Editor - DITA Support
perl, language-php, language-python, language-ruby, language-sql1999, language-sql2003,
language-sql92 (or -sql), language-tcl, language-upc (Unified Parallel C), language-html,
language-xml.
If you want to customize syntax highlighting for an HTML-based output format (XHTML, EPUB, etc), then
redefine any of the following CSS styles:
• .hl-keyword (keywords of a programming language),
• .hl-string (string literal),
• .hl-number (number literal),
• .hl-comment (any type of comment),
• .hl-doccomment (comments used as documentation, i.e. javadoc, or xmldoc),
• .hl-directive (preprocessor directive or in XML, a processing-instruction),
• .hl-annotation (annotations or "attributes" as they are called in .NET),
• .hl-tag (XML tag, i.e. element name),
• .hl-attribute (XML attribute name),
• .hl-value (XML attribute value),
• .hl-doctype ( and all its content).
Example: customization of the syntax highlighting of a keyword for HTML-
based output formats
.hl-keyword {
font-weight: bold;
color: #602060;
}
This can be done from within XMLmind XML Editor using Options → Customize Configuration →
Customize Document Conversion Stylesheets.
If you want to customize syntax highlighting for an XSL-FO-based output format (PDF, RTF, etc), then
redefine any of the following s: hl-keyword, hl-string, hl-number, hl-comment, hl-
doccomment, hl-directive, hl-annotation, hl-tag, hl-attribute, hl-value, hl-doctype.
Example: customization of the syntax highlighting of a keyword for XSL-FO-
based output formats
bold
#602060
This can be done from within XMLmind XML Editor using Options → Customize Configuration →
Customize Document Conversion Stylesheets.
4.4. Rich media content
This chapter explains how to add SVG, MathML, audio, video and Flash animations to your DITA topics and
how ditac processes this rich media content in the case where the output format supports rich media (e.g.
XHTML 5, EPUB 3) and also in the case where the output format does not support rich media (e.g. XHTML 1,
PDF, RTF).
28XMLmind XML Editor - DITA Support
Note
XMLmind XML Editor has buttons in its DITA Topic tool bar which allows to easily insert any
of the elements and processing-instructions described in this chapter.
Figure 7. The menu displayed by the "Add image" button
Figure 8. The menu displayed by the "Add MathML equation" button
Figure 9. The menu displayed by the "Insert media object" button
SVG
It is possible to include SVG graphics in a DITA document either by reference or by inclusion. Use an / element pointing to an SVG file to include it by reference. Example:
The XML source code corresponding to the above example is:
It's also possible to use an element pointing to an SVG file to include it by reference. Example:
Embedding SVG graphics in a DITA document can be achieved using the same element.
Example:
29You can also read