Adult Career Pathways
Workforce One User Guide
←
→
Page content transcription
If your browser does not render page correctly, please read the page content below
Adult Career Pathways Workforce One User Guide
Adult Career Pathways
                                              Workforce One (WF1)
                                                   User Guide

How to Use This Guide .............................................................................................................. 3
   Data Entry Requirement....................................................................................................3
   Purpose of the Guide ........................................................................................................3
   Getting Help.......................................................................................................................4
   Additional Information ......................................................................................................4
   ACP Terms vs WF1 Terms ...................................................................................................5

Enrolling a Person into the Program ........................................................................................ 6
    When to Enroll a Person ....................................................................................................6
    Creating a Person Record ................................................................................................7
    Completing a New Application .......................................................................................9
    Determining Eligibility ...................................................................................................... 10
    Completing Enrollment and Entering Initial Activities ................................................... 10

Co-Enrollment ......................................................................................................................... 13
   Rules..................................................................................................................................13
   Entering A Co-Enrollment ................................................................................................ 14

Creating and Updating an IEP ............................................................................................... 15
   Adding an Individual Employment Plan (IEP)................................................................ 15
   Printing and Signing the IEP ............................................................................................ 19
   Updating and Editing the IEP.......................................................................................... 20

Entering Support Services ...................................................................................................... 22

Opening and Closing Activities............................................................................................. 23
   How Activity Data is Used ............................................................................................... 23
      Required Services (Activities).......................................................................................... 24
      Opening Required Activities ........................................................................................... 24
      Opening Training Activities ............................................................................................. 25
      Opening Case Management Activities ........................................................................ 27
      Closing Activities ..............................................................................................................27

Entering an Academic Assessment ...................................................................................... 29

Entering Performance Information ........................................................................................ 31
    Entering a Credential ...................................................................................................... 31

Adult Career Pathways WF1 User Guide                                       Updated: June 2023                                                  1
Exiting a Person....................................................................................................................... 32
When to Exit a Person ...................................................................................................... 32
Exiting a Person from WF1 ............................................................................................... 33
EDS – Electronic Document Storage ..................................................................................... 35
Add a Document to Workforce One ............................................................................. 35
View Documents Added to Workforce One................................................................. 36
Edit Tags and Comments on Documents...................................................................... 37
Delete Documents from EDS .......................................................................................... 37
Copy using Person Record in Document Summary ..................................................... 37
Reports and Advanced Search ............................................................................................. 38
Reports and Their Uses..................................................................................................... 38
Creating a List of Saved Reports .................................................................................... 39
Selecting Criteria to Run Reports.................................................................................... 39
Creating Customized Reports Using Advanced Search .............................................. 41
Example Reports Using Advanced Search.................................................................... 42
Saving Searches for Future Uses ..................................................................................... 44
Navigating to Cases within Advanced Search Reports ............................................... 45
Appendix – Enrolling a Person into the Program .................................................................. 46
Person Search ..................................................................................................................46
Family Status Explanation Chart ..................................................................................... 46
Select here to return to Completing Enrollment and Entering Initial Activities, step 1.46
Appendix – Creating and Updating an IEP .......................................................................... 47
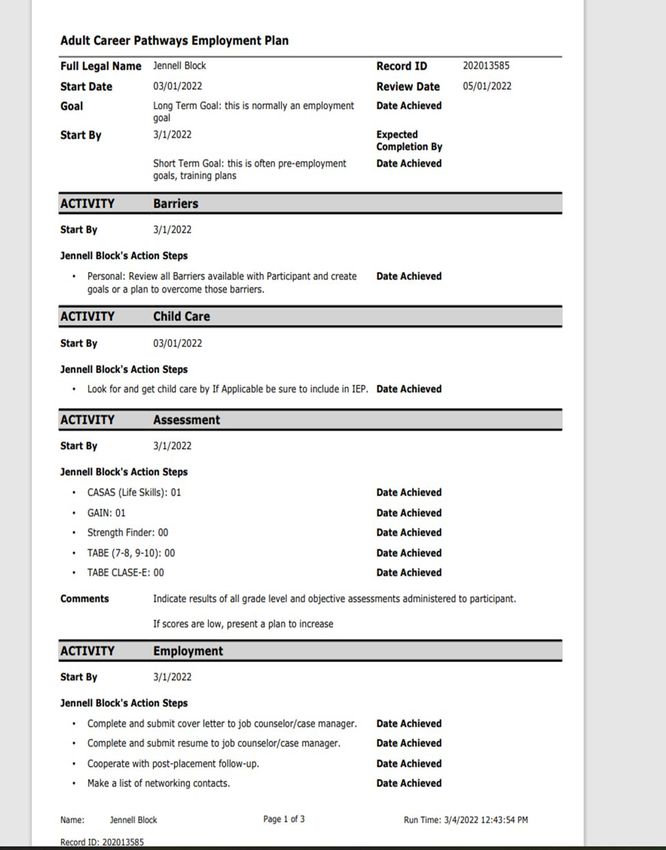
Sample IEP........................................................................................................................47
Appendix – Entering Support Services .................................................................................. 50
Support Services ..............................................................................................................50
Appendix – Opening and Closing Activities ........................................................................ 52
Activity Definition and Timing Tables.............................................................................. 52
Writing Case Notes ..........................................................................................................57
Appendix – Exiting a Person .................................................................................................. 60
Person Search ..................................................................................................................60
Exit Reasons Explanation Chart ...................................................................................... 60
Adult Career Pathways WF1 User Guide Updated: June 2023 2How to Use This Guide
Contents
• Purpose of the Guide
• Getting Help
• Additional Information
• ACP Terms vs WF1 Terms
• Appendix – Enrolling a Person into the Program
• Appendix – Creating and Updating an IEP
• Appendix – Entering Support Services
• Appendix – Opening and Closing Activities
• Appendix – Exiting a Person
NOTE:
• Workforce One was designed for use with Internet Explorer and Edge. Other browsers
such as Google Chrome and Safari will not display reports and results properly.
Data Entry Requirement
In accordance with Minnesota Statute 116L.98, all adult programs accepting funding from the
Workforce Development Fund, must use the state uniform outcome and reporting
measurement tool, which is Workforce One (WF1).
Grantees are required to enter all data into Workforce One within 15 business days of the
actual event date. This includes, but is not limited to, enrollments, activities, case notes and
exits. Workforce One data entry is required regardless of any additional data system an
organization/grantee uses such as Client Track, Salesforce, etc.
Purpose of the Guide
This guide is a program-specific resource to help you carry out certain tasks in Workforce One
(WF1) as required by MN Statute 116L.98. It provides step-by-step instructions, tips, examples,
and other information about these tasks to help you work as accurately and thoroughly as
possible. The guide is also intended as a supplement to job training, but it should not be used
as a self-study replacement to training.
Before Using This Guide:
• Gain Access to WF1: Select to complete a WF1 Security Access Form.
• Attend ETP Programs Case Management Training: Provided by the Workforce One
Team, this training includes a basic overview of system features and how to navigate
WF1, and available WF1 Help resources and manuals.
• Reports and Advanced Search Training: Provided by the WF1 Team, this training is
recommended for agency staff who will be monitoring progress and reporting
outcomes.
Adult Career Pathways WF1 User Guide Updated: June 2023 3Once access to WF1 is gained, upcoming training registration information can be found
in WF1 under Resources—Staff Training, enter a date parameter, then Run Search.
Training registration may also be completed by another within the organization with WF1
access.
When Using This Guide:
• Read What You Need: Read the tip boxes or link in the procedures to more information
only if needed. The guide is not intended to be read cover to cover.
• Use the Program-Specific Information: The guide is tailored to the ACP and Pathways to
Prosperity (P2P) programs, including terms, procedures, and policy and rule information.
Getting Help
This guide will help you work more accurately, thoroughly, and efficiently in WF1. If you use it,
you may need to call for help less often. However, if you do need help, send an email to your
ACP Grant Coordinator your request will be answered as quickly as possible.
WF1 has a Resource page which includes a set of User How-To Guides and a Glossary. The
User How-To Guides will show you features of the system not specific to this program, such as
running reports on your program participants, setting up ticklers to help you manage a
caseload, and more. We highly recommend that you read these guides so you can make the
most out of your case management system. The Glossary is a reference that explains what
each field in WF1 means. Access the Resources page by selecting Resources in the top menu.
Each page in WF1 has its own help content. View the help content for whatever page you are
currently viewing by selecting Help in the top menu. A pop-up screen will then appear,
providing a summary of the page, tips for entering information into the page, Glossary
definitions for each field on the page, and actions you can take on the page. Select Close or
Print to close the Help screen.
Additional Information
The following types of boxes may appear in some steps:
Tip boxes
TIPS:
• Provide ideas to help you work accurately, thoroughly, and efficiently
Rule boxes
RULES:
• Provide program rules related to your program as well as state or federal requirements.
Expert Advice boxes
Adult Career Pathways WF1 User Guide Updated: June 2023 4EXPERT ADVICE:
• Provide guidelines for making the best choices and selections related to your program
as tasks are completed.
Policy or Regulation boxes
POLICY:
• Provide brief explanations of state policies and/or federal regulations. They also provide
links to the actual policy or legislation.
Example: Illustrates special circumstances or situations. Example:
EXAMPLE:
• Be specific about the type of job and employment goal.
o Write: Jane wants to become a Licensed Practical Nurse (LPN) and work in a
pediatric clinic.
o Don’t write: Jane wants a job in the medical sector.
External Links
You will find external links with additional information in some steps to outside resources, such
as to O*NET or NAICS codes to help you complete the step.
Appendix
Many types of additional information are located in the appendix, such as, if/then tables. A
link to this information is provided in the step-by-step procedures. After reading the
information, another link brings you back to the step in the procedure where you left off.
ACP Terms vs WF1 Terms
The user guide contains terms used by Workforce One (WF1). Some terms in the user guide and
in WF1 may not be the same as with those used by your agency. Below are terms Adult Career
Pathways (ACP) may use and the equivalent used in WF1.
ACP Term Term in WF1
Client/Participant/Customer Person
Location Agency
Service Activity
Employment Counselor/ Navigator/ Career Counselor User
Individual Employment Plan Plan
Adult Career Pathways WF1 User Guide Updated: June 2023 5Enrolling a Person into the Program
Contents
• When to Enroll a Person
• Creating a Person Record
• Completing a New Application
• Determining Eligibility
• Completing Enrollment and Entering Initial Activities
REMINDER: These procedures serve as a guideline only. Each record will require data entry
specific to the situation of the person. Also, your agency may have specific policies or rules
that require you to do different actions or steps in addition to or instead of some of the steps
below.
When to Enroll a Person
The process to enroll a person is typically completed when an applicant meets with the
Navigator/Career Counselor one-on-one to obtain services from your agency and eligibility for
the program has been determined. The data entry and pages in WF1 used to enroll the person
correspond to the person’s specific eligibility and need for service.
RULES:
Each agency has its own intake process, but these rules apply to all agencies administering
ACP programs.
• Intake Form and WF1 Fields Must Match: Your agency’s intake form must correspond to
the fields within the WF1 enrollment pages. These fields include household and
demographic information and other types of information required by the system to
proceed with enrollment.
• Identity and SSN: You must obtain a photocopy of an official form of identification that
includes the person’s full name and date of birth and social security number. Review
Documentation Needed to Support Participant Eligibility to determine acceptable
forms. Place a copy of the documentation in the person’s hard file/EDS.
Reporting
As part of the enrollment process, a person is assigned a program. Every program including
the Adult Career Pathways program is funded by a state grant. The state runs reports to show
the total number of persons served/enrolled in each program. This report also shows your
specific agency’s overall performance. Providing correct and complete information is crucial
for accuracy in reporting. Your agency can run reports to monitor progress and outcomes
throughout the grant period.
Adult Career Pathways WF1 User Guide Updated: June 2023 6Creating a Person Record
Begin this procedure after providing the Tennessen Warning, determining eligibility, and
obtaining all required documents. Keep a copy of the person’s documents in the official file –
whether that be a paper file or uploading the documents into Electronic Document Storage
(EDS) in WF1.
This procedure begins at the Dashboard/Home Page. Start by searching for the person in the
system to avoid creating a duplicate record.
1. On the main menu bar, select Search and select Person from the drop-down list. The
Person Search page displays. Select here for the Person Search procedure.
• If the person was previously enrolled in an ACP program or a different program that
utilizes WF1, they will display in the Search Results list.
i. Select the person’s name from the list. The Person At-A-Glance page
displays.
ii. Select Contact in the left navigation bar. The Contact Information page
displays.
iii. If the person does not have an alternate contact skip to step vi. in the
Alternate Contact List area,
iv. If the person does have an alternate contact listed, select Add Alternate
Contact. The Alternate Contact Information page displays.
v. Complete all fields on the page with the contact information of someone
who does/does not live with the person.
vi. Select Save to return to the Contact Information page.
vii. Review the information and fix any errors on the page.
viii. Select Save. Skip to the Completing a New Application procedure below.
OR
b. If the person you are working with does not have a WF1 Person Record, they will not
display in the list. Continue the following steps to add a new person record in step 2
directly below.
2. Select Add New Person in the Search Results box. The Person Add page displays.
3. Complete all fields on the page. Required fields are indicated by an asterisk (*).
TIPS: These tips are for the following fields on the Person Add page.
• To ensure accurate and complete reports, always enter as much information as
you can even if the field is not required.
• SSN: Enter the social security number (SSN) now so that the system can auto-
populate it later in the eligibility pages. SSN can be verified according to the
Documentation Needed to Support Participant Eligibility.
• In the statewide Uniform Report Card.
Select here for more information on the Uniform Report Card.
• Primary E-mail: If the person has an email address, add it now so you can send
follow-up messages efficiently, when needed.
Adult Career Pathways WF1 User Guide Updated: June 2023 7POLICY:
• Verification of SSN: A person’s refusal or inability to show an item that verifies their
SSN cannot be used to deny service if the person is otherwise eligible to receive
services. However, DEED funds cannot be expended to serve or train the person.
Select here to read the ACP Acceptable Eligibility/Enrollment Documentation
listed by program.
4. Select Save. The person record is created. The Contact Information page displays.
5. Complete all fields on the Contact Information page. Required fields are indicated by
an asterisk (*).
TIPS: These tips are for Residential Address on the Contact Information page.
• If the geo coding search was unable to verify the address you entered, review
the address to determine if you made an error and fix.
• If you do not have the correct address, save the information entered so far and
return to the Contact Information page to enter it later.
• If the person is homeless, ask for the address of a family member or friend whose
address they can use as a mailing address. If they do not have one and have no
other address to provide, use your Agency’s address. Later, as part of wrap-
around services, help them set up general delivery or P.O. box address and
update the address on the Contact Information page.
a. In the Alternate Contact List area, select Add Alternate Contact. The Alternate
Contact Information page displays.
b. Complete all fields on the page with the contact information of someone who does
not live with the person.
c. Select Save to return to the Contact Information page.
6. Review the information and fix any errors on the page.
7. Select Save. The Person At-A-Glance page displays.
You have completed the Creating a Person Record procedure. The person now has a unique
WF1 Record ID number assigned to them. Continue with Completing a New Application
directly below.
Adult Career Pathways WF1 User Guide Updated: June 2023 8Completing a New Application
This procedure begins on the Person At-A-Glance page.
1. In the left navigation bar, in Case area, select Program/New App. The Program
Summary page displays.
2. Select Add New Application. The New Application page displays.
Review any other applications/enrollments the person may be enrolled and verify co-
enrollment policies prior to completing the application.
3. Complete all fields on the page. Required fields are indicated by an asterisk (*).
TIPS: These tips are for the following fields on the New Application page.
• Application Date: Enter the date the person completed and signed the
application/intake form. This date may be in the past.
• Location: Choose the site where the person will receive services.
• Funding Stream Category: Choose either ACP Competitive Grant (i.e., WESA,
Southeast Asian, African Immigrant, Getting to Work or Adult Support Services),
Pathways to Prosperity or ACP Direct Appropriation. A person may not be enrolled
in more than one of the same funding stream categories. See Co-Enrollment
section.
• Support Staff: Enter the name of the person who has authority to make changes to
the record, for example, a data specialist or colleague with whom you share
duties.
4. Review the information and fix any errors on the page.
5. You may write a case note in the Case Note area describing that you have entered the
person into WF1 and are completing the eligibility and enrollment process today.
EXPERT ADVICE:
• Spell check: To ensure your note is accurate and clear, always use the spell
checker to ensure that your free-form entries do not confuse your manager or state
monitor due to spelling errors.
• Case Notes: Write a case note every time you have contact with the person,
modify or add to their record, or when they submit something to you, e.g., a copy
of a training certificate or newly acquired credential. A preliminary case note is
required during the initial period of enrollment.
Select here to read How to Write a Case Note.
6. Select Continue to Eligibility. The Adult Career Pathways Eligibility page displays.
OR
Select Save and Exit Wizard if you need to get information that you don’t have to
continue. Return to this step when you are ready to begin again and select Continue to
Eligibility.
Adult Career Pathways WF1 User Guide Updated: June 2023 9You have finished the Completing a New Application procedure. Continue with Determining
Eligibility directly below.
Determining Eligibility
This procedure begins on the Eligibility page or by selecting Eligibility/Enrollment from within the
left navigation pane.
1. Complete all fields on the page. Required fields are indicated by an asterisk (*).
TIPS: These tips are for the following fields on the Adult Career Pathways or
Pathways to Prosperity (P2P) Eligibility pages.
• Decision Date: Enter the date you determined the person was eligible for the
program including obtaining all required verifications or administered assessments.
• P2P ONLY: Now Enrolled in Sec Ed: Refers to high school only (Secondary
Education). If the person is not enrolled in secondary education, or are enrolled in
any other kind of training, or not in training at all, select No. If the person is enrolled
in secondary education, select Yes. High School/Secondary Education students
are ineligible for P2P programs.
• ACP ONLY: Meets Eligibility Criteria: Select Yes and enter the person’s eligibility in
the Justification for Meeting Eligibility Criteria field, i.e., less than 200% FPG, person
of color.
2. Select Determine Results. The results display below the Determine Results button.
NOTE: If the word “Eligible” displays as the result, continue to step 3 below.
OR
If the word “Ineligible” or an error message displays, fix errors, and then select
Determine Result again. If “Eligible” displays and no error message appears, continue to
step 3 below. If “Ineligible” displays again, refer to the program eligibility criteria to
ensure participant is eligible for services.
3. Select Save and Continue to Enrollment. The Adult Career Pathways Program Enrollment
page displays.
OR
Select Save and Exit Wizard to save and complete the process later.
The Determining Eligibility procedure is completed. Continue with Completing Enrollment and
Entering Initial Activities directly below.
Completing Enrollment and Entering Initial Activities
This procedure begins on the Enrollment page or by selecting Eligibility/Enrollment from within
the left navigation pane.
1. Verify the auto-populated information (i.e. must match the info on the intake/
application form and/or documentation in the file) and complete the fields on the
page. Required fields are indicated by an asterisk (*).
Adult Career Pathways WF1 User Guide Updated: June 2023 10Important: Data on disability and race must be self-disclosed, meaning that the person
must offer this information on their own. This information must be provided on their
intake form without you asking them or otherwise prompting the person to tell you. If
they did not provide this information, you must enter the option that indicates that they
chose not to disclose.
TIPS: These tips are for some of the fields within the Adult Career Pathways Program
Enrollment page.
• Enrollment Date: Enter the date the person was enrolled in the program.
• Race: Your intake form may have more options than WF1. Choose the best match.
Use the same method for choosing race across your caseload. Choose white if the
person is Hispanic and if they do not state another race.
• Veteran: Select only if the person brings verification of status (i.e. a DD214 form).
o Service-Connected Disability: If the person became disabled while in military
service, select the appropriate percent disabled.
o Vet Separated in Last two Years: If the person left the military less than 2 years
ago, select Yes. If they left more than two years ago, select No.
o Campaigns: Check the box next to campaign the person enlisted into.
o Additional Veteran’s Priority may be found here.
• Family Status: Select here to see an explanation of family status options.
• Actual Family Size: The actual number of persons related by blood, marriage, or
adoption living in a single residence with the person. Count people not living in the
same residence but who were claimed as dependents on the family’s most recent
tax return.
• Financial Aid Status: Choose if the person is in college and is receiving financial aid
to support their studies.
• At or Below 200% Federal Poverty Guidelines: Determine poverty percentage using
income written on the intake form or on the income statement given to you.
• Lack of Significant Work History: Indicates whether or not the person has a weak
attachment to the workforce in the recent past. Select yes if the person has not
worked for the same employer for longer than three consecutive months in the two
years prior to application.
• Hourly Wage at Current Job: If unemployed at time of enrollment, enter 0.00
• Consent to Share with Partners: Select Yes if the person has signed the Notice of
Privacy Practices and How We Use Your Personal Information “Tennessen Warning”.
2. In the Open Initial Activity area, in the Activity Type drop-down list, select Assessment.
• In the Funding Stream drop-down list, select the desired funding stream.
Adult Career Pathways WF1 User Guide Updated: June 2023 11RULES:
• Every new enrollment must have at least one activity open to complete/save the
enrollment.
• To receive any service from ACP, the person must be enrolled in the Individual
Plan Development, Assessment, and Career Counseling activities. It is
recommended that you enroll the person in these activities at this point in the
process.
NOTE: Ask your manager if you do not know which funding stream to select.
3. Select Enroll and Add Another Activity. The Activity Add/Edit page displays.
• Enroll the person in any additional activities now. See also Opening and Closing Activities
for additional information.
TIPS: This tip is for adding an Individual Plan Development (IPD) as an activity.
• Adding IPD as an activity is different than creating the IEP itself. See Adding an
Individual Employment Plan (IEP).
You have completed the Completing Enrollment and Entering Initial Activities procedure.
NOTE: If you have used this procedure to co-enroll, you have completed co-enrollment.
Adult Career Pathways WF1 User Guide Updated: June 2023 12Co-Enrollment
Contents
• Rules
• Entering A Co-Enrollment
RULES:
• Participants enrolled in Pay-for-Performance Legislative Direct Appropriations
may not be co-enrolled with any other Employment & Training program under
DEED oversight, such as Pathways to Prosperity, WIOA, or Dislocated Worker.
Participants may not exit successfully from one DEED grant and consecutively
enroll into a Pay-for-Performance Direct Appropriation. The only exception to
this policy is co-enrollments with the Minnesota Family Resiliency Partnership
program.
Terms and Definitions:
• Co-Enrollment: When a participant is enrolled in more than one program. Occurs when a
participant receives support from multiple funding streams (grants).
• Program Sequence: Adult Career Pathways or Pathways to Prosperity
• Funding Stream Category: ACP Direct Appropriation or ACP Competitive Grant
• Funding Stream: ACP SFY**/** Grant Type Grantee Name
REMINDER: Specific ACP co-enrollment rules exist and can be found within the Adult Career
Pathways Operations Guide.
These procedures serve as a guideline only. Each record will require data entry specific to
the situation of the participant. Also, your agency may have specific policies or rules that
require you to do different actions or steps in addition to or instead of some of the steps
below.
Rules
Co-enrollment may occur within the same provider. When a provider must enroll a participant
into multiple ACP programs you will need to open a second program sequence (ACP Seq 2).
EXAMPLE:
One program sequence/grant (ACP Seq 1) provides the person with funding for support
services while another program sequence/grant (ACP Seq 2) provides the same person
with funding for tuition. Both services are provided by Agency A.
Adult Career Pathways WF1 User Guide Updated: June 2023 13TIPS:
When multiple funding streams are opened under activities to indicate co-
enrollments, performance outcomes will not be accurately captured.
Co-enrollment may occur between providers. When a participant needs several services that
one provider does not offer, co-enrollment can occur across multiple providers.
EXAMPLE:
• Agency A has a program through a Southeast Asian Economic Relief grant.
• Agency B has a program through a Pathways to Prosperity grant.
• Since both programs enter data into WF1 co-enrollment may occur.
Co-enrollment must be written into the person’s Individual Employment Plan (IEP). Agencies
may share IEPs internally between programs when co-enrolling.
Co-Enrollments must be thoroughly case noted; See case note section
See also ACP Program Operations Guide
Entering A Co-Enrollment
To co-enroll a person in a second ACP program, a new program sequence must be opened.
To open a second program sequence, complete a new application, determine eligibility, and
complete enrollment. See Completing a New Application (opening a second program
sequence) to get started.
Adult Career Pathways WF1 User Guide Updated: June 2023 14Creating and Updating an IEP
Contents
• Adding an Individual Employment Plan (IEP)
• Printing and Signing the IEP
• Updating and Editing the IEP
REMINDER: This procedure serves as a guideline. Each person will require data entry specific
to their situation. Also, your organization may have policies or rules that require you to do
different actions or steps in addition to or instead of some of the steps below.
Terms and Definitions:
• Plan and IEP: “Plan” and “IEP” are short for “Individual Employment Plan.”
Adding an Individual Employment Plan (IEP)
The plan serves as a contract between the employment counselor and the person. It tracks
their goals, barriers, achievements, and steps they plan to take. It should be a motivating tool
to help them achieve their goals. The plan is meant to be a living document that changes with
the person’s life circumstances.
• Paper or Online? Whether to use paper or online is determined at agency level. If you’re
interested in using a paper plan, contact program administrators for samples.
IMPORTANT: If you are using a paper plan, create the plan with the person before
beginning this procedure.
• Using a paper IEP during the interview. If you are using an online plan, but do not want
to use a computer during the interview or do not have one available, you may first print
out your agency’s IEP template, write down the person’s information during the
meeting, and later input the answers into the online plan. You will need to obtain the
person’s signature on either the written or online plan.
NOTE: IEP templates and requirements vary by agency based on program structure.
TIPS:
• Select here to view a sample IEP.
RULES:
• An IEP is required at enrollment or at least before the date of the first training activity.
The IEP (paper or printed online version) must be in the file and/or uploaded to EDS
within WF1.
• Training, support services, and individualized services (one-on-one) cannot be incurred,
obligated, or distributed until after the participant is enrolled AND the participant and
Career Navigator have both signed and dated the IEP.
• For a complete list of IEP requirements refer to the IEP section of Adult Career Pathways
Adult Career Pathways WF1 User Guide Updated: June 2023 15Program Operations Guide.
This procedure begins in the person record.
1. In the left navigation menu, in the Cases area, select Plan. The Plan Summary page
displays.
2. Select Add Plan. The Adult Career Pathways Employment Plan page displays.
3. FOR A PAPER PLAN
a. In the Plan Mode drop-down list, select Paper.
b. If you need a paper plan, select Paper, and then select Save and Continue.
c. Add a case note if desired.
d. In the Start Date field, enter the date the IEP was signed by employment counselor
and the person (if person and employment counselor sign on different dates, use
the last date the document was signed).
e. In the Review Date field, enter the date indicated on the IEP the person will
achieve the first goal or the date that is a year from the start date, whichever date
comes first.
f. In the Confirmation Date field, enter the date the plan is approved (usually the
same as the start date, but may be a few days later, e.g., if the person met with
you to create a plan, but had to come back with more information, the
confirmation date may be a later date than the start date).
g. The completed IEP may be uploaded to WF1 in the Electronic Document Storage
(EDS) section.
You have completed the Creating an Individual Employment Plan procedure for
paper plans.
FOR AN ONLINE PLAN
a. Select Online, then select Save and Continue. The page displays more fields.
b. Continue with step 3 directly below.
4. In the Full Legal Name field, type the person’s full legal name.
5. In the Goals field type the person’s employment goal(s).
RULES:
• At least one employment goal must be written in the Goals box.
EXAMPLE: Be specific about the type of job and employment goal.
• Write: Jane wants to become a Licensed Practical Nurse (LPN) and work in a
pediatric clinic.
• Don’t write: Jane wants a job in the medical sector.
6. In the Plan Sections area, in the Add Section drop-down list, select Assessment.
7. Select Add Section. The Assessment Section Edit page displays.
Adult Career Pathways WF1 User Guide Updated: June 2023 16a. Select Add Action Step. The Action Steps options display.
b. Select as many checkboxes as apply to your person. This may include:
• Career Assessment Inventory
• Math and reading assessment (this is required for some participants. See
Program Operations Guide for the policy) if the person does not have a 2-
year degree prior to starting credential/non-credentialed training)
• Other skills related information (including Non-Transferable Skills, Obsolete
Skills, etc.)
TIPS:
• Add Custom Step. Select if you wish to add a detail that is not listed.
• Action Step. Brackets around a word or phrase, e.g., {workshop/class} on
{day(s), time, location}, must be filled out with details. Upon closing the box,
fields will display in blue.
Select the blue text to fill in the details.
c. Select Ok.
d. Fill in the blue text for Action Steps you selected.
e. Add Comments for Printed Plan as needed.
f. Select Save Section. The Assessment Section Edit page redisplays.
8. In Plan Sections, select Barriers from the drop-down list.
9. Select Add Section. The Barriers Section Edit page displays.
• Select Add Action Step. Select as many barriers as you and the person identify
by selecting the checkbox next to each barrier.
TIPS: These tips are for fields on the Barrier Section Edit page.
• Action Steps that have brackets around a word or phrase, e.g.,
{workshop/class} on {day(s), time, location}, must be filled out with details.
When you close the box, each field will show in blue.
Select the blue text to fill in the details.
• Common barriers are Disability Status and Housing.
• Select Custom Step to add more information than is listed.
• Select Continue.
• Next to the first barrier, select Provide Specifics. A text box displays.
• Write a concise yet detailed description of the barrier in the text box.
Adult Career Pathways WF1 User Guide Updated: June 2023 17EXAMPLE: Be specific about the barrier.
• Write: Jane’s highest level of education is a GED. She needs to attend
post-secondary training to achieve her employment goal of a Licensed
Practical Nurse (LPN).
• Don’t write: Jane needs more school.
• Write: Jane’s financial needs analysis shows a financial barrier and needs
transportation support services to commute to training and job interviews.
• Don’t write: Jane cannot afford to do anything.
• Repeat step 9 for each barrier you selected in step 8.
• Select OK.
10. In the Plan Sections area, select Employment from the drop-down list, and then select
Add Section. The Employment Section Edit page displays. Select Add Action Step.
• Select as many as appropriate.
• Complete Start by and Expected Completion by fields.
11. In the Plan Sections area, select Support Services from the drop-down list, and then
select Add Section. The Support Services Edit page displays.
a. Select Add Action Step. Select as many as appropriate.
• Complete Start by and Expected Completion by fields.
12. In Plan Sections area, select Training from the drop-down list, and then select Add
Section. The Employment Section Edit page displays. Select Add Action Step. Select as
many checkboxes as appropriate.
• Complete Start by and Expected Completion by fields.
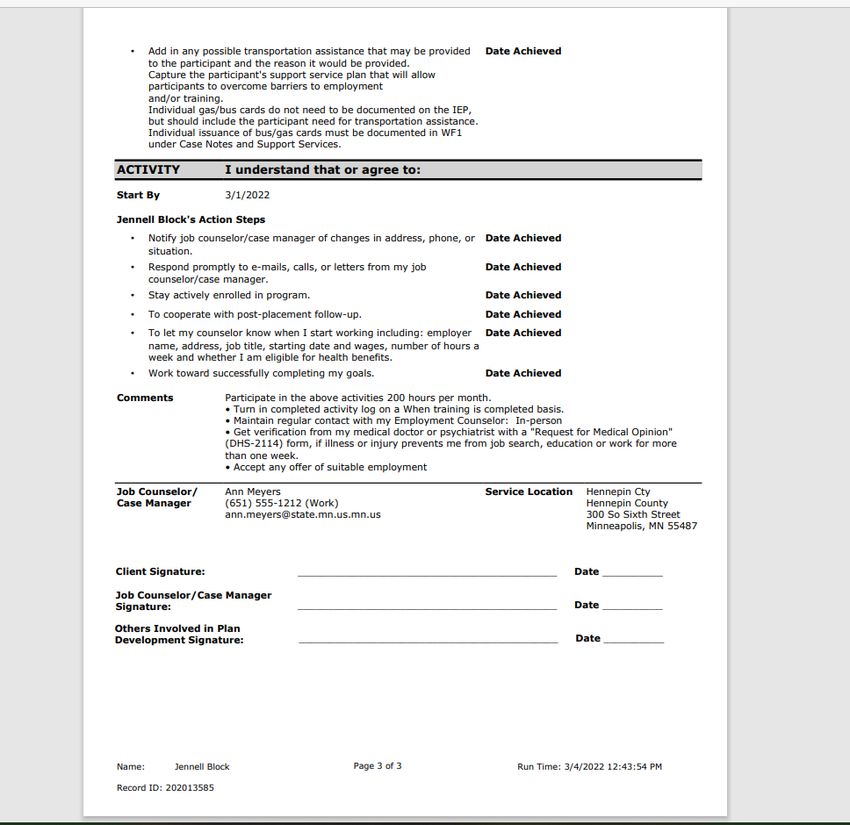
13. In Plan Sections area, select I understand and agree to from the drop-down list, and
then select Add Section.
• Select Add Action Step.
• Select as many checkboxes as appropriate.
14. At the bottom of the page, complete the start date, review date, and confirmation
date fields.
• In the Start Date field, enter the date the IEP was signed by employment
counselor and the person (if person and employment counselor sign on different
dates, use the last date the document was signed).
• In the Review Date field, enter the date indicated on the IEP the person will
achieve the first goal or the date that is a year from the start date, whichever
date comes first.
• In the Confirmation Date field, enter the date the plan is approved (usually the
same as the start date, but may be a few days later, e.g., if the person met with
you to create a plan, but had to come back with more information, the
confirmation date may be a later date than the start date).
15. Select Save and Activate.
Adult Career Pathways WF1 User Guide Updated: June 2023 18OR
Select Save Pending Plan to return to the plan later. If you select this option, you will
need to Save and Activate the plan before enrolling the person in other activities.
You have completed the Adding an Individual Employment Plan procedure. Continue with
Printing and Signing the IEP directly below.
Printing and Signing the IEP
This procedure begins on the ACP Program Employment Plan page.
1. At the bottom of the page, select View/Print. The Print Launch page displays.
2. In the bar below the Open PDF and Back to Plan Summary buttons, select the blue
floppy disk icon ( ), and from the drop-down list, select PDF.
3. Select Open to generate the printable plan and then print one copy.
4. Have the person and employment counselor sign the copy, make a copy of the plan,
and give it to the person for their records, then place the signed plan with original
signatures into the person’s case file.
RULE:
• A signed and dated IEP is required for every person enrolled in an Adult Career
Pathways program. If your agency’s paper IEP does not have a signature line, it is
required to add one since every IEP must be signed and dated by both the
employment counselor and person.
• Case note that a signed and dated plan is in the person’s case file.
You have completed the Printing and Signing the IEP procedure.
Adult Career Pathways WF1 User Guide Updated: June 2023 19Updating and Editing the IEP
Use this procedure to document a change in a person’s life circumstances, desired career
path, or other notable change.
RULES:
• The IEP (Paper and Online) must be updated when:
o Goals or objectives are achieved or changed, e.g., a person achieved their
Certified Nursing Assistant and wants to go back to school to become a licensed
practical nurse.
o Support service needs and/or barriers have changed because living conditions
and/or personal life changes have occurred.
This procedure begins in the Person Record.
1. In the left navigation menu, in the Cases area, select Plan. The Plan Summary page
displays.
2. In the Action column, select Copy. The Adult Career Pathways Program Employment
Plan page displays with fields populated with information from the old plan.
3. Edit the information on the page.
a. If the person has changed their career goal, in the Goals section, update the
O*NET codes and sample job titles.
4. In the Plan Sections area, in the Actions column, select Edit.
5. Edit the section, if needed.
6. Select Save Section.
7. Repeat steps 4-6 for all plan sections.
NOTE: You will need to complete steps 4-6 for each plan section, even if you do not
need to make any edits.
8. Towards the bottom of the page, complete the remaining date fields.
• In the Start Date field, enter the date the IEP was signed by employment
counselor and the person (if person and employment counselor sign on different
dates, use the last date the document was signed).
• In the Review Date field, enter the date indicated on the IEP the person will
achieve the first goal or the date that is a year from the start date, whichever
date comes first
• In the Confirmation Date field, enter the date the plan is approved (usually the
same as the start date, but may be a few days later, e.g., if the person met with
you to create a plan, but had to come back with more information, the
confirmation date may be a later date than the start date).
9. Select Save and Activate or Save as Pending.
a. Save and Activate: If there was already an active plan on the program
sequence, the old plan is now deactivated, and the new plan is activated.
Adult Career Pathways WF1 User Guide Updated: June 2023 20b. Save as Pending: A plan must be signed for it to be activated. If a participant
has not signed the printed plan, Select Save as Pending it remain as pending
until a signature is acquired and the counselor activates the plan.
10. Print the plan and have the person sign it. Printing and Signing the IEP
TIPS: These tips are for printing and signing the IEP
• Each agency may have different policies for obtaining signatures. Be sure to
check your agency’s policy prior to obtaining alternative signature.
• WF1 Connect may assist with the signature procedure.
Adult Career Pathways WF1 User Guide Updated: June 2023 21Entering Support Services
Support Services
WF1 tracks grant money that pays for the support services that are documented in a person’s
IEP. Each agency should have its own policy for providing equitable and consistent support
services to participants. Refer to the ACP Cost Category Guidance or talk to your program
administrator for more information.
REMINDER: This procedure serves as a guideline. Each person will require data entry specific to
their situation. Also, your organization may have specific policies or rules that require you to do
different actions or steps in addition to or instead of some of the steps below. Provided support
services must be outlined within your agency’s approved contract and included in your
agency’s support service policy.
This procedure begins in the Person Record
1. In the Service area on the left side navigation pane of a Person Record, select Support
Service. The Support Services Summary page displays.
2. In the ACP Sequence box, select Add Support Service. The Support Service Add/Edit
page displays.
TIPS: These tips are for the Support Service Add/Edit page.
• Staff Assigned: In the drop-down list, select a staff member.
• Support Service: In the drop-down list, select the appropriate support service type.
Select here to see a list of Support Services.
• Service Date: Enter the date the cost was incurred.
• Actual Amount: Enter the actual amount the organization spent on the specified
support service. If the support service was obtained at a discounted price, enter the
amount actually paid (not the value).
• Funding Stream: Select the funding stream which paid for the support service.
3. Select the Add as Case Note checkbox.
4. Select Save.
You have completed the Entering Support Services procedure.
Adult Career Pathways WF1 User Guide Updated: June 2023 22Opening and Closing Activities
Contents
• How Activity Data is Used
• Required Services (Activities)
• Opening Required Activities
• Opening Training Activities
• Opening Case Management Activities
• Closing Activities
REMINDER: These procedures serve as a guideline only. Each record will require data entry
specific to the person’s situation. Also, your agency may have specific guidance that
require you to do different actions or steps in addition to or instead of some of the steps
below.
Terms and Definitions:
• Activity: WF1 uses the term “Activity” to mean “Service” or “Event” in which a person
participates to accomplish program goals. Use Activity pages in WF1 to track data
related to IEP, accomplishments, and current progress or status of efforts toward
achieving plan goals.
• Open & Close: To “open” an activity in WF1 means entering data to allow the person to
use a service. The activity remains “open” until the person has completed the activity or
is no longer engaged in the activity. At that time, you “close” the activity.
How Activity Data is Used
DEED monitoring staff, Program Coordinators, and staff responsible for reporting performance
outcomes use data entered into the WF1 Activity pages to:
• Verify that program participants have received appropriate services.
• Verify and issue reimbursement payments.
• Run reports on grant outcomes. For example, reports may be used by DEED to provide
data to the Minnesota state legislature.
• Ensure Grantees are in compliance with their grant contract.
WF1 Activities Track:
• Services provided to individuals.
• Accomplishments and progress notes for current plans and goals.
• Funding sources of services, namely a funding stream or grant.
• The name of the staff person who approved each service.
• Dates of service.
• Location of service.
• Details about the person’s employer and/or training.
Adult Career Pathways WF1 User Guide Updated: June 2023 23Required Services (Activities)
All persons enrolled in Adult Career Pathways programs must receive three services from your
agency while enrolled and active in the program. These required services are usually
opened/entered into WF1 at the time of enrollment.
• Assessment
• Career Counseling
• Individual Plan Development (correlates to the development of the employment plan)
Select here to learn more about these three initial required activities.
POLICY: Select here to read the full IEP policy.
• Signed IEP: For a person to receive training, support services, or other services, the
agency must develop, complete, and have the Individual Employment Plan signed
by both the navigator/counselor and participant. Create an IEP with the person AND
complete the Adding an Individual Employment Plan (IEP) procedure AND open the
Individual Plan Development activity using the procedure below. A person cannot
exit until this procedure is completed.
Opening Required Activities
Use this procedure if you did not open the required activities, i.e., Assessment, Career
Counseling, and Individual Plan Development at the time of enrollment.
This procedure begins in the person’s record.
Activities can only be opened for a person who has been enrolled, begin this process within a
person record.
1. In the left navigation bar, under Cases, select Activity. The Activity Summary page
displays.
2. Select Add ACP Activity. The Adult Career Pathways Activity page displays.
3. In the Assign to Staff drop-down list, select the name of the staff person who is
responsible to monitor the person’s progress.
4. In the Activity Type drop-down list, select the activity you need to open.
5. Select Next. More fields display on the Adult Career Pathways Activity page. Complete
as many fields as you can.
• In the Start Date field, insert the date the activity is to begin.
• In the Funding Stream field, select the appropriate ACP funding stream from the
drop-down list.
Adult Career Pathways WF1 User Guide Updated: June 2023 24TIPS: These tips are for the Funding Stream field.
• The funding stream is the source of payment for the service provided to the
participant. Accurately selecting the funding stream ensures accurate reporting
to the state legislature.
• If a participant may be eligible for multiple funding streams. Select here for more
information on co-enrollment.
RULES:
• Start Date and End Dates: Must be within grant/funding stream/source span.
• Expirations: If a grant/program in which a participant is enrolled expires, but the
participant is still receiving services, close all activities associated with that grant
using the grant’s expiry date, and exit the participant with the Program/Type
Transfer option. This is only applicable when both the ending and new grants are
ACP grants. Open a new activity with the new funding stream and use the new
grant’s start date as the activity start date. Select here for the Closing Activities
Procedure.
6. Select Save or Save and Open New Activity to add another activity.
7. Repeat steps 2-6 for all three required initial activities.
You have completed the Opening Required Activities procedure.
Opening Training Activities
• An IEP is Required: A signed IEP is required before entering training activities. If a person
does not have a plan yet, enter one now before starting this procedure. See Adding an
Individual Employment Plan.
• An academic assessment is required to be entered prior to entering a non-credentialed
and credentialed training activity. See Entering an Academic Assessment.
• Same Service, Same Activity: Activities record what the person is doing during the
enrollment. However, be consistent across caseloads for similar services/activities.
Options for training activities: Select here to learn more about these activities.
• ABE/Remedial Training • Credentialed Coursework/Training
• Adult Diploma Program • Financial Literacy Education
• Apprenticeship • GED Training
• Basic Skills Instruction • On Ramp Training*
• Bridge Training* • Non-Credentialed Training
• ESL/ELL Training • Work Readiness Skills Training
• ITP Training* • Self-Employment Training
• OJT – Public or Private
* Activities specific to Pathways to Prosperity program
The Opening Training Activities procedure begins in the person’s record.
Adult Career Pathways WF1 User Guide Updated: June 2023 251. In the left navigation bar, in the Cases area, select Activity.
2. The Activity Summary page displays. Select Add ACP Activity.
3. In the drop-down list, select the name of the staff person assigned to the case.
4. In the Activity Type drop-down list, select the activity.
NOTE: Training activities will not display unless the person has a plan in WF1.
5. Select Next. Additional fields display.
6. In Start Date, enter the date the person will begin classes.
7. In Estimated End Date, enter the date the training is scheduled to end.
8. In Funding Stream drop-down list, select correct funding stream for the activity.
TIPS:
• When entering an Education or Employment activity, further information
about the educational institution or employer are required. It is best practice
to have this information prior to opening these activities. Creating a ‘cheat
sheet’ or chart for codes (CIP, O*NET, etc.) may be helpful to maintain
consistency. See below for further guidance.
9. In the School Info area, in the Location drop-down list, select the name of the school or
training institution.
10. In Training Program, select Search/Validate CIP to find the name of the training
program. Use key words to find the closest match.
TIPS:
• If you cannot find the training or an appropriate CIP for the training, then select
“Unlisted” and put more details in the comments box.
11. In the Training Title (O*NET) drop-down list, select the occupation that matches the
person’s training.
12. In the Proposed Credential Type drop-down list, select the type of degree or
certification the person will receive after completing training.
13. In Estimated Attainment Date, enter the date the person is expecting to receive a
diploma or other certificate of training completion.
14. In the Case Note box, write the training dates, the name or type of program, the name
of the school or training facility. Select here to learn more about writing case notes.
15. Select Save.
You have completed the Opening Training Activities procedure.
Adult Career Pathways WF1 User Guide Updated: June 2023 26Opening Case Management Activities
The following are options for Case Management activities:
• Employed Full-Time • Local Flag
• Employed Part-Time • Orientation
• *Financial Literacy Education • Retention
• Customized Cultural Program • *GED Training
• Job Search • *Work Readiness Skills Training
*These activities can also be considered Training Activities in some cases.
Select here to learn about more about Case Management activities.
This procedure begins in the Person’s record.
1. In the left navigation bar, in the Cases area, select Activity.
2. The Activity Summary page displays. Select Add ACP Activity.
3. In the Primary Support drop-down list, select the name of the staff member who is the
primary counselor for the person.
4. In the Activity Type drop-down list, select the activity.
5. Select Next. Additional fields display.
6. For Start Date, enter the date that the activity stated, E.g., if they are employed full time,
use the date the job began.
7. From the Funding Stream drop-down list, select the correct funding stream for this
activity.
8. In the Case Notes area, write a case note describing the activities. Select here for more
information on writing case notes.
9. Select Save.
You have completed the Opening Case Management Activities procedure.
Closing Activities
This procedure begins in the Person Record.
1. In the left navigation bar in the Cases area, select Activity. The Activity Summary page
displays.
2. Within the row of the Activity, you need to close, the last column, select Edit. The Adult
Career Pathways Activity page displays.
3. Write in the Comments area if there is anything you wish to add.
TIPS:
• Comments vs Case Notes: Generally, a comment is an explanation specific to the
data you are entering for a single field. Case notes are a written record of a
person’s case. Any Comments entered here will NOT appear as a case note. Any
Case Notes entered here will appear as a case note.
Adult Career Pathways WF1 User Guide Updated: June 2023 27You can also read


