Building a fishpond 1. Scope - Cement & Concrete SA
←
→
Page content transcription
If your browser does not render page correctly, please read the page content below

Building a fishpond
1. Scope
This leaflet deals with the construction of a pond shell in
concrete. Aspects of pond design and maintenance such as
water circulation and filtration are not included, and the
reader is advised to get specialist information on these at the
design stage.

2. Introduction
The method described in this leaflet is suitable for ponds with
a diameter or length of up to about 5 metres.

The floor and sides of the pond are formed by a fairly thin
continuous concrete shell which is lightly reinforced. No
additional waterproofing membrane is used, and the concrete
shell serves as the water container. The surrounding soil is
relied on to support the shell when the pond is full of water.
For the system to work successfully it is important that:

• The pond is constructed in undisturbed subsoil and not in
  filled soil.
• The concrete in the shell is thoroughly compacted to
  ensure that it is free of voids.                                Figure 1: Details of edge of pond

Many ponds of this type have in recent years been constructed
                                                                  5. Excavating
successfully both by professional landscapers and do-it-your-
                                                                  Excavate in undisturbed sub-soil to the required size and shape
self enthusiasts.
                                                                  allowing for a total shell thickness of 40 to 50 mm. The water
                                                                  depth should be at least 450 mm but 700 mm is preferred for
3. Making provision for rainwater runoff                          fish. The transition between side and bottom should be curved
Rainwater which falls on the garden or paving surrounding the     as shown in Figure 1 - sharp corners are difficult to build and
pond must not be allowed to run into the pond. The area           are weaker than curves.
immediately around the pond must therefore be sloped away
from the pond as shown in Figure 1.
                                                                  6. Lining the excavation
                                                                  This is done to ensure that the mesh stays clean and concrete
4. Edge detail                                                    used for the pond is not contaminated by soil.
It is advisable to create a nearly horizontal (but sloping down
away from the pond) rim around the edge of the pond. This         Line the excavation with a coat of cement plaster about
will serve to strengthen the shell. The rim can be left exposed   15 mm thick using 1 part of cement to 6 parts of sand, both
but will probably look better if it is covered with bricks or     materials measured in a loose state. Use enough water in the
stones laid in mortar. See Figure 1.                              mix to produce a workable, plastic consistence.
7. Spacer blocks                                                   8. Mesh
You will need at least 16 blocks for every square metre of pond    Place two layers of galvanized chicken mesh (25 mm openings)
shell including the rim. Make spacer blocks of mortar and place    against the spacer blocks so that the mesh is 15 mm clear of
the head of a 75 mm nail in the centre of each block. Block        the plaster lining. The twisted wires of the two layers should,
sizes should be 15 mm thick by 30 mm by 30 mm. Block details       as far as possible, be at right angles to each other as shown in
are shown in Figure 2.                                             Figure 4. The edges of the mesh should be overlapped by at
                                                                   least 50mm and laps staggered as far as possible. Ends of wires
                                                                   must be twisted under the mesh and not be allowed to stick
                                                                   out.

Figure 2: Details of spacer block
                                                                   Figure 4: Orientation of mesh layers
Mortar for spacer blocks should consist of a mixture of 1 part
of cement, 1 part of coarse sand and just enough water to          Fix the mesh in position with hooks pushed through the plaster
produce a plastic consistence. After casting the blocks cover      as shown in Figure 5. The hooks can be made of 4 mm thick
them with plastic sheeting for 24 hours to prevent drying out.     wire.
Then cure them by keeping them under water for at least a
week. Fix spacer blocks about 250 mm apart in both directions
and by pushing the nail through the plaster lining into the soil
as shown in Figure 3.

                                                                   Figure 5: Fixing the mesh

                                                                   The mesh must be continued into the rim at the edge of the
                                                                   pond.
Figure 3: Plaster lining and spacer block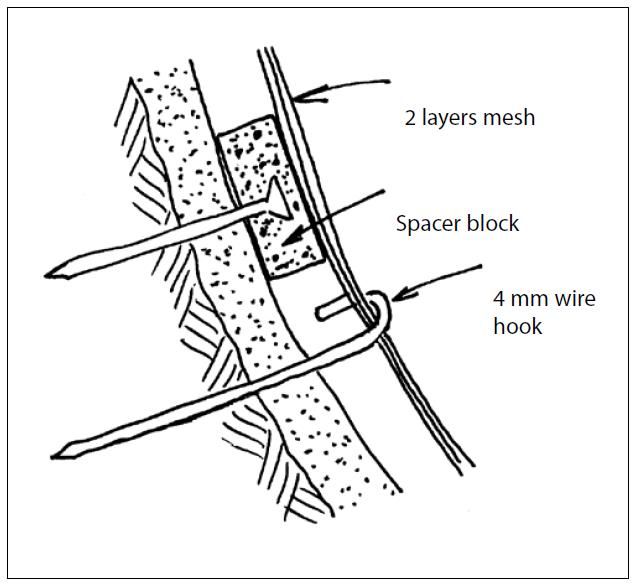
9. Mixing the concrete                                             Cover as soon as possible with plastic sheeting to ensure that
All cement sold in South Africa must meet the requirements of      the concrete cures in a moist state. The plastic sheeting should
SANS 50197 for Common cement or SANS 50413 for Masonry             preferably be light coloured – white or clear – because dark
cement and the National Regulator for Compulsory Standards         colours can cause heat to build up in the concrete. The pond
(NRCS) requirements as detailed in NRCS VC9085. Bags should        can be filled slowly two days after placing the concrete but the
be clearly marked with the strength grade, notation indicating     cover should remain in position until filling is complete. Parts
composition and a Letter of Authority (LOA) number issued by       of the concrete shell above the water level should be kept wet
the NRCS. An LOA is issued for each cement type from each          and covered for two weeks.
source. To verify valid LOA numbers contact the NRCS on
012 428 5199 or www.nrcs.org.za.                                   If filling has to be delayed, keep the cover over the shell for at
                                                                   least two weeks during which time the concrete should be
Note that Masonry cements complying with SANS 50413 are            kept visibly wet.
not permitted to be used in concrete.
                                                                   Change the water after it has been in the pond for a fortnight
Concrete for the shell is mixed in the proportions:                before stocking with fish and plants. (Several water changes
                                                                   are better.)
  Type CEM I or CEM II:           1 bag (50kg)
  Coarse concrete sand:           65 ℓ (1 x Wheelbarrow)           12. Quantities of materials
                                                                   A one-bag batch mixed to the proportions given above should
  Fine pit (plaster) sand:        20 ℓ
                                                                   be sufficient to do about 3 m2 of shell.
  6 mm stone:                     65 ℓ (1 x Wheelbarrow)
                                                                   13. Repairs
Plus enough water to give a plastic consistence similar to         Drain the pond before attempting repairs. Cracks in the shell
plaster.                                                           can be repaired as follows:

10. Notes:                                                         (a) Cut out a band of concrete 15 mm deep by 150 mm wide
• Batching of concrete materials must be done accurately.              along the crack so that the crack is in the centre of the
• Do not mix more than a one-bag batch at a time.                      band. Do not cut through the mesh.
• Mixing may be done in a concrete mixer or by hand on a
  concrete slab or steel plate.                                    (b) Remove all loose material including dust from the area
• Level off the wheelbarrows of sand and stone by scraping             which has been cut out if possible, use an industrial
  a plank across the rim of the wheelbarrow.                           vacuum cleaner to do this.

11. Placing and curing the concrete                                (c) Fix a 140 mm wide strip of galvanised mesh (25 mm or
It is important to place the entire shell in one continuous            preferably 13 mm openings) to the existing mesh where
operation to avoid creating joints which may become lines of           the concrete has been cut out.
weakness. Make sure therefore that sufficient materials and
labour are available.                                              (d) Prime the back and sides of the groove with a mixture of
                                                                       cement and water made to the consistence of thin cream.
Before starting to place the concrete remove any foreign               The priming coat must be applied in a very thin layer. Do
objects or debris such as leaves, twigs, soil lumps, etc. from         not pre-wet the concrete before priming.
the excavation.
                                                                   (e) Immediately afterwards, before the priming coat can dry
Concrete placing should be done in the shade if at all possible.       out, pack a fairly dry mixture of 1 part cement and 2 parts
                                                                       sand into the groove. The sand should be fairly coarse and
Using a plasterer’s trowel with the corners rounded off, press         which has been passed through a 2,36 mm sieve. Compact
the concrete through the mesh, filling up to the mesh and              the patch using an orbital sander, fitted with a smooth
removing the wire hooks as placing progresses.                         steel plate on the surface, filling any low areas and scraping
                                                                       off high areas.
Apply immediately afterwards another 15 mm of concrete
over the mesh so that the total concrete thickness is 30 mm.       (f) Keep the patch damp until the pond is filled.
It is very important to press the concrete firmly into position
to compact it thoroughly.                                          14. Additional waterproofing
                                                                   For additional waterproofing, if needed, a two-part polymer
Wood float the concrete to give a fairly rough texture. If a       modified cementitious waterproofing slurry or bituminous
smooth texture is required, use a steel trowel but only after      emulsion may be applied to the surface of the concrete.
the concrete has started to stiffen. Do not trowel if a layer of
water is covering the surface of the concrete. If placing is not
done in the shade, keep the surface of the concrete moist by
spraying lightly but frequently with water using a gardener’s
mist sprayer. Use only enough water to maintain a sheen on
the surface.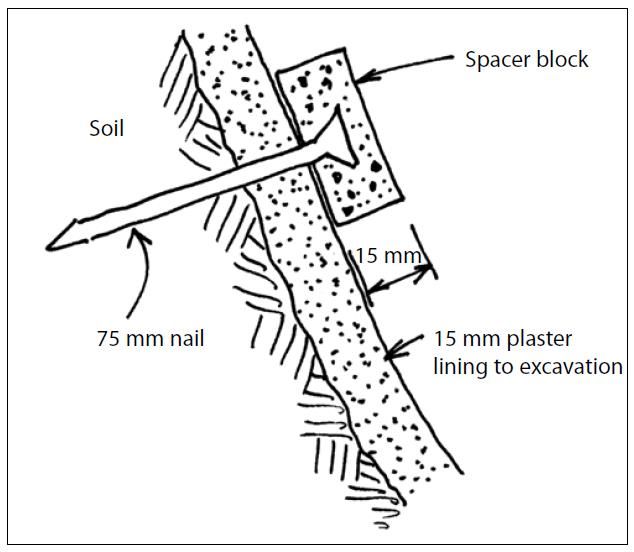
Cement & Concrete SA
                                                                                          P O Box 168, Halfway House, 1685
                                                                   Block D, Lone Creek, Waterfall Park, Bekker Road, Midrand
                                                                                                              T 011 315 0300
                                                                                              E-mail: info@cemcon-sa.org.za
Cement & Concrete SA, its directors, officers, employees,
                                                                                            Website: www.cemcon-sa.org.za
representatives and agents are not liable for any death, harm or
injury caused to any person or any loss, destruction or damage
                                                                        Published by: Cement & Concrete SA, Midrand, 2021
caused to any person’s property or possessions arising from
                                                                                                 © Cement & Concrete SA
goods supplied or services rendered by Cement & Concrete SA.
You can also read