COMET USER GUIDE EDIT USER ROLE - PRODUCTION VERSION 1.8.2
←
→
Page content transcription
If your browser does not render page correctly, please read the page content below

CoMET User Guide
    Edit User Role
  Production Version 1.8.2
Table of Contents
Contact Information                                             1

Acknowledgements                                                1

Overview                                                        1

New Users                                                       2

Log In                                                          2

Viewing Options                                                 6
   Dark Mode                                                    6
   Streamline Page                                              6

Link to CoMET User Guide                                        7

Filters                                                         7

Record Actions                                                   8
   New Record                                                    8
       Import                                                    8
          Upload an XML File                                     9
          Upload Multiple/Bulk XML Files                        11
          URL To Remote XML File                                13
       Create                                                   14
   Bulk Actions                                                 20
       Change Group (action not available for EDIT user role)   20
       Download (action not available for EDIT user role)       20
       Publishing                                               21
          Request to Publish                                    21

Metadata Records List                                           23
   Edit                                                         23
       Data Management Plan                                     23
       Data Stewardship Maturity Questionnaire (DSMQ)           23
       ISO Editor                                               24
          Extract and View Errors                               25
          Collaborative Editing                                 28
       Docucomp Components                                      28
   Manage                                                       28
       Copy                                                     28
       Revision History                                         30
          Compare Versions                                      31
          Undo a Change By Reverting To Prior Version           35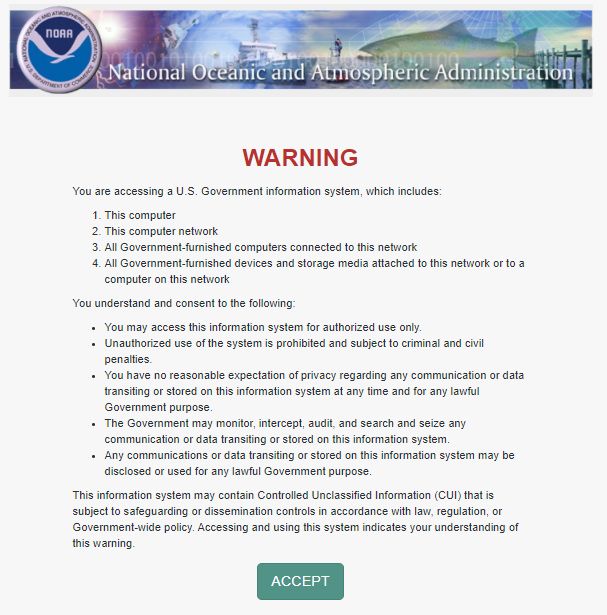
Delete Record                             36
   View                                          37
       CoMET Format XML                          38
       Landing Page HTML                         39
       Plain Text HTML                           40
       Unresolved ISO 19115-2 XML                41
   Assess                                        42
       Component Analysis                        42
       CSW Rubric                                43
       DOI Rubric                                44
       ISO Rubric V2                             45
   Validate                                      46
       Validate ISO                              46

Data Stewardship Maturity Questionnaire (DSMQ)   48
   New Record                                    48
       Create                                    48
       Edit                                      52
       Evaluate Questionnaire                    53

API                                              54
   Basic CRUD Operations                         55
      Operations Supported by API:               55
          Create — API endpoint - HTTP POST      55
          Update — API endpoint - HTTP PUT       56
          Export — API endpoint - HTTP GET       57
          Delete — API endpoint - HTTP DELETE    58
          Search — API endpoint - HTTP GET       59

Appendix                                         61
   Glossary of Terms                             61
Contact Information
Questions or feedback regarding this guide should be directed to the OneStop Metadata Content Team
(lori.hager@noaa.gov, catherine.luquire@noaa.gov, paul.lemieux@noaa.gov)

If you encounter issues or need to report a bug in CoMET, please email
ncei.collection-manager.support@noaa.gov. Describe the issue or bug and steps required to replicate it.
Additionally, provide your name and contact information if you wish to be contacted for issue
clarification and/or to receive updates on the status of the issue.

Acknowledgements
Special thanks to Charlie Burris, Jerri Reeves, and Marty Aubrey for their technical input

Overview
CoMET was created by the National Centers for Environmental Information (NCEI) to be NOAA’s
comprehensive and easy to use collection metadata creation and editing tool. It allows users to create ISO
compliant metadata, can support NCEI collection metadata template, and is a gateway to publishing
metadata to OneStop. CoMET includes a Data Stewardship Maturity Questionnaire (DSMQ) and Data
Management Plan (DMP) functionality.

This guide was developed to assist users with learning how to use CoMET quickly and efficiently. Upon
completing the guide, the user should be familiar with the base functionality of CoMET and be able to
create and edit existing metadata, as well as to be able to perform a DSMM assessment with the use of the
DSMQ form.

v1.8.2                                                                                          1

New Users
Note: If a NOAA employee, manager must request access
   ● Email: ncei.collection-manager.support@noaa.gov
   ● Subject:
        ○ New User for CoMET for employee name
   ● Body:
        ○ Employee’s contact information
        ○ Associated program or agency
        ○ Records Group(s) to be accessed
            ■ If Record Group is unknown, user will be assigned to default Record Group ‘CoMET
              Sandbox’
            ■ User may create/edit record here until appropriate Record Group is determined
        ○ Intended usage
        ○ Include if ability to Publish records is required
            ■ New users will be assigned default user role EDIT

Log In
   ●     Access CoMET at https://data.noaa.gov/cedit/
   ●     Select ‘Login’

         ○   If ‘Request Account’ is selected, email address for collection manager support is revealed
             ■ If account needed, follow instructions for New Users
   ●     Enter Username (email address without @noaa.gov) and email password OR
         click ‘NOAA ICAM SSO’ button

v1.8.2                                                                                           2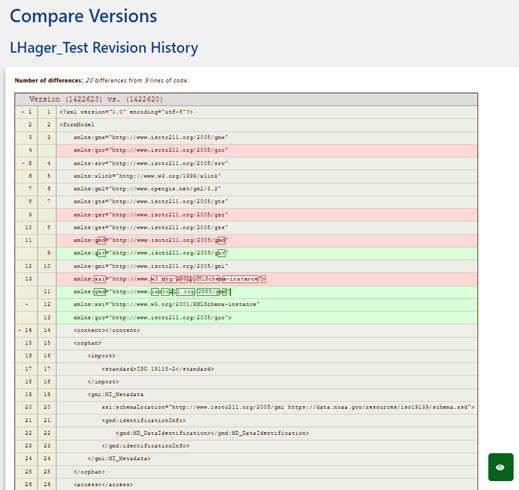
●     ‘Select a certificate’, if prompted
         ○ Select same certificate used when logging into work computer
   ●     Enter CAC PIN

   ●     After authentication, a Warning page is displayed
         ○ Click ‘Accept’ to proceed

v1.8.2                                                                    3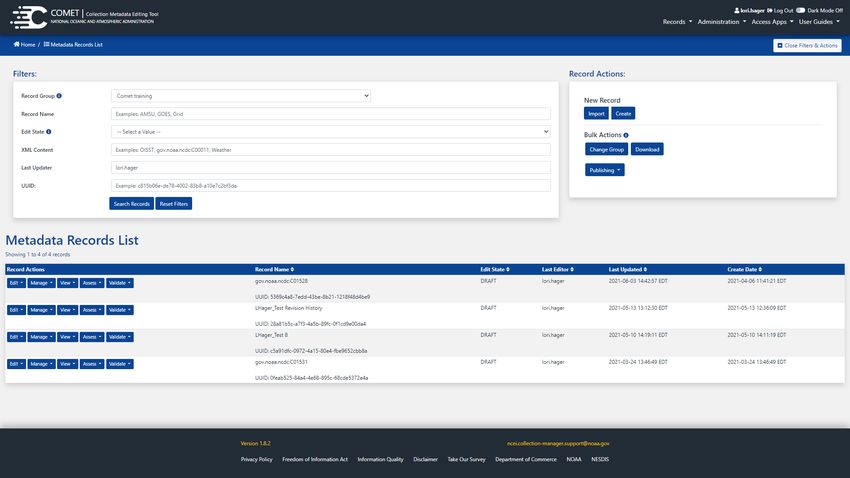
●     Select ‘Access Metadata Records’

Select team’s record group from ‘Record Group’ drop-down
Note: A Record Group must be selected prior to performing any actions

v1.8.2                                                                  4
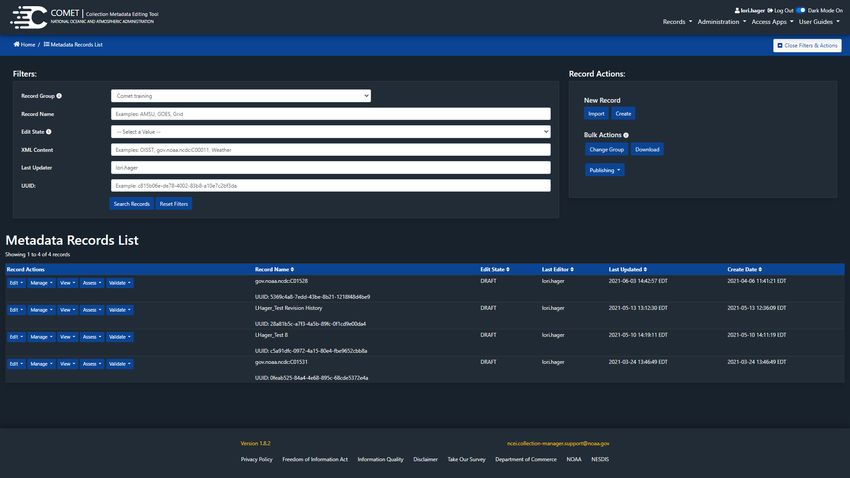
●   Page is auto-populated with records from that group, as well as any actions permitted per profil

    v1.8.2                                                                                             5
Viewing Options

Dark Mode
   ●     Toggle button for ‘Dark Mode’ at top right corner of screen
         ○ ‘Dark Mode On’ or ‘Dark Mode Off’

Streamline Page
   ●     Click ‘Close Filters & Actions’
         ○ Toggle between ‘Close Filters & Actions’ and ‘Open Filters & Actions’

v1.8.2                                                                             6
Link to CoMET User Guide
Note: Link to be updated
   ● At top right corner, click ‘User Guides’ drop-down
        ○ Select ‘CoMET User Guide’

   ●     Metadata site opens in new tab
         ○ Below RESOURCES, click link CoMET/DSMQ User Guide

Filters
   ●     Filters panel allows limiting number of records by various criteria
         ○ Filter records by:
              ■ Record Name
              ■ Edit State
              ■ XML Content
              ■ Last Updater
              ■ UUID
                  ● Automatically generated or use own from XML
         ○ Click ‘Search Records’ to apply filter(s)
         ○ Click ‘Reset Filters’ to clear filter(s)

v1.8.2                                                                         7
Record Actions
● Record Actions panel includes commonly-used actions
○ New Record
■ Import
● Import one or multiple valid 19115-2 ISO XML files
■ Create
● Create new records based on values in NCEI template
○ Bulk Actions
■ Change Group (action not available for EDIT user role)
● Allows records to be moved from one group to another
■ Download (action not available for EDIT user role)
● Allows download of multiple XML files
■ Publishing
● Request a draft to be published
New Record
Import
● In Record Actions panel, click ‘Import’
v1.8.2 8● ‘Import Record’ dialogue box opens
● Either click ‘Choose Files’ to upload XML file saved on computer OR enter URL for remote
XML file
○ All XML URLs must have XML extension
○ Multiple/Bulk files may be uploaded from computer
○ Multiple/Bulk URLs are not supported and must be imported individually
Upload an XML File
● Click ‘Choose Files’
○ Select XML file from computer
v1.8.2 9○ Optional: CoMET Record Name
■ If record name is not entered, collection metadata ID from FileIdentifier will be used
○ Select Record Format from drop-down
■ ISO-19115-2-XML is default option
● Click ‘Import’
v1.8.2 10● Get message ‘Metadata Record uploaded successfully!’
● If XML is not valid, receive error message
○ Check XML and try importing again
Upload Multiple/Bulk XML Files
● Click ‘Choose Files’
○ Select XML files from computer
v1.8.2 11○ Optional: CoMET Record Name
■ If record name is not entered, collection metadata ID (e.g. gov.noaa.ncdc:C01528) from
FileIdentifier will be used
○ Select Record Format from drop-down
■ ISO-19115-2-XML is default option
● Click ‘Import’
v1.8.2 12● Receive message for each record: ‘Metadata Record uploaded successfully!’
URL To Remote XML File
● Type or paste URL into ‘Or provide a URL . . .’ field
○ Optional: CoMET Record Name
■ If record name is not entered, collection metadata ID (e.g. gov.noaa.ncdc:C01528) from
FileIdentifier will be used
○ Select Record Format from drop-down
■ ISO-19115-2-XML is default option
v1.8.2 13● Click ‘Import’ ● Get message ‘Metadata Record uploaded successfully!’ Create ● In Record Actions panel, click ‘Create’ v1.8.2 14
●    From ‘Select a form’ drop-down, select ‘ISO Editor’

    ●    Click ‘Create Record’

    ●    At ‘Would you like to use a template?’ prompt
             ○ Select ‘No, use blank’ if record will not be submitted to NCEI
             ○ OR select ‘Yes, populate with the NCEI template’ if data will be submitted to NCEI
                ■ Contains pre-populated fields for standard NCEI data

Note: Instructions are same for ‘Yes, populate with the NCEI template’ as with ‘No, use blank’ except if
NCEI template is used, there is an additional field on Identification tab titled ‘Supplemental Information’
‘Supplemental Information’ is not a required field

v1.8.2                                                                                           15
● CoMET defaults to Identification tab
○ Enter data into fields
■ Required fields are indicated by a vertical red bar next to field name, as well as text
‘(required)’ after field name
v1.8.2 16JSON code can be directly modified or copied
● Click JSON button
○ Modify, as desired
○ OR highlight text and click ‘Copy’
○ If any changes made, click ‘Save’ in JSON window
● Click ‘JSON’ button again to close window
Additional fields may be included by clicking ‘Fields’ button
● Place check in box next to field
● If check box is gray, its field is already on page
○ Field is required and cannot be removed
● Deleting a check removes field and its values
● Language is checked by default
v1.8.2 17○ After selecting fields, click ‘Fields’ button again to close window
● Click ‘Data Citation’ tab (next to ‘Description’ tab)
● Enter Dataset Title in ‘Title’ field
● Use tabs to navigate through form
● Save periodically as form will not be saved automatically
Note: If CoMET is left idle too long, session will time out and unsaved data will be lost
User will receive Timeout Warning message
○ Click ‘Save’ button at top right of page OR Save icon at bottom right of page
v1.8.2 18● Save Message appears
○ User has option to add reason for changes made to record
■ Comment is optional but strongly recommended
○ Save Messages are included in Revision History
● Message appears ‘New record . . . created successfully’
Note: Even if one or more required fields are blank or not in the expected format, CoMET will ignore
the validation errors and allow the record to be created
v1.8.2 19● Metadata Records List page reloads Bulk Actions Change Group (action not available for EDIT user role) Download (action not available for EDIT user role) v1.8.2 20
Publishing

Request to Publish
Once record is complete, submit a request to have it published
   ● Select ‘Request to Publish’ from Publishing drop-down

    ●    Publishable Record List is displayed
         ○ Search records by Content, if desired

Note: To see all records to be published (if greater than 10 and fewer than 100), user must display number
of records per page in an amount greater than number of records to be published
        ○ At bottom left of page, click on drop-down box to change number of records to be displayed
            ■ Default is 10

v1.8.2                                                                                         21
● Check box(es) next to record(s) to be published
● Click ‘Request to Publish’
● Pop-up box requests ‘Enter Reason for Change’
○ Comment is optional but strongly recommended
● Click ‘OK’
● Message appears ‘Requested . . . record(s) for publication’
● Metadata Records page reloads
● Edit State changed from ‘DRAFT’ to ‘IN_REVIEW’
v1.8.2 22● Record(s) pushed to Publisher who will review and submit for publishing
Note: User must notify Publisher of record(s) awaiting approval
There are no automatic notifications from CoMET
Metadata Records List
● Metadata Records List is a table that meets all filtered requirements and allows various actions to
be performed on each record
○ Edit
■ Make changes to record data
○ Manage
■ Create copies of records, review a record’s revision history, and delete records
○ View
■ Displays data in various formats
○ Assess
■ Confirms ISO and NOAA compliance
○ Validate
■ Validates data against ISO standard
Edit
Data Management Plan
● In development
Data Stewardship Maturity Questionnaire (DSMQ)
● DSMQ is an easy to use tool for assessing stewardship quality of digital environmental datasets
○ Based on Data Stewardship Maturity Matrix (DSMM)
● If metadata record will be published in OneStop, completing a DSMQ allows user to take
advantage of OneStop’s unique relevancy ranking feature
○ It may help metadata appear higher in search results
v1.8.2 23● Future functionality will allow user to generate a Data Stewardship Maturity Report (DSMR)
based on answers provided in DSMQ
○ Report may be published under DSMR Technical Information Series with NOAA Central
Library’s Institutional Repository (IR)
○ Reports submitted to IR receive a Digital Object Identifier (DOI) that can be used for
citability and tracking purposes by author
● See DSMQ instructions
ISO Editor
Note: When Editing a record, if ‘No, use blank’ was selected when the record was initially created,
and the user did not enter data into all of the Required fields, the user receives a ‘Validation Failure’
message and cannot Save the record again until the missing required data is entered.
If ‘Yes, populate with the NCEI template’ was selected when the record was initially created, the user
does not receive a ‘Validation Failure’ message, at all. The user must still add the missing data but they
are not reminded of that by the program.
● On Metadata Records List panel, locate record to be edited and select ‘Edit’ drop-down from its
row
○ Select ‘ISO Editor’
● Record opens in new tab
● Edit metadata as desired
○ Insert Docucomp components, as needed
v1.8.2 24● If ‘No, use blank’ was selected when record initially created, and data is missing from
Description tab, ‘Collection Description’ or ‘Purpose’ OR data is missing from Data Citation tab,
‘Title’
○ Receive ‘Validation Failure: value missing’ message
○ ‘Extract and View Errors’ button will appear in top right corner
Extract and View Errors
● Click ‘Extract and View Errors’ in top right corner
v1.8.2 25● Fields with errors are displayed ● Enter missing data ● Click ‘Save’ v1.8.2 26
●    Save Message appears
         ○ User has option to add reason for changes made to record
            ■ Comment is optional but strongly recommended
         ○ Save Messages are included in Revision History

    ●    Message appears ‘Document updated successfully’

    ●    Editing Record page reloads

    ●    If ‘Yes, populate with the NCEI template’ was selected when record initially created, and
         data is missing from Description tab, ‘Collection Description’ or ‘Purpose’ OR data is missing
         from Data Citation tab, ‘Title’
         ○ Will not receive ‘Validation Failure: value missing’ message and ‘Extract and View Errors’
              button will not appear

Note: No error messages or alerts are given if required data is not present in record
User must confirm all data has been entered

v1.8.2                                                                                         27
Collaborative Editing
● Editors can edit only records within Record Groups to which they belong
● Records cannot be accessed by more than one editor at a time
● For 30 minutes after a record is saved, it becomes locked and cannot be accessed by another user
○ User who saved record may access it again without having to wait 30 minute time limit
Docucomp Components
Docucomp manages reusable components (pieces of ISO XML) referenced by URLs within collection
records, enabling many collections to use the same component, thereby increasing consistency and
decreasing maintenance effort; also supports vocabulary services
Docucomp User Guide: Xlinks section
Manage
Copy
● If a new record is similar to an existing record, it may be more efficient to make a few changes to
a copy
● Can use record in any Edit State - DRAFT, IN_REVIEW, or PUBLISH
● Edit State for copy will be DRAFT, regardless of original’s Edit State
● On Metadata Records List panel, locate record to be copied and select ‘Manage’ drop-down from
its row
○ Select ‘Copy’
v1.8.2 28● New tab opens ● From ‘Select Form’ drop-down, select ‘ISO Editor’ ● Click ‘Create Record’ ● Identical record created ● Editing page for copy opens ● If form is to have a different title, change it in ‘Internal COMET Record Name’ field ● Once changes to record are complete, click ‘Save’ v1.8.2 29
●     Save Message appears
         ○ User has option to add reason for changes made to record
            ■ Comment is optional but strongly recommended
         ○ Save Messages are included in Revision History

   ●     Message appears ‘New record . . . created successfully!’
   ●     Metadata Records List page reloads

Revision History
   ●     On Metadata Records List panel, locate record and select ‘Manage’ drop-down from its row
         ○ Select ‘Revision History’

v1.8.2                                                                                       30
● Each time a record is saved, Date and Updater are noted
○ If a Message was saved, it is also displayed
Compare Versions
● Check Version boxes of records to be compared
○ Clicking red ‘X’ in bottom right corner will deselect Version box
● Click ‘Compare Versions’
v1.8.2 31● Below ‘Version’, numbers in left column refer to more recent version and numbers in right
column refer to older version
● To see Record Details of most recent version, click green View Record button at bottom right of
page
○ Most recent version may or may not be one of versions compared above
v1.8.2 32● Record Details page opens for most recent version ● To see record’s XML, click ‘Show XML’ v1.8.2 33
●     XML may also be viewed from Revision History page
         ○ Below Action, click ‘View XML’

   ●     XML for selected record appears
           ○ Click Back arrow button to return to Revision History page

v1.8.2                                                                    34
Undo a Change By Reverting To Prior Version
● Recall an earlier version and make it current version
○ On Revision History page check appropriate Version box
■ Clicking red ‘X’ in bottom right corner will deselect Version box
○ Click its ‘Revert’ button
● Click ‘OK’
● Page opens with Record Details
v1.8.2 35○ Revision # is 6
■ Record had 5 versions
■ Version numbers were 1 through 5, with 5 being most recent (counting from bottom up)
■ Version 4 was recalled
■ Copy of version 4 became version 6
■ Next time record is edited, version 6 will be used
Delete Record
● On Metadata Records List panel, locate record to be copied and select ‘Manage’ drop-down from
its row
○ Select ‘Delete Record’
Note: Delete Record is not an option for records with Edit State of ‘Publish’
Published records cannot be deleted
v1.8.2 36● Confirmation message appears
○ Click ‘OK’
● Message appears ‘Record was removed successfully’
● Metadata Records List page reloads
View
Contents of record may be viewed in various ways
● On Metadata Records List panel, locate record to be viewed and select ‘View’ drop-down from its
row
● New tab opens
v1.8.2 37CoMET Format XML Internal format-neutral representation of descriptive information about the collection, includes related DMP and DSMQ information Example: v1.8.2 38
Landing Page HTML
HTML rendering of unresolved metadata content and how it will look on website
Xlinks are not resolved in this view

Example:

v1.8.2                                                                          39
Plain Text HTML
Plain text rendering of unresolved metadata content, which may include elements not presented on
Landing Page HTML

Example:

v1.8.2                                                                                       40
Unresolved ISO 19115-2 XML
Representation of unresolved ISO 19115-2 metadata content represented in ISO 19139-2, which is XML
implementation of ISO 19115-2 content standard

Example:

v1.8.2                                                                                    41
Assess
Contents of record may be assessed against various rubrics
   ● On Metadata Records List panel, locate record to be assessed and select ‘Assess’ drop-down from
       its row

    ●    New tab opens

Component Analysis
Shows information based on ISO XML tag
   ● Select ‘Component Analysis’
   ● Click link in top right corner to skip to its data

v1.8.2                                                                                    42
CSW Rubric Identifies ISO metadata elements that support the Open Geospatial Consortium Catalog Services for the Web (CSW) Specification v1.8.2 43
DOI Rubric
   ●     Mandatory for DOI Minting
         ○ This evaluation tests for the existence of a creator, title, publication date, and publisher in the
            metadata record and provides a preview of the content
   ●     Mandatory for Citation
         ○ This evaluation tests for the existence of a creator, title, publication date, publisher and DOI
            in the metadata record and provides a preview of the content
   ●     Mandatory for Landing Page
         ○ This evaluation tests for the existence of all the fields required to provide a useful and
            meaningful DOI landing page
   ●     Recommended for Landing Page
         ○ This evaluation tests for the existence of all the fields recommended to provide an even more
            useful and meaningful landing page

v1.8.2                                                                                              44
ISO Rubric V2 Tool to confirm if a record adheres to NOAA metadata best practices Displays ‘Completeness Score’, as well as scores for each category v1.8.2 45
Validate

Validate ISO
A metadata record can be validated using the XML Schema Definition (XSD)
   ● On Metadata Records List panel, locate record to be validated and select ‘Validate’ drop-down
       ○ Select ‘Validate ISO’

   ●     When validation run finishes, ‘Validate ISO’ page opens in new tab
         ○ If record is compliant with ISO XSD schema (no issue is found) ‘Validation Result:’ field
           displays ‘true’

v1.8.2                                                                                        46
● If record is not compliant with ISO, error messages are shown with line numbers
○ Error message lines are links
● At ‘XML’, click ‘Show XML’ to view all XML code
● At ‘Validation Summary’, click line link to view XML code for error
○ XML code appears above text
● User must refer to ISO Editor form to correct listed errors
v1.8.2 47Data Stewardship Maturity Questionnaire (DSMQ)
New Record
New DSMQ records are created one at a time using ‘Create’ button
Create
● In Record Actions panel, click ‘Create’
● From ‘Select a From’ dropdown, select Select “Data Stewardship Maturity Questionnaire
(DSMQ)”
● Click ‘Create Record’
● CoMET/DSMQ defaults to General tab
Note: User may select blue ‘Create’ button at top center of page or bottom center of page at any point
after entering a ‘Record Name’
v1.8.2 48● All fields in all tabs must be completed
● At C., click ‘Add Information URL’
○ Enter URL in field
○ Click red trashcan to delete URL
● Click ‘Next’ at bottom of page to move to next tab
● OR go back to top of page and select desired tab
● Tooltips with additional information will appear when user hovers cursor over underlined text
v1.8.2 49● Some responses open additional questions, e.g. at 4.1, selecting response ‘c’opens question 4.1c
● To save initial data, click ‘Create’ at top of page
○ Or click ‘Create’ at bottom of page
○ User may go back later to edit record
v1.8.2 50● If data is missing from ‘Dataset Short Name’, ‘Dataset Title’ or ‘Dataset Abstract’ fields, fields
will briefly highlight as pink
● Message appears ‘Record created successfully’
● Metadata Records List page reloads
v1.8.2 51Edit
● On Metadata Records List panel, locate record to be edited and select ‘Edit’ drop-down from its
row
○ Select ‘Data Stewardship Maturity Questionnaire (DSMQ)’
● Record opens in new tab
● Edit Metadata as desired
● Click ‘Save’ at top right of page or bottom of page
● Message appears ‘Record updated’
● Editing Record Page Reloads
● If ‘Exit’ was selected and no changes made to record, page reloads to Metadata Records List
● If changes were made, message box appears
v1.8.2 52● To exit without saving changes, click OK
● To save changes, click Cancel, then Save
Evaluate Questionnaire
● User may utilize ‘Evaluate Questionnaire’ functionality at any point in Editing process to receive
a maturity score for each section of questionnaire
○ Click ‘Evaluate Questionnaire’
● Each tab displays its Evaluation score
○ All questions in a tab must be answered to produce a score
● If record originally created in ISO Editor Record Name, Dataset Title and Dataset Abstract are
automatically entered in DSMQ record
v1.8.2 53API ● Log In to CoMET Note: A cookie will be created and used while interacting with the COMET API as long as the session stays alive ● Login example: #!/usr/bin/env bash #export COMET_LOGIN_URL="http://localhost:8080/cedit/login/wsLogin" export COMET_LOGIN_URL="https://data.noaa.gov/cedit/login/wsLogin" export COMET_URL="https://data.noaa.gov/cedit/" DEFAULT_USERNAME="firstname.lastname" echo -n "Enter username [$DEFAULT_USERNAME]:" read USERNAME if [ "$USERNAME" == "" ]; then USERNAME=$DEFAULT_USERNAME; fi echo -n "Enter password for $USERNAME: " read -s PASSWORD echo "" CREDENTIALS="username=$USERNAME&password=$PASSWORD" curl --data "$CREDENTIALS" \ -X "POST" \ -k \ "$COMET_LOGIN_URL" \ --cookie-jar cookies.txt \ v1.8.2 54
Basic CRUD Operations
   ●     User must be part of recordGroup with which they are trying to interact
   ●     To be added to a recordGroup, email ncei.collection-manager.support@noaa.gov

Operations Supported by API:
   ●     Create
         ○ Create a metadata record via an HTTP POST request
   ●     Read
         ○ View or Export a metadata record via an HTTP GET request (Export API)
   ●     Update
         ○ Change an existing record via an HTTP PUT request
   ●     Delete
         ○ Remove an existing record via an HTTP DELETE request

Create — API endpoint - HTTP POST
Operation URL: https://data.noaa.gov/cedit/metadata/import
Optional Query Parameters:
   ● recordGroup
        ○ String value representing record group in CoMET that records will be imported into
   ● description
        ○ String value of title of record in CoMET database
   ● transform
        ○ String value (typically ‘convert-iso19115-2-to-comet’) which converts ISO metadata into an
           internal format
   ● format
        ○ String value
           ■ Options are: xml, json, text
   ● uuid
        ○ String value
           ■ Only provide this if you want to generate your own uuid value for this record.
   ● editState
        ○ String value
           ■ Only provide this if you want your metadata published automatically.
               (&editState=APPROVED)

v1.8.2                                                                                      55
Create Example
#!/bin/bash
export COMET_URL="http://localhost:8080/cedit/"
RECORD_GROUP="CoMET"
IMPORT_FILE="$1"
IMPORT_TITLE=$2
TRANSFORM="convert-iso19115-2-to-comet"
UUID="$3"
EDIT_STATE="APPROVED"
curl --cookie cookies.txt \
-X "POST" \
-H "Content-Type: application/xml" \
-k \
--data-binary @"$IMPORT_FILE" \
"$COMET_URL/metadata/import?recordGroup=$RECORD_GROUP&descripti
on=$IMPORT_TITLE&transform=$TRANSFORM&format=&uuid=$UUID&editSt
ate=APPROVED"
echo
"$COMET_URL/metadata/import?recordGroup=$RECORD_GROUP&descripti
on=$IMPORT_TITLE&transform=$TRANSFORM&editState=$EDIT_STATE"
Update — API endpoint - HTTP PUT
Operation URL: https://data.noaa.gov/cedit/metadata/$uuid
URL Path Parameter:
● $uuid
○ String value
■ Only provide to generate own uuid value for record
■ Example uuid: 94306b70-1441-458f-83bf-9a338dda4dab
Optional Query Parameter:
● editState
○ String value
■ Only provide for metadata to be published automatically
■ &editState=APPROVED
v1.8.2 56Update Example:
#!/bin/bash
# update
export COMET_URL="https://data.noaa.gov/cedit/"
if [ $# -ne 3 ]; then
echo "usage: $0 ISO_XML TITLE UUID"
exit 2
fi
XML_FILE="$1"
DESCRIPTION="$2"
UUID="$3"
TRANSFORM="convert-iso19115-2-to-comet"
curl --cookie cookies.txt \
-X "PUT" \
-H "Content-Type: application/xml" \
-k \
--data-binary @"$XML_FILE" \
"$COMET_URL/metadata/$UUID?description=$DESCRIPTION&transform=$
TRANSFORM&editState=DRAFT"
Export — API endpoint - HTTP GET
Operation URL: https://data.noaa.gov/cedit/metadata/$uuid
URL Path parameter:
● $uuid
○ String value
■ Only provide to generate uuid value for record
■ Example uuid: 94306b70-1441-458f-83bf-9a338dda4dab
Optional Query Parameter:
● transform
○ String value
■ Typically ‘transform=convert-comet-to-iso19115-2’
■ Converts metadata record from CoMET internal format to ISO 19115-2
v1.8.2 57Export Example:
#!/bin/bash
export COMET_URL="https://data.noaa.gov/cedit/"
if [ $# -ne 2 ]; then
echo "Exporting with UUID as Filename."
FILENAME=$1
echo -e "\n"
else
echo "Exporting with $2 as Filename."
FILENAME=$2
fi
curl --cookie cookies.txt \
-X "GET" \
-k\
"$COMET_URL/metadata/$1?transform=convert-comet-to-iso19115-2"
> ${FILENAME}.xml
Delete — API endpoint - HTTP DELETE
Operation URL: https://data.noaa.gov/cedit/metadata/$uuid
URL Path Parameter:
● $uuid
○ String value
■ Only provide to generate uuid value for record
■ Example uuid: 94306b70-1441-458f-83bf-9a338dda4dab
v1.8.2 58Delete Example:
#!/bin/bash
export COMET_URL="https://data.noaa.gov/cedit/"
if [ $# -lt 1 ]; then
echo "usage: $0 UUID [UUID ...]"
exit 2
fi
for uuid in $@; do
curl --cookie cookies.txt \
-X "DELETE" -k \
"$COMET_URL/metadata/$uuid?format=text"
done
Search — API endpoint - HTTP GET
Operation URL: https://data.noaa.gov/cedit/metadata/search
Optional Query Parameters:
● recordGroup
○ String value representing record group in CoMET
● since
○ String value representing a date value (2016-03-01T09:10:00)
● max
○ String value representing maximum results returned
● format
○ String value
■ options are: xml, json, text
v1.8.2 59Search Example:
#!/bin/bash
export COMET_URL="https://data.noaa.gov/cedit/"
TIME_SINCE="2016-03-01T09:10:00"
EDIT_STATE="COMPLETED"
MAX_RECORDS="1000"
OUTPUT="xml"
output=$(curl --cookie cookies.txt \
-X "GET" \
-k \
"$COMET_URL/metadata/search?recordGroup=CoMET&max=$MAX_RECORDS&
format=text")
echo $output
More Code Examples
● Email ncei.collection-manager.support@noaa.gov to request access to a code repository used for
testing CoMET APIs
● Available to NCEI employees only
v1.8.2 60Appendix
Glossary of Terms
1. Collection - group of environmental data or products that share common characteristics, is
represented by a single metadata record, and consists of one or more granules
a. Also referred to as datasets
2. Data Group - a superset of collections
3. Data Management Plan - plan to ensure that data are properly documented, made accessible,
and preserved for future use
4. Data Stewardship Maturity Matrix (DSMM) - a unified framework for measuring stewardship
maturity of environmental datasets
5. Data Stewardship Maturity Questionnaire (DSMQ) - method to create a DSMM assessment
a. DSMQ is a more consistent and scalable approach than manual DSMM assessments
6. Data Stewardship Maturity Report (DSMR) - ISO standard-based dataset-level quality
metadata and data stewardship maturity report generated from DSMM assessment
7. Docucomp - tool to create and edit reusable ISO XML components
8. Edit States
a. DRAFT - default state assigned to record after being imported or created
i. Record is available for editing
b. IN_REVIEW - state of record once it has been requested to be published
i. Designates record is awaiting approval by Publisher
c. APPROVED - state of record once Publisher approves publication request and record is
sent to a WAF for publication and harvest
d. PUBLISH - if XML passes validation, CoMET automatically changes record’s state from
APPROVED to PUBLISH
e. INVALID - If XML does not pass validation, CoMET automatically changes record’s
state from APPROVED to INVALID
i. User must correct metadata and resubmit
9. Form Validation - ISO Editor’s validation that ensures required content is present
10. ISO Editor - a metadata creation and editing tool within CoMET. Provides form validation to
ensure required information is present
11. ISO Validation - Validates against ISO XML schema
12. JSON (Javascript Object Notation) - lightweight data-exchange format
13. Publish - sends metadata record to review queue for a Publisher to approve or reject
a. Once published, record is accessible on its associated WAF and OneStop
14. Record Group - related or associated metadata records managed by a team or project
15. Record Name - record title for CoMET
a. Record Name is not inserted into ISO XML
b. Recommended to use record fileIdentifier as Record Name
c. CoMET automatically assigns fileIdentifier as Record Name when ISO XML record is
imported
v1.8.2 6116. Relevancy Ranking - process of sorting search results so that files which are most likely to be
relevant to query are shown at top
17. Universal Unique Identifier (UUID) - required unique character string used to identify records
a. UUIDs are manually assigned or auto-generated, written into XML within UUID
attribute in MI_Metadata root element, and required for managing records via CoMET
API
18. User Roles
a. READONLY - default role assigned to external users that provides read only access to
forms and records
b. EDIT - default role assigned to internal users that allows creation and editing of records
c. GROUP - in addition to abilities assigned to EDIT user role, GROUP users may edit
forms and add or remove users from form group
d. PUBLISHER - in addition to abilities assigned to EDIT and GROUP user roles,
Publishers can move records between groups, download XML files, and approve publish
requests from editors
e. ADMIN - in addition to abilities assigned to EDIT, GROUP, and PUBLISH user roles,
Admin includes additional administrative abilities such as creating user accounts,
assigning user permissions, editing forms, thesaurus maintenance, etc
19. WAF - Web Accessible Folder
v1.8.2 62You can also read