COMPDM Documentation Volume 01: Installation Manual - T ...
←
→
Page content transcription
If your browser does not render page correctly, please read the page content below

COMPDM Documentation
Volume 01: Installation Manual
BU PLM

Version        2022
Last revised   2021-12-10
Status         released
Author         Jens Kübler

Protection category: public
Imprint

Issued by
T-Systems International GmbH
PU Digital Solutions, BU PLM
Hahnstr. 43D, Frankfurt
File name                                      Document number                                               Document name
COMPDM-                                        CPDMINST-2016                                                 Installation Manual
2022_01_Installation.d
ocx
Version                                        Last revised                                                  Status
2022                                           2021-12-10                                                    released

Author                                         Content checked by                                            Released by
Jens Kübler                                    Frederic Bluth                                                Frederic Bluth
                                                                                                             frederic.bluth@t-systems.com

Contacts                                       Telephone / fax                                               E-Mail
Jens Kübler                                    +49 711 999 7562                                              jens.kuebler@t-systems.com

Brief details
Instructions on how to install COMPDM

Copyright © 2020 by T-Systems International GmbH
All rights reserved, including those relating to partial reprinting, photomechanical reproduction (including micro copy) and analysis using databases or other equip-
ment.
Table of Contents
1                 Introduction ........................................................................................................ 6
2                 Installing COMPDM ........................................................................................... 8
2.1               Prerequisites for installing the COMPDM Server ................................................ 8
2.2               Installation Alternatives for the COMPDM Server ............................................... 9
2.2.1             Installing the Server as a Stand-alone Application ............................................. 9
2.2.2             Installing the Server as a Windows Service........................................................ 9
2.3               COMPDM Server Installation Steps ................................................................. 10
2.4               Further Configuration for Windows Service ...................................................... 17
2.4.1             Changing the Process Owner of the Service .................................................... 18
2.4.2             Mount Network Drives for the Service .............................................................. 19
2.5               Basic Configuration for COMPDM Modules ..................................................... 20
2.5.1             Launch COMPDM client app ............................................................................ 20
2.5.2             Configure LDAP Authentication........................................................................ 22
2.5.3             Configure Aras Access..................................................................................... 24
2.5.4             Configure Teamcenter Access ......................................................................... 26
2.5.5             Configure VPMV4 Access ................................................................................ 30
2.5.6             Configure EnoviaV6 Access ............................................................................. 33
2.5.7             Configure Windchill Access .............................................................................. 36
2.5.8             Configure ImageMaster Access ....................................................................... 40
2.5.9             Check CATIA V5 Configuration ........................................................................ 42
2.5.10            Check NX Configuration................................................................................... 43
2.5.11            Check CREO Configuration ............................................................................. 44
2.6               COMPDM Clients............................................................................................. 45
2.7               Installing the COMPDM Client App .................................................................. 47
2.8               Prerequisites for using the Browser Client ....................................................... 48
2.9               Using Secure HTTPS Connections .................................................................. 48
2.9.1             COMPDM Server to PLM Server Connection................................................... 49
2.9.2             COMPDM Client to COMPDM Server Connections ......................................... 51
2.9.3             COMPDM Primary to Secondary Server Connection ....................................... 55
Appendix: Licman Licenses for COMPDM ........................................................................ 56
Change History / Release Notes ...................................................................................... 58
file name:   COMPDM-2022_01_Installation.docx                   version: 2022           last revised:            2021-12-10
source:      Individual Development Suite 1.4.0                 status:   released      protection category:public                 3/58
List of Figures
Figure 1: Scope of COMPDM ................................................................................................ 6
Figure 2: Invoking the Installation Wizard ............................................................................ 10
Figure 3: Setting the Installation Directory ........................................................................... 10
Figure 4: Select Components to be Installed ....................................................................... 11
Figure 5: Select COMPDM Vault Location........................................................................... 11
Figure 6: Select COMPDM Work Directory .......................................................................... 12
Figure 7: Select Communication Port .................................................................................. 13
Figure 8: Optional Preconfigured Automotive Industry Data Models .................................... 14
Figure 9: Select Secondary Server Vault Location............................................................... 14
Figure 10: Port, Primary Server URL, and Group for Secondary Server .............................. 15
Figure 11: Finalize Installation Setup ................................................................................... 15
Figure 12: COMPDM Service in Windows' Computer Management Dialog ......................... 17
Figure 13: Change Service Log On (Optional) ..................................................................... 18
Figure 14: Login Panel ........................................................................................................ 21
Figure 15: Aras Connection Test ......................................................................................... 24
Figure 16: Aras credentials restricted to valid combinations ................................................ 25
Figure 17: Teamcenter Connection Test ............................................................................. 27
Figure 18: Teamcenter credentials restricted to valid combinations..................................... 29
Figure 19: VPMV4 Connection Test .................................................................................... 31
Figure 20: VPM credentials restricted to valid combinations ................................................ 32
Figure 21: EnoviaV6 Connection Test ................................................................................. 34
Figure 22: Enovia credentials restricted to valid combinations ............................................. 35
Figure 23: Windchill Connection Test .................................................................................. 36
Figure 24: ImageMaster Connection Test............................................................................ 41
Figure 25: Connecting the Client App to the COMPDM Server ............................................ 48
Figure 26 View Certificate in Chrome: 1- right-click on Padlock Symbol, 2 – select Certificate
    ..................................................................................................................................... 50
Figure 27 Export Certificate: 3 - Switch to “Details”, 4- “Copy to File” .................................. 50
Figure 28 Using Reverse Proxy for HTTPS Client Communication...................................... 52
Figure 29: Configuring the Server's FQN ............................................................................. 54

file name:   COMPDM-2022_01_Installation.docx                  version: 2022           last revised:            2021-12-10
source:      Individual Development Suite 1.4.0                status:   released      protection category:public                  4/58
List of Tables
Table 1: COMPDM Documentation ....................................................................................... 7
Table 2: COMPDM License Types and Codes .................................................................... 56

file name:   COMPDM-2022_01_Installation.docx         version: 2022        last revised:            2021-12-10
source:      Individual Development Suite 1.4.0       status:   released   protection category:public            5/58

1            Introduction
The application COMPDM is designed to connect three worlds: product lifecycle manage-
ment systems (PLM), computer aided design systems (CAD), and the international standard
ISO 10303 (STEP) for product data representation, exchange and long-term archiving.

                                                  Figure 1: Scope of COMPDM

COMPDM clients allow for an easy definition and maintenance of data exchange processes
between any of these worlds. A very simple and straightforward user interface allows the end
user to start and monitor preconfigured exchange processes.

The COMPDM server manages and executes data exchange processes in a highly efficient
manner, including import to and extraction from PLM systems and conversions of CAD files
according to your requirements.

This document is part of the COMPDM documentation, which is organized in several vol-
umes. The following table lists the available volumes and provides guidance about the rec-
ommended readings for both data exchange administrators and data exchange users.
file name:   COMPDM-2022_01_Installation.docx           version: 2022         last revised:            2021-12-10
source:      Individual Development Suite 1.4.0         status:   released    protection category:public            6/58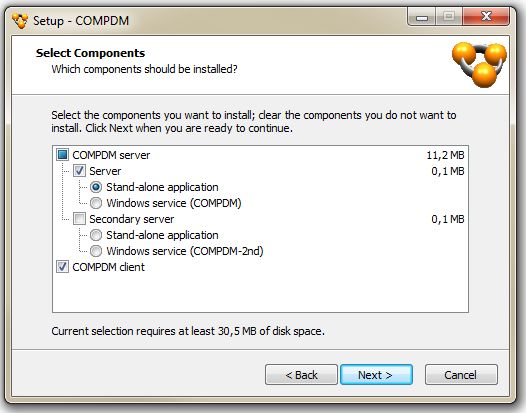
No.                 Title                                                           User            Administrator

     01             Installation                                                                               ✓
   02-A             User’s Manual (App Client)
                                                                                      ✓                        ✓
   02-B             User’s Manual (Browser Client)

     03             Basic Administration                                                                       ✓
     04             Advanced Customization
                                                                                                               (✓)
     05             Extended Customization with JAVA
                                                                                                               (✓)
                                                  Table 1: COMPDM Documentation

file name:   COMPDM-2022_01_Installation.docx             version: 2022           last revised:            2021-12-10
source:      Individual Development Suite 1.4.0           status:   released      protection category:public            7/58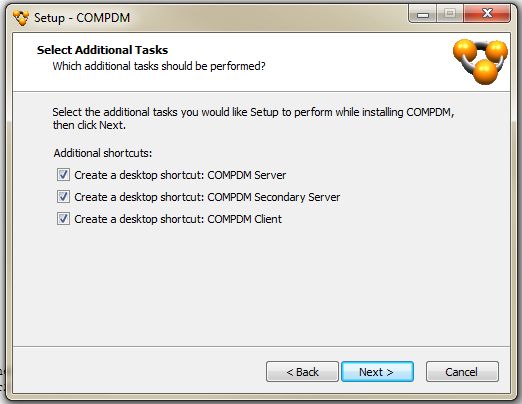
2             Installing COMPDM

2.1              Prerequisites for installing the COMPDM Server
     ▪ The COMPDM Server installation needs about 580 MB of free disk space
     ▪ All data exchange processes that are executed will store the data to be imported, ex-
             ported, transferred, or converted in a work directory on the server’s host. Plenty of disk
             space should be available for this.
     ▪ If COMPDM needs to handle CATIA V5 data, CATIA V5 must be installed on the host1.
     ▪ If COMPDM needs to handle NX data, Siemens NX must be installed on the host2
     ▪ If COMPDM needs to handle CREO data, Parametric Technology CREO must be in-
             stalled on the host3.
     ▪ If COMPDM is used with VPM V4, a COM/VPM server must be installed on a VPM cli-
             ent workstation4.
     ▪ If COMPDM is used without the CATIA and NX modules, a minimum of 8GB RAM is
             recommended. If CATIA or NX modules are used, the server PC should have a mini-
             mum of 16GB RAM.
     ▪ The COMPDM server operates with the T-Systems license protection utility named
             “Licman”. The necessary license server may either be installed locally (an installer is
             included in COMPDM’s installer) or on a different PC. See the appendix for more in-
             formation about COMPDM licenses.
Note:
COMPDM is a JAVA application. A COMPDM installation includes a suitable JAVA 11 envi-
ronment (Amazon Coretto). For this reason, no additional prerequisites in respect to the JA-
VA environment exist.

1   Supported CATIA releases of the standard installation are currently R18-R31. For other releases,
additional components might be needed. Please check with T-Systems.
2   Supported NX releases of the standard installation are currently NX10-NX12, NX1872-NX1980. For
other releases, additional components might be needed. Please check with T-Systems.
3   The supported CREO releases of the standard installation are R4 and R7. For other releases, addi-
tional components might be needed. Please check with T-Systems.
4   Installation of the COM/VPM server must be performed by T-Systems and is not described in this
documentation.
file name:    COMPDM-2022_01_Installation.docx     version: 2022        last revised:            2021-12-10
source:       Individual Development Suite 1.4.0   status:   released   protection category:public            8/58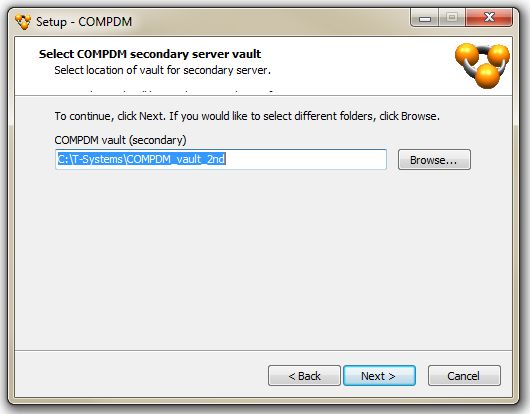
2.2             Installation Alternatives for the COMPDM Server
The COMPDM server can either be installed as a stand-alone application, or as a Windows
service. Each variant has its advantages and disadvantages. As a rule of thumb, you might
consider using the less complicated stand-alone installation for a test environment, whereas
for a production environment, the superior availability of a Windows service might outweigh
all disadvantages.

2.2.1               Installing the Server as a Stand-alone Application
The advantages are that you’ll have an additional task bar symbol on the server’s host for
COMPDM allowing to see the server status, shutdown or restart it, or to launch a COMPDM
client app. Server shutdown can be controlled from any COMPDM client app with “adminis-
trator” access. The server can run in a normal Windows user environment which facilitates
e.g. configuration of a CATIA environment.
The disadvantage is that after a restart of the server’s host, the COMPDM server will not be
restarted automatically.

2.2.2               Installing the Server as a Windows Service
The advantage is that the Windows operating system will ensure that the COMPDM server is
restarted automatically in case of a system restart.
The disadvantage is that a Windows service normally does not run under a normal user ac-
count and has no network drives mounted. This can cause problems e.g. in conjunction with
creating a valid CATIA environment for using the CATIA module and needs to be addressed
manually after installation, as described in section 2.4.

file name:   COMPDM-2022_01_Installation.docx     version: 2022        last revised:            2021-12-10
source:      Individual Development Suite 1.4.0   status:   released   protection category:public            9/58
2.3             COMPDM Server Installation Steps
Run the installer program,
Install_COMPDM_2022.0.x__win64.exe

                                                  Figure 2: Invoking the Installation Wizard

Click “Next”.

                                                  Figure 3: Setting the Installation Directory

Confirm with “Next”, after having modified the installation directory if needed. Note that
COMPDM is a 64bit Windows application.

file name:   COMPDM-2022_01_Installation.docx                   version: 2022              last revised:            2021-12-10
source:      Individual Development Suite 1.4.0                 status:   released         protection category:public            10/58
Figure 4: Select Components to be Installed
Select whether you want to install a primary server, a secondary server5, both, or none, and
a COMPDM rich client. For the server(s), choose whether it should be installed as a stand-
alone application or as a Windows service (refer to 2.2 for more details).
In case you have chosen to install a primary server, select COMPDM’s vault location, where
settings, data representations and data exchange methods will be stored.
Figure 5: Select COMPDM Vault Location
5 For detailed information about secondary servers, refer to the “Advanced Customization Manual”,
section 4 (“Multi-Server Configuration”)
file name: COMPDM-2022_01_Installation.docx version: 2022 last revised: 2021-12-10
source: Individual Development Suite 1.4.0 status: released protection category:public 11/58Click “Browse…” to open a file selection dialog that allows the selection of a folder on the
host’s file system which will be used for the COMPDM vault. This is where all configurations,
settings, user profiles, data models, data mapping definitions etc. will be stored. Typically,
not a lot of disk space is needed for it, a few megabytes should be enough.
The vault’s contents should be considered private to the COMPDM server. All files in it are
encrypted and cannot be modified outside of the control of the COMPDM server. No other
files should be placed in there as this can severely alter the server’s behavior6.
After having selected “Next”, COMPDM’s work directory and communication port are collect-
ed in subsequent pages. Furthermore, there is the option to install pre-configured data mod-
els for some OEMs from the Automotive industry.
Figure 6: Select COMPDM Work Directory
In contrast to the vault location, the work directory location should have a lot of free disk
space as all the data processed will be stored here temporarily and in addition, archives of
older processes, backups of the configuration, trace files and so on are stored in here as
well.
Files in the work directory are not encrypted (however, in many cases they are compressed),
but as with the vault, the work directory should be considered a directory private to the
COMPDM server and it should be avoided to have other files stored in there, which might
cause strange effects in the server’s behavior.
In other words, a commonly used directory such as e.g. “C:\tmp\” would not be a good
choice for the work directory.
Note also that the vault and the work directory may neither be the same location, nor may
they contain each other.
6 Two exceptions: A demoKey file containing a 1-day demo license key needs to be placed here
when used. In addition, custom setting declarations as described in the Basic Administration manual
will be placed likewise in the vault.
file name: COMPDM-2022_01_Installation.docx version: 2022 last revised: 2021-12-10
source: Individual Development Suite 1.4.0 status: released protection category:public 12/58On the next page, you may change the port number that is used for communication between
clients and the server.
Figure 7: Select Communication Port
COMPDM clients (and secondary servers) will communicate with the COMPDM server using
the HTTP protocol. The port to use can be freely chosen, you may need to check your com-
pany’s internal firewall policies to find a “free” port number, i.e. one that can be reached from
the relevant client computers later.
Note that the last two pages are suppressed if the installer detects that the selected vault
directory already contains a valid COMPDM configuration, i.e. if the installer is used to up-
date an existing COMPDM installation. Use COMPDM’s maintenance dialog in this case if
you wish to change the work directory location or port number in this case (refer to “Basic
Administration Manual”, section 5).
Next, several preconfigured templates and representations for NX and CATIA data may be
installed, which reflect the file naming conventions and required CAD properties of several
car manufacturers. In case you plan to use COMPDM for file-based data exchange with au-
tomotive companies, you might find them useful.
file name: COMPDM-2022_01_Installation.docx version: 2022 last revised: 2021-12-10
source: Individual Development Suite 1.4.0 status: released protection category:public 13/58Figure 8: Optional Preconfigured Automotive Industry Data Models
In case you have chosen to install a secondary server, select its vault on the next page:
Figure 9: Select Secondary Server Vault Location
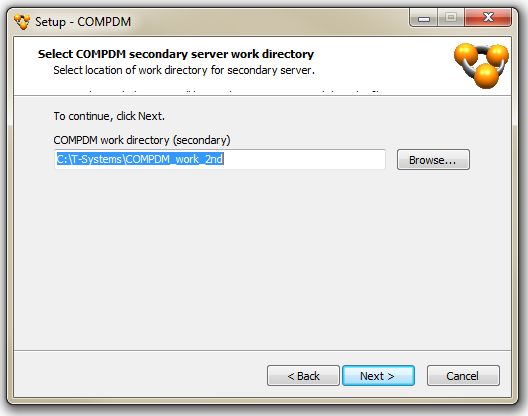
The next two pages allow to select the work directory, communication port, primary server
URL, and optionally the server group for the secondary server:
file name: COMPDM-2022_01_Installation.docx version: 2022 last revised: 2021-12-10
source: Individual Development Suite 1.4.0 status: released protection category:public 14/58Figure 10: Port, Primary Server URL, and Group for Secondary Server
• If you install primary and secondary server at the same time, the secondary server
will automatically be configured to use the installed primary server and the “Primary
server URL” field above is not shown
• If you install primary and secondary server on the same host, their ports, vaults and
work directories have to be disjoint
• Refer to the “Advanced Customization Manual”, section 4, for detailed explanation of
primary / secondary server installations and the use of server groups.
• If the installer detects an existing COMPDM installation in the chosen vault location,
these two pages are skipped. You may change all parameters in the secondary serv-
er’s Maintenance dialog (see “Basic Administration Manual”, section 5).
On the next page, you can choose to have desktop icons created for the client or for the
server(s) if installed as a stand-alone application:
Figure 11: Finalize Installation Setup
Check or uncheck the “Create a desktop icon” choices, then click “Next”.
Note that stand-alone servers can likewise be started from the start menu (they are found in
the start menu group “T-Systems/ COMPDM”).
file name: COMPDM-2022_01_Installation.docx version: 2022 last revised: 2021-12-10
source: Individual Development Suite 1.4.0 status: released protection category:public 15/58Confirm the installation on the next page with the “Install” Button. The installation begins.
The COMPDM server needs some additional software for proper operation. During installa-
tion, it is checked whether these components are already present. If not, their installers are
automatically launched, and you may install them in addition.
These are:
1. T-Systems Licman license manager
A Licman client needs to be installed and licenses for COMPDM must be present for
running COMPDM. Refer to the Licman installation manual for details.
2. MS Visual C++ runtime DLLs for VC2008, VC2010, VC2012, VC2013, and
VC2015-2022
They are required by the CATIA V5, NX, and CREO modules.
file name: COMPDM-2022_01_Installation.docx version: 2022 last revised: 2021-12-10
source: Individual Development Suite 1.4.0 status: released protection category:public 16/582.4 Further Configuration for Windows Service
If you chose to install COMPDM as a Windows service, the installer will create a Windows
service called “COMPDM” for a primary COMPDM server installation, and/or a Windows ser-
vice called “COMPDM-2nd” for a secondary COMPDM server installation. It will attempt to
start the services however they only start if the necessary Licman licenses are available. If
you provide the licenses after installation, start the service manually using the normal Win-
dows “Computer Management” dialog, “Services and Applications”, “Services”.
Figure 12: COMPDM Service in Windows' Computer Management Dialog
Use the standard “Start” and “Stop” actions for starting and stopping the COMPDM
service.
file name: COMPDM-2022_01_Installation.docx version: 2022 last revised: 2021-12-10
source: Individual Development Suite 1.4.0 status: released protection category:public 17/582.4.1 Changing the Process Owner of the Service
By default, a Windows service runs as a local system user. This may cause issues,
particularly if you use the CATIA module. When processing a CATIA data package,
the CATIA module needs to create a CATIA session and draw CATIA licenses; how-
ever, the licenses need to be configured using a normal (interactive) CATIA session
which is not available for the local system user. Therefore, you should change the
COMPDM service to run as a defined user who is admitted using CATIA.
This is done by right-clicking on the “COMPDM” / “COMPDM-2nd” service row in the
services table of the Windows Computer Management dialog and selecting “Proper-
ties”. In the “Log On” tab, change the standard setting to “This account” and provide
username and password. You need to stop and restart the COMPDM service after-
wards.
Figure 13: Change Service Log On (Optional)
file name: COMPDM-2022_01_Installation.docx version: 2022 last revised: 2021-12-10
source: Individual Development Suite 1.4.0 status: released protection category:public 18/582.4.2 Mount Network Drives for the Service
In case your CATIA or NX installations reside on a network drive which is normally
mounted in Windows under some drive letter, note that this drive will not be available
for COMPDM when running as a service. You will have to operate with the UNC no-
tation for the network drive (\\host\path). In case this is not possible e.g. be-
cause scripts that set the CATIA or NX environment make use of the drive letter, you
can mount the drives as follows:
Edit the server startup script, “server.bat” (for a primary server), or “server-
2nd.bat” (for a secondary server), which resides in COMPDM’s installation directo-
ry. To mount, for example, a drive named “S:”, add the following lines to the begin-
ning of the file:
if not exist S:\ (
net use S: /USER:
)
Since Windows requires you to provide the password in clear text, you should take
care that the server.bat/server-2nd.bat files have no read permissions for
normal users.
After having edited the server.bat/server-2nd.bat files, restart the service.
file name: COMPDM-2022_01_Installation.docx version: 2022 last revised: 2021-12-10
source: Individual Development Suite 1.4.0 status: released protection category:public 19/582.5 Basic Configuration for COMPDM Modules After all the installation steps described previously are completed, COMPDM licenses will be needed to proceed. You should contact T-Systems at this point to obtain the licenses if not yet done or install the license file on the Licman license server. The necessary steps are de- scribed in the Licman documentation7. Refer also to the appendix for information about the various Licman licenses used in conjunction with COMPDM. Once the licenses are installed, the licensed modules need to be set up. This requires ad- ministrator (admin) access to the COMPDM server, which is not available in COMPDM’s browser-based client, but rather in the COMPDM client app. 2.5.1 Launch COMPDM client app In case COMPDM was installed as a stand-alone application, start the COMPDM server from the Windows start menu or by double-clicking on the desktop link: If the server starts successfully, a COMPDM task bar symbol will appear after a few seconds: You can now start a COMPDM client app by moving the mouse pointer over the COMPDM symbol and holding down the right mouse button. A menu will pop up, where you select “Start new client”. Alternatively, or in case of a service installation, double-click the “COMPDM Client” desktop link to start a COMPDM client app. 7 Alternatively, a 1-day demo license key can be used for an initial tryout of the software file name: COMPDM-2022_01_Installation.docx version: 2022 last revised: 2021-12-10 source: Individual Development Suite 1.4.0 status: released protection category:public 20/58
The login dialog appears:

                                                  Figure 14: Login Panel

      •      Select the “admin” Username
      •      Enter the standard administrator password: “compdmneo”
      •      Click “Login”

The client window opens.

Note: The configuration steps described in this section only must be performed for a prima-
      ry COMPDM server. Secondary servers will obtain all necessary settings from their
      primary server and no local configuration is required.

file name:   COMPDM-2022_01_Installation.docx         version: 2022        last revised:            2021-12-10
source:      Individual Development Suite 1.4.0       status:   released   protection category:public            21/58
2.5.2 Configure LDAP Authentication
COMPDM can be configured to use a central LDAP service (e.g. Active Directory) to check
credentials entered during client login. This means that users and passwords do not have to
be maintained locally in COMPDM, but rather can be managed centrally. If the LDAP service
confirms the validity of credentials entered, a COMPDM user is created on the fly if it does
not already exist. Such automatically created COMPDM user accounts will be removed au-
tomatically if they get erased from the LDAP directory8.
To configure LDAP authentication:
• Log in as “admin”
• Enter the Settings Editor (“User & Settings” button, refer to
section 2.3 of the User’s Manual and the Basic Administration
document)
• Select “LDAP” tab (grey / to the left), enter the edit mode using
the “Edit settings” button
• Check “Use LDAP authentication”
• Switch to the “LDAP” tab (white / to the right)9
• Enter the URL of the LDAP service to use. Typically, it will begin with “ldap://”
• Enter name and password of the “master” account. This account will be used for au-
thentication when connecting to the LDAP service. It must have privileges to query
the LDAP service
• Configure the search path for checking usernames entered to COMPDM’s Login dia-
log (client app) or the browser client’s login page
• Configure the filter to use for queries. In the expression you enter, use “%%1” as a
placeholder for the entered username
• Optionally, define a semicolon separated list of group names. If this is done, only us-
ers that are found in one of the groups are acceptable for COMPDM. In this case, a
“value mapping table” with the name “LDAP group to user template” must
be created in COMPDM’s Method Editor, as described in section 4.2.5 of the “Basic
Administration” manual. This table should specify for each of the groups the name of
a so-called “template user” to copy initial COMPDM settings from when a user is cre-
ated on the fly during login.
A template user is a COMPDM user which is created manually in the Settings Editor
as described in section 2.3.1 of the “Basic Administration” manual. Use the admin’s
password to log into COMPDM as a template user and configure the template set-
tings.
8 Synchronization with the LDAP service to find obsolete user accounts is performed every 12 hours.
9 Note: Although by default, the next settings are on the “white” LDAP tab, i.e. they can take different
values for different profiles, consider changing them to global settings (i.e. the same value is used for
all profiles and users), as described in section 2.3.2 of the “Basic Administration Manual”.
file name: COMPDM-2022_01_Installation.docx version: 2022 last revised: 2021-12-10
source: Individual Development Suite 1.4.0 status: released protection category:public 22/58• If groups are not used, initial COMPDM settings for users created on the fly during
login are copied from the admin user
• Use the “Save changes” button to save the changes
• Restart the COMPDM server
Additional notes:
• COMPDM’s “admin” user is always a local user and not authenticated using the
LDAP service. The name “admin” is fixed (reserved) and cannot be changed.
• You can use the value %COMPDM-USER as the value of another COMPDM setting to
denote the user name that was used for login into the COMPDM client.
Likewise, you can use the value %COMPDM-PASSWORD to denote the password that
was provided during login into the COMPDM client (and which was successfully
checked against the LDAP service).
Use these two values to hand over the user’s name and password to a PLM system
for creating a PLM session with the account information provided during COMPDM
login
• If LDAP authentication is enabled, webservice access to the Cache module (as de-
scribed in section 7 of the “Advanced Customization” manual) is restricted to the ad-
min user, as no plain text passwords are used in this context.
file name: COMPDM-2022_01_Installation.docx version: 2022 last revised: 2021-12-10
source: Individual Development Suite 1.4.0 status: released protection category:public 23/582.5.3 Configure Aras Access
If your COMPDM licenses include Aras support, configure access to the Aras Innovator
server as follows:
• Restart the server and log in as “admin” again (see section 2.5.1)
• Enter the Settings Editor (“User & Settings” button, refer to
section 2.3 of the User’s Manual and the Basic Administration
document)
• Select “Aras” tab (white / to the right)
• Click on the “Manage Aras servers…” button. The Manage
Servers dialog appears (see section 2.3.4 of volume 03
“Basic administration” of the COMPDM documentation).
• Click “Add” and enter the URL of the Aras Innovator server in the “Resource” column.
This URL should begin with “http://” or “https:// “ (you might copy the URL
you are using to connect to Aras from your browser and remove the trailing “/Client”
if present”).
• Exit the Manage Servers Dialog using the “OK” button
• Select the Aras server you have just defined from the drop-down list next to “Aras In-
novator server”, and enter database name, username and password.
• If accessing the Aras server requires using a specific proxy server,
you can configure it under “HTTP proxy server for Aras”. Select
“Expert” to access this setting
• Use the “Test connection…” button to test whether the connection parameters and
credentials are valid. After a few seconds, the following message should appear:
Figure 15: Aras Connection Test
file name: COMPDM-2022_01_Installation.docx version: 2022 last revised: 2021-12-10
source: Individual Development Suite 1.4.0 status: released protection category:public 24/58In case of connection problems, an appropriate error message should appear instead.
• Use the “Save changes” button to save the changes
Optional: Restrict Login Parameters to Valid Combinations
By default, the Aras settings for database and user are free text fields. It is possible to con-
vert these to drop-down lists so that:
• You can only choose among valid database names
• After picking a database, you can only choose among the users defined in the data-
base
This feature thus eliminates a possible source of errors when providing Aras credentials.
It is activated as follows:
• First you should enter valid credentials and perform a successful “Test connection”,
as described above
• Set the option in the grey (left-hand side) “Aras” tab after having selected “Expert”:
• Save the changes, leave the Settings Editor, select “Representation”, select “New
Aras repr…”, create a dummy Aras representation
(COMPDM should now read the valid combinations of database / users from Aras)
• Restart COMPDM
The settings should now appear as drop-down lists.
Figure 16: Aras credentials restricted to valid combinations
file name: COMPDM-2022_01_Installation.docx version: 2022 last revised: 2021-12-10
source: Individual Development Suite 1.4.0 status: released protection category:public 25/582.5.4 Configure Teamcenter Access
If your COMPDM licenses include Teamcenter Unified Architecture support, configure ac-
cess to a Teamcenter server as follows:
• Restart the server and log in as “admin”
• Enter the Settings Editor (“User & Settings” button, refer to
section 2.3 of the User’s Manual and the Basic Administration
document)
• Select “Teamcenter” tab (white / to the right)
• Click on the “Manage Teamcenter servers…” but-
ton. The Manage Servers dialog appears (see sec-
tion 2.3.4 of volume 03 “Basic administration” of the COMPDM documentation).
• Click “Add” and enter the URL of the Teamcenter server in the “Resource” column.
This URL should begin with “http://” or “https://“ and end with “/tc” (see
hints at the end of this section).
• Exit the Manage Servers Dialog using the “OK”
• Select the Teamcenter server you have just defined from the drop-down list next to
“Teamcenter host”, Enter username, password, and optionally group and role”. In
“Teamcenter revision rule for structures”, you may modify the strategy to use when
expanding sub-structures (default is “Working; Any Status”)
• If accessing the Teamcenter server requires using a specific
proxy server, you can configure it under “Teamcenter HTTP
proxy server”. Select “Expert” to access this setting
file name: COMPDM-2022_01_Installation.docx version: 2022 last revised: 2021-12-10
source: Individual Development Suite 1.4.0 status: released protection category:public 26/58• Use the “Test connection…” button to test whether the connection parameters and
credentials are valid. After a few seconds, the following message should appear:
Figure 17: Teamcenter Connection Test
In case of connection problems, an appropriate error message should appear in-
stead.
• Use the “Save changes” button to save the changes
Obtaining the Teamcenter Server URL to use
The Teamcenter server URL to enter in the “Manage Teamcenter servers” dialog can be
found as follows:
If you use the Teamcenter thin client (web client), try using the same URL without the trailing
“/webclient”. This works in many cases.
If you use the Teamcenter rich client, find the client’s installation directory (standard:
C:\\Siemens\TC\). There should be a sub-directory named por-
tal\plugins\configuration_\ with a file named cli-
ent_specific_properties. Here you can find the URL in one of the variables DE-
FAULT_SERVER.URI or HTTP_SERVER_1.URI
If accessing Teamcenter uses an URL that starts with “https://“, it might be necessary to
copy SSL certificates (cacerts file) into COMPDM’s installation directory. Refer to section
2.9.1 for more details.
file name: COMPDM-2022_01_Installation.docx version: 2022 last revised: 2021-12-10
source: Individual Development Suite 1.4.0 status: released protection category:public 27/58Configuring COMPDM for Teamcenter with Single-Sign-On (SSO) Teamcenter Single-Sign-On is s specific authentication mechanism for Teamcenter where a login to a Teamcenter client typically produces several browser windows, one of which needs to stay open during the session. Either the Teamcenter credentials are then collected in such a browser window, or they are derived from the Windows session. Subsequent invocations of the Teamcenter client then do not require to enter these credentials again if the background browser session is still active. Please note that this is a Teamcenter-specific mechanism and is not to be confused with the management of user accounts using LDAP, as described in section 2.5.2. If Teamcenter is using single-sign-on, it means that COMPDM first requests a “SSO Token” from a Teamcenter SSO server. This token is then used for login into the Teamcenter server. You can enter the URL of the Teamcenter SSO server in COMPDM’s Settings Editor in the setting “Teamcenter SSO server” after having selected “Expert”. By default, COMPDM will use the so-called application ID “Teamcenter” when requesting a token from the SSO server. You can change this to another value by appending it to the Teamcenter SSO server URL with a “#” sign. Be aware that typically, the SSO server will use the Windows process owner of the token requester when processing the request, therefore it is important that the COMPDM server is started by the intended user and accessing Teamcenter with many different accounts in par- allel is not possible. Configuring a Master Account for Reading Customization Information COMPDM will use the Teamcenter session to retrieve information about the available object types and properties. However, Teamcenter allows to control whether certain object type (e.g. item types) are accessible to all users/roles or not. This means that for some accounts, the retrieved information may be incomplete, and due to COMPDM’s internal caching of cus- tomization information, this can even affect all other users. For proper operation with such Teamcenter installations, it is recommended to activate the “Read customization using master account” option in the “white” Teamcenter tab, and to provide user, password, group, and role for the master account. Of course, an account with high access rights (DBA role etc.) should be used. This setting is accessible after having selected “Expert”. Using Sponsored Login The master account, i.e. options “Teamcenter master account” and “Teamcenter master password”, can also be used as a “sponsor” for a sponsored login10. The provided account must belong to the “Sponsor” group. For a sponsored login, the option “Sponsored by ‘master’” must be activated. The provided “Teamcenter user” must be “sponsorable”. 10 Regardless of whether “Read customization using master account” is activated or not file name: COMPDM-2022_01_Installation.docx version: 2022 last revised: 2021-12-10 source: Individual Development Suite 1.4.0 status: released protection category:public 28/58
Optional: Restrict Login Parameters to Valid Combinations
By default, the Teamcenter settings for user, group, role, project, and revision rule are free
text fields. It is possible to convert these to drop-down lists so that:
      •      You can only choose among valid usernames

      •      After picking a user, you can only choose among the groups this user belongs to

      •      After picking the group, you can only choose among the roles assigned to this user
             with this group

      •      With user, group, and role selected, you can only select among projects and revision
             rules that are allowed for this combination

This feature thus eliminates a possible source of errors when providing Teamcenter creden-
tials. The drawback is that COMPDM needs to establish a connection to Teamcenter first
before being able to retrieve the valid parameter combinations. If the information is not com-
pletely available when activating the feature, some of the drop-down lists are empty.

Proceed as follows:
      •      First you should enter valid credentials (user/password) and perform a successful
             “Test connection”, as described above

      •      Set the option in the grey (left-hand side) “Teamcenter” tab after having selected “Ex-
             pert”:

      •      Save the changes, leave the Settings Editor, exit from the COMPDM client.

      •      Start the client again, enter the Settings editor, and select group/role/project/ revision
             rule. As soon as you encounter an empty drop-down-list, repeat the connection test /
             save / exit, until all settings have been initialized with their list of valid values.

      The settings should now appear as drop-down lists.

                                             Figure 18: Teamcenter credentials restricted to valid combinations

file name:   COMPDM-2022_01_Installation.docx                          version: 2022            last revised:            2021-12-10
source:      Individual Development Suite 1.4.0                        status:   released       protection category:public            29/58
2.5.5 Configure VPMV4 Access
If your COMPDM licenses include Enovia VPM V4 support, COMPDM will use a COM/VPM
server to access data inside VPM. The COM/VPM server is a UNIX application which must
be installed on one of your VPM UNIX clients by T-Systems as a prerequisite. Configure ac-
cess to the COM/VPM server and to VPM as follows:
• Restart the server and log in as “admin”
• Enter the Settings Editor (“User & Settings” button, refer to
section 2.3 of the User’s Manual and the Basic Administration
document)
• Select “VPMV4” tab (white / to the right)
• Click on the “Manage VPM servers…” button. The Man-
age Servers dialog appears (see section 2.3.4 of volume
03 “Basic administration” of the COMPDM documentation).
• Click “Add” and enter the URL of the COM/VPM server in the “Resource” column.
This URL should begin with “http://” or “https://” and end with a port number
and “/”.
Alternatively, if multiple COM/VPM servers are available and they are configured for
load balancing via a status directory, you may provide here the directory where the
status files reside (read access required). Provide the directory path directly or in
UNC notation (“\\server\path”). You can append a server type classification
(like “TEST”, “PRODUCTION” etc.) with a #-character (if unused, COMPDM will
choose among all active servers).
• Exit the Manage Servers dialog using the “OK” button
• Select the COM/VPM server you have just defined from the drop-down list next to
“COM/VPM server”, Enter user, password, organization, and role.
• If accessing the COM/VPM server requires using a specific proxy
server, you can configure it under “HTTP proxy server for VPM”.
Select “Expert” to access this setting
• Select the proper “VPM database type”, either “Oracle” or “DB2”
file name: COMPDM-2022_01_Installation.docx version: 2022 last revised: 2021-12-10
source: Individual Development Suite 1.4.0 status: released protection category:public 30/58• Use the “Test connection…” button to test whether the connection parameters and
credentials are valid. After a few seconds, the following message should appear:
Figure 19: VPMV4 Connection Test
In case of connection problems, an appropriate error message should appear in-
stead.
• Use the “Save changes” button to save the changes
file name: COMPDM-2022_01_Installation.docx version: 2022 last revised: 2021-12-10
source: Individual Development Suite 1.4.0 status: released protection category:public 31/58Optional: Restrict Login Parameters to Valid Combinations
By default, the VPM settings for user, role, and organization are free text fields. It is possible
to convert these to drop-down lists so that:
• You can only choose among valid usernames
• After picking a user, you can only choose among the roles this user has
• After picking the role, you can only choose among the organizations assigned to this
user in this role
This feature thus eliminates a possible source of errors when providing VPM credentials.
It is activated as follows:
• First you should enter valid credentials and perform a successful “Test connection”,
as described above
• Set the option in the grey (left-hand side) “VPMV4” tab after having selected “Expert”:
• Save the changes, leave the Settings Editor, select “Representation”, select “New
VPM repr…”, create a dummy VPM representation
(COMPDM should now read the valid combinations of user / role / organization from
VPM)
• Restart COMPDM
The settings should now appear as drop-down lists.
Figure 20: VPM credentials restricted to valid combinations
file name: COMPDM-2022_01_Installation.docx version: 2022 last revised: 2021-12-10
source: Individual Development Suite 1.4.0 status: released protection category:public 32/582.5.6 Configure EnoviaV6 Access
If your COMPDM licenses include EnoviaV6 support, configure access to the 3DExperience
server as follows:
• Restart the server and log in as “admin” again (see section 2.5.1)
• Enter the Settings Editor (“User & Settings” button, refer to
section 2.3 of the User’s Manual and the Basic Administration
document)
• Select “EnoviaV6” tab (white / to the right)
• Click on the “Manage EnoviaV6 servers…” button.
The Manage Servers dialog appears (see section
2.3.4 of volume 03 “Basic administration” of the
COMPDM documentation).
• Click “Add” and enter the URL of the EnoviaV6 server in the “Resource” column. This
URL should begin with “http://” or “https://” (copy the URL you are using to
connect to 3DExperience from your browser). In the “Release” column, choose the
release of your Enovia server11.
• Exit the Manage Servers Dialog using the “OK” button
• Select the Enovia server you have just defined from the drop-down list next to “Eno-
viaV6 server”, and enter user, password, and role.
• If accessing the EnoviaV6 server requires using a specific proxy
server, you can configure it under “HTTP proxy server for Enovia”.
Select “Expert” to access this setting.
• If the EnoviaV6 server uses “3DPassport authentication”, check the “3DPassport” set-
ting.
11 The standard installation supports several releases, currently R2013-R2021x. For other releases,
additional components are required. Please contact T-Systems in this case.
file name: COMPDM-2022_01_Installation.docx version: 2022 last revised: 2021-12-10
source: Individual Development Suite 1.4.0 status: released protection category:public 33/58• Use the “Test connection…” button to test whether the connection parameters and
credentials are valid. After a few seconds, the following message should appear:
Figure 21: EnoviaV6 Connection Test
In case of connection problems, an appropriate error message should appear in-
stead.
• Use the “Save changes” button to save the changes
file name: COMPDM-2022_01_Installation.docx version: 2022 last revised: 2021-12-10
source: Individual Development Suite 1.4.0 status: released protection category:public 34/58Optional: Restrict Login Parameters to Valid Combinations
By default, the EnoviaV6 settings for user, organization, project, and role are free text fields.
It is possible to convert these to drop-down lists so that:
• You can only choose among valid usernames
• After picking a user, you can only choose among the organizations this user has
• After picking the organization, you can only choose among the projects, then the
roles assigned
This feature thus eliminates a possible source of errors when providing Enovia credentials.
It is activated as follows:
• First you should enter valid credentials and perform a successful “Test connection”,
as described above
• Set the option in the grey (left-hand side) “EnoviaV6” tab after having selected “Ex-
pert”:
• Save the changes, leave the Settings Editor, select “Representation”, select “New
Enovia repr…”, create a dummy Enovia representation
(COMPDM should now read the valid combinations of user / organization / project /
role from Enovia)
• Restart COMPDM
The settings should now appear as drop-down lists.
Figure 22: Enovia credentials restricted to valid combinations
file name: COMPDM-2022_01_Installation.docx version: 2022 last revised: 2021-12-10
source: Individual Development Suite 1.4.0 status: released protection category:public 35/582.5.7 Configure Windchill Access
If your COMPDM licenses include Windchill support, configure access to the Windchill server
as follows:
• Log in as “admin” (see section 2.5.1)
• Enter the Settings Editor (“User & Settings” button, refer to sec-
tion 2.3 of the User’s Manual and the Basic Administration
document)
• Select “Windchill” tab (white / to the right)
• Click on the “Manage Windchill servers…” button. The
Manage Servers dialog appears (see section 2.3.4 of
volume 03 “Basic administration” of the COMPDM documentation).
• Click “Add” and enter the URL of the Windchill server in the “Resource” column. This
URL should begin with “http://” or “https://” (copy the URL you are using to
connect to Windchill from your browser). The URL should look like:
http://{your_host_name}:{port}/Windchill/
• Exit the Manage Servers dialog using the “OK” button
• Select the Windchill server you have just defined from the drop-down list next to
“Windchill server” and enter user and password.
• It is recommended to install a “custom task” on the Windchill server
for enhanced access to the server customization by COMPDM (see
below). If done, check the box “Windchill enable use of custom info
engine tasks” after having selected “Expert”.
• Use the “Test connection…” button to test whether the connection parameters and
credentials are valid. After a few seconds, the following message should appear:
Figure 23: Windchill Connection Test
In case of connection problems, an appropriate error message should appear in-
stead.
• Use the “Save changes” button to save the changes
file name: COMPDM-2022_01_Installation.docx version: 2022 last revised: 2021-12-10
source: Individual Development Suite 1.4.0 status: released protection category:public 36/58Installing COMPDM Custom Tasks on a Windchill Server
Some COMPDM functionalities require additional deployment (customization) on the Wind-
chill server. It is recommended to perform these additional installation steps, but they require
access to the Windchill server.
Installing the custom Windchill tasks has the following advantages:
• It is possible to retrieve global soft attributes
• It is possible to update the state of an object
• It is possible to rename parts, documents and CAD documents
• For attributes, COMPDM can detect whether they are mandatory and for string type
attributes, it can detect whether they accept only uppercase values.
Deploy and compile files to Windchill server
Follow the steps below to install Windchill COMPDM tasks on the Windchill server which will
be used by COMPDM to retrieve data model information and additional functionality that is
not covered by available out-of-the-box APIs.
The necessary Windchill COMPDM customization files can be found in the COMPDM instal-
lation directory under …/tools/windchill
In case of a cluster environment, perform following steps for each method server node:
• Copy Windchill COMPDM customization files to any directory on the computer where
the Windchill server is installed.
• Open a Windchill shell and navigate to location where the Windchill customization
files were copied to.
• Execute ant –f build.xml
file name: COMPDM-2022_01_Installation.docx version: 2022 last revised: 2021-12-10
source: Individual Development Suite 1.4.0 status: released protection category:public 37/58Create task delegates for custom info engine tasks
Note: During the previous step, custom task files were already copied to the
WT_HOME\tasks folder.
• Login to Windchill with “Site Administrator” privileges.
• Navigate to Site →Utilities → Task Delegate Administration
• The “Task delegate administration” login page will appear. Login with LDAP Server
administrator.
• The “Task delegate administration” page will appear. Click on “Import Delegates” and
import the delegates.ldif file supplied with the COMPDM Windchill patch. Check
“Overwrite leaf entries if they exist” before import.
file name: COMPDM-2022_01_Installation.docx version: 2022 last revised: 2021-12-10
source: Individual Development Suite 1.4.0 status: released protection category:public 38/58You can also read