CONTROLTOUCH USER MANUAL MANUEL UTILISATEUR - EN FR - exalux
←
→
Page content transcription
If your browser does not render page correctly, please read the page content below
EN
                     FR

CONTROLTOUCH
USER MANUAL
MANUEL UTILISATEUR
EN
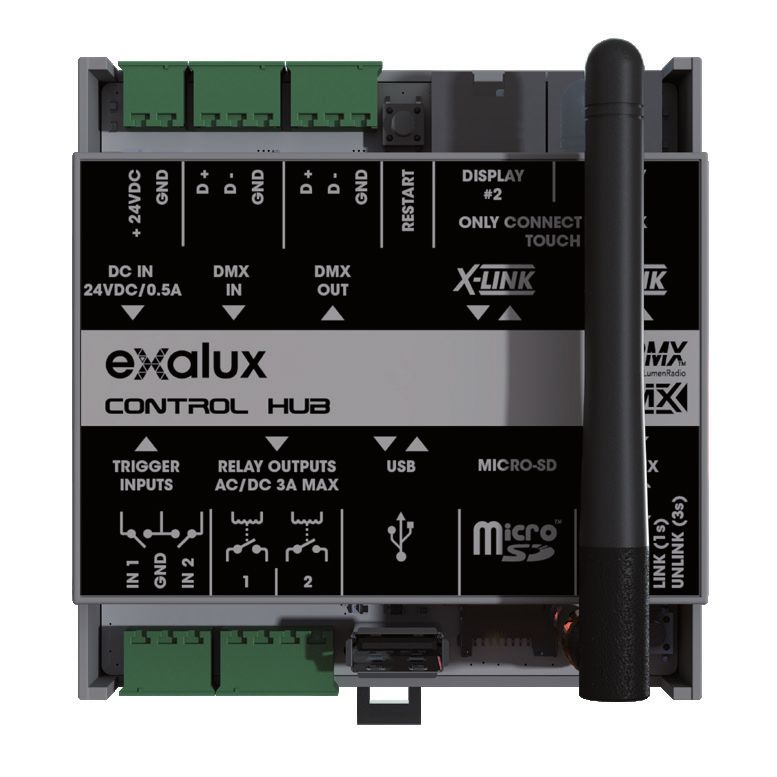
FR CONTROL HUB
[C]
[B] [D]
[A] [E]
[ F] [K]
[J]
[G]
[H] [I]
(A): DC input (B): DMX input (C): DMX output (D): Reset switch
(E): X-LINK ports (F): DIN rail mount (G): Trigger inputs (H): Relay outputs
(I): USB-A port (J): MicroSD slot (K): Antenna (SMA mount)
SPECIFICATIONS
DMX universe : 1 Input voltage : 24VDC
Interface : DMX (DMX512-A), CRMX™ by LumenRadio™ Power rating : 1,2W max (without HMI)
Power input : 2 position terminal block, 3.81mm 7W max (with 2 HMI)
DMX in/out : 3 position terminal block, 3.81mm IP Rating : IP2X
Triggers in : 3 position terminal block, 3.81mm Certifications : CE, RoHS
Relay out : 4 position terminal block, 3.81mm Dimensions : 88 x 90 x 32.5mm
Weight : 125g
2
CONTROL HMI 5’’                                                                                         EN
                                                                                                                FR

        [E]

                                                                                                [A]
  [D]
[C]                                                                                               [ B]

              (A): Proximity sensor    (B): 5'' Capacitive display   (C): Wall mount enclosure
              (D): X-LINK Port		       (E): MicroSD slot

SPECIFICATIONS
Display :                 TFT 5.0’’, 480x854, Capacitive Touch       IP Rating :        IP4X
DMX universe :            1                                          Certifications :   CE, RoHS
Power / data Input:       RJ45 (X-LINK port)                         Dimensions :       76.2 x 139.4 x 24.8mm
Input voltage :           7.0VDC to 30VDC                            Weight :           130g
Power rating :            2,1W max

                                                                                                                 3
EN
FR
                                      HOME
             The HOME screen is the main interface to use once the system has been
         configured. It allows simple control of the lights using the programmed memories.

                                           Home off screen

Touch anywhere on the display
to go back to the HOME screen
and turn on the lights using the                                         Shows the current time and
       programmed memories.                                              date, in 12h or 24h format.
                                                                         The clock and calendar are
                                                                         setup in the SYSTEM app.
                                                                         Thanks to an internal backup
                                                                         battery, the clock will not be lost
                                                                         in case of power down.
                                         Home about screen
Current firmware version of the
CONTROL HUB, CONTROL HMI,
DMX profiles library and number
  of CONTROL HMI connected.
                                                                         Versions of all the software
                                                                         components loaded in the
                                                                         system.

Touch anywhere on the display
to go back to the HOME screen.

4
EN
                                      HOME                                                             FR

             The HOME screen is the main interface to use once the system has been
         configured. It allows simple control of the lights using the programmed memories.

                                         Home scenes screen

Touch the buttons to select the
              memory to apply.
The memory currently in use is
          highlighted in yelllow.                                        Navigation tabs, used        to
                                                                         switch between scenes (static)
                                                                         and     sequences     (dynamic)
                                                                         memories.
                                                                         If only one type of memory is
                                                                         used, the tabs are hidden.
         Switch off all the lights.

                                        Home sequences screen

                                                                         Controls for the sequences
                                                                         player (Play, Pause, Stop).
Countdown of the remaining                                               Once a sequence ends, it
duration until the end of the                                            automatically restarts if the loop
                    sequence.                                            option is selected.

Opens the ABOUT screen, in                                               Opens the MENU, in order to
order to read the firmware                                               access all the apps to configure
                    version.                                             the system.

                                                                                                          5
EN
FR
                                            MENU
            Menu is the entry point to select which app you want to use. Its access can be
             restricted by a pin code, to prevent unauthorized user to access the settings.

                                                        RECORDER
                                      Transfer your settings from another controller
                                       to the CONTROL TOUCH with the DMX recor-
                                                                                       DMX BYPASS
                                      der, using the DMX input of the HUB interface.
                                                                                       Provides a secured way to
             LIGHTING CONTROL
                                                                                       control DMX fixtures, using an
Choose the lighting fixture from
                                                                                       external DMX controller. The
the library and adjust its settings
                                                                                       DMX received on the input port
 using the sliders on the screen.
                                                                                       is forwarded to the DMX output
                                                                                       and CRMX.

                        HOME
          Back to HOME screen.

                MEMORY NAMES                                                           SYSTEM
Use this app to enter meaningful                                                       Provides advanced control of
names for your memories, in                                                            the CONTROL TOUCH’s settings,
order to get the most intuitive                                                        including: display brightness,
          HOME screen possible.                                                        CRMX control, memory import/
                                                        PROGRAM                        export, reset, ...
                                       Allows to program automated behaviours,
                                       based on specific time & date, or from the
                                           trigger inputs of the CONTROL HUB.

6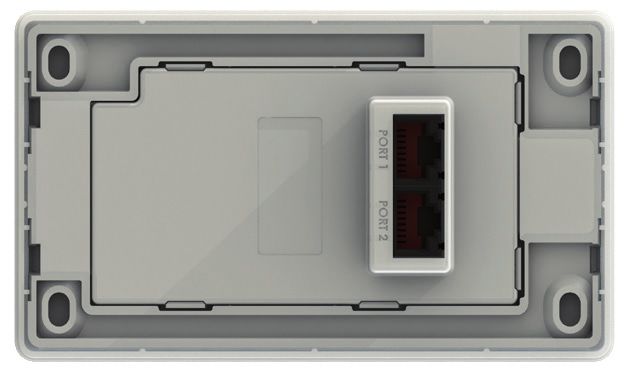
EN
                                         SYSTEM                                                        FR

           Provides advanced control of the CONTROL TOUCH’s settings, including : display
                      brightness, CRMX control, memory import/export, reset, ...

Switch between the tabs to access all                               Adjust the brightness of the display,
               the settings available.                              and select the inactivity behaviour.
                                                                    This behaviour is only applied on the
                                                                    HOME screen.
                                                                    Select the crossfade duration to apply
                                                                    when switching between two SCENE
           Clock and calendar setup.                                memories on the HOME screen.

Select the radio output power, which                                Enable or disable wireless operations
maximum can be limited by local                                     (CRMX). Link/unlink CRMX devices.
                           regulation.
EXALUX recommands keeping the
     default setting (20dBm/100mW).

                                                                    When PIN CODE is enabled, the access
                                                                    to the MENU will only be allowed if the
Individual resets and factory reset
                                                                    user enters the expected pin code.
             (hold button 3 seconds).
                                                                    This feature can be used to prevent
The import/export feature allows to                                 unauthorized users to access settings
save/restore all the memories and                                   and/or modify memories.
settings on an external USB stick,                                  Default pin code : 0000
        plugged in the CONTROL HUB.

                                                                                                          7
EN
FR
             FIXTURE CONTROL
          Choose the lighting fixture from the library and adjust its settings using the sliders
                                             on the screen.

The RELAY page provides control
of the two internal relay outputs
            of the CONTROL HUB.                                               Opens the fixture setup page,
                                                                              in order to choose the fixture
                                                                              parameters:
                                                                               • Type of fixture, from the library
                                                                                • DMX address
                                                                                • Zone

                                                                              Summary of the parameters of
                                                                              the selected fixture.
Select the fixture to control (60
                fixtures maximum).                                            Opens the zone adjustment
Long press on the tab of the                                                  and memory saving page.
selected fixture to enter a
                 custom nickname.                                             Overview of all the DMX
A fixture already in use is marked                                            channels used by the fixtures.
             with a yellow triangle.

                   Back to MENU.
                                           Adjust the fixture settings
                                               using the sliders.

8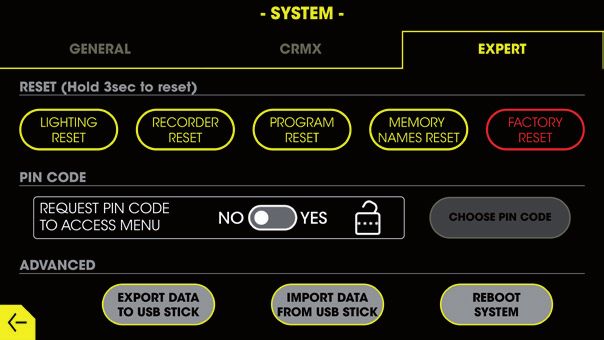
EN
              FIXTURE CONTROL                                                                         FR

             The FIXTURE SETUP screen is used to choose all the parameters of a fixture. The
           ZONES & MEMORIES screen provides zone adjustment and memory management.
                                                                          Enter the DMX address of the
                                                Fixture setup screen      fixture.
                                                                          The address should match the
           Enable / Disable the fixture.                                  one set on the fixture itself.
                                                                          If no address is specified, the
Select the profile of the fixture to                                      system will automatically assign
          control, from the DMX library.                                  the first address available.
Using the navigation arrows, select the
 brand, then select the fixture + mode.
                                                                          Assign a zone to the fixture.
                                                                          The brightness of each zone can
Go back to the main window ignoring                                       be controlled on the dedicated
                any changes made.                                         page (see below).

                                                                          Saves all the settings made and
  Pick a memory to unlock its control:       Zones and memories screen    go back to the main window.
•Erase: deletes the memory’s content.
•Save: saves all the current settings
(including zones and grand master).                                       Grand master: adjust the
•Apply: restores a saved memory.                                          brightness  of   all  fixtures
                                                                          (independently of their zone
                                                                          selection).
The memory state is defined by its colour:
•Yellow: Memory currently selected.                                       Zone adjustment: control the
•Grey: Memory is free, ready to be used.                                  brightness of all the fixtures
•White: Memory already used.                                              assigned to the zone.

                                                                                                         9
EN
FR
                               DMX BYPaSS
             Provides a secured way to control DMX fixtures, using an external DMX controller.
              The DMX received on the input port is forwarded to the DMX output and CRMX.

INFO
• This app can be used as backup, in order to still be able to control DMX fixtures,
even if no memorie has been programmed, or if the touch screen is faulty.
                                                                                              Visual diagram of the operations.
• When a CONTROL HUB is installed without any HMI (touchscreen), it automatically
enters «standalone mode», providing the same behaviour than in the DMX BYPASS
                                                                                              Any DMX frame received on the
app.                                                                                          DMX input is forwarded to DMX
                                                                                              output.
                                                                                              If the wireless feature is enabled, the
                                                                                              DMX is also generated on CRMX.
                                                                                              Refer to SYSTEM for details on how to
                                                                                              enable CRMX.

            Back to MENU.

                                                                     Shows the state of the
                                                                         DMX input.

10
EN
RECORDER FR
Transfer your settings from another controller to the CONTROL TOUCH with the
DMX recorder, using the DMX input of the HUB interface.
INFO
• The recorder stores the data into an internal micro-SD card, allowing very
Select the memory slot to use.
long recording sequences. The memory usage is shown on the display. •Grey: Memory free, ready to be
used.
• The recordering will be automatically stopped if the DMX source is
disconnected, or if the memory is full. •White: Memory already used.
contains some DMX. It is
necessary to erase its content in
order to use it again.
•Yellow: Memory selected.
Back to MENU.
Shows the state of the DMX input
of the CONTROL HUB. If no DMX Deletes the content of the
is detected, the record button is selected memory.
disabled.
Used to start recording DMX in
Stops the current recording.
the selected memory.
11EN
FR
MEMORY NaMES
Use this app to enter meaningful names for your memories, in order to get the
most intuitive HOME screen possible.
INFO
• A memory name can be set even if the memory is currently empty.
This allows two different workflows :
- Set the memory name, then fill the memory with DMX.
- Fill the memory with DMX, then choose a name.
Switch between the tabs to access
• The memory names are 18 character long, and printed inside the the two types of memories:
memory button on two lines.
The text is automatically truncated if too large. • Scenes, from LIGHTING CONTROL
• Sequences, from RECORDER
Back to MENU.
Memory selection:
•White: Memory already used.
•Grey: Memory is empty.
12EN
PROGRaM FR
Allows to program automated behaviours, based on specific time & date, or from
the trigger inputs of the CONTROL HUB.
Trigger based programs
Select the action to carry when
the trigger input closes.
Scroll and select a program
to set up, among two trigger
inputs based programs, and
nine time based ones.
Back to MENU.
Visual feedback of the trigger
input’s current state.
Select on which day the current
Time based programs
program needs to be enabled.
Overview of all the time based
programs in use.
Select the timestamp for the
current program.
Select the action associated to
the current program.
13EN
FR DUAL DISPLaY
INFO
• The CONTROL TOUCH system can be used with either one or two CONTROL HMI5’’ displays.
• Each display offers the same control capabilities detailed in this manual. There is no « master/slave » concept.
• When using the HOME app:
• The memory selection can made on any display.
• The displays are mirrored: any memory selection made on one display is automatically synchronized on the other.
• When opening any other app, the secondary display can no longer be used to select the memories. This state remains until the first displays goes
back to HOME.
• The memories are automatically saved on the CONTROL HUB’s microSD card, in order to ensure proper synchronization of the two displays.
• When adding or removing a display from the system, the CONTROL HUB must be restarted to ensure proper operations. This is done by pressing the
« restart » button for 0.5 second. This button is located close to the RJ45 connectors.
When one display is accessing any app other than The second display remains inhibited, until the first
HOME (MENU,FIXTURE CONTROL, RECORDER, ...) display goes back to the HOME app.
14EN
INSTaLLaTION DIaGRaM FR
EXALUX™
CONTROL HMI 5’’
(MAIN CONTROLLER) RJ45 X-Link port #1 DMX
DMX
FIXTURES
EXALUX™
CONTROL HMI 5’’ RJ45 X-Link port #2
(OPTIONAL)
DMX CRMX™
DMX CONTROLLER
FIXTURES
/ RECORDER
(OPTIONAL)
PUSH SWITCHES
RELAY OUTPUTS
(OPTIONAL)
(MAX 3A/24VDC/240VAC)
24VDC EXALUX™
POWER SUPPLY CONTROL HUB
15EN
FR CONTROL HUB
[C]
[B] [D]
[A] [E]
[ F] [K]
[J]
[G]
[H] [I]
(A): Entrée d’alimentation DC (B): Entrée DMX (C): Sortie DMX (D): Bouton reset
(E): Ports X-LINK (écrans) (F): Fixation rail DIN (G): Entrées trigger (H): Sorties relais
(I): Port USB-A (J): Lecteur MicroSD (K): Antenne (SMA)
CARACTERISTIQUES
Univers DMX : 1 Alimentation: 24VDC
Interface : DMX (DMX512-A), CRMX™ de LumenRadio™ Consommation : 1,2W max (sans écran)
Alimentation : Bornier 2 positions, pas 3.81mm 7W max (avec 2 écrans HMI)
DMX in/out : Bornier 3 positions, pas 3.81mm Indice IP : IP2X
Entrées trigger : Bornier 3 positions, pas 3.81mm Certifications : CE, RoHS
Sortie relais : Bornier 4 positions, pas 3.81mm Dimensions : 88 x 90 x 32.5mm
Poids : 125g
16CONTROL HMI 5’’ EN
FR
[E]
[A]
[D]
[C] [ B]
(A): Capteur de proximité (B): Écran tactile capacitif 5'' (C): Montage mural
(D): Port X-LINK (E): Lecteur MicroSD
CARACTERISTIQUES
Écran : TFT 5.0’’, 480x854, Tactile capacitif Indice IP : IP4X
Univers DMX : 1 Certifications : CE, RoHS
Alimentation / données : RJ45 (X-LINK port) Dimensions : 76.2 x 139.4 x 24.8mm
Tension d’alimentation : 7.0VDC à 30VDC Poids : 130g
Consommation : 2,1W max
17EN
FR
HOME
L’écran HOME est l’interface principale une fois que le système a été configuré.
Il permet de contrôler simplement les éclairages en utilisant les mémoires.
Écran « Home off »
Toucher l’écran pour revenir à
l’écran HOME, afin de pouvoir
allumer les éclairages, en Indication de la date et l’heure,
utilisant les mémoires qui ont au format 12h ou 24h.
été enregistrées. Le réglage de l’horloge se fait
dans l’application SYSTEM.
Grâce à une pile intégrée,
l’horloge est maintenue en cas
de coupure de courant.
Écran « Home about »
Versions du logiciel du CONTROL
HUB, du CONTROL HMI et de
la librairie DMX. Indication du
nombre de HMI connectées.
Versions de tous les composants
logiciels chargés dans le
système.
Toucher l’écran à n’importe
quel endroit pour revenir à
l’écran principal.
18EN
HOME FR
L’écran HOME est l’interface principale une fois que le système a été configuré.
Il permet de contrôler simplement les éclairages en utilisant les mémoires.
Écran « Home scènes »
Sélectionner la mémoire à
utiliser en appuyant sur le
bouton correspondant. Onglets de navigation,
La mémoire actuellement permettant de passer des
utilisée est repérée en jaune. mémoires « scènes » (statiques)
aux mémoires « séquences »
(dynamiques).
Si un seul de type de mémoire
est utilisé, ces onglets sont
Extinction de tous les éclairages. masqués.
Écran « Home séquences »
Contrôle du lecteur de
mémoires « séquences ».
Lorsqu’une séquence s’achève,
Décompte du temps restant elle est automatiquement
avant la fin de la séquence. relancée si l’option « loop » est
activée.
Ouvre l’écran ABOUT,permettant Ouverture du MENU, permettant
de connaître la version du d’accéder aux applications de
logiciel du système. configuration.
19EN
FR
MENU
Le MENU est le point d’entrée pour choisir une application à utiliser. Son accès
peut être restreint par un code pin, afin de bloquer les utilisateurs non-autorisés.
RECORDER
Enregistreur DMX, permettant la mémorisation de DMX BYPASS
LIGHTING CONTROL données DMX provenant d’un contrôleur externe. Permet de piloter des
Sélectionner un équipement équipements DMX, en utilisant
DMX à contrôler dans la un contrôleur DMX externe.
librairie et ajuster ses réglages Les données DMX reçues sont
simplement. retransmises sur la sortie DMX,
ainsi qu’en CRMX.
HOME
Retour à l’écran principal.
SYSTEM
MEMORY NAMES Permet le réglage des
Utiliser cette application pour paramètres avancés du
renommer les mémoires, dans CONTROL TOUCH, en particulier:
le but d’obtenir un écran HOME intensité de l’écran, contrôle
le plus intuitif possible. du CRMX, import/export
PROGRAM des mémoires sur clé USB,
Permet de programmer l’exécution automatique réinitialisation, …
de mémoires, basée sur la date et l’heure, ou sur
l’état des entrées trigger du CONTROL HUB.
20EN
SYSTEM FR
Permet le réglage des paramètres avancés du CONTROL TOUCH, en particulier :
intensité de l’écran, contrôle du CRMX, import/export des mémoires, …
Onglets de navigation, permettant Réglage du rétroéclairage de l’écran,
d’accéder à tous les paramètres. ainsi que son comportement en cas
d’inactivité (uniquement applicable
sur l’écran HOME).
Ajustement du fondu à appliquer
lorsqu’une nouvelle mémoire est
Réglage de la date et de l’heure. sélectionnée sur l’écran HOME.
Sélection de la puissance d’émission Activation/désactivation du CRMX
du module radio CRMX. (DMX sans fil).
Le niveau maximal peut être limité par Appairage des équipements CRMX.
une législation locale.
EXALUX recommande l’utilisation de
la valeur par défaut (20dBm/100mW).
Lorsque le code pin est activé, l’accès
au MENU est uniquement possible
Réinitialisation (partielle ou complète). si l’utilisateur renseigne la bonne
Maintenir appuyé 3 secondes. combinaison.
Cette option permet de restreindre
l’accès aux réglages pour utilisateurs
Import/export des mémoires sur clé non-autorisés.
USB branchée sur le CONTROL HUB. Code par défaut : 0000
21EN
FR
FIXTURE CONTROL
Sélectionner un équipement DMX à contrôler dans la librairie et ajuster ses
réglages simplement.
L’onglet RELAY permet le
pilotage des deux relais intégrés
au CONTROL HUB. Accès à la page « fixture setup »
permettant la sélection de :
• Son type (parmi la liste
d’équipements DMX)
• Son adresse DMX
• Sa zone
Synthèse des paramètres de
l’équipement sélectionné.
Sélection de l’équipement à Accès à l’écran d’ajustement
contrôler (60 max). des zones, et de sauvegarde
Un appui long permet de des mémoires.
renommer l’équipement.
Un équipement en cours Vue d’ensemble des canaux
d’utilisation est repéré par un DMX en cours d’utilisation.
triangle jaune.
Retour au MENU.
Ajuster les réglages de
l’équipement en utilisant les sliders.
22EN
FIXTURE CONTROL FR
FIXTURE SETUP permet de choisir les paramètres d’un équipement. L’écran ZONES
& MEMORIES est utilisé pour le réglage des zones et la gestion des mémoires.
Sélection de l’adresse DMX.
Écran « Fixture setup » L’adresse doit être identique à
celle réglée sur l’équipement.
Activer / désactiver l’équipement. Si aucune adresse n’est
renseignée, le système affecte
Sélection du profil DMX de
automatiquement la première
l’équipement, dans la librairie.
adresse disponible.
A l’aide des flèches de navigation,
sélectionner la marque puis le modèle
Affecte l’équipement à une
et le mode de l’équipement.
zone.
L’intensité lumineuse de chaque
Retour à l’écran principal, en ignorant
zone peut être ajustée depuis
tous les informations saisies.
l’écran dédié (voir ci-dessous).
Sélectionner une mémoire pour Sauvegarde les paramètres et
Écran « Zones and memories »
débloquer sa gestion: retourne à l’écran principal.
•Erase: efface le contenu de la mémoire.
•Save: sauvegarde l’état courant en
Grand master : ajuste l’intensité
mémoire (zones et grand master inclus).
lumineuse de tous les
•Apply: rappel d’une mémoire.
équipements (quelle que soit
leur zone).
La couleur d’une mémoire
renseigne son état :
Zone sliders : ajuste l’intensité
•Jaune: Mémoire sélectionnée. lumineuse de tous les
•Grise: Mémoire disponible. équipements affectés à la zone.
•Blanche: Mémore utilisée.
23EN
FR
DMX BYPaSS
Permet de piloter des équipements DMX, en utilisant un contrôleur DMX externe.
Les données DMX reçues sont retransmises sur la sortie DMX, ainsi qu’en CRMX.
INFO
• Cette application peut être utilisée en secours, pour pouvoir piloter des équipements Représentation graphique de
DMX même si aucune mémoire n’a été programmée, ou si l’écran tactile est défectueux. l’activité.
• Lorsque le CONTROL HUB est installé sans HMI (écran tactile),il bascule automatiquement Toute trame DMX reçue sur le port
en mode « standalone », offrant un fonctionnement similaire à DMX BYPASS. DMX d’entrée est retransmise sur le
port DMX de sortie.
Si la fonction sans fil est activée, le
DMX est également retransmis en
CRMX.
Se référer à SYSTEM pour obtenir
des informations sur l’activation du
CRMX.
Retour au MENU.
Indique la présence de DMX
à l’entrée du CONTROL HUB.
24EN
RECORDER FR
Enregistreur DMX, permettant la mémorisation de données DMX provenant d’un
contrôleur externe.
INFO Selectionner une mémoire à
• RECORDER sauvegarde les données sur une carte micro-SD interne,
utiliser:
permettant l’enregistrement de séquences de longue durée.
L’utilisation de l’espace mémoire est renseignée sur l’écran. •Grise: Mémoire disponible.
• L’enregistrement est automatiquement stoppé si la source DMX est •Blanche: Mémoire pleine.
déconnectée, ou si la mémoire est pleine. Il est nécessaire d’effacer la
mémoire avant de pouvoir
l’utiliser à nouveau.
•Jaune: Mémoire sélectionnée.
Retour au MENU.
Indique la présence de DMX à
l’entrée du CONTROL HUB.
Efface le contenu de la
Il est uniquement possible de
mémoire sélectionnée.
démarrer un enregistrement si
un signal DMX est détecté.
Démarre l’enregistrement dans
Termine l’enregistrement.
la mémoire sélectionnée.
25EN
FR
MEMORY NaMES
Utiliser cette application pour renommer les mémoires, dans le but d’obtenir un
écran HOME le plus intuitif possible.
INFO
• Il est possible de nommer une mémoire même si celle-ci est vide.
Ceci permet deux approches possibles :
- Nommer la mémoire, puis lui affecter des réglages DMX. Onglets de navigation permettant
- Affecter les réglages DMX à une mémoire, puis la nommer. d’accéder aux différents types de
mémoire :
• Les noms peuvent contenir jusqu’à 18 caractères et sont affichés sur deux
lignes, au centre des boutons. • Scènes, de l’application LIGHTING
Si le nom est trop long pour être affiché, il CONTROL
estautomatiquement réduit.
• Séquences, de l’application
RECORDER
Retour au MENU.
Sélection de mémoires:
•Blanche: Mémoire programmée.
•Grise: Mémory vide.
26EN
PROGRaM FR
Permet de programmer l’exécution automatique de mémoires, basée sur la date
et l’heure, ou sur l’état des entrées trigger du CONTROL HUB.
Programme « trigger »
Sélection de l’action à déclencher
lorsque l’entrée trigger s’active.
Sélection d’un programme
à configurer, parmi deux
programmes « trigger » et neuf
programmes « planification ».
Retour au MENU.
Retour visuel de l’état actuel de
l’entrée trigger.
Sélection des jours concernés Programme « planification »
par le programme.
Résumé graphique de tous les
programmes planifiés.
Sélection de l’heure de
déclenchement du programme.
Sélection de l’action déclenchée
par le programme.
27EN
FR DOUBLE ÉCRAN
INFO
• Le système CONTROL TOUCH peut être utilisé avec un ou deux écrans CONTROL HMI 5’’.
• Chacun des écrans offre les mêmes possibilités de réglage, décrites dans le présent manuel. Il n’y a pas de notion « maître / esclave ».
• Lorsque l’application HOME est utilisée:
• La sélection de mémoires peut se faire sur n’importe lequel des écrans.
• L’affichage est synchronisé: lorsqu’une mémoire est sélectionnée depuis l’un des écrans, l’affichage du second est automatiquement actualisé.
• Lorsqu’une autre application que HOME est utilisée, le second écran ne permet plus de sélectionner des mémoires. Cet état perdure jusqu’à ce
que le premier écran revienne sur l’application HOME.
• Les mémoires sont automatiquement sauvegardées sur la carte microSD du CONTROL HUB, afin d’assurer la synchronisation des deux écrans.
• Lorsqu’un écran est ajouté/retiré du système, il est nécessaire de redémarrer le CONTROL HUB. Pour cela, appuyer pendant 0.5 seconde sur le
bouton « restart », situé à côté des connecteurs RJ45.
Lorsqu’un écran accède à une application autre Le second écran est inhibé, jusqu’à ce que le
que HOME (MENU, FIXTURE CONTROL, ...) premier écran retourne sur l’application HOME.
28EN
DIAGRAMME D’INSTaLLaTION FR
EXALUX™
CONTROL HMI 5’’
(CONTRÔLEUR PRINCIPAL) Port RJ45 X-Link #1 DMX
APPAREIL
DMX
EXALUX™
CONTROL HMI 5’’ Port RJ45 X-Link #2
(CONTRÔLEUR OPTIONNEL)
DMX APPAREIL
ENREGISTREUR /
CRMX™
CONSOLE DMX
(OPTIONNEL)
INTERRUPTEURS
(OPTIONNEL) SORTIES RELAIS
(MAX 3A/24VDC/240VAC)
ALIMENTATION EXALUX™
24VDC CONTROL HUB
29EN
FR
Term of use in which is a common problem with all types of display
This system is designed to control lighting sources, for indoor technologies. Therefore, it is strongly advised to use the
use only. To prevent damage, do not expose it to liquid or screen saver function, which is able to dim down or turn
moisture and keep the device away from open flames and off the display when no one is nearby, based on proximity
heat sources. Avoid clogging and strong vibrations. Use sensor. This will also maximize display endurance.
the devices only in its intended use as described in this Moisture and water can damage the display. Moisture on
manual. Any other use, as well as use in other conditions, the surface of a powered display may cause the electrodes
will be considered non-compliant and can cause injury to corrode. Wipe off any moisture gently or let the display
and damage. No liability will be assumed for damages dry before usage. The performance of the display will
resulting from improper use. degrade under high temperature and humidity. Avoid such
conditions when using or storing.
CONTROL HUB Controller
This device requires DC voltage, which can result in an Care
electrical shock. Do not remove cover when powered. The Unplug CONTROL HUB before cleaning it. Do not use
parts inside the device are maintenance free. cleaning product, use a dry cloth and rub gently. Dirt from
Check the feature compliancy and correct operation of fingerprint oil and fat can easily stain the surface of the
the power supply before connecting it to the device. Before display. Gently wipe off any stains with a soft lint-free cloth.
connection, check if the voltage corresponds to the voltage Store the devices in a clean and dry place, away from
of your local power network and if the socket is equipped exposure to direct sunlight and dust.
with a GFCI. In case of non-compliance, the device may be
damaged and the user may be injured. Do not modify the
power cables nor the plugs in order to avoid short-circuits. Maintenance
In case of non-compliance, there is a risk of electric shock Unplug the devices from power during all maintenance
and fire hazard. If in doubt, contact a certified technician. operations. The devices should only be installed and
opened by people in full possession of their physical,
sensory and mental abilities who must have the required
CONTROL HMI 5” Display knowledge and experience. All the other persons are only
Always use the mounting holes on the display when allowed to operate the devices under the supervision or
mounting it to a wall, enclosure or panel. Do not apply direction of a person responsible for their safety.
undue tightness to the screws when fixing it to the chosen
wall/enclosure, the display case is made of plastic and may
be damaged if screws are fastened too tightly. Displays are Warranty
susceptible to mechanical shock and any force exerted on EXALUX cannot be responsible for material or personal
the module may result in deformed zebra stripes, a cracked damage resulting from improper use of the product or
display cell and broken backlight. non-compliance to the instructions. The warranty will not be
Avoid having to display the same image/object on the applied in these cases.
screen for lengthy periods of time. This will cause a burn-
30EN
FR
Utilisation conforme Évitez d’afficher la même image pendant une longue
Ce système est conçu pour le pilotage d’équipement période. Cela peut provoquer une «brulure d’écran» qui est
d’éclairage, pour un usage intérieur uniquement. un problème courant avec tous les types de technologies
Ne pas exposer le système à des liquides ou à l’humidité. Ne d’affichage. Il est donc fortement conseillé d’utiliser la
pas installer l’appareil à proximité d’une source de chaleur. fonction d’économiseur d’écran, qui permet de réduire/
Tenir l’appareil à l’écart des flammes. Ne pas recouvrir éteindre l’affichage lorsque personne n’utilise l’écran.
l’appareil, et éviter l’exposition aux fortes vibrations. L’humidité à la surface d’un écran alimenté peut
N’utilisez l’appareil que pour l’usage auquel il est destiné, provoquer la corrosion des électrodes. Essuyez doucement
tel que décrit dans ce manuel. Toute autre utilisation, ainsi l’humidité ou laissez l’écran sécher avant de l’utiliser.
que l’utilisation dans d’autres conditions, sera considérée Les performances de l’écran se dégradent lorsque la
comme non conforme et peut causer des blessures et des température et l’humidité sont élevées. Évitez de telles
dommages. Nous déclinons toute responsabilité pour les conditions lors de l’utilisation ou du stockage.
dommages résultant d’une mauvaise utilisation.
Nettoyage et stockage
Boîtier CONTROL HUB Débranchez les appareils avant de les nettoyer. N’utilisez
Ce dispositif nécessite une tension continue, ce qui peut pas de produit de nettoyage, utilisez un chiffon sec et
entraîner une décharge électrique. Ne retirez pas le frottez doucement. La saleté provenant de l’huile et de la
couvercle lorsque l’appareil est sous tension. Les pièces à graisse des empreintes digitales peut facilement tacher la
l’intérieur de l’appareil ne nécessitent aucun entretien. surface de l’écran. Essuyez doucement les taches avec un
Vérifiez la conformité des caractéristiques et le bon chiffon doux non abrasif.
fonctionnement de l’alimentation électrique avant de Rangez les appareils dans un endroit propre, sec, à l’abri
la connecter à l’appareil. Avant de brancher, vérifiez si la de la lumière directe du soleil et de la poussière.
tension correspond à celle de votre réseau local et si la
prise est équipée d’un disjoncteur de fuite à la terre (GFCI). Maintenance
En cas de non-conformité, l’appareil peut être endommagé Débranchez les appareils pendant toutes les opérations
et l’utilisateur peut être blessé. Ne modifiez pas les câbles de maintenance. Les appareils ne doivent être installés et
ni les prises. En cas de non-conformité, il y a un risque ouverts que par des personnes en pleine possession de
de décharge électrique et d’incendie. En cas de doute, leurs capacités physiques, sensorielles et mentales qui
contactez un technicien agréé. doivent avoir les connaissances et l’expérience requises.
Toutes les autres personnes ne sont autorisées à faire
Écran CONTROL HMI 5” fonctionner les appareils que sous la surveillance ou la
Toujours utiliser les trous de fixation du support de montage direction d’une personne responsable de leur sécurité.
prévus à cet effet pour fixer l’écran à un mur, un boîtier ou
un panneau. Ne serrez pas excessivement les vis, le support Garantie
est en plastique et peut être endommagé. EXALUX ne peut être tenu pour responsable des dommages
Les écrans sont sensibles aux chocs et toute force exercée matériels ou corporels résultant d’une mauvaise utilisation
sur le module d’affichage peut entraîner des bandes du produit ou du non-respect des instructions. La garantie
zébrées, des fissures ou un rétroéclairage non uniforme. ne sera pas appliquée dans ces cas.
31exalux.eu
DESIGNED MADE
IN IN
NANTES FRANCE
NOT0060-B | 03/2021
LIGHT CONNECT CONTROL DIMMING
EXALUX, 1 rue de la Noë 44322 Nantes Cedex 3 France | +33 9 72 45 70 43 | contact@exalux.euYou can also read


