INSTRUCTION MANUAL ENGLISH - Amazon S3
←
→
Page content transcription
If your browser does not render page correctly, please read the page content below
INSTRUCTION MANUAL

            Models #22150, 22151, 22152

                ENGLISH
WHAT’S IN THE BOX
 We recommend saving your telescope box so it can be used to store the telescope when it is not in use. Unpack the
 box carefully as some parts are small. Use the parts list below to verify that all parts and accessories are present.

 PARTS LIST

                                                                                                 1                                                                       5
  1
                                                                                                 2
  2
                                                                      7                                                                                                  6
  3
                                                                      8                          3                                                                       7
  4
  5

                                                                      9                                                                                                  8

  6
                                                                                                 4

          OMNI XLT AZ 102                                                                                     OMNI XLT AZ 114 and OMNI XLT AZ 130
          1. Telescope Tube                     6. Tripod                                                     1. Finderscope                        6. Omni XLT AZ Mount
          2. Finderscope                        7. Omni XLT AZ Mount                                          2. Telescope Tube                     7. Hex-key Wrench
          3. Eyepiece                           8. Hex-key Wrench                                            3. Slow Motion Knobs                      (Inside Mount)
          4. Erect Image Diagonal                  (Inside Mount)                                             4. Tripod                             8. Accesory Tray
          5. Slow Motion Knobs                  9. Accesory Tray                                              5. Focuser and Eyepiece

         SOLAR WARNING
 Never look directly at the Sun with the naked eye or with a telescope unless you have the proper solar filter. Permanent and irreversible eye damage may result.

 Never use your telescope to project an image of the Sun onto any surface. Internal heat build-up can damage the telescope and any accessories attached to it.

 Never use an eyepiece solar filter or a Herschel wedge. Internal heat build-up inside the telescope can cause these devices to crack or break, allowing unfiltered
 sunlight to pass through to the eye.

 Do not leave the telescope unsupervised, especially when children or adults unfamiliar with the correct operating procedures of your telescope are present.

2 | ENGLISH
ASSEMBLING YOUR TELESCOPE
THE MOUNT
The Omni XLT AZ mount and tripod come fully assembled,
so setting it up is easy.

1. Remove the tripod and mount from the box.

2. L
    oosen the hand knobs at the bottom of each leg and
   extend the inner section of the leg to the desired length.
   Tighten the knobs to secure the legs, being careful not
   to over tighten.

3.	Stand the tripod upright and pull the tripod legs apart
    until the center brace snaps into place.

4.	Place the accessory tray on top of the center brace and
    line up the holes. Insert the three thumb screws through
    the bottom of the leg brace and thread them into the
    tray.

5.	Make sure the leg hinge bolts are secure by snugging
    down the black thumbnuts at the top of each leg.

ADJUSTING THE ANGLE OF THE MOUNT ARM
Depending on your specific use of the telescope, you may
wish to change the angle of the mount arm to give you
additional range of motion. The mount comes set up for
the astronomical use; it can move upward but is limited
in its downward motion. If you are using the mount for
terrestrial observation from an elevated location (cliff top,
balcony, etc.) and you want to point the scope well below
the horizon, you will need to change the angle of the mount
arm to accommodate this.

To make this adjustment:

1. U
    nthread the round cover on the bottom of the vertical
   arm of the mount.

2. Using a 4 mm hex-key wrench (user supplied), remove
    the three screws under the cover.

3. Rotate the mount arm so that it is pointed straight up and
    thread the three screws back in.

4. Tighten the screws and replace the round cover.

                                                                 ENGLISH | 3
THE SLOW MOTION KNOBS
To attach the slow motion knobs to your mount:
1. L
ocate the supplied hex key hidden inside the slot in the
front of your mount.
2. Place the slow motion control knob over the D-shaped
gear shaft and push inward to make sure it is fully seated.
3. U
se the hex key to tighten the setscrews onto the gear
shaft.
4. Return the hex key to its storage position in the front of
the mount.
THE TELESCOPE TUBE
To attach the telescope tube to your tripod and mount:
1. Locate the dovetail bar mounted on the side of the
telescope tube.
2. Holding the telescope tube next to the mount, slide the
dovetail bar into the clamp at the top of the mount.
3. Tighten the hand knob on the bottom of the clamp to
secure the telescope in place.
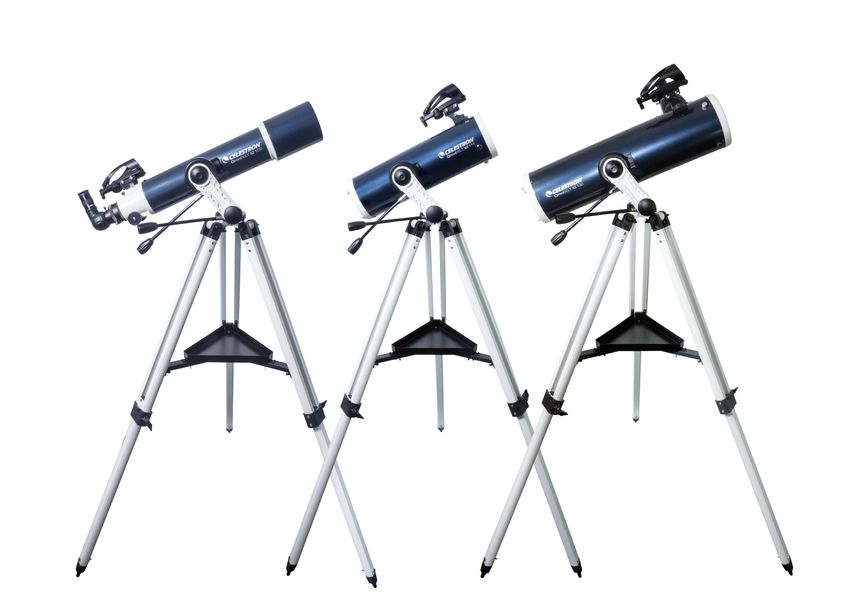
NOTE: T he 102 mm refractor is shown, but the 114 mm and 130 mm Newtonian telescopes
attach to the mount in the same way.
THE STAR DIAGONAL (FOR 102 MM REFRACTOR ONLY)
The star diagonal attaches to the back of a refracting
telescope and contains a small prism that reflects light
at a 90° angle, providing a more comfortable viewing
position. Because a star diagonal gives you a 100%
correctly oriented image, you can easily use the telescope
for daytime terrestrial observing.
To insert the diagonal:
1. Remove the caps from both sides of the diagonal.
2. Loosen the setscrews on the back of the focuser and
pull out the small dust cap.
3. Insert the smaller tube on the diagonal into the back of
the focuser and secure it by tightening the setscrews.
You can rotate the diagonal to any position by loosening
the setscrews.
4 | ENGLISH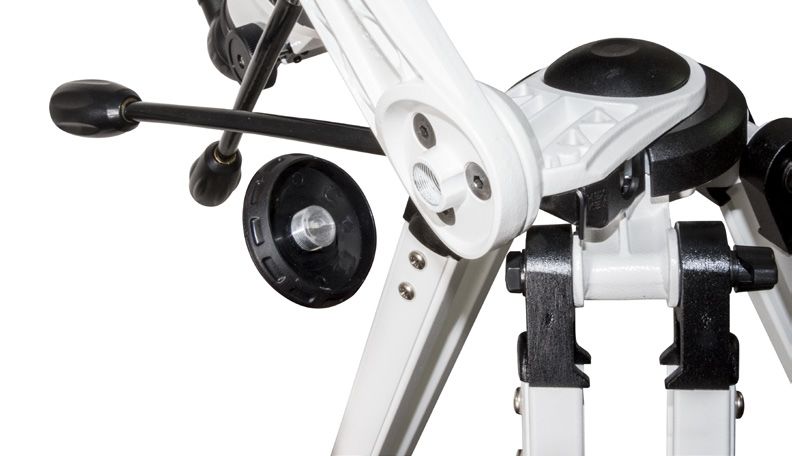
THE EYEPIECE
Your telescope comes with a 25 mm Plössl eyepiece,
which will give a moderately wide field of view. Additional
eyepieces can be purchased to increase or decrease the
magnification to your desired level.

To install an eyepiece on the 102 mm refractor:

1.
   Loosen the setscrews on the open end of the star
   diagonal.

2. Insert the silver barrel of the 25 mm eyepiece into the
   star diagonal.

3. Tighten the setscrews to secure the eyepiece

4. T
    o see the sharpest image possible, focus by looking
   through the eyepiece and slowly turning the focusing
   knobs until the image comes into sharp focus.

To install an eyepiece on the
114 mm and 130 mm Newtonian:

1. Loosen the setscrews on the open end of the star
   diagonal.

2.	Insert the silver barrel of the 25 mm eyepiece into the
    star diagonal.

3. Tighten the setscrews to secure the eyepiece

4.	To see the sharpest image possible, focus by looking
    through the eyepiece and slowly turning the focusing
    knobs until the image comes into sharp focus.

THE STARPOINTER PRO FINDERSCOPE
Your telescope comes with a Starpointer Pro Finderscope
that you will use as a sighting tool when aiming the telescope
at a target.

To install the finderscope:
1. Slide the finderscope bracket into the dovetail slot on
   the telescope tube near the focuser. The large window
   on the finder should be facing the front of the telescope.
2. Secure the bracket by tightening the setscrew on the
   dovetail slot.

                                                                 ENGLISH | 5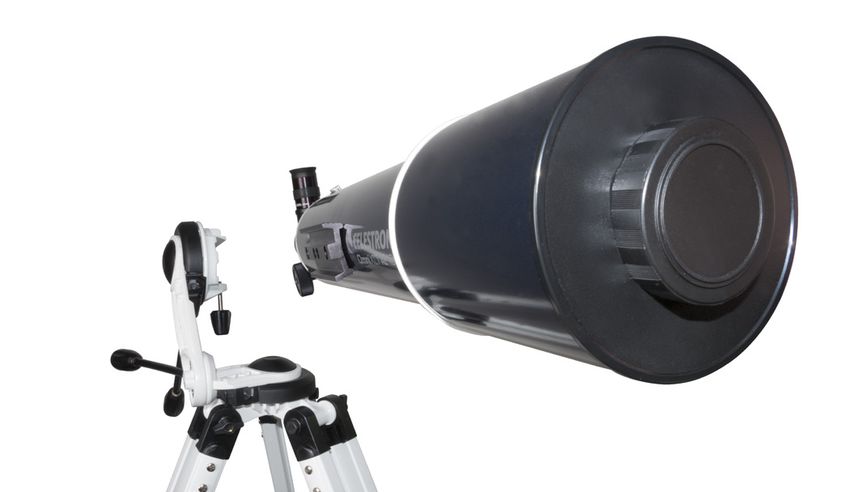
MOVING THE TELESCOPE
 The Omni AZ mount has slip clutches in both axes. To make large movements with the telescope, simply hold the optical
 tube and push it in the desired direction. To make fine adjustments or to track celestial objects, turn both slow motion
 knobs.

 ALIGNING THE STARPOINTER PRO FINDERSCOPE
 The Starpointer Pro Finderscope helps you aim your telescope by looking through its round glass window and covering
 your target with the red recticle projected in the window.

 The first time you assemble your telescope, you’ll need to align the finderscope with the main optics of the telescope.
 Although this step can be done at night, it is significantly easier during the day. Once you have completed the finderscope
 alignment, you should not have to repeat this step unless the finderscope is bumped or dropped.

 1. Take the telescope outside during the day. Using your naked eye, find an easily recognizable object, such as a streetlight,
    car license plate, or tall tree. The object should be as far away as possible, but at least a quarter mile away.

 2. R
     emove the main dust cover from the telescope and make sure your 25 mm eyepiece is installed.

 3. Move the telescope left and right or up and down so that it is roughly pointing toward the object you chose in step 1.

 4. L
     ook through the telescope’s eyepiece and manually move the telescope until the object you chose lies in the center of
    the view. If the image is blurry, gently turn the focus knobs until it comes into sharp focus.

    NOTE: T he image in the telescope eyepiece will appear upside-down. This is perfectly normal in an astronomical telescope.

 5. Once the object is centered in your 25 mm eyepiece, turn on the finderscope by turning the power/brightness switch
     knob on the bottom of the unit as far as it will go.

 6. W
     ith your head positioned about a foot behind the finder, look through the round window and locate the red reticle. It will
    probably be close to, but not on top of, the object you see when you are looking through the 25 mm eyepiece.

 7. Without moving the telescope, use the two adjustment knobs on the side and underneath the finderscope. One controls
     the left-right motion of the reticle, while the other controls the up-down motion. Adjust both until the reticle appears over
     the same object you are observing in the 25 mm eyepiece.

 Now choose some other distant targets to practice aiming your telescope. Look through the Starpointer Pro Finderscope
 window and place the red dot on the target you are trying to view and verify that it is the 25 mm eyepiece of the scope.

 With your finderscope aligned, your telescope is fully assembled and you are ready to observe!

 NOTE: Be sure to turn off the Starpointer Pro Finderscope when not in use to conserve battery power.

6 | ENGLISH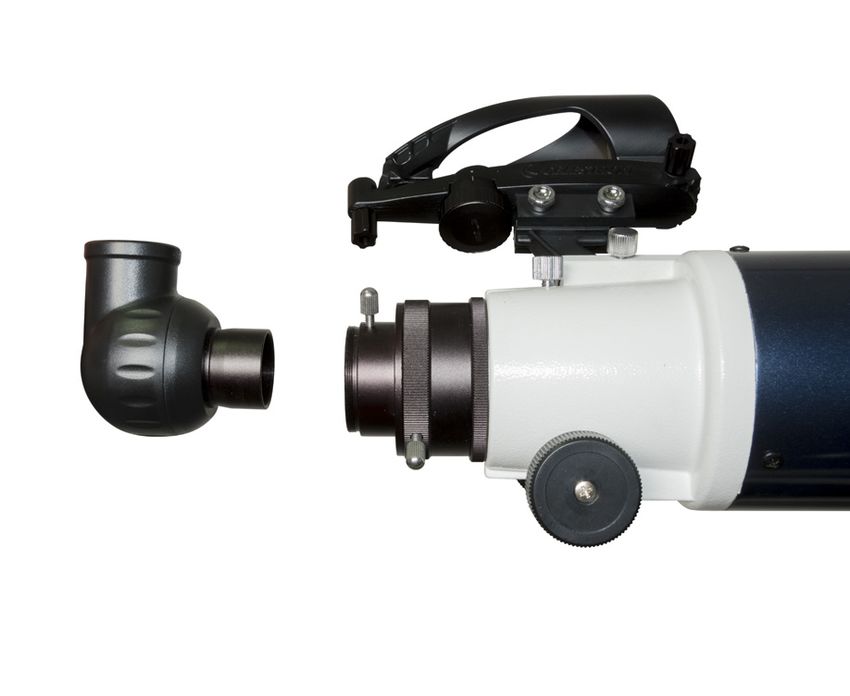
YOUR FIRST ASTRONOMICAL OBSERVING SESSION
THE MOON
Now you are ready to take your telescope out at night and do some real observing!

Let’s start with the Moon. The Moon takes about one month go through a complete phase cycle, from New Moon to Full
Moon and back again. Try observing it at different points during this cycle.

While you can observe the Moon any time it is visible in the night sky, the best time to view it is from two days after a New
Moon up to a few days before a Full Moon. During this period, you will be able to see the most detail in craters and lunar
mountain ranges. Consult a calendar to find out when the next New Moon will be.

1. With a clear view of the Moon, set up your telescope with the 25 mm eyepiece.

2. Turn on the finderscope and look through it to find the red reticle.

3. Move the telescope until you can see the Moon through the finderscope’s window and the reticle is centered on the Moon.

4. Look through the 25 mm eyepiece. Gently turn the focus knobs to adjust the sharpness of the image.

                   CONGRATULATIONS! YOU HAVE NOW OBSERVED YOUR FIRST CELESTIAL OBJECT!
To get a closer view of the Moon, replace the 20 mm eyepiece with the 4 mm eyepiece. It will give you more magnification,
making the Moon appear much larger. You may need to adjust the focus knobs when you change eyepieces to ensure you are
getting the sharpest image.

You can view many other celestial objects, such as planets, star clusters and nebulae using this same basic technique.

For more tips for astronomical observing, please visit: ExploreTheSky.com

There you will find comprehensive tips to help you get the most from your new telescope including:

        •   How to observe the planets
        •   How to locate and observe stars, double stars, star clusters
        •   How to observe deep-sky objects such as nebulae and galaxies
        •   How to choose a good location for astronomical observing
        •   How to evaluate sky conditions

                                                                                                                    ENGLISH | 7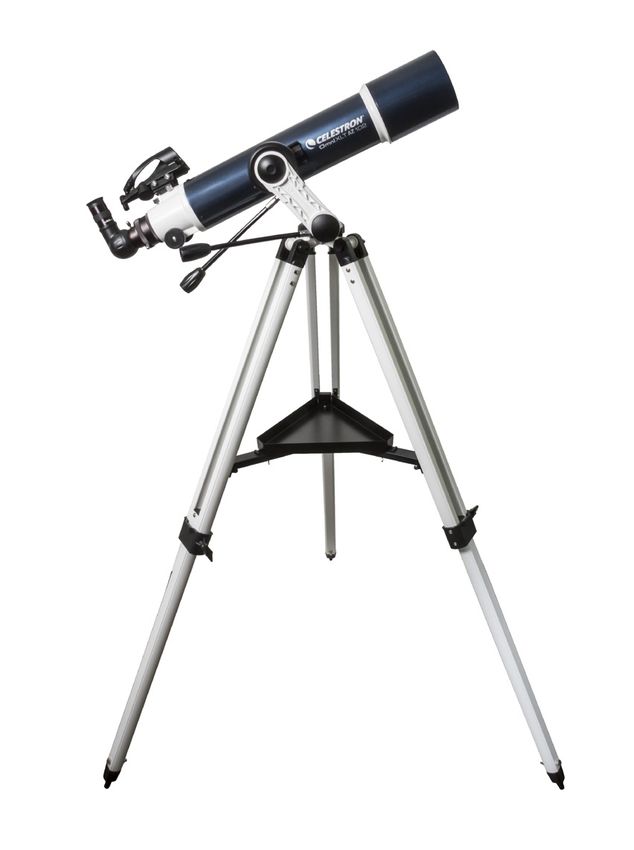
CELESTRON TWO YEAR LIMITED WARRANTY
 A. Celestron warrants your telescope to be free from defects in materials and workmanship for two years. Celestron will repair or replace
    such product or part thereof which, upon inspection by Celestron, is found to be defective in materials or workmanship. As a condition to
    the obligation of Celestron to repair or replace such product, the product must be returned to Celestron together with proof-of-purchase
    satisfactory to Celestron.

 B. The Proper Return Authorization Number must be obtained from Celestron in advance of return. Call Celestron at (310) 328-9560 to
     receive the number to be displayed on the outside of your shipping container.

 All returns must be accompanied by a written statement setting forth the name, address, and daytime telephone number of the owner,
 together with a brief description of any claimed defects. Parts or product for which replacement is made shall become the property of
 Celestron.

 The customer shall be responsible for all costs of transportation and insurance, both to and from the factory of Celestron, and shall be
 required to prepay such costs.

 Celestron shall use reasonable efforts to repair or replace any telescope covered by this warranty within thirty days of receipt. In the event
 repair or replacement shall require more than thirty days, Celestron shall notify the customer accordingly. Celestron reserves the right to
 replace any product which has been discontinued from its product line with a new product of comparable value and function.

 This warranty shall be void and of no force of effect in the event a covered product has been modified in design or function, or subjected to
 abuse, misuse, mishandling or unauthorized repair. Further, product malfunction or deterioration due to normal wear is not covered by this
 warranty.

 CELESTRON DISCLAIMS ANY WARRANTIES, EXPRESS OR IMPLIED, WHETHER OF MERCHANTABILITY OF FITNESS FOR A PARTICULAR USE, EXCEPT AS EXPRESSLY SET FORTH HEREIN. THE SOLE OBLIGATION
 OF CELESTRON UNDER THIS LIMITED WARRANTY SHALL BE TO REPAIR OR REPLACE THE COVERED PRODUCT, IN ACCORDANCE WITH THE TERMS SET FORTH HEREIN. CELESTRON EXPRESSLY DISCLAIMS ANY
 LOST PROFITS, GENERAL, SPECIAL, INDIRECT OR CONSEQUENTIAL DAMAGES WHICH MAY RESULT FROM BREACH OF ANY WARRANTY, OR ARISING OUT OF THE USE OR INABILITY TO USE ANY CELESTRON
 PRODUCT. ANY WARRANTIES WHICH ARE IMPLIED AND WHICH CANNOT BE DISCLAIMED SHALL BE LIMITED IN DURATION TO A TERM OF TWO YEARS FROM THE DATE OF ORIGINAL RETAIL PURCHASE.

 Some states do not allow the exclusion or limitation of incidental or consequential damages or limitation on how long an implied warranty
 lasts, so the above limitations and exclusions may not apply to you.

 This warranty gives you specific legal rights, and you may also have other rights which vary from state to state.

 Celestron reserves the right to modify or discontinue, without prior notice to you, any model or style telescope.

 If warranty problems arise, or if you need assistance in using your telescope contact: Celestron - 800.421.9649

 NOTE: T his warranty is valid to U.S.A. and Canadian customers who have purchased this product from an authorized Celestron dealer in the U.S.A. or Canada. Warranty outside the U.S.A. and Canada is valid only to
       customers who purchased from a Celestron’s International Distributor or Authorized Celestron Dealer in the specific country. Please contact them for any warranty service.

 FCC NOTE: This equipment has been tested and found to comply with the limits for a Class B digital device, pursuant to part 15 of
 the FCC Rules. These limits are designed to provide reasonable protection against harmful interference in a residential installation. This
 equipment generates, uses, and can radiate radio frequency energy and, if not installed and used in accordance with the instructions,
 may cause harmful interference to radio communications. However, there is no guarantee that interference will not occur in a particular
 installation. If this equipment does cause harmful interference to radio or television reception, which can be determined by turning the
 equipment off and on, the user is encouraged to try to correct the interference by one or more of the following measures:

 •R eorient or relocate the receiving antenna.
 • Increase the separation between the equipment and receiver.
 •C onnect the equipment into an outlet on a circuit different from that to which the receiver is connected.
 • Consult the dealer or an experienced radio/TV technician for help.

 Product design and specifications are subject to change without prior notification.
 This product is designed and intended for use by those 14 years of age and older.

                                                                                                                                                                                                     03-15
                                                                                                                                                                                     Printed in China
 © 2015 Celestron • All rights reserved
 celestron.com
 2835 Columbia Street • Torrance, CA 90503 U.S.A.
 Telephone: 800.421.9649

8 | ENGLISH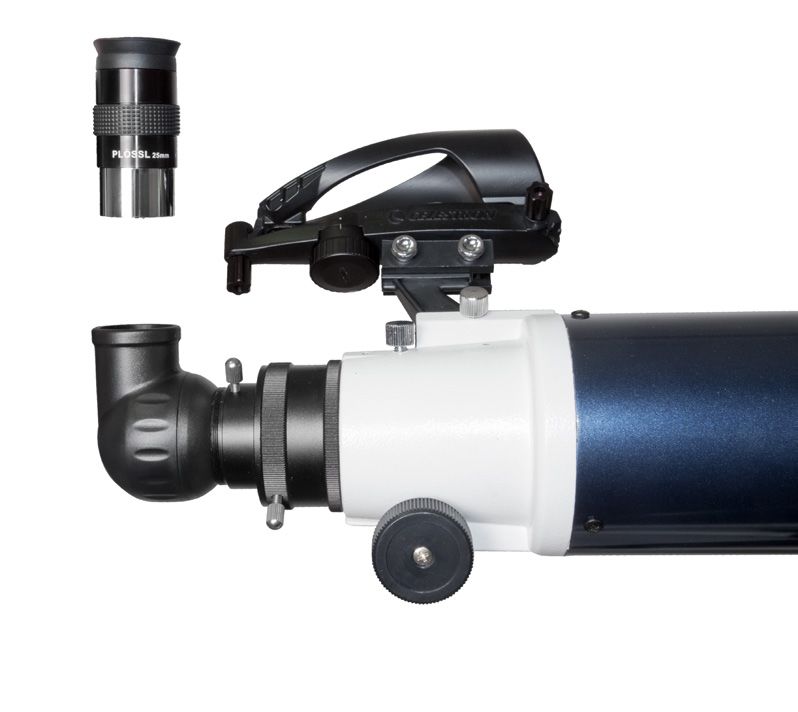
GUIDE DE L’UTILISATEUR

             Modèles no 22150, 22151 et 22152

                 FRANÇAIS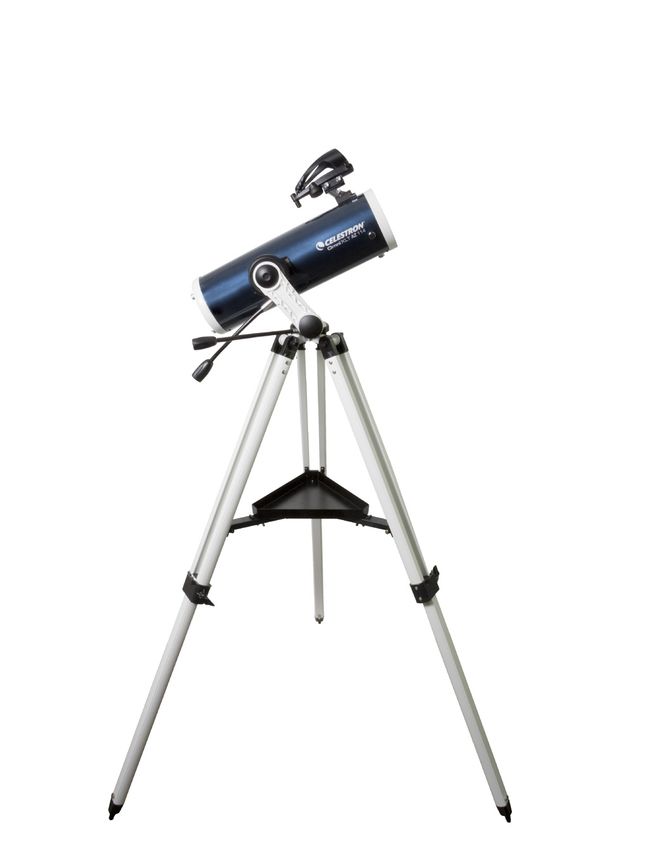
CONTENU DE LA BOÎTE :
  Nous vous recommandons de conserver votre boîte de télescope afin de pouvoir l’utiliser pour son rangement
  lorsqu’il n’est pas utilisé. Déballez le contenu de la boîte avec soin, car certaines pièces sont petites. Utilisez la liste
  des pièces ci-dessous pour vous assurer que toutes les pièces et tous les accessoires sont inclus dans la boîte.

  LISTE DES PIÈCES

                                                                                                    1                                                                         5
   1
                                                                                                    2
   2
                                                                        7                                                                                                     6
   3                                                                                                                                                                          7
                                                                        8                           3
   4
   5

                                                                                                                                                                             8
                                                                        9
   6
                                                                                                    4

           OMNI XLT AZ 102                                                                                      OMNI XLT AZ 114 and OMNI XLT AZ 130
           1. Tube de télescope                   6. Trépied                                                    1. Chercheur (viseur)                 6. Monture Omni XLT AZ
           2. Chercheur (viseur)                  7. Monture Omni XLT AZ                                       2. Tube de télescope                  7. Clé hexagonale (à
           3. Oculaire                            8. Clé hexagonale (à l’intérieur                             3. Molettes de mouvement lent             l’intérieur de la monture)
           4. Renvoi coudé                           de la monture)                                             4. Trépied                            8. Plateau pour
                                                  9. Plateau pour accessoires                                                                            accessoires
           5. Molettes de mouvement lent                                                                        5. Porte-oculaire et oculaire

          AVERTISSEMENT AU SUJET DES RAYONS DU SOLEIL :
  Ne regardez jamais directement le soleil à l’œil nu ou avec un télescope sans l’utilisation d’un filtre adéquat. Cela pourrait entraîner des lésions oculaires permanentes et
  irréversibles.
  N’utilisez jamais votre télescope pour projeter une image du soleil sur une surface quelconque. Une accumulation de chaleur interne pourrait endommager le télescope et
  tout accessoire qui s’y rattache.
  N’utilisez jamais un filtre solaire oculaire ou un prisme (hélioscope) de Herschel. Une accumulation de chaleur à l’intérieur du télescope peut endommager ces dispositifs,
  laissant alors la lumière non filtrée du soleil atteindre les yeux.
  Ne laissez pas le télescope sans surveillance, particulièrement en présence d’enfants ou d’adultes qui ne sont pas familiarisés avec le mode d’emploi.

10 | FRANÇAIS
ASSEMBLAGE DE VOTRE TÉLESCOPE
LA MONTURE
La monture et le trépied de l’Omni XLT AZ sont
entièrement assemblés, facilitant ainsi son installation.
1. Retirez le trépied et la monture de la boîte.
2. Desserrez les molettes au bas de chaque pied et
étendez la section intérieure du pied à la longueur
souhaitée. Afin de fixer les pieds, serrez sans excès les
molettes.
3. Mettez le trépied en position verticale et écartez l’un de
l’autre ses pieds jusqu’à ce qu’un déclic confirme que
l’entretoise centrale soit bien en place.
4. P
lacez le plateau pour accessoires sur le dessus de
l’entretoise et alignez les trous. Insérez les trois vis à
serrage à main par le dessous de l’entretoise et vissez-
les dans le plateau.
5. Assurez-vous que les boulons de charnière des pieds
sont fermement fixés en serrant bien les écrous à
serrage à main noirs situés en haut de chaque pied.
RÉGLAGE DE L’ANGLE DU BRAS DE MONTURE
En fonction de l’utilisation que vous ferez du télescope,
vous pouvez changer l’angle du bras de monture
pour vous donner plus d’amplitude des mouvements.
La monture fournie est réglée pour l’observation
astronomique. Vous pouvez la déplacer vers le haut, mais
son mouvement vers le bas est limité. Si vous utilisez la
monture pour l’observation terrestre depuis un endroit
surélevé (falaise, balcon, etc.) et que vous souhaitez
pointer le télescope bien au-dessous de l’horizon, vous
devrez modifier l’angle du bras de monture pour l’adapter.
Pour effectuer ce réglage :
1. Dévissez le couvercle rond situé au bas du bras vertical
de la monture.
2. À l’aide d’une clé hexagonale de 4 mm (fournie par
l’utilisateur), retirez les trois vis qui se trouvaient sous le
couvercle.
3. Faites pivoter le bras de monture afin qu’il soit pointé
tout droit vers le haut et revissez les trois vis.
4. Serrez les vis et remettez en place le couvercle rond.
FRANÇAIS | 11LES MOLETTES DE MOUVEMENT LENT
Pour fixer les molettes de mouvement lent sur votre
monture :
1. Prenez la clé hexagonale fournie, laquelle est cachée à
l’intérieur de la fente à l’avant de votre monture.
2. Placez la molette de réglage du mouvement lent sur
l’arbre en forme de D de l’engrenage et poussez vers
l’intérieur pour vous assurer qu’il est bien en place.
3. Utilisez la clé hexagonale pour serrer les vis de réglage
sur l’arbre de l’engrenage.
4. R
emettez la clé hexagonale dans son espace de
rangement situé à l’avant de la monture.
LE TUBE DU TÉLESCOPE
Pour fixer le tube du télescope sur votre trépied et votre
monture :
1.Localisez la barre queue d’aronde fixée le long du tube
du télescope.
2. Tenez le tube du télescope près de la monture, puis
faites glisser la barre queue d’aronde dans la pince
située sur la partie supérieure de la monture.
3. Serrez la molette située au bas de la pince pour fixer en
place le télescope.
REMARQUES: L e réfracteur de 102 mm est illustré. Les télescopes de Newton de 114 mm et
130 mm se fixent cependant sur la monture de la même façon.
LE RENVOI COUDÉ (POUR LE RÉFRACTEUR102 MM UNIQUEMENT)
Le renvoi coudé fixé à l’arrière d’une lunette astronomique
contient un petit prisme qui réfléchit la lumière à un angle
de 90°, permettant ainsi d’adopter une position plus
confortable pour l’observation. Puisque le renvoi coudé
vous donne également une image correctement orientée à
100 %, vous pouvez utiliser facilement ce télescope pour
l’observation terrestre pendant la journée.
To insert the diagonal:
1. Retirez les capuchons des deux extrémités du renvoi
coudé.
2. Desserrez les vis de réglage à l’arrière du porte-oculaire
et retirez le petit capuchon antipoussière.
3. Insérez le plus petit tube du renvoi coudé à l’arrière du
porte-oculaire et fixez-le en serrant les vis de réglage.
Vous pouvez faire pivoter le renvoi coudé dans n’importe
quelle direction en desserrant les vis de réglage.
12 | FRANÇAISL’OCULAIRE
Votre télescope est livré avec un oculaire Plössl 25 mm, lequel
vous donnera un champ de vision relativement large. D’autres
oculaires peuvent être achetés pour augmenter ou diminuer le
grossissement à votre gré.
Pour installer un oculaire sur le réfracteur 102 mm:
1. Desserrez les vis de réglage situées à l’extrémité ouverte du
renvoi coudé.
2. Insérez le barillet argenté de l’oculaire 25 mm dans le renvoi
coudé.
3. Serrez les vis de réglage pour fixer bien en place l’oculaire.
4. Pour obtenir l’image la plus nette qui soit, effectuez la
mise au point en regardant dans l’oculaire et en tournant
lentement les molettes de mise au point jusqu’à ce que
vous obteniez l’image la plus nette.
Pour installer un oculaire sur les réfracteurs de
Newton 114 mm et 130 mm :
1. Desserrez les vis de réglage argentées du porte-oculaire et
retirez le petit capuchon antipoussière.
2. Insérez le barillet argenté au bas de l’oculaire 25 mm dans
le porte-oculaire.
3. Serrez les vis de réglage pour fixer bien en place l’oculaire.
4.
Pour obtenir l’image la plus nette qui soit, effectuez la
mise au point en regardant dans l’oculaire et en tournant
lentement les molettes de mise au point jusqu’à ce que vous
obteniez l’image la plus nette.
LE CHERCHEUR
Votre télescope est livré avec un chercheur reflex à DEL rouge
que vous utiliserez comme outil d’observation lorsque vous
pointerez le télescope en direction d’une cible.
Pour installer le chercheur :
1. Faites glisser le support du chercheur dans la rainure de
fixation en queue d’aronde située sur le télescope près du
porte-oculaire. La grande fenêtre du chercheur doit être
orientée vers l’avant du télescope.
2. Fixez le support en serrant la vis de réglage située sur la
rainure de fixation en queue d’aronde.
FRANÇAIS | 13MOUVEMENTS DU TÉLESCOPE
La monture AZ Omni st dotée d’un système de débrayage sur les deux axes. Pour que le télescope effectue de grands
mouvements, il suffit de tenir le tube optique et de le pousser dans la direction désirée. Pour effectuer des réglages fins ou
pour suivre des objets célestes, tournez les deux molettes de mouvement lent.
ALIGNEMENT DU CHERCHEUR
Le chercheur à DEL rouge vous aide à pointer votre télescope lorsque vous regardez par sa fenêtre ronde en couvrant
votre cible avec le réticule rouge projeté sur la fenêtre.
La première fois que vous assemblez votre télescope, vous devrez aligner le chercheur avec l’élément optique principal du
télescope. Bien que cette étape puisse être effectuée pendant la nuit, il est beaucoup plus facile de l’effectuer en plein jour.
Une fois que vous avez terminé l’alignement du chercheur, vous ne devriez pas avoir à répéter cette étape à moins que le
chercheur ait été déplacé ou retiré.
Pour aligner le chercheur reflex à DEL rouge :
1. A
pportez votre télescope à l’extérieur alors qu’il fait jour. À l’œil nu, trouvez un objet facilement reconnaissable, comme
un lampadaire, une plaque d’immatriculation de voiture ou un grand arbre. L’objet doit être le plus loin possible, à au
moins un quart de mille (400 m ou plus).
2. Retirez la housse de protection principale du télescope et assurez-vous que votre oculaire 25mm a été installé.
3. Déplacez le télescope horizontalement et verticalement afin qu’il pointe vers l’objet que vous avez choisi à l’étape 1.
4. R
egardez à travers l’oculaire du télescope et déplacez manuellement le télescope jusqu’à ce que l’objet que vous avez
choisi se trouve dans le centre de vision. Si l’image est floue, tournez tout doucement les molettes de mise au point
jusqu’à ce que l’image soit nette.
REMARQUE: L’image dans l’oculaire du télescope s’affichera à l’envers. Ceci est tout à fait normal pour une lunette astronomique.
5. Une fois que l’objet est centré dans votre oculaire 25 mm, allumez le chercheur en tournant jusqu’à la fin de sa course la
molette de réglage d’intensité lumineuse avec interrupteur d’alimentation. Cette molette est située au bas de l’appareil.
6. Avec votre tête située à environ 30 cm (1 pied) derrière le chercheur, regardez par la fenêtre ronde et localisez le réticule
rouge. Il ne couvrira probablement pas l’objet que vous observez, mais sera à proximité lorsque vous regarderez à travers
l’oculaire 25 mm.
7. Sans déplacer le télescope, utilisez les deux molettes de réglage situées sur le côté et en dessous du chercheur. L’une
contrôle le mouvement gauche-droite du réticule, tandis que l’autre contrôle le mouvement haut-bas. Ajustez les deux
molettes jusqu’à ce que le réticule couvre l’objet que vous observez dans l’oculaire 25 mm.
Choisissez maintenant d’autres cibles lointaines pour vous exercer à pointer votre télescope vers une cible. Regardez par
la fenêtre du chercheur reflex à DEL rouge et placez le point rouge sur la cible que vous tentez d’observer et vérifiez qu’elle
est dans l’oculaire 25 mm du télescope.
Votre chercheur étant maintenant aligné, l’installation de votre télescope est terminée et vous êtes prêt pour l’observation!
REMARQUES: Assurez-vous d’éteindre le chercheur reflex à DEL rouge lorsqu’il n’est pas utilisé afin d’économiser les piles.
14 | FRANÇAISVOTRE PREMIÈRE SESSION D’OBSERVATION
ASTRONOMIQUE
LA LUNE
Vous êtes maintenant prêt à installer votre télescope à l’extérieur et faire de véritables observations pendant la nuit!
Commençons par la lune. Les phases de la lune s’étendent sur un cycle complet d’environ un mois, de la nouvelle lune à la
pleine lune et vice versa. Essayez de l’observer à différents moments au cours de ce cycle.
Alors que vous pouvez observer la lune à n’importe quel moment lorsqu’elle est visible dans le ciel nocturne, le meilleur
moment pour la voir est deux jours après une nouvelle lune jusqu’à quelques jours avant une pleine lune. Durant cette
période, vous pourrez voir plus de détails relatifs aux cratères et aux chaînes de montagnes lunaires. Consultez un calendrier
pour connaître la prochaine apparition de la nouvelle lune.
1. Lorsque la lune se voit clairement, installez votre télescope avec l’oculaire 25 mm.
2. Allumez le chercheur et regardez à travers celui-ci pour trouver le réticule rouge.
3. Déplacez le télescope de façon à voir la lune par la fenêtre du chercheur et le réticule centré sur la lune.
4. Regardez dans l’oculaire 25 mm. Tournez tout doucement les molettes de mise au point pour régler la netteté de l’image.
FÉLICITATIONS! VOUS OBSERVEZ MAINTENANT VOTRE PREMIER OBJET CÉLESTE!
Vous pouvez voir de nombreux autres objets célestes, tels que des planètes, des amas stellaires et des nébuleuses en
utilisant cette même technique de base.
Pour obtenir plus de conseils pratiques sur l’observation astronomique, veuillez consulter : ExploreTheSky.com
Vous y trouverez tous les conseils pratiques pour vous aider à profiter au maximum de votre nouveau télescope, y compris :
• Comment observer les planètes
• Comment localiser et observer les étoiles, les étoiles doubles et les amas d’étoiles
• Comment observer les objets du ciel profond tels que les nébuleuses et les galaxies
• Comment choisir un bon site pour l’observation astronomique
• Comment évaluer la condition du ciel
FRANÇAIS | 15GARANTIE LIMITÉE DE 2 ANS DE CELESTRON
A. Celestron garantit que votre monture de télescope sera exempte de tout défaut de matériaux ou de fabrication pour une période de
deux (2) ans. Celestron réparera ou remplacera ce produit ou une partie de celui-ci lorsqu’il a été déterminé, lors d’une inspection par
Celestron, que le produit est défectueux en raison d’un défaut de matériaux ou de fabrication. Comme condition à l’obligation de Celestron
de réparer ou remplacer un tel produit, le produit doit être retourné à Celestron avec la preuve d’achat satisfaisante pour Celestron.
B. Un numéro d’autorisation de retour valide doit être obtenu de Celestron avant le renvoi. Appelez Celestron au (310) 328-9560 pour
recevoir le numéro à afficher à l’extérieur de votre colis d’expédition.
Tous les retours doivent être accompagnés d’une déclaration écrite indiquant le nom, l’adresse et le numéro de téléphone de jour du
propriétaire, ainsi qu’une brève description des prétendus défauts. Les pièces ou le produit ayant été l’objet d’un remplacement deviendront
la propriété de Celestron.
Le client sera responsable de tous les frais de transport et d’assurance, à la fois vers et depuis l’usine de Celestron, et devra payer à l’avance
ces coûts.
Celestron fera des efforts raisonnables pour réparer ou remplacer tout télescope couvert par cette garantie dans les trente jours suivant
sa réception. Dans le cas où une réparation ou un remplacement nécessitera plus de trente jours, Celestron en avisera le client en
conséquence. Celestron se réserve le droit de remplacer tout produit qui a été retiré de sa gamme de produits disponibles avec un nouveau
produit ayant une valeur et des fonctions équivalentes.
Cette garantie sera nulle et sans effet dans le cas où la conception ou la fonction d’un produit couvert a été modifiée, ou lorsque le produit a
été soumis à un usage abusif, à de mauvaises manipulations ou à une réparation non autorisée. En outre, une défaillance ou une détérioration
du produit due à l’usure normale n’est pas couverte par cette garantie.
CELESTRON DÉCLINE TOUTE GARANTIE, EXPRESSE OU IMPLICITE, DE QUALITÉ MARCHANDE OU D’ADAPTATION À UN USAGE PARTICULIER, À MOINS DE DISPOSITIONS EXPRESSES DANS CE DOCUMENT.
LA SEULE OBLIGATION DE CELESTRON EN VERTU DE CETTE GARANTIE LIMITÉE SERA DE RÉPARER OU REMPLACER LE PRODUIT COUVERT, EN CONFORMISTE AVEC LES DISPOSITIONS DE CE DOCUMENT.
CELESTRON DÉCLINE TOUTE RESPONSABILITÉ POUR TOUTE PERTE DE PROFITS, TOUT DOMMAGE GÉNÉRAL, PARTICULIER OU INDIRECT POUVANT RÉSULTER DE LA VIOLATION DE TOUTE GARANTIE, OU EN
RAISON DE L’UTILISATION DE, OU DE L’INCAPACITÉ À UTILISER, UN PRODUIT CELESTRON. TOUTE GARANTIE IMPLICITE QUI EST ET QUI NE PEUT ÊTRE DÉCLINÉE SERA LIMITÉE À UNE DURÉE DE DEUX ANS À
PARTIR DE LA DATE D’ACHAT INITIALE.
Certains états ou certaines provinces ne permettent pas l’exclusion ou la limitation des dommages accessoires ou indirects ou une limitation
sur la durée d’une garantie implicite, alors dans ces cas les limitations et exclusions susmentionnées pourraient ne pas s’appliquer à vous.
Cette garantie vous donne des droits légaux spécifiques, et vous pouvez également avoir d’autres droits qui varient d’un état ou d’une
province à l’autre.
Celestron se réserve le droit de modifier ou de cesser la production de tout modèle ou style de télescope, et cela sans préavis.
Si des problèmes liés à la garantie surviennent, ou si vous avez besoin d’assistance pour utiliser votre télescope, contactez:
Celestron, Service à la clientèle. Tél. (310) 328-9560
Du lundi au vendredi, de 8 h à 16 h HNP
REMARQUE: C ette garantie est valable pour les clients américains et canadiens qui ont acheté ce produit auprès d’un revendeur autorisé Celestron aux États-Unis ou au Canada. La garantie en dehors des É.-U. et
du Canada n’est valable que pour les clients ayant acheté le produit d’un distributeur international de Celestron ou d’un distributeur agréé dans le pays en question. Veuillez communiquer avec eux pour
toute réparation sous garantie.
REMARQUE RELATIVE À LA FCC : Cet équipement a été testé et jugé conforme aux limites établies pour un dispositif numérique
de classe B, conformément à la partie 15 de la réglementation de la FCC. Ces limites ont été mises en place pour offrir une protection
raisonnable contre les interférences dans un complexe résidentiel. Cet équipement génère et peut émettre des fréquences radio et,
s’il n’est pas installé et utilisé conformément aux instructions du manuel, peut causer des interférences nuisibles aux communications
radio. Mais il n’existe aucune garantie que des interférences ne seront pas produites dans une installation particulière. Si cet équipement
crée des interférences pour la réception radio ou télévisuelle, ce qui peut être constaté en l’allumant et en l’éteignant, alors il vous est
conseillé d’y remédier d’une des manières suivantes :
• Réorientez ou déplacez l’antenne de réception.
• Augmentez la distance séparant l’équipement et le récepteur.
• Branchez l’équipement dans une prise de courant faisant partie d’un circuit différent de celui sur lequel le récepteur est branché.
• Consultez le distributeur ou un technicien radio ou TV d’expérience pour de l’assistance.
La conception et les caractéristiques du produit sont indiquées sous réserve de modifications sans préavis.
Ce produit a été conçu à l’intention des utilisateurs de 14 ans et plus. 03-15
Printed in China
© 2015 Celestron • All rights reserved
celestron.com
2835 Columbia Street • Torrance, CA 90503 U.S.A.
Telephone: 800.421.9649
16 | FRANÇAISBEDIENUNGSANLEITUNG
Modellnr. 22150, 22151, 22152
DEUTSCHLIEFERUMFANG:
Wir empfehlen Ihnen, die Verpackung Ihres Teleskops aufzubewahren, um das Teleskop bei Nichtverwendung darin
zu verstauen. Gehen Sie beim Auspacken vorsichtig vor, da Kleinteile enthalten sind. Überprüfen Sie anhand der
untenstehenden Teileliste die Vollständigkeit aller Teile und Zubehörteile.
TEILELISTE
1 5
1
2
2
7 6
3
8 3 7
4
5
9 8
6
4
OMNI XLT AZ 102 OMNI XLT AZ 114 and OMNI XLT AZ 130
1. Teleskoptubus 6. Stativ 1. Sucherfernrohr 6. Omni XLT AZ-Montierung
2. Sucherfernrohr 7. Omni XLT AZ-Montierung 2. Teleskoptubus 7. Innensechskant-
3. Okular 8. Innensechskant-Schlüssel (im 3. Slowmotion-Knöpfe Schlüssel (im Inneren der
Inneren der Montierung) Montierung)
4. Aufricht-DiagonalspiegeL 4. Stativ
9. Zubehörablageay 8. Zubehörablage
5. Slowmotion-Knöpfe 5. Porte-oculaire et oculaire
SONNENSTRAHLEN-WARNHINWEIS
Schauen Sie weder mit bloßem Auge noch durch ein Teleskop direkt in die Sonne, es sei denn, Sie verfügen über einen geeigneten Sonnenfilter. Permanente und
irreversible Augenschäden können daraus resultieren.
Das Teleskop keinesfalls zur Projektion eines Bildes der Sonne auf eine Oberfläche verwenden. Durch die interne Wärmeakkumulation können das Teleskop und etwaiges
daran angeschlossenes Zubehör beschädigt werden.
Niemals einen Okularsonnenfilter oder einen Herschelkeil verwenden. Die interne Wärmeakkumulation im Teleskop kann zu Rissen oder Brüchen dieser Instrumente führen.
Dadurch könnte ungefiltertes Sonnenlicht ins Auge gelangen.
Lassen Sie das Teleskop nicht unbeaufsichtigt, vor allem wenn sich Kinder oder Erwachsene, die mit der korrekten Bedienung Ihres Teleskops nicht vertraut sind, in der
Nähe befinden.
18 | DEUTSCHDAS TELESKOP AUFBAUEN
DIE MONTIERUNG
Der Aufbau gestaltet sich einfach, da Stativ und Montierung
des Omni XLT AZ vollständig montiert geliefert werden:
1. Nehmen Sie Stativ und Montierung aus der Schachtel.
2. Lösen Sie die Knöpfe an jedem Beinunterteil und ziehen
Sie den Innenteil jedes Beins auf die gewünschte Länge
aus. Ziehen Sie die Knöpfe zum Feststellen der Beine
wieder an, wenden Sie jedoch dabei nicht zu viel Kraft
auf.
3. Stellen Sie das Stativ auf und ziehen Sie die Stativbeine
auseinander, bis die Halterung einrastet.
4. Platzieren Sie die Zubehörablage oben auf die
Mittelstange und richten Sie die Bohrungen aus. Führen
Sie die drei Flügelschrauben durch die Unterseite der
Beinhaltung und drehen Sie sie in die Ablage.
5. S
tellen Sie sicher, dass die Gelenkbolzen sicher an den
schwarzen Flügelmuttern oben an jedem Bein sitzen.
DEN WINKEL DES MONTIERUNGSARMS EINSTELLEN
Je nach Verwendungsweise Ihres Teleskops können Sie den
Winkel des Montierungsarms für mehr Bewegungsfreiheit
anpassen. Die Montierung ist für das astronomische
Beobachten vormontiert; es kann weit nach oben bewegt
werden, ist jedoch nur begrenzt nach unten schwerkbar.
Wenn Sie die Montierung für Bodenbeobachtungen von
einer erhöhten Position (Klippe, Balkon etc.) aus verwenden
und das Teleskop weit unter den Horizont schwenken
möchten, muss der Winkel des Montierungsarms hierfür
angepasst werden.
Den Winkel einstellen:
1. Drehen Sie die runde Abdeckung unten am vertikalen
Montierungsarm ab.
2. Nehmen Sie die drei Schrauben unter der Abdeckung
mithilfe eines 4-mm-Innensechskant-Schraubendrehers
(nicht enthalten) ab.
3. Drehen Sie den Montierungsarm senkrecht nach oben
und drehen Sie die drei Schrauben wieder hinein.
4. Z
iehen Sie die Schrauben fest und bringen Sie die runde
Abdeckung wieder an.
DEUTSCH | 19DIE SLOWMOTION-KNÖPFE
So bringen Sie die Slowmotion-Knöpfe an Ihre Montierung
an:
1. V
orne an der Montierung befindet sich verborgen in einer
Spalte ein mitgelieferter Innensechskantschlüssel.
2.
Platzieren Sie den Slowmotion-Knopf über dem
D-förmigen Schaft und drücken Sie ihn fest nach innen.
3.
Ziehen Sie die Befestigungsschrauben mithilfe des
Innensechskantschlüssels fest.
4. L
egen Sie den Innensechskantschlüssel wieder in die
Aufbewahrung der Montierung.
DER TELESKOPTUBUS
So bringen Sie den Teleskoptubus an Ihrem Stativ mit
Montierung an:
1.Die Schwalbenschwanzführung befindet sich seitlich am
Teleskoptubus.
2.
Halten Sie den Teleskoptubus neben die Montierung
und schieben Sie die Schwalbenschwanzführung in die
Klammer oben an der Montierung.
3. Z
iehen Sie den Knopf unten an der Klammer fest, um das
Teleskop zu arretieren.
ANMERKUNG: H ier ist der 102-mm-Refraktor abgebildet, doch für die 114-mm- und 130-mm-
Newton-Teleskope erfolgt die Fixierung an der Montierung auf dieselbe Weise.
DER ZENITSPIEGEL (NUR FÜR DEN 102-MM-REFRAKTOR)
Der Zenitspiegel auf der Rückseite des Refraktorteleskops
reflektiert das Licht über einen kleinen Spiegel in einem
Winkel von 90 ° und ermöglicht so eine bequemere
Betrachtungsposition. Da ein Zenitspiegel ein
hundertprozentig korrekt ausgerichtets Bild liefert, können
Sie das Teleskop leicht für terrestrische Beobachtungen
bei Tageslicht einsetzen.
Den Zenitspiegel anbringen:
1. Nehmen Sie beide Kappen vom Zenitspiegel ab.
2.
Lösen Sie die Feststellschrauben auf der Rückseite des
Fokussierers und ziehen Sie die kleine Staubschutzkappe ab.
3. Setzen Sie den kleineren Tubus des Zenitspiegels in die
Rückseite des Fokussierers ein und sichern Sie diesen
durch Anziehen der Feststellschrauben.
Wenn Sie die Feststellschrauben wieder lösen, können
Sie den Zenitspiegel in jede beliebige Richtung drehen.
20 | DEUTSCHOKULAR
Ihres Teleskops verfügt über ein 25-mm-Plössl-Okular für
ein moderat breites Gesichtsfeld. Zusätzliche Okulare für
eine geringere oder höhere Vergrößerungsstufe sind separat
erhältlich.
So installieren Sie ein Okular am 102-mm-Refraktor:
1. Lösen Sie die Feststellschrauben am offenen Ende des
Zenitspiegels.
2. Schieben Sie den Chromabschnitt des 25-mm-Okulars in
den Zenitspiegel.
3. Z
iehen Sie die zwei Feststellschrauben wieder an, um das
Okular zu fixieren.
4. F
ür ein gestochen scharfes Bild müssen Sie fokussieren,
indem Sie durch das Okular sehen und die Fokussierknöpfe
solange langsam drehen, bis Sie das schärfste Bild erhalten.
So installieren Sie ein Okular am 114-mm- und 130-mm-
Newton-Teleskop:
1. Lösen Sie die beiden silbernen Feststellschrauben
am Fokussierer und ziehen Sie die kleine Kunststoff-
Schutzkappe ab.
2. Stecken Sie den Silberzylinder an der Unterseite des
25-mm-Okulars in den Fokussierer.
3. Ziehen Sie die zwei Feststellschrauben wieder an, um das
Okular zu fixieren.
4. Für ein gestochen scharfes Bild müssen Sie fokussieren,
indem Sie durch das Okular sehen und die Fokussierknöpfe
solange langsam drehen, bis Sie das schärfste Bild
erhalten.
DAS SUCHERFERNROHR
Ihr Teleskop ist mit einem Reflex-Sucherfernrohr mit roter LED
ausgestattet, mit dessen Hilfe Sie ein fernes Zielobjekt im
Teleskop anvisieren können.
Installation des Suchfernrohrs:
1. Schieben Sie die Sucherfernrohr-Halterung in die Spalte
des Schwalbenschwanzes am Teleskop in der Nähe des
Fokussierers. Das große Fenster des Sucherfernrohrs muss
in Richtung der Vorderseite des Teleskops weisen.
2. Fixieren Sie die Halterung, indem Sie die Flügelschrauben
der Spalte am Schwalbenschwanz festziehen.
DEUTSCH | 21DAS TELESKOP SCHWENKEN
Die Omni AZ-Montierung verfügt über Rutschkupplungen an beiden Achsen. Für ausladende Teleskopschwenks wird
einfach der optische Tubus in die gewünschte Richtung gedrückt. Für Feineinstellungen oder das Nachführen von
Himmelsobjekten werden die beiden Slowmotion-Knöpfe gedreht.
JUSTIEREN DES SUCHFERNROHRS
Das Reflex-Sucherfernrohr mit roter LED unterstützt Sie beim Ausrichten Ihres Teleskops, indem Sie beim Blick durch das
runde Glasfenster Ihr Zielobjekt mit einem roten Fadenkreuz, der auf das Fenster projiziert wird, abdecken können.
Nach dem ersten Aufbau Ihres Teleskops müssen Sie das Sucherfernrohr an der Hauptoptik Ihres Teleskops ausrichten.
Obwohl dies auch bei Nacht vorgenommen werden kann, ist es bei Tag bedeutend einfacher. Einmal ausgerichtet muss Ihr
Sucherfernrohr nicht erneut ausgerichtet werden, es sei denn, es wird einem Stoß ausgesetzt oder fällt um.
So wird das Reflex-Sucherfernrohr mit roter LED justiert:
1. Nehmen Sie Ihr Teleskop bei Tag nach draußen. Suchen Sie mit dem bloßen Auge ein leicht erkennbares Objekt, wie
eine Straßenlaterne, ein Autokennzeichen oder einen hohen Baum. Das Objekt sollte 400 Meter oder weiter entfernt
sein.
2. Nehmen Sie die große Schutzabdeckung vom Teleskop ab und vergewissern Sie sich, dass das 25-mm-Okular
angebracht ist.
3. Schwenken Sie das Teleskop nach links und rechts bzw. auf und ab, um das in Schritt 1 gewählte Objekt grob
anzuvisieren.
4. Schauen Sie durch das Teleskopokular und schwenken Sie dieses manuell, bis das ausgewählte Objekt im Zentrum des
Gesichtfelds liegt. Ist das Bild unscharf, drehen Sie langsam am Fokussierknopf, bis das Bild scharf gestellt ist.
HINWEIS: D as Bild im Teleskop-Okular steht dabei auf dem Kopf. Das ist für ein Astronomie-Teleskop völlig normal.
5. Sobald das Objekt im 25-mm-Okular zentriert ist, können Sie das Sucherfernrohr einschalten, indem Sie den Netz-/
Helligkeitsschalter bis zum Anschlag im Uhrzeigersinn drehen.
6. Bringen Sie Ihren Kopf etwa 30 cm hinter den Sucher, schauen Sie durch das runde Fenster und suchen Sie das rote
Fadenkreuz. Dieser befindet sich höchstwahrscheinlich nahe, jedoch nicht direkt auf dem Objekt, das Sie durch das
25-mm-Okular betrachten.
7. Drehen Sie nun, ohne das Teleskop zu bewegen, an den beiden Einstellknöpfen seitlich und unterhalb des
Sucherfernrohrs. Der eine steuert die Links-Rechts-Bewegung und der andere die Auf- und Abbewegung des
Fadenkreuzes. Stellen Sie beide so ein, dass das Fadenkreuz direkt über dem Objekt erscheint, dass Sie im 25-mm-
Okular betrachten.
Visieren Sie nun einige andere entfernte Zielobjekte an, um das Ausrichten Ihres Teleskops zu üben. Schauen Sie durch
das Fenster des Reflex-Sucherfernrohrs mit roter LED und führen Sie den roten Punkt über das Zielobjekt; vergewissern
Sie sich dabei, dass Sie durch das 25-mm-Okular schauen.
Nach dem Ausrichten des Sucherfernrohrs ist Ihr Teleskop vollständig montiert und bereit für die erste Beobachtung!
ANMERKUNG: Achten Sie darauf, das Reflex-Sucherfernrohr mit roter LED bei Nichtverwendung auszuschalten, um die Batterie zu schonen.
22 | DEUTSCHIHRE ERSTE ASTRONOMISCHE BEOBACHTUNG
DER MOND
Jetzt können Sie Ihr Teleskop bei Nacht nach draußen nehmen und ans Beobachten gehen!
Fangen wir mit dem Mond an. Der Mond benötigt für einen vollständigen Phasenzyklus vom Neumond über den Vollmond
zurück zum Neumond ungefähr einen Monat. Versuchen Sie, ihn zu verschiedenen Stadien dieses Zyklus zu beobachten.
Obwohl sich der Mond immer als Beobachtungsobjekt eignet, wenn er sichtbar am Nachthimmel steht, ist die beste Zeit
zwei Tage nach dem Neumond bis ein paar Tage vor dem Vollmond. Innerhalb dieses Zeitfensters zeigen sich Krater und
Mondgebirge am detailreichsten. Schauen Sie in einem Kalender nach, wann Neumond ist.
1. Bauen Sie Ihr Teleskop mit dem 25-mm-Okular auf, sobald Sie eine freie Sicht auf den Mond haben.
2. Schalten Sie das Sucherfernrohr ein und schauen Sie hindurch, um das rote Fadenkreuz auszumachen.
3. Schwenken Sie Ihr Teleskop, bis Sie den Mond durch das Sucherfernrohr-Fenster sehen können und sich das rote
Fadenkreuz mittig auf dem Mond befindet.
4. Schauen Sie durch das 25-mm-Okular. Drehen Sie vorsichtig an den Fokussierknöpfen, um das Bild scharfzustellen.
HERZLICHEN GLÜCKWUNSCH! SIE HABEN GERADE IHR ERSTES HIMMELSOBJEKT BEOBACHTET!
Sie können mithilfe dieser grundlegenden Technik viele weiter Himmelsobjekte, wie Planeten, Sternhaufen und Nebel,
beobachten.
Besuchen Sie für weitere Tipps über astronomische Beobachtungen: ExploreTheSky.com
There you will find comprehensive tips to help you get the most from your new telescope including:
• Wie man Planeten beobachtet
• Wie man Sterne, Doppelsterne und Sternhaufen lokalisiert und beobachtet
• Wie man Deep-Sky-Objekte wie Nebel und Galaxien beobachtet
• Wie man einen guten Standort für astronomische Beobachtungen auswählt
• Wie man die Bedingungen am Himmel bewertet
DEUTSCH | 23ZWEIJÄHRIGE EINGESCHRÄNKTE GARANTIE VON CELESTRON
A. C
elestron garantiert, dass Ihre Teleskop-Montierung für zwei Jahre frei von Material- und Verarbeitungsfehlern ist. Celestron
wird ein solches Produkt oder Teile davon, wenn nach Inspektion durch Celestron ein Defekt an Material oder Verarbeitung
gefunden wurde, reparieren oder austauschen. Die Verpflichtung von Celestron, ein solches Produkt zu reparieren oder
auszutauschen, unterliegt der Bedingungen, dass das Produkt zusammen mit einem für Celestron zufriedenstellenden
Kaufbeleg an Celestron zurückgesendet wird.
B. D
ie korrekte Rücksende-Autorisationsnummer muss zuvor von Celestron angefordert werden. Rufen Sie Celestron unter
(310) 328-9560 an, um die Nummer, die auf der Außenseite Ihres Versandcontainers aufgebracht ist, zu erhalten.
Alle Rücksendungen müssen eine schriftliche Erklärung enthalten, aus der der Name, die Adresse und die Telefonnummer
des Eigentümers, zu der er tagsüber erreichbar ist, zusammen mit einer kurzen Beschreibung aller beanstandeten Defekte,
hervorgeht. Ausgetauschte Teile oder Produkte werden Eigentum von Celestron.
Der Kunde ist für alle Kosten für Versand und Versicherung zu und vom Celestron-Werk verantwortlich und muss diese
Kosten im Voraus begleichen.
Celestron muss vernünftige Maßnahmen ergreifen, um jede Teleskopmontierung unter dieser Garantie innerhalb von 30
Tagen nach Erhalt zu reparieren oder auszutauschen. Für den Fall, dass Reparatur oder Austausch mehr als dreißig Tage
in Anspruch nimmt, muss Celestron den Kunden entsprechen in Kenntnis setzen. Celestron behält sich das Recht vor, ein
Produkt, das aus der Produktlinie ausgeschieden ist, durch ein neues oder in Wert und Funktion vergleichbares Produkt zu
ersetzen.
Diese Garantie erlischt und wird außer Kraft gesetzt, für den Fall, dass ein Produkt unter der Garantie in Design oder Funktion
modifiziert wurde oder Missbrauch, unsachgemäße Handhabung oder unautorisierter Reparatur unterzogen wurde. Des
Weiteren sind Produktfehlfunktionen oder Wertminderung aufgrund von normalem Verschleiß von dieser Garantie nicht
abgedeckt.
CELESTRON LEHNT JEGLICHE GEWÄHRLEISTUNG, OB AUSDRÜCKLICH ODER STILLSCHWEIGEND, OB DER MARKTGÄNGIGKEIT ODER DER EIGNUNG
FÜR EINEN BESTIMMTEN ZWECK, AUSSER DEM HIERIN GENANNTEN, AB. DIE ALLEINIGE VERPFLICHTUNG VON CELESTRON UNTER DIESER
EINGESCHRÄNKTEN GARANTIE BESTEHT DARIN, DAS DURCH DIE GARANTIE ABGEDECKTE PRODUKT IN ÜBEREINSTIMMUNG MIT DEN HIERIN
FESTGEHALTENEN BEDINGUNGEN ZU REPARIEREN ODER AUSZUTAUSCHEN. CELESTRON LEHNT AUSDRÜCKLICH JEGLICHE HAFTUNG FÜR ENTGANGENE
PROFITE, ALLGEMEINE, SPEZIELLE, INDIREKTE ODER FOLGESCHÄDEN AB, DIE SICH AUS EINER GARANTIEVERLETZUNG ERGEBEN KÖNNTEN ODER
DIE DURCH NUTZUNG BZW. UNFÄHIGKEIT ZUR NUTZUNG JEGLICHEN CELESTRON-PRODUKTS ERGEBEN. JEGLICHE STILLSCHWEIGENDE ODER NICHT
BEANSPRUCHBARE GEWÄHRLEISTUNGEN IST ZEITLICH AUF ZWEI JAHRE AB DATUM DES URSPRÜNGLICHEN KAUFS BESCHRÄNKT.
Einige Staaten erlauben keinen Ausschluss oder keine Beschränkung von zufälligen oder Folgeschäden sowie keine zeitliche
Begrenzung einer stillschweigenden Garantie; daher könnten die oben genannten Beschränkungen und Ausschlüsse auf Sie
nicht zutreffen.
Diese Garantie gibt Ihnen bestimmte Rechte und darüber hinaus könnten Sie auch weitere Rechte haben, die von Land zu
Land variieren.
Celestron behält sich das Recht vor, jegliches Modell und jeglichen Teleskoptyp zu modifizieren oder aus der Produktlinie
auszuschließen, ohne Ihnen dies vorher anzukündigen.
Wenn ein Garantiefall eintritt oder wenn Sie Hilfestellung bei der Verwendung Ihrer Teleskopmontierung benötigen, wenden
Sie sich bitte an: Celestron, Kundendienstabteilung, Tel. (310) 328-9560Tel. (310) 328-95
FCC-ERKLÄRUNG: Dieses Gerät wurde getestet und entspricht den Grenzwerten für digitale Geräte der Klasse B in Übereinstim-
mung mit Artikel 15 der FCC-Bestimmungen. Diese Grenzwerte bieten einen angemessenen Schutz vor Störungen in Wohnanlagen.
Dieses Gerät erzeugt, verwendet und strahlt Hochfrequenzenergie aus und kann den Funkverkehr stören, wenn es nicht gemäß den An-
weisungen installiert und verwendet wird. Es kann jedoch nicht garantiert werden, dass in einer bestimmten Einrichtung keine Störungen
auftreten. Falls dieses Gerät Störungen des Radio- oder Fernsehempfangs verursacht, was durch ein vorübergehendes Ausschalten
des Geräts festgestellt werden kann, wird der Benutzer dazu angehalten, die Störung durch eine oder mehrere der nachstehenden
Maßnahmen zu beheben:
• Neuausrichtung oder Positionsveränderung der Empfangsantenne.
• Den Abstand zwischen dem Gerät und dem Empfänger vergrößern.
• Anschluss des Geräts an eine Steckdose, die nicht am selben Stromkreis angeschlossen ist, wie die des Empfängers.
• Den Händler oder einen erfahrenen Radio- und Fernsehtechniker um Hilfe bitten.
Produktdesign und technische Daten können ohne Vorankündigung geändert werden.
Dieses Produkt wurde für die Verwendung durch Personen von 14 Jahren und darüber entworfen und vorgesehen.
03-15
Printed in China
© 2015 Celestron • All rights reserved
celestron.com
2835 Columbia Street • Torrance, CA 90503 U.S.A.
Telephone: 800.421.9649
24 | DEUTSCHYou can also read