Introduction to Visual Studio and C#
←
→
Page content transcription
If your browser does not render page correctly, please read the page content below

Telemark
University
College
Department
of
Electrical
Engineering,
Information
Technology
and
Cybernetics
Introduction
to
Visual
Studio
and
C#
HANS-‐PETTER
H ALVORSEN,
2 014.03.12
Faculty of Technology, Postboks 203, Kjølnes ring 56, N-3901 Porsgrunn, Norway. Tel: +47 35 57 50 00 Fax: +47 35 57 54 01
Table
of
Contents
1.
Introduction
.......................................................................................................................
5
1.1.
Visual
Studio
...............................................................................................................
5
1.2.
C#
................................................................................................................................
6
1.3.
.NET
Framework
..........................................................................................................
6
1.4.
Object-‐Oriented
Programming
(OOP)
.........................................................................
7
2.
Visual
Studio
......................................................................................................................
8
2.1.
Introduction
................................................................................................................
8
2.2.
Getting
Started
...........................................................................................................
8
2.2.1.
Integrated
Development
Environment
(IDE)
.......................................................
8
2.2.2.
New
Project
..........................................................................................................
9
2.2.3.
Solution
Explorer
................................................................................................
10
2.2.4.
Toolbox
..............................................................................................................
11
2.2.5.
Editors
and
Designers
........................................................................................
12
2.2.6.
Properties
window
.............................................................................................
12
2.2.7.
Build
and
Debug
Tools
.......................................................................................
13
3.
Windows
Programming
...................................................................................................
15
3.1.
Introduction
..............................................................................................................
15
3.1.1.
Windows
Forms
.................................................................................................
15
3.1.2.
WPF
....................................................................................................................
16
3.2.
Hello
World
...............................................................................................................
16
4.
Getting
Started
with
C#
...................................................................................................
19
2
3
Table
of
Contents
4.1.
Introduction
..............................................................................................................
19
4.2.
Data
Types
and
Variables
..........................................................................................
19
4.2.1.
Boolean
type
......................................................................................................
20
4.2.2.
Numeric
types:
Integrals,
Floating
Point,
Decimal
.............................................
20
4.2.3.
String
type
..........................................................................................................
20
4.2.4.
Arrays
.................................................................................................................
21
4.3.
Control
Flow
..............................................................................................................
21
4.3.1.
The
if
Statement
................................................................................................
21
4.3.2.
The
switch
Statement
........................................................................................
22
4.4.
Loops
.........................................................................................................................
23
4.4.1.
The
while
Loop
...................................................................................................
23
4.4.2.
The
do
Loop
.......................................................................................................
23
4.4.3.
The
for
Loop
.......................................................................................................
24
4.4.4.
The
foreach
Loop
...............................................................................................
24
4.5.
Methods
....................................................................................................................
24
4.5.1.
Nonstatic
Methods
............................................................................................
25
4.5.2.
Static
Methods
...................................................................................................
25
4.6.
Namespaces
..............................................................................................................
26
4.7.
Classes
.......................................................................................................................
26
4.7.1.
Constructor
........................................................................................................
27
4.8.
Properties
.................................................................................................................
29
4.9.
Naming
Convention
..................................................................................................
31
5.
More
Object-‐oriented
Techniques
...................................................................................
33
5.1.
Inheritance
................................................................................................................
33
5.2.
Polymorphism
...........................................................................................................
34
5.3.
Encapsulation
............................................................................................................
35
Tutorial:
Introduction
to
Visual
Studio
and
C#
4

                                              Table
  of
  Contents


6.
   Exception
  Handling
  ..........................................................................................................
  36


7.
   Windows
  Forms
  Example
  .................................................................................................
  38


8.
   Web
  Programming
  ...........................................................................................................
  44


        8.1.
   Introduction
  ..............................................................................................................
  44


        8.2.
   HTML
  .........................................................................................................................
  44


        8.3.
   Web
  Browser
  ............................................................................................................
  44


        8.4.
   CSS
  ............................................................................................................................
  45


        8.5.
   JavaScript
  ..................................................................................................................
  45


        8.6.
   ASP.NET
  .....................................................................................................................
  45


        8.7.
   AJAX/
  ASP.NET
  AJAX
  .................................................................................................
  46


        8.8.
   Silverlight
  ..................................................................................................................
  46


9.
   Database
  Programming
  ...................................................................................................
  47


        9.1.
   ADO.NET
  ...................................................................................................................
  47


                                           Tutorial:
  Introduction
  to
  Visual
  Studio
  and
  C#
1.
Introduction
In
this
Tutorial
we
will
use
Visual
Studio
and
C#.
C#
is
the
programming
language,
while
Visual
Studio
is
the
development
environment.
Useful
links:
Visual
Studio:
http://msdn.microsoft.com/en-‐us/library/dd831853.aspx
C#:
http://msdn.microsoft.com/en-‐us/library/kx37x362.aspx
1.1.
Visual
S tudio
Microsoft
Visual
Studio
is
an
integrated
development
environment
(IDE)
from
Microsoft.
It
can
be
used
to
develop
console
and
graphical
user
interface
applications
along
with
Windows
Forms
applications,
web
sites,
web
applications,
and
web
services
in
both
native
code
together
with
managed
code
for
all
platforms
supported
by
Microsoft
Windows,
Windows
Phone,
Windows
CE,
.NET
Framework,
.NET
Compact
Framework
and
Microsoft
Silverlight.
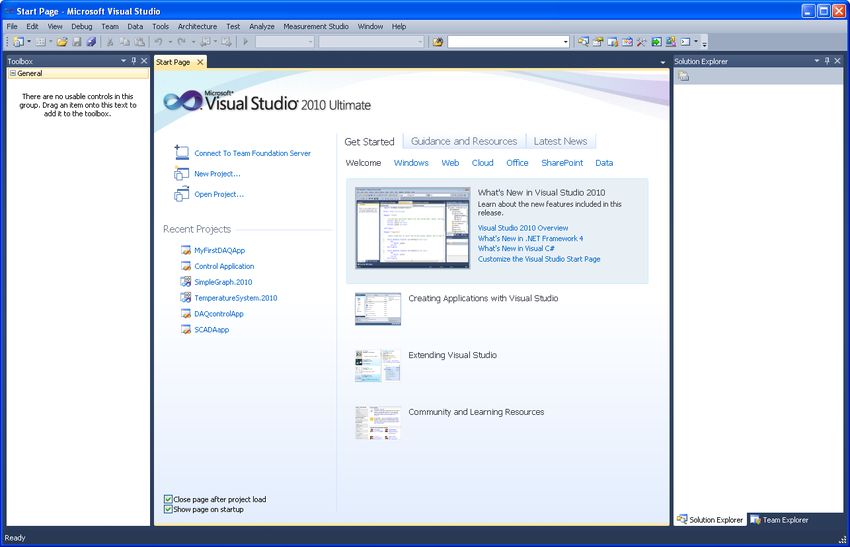
Below
we
see
the
integrated
development
environment
(IDE)
in
Visual
Studio:
5
6
Introduction
New
projects
are
created
from
the
“New
Project”
window:
1.2.
C#
C#
is
pronounced
“see
sharp”.
C#
is
an
object-‐oriented
programming
language
and
part
of
the
.NET
family
from
Microsoft.
C#
is
very
similar
to
C++
and
Java.
C#
is
developed
by
Microsoft
and
works
only
on
the
Windows
platform.
1.3.
.NET
F ramework
The
.NET
Framework
(pronounced
“dot
net”)
is
a
software
framework
that
runs
primarily
on
Microsoft
Windows.
It
includes
a
large
library
and
supports
several
programming
languages
which
allow
language
interoperability
(each
language
can
use
code
written
in
other
languages).
The
.NET
library
is
available
to
all
the
programming
languages
that
.NET
supports.
Programs
written
for
the
.NET
Framework
execute
in
a
software
environment,
known
as
the
Common
Language
Runtime
(CLR),
an
application
virtual
machine
that
provides
important
services
such
as
security,
memory
management,
and
exception
handling.
The
class
library
and
the
CLR
together
constitute
the
.NET
Framework.
Tutorial:
Introduction
to
Visual
Studio
and
C#
7
Introduction
1.4.
Object-‐Oriented
P rogramming
( OOP)
Object-‐oriented
programming
(OOP)
is
a
programming
language
model
organized
around
"objects"
rather
than
"actions"
and
data
rather
than
logic.
Historically,
a
program
has
been
viewed
as
a
logical
procedure
that
takes
input
data,
processes
it,
and
produces
output
data.
The
first
step
in
OOP
is
to
identify
all
the
objects
you
want
to
manipulate
and
how
they
relate
to
each
other,
an
exercise
often
known
as
data
modeling.
Once
you've
identified
an
object,
you
generalize
it
as
a
class
of
objects
and
define
the
kind
of
data
it
contains
and
any
logic
sequences
that
can
manipulate
it.
Each
distinct
logic
sequence
is
known
as
a
method.
A
real
instance
of
a
class
is
called
an
“object”
or
an
“instance
of
a
class”.
The
object
or
class
instance
is
what
you
run
in
the
computer.
Its
methods
provide
computer
instructions
and
the
class
object
characteristics
provide
relevant
data.
You
communicate
with
objects
-‐
and
they
communicate
with
each
other.
Important
features
with
OOP
are:
• Classes
and
Objects
• Inheritance
• Polymorphism
• Encapsulation
Simula
was
the
first
object-‐oriented
programming
language.
Simula
was
developed
in
the
1960s
by
Kristen
Nygaard
from
Norway.
Java,
Python,
C++,
Visual
Basic
.NET
and
C#
are
popular
OOP
languages
today.
Since
Simula-‐type
objects
are
reimplemented
in
C++,
Java
and
C#
the
influence
of
Simula
is
often
understated.
The
creator
of
C++
(1979),
Bjarne
Stroustrup
(from
Denmark),
has
acknowledged
that
Simula
was
the
greatest
influence
on
him
to
develop
C++.
Tutorial:
Introduction
to
Visual
Studio
and
C#
2.
Visual
Studio
2.1.
Introduction
Home
page
of
Visual
Studio:
http://www.microsoft.com/visualstudio
There
exist
different
versions
of
Visual
Studio,
such
as
Visual
Studio
Express
(free),
Visual
Studio
Professional,
Visual
Studio
Premium
and
Visual
Studio
Ultimate.
2.2.
Getting
S tarted
2.2.1.
Integrated
D evelopment
E nvironment
( IDE)
The
Visual
Studio
product
family
shares
a
single
integrated
development
environment
(IDE)
that
is
composed
of
several
elements:
the
Menu
bar,
Standard
toolbar,
various
tool
windows
docked
or
auto-‐hidden
on
the
left,
bottom,
and
right
sides,
as
well
as
the
editor
space.
The
tool
windows,
menus,
and
toolbars
available
depend
on
the
type
of
project
or
file
you
are
working
in.
Below
we
see
the
Visual
Studio
IDE
(Integrated
Development
Environment):
8

9
Visual
Studio
2.2.2.
New
P roject
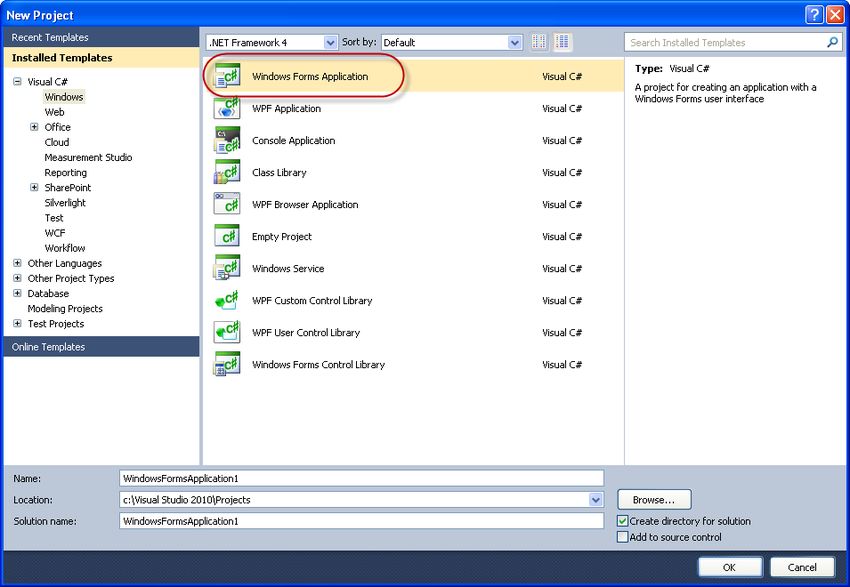
The
first
thing
you
do
when
you
want
to
create
a
new
application
is
to
create
a
new
project.
This
can
be
done
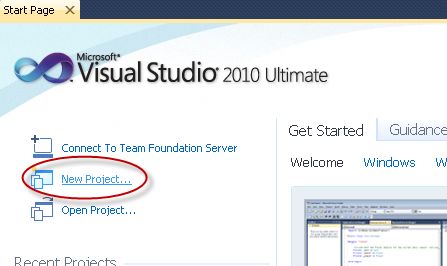
from
the
Start
Page:
Or
from
the
File
menu:
Then
the
“New
Project”
window
appears:
Tutorial:
Introduction
to
Visual
Studio
and
C#
10

                                                 Visual
  Studio


In
  this
  window
  you
  will
  select
  an
  appropriate
  template
  based
  on
  what
  kind
  of
  application
  you

want
  to
  create,
  and
  a
  name
  and
  location
  for
  your
  project
  and
  solution.


The
  most
  common
  applications
  are:


         •   Windows
  Form
  Application

         •   Console
  Application

         •   WPF
  Application

         •   ASP.NET
  Web
  Application

         •   Silverlight
  Application


2.2.3.
              Solution
   E xplorer

Solutions
  and
  projects
  contain
  items
  that
  represent
  the
  references,
  data
  connections,

folders,
  and
  files
  that
  you
  need
  to
  create
  your
  application.
  A
  solution
  container
  can
  contain

multiple
  projects
  and
  a
  project
  container
  typically
  contains
  multiple
  items.


                                    Tutorial:
  Introduction
  to
  Visual
  Studio
  and
  C#
11
Visual
Studio
2.2.4.
Toolbox
The
Toolbox
contains
all
the
necessary
controls,
etc.
you
need
to
create
your
user
interface.
See
Figure
below.
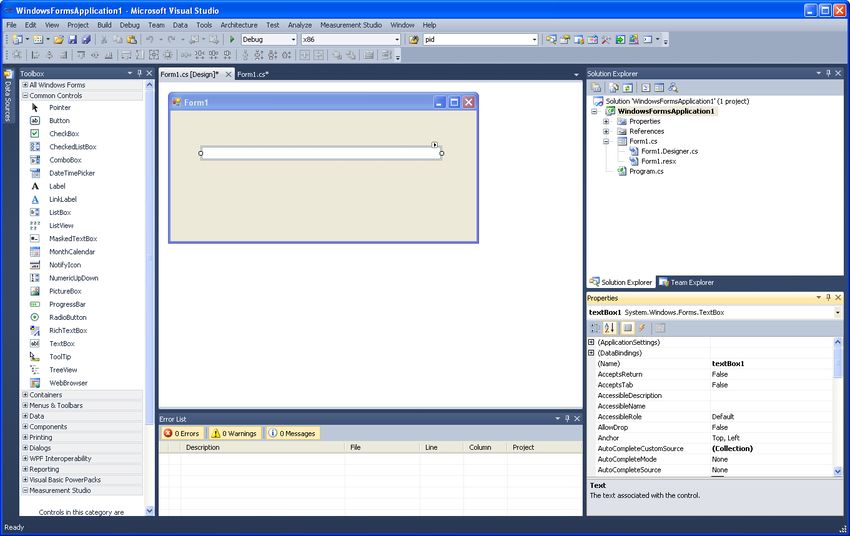
The
Toolbox
contains
all
the
controls,
etc.
we
can
use
in
our
user
interface.
In
order
to
use
them
in
our
user
interface,
we
just
drag
and
drop
them
to
the
“Form”,
as
shown
below:
Tutorial:
Introduction
to
Visual
Studio
and
C#
12

                                                  Visual
  Studio


2.2.5.
               Editors
   a nd
   D esigners

Visual
  Studio
  has
  different
  editors
  and
  design
  tools.


Graphical
  User
  Interface
  Designer:


Code
  Editor:


2.2.6.
               Properties
   w indow

Each
  control
  we
  have
  on
  our
  user
  interface
  has
  lots
  of
  Properties
  we
  can
  set.


                                      Tutorial:
  Introduction
  to
  Visual
  Studio
  and
  C#
13

                                              Visual
  Studio


This
  is
  done
  in
  the
  Properties
  window:


2.2.7.
               Build
   a nd
   D ebug
   T ools

In
  Visual
  Studio
  we
  have
  lots
  of
  Build
  and
  Debugging
  Tools.


Build
  menu:


Below
  we
  see
  the
  Build
  menu:


The
  most
  used
  tool
  is
  “Build
  Solution”
  (Shortcut
  Key:
  F6).


Debug
  menu:


Below
  we
  see
  the
  Debug
  menu:


                                      Tutorial:
  Introduction
  to
  Visual
  Studio
  and
  C#
14

                                       Visual
  Studio


The
  most
  used
  tool
  is
  “Start
  Debugging”
  (Shortcut
  Key:
  F5).


                                    Tutorial:
  Introduction
  to
  Visual
  Studio
  and
  C#
3.
   Windows
  Programming

3.1.
               Introduction

When
  creating
  ordinary
  Windows
  applications,
  we
  can
  select
  between
  the
  following:


       •   Windows
  Forms
  Application

       •   WPF
  Applications
  (Windows
  Presentation
  Foundation)


Windows
  Forms
  is
  the
  standard
  way
  of
  creating
  Windows
  applications
  and
  has
  existed
  in

many
  years,
  even
  before
  .NET
  1.0
  (2002)
  was
  introduced.
  WPF
  is
  a
  new
  approach
  from

creating
  Windows
  applications
  and
  was
  introduced
  with
  .NET
  Framework
  3.0
  (2006).


For
  example
  has
  the
  Visual
  Studio
  IDE
  been
  entirely
  rewritten
  using
  WPF.


Windows
  Forms
  Application
  and
  WPF
  Applications
  will
  be
  explained
  in
  more
  detail
  below.


3.1.1.
             Windows
   F orms

Windows
  Forms
  is
  the
  standard
  way
  of
  creating
  Windows
  applications.


Select
  “Windows
  Forms
  Application”
  in
  the
  “New
  Project”
  window:


                                                                   15
16
Windows
Programming
3.1.2.
WPF
Developed
by
Microsoft,
the
Windows
Presentation
Foundation
(or
WPF)
is
a
computer-‐software
graphical
subsystem
for
rendering
user
interfaces
in
Windows-‐based
applications.
WPF
is
intended
to
take
over
for
the
traditional
Windows
Forms.
The
graphical
user
interface
in
WPF
is
designed
using
XAML
(Extensible
Application
Markup
Language).
XAML:
Following
the
success
of
markup
languages
for
web
development,
WPF
introduces
a
new
language
known
as
eXtensible
Application
Markup
Language
(XAML),
which
is
based
on
XML.
XAML
is
designed
as
a
more
efficient
method
of
developing
application
user
interfaces
Select
“WPF
Application”
in
the
“New
Project”
window:
3.2.
Hello
W orld
We
start
by
creating
a
traditional
“Hello
World”
application
using
Windows
Forms.
The
application
is
shown
below:
Tutorial:
Introduction
to
Visual
Studio
and
C#
17

                                Windows
  Programming


The
  Visual
  Studio
  IDE
  looks
  like
  this:


In
  this
  project
  we
  use
  a
  simple
  TextBox
  (textBox1)
  and
  when
  we
  start
  the
  program
  the
  text

“Hello
  World”
  is
  written
  to
  the
  TextBox.


The
  code
  is
  as
  follows:

using     System;
using     System.Collections.Generic;
using     System.ComponentModel;
using     System.Data;
using     System.Drawing;
using     System.Linq;
using     System.Text;
using     System.Windows.Forms;

namespace WindowsFormsApplication1
{
   public partial class Form1 : Form
   {
       public Form1()
       {
          InitializeComponent();
       }

                                          Tutorial:
  Introduction
  to
  Visual
  Studio
  and
  C#
18

                                Windows
  Programming


             private void Form1_Load(object sender, EventArgs e)
             {

                 textBox1.Text = "Hello World";

             }

         }
}

                               Tutorial:
  Introduction
  to
  Visual
  Studio
  and
  C#
4.
Getting
Started
with
C#
C#
is
a
modern
Object-‐oriented
programming
language.
Object-‐oriented
programming
(OOP)
is
a
programming
paradigm
using
"objects"
–
data
structures
consisting
of
data
fields
and
methods
together
with
their
interactions
–
to
design
applications
and
computer
programs.
Programming
techniques
may
include
features
such
as
data
abstraction,
encapsulation,
messaging,
modularity,
polymorphism,
and
inheritance.
4.1.
Introduction
In
this
chapter
we
will
start
with
the
basic
all
programming
languages
have:…
• Data
Types
and
Variables
• Control
Flow:
If-‐Else,
etc.
• Loops:
While
Loops,
For
Loops,
etc.
Further
we
will
introduce
the
following:
• Namespaces
• Classes
• Data
Fields
• Methods
• Properties
In
the
next
chapter
we
will
go
more
in
depth
of
what
Object-‐oriented
programming
is
and
introduce
the
following
important
OOP
topics:
• Inheritance
• Polymorphism
• Encapsulation
Note!
C#
is
case-‐sensitive.
4.2.
Data
T ypes
a nd
V ariables
19
20

                                  Getting
  Started
  with
  C#


“Variables”
  are
  simply
  storage
  locations
  for
  data.
  You
  can
  place
  data
  into
  them
  and
  retrieve

their
  contents
  as
  part
  of
  a
  C#
  expression.
  The
  interpretation
  of
  the
  data
  in
  a
  variable
  is

controlled
  through
  “Types”.


The
  C#
  simple
  types
  consist
  of:


         •   Boolean
  type

         •   Numeric
  types:
  Integrals,
  Floating
  Point,
  Decimal

         •   String
  type


4.2.1.
               Boolean
   t ype

Boolean
  types
  are
  declared
  using
  the
  keyword
  “bool”.
  They
  have
  two
  values:
  “true”
  or

“false”.
  In
  other
  languages,
  such
  as
  C
  and
  C++,
  boolean
  conditions
  can
  be
  satisfied
  where
  0

means
  false
  and
  anything
  else
  means
  true.
  However,
  in
  C#
  the
  only
  values
  that
  satisfy
  a

boolean
  condition
  is
  true
  and
  false,
  which
  are
  official
  keywords.


Example:

bool content = true;
bool noContent = false;

4.2.2.
   Numeric
   t ypes:
   I ntegrals,
   F loating
   P oint,

     Decimal

Example:

int i=35;
long y=654654;

float x;
double y;
decimal z;

4.2.3.
               String
   t ype

Example:

string myString=”Hei på deg”;

Special
  characters
  that
  may
  be
  used
  in
  strings:


                                      Tutorial:
  Introduction
  to
  Visual
  Studio
  and
  C#
21

                                  Getting
  Started
  with
  C#


4.2.4.
               Arrays

Example:

int[] myInts = { 5, 10, 15 };

4.3.
                 Control
   F low

To
  be
  able
  to
  control
  the
  flow
  in
  your
  program
  is
  important
  in
  every
  programming
  language.


The
  two
  most
  important
  techniques
  are:


         •   The
  if
  Statement

         •   The
  switch
  Statement


4.3.1.
               The
   i f
   S tatement

The
  if
  statement
  is
  probably
  the
  most
  used
  mechanism
  to
  control
  the
  flow
  in
  your

application.


An
  if
  statement
  allows
  you
  to
  take
  different
  paths
  of
  logic,
  depending
  on
  a
  given
  condition.

When
  the
  condition
  evaluates
  to
  a
  boolean
  true,
  a
  block
  of
  code
  for
  that
  true
  condition
  will

execute.
  You
  have
  the
  option
  of
  a
  single
  if
  statement,
  multiple
  else
  if
  statements,
  and
  an

optional
  else
  statement.


Example:

bool myTest;

                                     Tutorial:
  Introduction
  to
  Visual
  Studio
  and
  C#
22

                                   Getting
  Started
  with
  C#


myTest=false;

if (myTest==false)
       MessageBox.Show("Hello");

If
  we
  have
  more
  than
  one
  line
  of
  code
  that
  that
  shall
  be
  executed,
  we
  need
  to
  use
  braces,

e.g.:

bool myTest;

myTest=false;

if (myTest == false)
{
       MessageBox.Show("Hello1");
       MessageBox.Show("Hello2");
}

For
  more
  complex
  logic
  we
  use
  the
  if
  …
  else
  statement.


Example:

bool myTest;

myTest=true;

if (myTest == false)
{
       MessageBox.Show("Hello1");
}
else
{
       MessageBox.Show("Hello2");
}

Or
  you
  can
  use
  nested
  if…
  else
  if
  sentences.


Example:

int myTest;

myTest=2;

if (myTest == 1)
{
        MessageBox.Show("Hello1");
}
else if (myTest == 2)
{
        MessageBox.Show("Hello2");
}
else
{
        MessageBox.Show("Hello3");
}

4.3.2.
                The
   s witch
   S tatement

Another
  form
  of
  selection
  statement
  is
  the
  switch
  statement,
  which
  executes
  a
  set
  of
  logic

depending
  on
  the
  value
  of
  a
  given
  parameter.
  The
  types
  of
  the
  values
  a
  switch
  statement

operates
  on
  can
  be
  booleans,
  enums,
  integral
  types,
  and
  strings.


                                       Tutorial:
  Introduction
  to
  Visual
  Studio
  and
  C#
23

                                     Getting
  Started
  with
  C#


Example:

switch (myTest)
{
       case 1:
       MessageBox.Show("Hello1");
       break;

             case 2:
             MessageBox.Show("Hello2");
             break;

             default:
             MessageBox.Show("Hello3");
             break;
}

4.4.
                  Loops

In
  C#
  we
  have
  different
  kind
  of
  loops:


         •   The
  while
  loop

         •   The
  do
  loop

         •   The
  for
  loop

         •   The
  foreach
  loop


4.4.1.
                The
   w hile
   L oop

A
  while
  loop
  will
  check
  a
  condition
  and
  then
  continues
  to
  execute
  a
  block
  of
  code
  as
  long
  as

the
  condition
  evaluates
  to
  a
  boolean
  value
  of
  true.


Example:

int myInt = 0;

while (myInt < 10)
{
       MessageBox.Show("Inside Loop: " + myInt.ToString());
       myInt++;
}
MessageBox.Show("Outside Loop: " + myInt.ToString());

4.4.2.
                The
   d o
   L oop

A
  do
  loop
  is
  similar
  to
  the
  while
  loop,
  except
  that
  it
  checks
  its
  condition
  at
  the
  end
  of
  the

loop.
  This
  means
  that
  the
  do
  loop
  is
  guaranteed
  to
  execute
  at
  least
  one
  time.
  On
  the
  other

hand,
  a
  while
  loop
  evaluates
  its
  boolean
  expression
  at
  the
  beginning
  and
  there
  is
  generally

no
  guarantee
  that
  the
  statements
  inside
  the
  loop
  will
  be
  executed,
  unless
  you
  program
  the

code
  to
  explicitly
  do
  so.


Example:


                                        Tutorial:
  Introduction
  to
  Visual
  Studio
  and
  C#
24

                                     Getting
  Started
  with
  C#


int myInt = 0;

do
{
        MessageBox.Show("Inside Loop: " + myInt.ToString());
        myInt++;
} while (myInt < 10);
MessageBox.Show("Outside Loop: " + myInt.ToString());

4.4.3.
                 The
   f or
   L oop

A
  for
  loop
  works
  like
  a
  while
  loop,
  except
  that
  the
  syntax
  of
  the
  for
  loop
  includes

initialization
  and
  condition
  modification.
  for
  loops
  are
  appropriate
  when
  you
  know
  exactly

how
  many
  times
  you
  want
  to
  perform
  the
  statements
  within
  the
  loop.


Example:

for (int i = 0; i < 10; i++)
{
        MessageBox.Show("Inside Loop: " + myInt.ToString());
        myInt++;
}
MessageBox.Show("Outside Loop: " + myInt.ToString());

4.4.4.
                 The
   f oreach
   L oop

A
  foreach
  loop
  is
  used
  to
  iterate
  through
  the
  items
  in
  a
  list.
  It
  operates
  on
  arrays
  or

collections.


Example:

string[] names = { "Elvis", "Beatles", "Eagles", "Rolling Stones" };

foreach (string person in names)
{
        MessageBox.Show(person);
}

4.5.
                   Methods

Methods
  are
  extremely
  useful
  because
  they
  allow
  you
  to
  separate
  your
  logic
  into
  different

units.
  You
  can
  pass
  information
  to
  methods,
  have
  it
  perform
  one
  or
  more
  statements,
  and

retrieve
  a
  return
  value.
  The
  capability
  to
  pass
  parameters
  and
  return
  values
  is
  optional
  and

depends
  on
  what
  you
  want
  the
  method
  to
  do.


Methods
  are
  similar
  to
  functions,
  procedure
  or
  subroutine
  used
  in
  other
  programming

languages.
  The
  difference
  is
  that
  a
  method
  is
  always
  a
  part
  of
  a
  class.


Example:

public void ShowCarColor(string color)

                                        Tutorial:
  Introduction
  to
  Visual
  Studio
  and
  C#
25

                                Getting
  Started
  with
  C#


{

             MessageBox.Show("My Car is: " + color);

}

We
  learn
  more
  about
  methods
  in
  the
  Classes
  section
  below.


We
  have
  2
  kinds
  of
  Methods:


         •   Static
  Methods

         •   Nonstatic
  Methods
  (Instance
  Method)


Static
  Methods
  belongs
  to
  the
  whole
  class,
  while
  nonstatic
  Methods
  belong
  to
  each
  instance

created
  from
  the
  class.


4.5.1.
                  Nonstatic
   M ethods

Example:


We
  define
  the
  class:

class Car
{

              //Nonstatic/Instance Method
             public void SetColor(string color)
             {

                 MessageBox.Show("My Car is: " + color);

             }
}

Then
  we
  use
  it:

Car myCar = new Car(); //We create an Instance of the Class

myCar.SetColor("blue"); //We call the Method

4.5.2.
                  Static
   M ethods

Example:


We
  define
  the
  class:

class Boat
{

             //Static Method
             public static void SetColor(string color)
             {

                 MessageBox.Show("My Boat is: " + color);

             }
}

                                     Tutorial:
  Introduction
  to
  Visual
  Studio
  and
  C#
26
Getting
Started
with
C#
Then
we
use
it:
Boat.SetColor("green");
i.e.,
we
don’t
need
to
create
an
object/instantiating
the
class
before
we
use
the
Static
Method.
4.6.
Namespaces
Namespaces
are
C#
program
elements
designed
to
help
you
organize
your
programs.
They
also
provide
assistance
in
avoiding
name
clashes
between
two
sets
of
code.
Implementing
Namespaces
in
your
own
code
is
a
good
habit
because
it
is
likely
to
save
you
from
problems
later
when
you
want
to
reuse
some
of
your
code.
You
specify
the
Namespaces
you
want
to
use
in
the
top
of
your
code.
Example:
When
you
create
a
new
Windows
Forms
application,
the
following
default
namespaces
will
be
included.
using System;
using System.Collections.Generic;
using System.ComponentModel;
using System.Data;
using System.Drawing;
using System.Linq;
using System.Text;
using System.Windows.Forms;
…
It
is
just
to
add
more
when
you
need
it.
More
about
Namespaces
later.
4.7.
Classes
The
first
step
in
OOP
is
to
identify
all
the
objects
you
want
to
manipulate
and
how
they
relate
to
each
other,
an
exercise
often
known
as
data
modeling.
Once
you've
identified
an
object,
you
generalize
it
as
a
class
of
objects
and
define
the
kind
of
data
it
contains
and
any
logic
sequences
that
can
manipulate
it.
Each
distinct
logic
sequence
is
known
as
a
method.
A
real
instance
of
a
class
is
called
an
“object”
or
an
“instance
of
a
class”.
The
object
or
class
instance
is
what
you
run
in
the
computer.
Its
methods
provide
computer
instructions
and
the
class
object
characteristics
provide
relevant
data.
You
communicate
with
objects
-‐
and
they
communicate
with
each
other.
Tutorial:
Introduction
to
Visual
Studio
and
C#
27

                                Getting
  Started
  with
  C#


Everything
  in
  C#
  is
  based
  on
  Classes.
  Classes
  are
  declared
  by
  using
  the
  keyword
  class

followed
  by
  the
  class
  name
  and
  a
  set
  of
  class
  members
  surrounded
  by
  curly
  braces.


A
  class
  normally
  consists
  of
  Methods,
  Fields
  and
  Properties.


Every
  class
  has
  a
  constructor,
  which
  is
  called
  automatically
  any
  time
  an
  instance
  of
  a
  class
  is

created.
  The
  purpose
  of
  constructors
  is
  to
  initialize
  class
  members
  when
  an
  instance
  of
  the

class
  is
  created.
  Constructors
  do
  not
  have
  return
  values
  and
  always
  have
  the
  same
  name
  as

the
  class.


Example:


We
  define
  the
  following
  class:

class Car
{

             public string color; //Field

             //Method
             public void ShowCarColor()
             {

                    MessageBox.Show("My Car is: " + color);

             }
}

Then
  we
  can
  use
  it:

Car myCar = new Car(); //We create an Instance of the Class

myCar.color = "blue"; //We set a value for the color Field

myCar.ShowCarColor(); //We call the Method

The
  result
  is
  as
  follows:


4.7.1.
                  Constructor

The
  purpose
  of
  constructors
  is
  to
  initialize
  class
  members
  when
  an
  instance
  of
  the
  class
  is

created.


Example:


We
  can
  use
  a
  Constructor
  to
  create
  a
  “default”
  color
  for
  our
  car.


We
  define
  the
  class:


                                            Tutorial:
  Introduction
  to
  Visual
  Studio
  and
  C#
28

                                Getting
  Started
  with
  C#


class Car
{

           public string color; //Field

           //Constructor - Used to initialize the Class
           public Car()
            {
               color="green";
            }

           //Method
           public void ShowCarColor()
           {

                 MessageBox.Show("My Car is: " + color);

           }
}

Then
  we
  can
  use
  it:

Car myCar = new Car(); //We create an Instance of the Class

myCar.ShowCarColor(); //We call the Method

myCar.color = "blue"; //We set a value for the color Field

myCar.ShowCarColor(); //We call the Method

The
  results
  are
  as
  follows:


…


Example:


We
  can
  also
  do
  the
  following:

class Car
   {

           public string color; //Field

           //Constructor - Used to initialize the Class
            public Car(string initColor)
            {
                color = initColor;

                                      Tutorial:
  Introduction
  to
  Visual
  Studio
  and
  C#
29

                                   Getting
  Started
  with
  C#


             }

             //Method
             public void ShowCarColor()
             {

                 MessageBox.Show("My Car is: " + color);

             }
         }

Then
  we
  use
  it:

Car myCar = new Car("green"); //We create an Instance of the Class

myCar.ShowCarColor(); //We call the Method

New
  feature:
  Initialization
  an
  object
  without
  a
  Constructor:


In
  C#
  4.0
  we
  can
  do
  the
  following:


We
  define
  the
  Class
  (without
  any
  contructor):

class Car
{

             public string color; //Field
             public string model; //Field

             //Method
             public void ShowCarColor()
             {

                 MessageBox.Show("My Car Color is: " + color);
                 MessageBox.Show("My Car Model is: " + model);

             }
}

Then
  we
  do
  the
  following:

Car myCar = new Car {color="white", model="2004"};

myCar.ShowCarColor(); //We call the Method

4.8.
                    Properties

Properties
  provide
  the
  opportunity
  to
  protect
  a
  field
  in
  a
  class
  by
  reading
  and
  writing
  to
  it

through
  the
  property.
  In
  other
  languages,
  this
  is
  often
  accomplished
  by
  programs

implementing
  specialized
  getter
  and
  setter
  methods.
  C#
  properties
  enable
  this
  type
  of

protection
  while
  also
  letting
  you
  access
  the
  property
  just
  like
  it
  was
  a
  field.


Example:


We
  define
  a
  Class
  with
  Properties
  and
  a
  Method:

class Car
{

                                         Tutorial:
  Introduction
  to
  Visual
  Studio
  and
  C#
30

                                Getting
  Started
  with
  C#


             public string Name {get; set;}
              public string Color {get; set;}

             public void ShowCarProperties()
             {

                 MessageBox.Show("My Car Name is: " + Name);
                 MessageBox.Show("My Car Color is: " + Color);

             }

}

Then
  we
  can
  use
  it:

Car myCar = new Car();

myCar.Name="Volvo";
myCar.Color="Blue";

myCar.ShowCarProperties();

The
  results
  are:


…


So
  far,
  the
  only
  class
  members
  you've
  seen
  are
  Fields,
  Properties,
  Methods,
  and

Constructors.
  Here
  is
  a
  complete
  list
  of
  the
  types
  of
  members
  you
  can
  have
  in
  your
  classes:


         •   Constructors

         •   Destructors
  (opposite
  of
  Constructors)

         •   Fields

         •   Methods

         •   Properties

         •   Indexers

         •   Delegates

         •   Events

         •   Nested
  Classes


                                                Tutorial:
  Introduction
  to
  Visual
  Studio
  and
  C#
31

                                    Getting
  Started
  with
  C#


4.9.
                  Naming
   C onvention

There
  is
  different
  name
  convention
  for
  how
  to
  specify
  your
  variables,
  classes
  and
  Methods,

etc.


Camel
  notation:


For
  variables
  and
  parameters/arguments
  we
  normally
  use
  “Camel
  notation”.


Examples:

string myCar;
int number;
string backColor;

→
  In
  Camel
  casing
  the
  first
  letter
  of
  an
  identifier
  is
  lowercase
  and
  the
  first
  letter
  of
  each

subsequent
  concatenated
  word
  is
  capitalized.


Pascal
  notation:


For
  classes,
  methods
  and
  properties,
  we
  normally
  use
  “Pascal
  notation”.


Examples:

class Car
{
   void ShowCarColor()
   {
      …
   }
}

→
  In
  Pascal
  casing
  the
  first
  letter
  in
  the
  identifier
  and
  the
  first
  letter
  of
  each
  subsequent

concatenated
  word
  are
  capitalized.


For
  Namespaces
  we
  use
  Pascal
  casing
  and
  a
  dot
  separator.


Examples:

System.Drawing
System.Collections.Generics

Controls:


For
  controls
  on
  your
  user
  interface
  we
  either
  use
  “Pascal
  notation”
  or
  “Hungarian
  notation”,

but
  stick
  to
  one
  of
  them!


Examples:


“Pascal
  notation”:

LoginName
LoginPassword

                                        Tutorial:
  Introduction
  to
  Visual
  Studio
  and
  C#
32
Getting
Started
with
C#
“Hungarian
notation”:
txtName
txtPassword
lblName
btnCancel
Where
“txt”
means
it
is
a
Text
Control,
“lbl”
a
Label
Control,
“btn”
a
Button
Control,
etc.
Acronyms:
Casing
of
acronyms
depends
on
the
length
of
the
acronym.
All
acronyms
are
at
least
two
characters
long.
If
an
acronym
is
exactly
two
characters,
it
is
considered
a
short
acronym.
An
acronym
of
three
or
more
characters
is
a
long
acronym.
In
general,
you
should
not
use
abbreviations
or
acronyms.
These
make
your
names
less
readable.
Similarly,
it
is
difficult
to
know
when
it
is
safe
to
assume
that
an
acronym
is
widely
recognized.
But
if
you
must,
the
rules
are
as
follows:
Short
acronym
Examples
(two
characters):
DBRate
A
property
named
DBRate
is
an
example
of
a
short
acronym
(DB)
used
as
the
first
word
of
a
Pascal-‐cased
identifier.
ioChannel
A
parameter
named
ioChannel
is
an
example
of
a
short
acronym
(IO)
used
as
the
first
word
of
a
camel-‐cased
identifier.
Long
acronym
Examples
(three
or
more
characters):
XmlWriter
A
class
named
XmlWriter
is
an
example
of
a
long
acronym
used
as
the
first
word
of
a
Pascal-‐cased
identifier.
htmlReader
A
parameter
named
htmlReader
is
an
example
of
a
long
acronym
used
as
the
first
word
of
a
camel-‐cased
identifier.
Tutorial:
Introduction
to
Visual
Studio
and
C#
5.
More
Object-‐oriented
Techniques
In
this
chapter
we
will
introduce
the
following
Object-‐oriented
techniques:
• Inheritance
• Polymorphism
• Encapsulation
5.1.
Inheritance
Inheritance
is
one
of
the
primary
concepts
of
object-‐oriented
programming.
It
allows
you
to
reuse
existing
code.
Through
effective
employment
of
reuse,
you
can
save
time
in
your
programming.
Example:
We
define
the
Base
class:
class Car
{
public void SetColor(string color)
{
MessageBox.Show("My Car is: " + color);
}
}
Then
we
define
a
new
class
that
inherits
from
the
Base
Class:
class Volvo : Car
{
//In this simple Example this class does nothing!
}
Then
we
start
using
the
classes:
Car myCar = new Car();
myCar.SetColor("blue");
Volvo myVolvo = new Volvo();
33
34
More
Object-‐oriented
Techniques
myVolvo.SetColor("green");
As
you
can
see
we
can
use
the
“SetColor()”
Method
that
has
been
defined
in
the
Base
Class.
5.2.
Polymorphism
Another
primary
concept
of
object-‐oriented
programming
is
Polymorphism.
It
allows
you
to
invoke
derived
class
methods
through
a
base
class
reference
during
run-‐time.
Example:
We
start
with
a
Base
Class:
class Car
{
public virtual void CarType()
{
MessageBox.Show("I am a Car");
}
}
The
virtual
modifier
indicates
to
derived
classes
that
they
can
override
this
method.
Then
we
create
3
new
Classes
that
derive
from
the
Base
Class:
class Volvo : Car
{
public override void CarType()
{
MessageBox.Show("I am a Volvo");
}
}
class Ford : Car
{
public override void CarType()
{
MessageBox.Show("I am a Ford");
}
}
class Toyota : Car
{
public override void CarType()
{
MessageBox.Show("I am a Toyota");
}
}
These
3
classes
inherit
the
Car
class.
Each
class
has
a
CarType()
method
and
each
CarType()
method
has
an
override
modifier.
The
override
modifier
allows
a
method
to
override
the
virtual
method
of
its
base
class
at
run-‐time.
Then
we
can
use
it:
Car[] car = new Car[4];
car[0] = new Car();
Tutorial:
Introduction
to
Visual
Studio
and
C#
35
More
Object-‐oriented
Techniques
car[1] = new Volvo();
car[2] = new Ford();
car[3] = new Toyota();
foreach (Car carmodel in car)
{
carmodel.CarType();
}
The
result
is:
…
…
…
→
This
is
Polymorphism.
5.3.
Encapsulation
Encapsulation
means
that
the
internal
representation
of
an
object
is
generally
hidden
from
view
outside
of
the
object's
definition.
Typically,
only
the
object's
own
methods
can
directly
inspect
or
manipulate
its
fields.
We
can
set
different
Access
rights
on
Classes
and
Methods:
Tutorial:
Introduction
to
Visual
Studio
and
C#
6.
Exception
Handling
In
programming
error
and
exception
handling
is
very
important.
C#
has
built-‐in
and
ready
to
use
mechanism
to
handle
this.
This
mechanism
is
based
on
the
keywords
try,
catch,
throw
and
finally.
Exceptions
are
unforeseen
errors
that
happen
in
your
programs.
Most
of
the
time,
you
can,
and
should,
detect
and
handle
program
errors
in
your
code.
For
example,
validating
user
input,
checking
for
null
objects,
and
verifying
the
values
returned
from
methods
are
what
you
expect,
are
all
examples
of
good
standard
error
handling
that
you
should
be
doing
all
the
time.
However,
there
are
times
when
you
don't
know
if
an
error
will
occur.
For
example,
you
can't
predict
when
you'll
receive
a
file
I/O
error,
run
out
of
system
memory,
or
encounter
a
database
error.
These
things
are
generally
unlikely,
but
they
could
still
happen
and
you
want
to
be
able
to
deal
with
them
when
they
do
occur.
This
is
where
exception
handling
comes
in.
When
exceptions
occur,
they
are
said
to
be
“thrown”.
C#
uses
the
keywords
try,
catch,
throw
and
finally.
It
works
like
this:
A
method
will
try
to
execute
a
piece
of
code.
If
the
code
detects
a
problem,
it
will
throw
an
error
indication,
which
your
code
can
catch,
and
no
matter
what
happens,
it
finally
executes
a
special
code
block
at
the
end.
The
syntax
is
as
follows:
MyMethod()
{
try
{
... //Do Something that can cause an Exception
}
catch
{
... //Handle Exceptions
}
finally
{
... //Clean Up
}
}
Example:
public void WriteDaqData(double analogDataOut)
{
Task analogOutTask = new Task();
36
37

                                    Exception
  Handling


             AOChannel myAOChannel;

              try
             {

                 myAOChannel = analogOutTask.AOChannels.CreateVoltageChannel(
                    aoChannel,
                    "myAOChannel",
                    0,
                    5,
                    AOVoltageUnits.Volts
                    );

                 AnalogSingleChannelWriter writer = new
                   AnalogSingleChannelWriter(analogOutTask.Stream);

                writer.WriteSingleSample(true, analogDataOut);
             }
             catch (Exception e)
             {
                string errorMessage;

                 errorMessage = e.Message.ToString();

             }

             finally
             {
                analogOutTask.Stop();
             }

         }


                            Tutorial:
  Introduction
  to
  Visual
  Studio
  and
  C#
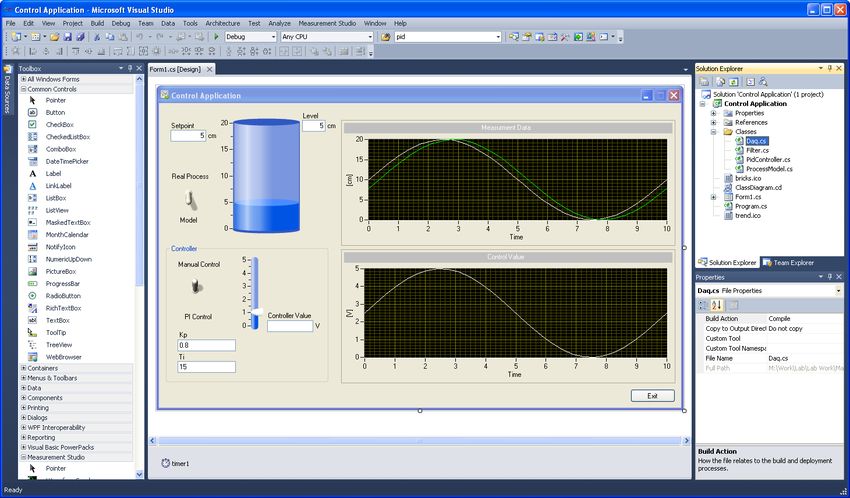
7.
Windows
Forms
Example
In
this
chapter
we
will
go
through
a
large
example.
In
this
example
we
will
create
an
application
in
Visual
Studio
that
controls
the
following
water
tank
process:
The
purpose
is
to
control
the
level
in
the
water
tank.
In
order
to
communicate
with
the
physical
process
we
use
a
NI
USB-‐6008
DAQ
device:
We
will
not
show
all
the
details
in
the
code,
but
focus
on
the
structure.
Below
we
see
the
user
interface
we
have
created
in
Visual
Studio:
38
39

                                Windows
  Forms
  Example


Below
  we
  see
  the
  Visual
  Studio
  project:


We
  start
  with
  defining
  the
  classes
  we
  need
  in
  our
  application.


In
  the
  Solution
  Explorer
  we
  have
  defined
  a
  “Classes”
  folder
  where
  we
  put
  all
  the
  classes
  we

create:


                                     Tutorial:
  Introduction
  to
  Visual
  Studio
  and
  C#
40
Windows
Forms
Example
In
order
to
create
new
classes
we
right-‐click
in
the
Solution
Explorer
and
select
“Add-‐New
Item…”:
Next
we
select
the
Class
item
in
the
“Add
New
Item”
window:
Tutorial:
Introduction
to
Visual
Studio
and
C#
41

                                Windows
  Forms
  Example


Classes:


We
  start
  with
  the
  “Daq”
  Class
  that
  contains
  logic
  for
  reading
  and
  writing
  to
  the
  DAQ
  device:

//Include necessary Namespaces
using System;
using System.Collections.Generic;
using System.Linq;
using System.Text;
using NationalInstruments;
using NationalInstruments.DAQmx;

namespace Tuc.Control //We define a useful namespace
{
    public class DaqData
   {

             public string aiChannel;
             public string aoChannel;

             //Constructor
              public DaqData(...)
             {
                 ...
             }

              //Method
              public double ReadDaqData()
             {
                 ...
             }

              //Method
             public void WriteDaqData(...)
             {
                ...
             }
         }
}

                                     Tutorial:
  Introduction
  to
  Visual
  Studio
  and
  C#
42
Windows
Forms
Example
It
is
good
practice
to
create
a
new
file
for
each
new
class
we
define.
Then
we
start
by
defining
a
meaningful
Namespace.
Next
we
define
our
Class
with
necessary
Fields,
Properties
and
Methods.
We
also
need
to
include
the
necessary
Namespace
our
Class
will
need.
In
this
example
we
have
included
some
3.party
Assemblies
from
National
Instruments:
using NationalInstruments;
using NationalInstruments.DAQmx;
These
Assemblies
contains
the
driver
to
the
NI
USB-‐6008
DAQ
device
we
are
using.
The
Assemblies
we
use
must
be
added
in
the
“References”
folder
in
the
Solution
Explorer:
Main
Application:
In
our
main
application
we
start
with
including
our
Namespace:
using NationalInstruments;
using NationalInstruments.UI;
using NationalInstruments.UI.WindowsForms;
using System;
using System.Collections.Generic;
using System.ComponentModel;
using System.Data;
using System.Drawing;
using System.Linq;
using System.Text;
using System.Windows.Forms;
using Tuc.Control;
namespace Control_Application
{
public partial class Form1 : Form
{
...
}
}
Tutorial:
Introduction
to
Visual
Studio
and
C#
43

                                 Windows
  Forms
  Example


It
  is
  also
  a
  good
  idea
  to
  create
  different
  regions
  in
  order
  to
  structure
  your
  code
  better.
  This

can
  be
  done
  like
  this:

//Comment
#
  region


             ... //Your Code
#
  endregion


In
  this
  way
  our
  Main
  Application
  may
  look
  like
  this:


                                       Tutorial:
  Introduction
  to
  Visual
  Studio
  and
  C#
8.
Web
Programming
8.1.
Introduction
Today
most
of
the
applications
focus
on
the
Internet,
where
the
applications
can
be
viewed
in
a
standard
Web
Browser.
Static
Web
pages
are
based
on
HTML
and
CSS.
In
order
to
create
more
advanced
applications,
we
need
more
powerful
tools.
Important
frameworks
and
tools
for
creating
dynamic
web
pages:
• ASP.NET
• AJAX/
ASP.NET
AJAX
• JavaScript
• Silverlight
These
frameworks
and
tools
will
be
explained
below.
See
the
Tutorial
“ASP.NET
and
Web
Programming”
for
more
details.
8.2.
HTML
HTML,
which
stands
for
HyperText
Markup
Language,
is
the
predominant
markup
language
for
web
pages.
HTML
is
the
basic
building-‐blocks
of
webpages.
HTML
is
written
in
the
form
of
HTML
elements
consisting
of
tags,
enclosed
in
angle
brackets
(like
),
within
the
web
page
content.
HTML
tags
normally
come
in
pairs
like
and
.
The
first
tag
in
a
pair
is
the
start
tag,
the
second
tag
is
the
end
tag
(they
are
also
called
opening
tags
and
closing
tags).
In
between
these
tags
web
designers
can
add
text,
tables,
images,
etc.
8.3.
Web
B rowser
The
purpose
of
a
web
browser
is
to
read
HTML
documents
and
compose
them
into
visual
or
audible
web
pages.
The
browser
does
not
display
the
HTML
tags,
but
uses
the
tags
to
interpret
the
content
of
the
page.
44
45
Web
Programming
Today
we
have
the
following
major
Web
Browsers:
• Internet
Explorer
(by
Microsoft)
• Firefox
(by
Mozilla)
• Chrome
(by
Google)
• Safari
(by
Apple)
• Opera
(by
Opera
from
Norway)
8.4.
CSS
Web
browsers
can
also
refer
to
Cascading
Style
Sheets
(CSS)
to
define
the
appearance
and
layout
of
text
and
other
material.
The
W3C,
maintainer
of
both
the
HTML
and
the
CSS
standards
8.5.
JavaScript
JavaScript
is
an
object-‐oriented
scripting
language
basically
used
to
create
dynamic
web
pages.
JavaScript
is
primarily
used
in
the
form
of
client-‐side
JavaScript,
implemented
as
part
of
a
web
browser
in
order
to
provide
enhanced
user
interfaces
and
dynamic
websites.
8.6.
ASP.NET
ASP.NET
is
a
web
application
framework
developed
by
Microsoft
to
allow
programmers
to
build
dynamic
web
sites,
web
applications
and
web
services.
ASP.NET
is
part
of
the
Visual
Studio
package
It
was
first
released
in
January
2002
with
version
1.0
of
the
.NET
Framework,
and
is
the
successor
to
Microsoft's
Active
Server
Pages
(ASP)
technology.
ASP.NET
is
built
on
the
Common
Language
Runtime
(CLR),
allowing
programmers
to
write
ASP.NET
code
using
any
supported
.NET
language,
such
as
C#
and
VB.NET.
ASP.NET
web
pages
or
webpage,
known
officially
as
Web
Forms],
are
the
main
building
block
for
application
development.
Web
forms
are
contained
in
files
with
an
“.aspx”
extension.
Select
“ASP.NET
Application”
in
the
“New
Project”
window:
Tutorial:
Introduction
to
Visual
Studio
and
C#
46
Web
Programming
8.7.
AJAX/
A SP.NET
A JAX
AJAX
is
an
acronym
for
Asynchronous
JavaScript
and
XML.
AJAX
is
a
group
of
interrelated
web
development
methods
used
on
the
client-‐side
to
create
interactive
web
applications.
With
Ajax,
web
applications
can
send
data
to,
and
retrieve
data
from,
a
server
asynchronously
(in
the
background)
without
interfering
with
the
display
and
behavior
of
the
existing
page.
ASP.NET
AJAX
is
a
set
of
extensions
to
ASP.NET
developed
by
Microsoft
for
implementing
AJAX
functionality.
8.8.
Silverlight
Microsoft
Silverlight
is
an
application
framework
for
writing
and
running
browser
plug-‐ins
or
other
rich
internet
applications,
with
features
and
purposes
similar
to
those
of
Adobe
Flash.
The
run-‐time
environment
for
Silverlight
is
available
as
a
plug-‐in
for
most
web
browsers.
Silverlight
is
also
one
of
the
two
application
development
platforms
for
Windows
Phone
7/8.
The
latest
version
is
Silverlight
5.0.
Silverlight
is
based
on
WPF,
so
in
Silverlight
applications,
user
interfaces
are
declared
in
Extensible
Application
Markup
Language
(XAML)
and
programmed
using
a
subset
of
the
.NET
Framework.
Tutorial:
Introduction
to
Visual
Studio
and
C#
9.
Database
Programming
Most
of
today’s
applications
use
a
backend
database
to
store
important
data,
e.g.,
Facebook,
Twitter,
etc.
In
order
to
use
databases
in
our
applications
we
need
to
know
Structured
Query
language
(SQL).
For
more
information
about
SQL,
see
the
following
Tutorial:
Structured
Query
Language
(SQL)
In
addition
you
need
to
know
about
database
systems.
We
have
different
kind
of
database
systems
and
lots
of
different
vendors.
Since
this
Tutorial
is
about
Visual
Studio
and
C#,
we
will
use
Microsoft
SQL
Server.
For
more
information
about
database
systems
in
general
and
specially
SQL
Server,
see
the
following
Tutorial:
Introduction
to
Database
Systems
The
Tutorials
are
available
from:
http://home.hit.no/~hansha
9.1.
ADO.NET
ADO.NET
(ActiveX
Data
Object
for
.NET)
is
a
set
of
computer
software
components
that
programmers
can
use
to
access
data
and
data
services.
It
is
a
part
of
the
base
class
library
that
is
included
with
the
Microsoft
.NET
Framework.
It
is
commonly
used
by
programmers
to
access
and
modify
data
stored
in
relational
database
systems,
though
it
can
also
access
data
in
non-‐relational
sources.
47
Telemark
University
College
Faculty
of
Technology
Kjølnes
Ring
56
N-‐3914
Porsgrunn,
Norway
www.hit.no
Hans-‐Petter
Halvorsen,
M.Sc.
Telemark
University
College
Faculty
of
Technology
Department
of
Electrical
Engineering,
Information
Technology
and
Cybernetics
E-‐mail:
hans.p.halvorsen@hit.no
Blog:
http://home.hit.no/~hansha/
You can also read