Notes from the Owners of Cecilia Tartan 3400 - San Juan Sailing
←
→
Page content transcription
If your browser does not render page correctly, please read the page content below
Cecilia Owners’ Notes                                                                              July 2021

                            Notes from the Owners of Cecilia
                                      Tartan 3400

Dear Friends,
        Welcome aboard Cecilia!
We placed Cecilia in charter with San Juan Sailing in 2006. Before that, we were long time charter guests, so
we have been in your shoes. We watched designs come and go, and frankly, we know the Tim Jacket Tartan
3400 is our dream boat. She is superbly responsive as well as beautiful!
        We have many wonderful cruising memories in the San Juan Islands and points north. Our hope is that
you may enjoy Cecilia as much as we do. If something comes up, please feel free to give us a call at 831-484-
1467. If you think of anything that would make her more enjoyable for you, let us know through San Juan
Sailing. We have not overlooked any detail in our effort with our ultimate sailboat.
        We wish you fair winds and wonderful memories. Thank you for being our guests!

Stan & Rita Jacques
Cecilia, Monterey, CA

                                                      1
Cecilia Owners’ Notes                                                                                                                                         July 2021

Table of Contents
1.    Specifications and Vessel Information ............................................................................................................ 3
2.    Nuances ........................................................................................................................................................... 4
3.    Emergency/Safety Equipment ......................................................................................................................... 4
4.    Anchors and Windlass ..................................................................................................................................... 5
5.    Barbecue .......................................................................................................................................................... 7
6.    Batteries, Charging & Inverter ......................................................................................................................... 8
7.    Berths and Bedding ......................................................................................................................................... 9
8.    Bilge Pumps ................................................................................................................................................... 10
9.    Dinghy and Outboard .................................................................................................................................... 11
10.      Dodger........................................................................................................................................................ 14
11.      Electrical ..................................................................................................................................................... 14
12.      Electronics/Instruments............................................................................................................................. 15
13.      Engine......................................................................................................................................................... 18
14.      Entertainment System ............................................................................................................................... 23
15.      Fuel ............................................................................................................................................................. 23
16.      Head and Holding Tank .............................................................................................................................. 23
17.      Heaters (Cabin) .......................................................................................................................................... 25
18.      Lighting....................................................................................................................................................... 26
19.      Refrigeration and Freezer .......................................................................................................................... 26
20.      Sails and Rigging......................................................................................................................................... 27
21.      Showers and Sump Pump .......................................................................................................................... 29
22.      Spares and Tools ........................................................................................................................................ 30
23.      Storage ....................................................................................................................................................... 30
24.      Stove/Oven ................................................................................................................................................ 31
25.      Water ......................................................................................................................................................... 32

                                                                                     2
Cecilia Owners’ Notes                                                                             July 2021

1. Specifications and Vessel Information
Vessel Information:
Washington State Parks Annual Permit Decal – Located on the cabin exterior, port side aft.

U.S. Customs Re-Entry Decal – Located on the aft side of the helm binnacle.

Vessel Official Number - 1180349 (same number as shown on the Coast Guard Certificate of Documentation
found in Section 5 Documentation of the Charter Guest Reference Manual (white binder). Cecilia’s number is
located in lazerette, starboard hull. Look for 3” high characters.

Coast Guard Boarding Document – Refer to the Charter Guest Reference Manual (white binder), Section 5
Documentation. Explains what to expect if you are boarded by the Coast Guard and where to find the
information/equipment they may ask to see as part of their safety inspection.

Specifications:
             Year: 2005                                   Engine: Yanmar 27 hp Saildrive
     Make/Model: Tartan 3400                                 Fuel: 25 US Gal
              LOA: 34’ 5”                                  Water: 60 US Gal
            Beam: 11’ 11”                                 Holding: 20 US Gal
            Draft: 6’ 6”                                   Heads: 1 with shower
    Displacement: 10,800 lbs. (Dry)                  Electronics: Raymarine & Garmin

Mast Height above WL: 52’6”

      Staterooms: 2 doubles plus 2 singles in the Salon
     Stateroom 1: Headroom: 6’-3”; Berth Dimensions: Queen size
     Stateroom 2: V-Berth: Headroom 6’-3”; Berth Dimensions: Full size, romantic taper at bow,
                  with extension installed, length 6’-6”
    Salon Headrm: 6’3” at centerline in main salon
      Refrigerator: Top & Side Doors 2          Freezer: 1.5 lbs frozen meat
                    levels

                                                      3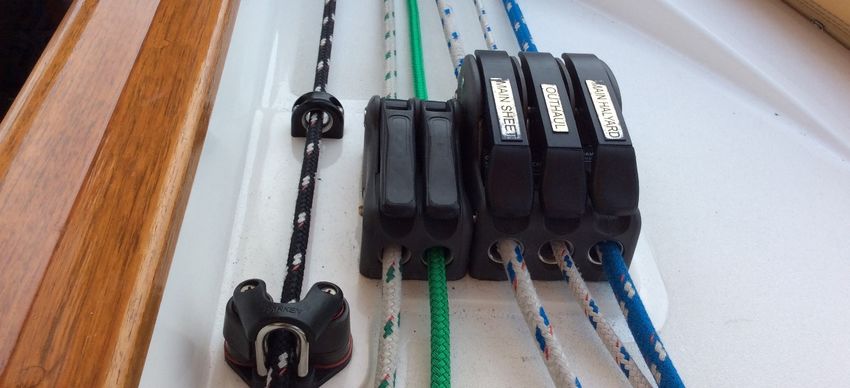
Cecilia Owners’ Notes                                                                                July 2021

2. Nuances
Bright & Light Cherry Wood Interior

Off White Leather Salon Cushions

3. Emergency/Safety Equipment

You are not likely to need these, but must know their location.

Bilge Pump (Manual) and Handle Located in the cockpit next to engine panel. Handle stored in the starboard
aft cockpit locker clipped to the underside of the lid. Note: if water rises above
floorboards, can use shower sump pumps also in emergency.

Carbon Monoxide Detector Salon by Nav station See photo ———————
Cockpit Cushions In case of COB, throw anything that floats, quickly.

Emergency Tiller Located in the Lazarette It is a two inch metal pipe with an “elbow”
bend. The runner post attachment point is under the transom seat. Remove the 6”
round metal cover.

Fire Extinguishers (3) One is located on the shelf by the Navigation table, one in the cabinet above the port
settee, and one in the V-berth port hanging closet.

First Aid Kit In the head vanity cabinet.
.
Flares (Pyrotechnic - 3) In green mesh bag in starboard settee cabinet..

Flashlights (2) Companionway port side,& openly visible under Nav Station, clipped.

High Water Alarm Nav Station See photo —————

Horn, handheld In green mesh bag in nav station.

LifeSling Port stern pulpit, Please review the cartoons on the face of the case for
procedures. The lanyard is secured to the boat so that tossing the floating harness allows it
to tow behind the boat like a ski tow rope. Circling the person overboard will draw the
recovery line near them.

PFDs (6 foam vests) Located in the Head hanging wet-locker. NSO: encourage wearing at all times when
working the deck and often in the cockpit.

                                                        4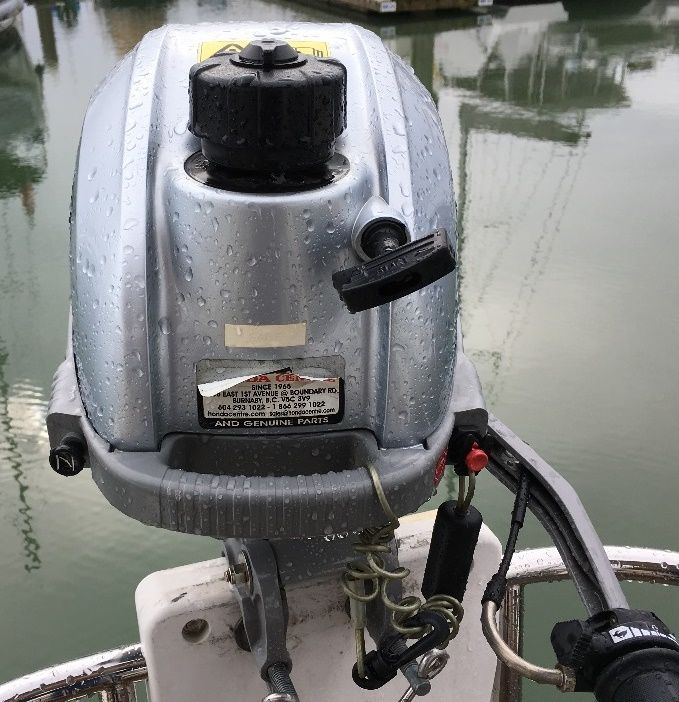
Cecilia Owners’ Notes                                                                                   July 2021

Propane Detector The Xintex propane detector and solenoid switch is on the aft bulkhead of the galley above
AC outlet. See photo—————————————-

Tapered Plugs are attached to each thru-hull: 3, head wet locker; galley sink; depth sound v-berth, horizontal
hinged door; and engine raw water intake on sail drive, for total of 6.

Tools and Spares Nav Station under Seat in Bins and V-Berth Locker under Mattress in Bins.

Windlass Clutch Release/Tighten Wrench Located in the nav desk, winch handle labeled “Maxwell.”

VHF Radio Channel 16. VHF base unit at nav station and remote mic at helm.

4. Anchors and Windlass
Highlights
   • Windlass controller is in the anchor locker.
   • Windlass circuit breaker switch is labeled and located below the navigation
       station seat.
   • Chain length markings: 200’ of chain marked with 1 piece of yellow line at
       25’ intervals and 2 pieces of yellow line side by side at 100’ and 200’. Red
       paint marks the end of the chain. There is 100’ of rode after the end of the chain that connects to the
       boat for safety. The placard shown on the right is glued to the inside of the anchor locker door as a
       reminder.
   • Windlass clutch release/tighten wrench is located inside the Nav Station desk; it is the winch handle
       labeled “Maxwell.”
   • The windlass gypsy is not designed to hold the boat while anchored, so please use the snubber with
       chain hook to hold the chain while anchored.
   • Please avoid chipping the bow with the anchor by using caution and slowly raising/lowering the anchor
       when it is out of the water.
   • Turn ON the Anchor light overnight. Breaker switch is labeled and located on he DC panel at the nav
       station.
   • Secondary/Spare anchor is stowed in the starboard cockpit locker.

Details

Main anchor –The primary anchor is a 33 lb Lewmar Claw, which holds well in a variety of conditions. The
5/16” chain length is 200 ft. marked with 1 piece of yellow line at 25’ intervals and 2 pieces of yellow line side
by side at 100’ and 200’. Red paint marks the end of the chain. There is 100’ of rode after the end of the chain
that connects to the boat for safety.

Snubber - We use the heavy snubber employed for both nested anchor underway and for overnight.

                                                        5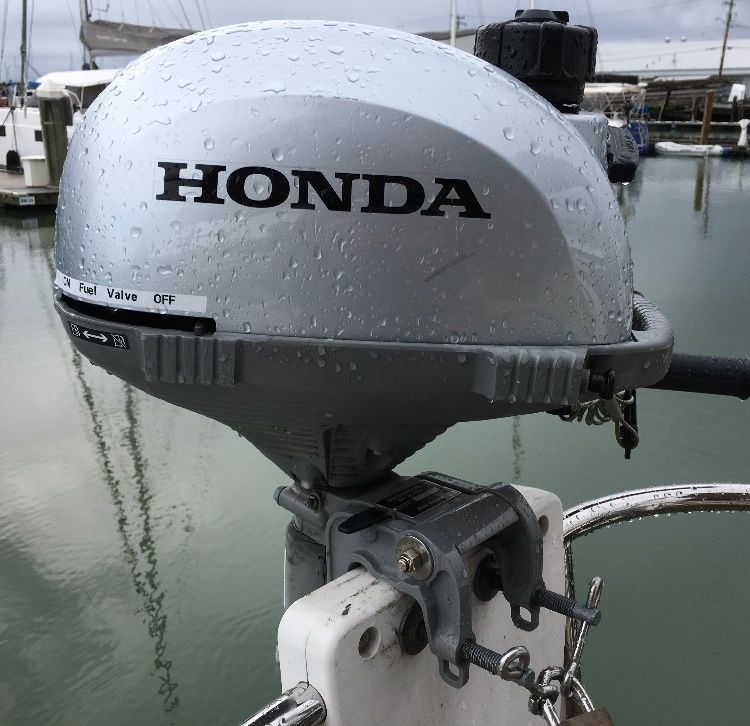
Cecilia Owners’ Notes                                                                                  July 2021

Secondary – Heavy duty but light weight aluminum Fortress anchor stowed in the starboard cockpit locker,
with 15’ chain and 200’ of rode in a separate bag.

To Deploy Anchor:
   1) We check tide tables to determine current water level and amount of drop while anchored.

   2) Weather (ch 4, “Northern Inland Waters” or ch 7) helps select a safe anchorage.

   3) The windlass circuit breaker is below the navigation station seat. Turn it on. Have engine running
      when deploying anchor to prevent draining batteries. When deployed, turn off windlass circuit
      breaker.

   4) Normal for the islands is a 4 to 1 scope, bow to bottom (add 5 feet to depthsounder reading: 4’
      freeboard and 1’ for transducer below waterline) . In San Juans, anchorages are often about 25’ bow to
      bottom, so we often deploy about 100’ chain—hence mark 2 pieces of yellow line side by side at 100’

   5) To avoid hitting the hull when initially lowering the anchor, we do the following to prevent the anchor
      from swinging as it travels over the roller: Push the anchor forward keeping the shank level before
      gradually allowing the shank to rise as we ease it forward slowly into the hanging position (no swing!).

   6) Lower the anchor to approximately the number of feet on the depthsounder so the anchor is on the
      bottom, by depressing the down switch

   7) A signal to the helmsman prompts reverse at idle speed while deploying rode to the desired scope.

   8) We then allow the anchor to set and to stop the boat while it continues in reverse, idle speed. We then
      line up objects on shore to determine if we are holding, staying in reverse at idle for about one minute.

   9) Finally, we reset the snubber. Secure to the starboard deck cleat, next attach the hook to the anchor
      chain.
   10) Then ease the windlass so it is not under strain.

   11) If stronger winds are forecast, test with RPM at half the projected windspeed (1,000 rpm for winds to
       20 knots; 1,500 rpm for 30 knots, etc), after setting snubber. (Check movement shoreside.)

   12) In storm conditions (or storm forecast), you can increase scope if there is adequate room to leeward.

   13) The secondary anchor is available for additional holding power if a storm is anticipated, but best if set
       before the storm hits.

   14) If anchored in a small cove, you may wish to deploy a line ashore. 600’ floating polypropylene on a reel
       resides in a cockpit locker. Open transom doors; use the mop handle as an axle through the reel; set
       mop handle on helm seats. Deploy the line with the dinghy while the spool unwinds. If sufficient
       length, bring the line around a secure shore object and back to the boat to a transom cleat for ease of
       retrieval.

                                                       6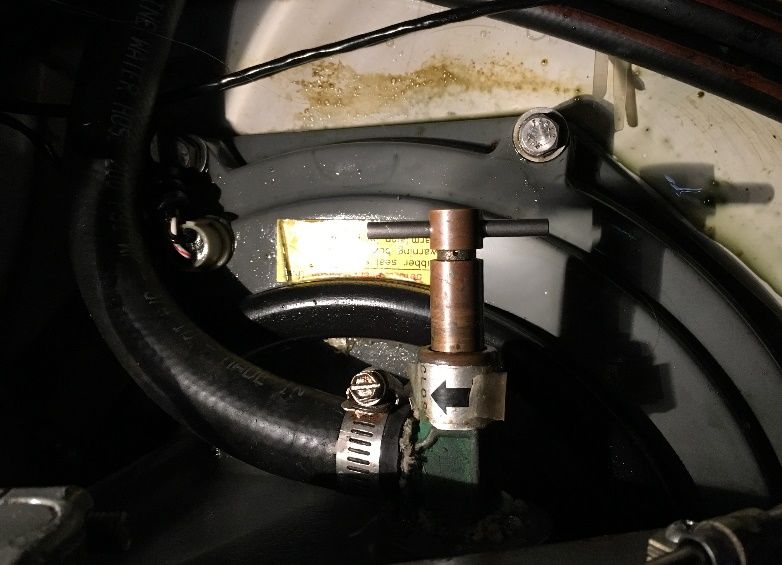
Cecilia Owners’ Notes                                                                                  July 2021

To retrieve the anchor:
    1) Start the engine, given that the windlass draws from the engine start battery. Turn on the Windlass
        circuit breaker.

   2) Remove the snubber

   3) Engage forward gear as needed to keep the chain vertical, exercising care to avoid over-standing and
      dragging the chain against the hull. Press the controller “up” switch, always assuring the chain is
      vertical during retrieval—this avoids either towing the boat or dragging the chain against the hull.

   4) Piling-up of chain under the windlass can jam it. Use the versatile mop handle to push the chain to
      level the piling-up.

   5) As the length of rode remaining approaches the water depth, the sound of the windlass laboring alerts
      us to immediately stop. Sometimes a brief pause will cause the anchor to break free, given the 90
      degree angle of pull. Use the engine, not the windlass, to break out the anchor with the engine in idle
      forward.

   6) To nest the anchor without chipping the hull, the anchor may need to be swiveled. Use the windlass to
      bring the anchor shank up and over the bow roller in one continuous motion, then nest the anchor by
      hand.

   7) After nesting, with a slight slack in the chain; secure the anchor once again with the snubber on the
      starboard deck cleat. As noted, the chain is only “unsnubbed” when it is moving in or out.

   8) Reminder: secure the windlass controller into its holder before closing the anchor locker lid.

   9) Turn off the Windlass Breaker.

5. Barbecue

Highlights
   • Shut-off valve is located in the propane tank locker. Look for blue handle.
   • BBQ propane hose is not plumbed through the solenoid valve.
   • Please close the shut-off valve and clean grill when finished cooking.

Details
   • To operate:
   • Turn on the BBQ propane hose isolation valve located in the propane tank locker located on the
        starboard cockpit gunwale.
   • Grab a BBQ lighter from the galley and insert the end into the small hole in the BBQ below the grill
        until ½” from the burner. Light the BBQ lighter.
   • Turn the regulator on the right side of the BBQ to the “Light” position.
   • As a courtesy to the next charter guest, please clean the BBQ grill with the wire brush.

                                                      7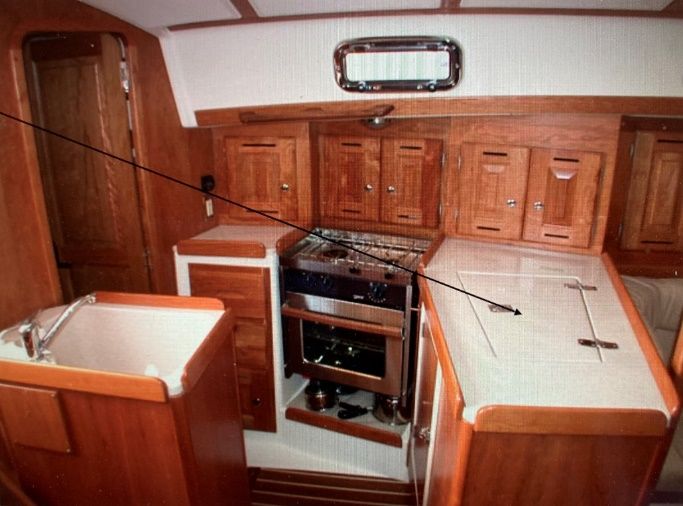
Cecilia Owners’ Notes                                                                                 July 2021

   •      Turn off the regulator and isolation valve when done cooking. Regulators often malfunction and don’t
          close properly so it’s important to turn off the isolation valve too.

6. Batteries, Charging & Inverter

Highlights
       • Please keep batteries above 12.2v at all times. 12.8v is fully charged (with all loads turned OFF –
           including the fridge and when not charging).
       • When charging, battery voltage will read above 13v.
       • Ensure batteries are charging when connected to shore power – see details below in Battery
           Charging section.
       • When underway, the engine is automatically charging all batteries.
       • At anchor, there is no generator on board but the house battery bank is ample enough to handle
           normal DC loads including lights, the fridge, diesel cabin heater and entertainment system.
       • Caution is needed when inverting and using 120V power. Only low draw (wattage) items like phone
           charging or computers. High wattage items like hair dryers and electric heaters will kill the
           batteries.

Details

BATTERIES:
Cecilia has the following battery groups on board:
   • There are five batteries on board, two in the lazarette and three under the aft cabin
        mattress.
   • Engine start - single Group 24 deep cycle
   • House - four Group 24 deep cycle

All batteries are charged automatically when connected to shore power or while the engine is running.

Battery disconnect switches
   • The battery disconnect red rotary dial switch and the DC Main are to the right
        of the DC panel in the nav station.
   • The switches should remain in the “I” or ON position all the time.
   • In the unlikely event that the engine start battery is depleted, turn the red dial
        switch to the “COMBINE” position to use the house batteries to start the
        engine.
   • After the engine starts, turn the house battery switch back to the “I” or ON
        position.
   • After running the engine at cruise RPM for at least 1 hr, turn off the engine and
        try to restart. If it restarts using the start battery with no hesitation then you
        are good to go. If the engine won’t start or the start battery is slow cranking
        then contact the SJS office.

                                                        8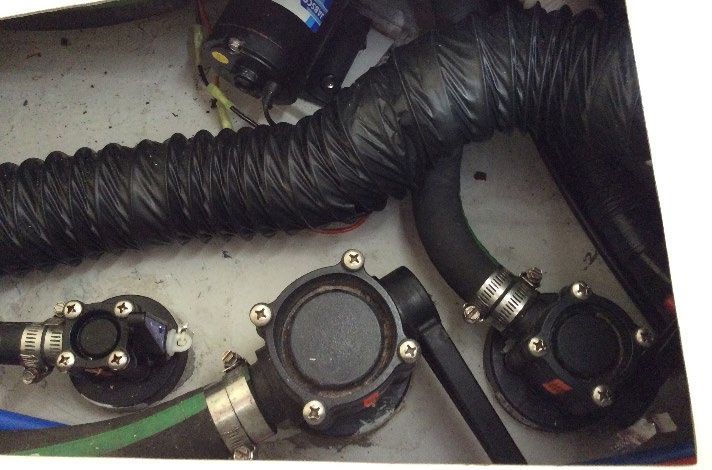
Cecilia Owners’ Notes                                                                                 July 2021

   •    Never move the red dial switch to OFF when the engine is running. This will blow the diodes on the
        alternator and the batteries will no longer charge.

CHARGING/INVERTING

Charging – Shore Power

   •   Connect the 30Amp shore power cord to the receptacle on the starboard
       cockpit coaming.
   •   Turn ON the AC breaker on the AC panel.
   •   Turn ON outlets and outlets 2 on AC panel
   •   Turn ON water heater and battery charger

Charging – Engine

   •   All batteries are automatically being charged when the engine is running.

Inverter
   • There are two 12 volt outlets for recharging mobile devices: below
       the electric panel & ignition panel.
   • If 120v power is needed for low wattage devices when shore power
       is not available, the Inverter can be turned ON.
   • The inverter powers the 120v outlets.
   • At the control panel, turn on inverter
   • On the AC panel, flip ON outlets and outlets 2.
   • Please turn the inverter OFF when not in use.
   • Note: Do not press the inverter on button when connected to
       shore power

7. Berths and Bedding

Cecilia has two cabins, hanging lockers and storage areas. There are ample sources of lighting in each berth
with individual controls for reading lights.

The aft cabin has a queen size berth for the ship’s master with entry way standing room, a hanging clothes
locker and shelves each within a cherry wood door.

The V-Berth provides two adults romantic coziness with a hanging locker, two large drawers, and a spacious
two shelve cabinet each enclosed within the cherry wood cheerfulness.

                                                       9
Cecilia Owners’ Notes                                                                                      July 2021

The sumptuous leather settees in the main salon can sleep one adult on port and one on starboard, with great
headroom and open airiness.

8. Bilge Pumps
Highlights

   •      Emergency Bilge Pump (manually operated): located in the cockpit next to the ignition panel. The
          handle is stored in the starboard aft cockpit locker, clipped to the underside of the lid.
   •      Electric Bilge Pump: Has an automatic float switch. The pump will come on when enough water comes
          in to cover the float switch. Please leave the bilge pump switch in "auto" position at all times. The
          electric bilge pump can be used manually at the electrical panel.
   •      The pump inlet is located under the sole in the salon,. Check the strainer on the pump inlet for any
          clogging debris and remove if needed.
   •      Please visually inspect the bilge each day, which is accessed by lifting the floorboard in the main salon.
          The intake tube is at the lowest point in the bilge
   •       The refrigerator drains into the sump basin, so most accumulated water is from melting ice and
          condensation.

Details

   1. Emergency Hand Bilge Pump – This hand operated pump is located in the cockpit next to the ignition
      panel. The handle is stored in the starboard aft cockpit locker, clipped to the underside of the lid.
   2. Electric Bilge Pump – Has an automatic float switch. The pump is located under the sole in the aft
      cabin. Note: the circuit breaker labeled “Bilge pump” must be “on” at all times for the float switch to
      work (marked by “double green” dots). The bilge pump has an in-line screen strainer. If pump fails to
      empty bilge, check the strainer, in case it may have become clogged with debris.

Note: in emergencies, the shower sump pump can be turned on at the DC panel.

                                                          10
Cecilia Owners’ Notes July 2021
9. Dinghy and Outboard
Highlights
• 10’ Kachemak inflatable dinghy with rigid aluminum floor and bottom, 2.3hp Honda outboard.
• Tow the dinghy 6' off stern using the port cleat (the side away from the diesel exhaust). Use a proper
cleat hitch and for peace of mind tie off the painter’s bitter end to base of the stern pulpit. In very
rough conditions, shortening the painter makes it unlikely the dinghy will flip in the wind and waves.
• Please don't tow with outboard attached to dinghy or leave outboard on the dinghy overnight.
• Dinghy air pump and patch kit are stowed in the starboard lazarette.
• Manual hand water pump, air pump & repair kit may be stowed in dingy front compartment.
• The 2.3hp Honda outboard is air cooled 4-stroke and takes straight gas.
• The spare 1-1/4 gal orange gas can is filled 2/3 full (for expansion in hot weather) by our staff. We will
top it off when you return the boat, no charge. We stow it in the dinghy, tied to the transom. For
safety, please never store gasoline in a compartment on board Cecilia.
Details
Towing the Dinghy
Always remove the outboard motor before towing. We leave the red spare gas can for the outboard engine in
the dingy, tied off to the transom. Towing works best when the dinghy is brought close to the boat with 4-5
feet of painter line between the stern and the towing bridle of the dinghy. This lifts the bow out of the water
and reduces drag. To keep the dinghy away from engine exhaust, tie the painter off at the port stern cleat with
a standard cleat knot, then attach the bitter end to the stern rail using a rolling hitch or similar secure knot.
OPERATING TIP: Leave the self-bailing valve (located in the stern) open when towing to let any accumulated
water drain out. Close it when ready to use the dinghy.
Preparing the Outboard
1. Unlock the outboard (combination is listed on your charter packet) and reattach the lock nearby on the
stern rail.
2. Carefully loosen the mounting screws on the outboard bracket keeping one hand on the outboard
handle at all times or tie the motor off to a dock line attached to Cecilia. We actually witnessed a crew
member allowing an outboard to flip off the rail and quickly sink into 30 feet of water!
3. Transferring the outboard to the dinghy is best accomplished by having one crew member in the
dinghy to receive the outboard from another crew member on deck, rather than a single crew member
trying to get off the boat and onto the dinghy with outboard in hand. Although the outboard is
relatively light, it should be handled carefully.
11Cecilia Owners’ Notes July 2021
Starting the Outboard
1. Open the fuel valve by pushing the fuel valve lever
(starboard aft corner of the outboard) aft to the ON
position.
2. Pull the choke all the way out (starboard forward
corner of the outboard).
3. Open the air vent on the top of the fuel cap (top of
outboard) by turning the indicator half way between
ON and OFF. We have discovered that turning the
indicator all the way to ON will sometimes cause the
valve to close. Fuel valve
4. Make sure the black U-shaped kill clip (attached to the
red or gray lanyard) is clipped into the red shut-off
knob (port forward corner of the outboard).
Tilt Lock
5. Turn the throttle handle to the start position. There is
Lever
a friction thumb screw that can be tightened to hold
the throttle in the start position.
6. NOTE: The motor has a centrifugal clutch (no gear
shift) – the propeller will spin when the RPM is above idle.
Please make sure the dinghy is securely tied to Cecilia as the
dinghy will surge forward when the motor first starts up at
Ignition/Kill
the starting RPM then will stop when you turn the throttle
Switch
back to idle RPM after warmed up (about 10 seconds).
7. Pull the starter cord quickly then repeat a few times if Choke
needed until the motor starts. (You shouldn’t have to pull it
more than 5 times.)
8. Slowly push the choke back in shortly after the engine starts
(after about 5 or 10 seconds). If the motor starts to run
rough then ease the choke back out for another 5 seconds
and then try pushing back in. Turn the throttle back to idle.
While Outboard Is Running
1. Keep the red lanyard kill clip connected to your belt or PFD while operating.
2. The motor has a centrifugal clutch (no gear shift) – the propeller will spin when the RPM is above idle - just
throttle up to go forward and throttle down to stop. If you want to go in reverse just swivel the outboard
around 180 degrees and throttle up.
3. Note that you will only have steerage when the propeller is driving the boat (throttle above idle RPM).
Arriving at the Beach
12Cecilia Owners’ Notes July 2021
1. Before you hit the beach and while still in a few feet of water, stop the motor by pushing in the red shut-
off knob (where the kill clip is clipped in) or just pull the red lanyard until the clip pops off. Close the fuel
valve and vent lever (the motor will leak fuel when tilted if these are not closed. Also, the carburetor will
be flooded making it hard to restart the motor).
2. Tilt the motor out of the water by pulling the motor head forward until it stops – you should hear a “click”
as the tilt support locks in place. Note that the motor is held in the lowered position by friction from a
large rubber clip that grips the shaft. Very little force is needed to pull the motor shaft out of the clip.
3. To tilt the outboard back in the water, first pull on the motor head slightly to take the strain off the tilt lock
then release the tilt lock by lifting up the black handled lever below the motor head on the starboard side
of the shaft.
4. Please do not drag the dinghy up the beach over sharp rocks and barnacles.
5. Secure the painter to ensure the dinghy doesn’t float away on a rising tide.
When The Outboard Is Not In Use
1. Put the outboard back on the outboard mount on Cecilia’s stern rail and tighten both bracket screws.
2. Put the combination lock back on the bracket screws.
3. Close the fuel valve and fuel cap vent.
4. Put the blue Honda cover back on the motor head.
Outboard Troubleshooting
• If the motor won’t start, review steps 1-8 above to make sure you’ve correctly done all 8 steps.
• A faulty Spark Plug is often the problem. There is a blue “Honda Outboard Tools” kit containing a spare
spark plug and spark plug wrench in the “Engine Spares” box. If you use the spare spark plug, notify
your check-in skipper upon your return so a new one can be placed aboard for future guests.
• If the motor is running fine and suddenly quits then it is often because the fuel cap vent is closed.
• If the motor is running fine but the propeller won’t spin with the RPM above idle then the shear pin is
probably broken. Put the motor back on the stern rail bracket, take the cotter pin out to remove the
propeller and replace the broken shear pin. A spare pin is located at the forward underside of the
motor head.
Inflating the Dinghy
If the dinghy needs inflation, the foot pump is in the starboard cockpit lazarette. The dinghy has three (3) baffles, each
with an inflation valve located on the inside of the boat.
The foot pump is held closed with a locking clasp. Release the clasp, insert the inflation nozzle onto the valve and give a
¼ turn to lock it in place. Inflate the baffle with the foot pump until it is firm. When done, carefully detach the inflation
hose. If the valve is still open, press it once to close it.
If you need to make a repair, the repair kit and instructions can be found in in the tools and spare parts storage
compartment located under the navigation station seat.
13Cecilia Owners’ Notes July 2021
10. Dodger
Highlights
• Hint: if we get early morning dew fogging our dodger glass, or salt crystals from spray, we rinse off
with a pan of fresh water from the galley (salt crystals may need a second splash). We avoid wiping. By
the way, if you or your guests use aerosol sunscreen, please apply well away from the dodger.
Sunscreen will destroy the glass. (San Juan Sailing replaced two panels destroyed by sunscreen.)
11. Electrical
Highlights
• The AC and DC panel breakers use the color dot convention shown:
• Main AC breaker/switch is located on the AC panel in nav station (see
photo page 8).
• Main DC breaker/switch located on the DC panel in nav station (see
photo page 7).
• The Outlets breakers on the upper left section of the AC panel are
powered by either Shore Power or the Inverter.
Switches and Controls on the Electrical Panel (see photo below)
The electrical panel is in the nav station on the starboard side. Here are some things to note:
• Shore Power: All the AC controls are along the left side of the panel. There is a “master switch” to turn
on & off AC power when you connect and disconnect shore power. When the AC is ON, a green LED
light is illuminated. Please ensure that the switches for the AC items (water heater, battery charger, AC
plugs) are turned OFF before connecting or disconnecting shore power.
• Water Heater: Activate the electric hot water heater when you are on shore power if you need more
hot water (when the engine is running it heats the water).
• Battery Charger: Off - See victron energy battery monitor.
• Outlets: Activate two switches to turn ON the AC electrical outlets located throughout the boat.
• Bilge Pump: Always leave the bilge pump setting in “Auto.” Test the pump daily by switching to manual
and listening for the pump to run, then return it to the “Auto” setting.
• Water Pump: If you don’t hear the pump start when you turn it ON at the panel, it means that the
system is at working pressure – you should hear the pump start again after you use some fresh water.
Note that the marine toilet uses raw water and does not impact the fresh water supply. Shower and
sink in the head use the fresh water supply, as does the cockpit shower.
OPERATING TIP: When underway and if no one is below decks, we turn the water pump OFF.
• Cabin Lights: This switch turns ON/OFF DC power to the LED lights located throughout the boat. It must
be “ON” before you can turn on any lights on the boat.
14Cecilia Owners’ Notes July 2021
• Fridge Unit: We usually leave the fridge switch “ON” whenever we’re on the boat. If the house battery
charge level drops to near 12.2v and you aren’t planning to run the engine or to connect to shore
power, then turn the fridge off. Your provisions will stay cold overnight.
• Navigation Instruments: Turn three (3) switches “ON” to activate the electronics, instrumentation, and
multi-function display in the cockpit: Navigation, Radar & Autopilot.
• Anchor, Steaming and Deck Flood Lights: When anchored or mooring, turn on the Anchor Light at dusk
(located at the top of the mast). When motoring at night, turn on the mast-mounted Steaming Light.
Turn on the deck Flood Light if you must go forward on deck at night.
12. Electronics/Instruments
CHART PLOTTER: Raymarine C Series MFD Digital Chart Plotter
Highlights
• Turn on the Navigation Instruments, Radar and Autopilot switches on the electrical panel. (see panel photo
below)
• Press Power on the MFD in the cockpit. Note - this is not a touch screen; use the buttons.
• The screen in the cockpit will sound an alarm requesting you acknowledge the system by pressing the smaller
of the two overlaid round buttons on the panel. This is also the cursor controller joystick. Press Home to go
to the menu icons should they not appear.
• From the menu icons on the screen, use the cursor to select the Nav Chart icon then press the cursor to
activate. You may turn the larger round button to scroll the cursor thru the icons. Selection is only by pushing
the smaller button.
• Zoom In & Zoom Out: push the magnifying glass with the (+) or (-); You may also turn the larger round button
either left or right.
15Cecilia Owners’ Notes July 2021
• Course Over Ground (COG) & Heading (HDG) colored lines from the bow of the Ship Icon: instead of using the
colors, float cursor over line to identify COG or HDG for certainty.
• Find Ship icon: Press Menu / select Find Ship / press center small round button / press Back.
• Clear Waypoints & Tracks: select Menu / Navigation / Waypoints or Tracks / Remove / Back.
• Brightness Control: if you depress the power button, a menu will come up on the bottom half of the screen;
you can use the rotary control to adust the brightness.
• Remember this is only an aid to navigation.
• The primary aids to navigation are the Map-tech waterproof chart book, the rolled charts and, most
importantly, your own due diligence.
DEPTH SOUNDER:
Highlights
• The depth sounder is an aid to navigation in shallow water.
• It may not give accurate readings beyond 250 feet. In deep water you may get false readings caused by
currents, changes in water temperature, fish, and seaweed.
• The key to avoiding hazards is to know exactly where you are at all times, best done from the charts. We do
not recommend using the alarm. Experience in the islands tells us that it goes off at the wrong time--usually
the middle of the night as a fish passes underneath.
• There is an additional depth readout instrument in the main cabin above the VHF so that you can check depth
when at anchor without having to go outside.
KNOT METER:
Highlights
• Digital knot meter shows the speed of the boat.
16Cecilia Owners’ Notes July 2021
• If it shows a reading of "0.00" while underway, the impeller is most likely clogged with a piece of eelgrass. In
our experience this usually clears with the movement of the boat.
AUTOPILOT:
Highlights
• To engage the autopilot, press “AUTO” one time
• To disengage the autopilot, press “STBY”
A.I.S. (Automatic Identification System):
Highlights
• Cecilia transmits her position and data via an AIS signal as well as
receives AIS signals from other vessels equipped with AIS transmitters
(Commercial vessels are required to have AIS, recreational vessels are
optional). Cecilia is transmitting her position full time (The AIS unit is
wired directly to the batteries). Cecilia is also transmitting her position
when the VHF base unit radio is ON.
• On most vessels the VHF base unit radio must be ON to send and receive
AIS data. Some vessels will have a separate AIS unit installed and wired
to the batteries for full-time transmitting. The chart plotter is tied to
the VHF radio or AIS Unit and shows the positions of vessels with AIS as
triangles. Make sure the AIS overlay is turned ON in the settings menu.
• AIS information supplements marine radar, which continues to be the primary method of collision
avoidance for water transport.
• AIS requires each vessel to have a 9 digit MMSI (Maritime Mobile Service Identity) number to transmit
position and data. Cecilia’s MMSI number is 368119280; Call Sign is WDL3201; Official Ship #1180349;
Expiration11/05/2029.
Details
AIS vessels appear on the chart plotter screen as triangles (must have AIS overlay turned ON). The triangle
points in the direction that the vessel is moving and if you place the cursor over the triangle the system will
give you additional information (such as name, size, speed, bearing, etc.) about the vessel. The system also
transmits this same type of information about Cecilia to other vessels with AIS.
The AIS is an added safety feature which allows large commercial vessels to easily see you and your
direction/speed. They may try to contact you via VHF channel 16 to verify your course intent. In addition AIS
allows San Juan Sailing/Yachting to provide faster assistance in case of unplanned maintenance issues as well
as alert San Juan Sailing/Yachting of Cecilia’s return approach. Vessels with AIS can be viewed in real-time
through mobile device apps and websites like www.marinetraffic.com that will reveal vessel name, course,
speed, track, and other information.
VHF RADIOS:
Highlights
• Garmin VHF base with remote at the helm.
• Turn on base unit & VHF switch on the electric panel.
• Helm remote VHF is attached to the helm instrument panel.
• On most vessels the VHF base unit radio and must be ON to send and
receive AIS data. Some vessels will have a separate AIS unit installed
17Cecilia Owners’ Notes July 2021
and wired to the batteries for full-time transmitting. The chart plotter is tied to the VHF radio or AIS
Unit and shows the positions of vessels with AIS as triangles.
• See A.I.S. (Automatic Identification System) section above for detailed description of AIS.
RADAR:
Highlights
1. The Radar is integrated in the Raymarine C Series Digital MFD. [Reflector—
—
2. The unit defaults to "standby" when powered up.
3. To activate radar, toggle from "standby" to "transmit."
4. Toggle back to "standby" when radar is no longer required. Using the radar increases power
consumption.
5. Procedure for Radar Overlay on Chart: push Menu, select Radar/AIS, select Transmit, push Back until
you get to Chart screen; Radar shows as purple overlay.
6. Highly recommend that you enjoy a second cup of coffee or tea instead of attempting to sail in reduced
visibility. A motor yacht tanker or freighter traveling at 20 knots takes only 39 seconds to travel 1/4 mile,
a dangerous situation in decreased visibility. Traveling in reduced visibility is against the charter
agreement.
13. Engine
Highlights
• Yanmar 27hp 3-cylinder diesel with sail drive that will provide many
hours of cruising pleasure.
• The saildrive helps eliminate shaft vibration, noise, and alignment
problems. Under engine power, you will find Cecilia to be quiet,
balanced, maneuverable, and powerful.
• Maximum RPM is 3000. Cruising RPM is 2000-2400. Idle is around 900
RPM. It’s OK and in fact preferred to vary engine speed as you cruise.
Please try not to exceed the cruising RPM range.
18Cecilia Owners’ Notes July 2021
Details
Inspecting the Engine
Engine access is provided by lifting the companionway stairs, which operate on hydraulic
lifts – there are no latches, just lift it up, push it down. Side & front access is provided
via hatches in the aft cabin.
We recommend performing the following inspections each morning before getting
underway:
• Lift the companionway steps to access the engine compartment. Look around
and below the engine for any signs of oil or other fluid leaks.
• Check the coolant level. Anywhere between the two lines (high and low) on the
overflow reservoir is where you want to be.
• Inspect the raw water strainer for debris (located under galley sink). In case of an engine overheat
alarm, check for eelgrass clogging the strainer. Unscrew the top of the strainer, clean out any debris,
then replace it. You have to close the raw water valve in the engine compartment before you clean the
strainer (see page 20, Engine Overheating for instructions).
• Check belt tightness by deflecting the belt inward with your fingers; it should not depress more than an
inch or so.
For longer charters (> 7 days), check the oil level once a week. The dipstick is on the port side of the engine
and accessed from the aft cabin (look down and to your left). If you need to add oil, there is spare oil stored in
the aft cabin bottom shelf. There is one oil filler cap on top of the engine. Do not overfill, add no more than a
cup at a time and re-check the oil level.
The fuel filter is at the front of engine as is the
water pump.
Starting the Engine
This is a keyless start system. The main battery
engine switch is on all the time.
1. Ensure that the throttle/gearshift is in
neutral.
OPERATING TIP: In colder weather or
when you want to run the engine at a
higher idle speed (e.g., to charge
batteries), depress the red button at the
base of the throttle and push the throttle
slightly forward. This disengages the transmission and allows the engine to run at a higher idle RPM.
We recommend targeting 1000-1200 RPM for warm-up and battery charging.
19Cecilia Owners’ Notes July 2021
2. Press the bottom “POWER” button to turn on the ignition. Red lights will illuminate on the tachometer
dial. Do not hold the button or it will turn the ignition off.
3. Press top “START” button, which will start the engine.
4. Listen/look for water discharging from the aft starboard end of the hull. If water is not in the exhaust
immediately shut the engine down and contact SJS.
OPERATING TIP: Allow 5-10 minutes of warm up before placing a load on the engine. It stresses a diesel engine to be
placed under load when cold. Conversely, allowing a diesel engine to idle too long will cause carbon build-up.
Running the Engine
• Engage forward or reverse gear by moving the transmission directly from Neutral to Idle-Forward or
Idle-Reverse (the transmission will click into each setting), pause momentarily, then move the throttle
forward/backward smoothly to your desired RPM setting. Engaging the transmission in jerky
incremental steps can slip the clutch, causing damage over time.
• To keep the transmission “healthy” when shifting from forward to reverse and vice-versa, pause ~2
seconds in the 12 o'clock neutral position (say “one and two and”) before shifting gears.
• An economical cruising speed of 6 knots is achieved at 2400 RPM, which uses about 0.5 gallon of diesel
per hour. Please do not exceed 2700 RPM as maximum hull speed is 7.1 knots: it’s hard on the engine
and fuel consumption goes way up with very little increase in speed, and too much time at speeds over
2400 RPM can cause overheat. We recommend keeping the engine speed under 2400 RPM for most
operating conditions.
• To avoid sucking in air or sludge when the fuel level approaches ¼ of a tank, refuel when the fuel drops
below ½ full and before it reaches ¼ full. The tank holds 25 gallons, so topping up at about 8 gallons is a
reasonable exercise and doesn’t take too long.
Shutting Down the Engine
1. Allow the engine to idle for a few minutes in neutral to cool down.
2. Press the middle “STOP” button, which will stop the engine.
3. After engine stops, press the bottom “POWER” button and hold for a second until the red lights on the
tachometer turn off. If the bottom power button is not turned off, an alarm will sound periodically.
SAFETY REMINDER – Never stop the engine by turning off the battery switch. Doing so will seriously
damage the diodes on the alternator and the batteries will no longer charge.
Boat Handling with the Engine
Cecilia has a deep 6’ 6” fin keel, a keenly responsive helm, and a narrow turning radius.
San Juan Sailing offers free handling instruction before you leave for your charter if you’d like to practice with
Cecilia or just bone up on your boat handling skills. Spending 30-60 minutes practicing getting in and out of the
Bellingham marina can be a great experience.
20Cecilia Owners’ Notes July 2021
Forward
Because the saildrive/propeller is almost directly below the engine, the wash from the prop takes a moment
to reach the rudder; anticipate this delay when maneuvering in tight spaces. A short burst of throttle will
direct water at the rudder, which if already turned, will result in a short, sharp turn with little forward
movement – a strategy that can be handy when turning in confined spaces.
Reverse
Prop walk is minimal to starboard in reverse. Driving in reverse is a pleasure. Grip the wheel firmly when in
reverse: water pressure on the aft edge of the rudder can push the rudder over to one side, which is hard on
the steering mechanism (and your arms).
Docking
Unless there are high winds, we typically motor in the marina in Idle-Forward, which will produce a boat speed
of about 2 knots. About 4 slips from our target dock, we shift to neutral and glide in. Use the engine to stop
the boat at the dock, and don’t shut down the engine until the vessel is secured at the dock.
SAFETY REMINDER: It’s difficult for people holding lines on the dock to stop the momentum of a heavy
cruising sailboat. It’s also a bad idea to use dock lines on a cleat to stop movement; this can result in a sudden
swing of the boat and damage to cleats, boat, and/or dock. And please, no crew should jump to the dock. If
you can’t step off calmly, back-up and try again.
When coming into our docks in strong winds, or if you’d just like a little assistance on arrival, hail “San Juan
Sailing” on VHF Channel 80. They’ll be glad to offer some coaching and/or catch your lines. In fact, most
marinas in the Islands will help you if you hail them and ask for assistance. Asking for docking assistance is a
sign of smart seamanship.
SAFETY REMINDER –Whenever you are departing or arriving at the dock have a crew member designated as
the “roving fender” team mate. If you are going to accidentally “touch” a boat or other object, lower the
fender to the point of contact.
Troubleshooting Engine Problems
Yanmar engines are incredibly durable and you shouldn’t have any problems on your voyage. Nevertheless,
there are a few things to watch out for.
Engine Overheating
If the engine overheat buzzer sounds while the engine is running, it’s usually no more serious than eelgrass
plugging up the raw water strainer. The solution to this problem is prevention – keep an eye out for eelgrass
mats, especially along those “soapy” looking tide and eddy lines in the water, and don’t run over it. When
eelgrass gets sucked into the engine cooling water intake, it collects in the raw water strainer.
Check for water gurgling out the exhaust. If gurgling, check the coolant level. If no water is gurgling, the raw
water strainer is probably plugged with eel grass. To clear eelgrass from the raw water strainer, stop the
engine. The strainer is located under the galley sink at the aft end of the cabinet. Check the strainer for visible
obstruction. If eel grass is visible, first close the raw water intake seacock (located on the sail drive housing,
21Cecilia Owners’ Notes July 2021
port side, forward end of the engine, look for the brass “T” handle. Refer to photo below). NOTE: The valve
takes about 12 full rotations of the T-handle to open or close.
Seacock:
Raw Water Intake Valve
Brass Handle (located on
port side of sail drive
housing)
Open the raw water strainer lid located under galley sink (photo) by removing the 2 wing nuts
at the top. Extract the stainless steel filter element and remove the eel grass inside the yacht
over the trash bin - there is a rubber O ring gasket that you must secure. Open the seacock
to insure it is not clogged, close it again and reinsert the filter element with O ring, making
certain the lid sits flush to get a good seal. Gently tighten the wing nuts simultaneously; don’t
over tighten. Reopen the seacock, then restart the engine.
If after restarting the engine it overheats again, make certain the raw water intake seacock
is open; then check the seal between the strainer, the rubber gasket, and the lid. If the
strainer is drawing air, it won’t draw water. If needed, open and then retighten the lid on
the strainer and check to make sure the rubber gasket is in place in the lid (and not lying in the bilge.)
If the above steps fail to solve the problem, call San Juan Sailing for assistance.
Loss of Oil Pressure or Coolant
If the engine loses oil pressure, the warning buzzer will sound and the oil icon warning light on the tachometer
will light up, so check which light is showing red. If it’s the oil light, shut down the engine, check the oil level,
and contact San Juan Sailing.
The alarm buzzer is more likely to indicate engine overheating, and the temperature icon light will light up.
Before you shut down the engine, check for water gurgling out the exhaust. If you have a “wet exhaust,” check
the coolant level in the overflow reservoir bottle. If none is seen, add enough to reach the top-level line on the
bottle. After the engine cools down, remove the cap on the engine block and add coolant. And check the bilge
for a light green liquid (coolant). If coolant is found in the bilge, call San Juan Sailing immediately.
If the coolant reservoir bottle is full, check to see if the engine threw a belt. Without a belt on the raw water
pump, the coolant won’t circulate and cool the engine. Replacement belts are in the engine spares kit. One
other possibility is that the impeller in the raw water pump has failed. While they are replaced each spring
with a new one, it’s still possible that a hard object may be drawn in and break off an impeller blade. A
22Cecilia Owners’ Notes July 2021
replacement impeller is found with the engine spares. Call San Juan Sailing if you suspect you have an impeller
problem.
OPERATING TIP: Bottom line – you’re on vacation! If the engine is giving you problems, call SJS for assistance.
They have repair teams in the Islands to assist you.
14. Entertainment System
Cecilia is equipped with a marine entertainment system for audio with Bose Speakers in the main cabin and
marine speakers in the cockpit. Highlights of the entertainment system include:
• Audio system: AM/FM Stereo, USB connection for audio players - iPod, iPhone, iPad.
The Audio system unit is located next to the VHF radio at the Nav station. To connect an iPod or other
portable music player using the USB port, plug in your device using your own cable.
15. Fuel
Highlights
• The diesel fuel tank holds 25 gallons (96.4 liters).
• The fuel gauge is located at the nav station.
• Refuel when gauge reads ½ or greater or at 20 hrs engine run time.
• Fuel deck fill is on the starboard deck by the mast labeled “Diesel.”
• In nominal conditions, the engine consumes 0.79 gal/hr at 2700 rpm.
• As part of your paper log, track engine run time: 25 gal = 30 hrs.
Details
Fueling:
Please fill very carefully because it is difficult to tell when the tank is full. You need to put your ear to the tank,
not fill “too fast”, and be prepared to stop immediately when the pitch rises.
In the locker under the Nav seat, there are disposable gloves. The attendant will give you absorbent pads.
Before fueling, build a fuel absorbent dam fore and aft in case of overfill (reaching for the pads after the spill is
too late).
16. Head and Holding Tank
Highlights
• Only what has been eaten goes in the toilet..
• The marine head is a traditional Jabsco manual flush system using seawater.
23Cecilia Owners’ Notes July 2021
• The toilet discharge hose has Y-valve (photo) set to flush the toilet directly into the holding tank.
• The holding tank level gauge is located in the head on sink cabinet wall next to the toilet.
• 20 gal Holding tank should be emptied every second day.
Details
Please do not put anything in the toilet that has not been eaten. Experienced sailors deposit toilet paper in a
wastebasket in Ziploc baggies, not down the toilet because paper will clog the hoses. The head holding tank
capacity is 20 gallons. If you have four people on board and have ‘normal’ usage, the tank will need to be
emptied every second day.
San Juan Sailing staff will discuss holding tanks and pump outs on your arrival. Our one plea is this: please
don’t over fill the holding tank as leaking sewage is most unpleasant! Thank you.
Please note that in U.S. waters it is illegal to discharge holding tanks overboard. While in Canadian waters
outside of bays and harbors overboard discharge is allowed.
Head and Holding Tank:
o The head is a traditional Jabsco manual flush system using seawater. The seawater suction
seacock for this head is located under the floorboard of the wet locker in the head.
o If the toilet pump starts to resist your flushing effort, don’t force it! Exploding or leaking sewage
is most unpleasant! Search out the problem and correct it.
o To check the level of the holding tank read the gauge next to the toilet seat on the sink cabinet.
Empty the holding tank when it is ¾ full or before.
Emptying the Holding Tank
1. Deck Pumpout
2. Overboard Discharge (where legal)
The head has a 20 gallon holding tank located under the aft cabin mattress. The "Y" valve which indicates the
flow from the head to either tank or discharge is located on the aft wall of the shower stall. The arrows on the
“Y” valve will point to either “tank” or “discharge”. Normal operation is into the tank. Discharge is not done in
these waters. The tank can be pumped out two ways:
1. Deck Pumpout - stations located at various harbors throughout the islands.
The holding tanks can be pumped out via the labeled deck fills. After pumping out the holding tanks,
please refill each tank with about 5 gallons of fresh water through the deck fitting to rinse, and then
pumpout again. This will help keep the waste system smelling fresh! Thank you!
24Cecilia Owners’ Notes July 2021
2. Overboard Discharge (where legal) - Running the macerator to discharge into open waters when
allowed. (San Juan sailing will provide further information about approved areas for discharge of
macerated waste)
When using the macerator please follow these steps:
1. Open the sea cock for the macerator, located under the
floor of the wet locker in the head. The head intake,
discharge and macerator seacocks are from outboard to
inboard respectively; left to right in the photo.—————
2. The macerator seacock handle is closest to the center of
the boat. Lift the handle to a vertical position to open.
3. Turn the macerator on at the electrical panel. It will take
less than two minutes to empty the tank. A high pitch
sound indicates it has emptied. It pumps off the stern so
a lookout to report clear discharge is also helpful.
A tank gauge is located on the side of the sink next to the head,
however, it does not read accurately. As a rule of thumb, the holding tank is fuller than you think so empty
every two days. San Juan Sailing staff will discuss holding tanks and pump-outs on your arrival. Our one plea is
this--as you use the holding tank, please monitor it carefully! Exploding or leaking sewage is most unpleasant!
At the pump out station the tank should be pumped out, filled with fresh water through the deck fitting to rinse,
and then pumped out again. The air vent for the holding tank is just below the aft starboard cleat.
17. Heaters (Cabin)
Highlights - Cecilia has three options for cabin heat:
• Espar Diesel Fired Furnace Heat Exchange to Hydronic Circulation
• Engine Heat Exchange to Hydronic Circulation
• Portable 120V Electric Heater on shore power
Details
Espar Diesel Furnace
The Espar diesel fired, hydronic cabin heater with the thermostat mounted below the electrical panel. The heat
is dry, comfortable, and on those occasional rainy days or cool evenings, makes a huge difference in cruising
comfort! The heater also heats the fresh water so you have hot water without running the engine. There is a
breaker for the system power labeled “Heater” on the DC electrical panel. It should ALWAYS remain turned ON.
The thermostat unit (located below the electrical panel) has an ON/OFF switch which is used
start or shut down the system. The Espar Diesel Heater is the most efficient when on the
water.
Espar Diesel Furnace Operation:
1. Ensure that the “Heater” breaker on the DC panel is ON (should always remain ON).
2. Press the rocker switch on the Espar thermostat to the ON position at electric panel.
3. Rotate the thermostat dial to the high position. (red and green lights will come on over
thermostat)
25You can also read