Oklahoma School Testing Program - KIOSK INSTALLATION GUIDE 2021-2022 School Year - Cognia Help and Support
←
→
Page content transcription
If your browser does not render page correctly, please read the page content below
Oklahoma School Testing Program
KIOSK INSTALLATION GUIDE   2021-2022 School Year
KIOSK INSTALLATION GUIDE

Cognia is a registered trademark of Cognia, Inc. The Cognia logo is a trademark of Cognia, Inc.
All rights reserved.

© 2021 eMetric, LLC. This document, including all attachments, contains the proprietary and
confidential information of eMetric. It is not to be distributed to any party without the explicit written
consent of eMetric.

iTester is a trademark of eMetric LLC.

Version Control
 Version       Date               Author                  Change Description
 1.0           10/8/2021          eMetric                 Created support documentation per 2021-2022
                                                          requirements discussion with Cognia and OK SDE.

                                                                                                             2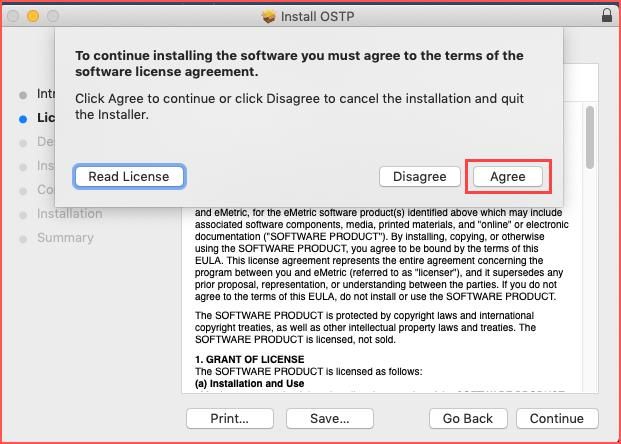
KIOSK INSTALLATION GUIDE

TABLE OF CONTENTS

INTRODUCTION ............................................................................................................................................................... 5
    TECHNICAL SUPPORT .....................................................................................................................................................................................5

TESTING ENVIRONMENT............................................................................................................................................... 6
    OVERVIEW ...............................................................................................................................................................................................................6
    PROCESS ...................................................................................................................................................................................................................6
    TESTING ENVIRONMENT SETUP .............................................................................................................................................................7
    NETWORK CONNECTIVITY.........................................................................................................................................................................7
    BANDWIDTH..........................................................................................................................................................................................................8
    THIN-CLIENT ENVIRONMENTS ................................................................................................................................................................9
    MONITOR SETTINGS ........................................................................................................................................................................................9
    SPANISH LANGUAGE SUPPORT ........................................................................................................................................................... 10
               LANGUAGE PACK ................................................................................................................................................................................ 10
               LANGUAGE SETTINGS ..................................................................................................................................................................... 10
    DEFAULT VOICE SETTINGS FOR TEXT-TO-SPEECH ACCOMMODATIONS .......................................................... 11
    DISABLE TOUCH SETTINGS FOR THIRD-PARTY SOFTWARE .......................................................................................... 11

OSTP KIOSK INSTALLATION ....................................................................................................................................... 12
    WINDOWS® OS ................................................................................................................................................................................................. 12
               Step 1: Set up your building testing environment ................................................................................................................ 12
               Step 2: Download the OSTP Kiosk ............................................................................................................................................... 12
               Step 3: Install the downloaded Kiosk ........................................................................................................................................... 13
    WINDOWS® MSI PACKAGE SCRIPTED INSTALLATION ....................................................................................................... 17
               Script Examples ....................................................................................................................................................................................... 17
    WINDOWS® MSI PACKAGE INSTALLATION VIA GROUP POLICY ................................................................................. 18
    WINDOWS® NETWORK KIOSK INSTALLATION ........................................................................................................................ 18
    MAC OS® ............................................................................................................................................................................................................... 19
               Step 1: Set up your school testing environment .................................................................................................................... 19
               Step 2: Download the OSTP Kiosk ............................................................................................................................................... 19
               Step 3: Install the downloaded Kiosk ........................................................................................................................................... 19
    DISABLING SIRI ................................................................................................................................................................................................. 24
    ACCCESSIBILITY ACCESS ON MAC OS® 10.14 ........................................................................................................................... 24
    LINUX® .................................................................................................................................................................................................................... 26
               Step 1: Set up your school testing environment .................................................................................................................... 26
               Step 2: Download the OSTP Kiosk ............................................................................................................................................... 26
               Step 3: Install the downloaded Kiosk ........................................................................................................................................... 28

                                                                                                                                                                                                                               3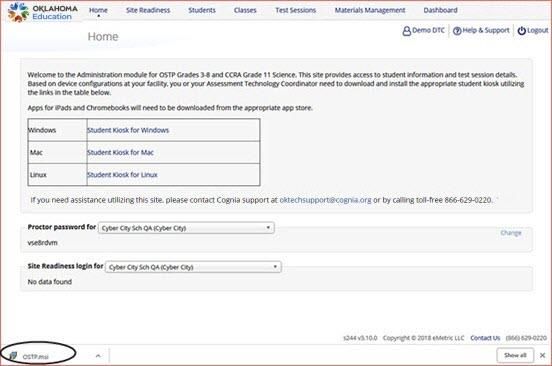
KIOSK INSTALLATION GUIDE

iPAD APPLICATION INSTALLATION ......................................................................................................................... 33
   DOWNLOAD THE iTESTER APP FROM THE APPLE APP STORE ..................................................................................... 33
              Assessment Mode .................................................................................................................................................................................. 34

CHROMEBOOKTM APPLICATION INSTALLATION ................................................................................................ 35
   MANAGED CHROMEBOOKSTM ............................................................................................................................................................. 35
   NON-MANAGED CHROMEBOOKSTM ............................................................................................................................................... 40
   MANAGED CHROMEBOOKSTM: TURN OFF AUTO-UPDATE ............................................................................................ 42

SITE READINESS TESTING AND SITE CERTIFICATION ........................................................................................ 44
   PURPOSE............................................................................................................................................................................................................... 44
   SITE READINESS TESTING ........................................................................................................................................................................ 44
              Step 1: Find the Site Readiness account information ......................................................................................................... 44
              Step 2: Authenticate every device or device configuration to be used for testing ............................................. 45
   SITE CERTIFICATION ................................................................................................................................................................................... 48

                                                                                                                                                                                                                         4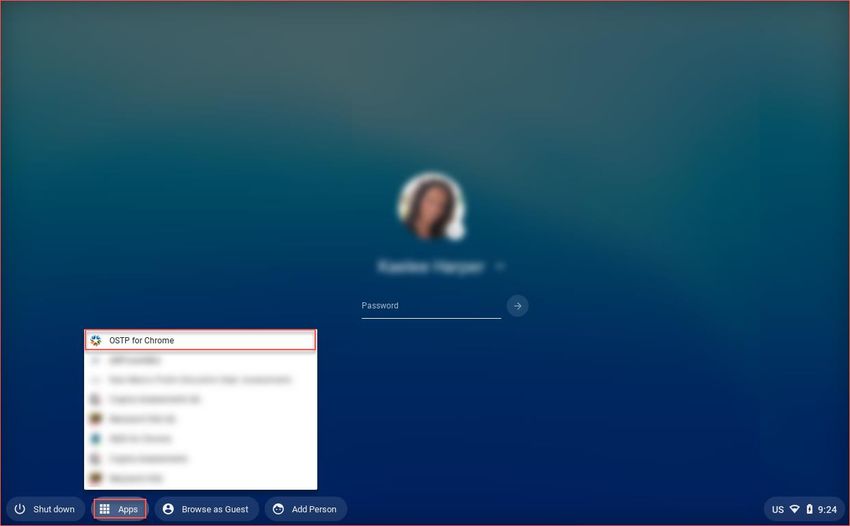
KIOSK INSTALLATION GUIDE

INTRODUCTION
This document is intended for technology personnel responsible for setting up the Oklahoma School
Testing Program (OSTP) and the College- and Career-Readiness Assessments (CCRA) online-testing
environment.

There are two components of OSTP & CCRA online testing: the OSTP Data Portal, used by building and
district administrators to perform all administrative tasks, and the OSTP Kiosk, used by students for
testing. This document contains instructions for installing the iTesterTM OSTP Kiosk and conducting site
readiness testing on devices used for online testing.

Note: The OSTP Kiosk is a version of the iTester student testing kiosk application that has been tailored
for the OSTP & CCRA. Some technical documentation may refer to the OSTP Kiosk as iTester.

For more information on working with the OSTP Data Portal, see the OSTP Data Portal User Guide, which is
available on the Help & Support page: https://oklahoma.onlinehelp.cognia.org/guides

TECHNICAL SUPPORT
If you experience any difficulty downloading or installing the kiosk, contact Cognia Technical Support at
oktechsupport@cognia.org or (866) 629-0220.

   For technical questions about the installation of Cognia Service Desk
   the kiosk, test administration or other technical Toll free: 1 (866) 629-0220
   information, contact:                             Email: oktechsupport@cognia.org

                                                 Oklahoma State Department of Education Office of
   For questions or information regarding OSTP & Assessments
   CCRA policy and testing procedures, contact:  Phone: (405) 521-3341
                                                   Website: http://sde.ok.gov/sde/office-assessments

                                                                                                            5
KIOSK INSTALLATION GUIDE

TESTING ENVIRONMENT
OVERVIEW
The OSTP Kiosk refers to the software application used for secure online testing for the Oklahoma
School Testing Program and College- and Career-Readiness Assessments. The student testing kiosk
restricts access to other computer applications during testing. The kiosk is a cross-platform, rich internet
application that employs the industry’s highest standard in security, reliability, and usability for high-
stakes assessment. The kiosk runs seamlessly on Windows®, Mac®, and Linux® operating systems, iPad®
tablets, with and without external keyboards, and Chromebook™ notebook computers.

Information on student test interface tools, accommodations, accessibility features and navigation can
be found in the OSTP Kiosk User guide here: https://oklahoma.onlinehelp.cognia.org/guides

Information on using third party accessibility or accommodations software with the student test
interface can be found in the Testing with Third Party Assistive Technology Guide here:
https://oklahoma.onlinehelp.cognia.org/guides

PROCESS
The testing environment for a school is installed and set up by an IT Coordinator (ITC), or a Building Test
Coordinator (BTC) or District Testing Coordinator (DTC) acting as an ITC.

After your DTC or BTC has set up your ITC account, you will receive your user account information via
email.

To install and set up the kiosks for your building:
    1. Review the Technology Guidelines to ensure that you have the correct equipment for student
        testing.
        https://oklahoma.onlinehelp.cognia.org/guides

    2. Configure your network to support student testing on the kiosk:
          • Testing Environment Setup
          • Network Connectivity
          • Bandwidth
          • Thin-Client Environments
          • Monitor Settings
          • Spanish Language Support
          • Default Voice Settings for Text-to-Speech Accommodations

    3. Download and install the appropriate kiosk to each student testing device:
          • Windows®
          • macOS®
          • Linux®
          • iPad® application
          • ChromebookTM application

                                                                                                           6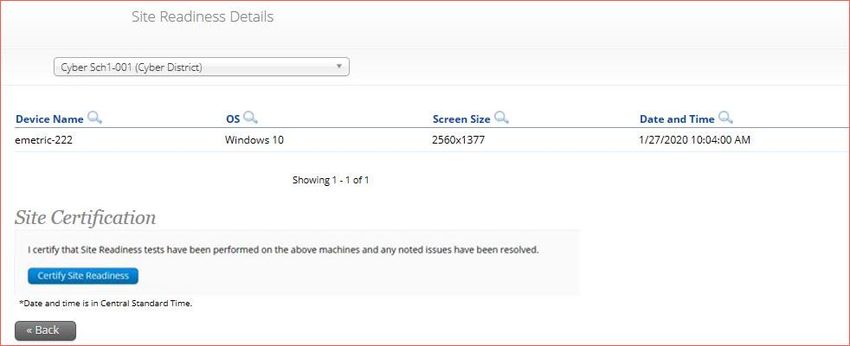
KIOSK INSTALLATION GUIDE

    4. Complete the Site Readiness tests, which perform a system check and provides a testing
       simulation scenario for each device or device configuration.

        Note: To ensure that the testing environment is ready for students on time, we recommend that
        you run the Site Readiness tests directly after installing the test device kiosks.

    5. When all of the configurations to be used for student testing are ready, certify that your site is
       ready for student testing.

TESTING ENVIRONMENT SETUP
The Kiosk can be installed on the network or on an individual student testing device. The advantages and
disadvantages for each are listed in the table below. We recommend a local installation to avoid
network connection issues.

                         Individual Device
                                                                        Network installation
                            Installation

                    No impact on LAN traffic Time spent on application installation and configuration would
 Advantages         during initial application be considerably less.
                    launch.                    Centralized location for application updates and configuration.

                    Application installation and Downloading the application from the network folder to the
                    configuration will take more test taker’s testing device could introduce single point of failure
 Disadvantages      time.                        during application launch.
                                                  Initial application launch could be delayed depending on the
                                                  LAN traffic and bandwidth.

NETWORK CONNECTIVITY
All student testing devices used for student testing should have access to the Internet and should be
able to access the server using HTTP/HTTPS protocols on ports 80 and 443.
     1. Whitelist the following sites on ports 80 and 443 in content filtering proxies or other locally used
        proxy software.
            •    https://oklahoma.cognia.org
            •    https://okpracticetest.cognia.org
            •    fonts.googleapis.com/
            •    themes.googleusercontent.com/
            •    googleusercontent.com/
            •    https://cognito-identity.us-west-2.amazonaws.com
            •    https://cognito-identity.us-east-1.amazonaws.com
            •    https://eventsapi.emetric.net/nmprod/router
            •    app.getsentry.com

            •    dc.services.visualstudio.com

                                                                                                                   7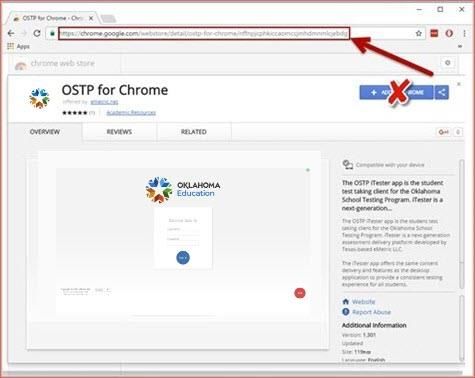
KIOSK INSTALLATION GUIDE

            •   az416426.vo.msecnd.net
        Note: It is critical that districts and buildings using web content filters perform site readiness
        testing to confirm the Student Interface Test content can be downloaded to student kiosk
        clients without any issue.

    2. If you are working with sandboxing applications (such as Faronics Deep FreezeTM), do one of the
       following while installing the kiosk:
            • Choose network folder location for local caching.
            • Make sure the default location, such as C:\Users\user\AppData\Local\eMetric
                (%localappdata%/emetric) and its contents are not deleted by these applications.

        Note: Student-testing data, including encrypted responses, will be saved to the indicated
        location only if the network connection or Internet connection is lost during the test. Students
        will be able to continue testing without interruption, but their testing data will be saved in the
        indicated folder.

    3. Buildings with low internet bandwidth:
           • We recommend that buildings with an Internet download speed of less than 1.5 Mbps
               or less than 256 Kbps stagger students starting the test.

BANDWIDTH
A school’s capacity to support test takers is a function of the school’s available bandwidth and size of the
test resource. To eliminate concern regarding adequate bandwidth, iTester includes a web-based
readiness tool for school and districts to verify their infrastructure, network bandwidth, and testing
devices are properly configured for administering student testing. The tool is designed to simulate a test
scenario and is used to verify that devices to be used for testing meet the minimum requirements and
have been properly configured.

A system check is also conducted to test bandwidth, connectivity to the test delivery system, and ability
to support text-to-speech functionality. The results (pass/fail) from the verification process are
immediately viewable; deficits, including inadequate bandwidth to support the desired number of
concurrent test takers, are identified as well. In training, we will cover the need to conduct the site
readiness test by all buildings and districts.

Additionally, the bandwidth necessary for a certain number of students to test simultaneously (defined
as clicking “Continue” simultaneously, as that is what triggers the test content to download to the
students’ workstations), will depend on the size of the actual operational forms. We adjust our
bandwidth tests to calculate using the average form session size (which we expect will be 3 MB or less).
No video content, which could adversely affect form size, will be included in the operational forms this
coming year, and we optimize our system and the content itself to be as streamlined and lightweight as
possible.

Therefore, it is imperative that the Site Readiness Test be conducted by the technology coordinator at
each building to ensure adequate bandwidth for testing.

                                                                                                             8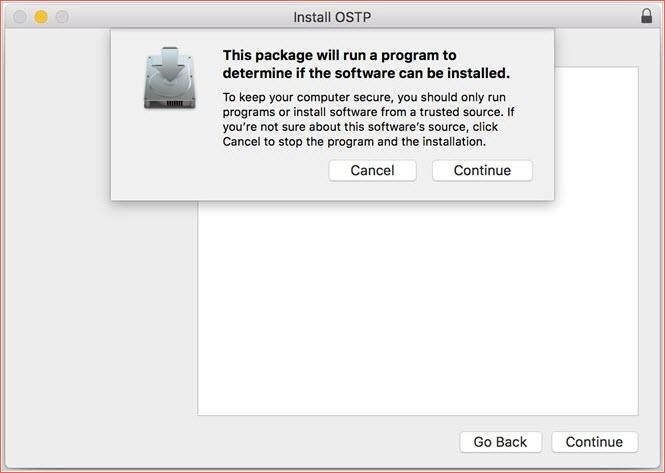
KIOSK INSTALLATION GUIDE

THIN-CLIENT ENVIRONMENTS
When using thin-client environments, such as Terminal Services, Citrix®, or LTSP®, make sure that there
is enough memory, CPU, and bandwidth on the server to accommodate multiple student test sessions.
The application requires a minimum of 80 MB of memory per client session and performance can vary
depending on the size and type of the test. Allowing multiple sessions on an improperly sized thin-client
environment will lead to poor performance.

Additionally, schools using thin-clients need to be cautious when there is 1 GB or less of physical
memory on the student testing device. In this case, we highly recommend that you use a local
installation. As a rule, if you can use ChromeTM browser to access web-based email or web-based
streaming services on all student testing devices simultaneously, then testing should go well.

In thin-client environments, the accounts students use to log in to the student testing devices must be
unique for each student. Also, each account must have its own dedicated user profile.

Note: If the kiosk in your thin-client deployment experiences performance issues, such as graphics not
rendering, fuzzy screens, or screen flickering, we recommend disabling or adjusting the hardware
graphics acceleration.

For assistance, contact the Cognia Service Desk at oktechsupport@cognia.org or (866) 629-0220.

MONITOR SETTINGS
Ensure that all monitors used for testing are set to the default color settings. If a student requires a
zoom accommodation, review the recommended screen resolutions in the table below:

     Required Zoom Level               Recommended
         for Student                  Screen Resolution
  100% (No Zoom)               1024 x 768 (or higher)
  150%                         1920 x 1080 (or higher)
  200%                         1920 x 1080 (or higher)
  300%                         1920 x 1080 (or higher)

Note: These are only recommended screen resolutions. Use the screen resolution you feel the student
would be most comfortable with.

The student or test administrator may set the zoom level within the Kiosk when the student logs in using
their unique username and password at the time of testing.

                                                                                                           9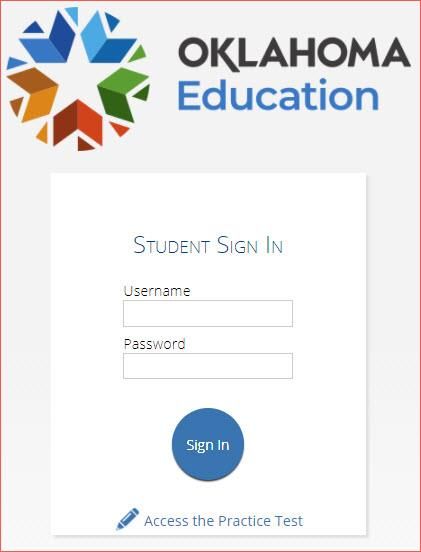
KIOSK INSTALLATION GUIDE

SPANISH LANGUAGE SUPPORT
The OSTP & CCRA online test administration is also available in Spanish.

The Spanish Text-to-Speech version of the test is not available on iPads, but is supported on the
following systems:
     • Windows® 8.1 and 10
     • macOS® 10.14 – 11.6 (64-bit only)
     • Chrome OSTM 80-94
LANGUAGE PACK
The Spanish version of the test uses the Text-To-Speech accommodation, which requires a Cepstral
Spanish language pack to be installed on the machine where the test will be taken.

Important: Licensing of this language pack is limited, so plan to cycle the students with this
accommodation through your testing space to avoid the need for multiple installation of this language
pack.

Note: For assistance on obtaining Cepstral licenses, contact Cognia Service Desk at
oktechsupport@cognia.org or call (866) 629-0220.

Important: Chromebooks will utilize Google’s native speech engine configured for ChromeOSTM and
therefore do not require the Cepstral Language Pack.

LANGUAGE SETTINGS
To ensure the log in screen, navigation buttons, and on-screen prompts are all in Spanish, you will
change the OSTP Kiosk to the Spanish Language version.
    1. Launch the OSTP Kiosk.
    2. On the Sign in Screen select Español from the localization drop-down list at the bottom of the
       page.

You can also set up your language preferences manually on Windows and Mac workstations.

Windows workstations
   1. From the Control Panel, click Clock, Language, and Region, and then click Region and Language.
   2. On the Formats tab, from the Format drop-down list, select Spanish (United States). Click Apply
      and then click OK.
      • If you are prompted for an administrator password or confirmation, type the password, or
          provide confirmation.
    3. To change the keyboard setting, on the Keyboard and Languages tab. On the General
       tab, click Change keyboards, and then select Spanish (United States). Click Apply, and
       then click OK.
    4. To restart your computer, click Restart now.

        Note: The commands may differ slightly depending on which version of Windows you
        are using. Windows 10: Settings > Region & Language > Select Add a Language.

                                                                                                        10
KIOSK INSTALLATION GUIDE
Mac workstations
1. Choose Apple menu > System Preferences, then click Language & Region.
2. Under the Preferred Languages list, click the + and select Español – Spanish (US) and click Add.
3. Select Use Spanish (US) once this notification appears:
4. In the Region menu, select United States.
5. Restart the device.
DEFAULT VOICE SETTINGS FOR TEXT-TO-SPEECH ACCOMMODATIONS
The voice used by the student testing kiosk for text-to-speech is the voice set as the default on the
device the student is using for testing. Ensure that the desired voice is set at the default for the
operating system installed on the device.
To update the default voice for Windows® 8.1:
1. Click the Start button. (Right-click the Start button if using Windows® touch)
2. Click Control Panel.
3. Click Ease of Access.
4. Click Ease of Access Center.
5. Click use the computer without a display.
6. Click Set up Text to Speech.
7. Click the voice you want to use in the Voice Selection box.
To update the default voice for Windows® 10:
1. Click the Windows® button.
2. Click Settings.
3. Click Time & Language.
4. Click Speech under the Time & Language menu on the left side of the screen.
5. Select the voice you want to use in the Voice Selection box.
To update the default voice for macOS® 10.14 – 11.6:
1. Click System Preferences.
2. Click Accessibility.
3. Click Speech.
4. Click the voice you want to use in the System Voice box.
DISABLE TOUCH SETTINGS FOR THIRD-PARTY SOFTWARE
The sketch tool & text highlight tool are not available if third-party software with touch settings is
installed on the student workstation. Please see the Testing with Third Party Assistive Technology Guide
for steps to disable touch settings: https://oklahoma.onlinehelp.cognia.org/guides
11KIOSK INSTALLATION GUIDE
OSTP KIOSK INSTALLATION
WINDOWS® OS
Follow the steps below to install the kiosk on all student testing devices running Windows®.
Step 1: Set up your building testing environment
Review Testing Environment in detail.
Step 2: Download the OSTP Kiosk
After your District Test Coordinator (DTC) or Building Test Coordinator (BTC) sets up your IT Coordinator
(ITC) account, you will receive your user account information via email.
Note: If you do not have a dedicated ITC, a DTC or BTC can complete all ITC tasks using their DTC or BTC
account. Ensure you have the correct administrative rights to make changes to student testing devices.
When you have your login credentials, you are ready to download the OSTP Kiosk:
1. Go to the OSTP Data Portal at https://oklahoma.cognia.org and log in with your username and
password.
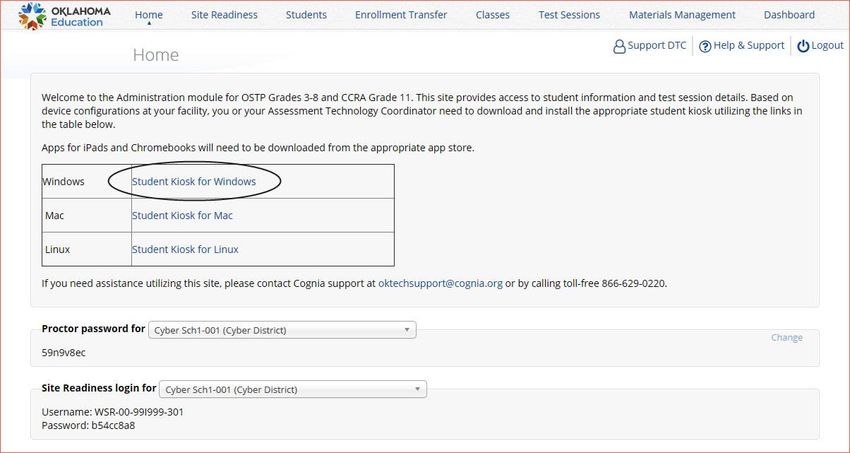
2. On the portal home page, click Administration. The Administration home page appears.
3. Click Student Kiosk for Windows®. You will see a Download progress bar at the bottom of the
page.
12KIOSK INSTALLATION GUIDE
Step 3: Install the downloaded Kiosk
When the download completes:
1. Click the installation file in the Download bar at the lower-left corner of the Administration
home page.
2. Read the End-User License Agreement and select I agree to the license terms and conditions.
Click Install to continue.
13KIOSK INSTALLATION GUIDE
3. Read the instructions and click Next to continue.
4. Type the destination folder in the space provided and click Next to continue.
Note: You can choose to install the kiosk in a shared network folder or a local folder on the
student testing device. We recommend a local installation to avoid network connection issues
(see Network Connectivity).
14KIOSK INSTALLATION GUIDE
5. Select the directory to store student responses and click Next to continue.
• Important: This is the failover location for saving student responses in the event
network connectivity is lost.
• Use the User Profile directory for caching
During kiosk installation, if you choose the default option to store the stored response
files in the user profile, these files will have names like this format:
• Use a custom directory for caching
If you select Save in the following directory, you must manually enter the alternate
path.
6. Confirm that you are ready to install the kiosk, and then click Install.
15KIOSK INSTALLATION GUIDE
7. Click Finish to complete the installation.
When you are ready to test the kiosk installation for this configuration, see Site Readiness Testing and
Site Certification.
16KIOSK INSTALLATION GUIDE
WINDOWS® MSI PACKAGE SCRIPTED INSTALLATION
Network administrators can install the OSTP Kiosk via an installation script to be executed by
an Admin account on the machine. The script can be written to run without any human
interaction (quiet switch) and to install in the default directory (C:\Program Files) or any target
directory of choice. Uninstalling the Client can also be scripted.
Below are generic scripts that can be used for installation and uninstallation.
Script Examples
= Complete path to the OSTP MSI installation file, including .msi installation file name.
Example: C:\Downloads\OSTP.msi
= Complete path to the location where OSTP Kiosk should be installed other than the
default location (C:\Program Files). Example: C:\OSTP\Installation_Dir
= Complete path to the location for storing the cache and encrypted student
responses created due to network interruptions. Example: D:\Cache.
Note: Ensure that this location is excluded from system restore software, like Deep Freeze.
Installation script
msiexec /I "" /quiet INSTALLDIR=""
ITESTERAPPDATALOCATION="" INSTALLLEVEL=2
Example: msiexec /I "C:\Downloads\OSTP.msi" /quiet INSTALLDIR="C:\OSTP"
ITESTERAPPDATALOCATION="D:\Cache" INSTALLLEVEL=2
Warning: If you do not specify ITESTERAPPDATALOCATION, then the Local Application Data folder
located in the User Profile of the actively logged-in user will be used by default. If you do not specify
INSTALLLEVEL=2, then the configuration required for setting the will not be
created.
Uninstallation script
msiexec /X "" /quiet
Example: msiexec /X "C:\Downloads\OSTP.msi" /quiet
17KIOSK INSTALLATION GUIDE
WINDOWS® MSI PACKAGE INSTALLATION VIA GROUP POLICY
Network administrators can use Microsoft Active Directory Group Policy to distribute the
OSTP Kiosk MSI package seamlessly to all client computers.
Follow the step-by-step instructions described in the following Knowledge Base article:
http://support.microsoft.com/kb/816102.
Note: Default installation locations will be used when using Group Policy to distribute the OSTP
Kiosk. This option will also not allow systematically specifying a network location for caching and
storing encrypted student responses created due to network interruptions. The local Application
Data folder located in the User Profile of the actively logged-in user will be used by default.
WINDOWS® NETWORK KIOSK INSTALLATION
To install the kiosk on a network:
1. Complete the local kiosk installation listed above on the machine that will host the application.
2. Configure the stored response location to network share or leave as default during installation.
3. Locate and distribute the shortcut in the installation folder to the student testing devices used
for testing. This will be labeled “Shortcut to OSTP” and should point to Networklaunch.exe. In a
Network Installation the Networklaunch.exe must be used for testing.
4. Ensure that users have read/write/modify access to stored response directory configured in
Step 2.
5. Ensure that users have read/write/modify permission to their own user profile, where the
application will be copied to and run from.
Individual student testing devices require read/write/modify permissions to %TEMP%\eMetric as
the program is copied into the local %TEMP% profile by default on first-time launch from a network
location. Devices without the specified read and write permissions to %TEMP%\eMetric will
experience a Windows® Error Code 1260 upon first-time launch in a Network Kiosk Installation.
18KIOSK INSTALLATION GUIDE
MAC OS®
Follow the steps below to install the kiosk on all student-testing Mac devices.
Step 1: Set up your school testing environment
Review Testing Environment in detail.
Step 2: Download the OSTP Kiosk
After your District Test Coordinator (DTC) or Building Test Coordinator (BTC) sets up your IT Coordinator
(ITC) account, you will receive your user account information via email.
Note: If you do not have a dedicated ITC, a DTC or BTC can complete all ITC tasks using their DTC or BTC
account. Ensure you have the correct administrative rights to make changes to student testing devices.
When you have your login credentials, you are ready to download the OSTP Kiosk:
1. Go to the OSTP Data Portal at https://oklahoma.cognia.org/ and log in with your username and
password.
2. On the portal home page, click Administration.
The Administration home page appears.
3. Click Student Kiosk for Mac.
You will see a Download progress bar at the bottom of the page.
Step 3: Install the downloaded Kiosk
Upon completion of the download process:
1. Navigate to the file location you specified during the File Save process.
19KIOSK INSTALLATION GUIDE
2. The package will run a program to determine if the software can be installed. Click Continue.
3. Read the instructions and click Continue.
4. Read and agree with the Software License Agreement.
20KIOSK INSTALLATION GUIDE
21KIOSK INSTALLATION GUIDE
5. Verify the installation type.
6. When you are ready, click Install. You may be required to enter a password.
22KIOSK INSTALLATION GUIDE
7. Indicate where you would like to store student responses, and then click Continue.
• User’s Home Directory
During kiosk installation, if you choose the default option to store the stored response files
in the user profile, these files will have names similar to this format:
~/.iTester/storage/iTesterSync_AD849G-DA56-19F3-73K39823DJS3
• Custom location
If you select Save in the following directory, you must manually enter the alternate path.
Important: This is the failover location for saving student responses in the event network
connectivity is lost. For more information, contact the Cognia Service Desk at
oktechsupport@cognia.org or (866) 629-0220.
8. When the installation is complete, click Close.
23KIOSK INSTALLATION GUIDE
When you are ready to test the Kiosk installation for this configuration, see Site Readiness Testing and
Site Certification.
DISABLING SIRI
Any apple device running macOS® 10.13 will need to disable Siri for the OSTP Kiosk to launch. If Siri is
enabled, a message will appear indicating that Siri will need to be closed.
To disable Siri:
1. Open System Preferences.
2. Select Siri from the Control Panel options.
3. Uncheck the box next to Enable Siri.
4. Uncheck the box next to Show Siri in menu bar.
5. Close System Preferences.
ACCCESSIBILITY ACCESS ON MAC OS® 10.14
Mobile Device Management (MDM) software allows IT administrators to configure and manage the
OSTP Kiosk across multiple devices. For Apple devices running macOS® Mojave (10.14.x) and not utilizing
MDM software, there may be an accessibility warning when launching the OSTP Kiosk:
24KIOSK INSTALLATION GUIDE
To allow accessibility of the OSTP Kiosk:
1. Open System Preferences.
2. Select Security and Privacy.
3. In Security and Privacy, click the Privacy tab.
4. Select Accessibility.
5. Click the lock to make changes and click the + to add the OSTP Kiosk to the Allow the
apps below to control your computer menu.
6. Select the app’s checkbox.
25KIOSK INSTALLATION GUIDE
LINUX®
Follow the steps below to install the kiosk on all student-testing Linux® devices.
Step 1: Set up your school testing environment
Review Testing Environment in detail.
Step 2: Download the OSTP Kiosk
After your District Test Coordinator (DTC) or Building Test Coordinator (BTC) sets up your IT Coordinator
(ITC) account, you will receive your user account information via email.
Note: If you do not have a dedicated ITC, a DTC or BTC can complete all ITC tasks using their DTC or BTC
account. Ensure you have the correct administrative rights to make changes to student testing devices.
When you have your login credentials, you are ready to download the OSTP Kiosk:
1. Go to the OSTP Data Portal at https://oklahoma.cognia.org/ and log in with your username and
password.
2. On the portal home page, click Administration.
The Administration home page appears.
3. Click Student Kiosk for Linux.
4. If prompted Save File, file should download to the downloads folder.
Note: Linux 32-bit is no longer supported.
26KIOSK INSTALLATION GUIDE
5. Extract the installation file from the zipped package to a location on the computer.
27KIOSK INSTALLATION GUIDE
Step 3: Install the downloaded Kiosk
Upon completion of the download process:
1. Open the installation folder in Terminal, navigate to the kiosk installer file and ensure it is
executable.
2. Disable Wayland in GDM configuration file.
3. Ensure that the Super Key (Windows Key) has been disabled.
4. Ensure the basic fonts package is installed.
28KIOSK INSTALLATION GUIDE
5. Set the COLORTERM environment variable
6. Invoke the executable.
7. Click Yes on the Installation Page.
8. Read Welcome page and click Next to continue.
9. Read the License Agreement and click I accept the terms of the license agreement. Click Next to
continue.
29KIOSK INSTALLATION GUIDE
10. Verify the installation folder is correct. Click Next to continue.
Tip: If it is not correct, click Browse to find the destination where the kiosk should be installed.
We recommend a local installation to avoid network connection issues (for more information,
see Network Connectivity).
Note: This will also be the cache location to save student responses.
30KIOSK INSTALLATION GUIDE
11. Review the settings before the installer begins to copy files and click Next.
12. Click Finish to exit Setup.
13. Finally, allow the installer to add packages/dependencies that are required by the application.
31KIOSK INSTALLATION GUIDE
When you are ready to test the kiosk installation for this configuration, see Site Readiness Testing and
Site Certification.
32KIOSK INSTALLATION GUIDE
iPAD APPLICATION INSTALLATION
DOWNLOAD THE iTESTER APP FROM THE APPLE APP STORE
iTester’s iPad application is a Single Instance application. IT Coordinators will select the state during the
initial setup of the app. The previous version of the OSTP & CCRA app will need to be removed from
devices to avoid confusion for students.
If you do not already have the iTester app on your iPad, it is available as a free download from the Apple
App Store.
1. Open the App Store on the iPad.
2. Search for iTester.
3. When you locate the iTester app, click to download it to the iPad.
4. Launch the iTester app.
5. Choose your location from the drop-down menu and then click Go. You will be directed to the
student sign in screen for your state.
33KIOSK INSTALLATION GUIDE
Note: If you select the wrong location, please choose the Change Location on the iTester login
page.
When you are ready to test the kiosk installation for this configuration, see Site Readiness
Testing and Site Certification.
Assessment Mode
A feature in iPadOS called Assessment Mode (AM) (formerly known as Automatic Assessment
Configuration (AAC)) works with iTester to lock down an iPad for online testing. Users in the field need
to do nothing to set up AM. When a student launches the iTester App, logs into a test, and then logs into
a test session, Assessment Mode will automatically prompt the user to enter single app mode and will
disable auto correction, define, spell check, predictive keyboard, and some keyboard shortcuts (for a
complete list https://support.apple.com/en-us/HT204775).
This feature helps ensure a secure test environment without requiring IT Coordinators to use Mobile
Device Manager Software or manually turn on guided access and change keyboard settings. Assessment
Mode is the preferred method of securing the iTester App and should be used in place of guided access.
If guided access is on, it will override AM; therefore, guided access should be turned-off to allow AM to
function. No additional set-up is necessary to enable Assessment Mode.
34KIOSK INSTALLATION GUIDE
CHROMEBOOKTM APPLICATION INSTALLATION
MANAGED CHROMEBOOKSTM
These instructions are for IT Coordinators who have access to their ChromebookTM device management
console to administer and manage their ChromebookTM devices.
To install the OSTP app:
1. As the ChromebookTM administrator, log in to your Chrome OSTM management console
(https://admin.google.com)
2. Navigate to Device Management, and then select Chrome management.
3. Click on Device Settings.
4. In the Device Settings section, scroll to User Data (Erase all local user info, settings, and state
after each sign-out) field, select Do not erase all local data from the drop-down list.
Note: This setting is crucial to allow Chrome local storage to be used to store student
responses if network connectivity is lost.
5. On the Device Settings page, scroll down to the Kiosk Settings section:
Ensure that Managed guest session is set to Do not allow managed guest sessions
35KIOSK INSTALLATION GUIDE
6. Navigate back to the Chrome Management screen and select Apps & Extensions.
36KIOSK INSTALLATION GUIDE
7. Select the Kiosks tab.
8. Expand the yellow + in the bottom-right corner and select Add from Chrome Web Store.
9. To add the OSTP app, in the search box, type OSTP for Chrome and press Enter.
10. When you see the OSTP app, click Select.
The OSTP app appears in the Kiosks list, and the app settings are displayed.
37KIOSK INSTALLATION GUIDE
When these steps are completed, the OSTP application will appear on all Chromebook™ devices that are
in your domain.
Important Note: Verify in Kiosk Settings that “Allow App to manage power” is disabled. To do
this click on Chrome Management under Device Settings and select App Management.
Click on the OSTP for Chrome app name and check to make sure the setting Allow app to
manage power is disabled (slider is moved to the left and not green).
When you are ready to test the Kiosk installation for this configuration, see Site Readiness Testing and
Site Certification.
Important: Students should not log into Chromebooks™ to take an operational test. When the
managed Chromebooks™ are turned on, simply click the Apps link on the bottom of the log-in
screen and select the OSTP for Chrome app. The secure browser will open in full-screen mode.
38KIOSK INSTALLATION GUIDE
For more information, see the following links:
• Use Chromebooks™ for Student Assessments.
Important: Read “Scenario 1: School sets up Chromebook™ to run as a Single App Kiosk running the
exam app.” Do not follow the instructions for Scenarios 2 and 3.
• Manage Device Settings, which provides general information for managed Chromebooks.
39KIOSK INSTALLATION GUIDE
NON-MANAGED CHROMEBOOKSTM
These instructions are for installing the OSTP app onto individual, non-managed Chromebooks™. Please
note that only the admin user on a non-managed Chromebook™ may install kiosk applications.
Note: If the Chromebook™ is from 2017 or later, it will not work in kiosk mode unless it is managed by
an administrator. To run the Chromebook™ in kiosk mode, you will need a Chrome management license.
For more information, please follow the following link: Use a Chromebook as a Kiosk.
To install the OSTP for Chrome app:
1. Using the Chromebook™, search for OSTP in the Chrome Web Store and click into the OSTP for
Chrome application.
2. Once the OSTP for Chrome detail page comes up, use CTRL + C on your keyboard to copy the
URL of the application. Do not click the “Add to Chrome” button.
3. Open a separate tab and type chrome://extensions into the search bar.
40KIOSK INSTALLATION GUIDE
4. At the top of the page, select “Developer mode” followed by the Manage kiosk applications.
5. In the Manage Kiosk Application window, paste the URL from step 2 into the “Add kiosk
application:” box and click Add to add the application to the Chromebook™.
6. Sign out of the Chromebook™ to return to the main login screen.
7. On the login screen and prior to logging in, click Apps at the bottom left of the screen.
41KIOSK INSTALLATION GUIDE
8. To launch the app, select OSTP for Chrome.
When you are ready to test the Kiosk installation for this configuration, see Site Readiness Testing and
Site Certification.
MANAGED CHROMEBOOKSTM: TURN OFF AUTO-UPDATE
Newer versions of Chrome OSTM may be released during the testing window, but these newer versions
will not be supported until compatibility testing is complete. Therefore, it is highly recommended that
auto-update be turned off on all managed ChromebookTM devices until after the testing window is
closed.
To turn off auto-update:
1. As the ChromebookTM administrator, log in to your Chrome management console.
(https://admin.google.com)
2. Navigate to Device Management, click Chrome Management, and then select Device Settings.
42KIOSK INSTALLATION GUIDE
3. On the Device Settings page, scroll down to the Auto Update Settings section within Device
Update Setting:
Ensure that Auto Updates is set to Stop auto-updates.
Note: Non-managed ChromebooksTM do not have an option to turn off auto-update. Therefore, use of
these devices once they have updated to a non-supported version of Chrome OSTM is at the district’s
own risk.
43KIOSK INSTALLATION GUIDE
SITE READINESS TESTING AND SITE CERTIFICATION
PURPOSE
The Site Readiness Test identifies potential technical problems prior to student testing. The test is
designed to simulate a test scenario and is used to verify that testing devices meet the minimum
requirements and have been properly configured.
To administer the Site Readiness Test, the ITC, DTC, or BTC launches the OSTP Kiosk on each device
configuration (i.e., device type and operating system) being used for testing and uses the site readiness
login for the assigned school.
The Site Readiness Test includes the System Set-Up test and the Student Interface Test. The System Set-
Up test will test your bandwidth, connectivity, screen resolution and the text-to-speech function. The
Student Interface Test will provide you with sample test questions to determine whether the device is
capable of correctly displaying and navigating test content in iTester.
Note: The Site Readiness Test must be conducted on the secure kiosk and apps. The test does not need
to be conducted on the browsers used for practice tests.
SITE READINESS TESTING
It is crucial that the Site Readiness Test be performed on every device configuration that will be used for
testing. The results for each device tested will be captured and displayed on the Site Readiness Details
page within the OSTP Data Portal.
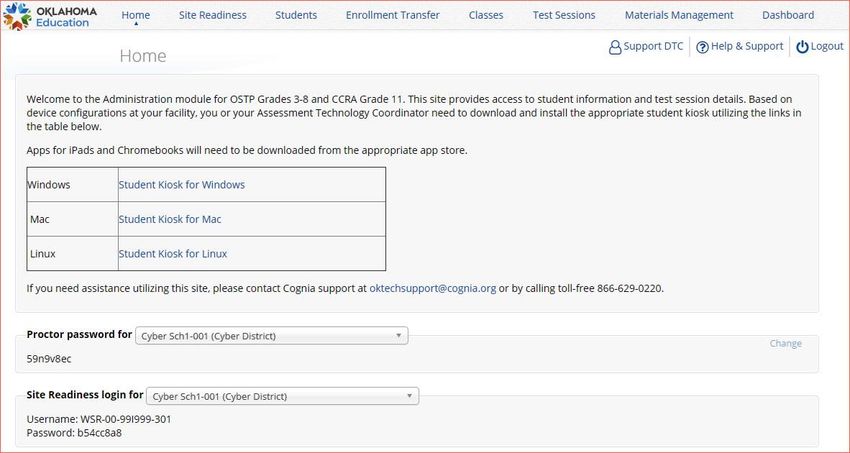
Step 1: Find the Site Readiness account information
1. Log in to the OSTP Data Portal with your username and password.
2. On the Portal home page, click Administration. The Site Readiness account information appears
at the bottom of the Administration home page.
3. Make a note of the username and password for your school, which you will use to log in to the
Kiosk.
44KIOSK INSTALLATION GUIDE
Step 2: Authenticate every device or device configuration to be used for testing
1. Launch the OSTP Kiosk on the device.
2. Log in to the Kiosk with the Site Readiness username and password provided for your building.
Important: Use the Site Readiness login credentials exclusively for your building only. Do not use
the site readiness credentials for any other purpose or for any other building.
3. Verify your building name at the top of the page. In the System Set-Up Test section, click the
Check System Set-Up to begin the test.
45KIOSK INSTALLATION GUIDE
The screen resolution, host URL, and operating system for the device are listed at the top of the
System Set-Up Test page. The results of each test appear as soon as it is completed.
4. The Connection Capacity Test evaluates your site’s capacity for simultaneous test downloads. It
provides you with your current download speed between the testing device and test testing
servers (data center) and based on that speed, it supplies you with the maximum number of
students that may simultaneously log-in and download a test session.
Note: If you plan to test more students that the number of simultaneous test downloads listed
during the same period, we recommend dividing them into groups no greater than the number
of simultaneous test downloads provided and stagger the groups’ test log-in by 1-2 minutes.
This will ensure that test content is downloaded without interruption.
5. The Connectivity Check is designed to ensure the testing device has access to both the kiosk’s
local storage folder where student responses will be saved if the test device loses internet
connectivity, and the testing servers.
• If the Connectivity Check fails with a message that says “The connectivity check failed.
Please check your read and write permissions to the storage folders and try again or
contact Support for further assistance. Error Code: 6004 – StorageWriteFail”, this means
that the OSTP Kiosk does not have the proper permissions to the storage folder. The
kiosk requires read, write, and modify permissions on Windows and Read & Write on
Mac and Linux.
• If the test fails for any other reason other than “Storage location written,” please
contact the Help Desk immediately and provide the error message along with the error
code at oktechsupport@cognia.org or (866) 629-0220.
46KIOSK INSTALLATION GUIDE
6. The screen resolution test will ensure that the testing device meets the required screen size and
resolution for an optimal testing experience. If this test fails, adjust the screen resolution of the
device.
7. In the Text-to-Speech field, click the Test Text-to-Speech to play a voice sample.
• If you can hear the voice sample, click Yes.
• If you cannot hear the voice sample, click No, and fix your audio connection. Please
ensure that there is a voice package installed on your machine, that there is an audio
playback device connected to the testing device (internal speakers, external speakers,
headphones, etc.), the volume is not muted and is audible, and that the desired audio
playback device is set as the default device.
8. When you are done, click Return to return to the Site Readiness page.
• If all the system checks succeed, you are ready to being the next Site Readiness test.
• If one or more system checks fail, adjust your configuration as needed and re-run the
System Set-Up test.
9. When the System Set-Up test is completed, click the blue Check Student Interface session
button.
10. Read the instructions on the page, and then click Continue.
11. Answer each of the test questions, using the navigation buttons on the right. Ensure you can
effectively use text and drawing response tools.
12. From the last test question page, click Finish.
13. From the Test Review page, click Turn In to submit your test.
47KIOSK INSTALLATION GUIDE
14. To confirm, click Turn In again.
You return to the Site Readiness page, where the test session is grayed out.
15. To exit the Site Readiness tests, click Exit in the top-right corner of the page.
16. To close the Kiosk, click Exit at the bottom of the page.
SITE CERTIFICATION
After all devices or device configurations for your school have successfully completed the Site Readiness
Test, the DTC, STC, or ITC will certify the site for testing.
1. Log in to the OSTP Data Portal with your username and password.
2. Click Administration.
3. Click Site Readiness at the top of the page.
48KIOSK INSTALLATION GUIDE
4. On the Site Readiness page, locate the school to be certified, and then click View Details.
The Site Details page appears.
5. Verify that all the devices or device configurations for this location have successfully taken the
Site Readiness Test.
6. Click Certify Site Readiness and click Yes to confirm.
The Site Certification section updates with the date and time when the site was certified and
username of the user who certified the site for testing.
49You can also read