SMPA-R1305G-S, "Player-S" SMPA-R1505G-D, "Player-D" - Setup Guide: SMPA Setup Guide
←
→
Page content transcription
If your browser does not render page correctly, please read the page content below
SMPA Setup Guide

Setup Guide:

SMPA-R1305G-S, “Player-S”

SMPA-R1505G-D, “Player-D”

January 26, 2022   Scala, Inc.   Page | 1
SMPA Setup Guide

                    Table of Contents
Introduction ............................................................................................................................................................................................................................. 4
Scala Media Player-SMPA-R1x05G-x............................................................................................................................... Error! Bookmark not defined.
Setting Up the SMPA .............................................................................................................................................................................................................. 6
    Box Contents ....................................................................................................................................................................................................................................................................................... 6
    Device Images .................................................................................................................................................................................................................................................................................... 7
    Required Materials for Setup ................................................................................................................................................................................................................................................... 8
    Connecting the Cables................................................................................................................................................................................................................................................................. 8
    Hardware EDID Emulation........................................................................................................................................................................................................................................................ 9
         Integrated Hardware EDID Configuration ............................................................................................................................................................................................................... 9
Deployment Configuration of the SMPA ........................................................................................................................................................................ 10
    Necessary System Setup Tasks for Enabling a SMPA ............................................................................................................................................................................................ 11
    Microsoft® Unified Write Filter ............................................................................................................................................................................................................................................. 12
         Verifying the state of UWF ................................................................................................................................................................................................................................................. 12
         Disabling UWF ............................................................................................................................................................................................................................................................................ 12
         Enabling UWF ............................................................................................................................................................................................................................................................................. 12
    Connecting to a Physical LAN or Wireless Network .............................................................................................................................................................................................. 13
         Connecting to a Wireless Network ............................................................................................................................................................................................................................... 13
         Connecting to a Physical LAN .......................................................................................................................................................................................................................................... 13
         Configuring the DHCP or Static IP Address ........................................................................................................................................................................................................... 13
    SMPA Display Configurations ............................................................................................................................................................................................................................................... 14
         Supported Display Configurations .............................................................................................................................................................................................................................. 14
         Configuring Display Settings ............................................................................................................................................................................................................................................ 15
    Configuring Audio ..........................................................................................................................................................................................................................................................................16
         Configuring audio from the Start Menu ...................................................................................................................................................................................................................16
         Configuring audio from the Task Bar .........................................................................................................................................................................................................................16
    Setting the Date and Time .......................................................................................................................................................................................................................................................17
         Setting the Device Time Zone .........................................................................................................................................................................................................................................17
         Setting the Device Time .......................................................................................................................................................................................................................................................17
         Changing the Internet Time Server on Windows 10 ....................................................................................................................................................................................... 18
         Setting the Regional/Locale Formats .........................................................................................................................................................................................................................19
    User Account Passwords ......................................................................................................................................................................................................................................................... 20
         Configure the Scala System Account ....................................................................................................................................................................................................................... 20
         Configure the Scala Display Engine Account ..................................................................................................................................................................................................... 20
         Configure TightVNC for Remote Connection and Administration ....................................................................................................................................................... 21
    Configuring System Restarts ................................................................................................................................................................................................................................................. 22
         Weekly System Restarts ...................................................................................................................................................................................................................................................... 22
         Daily System Restarts ........................................................................................................................................................................................................................................................... 24
    Configuring the Auto-Logon Script ..................................................................................................................................................................................................................................26
Scala Windows Playback Engine Configuration for SMPA ...................................................................................................................................... 28
    Accessing the SCALA PLAYER CONFIGURATION TOOL ................................................................................................................................................................................... 28
    Scala Player Configuration Profile..................................................................................................................................................................................................................................... 30
         Network .......................................................................................................................................................................................................................................................................................... 30
         Logging ........................................................................................................................................................................................................................................................................................... 32
         Playback.......................................................................................................................................................................................................................................................................................... 33
         Playback (Advanced) ............................................................................................................................................................................................................................................................ 34
         Modules ........................................................................................................................................................................................................................................................................................... 35

January 26, 2022                                                                                                                        Scala, Inc.                                                                                                                                     Page | 2
SMPA Setup Guide

         Info ...................................................................................................................................................................................................................................................................................................... 35
Connecting the SMPA to Content Manager Server Using the Network Tab..................................................................................................... 36
Completing Configuration, System Restart for the SMPA ....................................................................................................................................... 40
    Start Player Network Transmission Client ................................................................................................................................................................................................................... 40
    Enable UWF ...................................................................................................................................................................................................................................................................................... 40
    Restart the Player.......................................................................................................................................................................................................................................................................... 40
Appendix I: AMD Radeon Eyefinity™ Settings ............................................................................................................................................................ 43
Appendix II: EDID Emulation ............................................................................................................................................................................................. 46
    Integrated Hardware EDID Configuration .................................................................................................................................................................................................................. 46
    AMD Radeon, Software EDID-Emulation, Configuration ................................................................................................................................................................................. 46
Appendix III: AMD Display Continuity ............................................................................................................................................................................ 50
Appendix IV: SSH Connection ............................................................................................................................................................................................53
    Example Uses of OpenSSH for Security Tunneling Remote Connections ............................................................................................................................................ 55
Appendix V: System Configuration Using the Command Line............................................................................................................................... 56
Appendix VI: Automated/Scripted Player Configuration ..........................................................................................................................................57
    ScalaProv.py ....................................................................................................................................................................................................................................................................................... 57
    Command Prompt/Windows System Utilities scripting example ............................................................................................................................................................ 64
Appendix VII: TightVNC, remote console IP-KVM, Network Profile (NLA)/Windows Firewall rule configuration & reverse
connections ............................................................................................................................................................................................................................ 65
    Windows10-IoT-Enterprise-2019-LTSC, configuration/re-configuration of “Network Location”........................................................................................... 66
         From an “Administrative” PowerShell session .................................................................................................................................................................................................... 66
         GUI ..................................................................................................................................................................................................................................................................................................... 67
         REGEDIT/Registry ................................................................................................................................................................................................................................................................... 68
         Local Group Policy/GPEDIT.MSC or SecPol.MSC ............................................................................................................................................................................................... 69
    Reverse-VNC ..................................................................................................................................................................................................................................................................................... 70
Scala End User License Agreement Version: June 2017 .......................................................................................................................................... 71
GNU GENERAL PUBLIC LICENSE ...................................................................................................................................................................................... 85
         Preamble ....................................................................................................................................................................................................................................................................................... 85
         TERMS AND CONDITIONS FOR COPYING, DISTRIBUTION AND MODIFICATION .................................................................................................................... 85
         END OF TERMS AND CONDITIONS............................................................................................................................................................................................................................ 87
         How to Apply These Terms to Your New Programs ....................................................................................................................................................................................... 87
GNU GENERAL PUBLIC LICENSE Version 3, 29 June 2007........................................................................................................................................ 88
         PREAMBLE ................................................................................................................................................................................................................................................................................... 88
         TERMS AND CONDITIONS ................................................................................................................................................................................................................................................ 88
         END OF TERMS AND CONDITIONS.............................................................................................................................................................................................................................93
SIL OPEN FONT LICENSE .................................................................................................................................................................................................... 94
         PREAMBLE ................................................................................................................................................................................................................................................................................... 94
         DEFINITIONS .............................................................................................................................................................................................................................................................................. 94
         PERMISSION & CONDITIONS .......................................................................................................................................................................................................................................... 94
         TERMINATION............................................................................................................................................................................................................................................................................ 94
         DISCLAIMER .................................................................................................................................................................................................................................................................................95
Ubuntu font license ............................................................................................................................................................................................................. 96
    Version 1.0 ........................................................................................................................................................................................................................................................................................... 96
         Preamble ....................................................................................................................................................................................................................................................................................... 96
         Definitions .................................................................................................................................................................................................................................................................................... 96
         Permission & Conditions .................................................................................................................................................................................................................................................... 96
         Termination ................................................................................................................................................................................................................................................................................. 96
         Disclaimer ..................................................................................................................................................................................................................................................................................... 96
January 26, 2022                                                                                                                            Scala, Inc.                                                                                                                                         Page | 3
SMPA Setup Guide

Introduction
This document provides information and set up instructions for two Scala Media Players with AMD
processors (SMPAs):
    1. Player S (SMPA-R1305G-S) - a single output digital signage media playback device that provides for
       either FHD(1080p) or basic 4K(2160p) playback.
    2. Player D (SMPA-R1505G-D) - a dual output digital signage media playback device that provides for
       either FHD(1080p) or 4K(2160p) playback.

The sections that follow will explain how to:

   •   Review and verify your SMPA player hardware.
   •   For the SMPA-R1505G-D, enable the AMD Eyefinity™ dual-output video modes,
       (with multi-channel support in the Scala Enterprise Windows Playback Engine software).
   •   Configure either the hardware, or software, EDID-Emulation and Display continuity.
   •   Setup the essential attributes of this unit’s customized “Embedded” Windows OS Installation.
   •   Commission, (uniquely-link), the Windows Playback Engine with a Scala Enterprise Content
       Manager Server.

Player Capabilities
Configuration Options
The Scala Media Players have a range of flexible configuration options—allowing you to either
manually/individually configure players on site or preconfigure them “en masse” at a staging depot prior to
deployment.

General Playback Capabilities
Player S and Player D both have an AMD Ryzen R1000-series APU running the Windows® Operating
System with the Scala Enterprise Windows-based digital signage Playback Engine. They support 3D-
graphics compositing, hardware accelerated video playback and, for Player D dual-output units: AMD
Eyefinity™ display modes that support “Single-Large-Surface” canvases of up to 7680x2160, or 3840x4320,
[Dual 4K@60Hz outputs with coordinated “V_SYNC”, (.a.k.a “Page-flip”/vertical synchronization), via AMD’s
Eyefinity2™ SLS feature.]

Depending on the specific multimedia workload, the Player D’s computer graphic display outputs can
incorporate video elements comprising of up to 2160p, (60Mbps ABR H.264/AVC, MainProfile@Level
5.1)/(40Mbps ABR H.265/HEVC, MainProfile@Level 5.1), video streams.

EDID
As dedicated Digital Signage Players, the SMPA devices incorporate both hardware and software “EDID-
Emulation/(EDID-Override) as well as “Display Continuity.” These functions permit the maintenance of
stable playback from the incorporated Scala Enterprise Digital Signage Player software in the cases where
the actual display output devices may become disconnected.

The SMPA-R1505G-D supports these EDID functions via two different approaches:
January 26, 2022                                 Scala, Inc.                                       Page | 4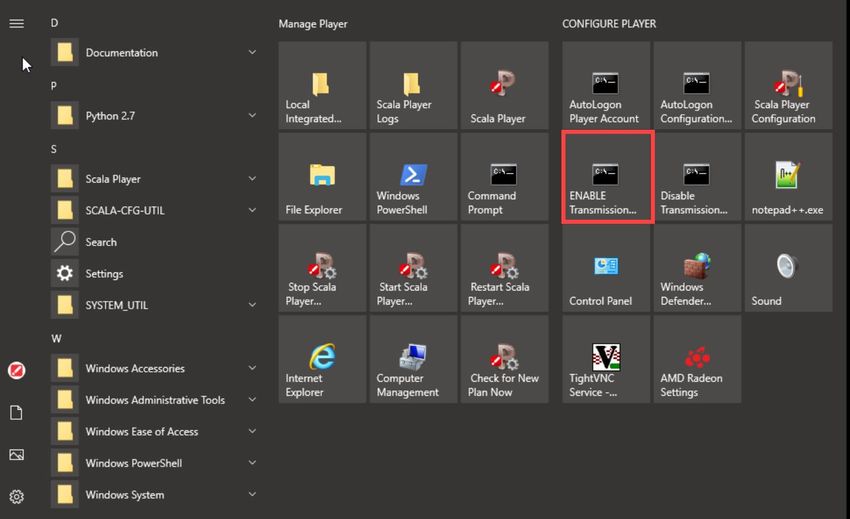
SMPA Setup Guide

   •   HW, natively through the hardware, providing a simpler “plug and play” approach
   •   SW, as an advanced function in the AMD Radeon Embedded device driver software stack.

The SMPA-R1305G-S supports:
   • SW, as an advanced function in the AMD Radeon Embedded device driver software stack.

HW EDID-Emulation is simpler to enable/disable; however it is subject to various display device
compatibility limitations. The SW EDID-Emulation functionality has a greater capacity to accommodate the
various ways in which the relevant signal standards have been implemented across the breadth of the AV-
Industry; however, it is significantly more involved in the configuration process.

January 26, 2022                               Scala, Inc.                                      Page | 5
SMPA Setup Guide

SMPA Hardware Overview
The SMPA units are passively cooled, (no fans/blowers), x86 PC Digital Signage Players based on the AMD
Embedded Ryzen R1K-series APU SoC.

The SMPAs have either one or two HDMI 2.0a video connectors with hex-nut stand-offs for facilitating the
“screw-down” retention of HDMI cables that have integrated locking screws in their connector hoods or via
the addition of external HDMI cable lock brackets (not included).

In addition, these devices feature the following Input/Output ports:

   •   LAN: GbE, (One or Two RJ45 Gigabit Ethernet), IEEE 802.3ab, [Realtek RTL8111H-CG or compatible]
   •   Wi-Fi: One SMA antenna sockets for IEEE 802.11ac/a/b/g/n 2.4GHz/5GHz dual-band and Bluetooth 5.0
       based on an AzureWave AW-CB375NF M.2 module
   •   [Optional] Factory-installed 4G-LTE cellular data connectivity
   •   Serial: One DB9-male RS232 Serial port
   •   USB: 4x USB 3.x Type-A host ports
   •   Audio: 1x 3.5 mm Mono Microphone; 1x 3.5mm Stereo line-out.
   •   Remote Power Switch: RJ11 jack for remote power button & power LED
   •   LED-Buttons: Power On/Off; HW EDID-Emulator ON/OFF & Copy/Erase
   •   Recessed(pinhole) buttons: Clear CMOS, Reset

The SMPA runs the Windows 10 IoT Enterprise 2019 LTSC operating system in a “two partition”
implementation that supports the “Universal Write Filter”, (UWF), feature. UWF permits for a “Locked
System Configuration State” in which the device is more resistant to tampering/alteration than would be
normally the case for a PC based on a Windows operating system.

Setting Up the SMPA
       Before installation, unpack the SMPA unit and carefully inspect it for damage.

The following topic provides information about the Scala Media Player hardware unit, including:
   • Box contents
   • Device images
   • Required Materials
   • Connecting the cables

Box Contents
The Scala Media Player SMPA-R1x05G comes with the following components:
   • SMPA Digital Signage Media Player device
   • A Universal Power adapter + country-specific AC electric wall-cable & plug
   • One Wi-Fi, (optionally one 4G-LTE), SMA antennas
   • A “Rail-Mounting-Kit” with two brackets, appropriate Torx screws and Torx key-wrench
   • Scala Media Player “Quick Start” Guide card or insert

January 26, 2022                                 Scala, Inc.                                      Page | 6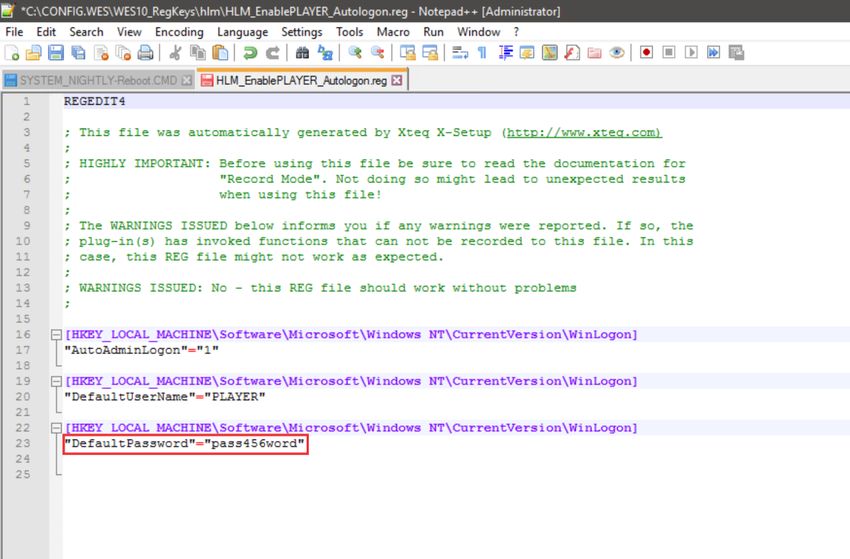
SMPA Setup Guide

Device Images
SMPA-R1305G-S

SMPA-R1505G-D

January 26, 2022   Scala, Inc.   Page | 7
SMPA Setup Guide

Required Materials for Setup
To set up the Scala Media Player, you will need:

   •    Display monitor(s) [HDMI v.1.4b or better] The SMPA-R1x05G’s are designed to support up to HDMI
        v.2.0a, 2160p@60Hz, devices.
   •    One or two RJ-45 CAT6 Ethernet cable(s), connected to the appropriate Ethernet Switches, or other
        compatible 100/1000Base-T devices, for wired networking communications.
   •    A 100V..240V, (50Hz or 60Hz), electrical outlet (units ship with sales-destination-market power leads)
   •    One or two HDMI cables—three meters or less (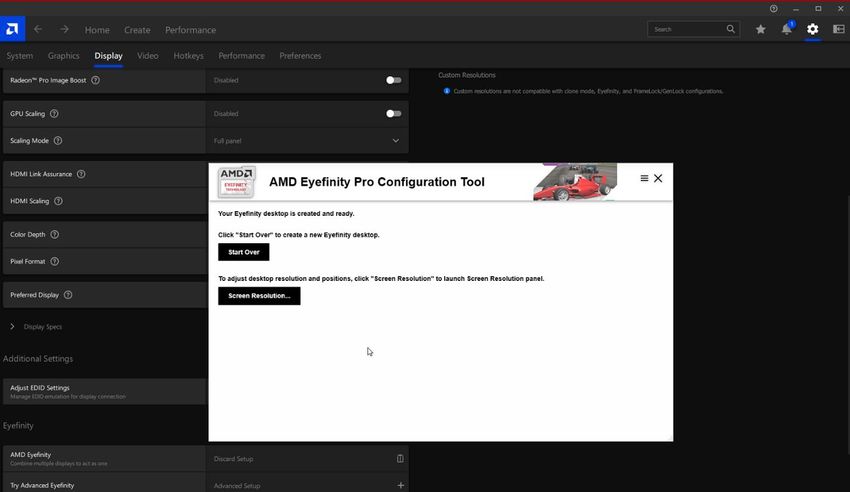
SMPA Setup Guide

       The hardware EDID emulator may not be compatible with all display devices. When configuring
       an SMPA with a device that is not compatible with the integrated HW-EDID-Emu, the software
       AMD RADEON, Advanced Settings, EDID-Emulation + the AMD Display Continuity utility is an
       alternative method of enabling a persistent display configuration state.

Hardware EDID Emulation
The Player D’s integrated Hardware EDID emulator provides both the functions of “EDID override” and
Display Continuity” in a way that is independent of both the Windows OS and the iGPU device driver stack.
This allows you to more conveniently enable and disable this functionality when configuring monitors. The
hardware EDID emulator has two buttons that control operation:

   •   Copy/Erase
   •   Emulation On

These buttons have internal LED indicators that identify the status of EDID emulation. The table below
identifies the statuses of the EDID emulator.

Integrated Hardware EDID Configuration

 Copy/Erase—Long-Press      Brief indicator red-flash, green indicator extinguished. Memory cleared. If the
                            EDID-On/Off is depressed, the LED indicates Amber. This means that there is
                            no valid EDID-data stored.
 Copy/Erase—Brief-Press     Green indicator lights. The EDID-Emulator has stored a valid EDID-Data block
                            from HDMI-port-1. The EDID-Emulator does not automatically "turn-on" as it
                            did on PROTO-1.
 EDID-On/Off                If the EDID-Copy/Erase indicator is on-green(Valid-Data); then a brief-press of
                            the On/Off will activate the EDID-Emulator and the button indicator will light
                            green.

Please see Appendix II: EDID Emulation for details of the operation of the AMD RADEON Software EDID

January 26, 2022                                 Scala, Inc.                                        Page | 9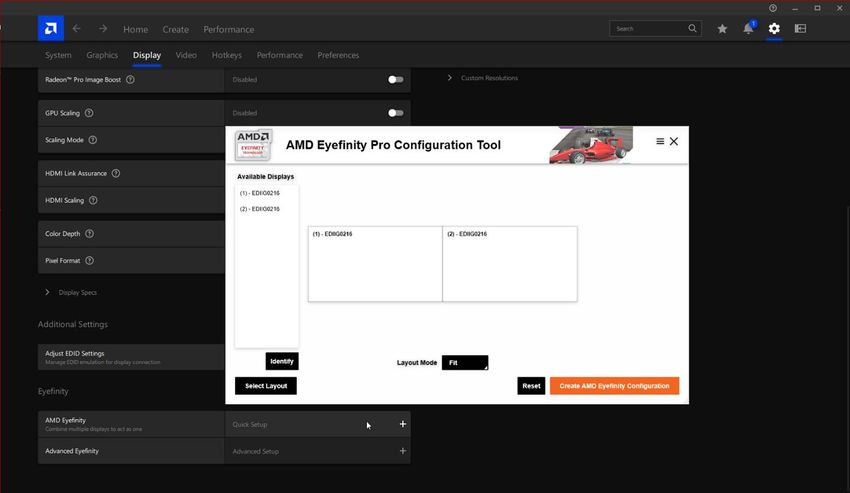
SMPA Setup Guide
Deployment Configuration of the SMPA
It is important to make a distinction between the Windows Operating System, the AMD Embedded Display
driver settings, and the Scala Windows Playback Engine:
• The Windows operating system contains Windows system utilities for the configuration of the
global system attributes--such as: Display Modes, Audio Outputs, System Time, Regional/Locale
attributes, and Network settings.
• The AMD RADEON settings application controls the “special display attributes” of the AMD Vega™
integrated graphics processor of the AMD Embedded V1x05G Ryzen APU.
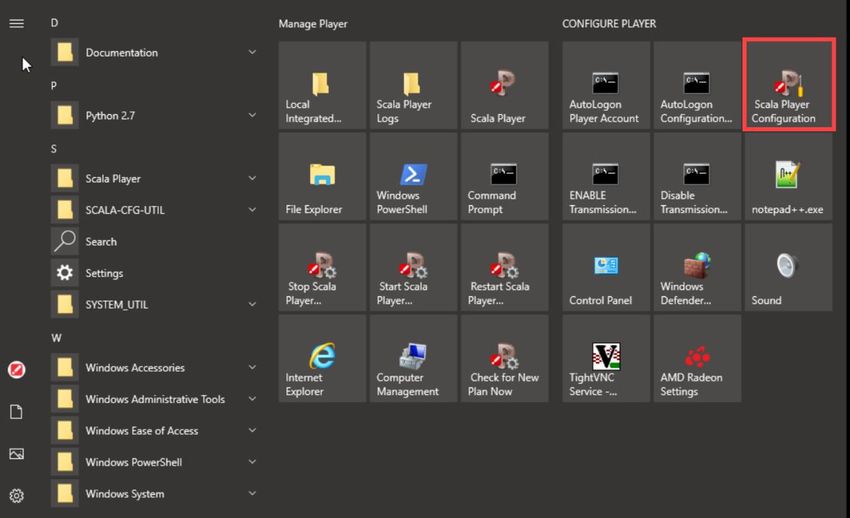
• The Scala Windows Playback Engine is configured using the “PLAYER CONFIGURATION TOOL”
which has the functionality needed to link the Player Display Engine to its Scala Enterprise Content
Manager Server and support the intended Playback operations.
The following topics offer guidance in the deployment configuration of the device’s Windows® 10-IoT-2019-
LTSC Operating System. After the OS settings has been appropriately implemented, please follow the steps
required to configure the Scala Enterprise Player Display Engine software for correct presentation of media
content and communication-with a Scala Enterprise Content Manger Server.
Before proceeding with local device configuration, ensure that you have created and enabled a
Player device entry for this device in the Scala Enterprise Content Manager.
January 26, 2022 Scala, Inc. Page | 10SMPA Setup Guide
Necessary System Setup Tasks for Enabling a SMPA
The items listed below need to be configured in the Windows operating system to set up a Player for
service. Detailed instructions for these items are provided in the sections that follow.
• Verify/Disable the Microsoft® Unified Write Filter
• Connect to a Network, physical LAN or Wireless, and set the desired TCP/IP and Windows
Firewall options
• Configure the display settings
• Configure audio
• Set the correct date and time, regional/locale, options
• Configure the device name
• Change VNC & scala-user, & player-user account passwords
• Edit the auto-login scripts to match the new unique passwords and run the “Autologon-
PLAYER” script to implement the new password!
• Edit the “Enable Nightly/Weekly” script(s) to match the new unique system passwords and the
desired day & time for system restarts. Run the script to implement the changes.
• Run the PLAYER CONFIGURATION TOOL and configure the specific Playback attributes and
link the Player to its pre-defined Player definition entry in the Scala Enterprise Content
Manager.
• Reboot & verify correct function.
• Enable the Microsoft® Unified Write Filter. Reboot.
Most of these operations may be performed using either the Windows/Scala GUI utilities or via
Command Prompt commands. Command Prompt configuration methods lend themselves better
to scripting/automation and are generally favored for the deployment of larger numbers of Players.
January 26, 2022 Scala, Inc. Page | 11SMPA Setup Guide
Microsoft® Unified Write Filter
Scala Media Players and their customized Windows 10 IoT Enterprise LTSC operating system have the
Unified Write Filter (UWF) feature installed and configured. When enabled, UWF protects key system
files from unintentional modification. By default, when initially configuring a device, UWF should be
disabled. Prior to attempting the configuration of a device, it is prudent to verify that UWF is in fact
disabled on the specific device with which one is working.
Verifying the state of UWF
From an Administrative Command Prompt, run: C:\TOOLS\UWF_GET-CONFIG_C.CMD
If UWF is disabled, the FILTER SETTINGS/Filter state: will be “OFF”. If UWF is enabled, the FILTER
SETTINGS/Filter state: will be “ON.”
Disabling UWF
If making changes to the player configuration after initial set-up and UWF has been enabled for the Player’s
typical deployment operation; the UWF will need to be disabled.
Run the script C:\Tools\DISABLE_UWF_C.CMD in an Administrative Command Prompt.
Once finished, ensure that you enable UWF to maintain changes and reboot the system.
Enabling UWF
On completing the unit’s deployment configuration, it is strongly advised that one enable UWF—both to
protect the system configuration from tampering and to extend the lifespan of the unit’s SSD storage
device by reducing unnecessary write activities to the “C: BOOT_APPS” partition. If installing additional
software, reboot the unit before making any configuration changes and allow any post-reboot installation
steps to take effect.
To enable UWF, run the script: C:\Tools\ENABLE_UWF_C.CMD from an Administrative Command Prompt.
If you make changes to the system and they do not take effect, check to see if UWF was in fact
disabled. To disable UWF, Using an Administrative Command Prompt, run the script:
C:\Tools\DISABLE_UWF_C.CMD. Restart the device and continue configuration.
January 26, 2022 Scala, Inc. Page | 12SMPA Setup Guide
Connecting to a Physical LAN or Wireless Network
Connecting to a Wireless Network
For instructions regarding how to connect to a Windows 10 operating system, see Connect to Wi-Fi on
Microsoft's support site.
Connecting to a Physical LAN
For instructions regarding how to connect a Windows 10 operating system to a physical LAN, see Change
TCP/IP settings on Microsoft’s support site.
Configuring the DHCP or Static IP Address
By default, a Windows 10 Scala Media Player will obtain an IPv4 address via Dynamic Host Configuration
Protocol (DHCP). If using DHCP, the device will automatically obtain an IP address when connected to its
Wi-Fi or Ethernet LAN. On some networks, you will want to assign a specific Static-IP address. This can
either be centrally administered on the network’s DHCP server via Static/Assigned-DHCP-leases based on
the device’s MAC#, [Every Scala Media Player has a MAC-address-sticker both on its chassis as well on its
shipping box.], or a static IP-address can be assigned and applied to a unit manually. This is done direct on
the device. Use the following instructions to set up a Static IP address for the network connection.
1. Navigate to Start > Settings.
The Windows Settings page appears.
2. Click the Network and Internet icon.
The Network Status page appears.
3. Click the Change adapter options link located under the Change your network settings section.
The Control Panel/All Control Panel Items/Network Connections dialog appears.
4. Select either the active Ethernet or Wi-Fi network adapter.
5. Click the Change setting of this connection link. This link may not display in your view. If not, click
the double ">>" in the Windows® dialog and it should appear.
The Wi-Fi/Ethernet connection Properties dialog appears.
Alternately, right click on the appropriate active connection type and select the Properties link.
6. Select the Internet Protocol Version 4 (TCP/IPv4) item and click the Properties button.
The Internet Protocol Version 4 (TCP/IPv4) Properties dialog appears.
7. Navigate to either the [General] or [Alternate Configuration] tab.
8. Click either the Use the following IP address or the User configured radio button.
9. Enter appropriate IP address and DNS settings.
10. Click the OK button.
January 26, 2022 Scala, Inc. Page | 13SMPA Setup Guide
SMPA Display Configurations
The emplacement of a SMPA Digital Signage solution requires the appropriate configuration of the Media
Player matched with the setup of the attached display devices. There are two environments in which your
Player with the intended displays can be configured:
• On site
• In a central Warehouse/Service Depot staging environment
A staging environment is best for mass deployments of identical/highly-similar units. The programming of
the HW-EDID Emulator requires that the staging environment have a “representative sample set” of the
display devices intended for the field deployment. [In a large scale deployment it is assumed that the
actual field display devices will be directly “drop-shipped” to the deployment sites from the Manufacturer.]
Supported Display Configurations
The SMPA-R1x05G supports either single or independent, (Windows Extended Desktop), dual Displays or
the following Eyefinity™ Single Large Surface, (SLS), “unified” dual display device configurations in
HD(1080p) or 4K(2160p) video output modes.
Two Landscape Oriented Monitors
Two Portrait Oriented Monitors
January 26, 2022 Scala, Inc. Page | 14SMPA Setup Guide
Configuring Display Settings
Configure the display settings for the Windows operating system to match your desired output
arrangement. The Player D’s dual outputs support several common display device arrangements:
• Single Output: Landscape or Portrait
• Dual-Independent Output: Horizontal/Vertical, Landscape or Portrait
• Dual Independent Output: Horizontal/Vertical, Landscape + Portrait
• Eyefinity2, (Single Large Surface), Output: Horizontal/Vertical, Landscape or Portrait
To set the relative screen positions and orientations:
1. Ensure that both display devices are connected to the Scala Media Player-DX.
2. Navigate to the desktop.
3. Right click anywhere on the desktop.
Select the Display Settings option.
ALTERNATE: Navigate to Start > Settings & click on System > Display
4. Arrange the displays as required using the Select and rearrange displays widget/option for an
extended Windows desktop.
5. Save your changes.
Please see Appendix I: AMD Radeon Eyefinity™ Settings for how to implement SLS outputs.
January 26, 2022 Scala, Inc. Page | 15SMPA Setup Guide
Configuring Audio
You can configure audio for the Windows OS from the Sound tile on the Windows Start Menu, (the tile links
to the Control Panel> Sound dialog); alternately you can access the Sound settings page:
Start>Settings>System>Sound. You may also right-click on the Speakers icon in the Windows Taskbar
which will provide you with menu options for Open Sound Settings and Open Volume Mixer.
Configuring audio from the Start Menu
1. Navigate to the Sound tile in the [Start] menu. (Control Panel> Sound)
The Control Panel> Sound dialog appears.
2. Click the Playback tab.
3. Select a playback device.
4. Click the Apply button.
5. Adjust the sound levels and other audio device-specific options from the Playback device’s
[Properties] button and Speaker properties dialog.
6. Click the OK button to save and exit.
Configuring audio from the Task Bar
1. Right click the Speakers icon on the Windows task bar.
2. Select Open Sound Settings or the Open Volume Mixer.
…the Sound settings page appears or the Volume Mixer dialog.
3. Select the desired audio device and adjust the audio parameters as appropriate.
January 26, 2022 Scala, Inc. Page | 16SMPA Setup Guide
Setting the Date and Time
To reliably maintain accurate logging, coordinate playback, and schedule updates, all Scala Media Players
should be synchronized to a common Network Time Protocol, (NTP), time server. If your Scala Media Players
have access to an Internet connection, the Microsoft default time server is time.windows.com.
Valid alternative public time Servers, Regional & National, can be found via resources which can be found
on the SNTP Time Servers page on Microsoft’s support site or at the Network Time Foundation.
If your Scala Media Players do not have access to the public Internet, a best practice is to set up the NTP-
service on the Server running the Scala Enterprise Content Manger as the authoritative Network Time
Protocol (NTP) server for the Digital Signage network. The CM should then in turn be synchronized to a
trusted time server such as that provided by the Corporate WAN/Internet Service Provider.
Setting the Device Time Zone
1. Navigate to Windows Menu > System > Control Panel.
The Control Panel>All Control Panel Items dialog appears.
2. Click the Date and Time link.
The Date and Time dialog appears.
3. Click the Change time zone... button on the Date and Time tab.
4. Select the correct time zone for the device.
5. Click OK in the Date and Time dialog when finished.
Setting the Device Time
1. Navigate to Windows Menu > Windows System > Control Panel.
The Control Panel\All Control Panel Items dialog appears.
2. Click the Date and Time link.
The Date and Time dialog appears.
3. Click the Internet Time tab.
4. Click the Change settings... button.
The Internet Time Setting dialog appears.
5. Select a server
6. Click the Update Now button.
7. Click the OK button in the Date and Time dialog when finished.
January 26, 2022 Scala, Inc. Page | 17SMPA Setup Guide
Changing the Internet Time Server on Windows 10
1. Open the Control Panel.
2. Click Date and Time.
3. Click the Internet Time tab.
4. Click the Change settings… button.
5. Check that the Synchronize with an Internet time server box is selected
6. Use the dropdown menu to select a different server.
7. Click the Update now button to synchronize the time with the new server.
ALTERNATE: How to Change the Time Server on Windows 10 Using the Registry
Note: Using the Control Panel, you can change the Internet Time settings to your desired Time Server;
however, only one new entry may be added to the time server list. In order to add multiple addresses to the
list, one must either edit the registry or use the Command Line tools to add new NTP Servers to a system.
1. Use the Windows key + R keyboard shortcut to open the Registry.
2. Type regedit and click OK to open the Registry.
3. Browse to the following path:
HKEY_LOCAL_MACHINE\SOFTWARE\Microsoft\Windows\CurrentVersion\DateTime\Servers.
4. On the right side, right-click on the Servers (folder) key, select New, and click on String Value.
5. Type a number that corresponds to the position of the new entry in the server dropdown menu in
Control Panel.
6. Double click on the newly created string value.
7. Type the address of the Network Time Protocol (NTP) server. For example, if you were to use the
network’s ISP Time Server as a back up, enter “isp-time-server.isp-network-name.net.”
ALTERNATE: How to Change the Time Server on Windows 10 using an Administrative
Command Prompt
Use the following command:
w32tm /config /manualpeerlist:"customer-time-server.digital-signage.com time-server.isp-
network-name.net" /syncfromflags:manual /update.
For more detailed information, see: Windows Time service tools and settings
January 26, 2022 Scala, Inc. Page | 18SMPA Setup Guide
Setting the Regional/Locale Formats
1. Open the Control Panel.
2. Click Region.
3. Make changes in the Region settings.
The Additional Settings button provides more detailed options for Numerical values, Time and Date
format strings, Currency, and Language preferences.
January 26, 2022 Scala, Inc. Page | 19SMPA Setup Guide
User Account Passwords
Scala Media Players come pre-configured with default passwords for the Configure Player account, Scala
Player account, and the TightVNC connection. The following table identifies each account, the username,
the default password, and a description of the account.
Account Name Username Password Description
Configure Player Scala scala123# Use this account to configure both the operating system
and the Scala Windows Playback Engine
Scala Player player scala123# Use this account for playback of Scala content.
TightVNC n/a test123# Use this connection to remotely access the player.
connection*
While it is a best practice that all deployed Players have unique, highly obfuscated, passwords; the
administrative burden involved can make such a task impractical. At a minimum, it is advised that
all Digital Signage network devices have complex passwords that are unique to the particular
network.
If you have a strong interest in implementing best practices for Player Networks, please contact
Scala Services for a consulting engagement.
Configure the Scala System Account
Use this account to make configuration changes for the Windows OS and the Scala Windows Player.
1. Navigate to Start > Windows Administrative Tools > Computer Management.
[ALTERNATIVE: Win+X > Computer Management]
The Computer Management dialog appears.
2. Double click on the Local Users and Groups folder.
3. Double click on the Users folder.
4. Right click on the SCALA folder.
5. Select the Set Password... option in the dialog.
6. Click Proceed.
You may disregard the warning about the consequences of resetting the password.
7. Enter a password in the New Password and Confirm Password text fields.
8. Click OK to store the new password.
Configure the Scala Display Engine Account
Use this account to play back content.
1. Navigate to Start > Windows Administrative Tools > Computer Management.
[ALTERNATIVE: Win+X > Computer Management]
2. Double click on the Local Users and Groups folder.
3. Double click on the Users folder.
4. Right click on the PLAYER folder.
5. Select the Set Password... option in the dialog.
6. Click Proceed.
You may disregard the warning about the consequences of resetting the password.
7. Enter a password in the New Password and Confirm Password text fields.
8. Click OK to store the new password.
January 26, 2022 Scala, Inc. Page | 20SMPA Setup Guide
Configure TightVNC for Remote Connection and Administration
Use the “TightVNC Service –Control Interface” [Start] menu tile to configure the VNC setting controlling
remote graphical console access to the player. There are two passwords for TightVNC: the administrative
password, (governing changes in settings to this service), and the “remote connection” password.
Either launch this tool from the [Start] menu or navigate to the TightVNC icon located in the Taskbar
system tray and right-click & select “Configure…” on the menu.
The TightVNC Control Authentication dialog appears.
1. Enter the administrative password included on your Scala Media Player Guide.
2. Click the OK button.
The TightVNC Service Configuration dialog appears. Enter the default VNC admin password so that
you can make changes to this service.
3. Click on the [Server] tab.
4. Click the [Change...] button under Primary password.
5. Enter a password in the New Password and Confirm Password text fields.
6. Click the Ok button.
7. Navigate to the Administration tab.
8. In the Control Interface section, click the Change... button to change the administrative password.
9. Enter a password in the New Password and Confirm Password text fields.
10. Click the Apply button to apply changes to the account.
11. Click the OK button to exit the dialog.
January 26, 2022 Scala, Inc. Page | 21SMPA Setup Guide
Configuring System Restarts
Restart your Scala Media Player regularly to ensure stable and reliable operation.
There are two pre-configured options:
• Daily system reboots
• Weekly system reboots
The following table describes the system restart type, file name, frequency, default day of the week, and
default time of restart.
Restart File Name Frequency Default Day of the Week Default
Type Time
Daily C:\Tools\SYSTEM_NIGHTLY- once per day SUN, MON, TUE, WED, THU, 5:30AM
Reboot.CMD FRI, SAT
Weekly C:\Tools\SYSTEM_WEEKLY- once per week SUN 5:30AM
Reboot.CMD
By default, the Windows Tasks configured by this these scripts are not enabled.
It is generally sufficient to configure Scala digital signage players for weekly reboots. However, in some
usage scenarios involving more complex data manipulation—such as Player-based, (local), ODBC database
information retrieval connections, XML file parsing, or playback content incorporating complex HTML5-
WebClip/JavaScript programming, rebooting a Player on a nightly basis is more appropriate for stable and
consistent function.
When editing either the weekly reboot or nightly reboot scripts, please select a day, and time of day, that
will reduce the impact of the momentary loss of Media Player output/availability.
Weekly System Restarts
Scala Media Players can be configured to restart once a week at a specific date and time. The default time is
Sunday at 5:30 am.
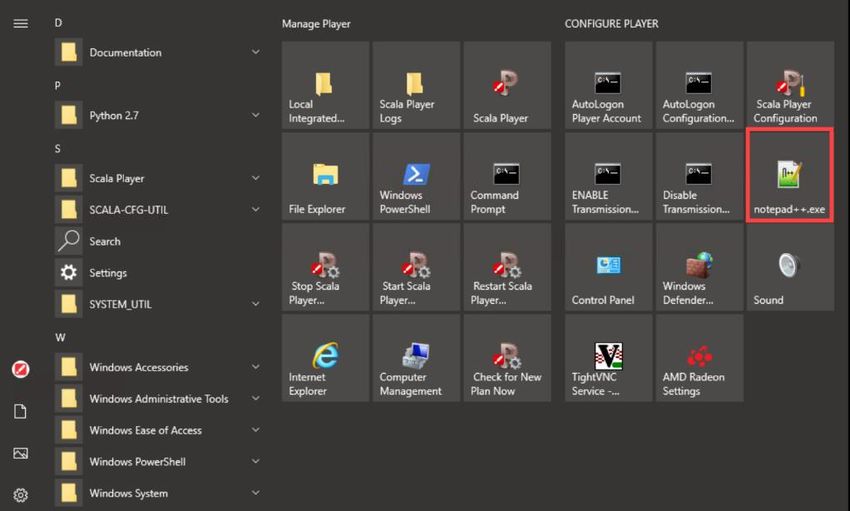
1. Open the Notepad++ tile, found on the Windows menu.
January 26, 2022 Scala, Inc. Page | 22SMPA Setup Guide
2. Open the file C:\Tools\SYSTEM_WEEKLY-Reboot.CMD
Modify the day & time in the schtasks command at the end of the script, using 24 hour time.
3. Save the script and close Notepad++.
4. Run the .CMD file either by double clicking on the file in the Windows File Explorer or using the
Win+X > Run command from the System menu.
January 26, 2022 Scala, Inc. Page | 23SMPA Setup Guide Daily System Restarts Scala Media Players can be configured to restart every 24 hours. The default setting is 5:30am. 1. Launch Notepad++ from the tile in the [Start] menu. 2. Open the file C:\Tools\SYSTEM_NIGHTLY-Reboot.CMD. January 26, 2022 Scala, Inc. Page | 24
SMPA Setup Guide

      Modify the time in the schtasks command at the end of the script, using 24 hour time.

   3. Save the script and close Notepad++.
   4. Run the .CMD file either by double clicking on the file in the Windows File Explorer or using the
      Win+X > Run command from the System menu.

January 26, 2022                                 Scala, Inc.                                       Page | 25
SMPA Setup Guide
Configuring the Auto-Logon Script
While playback can occur through the Scala, (Configuration), user account, it is not recommended as the
Player, (Display Engine), user account environment has been configured to suppress various UI-elements
which can disrupt the visual display of the Scala Enterprise Player Display Engine content/presentation.
In addition, by setting the system to auto-logon to the Scala Player account it is possible to restrict user
operations/interactions which might be used to alter/damage the settings of the Windows OS should the
Scala Player Display Engine be terminated.
• The registry script, HLM_EnablePLAYER_Autologon.reg, which is called from the CMD script,
ENABLE_Display_Engine_PLAYER_AutoLogon.CMD, allows you set the Player, (Playback Display
Engine), user account to that which the Windows Operating System will automatically logon with
then the system starts.
• The registry script, HLM_EnableSCALA-CFG-AdminAutologon.reg, which is called from the CMD
script, ENABLE_Config_PC_User_SCALA_AutoLogon.CMD, allows you set the Scala, (Configuration),
user account to that which the Windows Operating System will automatically logon with then the
system starts.
[In the normal operation of a SMPA, this would not ever be done as the device starts “out of the
box” in the Scala, (Configuration), user account, is configured for its deployment, and then is set to
auto-logon into the Player, (Playback Display Engine), user account for the remainder of its service
life. The “go-back” Auto-Logon-to-the-Configuration-Account script exists to assist with QA-testing
as well as device reconfiguration/redeployment operations. ]
The [Start] menu contains a both shortcuts and tiles to these system-configuration helper scripts which
specify into which of the device’s user accounts that the system will logon.
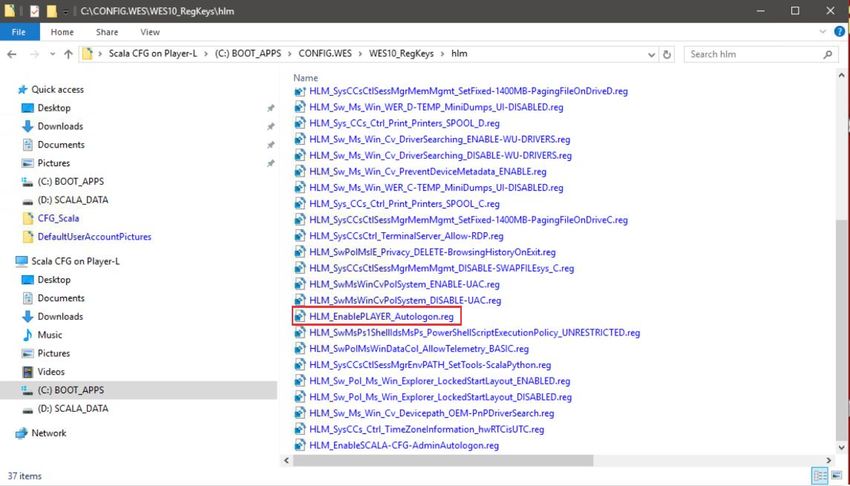
Before running these .CMD scripts after the device’s default user account passwords have been changed;
the .REG scripts need to be edited in order to contain the new, correct, account passwords!
Open the Notepad++ tile in the [Start] menu.
Open the files:
C:\CONFIG.WES\WES10_RegKeys\hlm\HLM_EnablePLAYER_Autologon.reg &
C:\CONFIG.WES\WES10_RegKeys\hlm\ HLM_EnableSCALA-CFG-AdminAutologon.reg
January 26, 2022 Scala, Inc. Page | 26You can also read


