Vendor Registration and Training Guides - February 2021 - Infotech
←
→
Page content transcription
If your browser does not render page correctly, please read the page content below

Vendor Registration and
Training Guides
February 2021
Address: 2970 SW 50th Terrace, Gainesville, Florida 32608-5076
Web: www.infotechinc.com
Customer support is available by phone or email Monday through Friday from 7:00 A.M. - 8:00
P.M. Eastern Time, excluding legal holidays and when posted.
Contact
By mail:
Infotech Doc Express Toll free phone:
2970 SW 50 Terrace (888) 352-2439, option #4
Gainesville, FL 32608-5076 Email: support@docexpress.com
Bid Express Toll free phone: By Fax:
(888) 352-2439, option #1 (888) 971-4191
Email: support@bidexpress.com
Knowledge center:
https://infotechinc.zendesk.com/hc/en-us
Appia Toll free phone: Suggestions/ideas/general input:
(888) 352-2439, option #2 feedback@bidexpress.com
Email: appia-support@infotechfl.com
Appia, the Appia logo, Bidx.com, Bid Express, the Bid Express logo, Doc Express, the Doc
Express logo, and Info Tech are registered service marks of Info Tech, Inc. Infotech, the Infotech
logo, Infotech Consulting, and the Infotech Consulting logo are trademarks of Info Tech, Inc.
Copyright © 2021, Info Tech, Inc., DBA Infotech. All rights reserved. This document or parts thereof
may not be reproduced in any form without written permission of Info Tech, Inc., DBA Infotech.
Produced in the United States of America.
Contents

Bid Express Registration Guide

1. Registration and Setup .......................................................... 1-1
     1.1 System Requirements .......................................................... 1-2

2. Manager Information ............................................................ 2-1
     2.1 Register for a Manager Account ............................................. 2-1
     2.2 Manage Employees ............................................................. 2-4
          2.2.1 Employee Search ....................................................... 2-5
          2.2.2 Invite Employees ....................................................... 2-6
          2.2.3 Employee Roles ......................................................... 2-6

3. User Account Activation ........................................................ 3-1

4. My Account Page ................................................................. 4-1
     4.1 Employees ........................................................................ 4-1
          4.1.1 Employee Search ....................................................... 4-3
     4.2 Change Your Contact Information ........................................... 4-3
     4.3 Change Your Email Address, Password, or Security Information .... 4-4
          4.3.1 Change Password ...................................................... 4-4
          4.3.2 Email Address ........................................................... 4-5
          4.3.3 Security Question....................................................... 4-6
     4.4 Update Business Logo ......................................................... 4-6

                                                  i
5. Infotech Digital ID Page ......................................................... 5-1
     5.1 Multi-browser ID ................................................................ 5-2
          5.1.1 Create the Digital ID ................................................... 5-3
          5.1.2 Install and Back Up the Digital ID ................................... 5-4
     5.2 Back Up and Import Your Digital ID ......................................... 5-5
          5.2.1 Back Up Your Digital ID ............................................... 5-5
          5.2.2 Import Your Digital ID .................................................. 5-6
     5.3 Infotech Express Sign Tool .................................................... 5-6

6. Subscription Payments.......................................................... 6-1
     6.1 Bid Express Payments ......................................................... 6-1
          6.1.1 Getting a Subscription ................................................ 6-2
          6.1.2 Purchase Details ........................................................ 6-3
          6.1.3 Late Payments .......................................................... 6-3
     6.2 Credit Card Information........................................................ 6-4
     6.3 Cancel a Subscription .......................................................... 6-4

7. My Profile Tab ..................................................................... 7-1
     7.1 NIGP Codes ....................................................................... 7-1
          7.1.1 Add Codes................................................................ 7-2
          7.1.2 Delete Codes ............................................................ 7-2
     7.2 Users ............................................................................... 7-3

Bid Express Vendor’s Guide

8. Introduction ........................................................................ 8-1
     8.1 Understanding the Bid Express Service ................................... 8-2
     8.2 Bid Express Home Page ....................................................... 8-2
     8.3 Subscriptions and Payment Information ................................... 8-4
     8.4 The Help Tab ..................................................................... 8-4
     8.5 Notices ............................................................................ 8-4

9. Solicitations and Responses ................................................... 9-1
     9.1 Sorting and Searching ......................................................... 9-1

                                                    ii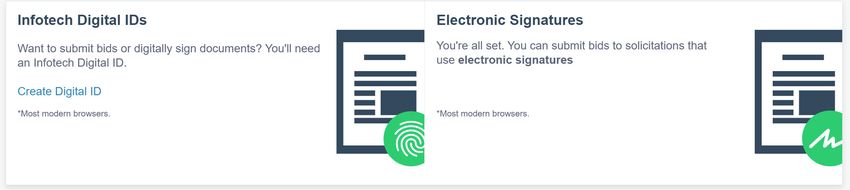
9.2 Agency Notifications ........................................................... 9-3
9.3 Bidding ............................................................................ 9-4
10. Entering Bids or Responses ................................................. 10-1
10.1 The Bids Tab ................................................................... 10-1
10.2 Bid Components .............................................................. 10-2
10.2.1 Grouped Fields ....................................................... 10-2
10.2.2 Optional or Alternate Components............................... 10-3
10.2.3 Vendor Component Entry .......................................... 10-3
10.3 Preference ..................................................................... 10-4
10.4 Q & A ............................................................................. 10-5
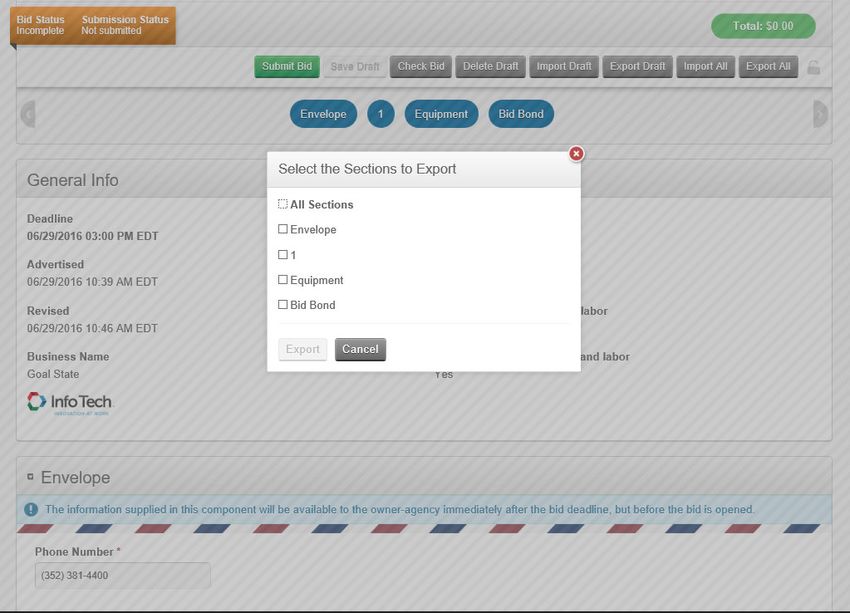
10.5 Table or Item List Export and Import ..................................... 10-6
10.5.1 Export All/Import All ................................................. 10-6
10.6 Save Draft and Check Bid ................................................... 10-8
10.7 Export Draft .................................................................... 10-9
10.8 Import Draft .................................................................. 10-10
10.9 Submitting the Bid or Response ........................................ 10-11
11. Withdrawals, Amendments, and Resubmitting Bids ................... 11-1
12. Apparent Bids or Responses ................................................ 12-1
12.1 Apparent Bids ................................................................. 12-1
12.2 View Bid Tab Reports ........................................................ 12-2
13. Logging Out of the Bid Express System ................................... 13-1
iii
iv

Vendor Training Guide

February 2021
Address: 2970 SW 50th Terrace, Gainesville, Florida 32608-5076
Web: www.infotechinc.com
Customer support is available by phone or email Monday through Friday from 7:00 A.M. - 8:00
P.M. Eastern Time, excluding legal holidays and when posted.
Contact
By mail:
Infotech Doc Express Toll free phone:
2970 SW 50 Terrace (888) 352-2439, option #4
Gainesville, FL 32608-5076 Email: support@docexpress.com
Bid Express Toll free phone: By Fax:
(888) 352-2439, option #1 (888) 971-4191
Email: support@bidexpress.com
Knowledge center:
https://infotechinc.zendesk.com/hc/en-us
Appia Toll free phone: Suggestions/ideas/general input:
(888) 352-2439, option #2 feedback@bidexpress.com
Email: appia-support@infotechfl.com
Appia, the Appia logo, Bidx.com, Bid Express, the Bid Express logo, Doc Express, the Doc
Express logo, and Info Tech are registered service marks of Info Tech, Inc. Infotech, the Infotech
logo, Infotech Consulting, and the Infotech Consulting logo are trademarks of Info Tech, Inc.
Copyright © 2021, Info Tech, Inc., DBA Infotech. All rights reserved. This document or parts thereof
may not be reproduced in any form without written permission of Info Tech, Inc., DBA Infotech.
Produced in the United States of America.
Contents

1. Registration and Setup .......................................................... 1-1

     1.1 System Requirements .......................................................... 1-2

2. Manager Information ............................................................ 2-1

     2.1 Register for a Manager Account ............................................. 2-1
     2.2 Manage Employees ............................................................. 2-4
          2.2.1 Employee Search ....................................................... 2-5
          2.2.2 Invite Employees ....................................................... 2-6
          2.2.3 Employee Roles ......................................................... 2-6

3. User Account Activation ........................................................ 3-1

4. My Account Page ................................................................. 4-1

     4.1 Employees ........................................................................ 4-1
          4.1.1 Employee Search ....................................................... 4-3
     4.2 Change Your Contact Information ........................................... 4-3
     4.3 Change Your Email Address, Password, or Security Information .... 4-4
          4.3.1 Change Password ...................................................... 4-4
          4.3.2 Email Address ........................................................... 4-5
          4.3.3 Security Question....................................................... 4-6
     4.4 Update Business Logo ......................................................... 4-6

5. Infotech Digital ID Page ......................................................... 5-1

                                                  i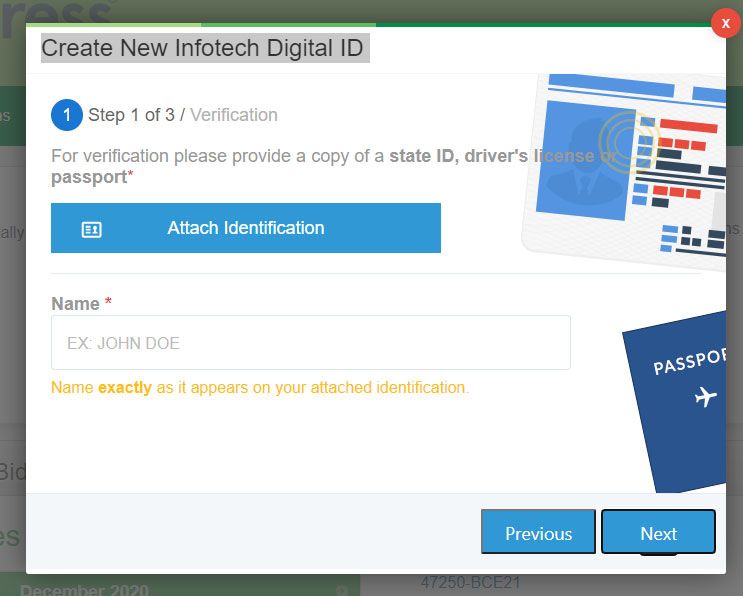
5.1 Multi-browser ID ................................................................ 5-2
          5.1.1 Create the Digital ID ................................................... 5-2
          5.1.2 Install and Back Up the Digital ID ................................... 5-4
     5.2 Back Up and Import Your Digital ID ......................................... 5-5
          5.2.1 Back Up Your Digital ID ............................................... 5-5
          5.2.2 Import Your Digital ID .................................................. 5-6
     5.3 Infotech Express Sign Tool .................................................... 5-6

6. Subscription Payments.......................................................... 6-1

     6.1 Bid Express Payments ......................................................... 6-1
          6.1.1 Getting a Subscription ................................................ 6-2
          6.1.2 Purchase Details ........................................................ 6-3
          6.1.3 Late Payments .......................................................... 6-3
     6.2 Credit Card Information........................................................ 6-4
     6.3 Cancel a Subscription .......................................................... 6-4

7. My Profile Tab ..................................................................... 7-1

     7.1 NIGP Codes ....................................................................... 7-1
          7.1.1 Add Codes................................................................ 7-2
          7.1.2 Delete Codes ............................................................ 7-2
     7.2 Users ............................................................................... 7-3

                                                    ii
1. Registration and Setup
Welcome to the Bid Express service. This document is for vendor managers
and users.
If you have any questions about the manager or user roles or the registration
process, please contact customer support at 888-352-BIDX (2439) and select
option 3.
Figure 1-1. Login Page
This Bid Express service is a different system than the Bid Express service that
uses the Bid component of the AASHTOWare Project Bids software. Please be
sure you are signing up for the correct one. If you need help, please contact
customer support at support@bidexpress.com.
Bid Express Vendor Registration Guide 1-11.1 System Requirements
The new Infotech multi-browser Digital ID and electronic signatures can be
used with most modern browsers.
If you are using the old Digital IDs for the Bid Express service:
You must use a 32-bit version of Internet Explorer 10 or 11.
ActiveX functionality should not be disabled in your browser settings.
1-2 Bid Express Registration and Setup2. Manager Information
If you are the first person to register for an account for your company, you are
automatically assigned the role of manager. You can also invite other users to
the service and assign this role to other users. You cannot change your own
role.
2.1 Register for a Manager Account
Note: For instructions on registering if you were sent an invitation
email, please see the User Account Activation section.
Use these instructions if you are the first person in your company to register for
an account.
1. Click Register on the service’s login page. The service takes you to
the Registration page. The information on the right may vary
depending on to what service you are registering.
Bid Express Vendor Registration Guide 2-1Figure 2-1. Registration Page
2. Enter your first name in the First name field of the My Info section.
3. Enter your last name in the Last name field.
4. Enter your valid email address in the Email field. This is the email
address to which the service will send notifications and messages.
5. Re-enter your email address in the Email Confirmation field.
6. Enter a password in the Password field. The password must be at
least eight characters and include one uppercase letter, one
lowercase letter, one number, and one symbol.
7. Re-enter the password in the Confirm your password field.
8. Select a security question from the Questions list.
9. Answer the security question in the Answer field. This answer is
case-sensitive.
10. Enter the legal name of your business in the Name field of the My
Business section.
11. Enter your business’s phone number and address in the proper fields.
2-2 Manager Information12. Read the Privacy Policy, the Terms of Use, and the DMCA Policy by
selecting the links at the bottom of the page.
13. Click the X in the title bar of the policies when you are finished to
return to the Registration page.
14. Select the option to indicate you have read and agree to the Privacy
Policy, the Terms of Use, and the DMCA Policy.
15. Select the update option to receive emails about new product
releases and promotional offerings.
16. Click REGISTER.
If there is a business in the system with a similar name to the one you entered,
you will see an informational message. If it is not your company, click CREATE
NEW BUSINESS. If this is your company, click REQUEST INVITATION. The manager
registered with the service will receive an email with your request.
If you created a new business, the service gathers your information and sends
an activation email to the entered email address and displays the name of the
service for which you registered. You must click the link in the email in order to
activate your account.
Note: If you do not see this message, please check your Spam
folder.
Figure 2-2. Account Activation Email
Once you click the link in the email, the Activate Account page opens.
Bid Express Vendor Registration Guide 2-3Figure 2-3. Account Activation
Enter the password you used on the registration page in the Password field and
click ACTIVATE. The service returns to the home page.
Depending on the agency, you may need to install the Sign Tool and generate
an Infotech Digital ID in order to bid on solicitations. You may need only
electronic signatures for bidding. For more information, please see the Infotech
Digital ID Page chapter.
Figure 2-4. Digital ID and Electronic Signature
2.2 Manage Employees
As a manager, you can invite other employees to join your business through the
My Account page. If you are within a service, select the Global Navigation menu
(represented by the three lines in the upper left corner) and select My
Account.
The Employees section of the My Account page lists all the employees of the
organization, their contact information, and their assigned roles.
2-4 Manager InformationFigure 2-5. My Account Page With Employees
Some services require the use of Infotech Digital IDs. Once employees start the
process of registering for IDs, the status of their IDs displays next to their
names in the Digital ID column.
An Action button displays for all employees on the My Account page:
Change Role Allows you to change roles for an employee to User or
Manager. You cannot change your own role.
Remove Removes the employee from accessing the service as
part of your business. The employee’s account will be
disabled.
2.2.1 Employee Search
To quickly search for an employee, enter the employee’s name or email address
in the Search for Employees field and click SEARCH. Click the three dots under
the Search field to expand the search criteria.
Bid Express Vendor Registration Guide 2-5Figure 2-6. Employee Search
Clear the search by clicking the X in the field or click Reset search.
2.2.2 Invite Employees
To invite employees to join your business, click INVITE EMPLOYEES. Enter the email
addresses of the employees you want to invite. Once all addresses have been
entered, click INVITE EMPLOYEES.
If you see a message stating an email address already has an account, please
contact customer support for help in adding the account to your business.
The service sends an email invitation to the email addresses entered and lists
the employees above the employee list on the My Account page.
Note: Instructions for registering for an account via an email
invitation are in the User Account Activation section.
You can rescind an invitation by clicking Remove for an employee.
You will receive an email once an invitation has been accepted and when the
employee completes the account registration.
2.2.3 Employee Roles
Employees are always assigned the role of user, but a manager can change that
role. Managers cannot change their own roles.
2-6 Manager InformationThe roles set here are not part of the individual services. Please search the
knowledge center help for each service for information on roles.
Those assigned a manager role can:
Invite other employees to join your organization, change their roles,
and remove employees from your organization.
Upload a business logo.
Change the business name and contact information.
Give customer support permission to add an existing account to your
business.
See the My Account Page chapter for more information on uploading the logo or
changing your information.
Bid Express Vendor Registration Guide 2-72-8 Manager Information
3. User Account Activation
If you were sent an invitation to open an account, you will be assigned the role
of user. Your role can be adjusted by the manager. You may have a separate
role assigned for the service to which you have subscribed.
When a manager invites you to join the organization, you will receive an email
with a link to create an account. Click the link. The Account Activation page
opens.
Figure 3-1. User Account Activation Page
Complete the fields on the registration form. All fields are required. If you have
any issues creating your account, please contact customer support.
Bid Express Vendor Registration Guide 3-11. Enter your first name in the First name field.
2. Enter your last name in the Last name field.
3. Enter a password in the Password field. The password must be at
least eight characters and contain one uppercase letter, one
lowercase letter, one symbol, and one number.
4. Re-enter the password in the Password Confirmation field.
5. Select a security question from the Question drop down list. This
question is used to verify your identity in case you forget your
password.
6. Enter the answer to your security question. This answer is case
sensitive.
7. Read the Privacy Policy, Terms of Use, and DMCA Policy, then select
the check box indicating you have read them.
8. Click ACTIVATE.
The service brings you to the My Account page where you can see your user
information and other employees of your business. See the My Account Page
chapter for more information.
If you wish to go to the service to which you have been subscribed, click the
Global Navigation menu (represented by the three lines) in the upper left
corner and select your service.
3-2 User Account Activation4. My Account Page
The My Account page allows you to update your account information, including
your address and phone number, plus see the contact information and roles of
other employees of your business and the status of their Infotech Digital IDs.
You can also update your email, password, time zone, and challenge question.
Figure 4-1. My Account Page - Manager
If you are a manager, you can also upload a business logo and invite employees
to join your business (see Section 2.2.2).
4.1 Employees
The Employees section of the My Account page lists all the employees of the
organization, their contact information, and their assigned roles.
Bid Express Vendor Registration Guide 4-1Figure 4-2. My Account Page With Employees
If you are within a service, select the Global Navigation menu (represented by
the three lines in the upper left corner) and select My Account.
Some services require the use of Infotech Digital IDs. Digital IDs generated
after October 2020 are the multi-browser IDs and can be used with most web
browsers, like Chrome or Edge. IDs generated before October 2020 are the
legacy IDs, which can be used only with Internet Explorer. Once employees
start the process of registering for IDs, the status and type of their IDs display
next to their names on the My Account page.
An Action button display for all employees on the My Account page:
Change Role Allows you to change roles for an employee to User or
Manager. You cannot change your own role.
Remove Removes the employee from accessing the service as
part of your business. The employee’s account will be
disabled.
4-2 My Account Page4.1.1 Employee Search
To quickly search for an employee, enter the employee’s name or email address
in the Search for Employees field and click SEARCH. Click the three dots under
the Search field to expand the search criteria.
Figure 4-3. Employee Search
Clear the search by clicking the X in the field or click Reset search.
4.2 Change Your Contact Information
All users can change their first name, last name, and phone number. If you are
the manager, you can also change the business name and contact information.
If you currently have an Infotech Digital ID and you update your first name, last
name, or business name, you will be required to create a new ID. If there are
additional employees as a part of your business and you change the business
name, they will also need to create new IDs. Your updated names will not
display on the Infotech Digital ID page because the ID is registered to your old
names.
1. While on the My Account page, click EDIT in the header with your
name. The service opens your account information.
2. Change the information and click UPDATE. Any field marked with an
asterisk is required.
Bid Express Vendor Registration Guide 4-3Figure 4-4. My Account Updates
The service updates your information and returns you to the My Account page.
4.3 Change Your Email Address, Password, or Security
Information
You can change your email address, security challenge question, or password
from the Actions menu. You will have to enter your password for each change
you make to verify your account.
4.3.1 Change Password
Your password must be at least eight characters and include one uppercase
letter, one lowercase letter, one number, and one symbol.
Figure 4-5. Change Password Window
4-4 My Account Page1. While on the My Account page, click ACTIONS in the header with your
name.
2. Select Change Password.
3. Enter your new password in the New Password field.
4. Re-enter your new password in the New Password Confirmation field.
5. Enter your current password in the Current Password field.
6. Click SAVE.
The service updates your password information and returns you to the My
Account page.
4.3.2 Email Address
When you update your email address, you will receive a security code to the
email address currently on file to authorization the change.
1. While on the My Account page, click ACTIONS in the header with your
name.
2. Select Change Email.
3. Read the information in the Verify Email Address window and click OK.
The service will send a security code to the email address on file.
4. Enter your new email address in the New Email and Email
Confirmation fields.
5. Enter your account password in the Password field.
6. Enter the security code sent to your email address in the Security
Code field.
Bid Express Vendor Registration Guide 4-57. Log in to your new email account. Open the email sent to you by the
service and click the confirmation link to verify your new email
address.
8. Answer the security question and click CONFIRM.
The service returns you to the My Account page. Remember to use your new
email address the next time you log in to the service.
4.3.3 Security Question
You can also update your security question.
1. While on the My Account page, click ACTIONS in the header with your
name.
2. Select Change Security Challenge Question.
3. Select a question and enter an answer. The answer is case sensitive.
4. Enter your password and click SAVE.
4.4 Update Business Logo
If you are the manager, you can load a company logo onto the My Account
page. This logo will be seen by all your employees.
1. While on the My Account page, click the circle next to your company
name and address.
2. Navigate to and select the picture file of your logo.
3. Click OPEN.
The service uploads the picture. This may take a moment, depending on the
size of the file.
4-6 My Account Page5. Infotech Digital ID Page An Infotech Digital ID is an electronic tool that allows users to digitally sign documents, such as bids or contracts, submitted via an Infotech service. Digital IDs are used as part of a secure method of maintaining confidentiality and identity verification. Depending on the agency, you may be required to have a Digital ID created and approved before using any feature that requires a digital signature, such as posting a letting solicitation or signing a contract document. If a Digital ID is not required, the service may require an electronic signature. There is no registration process for an electronic signature As technology advances, the way Digital IDs are used also advances. Depending on when your ID was created, you either use a single-browser Digital ID (for use with Internet Explorer) or a multi-browser Digital ID (for use on most modern web browsers, such as Chrome).If you’re using the single- browser Digital ID, you will also need the Sign Tool. The service will indicate if it needs a Digital ID or the Sign Tool. If you are not sure, please call customer support at 888-352-2439. If you have an Infotech Digital ID and you update your first name, last name, or business name, you will be required to create a new ID. Other employees from your business who have Digital IDs will also need to create new IDs if you Bid Express Vendor Registration Guide 5-1
change the business name. New IDs will be created using the multi-browser ID
technology (though it can be used with your current bids).
Figure 5-1. Create Digital ID
5.1 Multi-browser Digital ID
You’ll need access to your email in order to receive a verification code.
You’ll need a copy of the your driver’s license, passport, or state ID in a
file that can be uploaded.
An Infotech customer support representative will call the you, hopefully
within one business day, to confirm their identification.
The ID must be installed after the identify is confirmed.
It may take up to seven days to complete the entire process.
5.1.1 Create the Digital ID
Figure 5-2. Create New Infotech Digital ID
5-2 Infotech Digital ID Page1. Click Create Digital ID to start the application.
2. Get the security code from your email and come back to the generate ID
process.
3. Enter your account password and the code. Click Next.
4. Read the creation information and click Next.
5. Click Attach Identification. Navigate to and select the file containing
your ID and click Open.
Figure 5-3. Create New ID Attach Identification
6. Enter your name EXACTLY as it appears in the ID, including any
punctuation marks or suffixes (like Jr.), and in legal order. Click Next.
7. Enter your contact phone number.
8. Enter the state where the company headquarters are located. Click Next.
9. Review your business information. Confirm that the name of the person
listed is the authorized signer for your company and your company name
matches how you would like to submit bids to the agency. Click Submit.
A member of the customer support team will call you after the application is
processed, hopefully within one business day, to confirm who you are. Once
that happens, you’ll get an email with instructions on installing your multi-
browser Digital ID.
Bid Express Vendor Registration Guide 5-35.1.2 Install and Back Up the Digital ID
When installing the ID, log in to the Infotech service from the same
device and use the same browser as when you created the ID.
Create the backup ID when prompted and save it to an external media,
such as a flash drive. You’ll need it if you use a different computer or if
you experience data loss. If you create the ID on a laptop using Chrome,
you can’t use it on a laptop using Edge or Desktop using Chrome unless
you import it. The service will let you know if you have to import your ID.
The service does not keep a copy of your ID file.
If you haven’t yet deleted the backup file of your old Digital ID, now’s a
good time to do it.
Once your business information has been checked, you’ll receive an email with
a link to install your ID.
Figure 5-4. Digital ID Account Verification
1. Click the link, or log in to your account. You can manage the installation
of your Digital ID from the Digital ID tab of the My Account page.
2. Click Install Digital ID.
3. Create your backup ID by clicking Back Up Your Digital ID.
4. Click Back Up.
5-4 Infotech Digital ID PageFigure 5-5. Back Up Your Infotech Digital ID
5. If you see a Save As window, navigate to the flash drive or other external
media where you will save your backup Digital ID. If you don’t see the
window, your backup ID was saved in your Downloads folder. Copy the
backup to the flash drive or other external media.
5.2 Back Up and Import Your Digital ID
You created a backup of your Bid Express Digital ID as part of the instructions
for generating the ID. You can also create a backup from the Digital ID page.
Import the backup if you move to a new computer or if you experience data loss.
5.2.1 Back Up Your Digital ID
1. Select the Global Navigation menu (represented by the three lines in
the upper left corner) and select My Account.
2. Select Digital ID from the side menu to see the My Digital ID page.
3. Click BACK UP, then click BACK UP again.
4. If you see a Save As window, navigate to the flash drive or other
external media where you will save your backup Digital ID. If you don’t
see the window, your backup ID was saved in your Downloads folder.
Copy the backup to the flash drive or other external media.
Use the Global Navigation menu to return to the Bid Express service.
Bid Express Vendor Registration Guide 5-55.2.2 Import Your Digital ID
Import the backup of your ID if you change computers. You must know the
location and password of your backup ID. The service is not able to reset or
change this password.
1. Select the Global Navigation menu (represented by the three lines in
the upper left corner) and select My Account.
2. Select Digital ID from the side menu to see the My Digital ID page.
3. Click IMPORT.
4. Navigate to the location and select the backup of your Digital ID.
5. Click OPEN.
6. Enter your Digital ID password and click OK.
The service imports the backup of your Digital ID and returns you to the Digital
ID page. Use the Global Navigation menu to return to the Bid Express service.
5.3 Infotech Express Sign Tool
If you have an older Digital ID, the Infotech Express Sign Tool utility may be
required. If it is necessary, you will see an informational message within the
service if it is not yet installed.
Your computer will need to be rebooted in order for the Sign Tool utility to finish
the installation.
Click Install Sign Tool within the service. Read the instructions, then click
DOWNLOAD.
5-6 Infotech Digital ID PageFigure 5-6. Infotech Sign Tool Instructions Follow the instructions to install the Sign Tool utility. Bid Express Vendor Registration Guide 5-7
5-8 Infotech Digital ID Page
6. Subscription Payments
The Payments page is where you would manage your credit card information
and payment options when you subscribe to a paid service.
Figure 6-1. Payments Page Without Subscription
The page remains empty unless you subscribe to a paid service.
6.1 Bid Express Payments
There are two ways of paying for the Bid Express service: Monthly Subscription
and Pay as you go.
With the Monthly Subscription method, you can respond to an unlimited number
of solicitations. The Bid Express service sends convenient email notifications
Bid Express Vendor Registration Guide 6-1for each solicitation selected for bidding. You can also opt to receive additional
email notifications from the agency’s home page about posting and withdrawals
of solicitations. Once you select a solicitation for bidding, you can submit a bid
even if your subscription ends before the bid deadline. You will be billed each
month on the day you start your subscription.
The Pay as you go method charges a fee each time you select the opportunity to
bid on a solicitation. This option includes access to email notifications for the
paid solicitation only.
6.1.1 Getting a Subscription
You can get a monthly subscription to the Bid Express service after logging in.
Click UNLOCK FULL ACCESS on either the Home page or the My Profile page. The
Bid Express service takes you to the Purchase Details page.
You can also begin a subscription or pay for the solicitation when you select the
solicitation and click SELECT FOR BIDDING. Select either START YOUR SUBSCRIPTION to
start a monthly subscription or select PAY FOR THIS SOLICITATION to pay for solely
the one solicitation.
The Bid Express service displays the purchase details for each option.
Figure 6-2. Subscription Options
6-2 Subscription Payments6.1.2 Purchase Details
When you purchase a service subscription, you are brought to the Purchase
Details page. This displays the product, service, and description of your
purchase, along with the monthly amount and the date through when your
subscription is paid.
If you’ve already entered a credit card to pay for a previous service, click the
button to pay with the card on file or click to pay with a new card.
Figure 6-3. Purchase Details Page
Enter your credit card information and click the payment amount. The service
checks the card to approve the payment and then returns you to the service.
6.1.3 Late Payments
If you have not paid for your monthly subscription, you will not be able to bid on
a solicitation in the Bid Express service. If your payment has been denied, it
could be because the credit card has expired.
You will be given the option of paying per solicitation or purchasing a monthly
subscription.
Bid Express Vendor Registration Guide 6-36.2 Credit Card Information
Once you enter your credit card information to pay for services, you can update
it at any time.
1. Click My Account from the Global Navigation menu in the upper left
corner if you are not already there.
2. Click Payments in the side menu.
3. Click UPDATE CREDIT CARD.
4. Enter your credit card information in the Update Credit Card fields.
5. Click UPDATE.
The service updates your credit card and returns you to the Payments page.
6.3 Cancel a Subscription
You can cancel a service to which you are subscribed. Your subscription will
remain active until your billing date.
1. Click My Account from the Global Navigation menu in the upper left
corner if you are not already there.
2. Click Payments in the side menu.
3. Locate the service in the list and click Unsubscribe for that service.
4. Click OK in the unsubscribe confirmation window.
The service displays the canceled subscription and indicates the date through
which it is paid.
6-4 Subscription Payments7. My Profile Tab
The MY PROFILE tab in the Bid Express service contains your Bid Express
subscription information and a way to manage your National Institute of
Governmental Purchasing (NIGP) codes.
You will also see the names and roles of employees with Bid Express accounts.
Only managers can change the roles of the users. It is recommended that every
business have at least two managers.
Figure 7-1. My Profile Tab
7.1 NIGP Codes
You can add National Institute of Governmental Purchasing (NIGP) codes to
your profile if you have a monthly subscription to the Bid Express service, if the
Bid Express Vendor Registration Guide 7-1agency sponsors free notifications for vendors, or if the agency sponsors
solicitations. You will receive an email if an agency (or the agency of a
sponsored account) posts a solicitation that includes your selected codes.
7.1.1 Add Codes
1. Go to the MY PROFILE tab if you are not already there.
2. Click MANAGE CODES in the Codes section. The Bid
Express service displays the Manage Codes window.
3. Enter the code class in the Choose a class field or
click the arrow to select the class from the list.
4. Enter a code in the Choose a code field or click in the
field to select the code from the list.
5. Keep entering codes for the selected class until you
are finished.
6. Click SAVE when all codes have been added.
7. Repeat the process to add more classes and codes.
The NIGP codes will be added to your business.
7.1.2 Delete Codes
1. Go to the MY PROFILE tab if you are not already there.
2. Click the X for the code you wish to delete.
3. Click OK in the Delete Confirmation window
7-2 My Profile Tab7.2 Users
As the manager of a Bid Express account, you have the ability to assign roles to
members of your business. These roles are different than the roles assigned for
account activation.
Figure 7-2. User Roles
Each role has its own security and available accessibility throughout the Bid
Express site.
Role Abilities
Manager Can assign roles, purchase subscriptions, edit business
information, select a solicitation for bidding, create, edit,
withdraw, or submit bids. This role must have a Digital ID if
working with owner-agencies that require Digital IDs.
Bidder Can select a solicitation for bidding, create, edit, withdraw,
or submit bids. This role must have a Digital ID if working
with owner-agencies that require Digital IDs.
Executive Has read-only access to everything, but cannot edit
Manager anything.
1. Click the MY PROFILE tab if it is not already selected.
2. Scroll to the User section. Use the drop-down list to select the
appropriate role for each employee.
Bid Express Vendor Registration Guide 7-3 Note: If you created the business, you are automatically assigned
the role of Manager. Your role cannot be changed unless it is by
another manager. If you are invited to join the business, you are
automatically assigned the role of executive manager. The manager
can change your role.
7-4 My Profile TabVendor Training Guide October 2020
Address: 2970 SW 50th Terrace, Gainesville, Florida 32608-5076
Web: www.infotechinc.com
Customer support is available by phone or email Monday through Friday from 7:00 A.M. - 8:00
P.M. Eastern Time, excluding legal holidays and when posted.
Contact
By mail:
Infotech Doc Express Toll free phone:
2970 SW 50 Terrace (888) 352-2439, option #4
Gainesville, FL 32608-5076 Email: support@docexpress.com
Bid Express Toll free phone: By Fax:
(888) 352-2439, option #1 (888) 971-4191
Email: support@bidexpress.com
Appia Toll free phone: Suggestions/ideas/general input:
(888) 352-2439, option #2 feedback@bidexpress.com
Email: appia-support@infotechfl.com
Appia, the Appia logo, Bid Express, the Bid Express logo, Doc Express, the Doc Express logo,
and Info Tech are registered service marks of Info Tech, Inc. Infotech, the Infotech logo, Infotech
Consulting, and the Infotech Consulting logo are trademarks of Info Tech, Inc.
Copyright © 2020, Info Tech, Inc., DBA Infotech. All rights reserved. This document or parts thereof
may not be reproduced in any form without written permission of Info Tech, Inc., DBA Infotech.
Produced in the United States of America.Contents
8. Introduction ............................................................................................................ 8-1
8.1 Understanding the Bid Express Service ................................................... 8-2
8.2 Bid Express Home Page .............................................................................. 8-2
8.3 Subscriptions and Payment Information .................................................. 8-3
8.4 Infotech Digital IDs and Electronic Signatures...................................... 8-4
8.5 Help ................................................................................................................. 8-4
8.6 Notices............................................................................................................ 8-4
9. Solicitations and Responses .............................................................................. 9-1
9.1 Sorting and Searching ................................................................................. 9-2
9.2 Agency Notifications .................................................................................... 9-3
9.3 Bidding ........................................................................................................... 9-5
10. Entering Bids or Responses ........................................................................... 10-1
10.1 The Bids Tab .............................................................................................. 10-2
10.2 Bid Components ....................................................................................... 10-2
10.2.1 Grouped Fields .............................................................................. 10-3
10.2.2 Optional or Alternate Components............................................ 10-3
10.2.3 Vendor Component Entry ............................................................ 10-4
10.2.4 Envelope Components ................................................................. 10-4
10.3 Preference ................................................................................................. 10-5
10.4 Q & A ........................................................................................................... 10-6
10.5 Table or Item List Export and Import .................................................... 10-7
i10.5.1 Export All/Import All ..................................................................... 10-7
10.6 Save Draft and Check Bid ....................................................................... 10-9
10.7 Export Draft ............................................................................................. 10-10
10.8 Import Draft ............................................................................................. 10-12
10.9 Submitting the Bid or Response .......................................................... 10-13
11. Withdrawals, Amendments, and Resubmitting Bids or
Responses .......................................................................................................... 11-1
12. Apparent Bids or Responses ......................................................................... 12-1
12.1 Apparent Bids ........................................................................................... 12-1
12.2 View Bid Tab Reports ............................................................................... 12-2
13. Logging Out of the Bid Express Service ..................................................... 13-1
ii8. Introduction
Welcome to the Bid Express service.
Use the Bid Express service to submit bids or requests for information and win jobs,
eliminating the expense and hassle of paperwork and travel. The service does all
computations where extensions are used and alerts vendors to omissions, addenda
and other requirements, producing virtually error-free bids.
The Bid Express service saves the time needed for preparing bids on paper and the
travel time and expense involved in attending lettings and submitting bids in person.
Using your Internet browser, access the Bid Express website at www.bidexpress.com.
Figure 8-1. The Bid Express Login Page
Bid Express Vendor’s Guide 8-18.1 Understanding the Bid Express Service
As a vendor, you can:
Quickly search for opportunities from a variety of owner-agencies
Prepare and send a sealed, secure Bid Express bid or respond to a
request for proposal directly from your Internet browser
Electronically verify bid bonds
View bid-related documents online, including plans
View apparent bid results as soon as they are posted
This information is provided to help you operate effectively and efficiently when using
the Bid Express service.
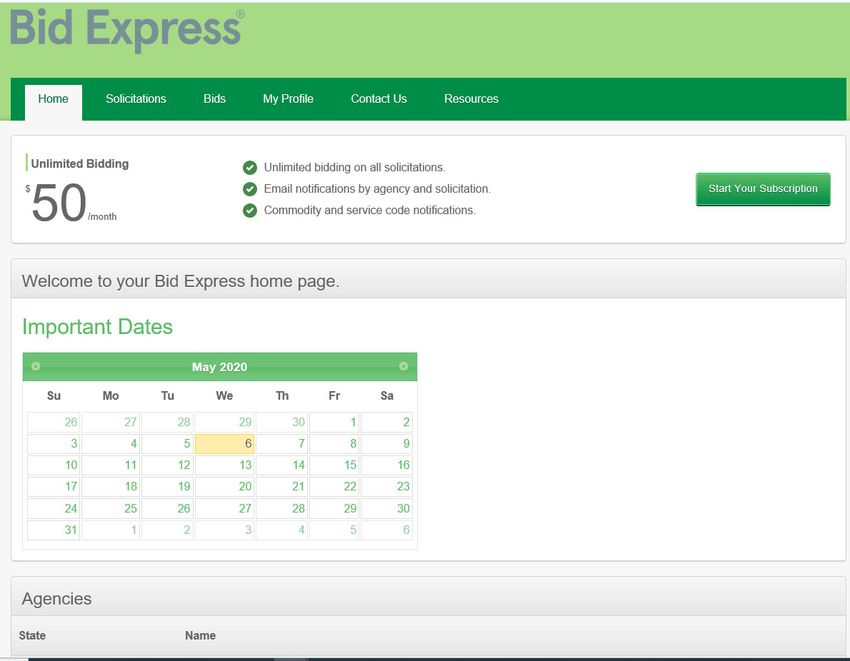
8.2 Bid Express Home Page
Before you can use the Bid Express service, you must log in. After you successfully log
in, the Bid Express service displays the Bid Express home page.
Figure 8-2. Agency Home Page
8-2 IntroductionThe Home page displays options for subscribing to the Bid Express service and a
calendar of important dates.
You will also see list of agencies that have registered with the Bid Express service.
Click on an agency name to see the agency's general information.
The three short lines in the upper left corner is the Global Navigation menu. Click this
icon to access other services or your account information. You can also use this menu
to log out of the Bid Express service.
Exercise 8-1
In the following exercise you will log on to the Bid Express service.
1. Go to http://www.bidexpress.com.
2. Click LOGIN.
3. In the Email field, type the email address you used when you registered for a
Bid Express account.
4. In the Password field, type your password.
5. Click the LOG IN button.
8.3 Subscriptions and Payment Information
If your business has not yet signed up for a monthly subscription to the Bid Express
service, you will see the different subscription options when you log in to your Bid
Express account.
For information on monthly subscription or pay-as-you-go options, please see the
Subscription Payments chapter of the Bid Express Registration Guide.
Bid Express Vendor’s Guide 8-38.4 Infotech Digital IDs and Electronic Signatures All solicitations or requests for proposal require either a Digital ID or an electronic signature for verifying authorization to submit the bid. This will be indicated with a banner at the top of the solicitation’s General Info section. If the owner-agency set the solicitation to require an electronic signature, you will need to enter your name when you submit your bid. If the owner-agency set the solicitation to require a Digital ID, you must have a Digital ID created and approved before submitting the bid. If your ID was created before October 2020, you must also install the Sign Tool. The Bid Express service will display a message if you need to complete either of these steps. You should submit all requests for Digital ID approval and activation no fewer than seven days in advance of the anticipated need to use the Digital ID. If you need help, please see the Bid Express Registration Guide or contact customer support. 8.5 Help After logging in, click Help in the lower right corner to access the knowledge center for the Bid Express service. Enter the topic you need help on and select the suggestion that fits your need. Once you select a topic, you can click the arrow in the upper right of the list to access the entire help system. When you are finished, return to the Bid Express service by selecting the tab in your browser. 8.6 Notices You will receive a notice when the customer support team has information to share, such as holiday hours or an update on inclement weather. 8-4 Introduction
When there is a new notice, a number displays in the bell icon at
the top of the page. The notice is also shown in the software.
Red notices have a high priority. Yellow ones have a medium
priority. Blue ones are low priority. Click the X to delete the notice
from the page.
Figure 8-3. Notices
Click the Bell icon to open the Notices page.
Figure 8-4. Notices Page
Use the product filter to see notices for a specific product.
When you are finished, return to your service through the Global
Navigation menu.
Bid Express Vendor’s Guide 8-58-6 Introduction
9. Solicitations and Responses
When you are finished with this section, you should be able to:
Sort the solicitations by number or deadline
Search for a solicitation
View solicitations details
Add yourself to the plan holder list
Select a solicitation for bidding
Unless otherwise noted, the actions you take when preparing a bid for a solicitation
can also be taken when you prepare a response to a Request for Proposal (RFP).
The Bid Express service is designed for you to view solicitations before deciding upon
which ones to bid. Although many owner-agencies have different workflow and
business rules, there are many common functions that apply to all participating
owner-agencies.
Click the SOLICITATIONS tab to view available solicitations.
Bid Express Vendor’s Guide 9-19.1 Sorting and Searching
When owner-agencies advertise a solicitation, it displays on the Solicitations tab.
Figure 9-1. Solicitations Tab With Advanced Search
The solicitation number and description are displayed, as is the deadline and the
name of the owner-agency that created the solicitation.
The Free tag indicates no subscription to the Bid Express service is needed to bid on
the solicitation.
Solicitations can be sorted by the solicitation number or deadline. In addition, you can
use the simple search feature to filter solicitations by owner-agency, solicitation
number, NIGP codes, and description.
Use the advanced search by clicking the three horizontal lines under the Search field.
You can search by a deadline date range and by the status of a solicitation. The
advanced search builds on any terms entered in the simple search field. For example,
if you enter an owner in the simple search field and then use the advanced search to
find open solicitations, the Bid Express service will display open solicitations only for
the owner in the simple search field.
Click Reset Search to clear all the search criteria and return to the full list of
solicitations.
9-2 Solicitations and ReponsesExercise 9-1
In the following exercise you will sort the solicitations by number and deadline, filter
by owner-agency, and search for solicitations in a date range.
1. Log in to the Bid Express service.
2. Select the SOLICITATIONS tab.
3. Click Number at the top of the solicitation list.
4. Click Deadline at the top of the solicitation list.
5. Enter the name of an owner in the Search field and press ENTER.
6. Click the three horizontal lines under the Search field.
7. Enter the beginning date and time of the deadline date range in the first
Deadline Date Range field.
8. Enter the end date and time of the deadline date range in the second Deadline
Date Range field.
9. Click SEARCH.
9.2 Agency Notifications
When you are on the SOLICITATIONS tab, click a name in the Owner column to navigate to
the Owner-agency’s home page to view general information, standard documents
used by that owner-agency, a list of upcoming solicitations, and a list of closed
solicitations.
You can receive email notifications whenever the selected owner-agency advertises or
withdraws any solicitation. You can subscribe to notifications only if you have a
monthly subscription to the Bid Express service, if the agency sponsors free
notifications for vendors, or if the agency sponsors solicitations. Only those in your
Bid Express Vendor’s Guide 9-3business who have specifically signed up for an owner-agency’s notifications will
receive them.
Click the enable notifications link to subscribe.
To remove yourself from the notifications, select the disable notifications link.
When you select a solicitation for bidding, you and all approved members of your
business automatically receive notifications when:
An amendment is issued
The date is changed for the questions and answers deadline
A solicitation is withdrawn
A withdrawn solicitation is re-advertised
Your bid or response is submitted, withdrawn, or resubmitted
Public documents are posted for a closed solicitation
Apparent bids are posted
Figure 9-2. Enable Owner-agency Notifications
9-4 Solicitations and Reponses9.3 Bidding
Select that solicitation number from the list on the SOLICITATIONS tab to see the
solicitation details page.
Figure 9-3. Solicitation Details
Review the details of the solicitation and whether it uses a Digital ID or electronic
signature. You can add yourself to the plan holders list if you wish. This enables you
to get plan holder notifications for this solicitation without selecting it to bid. You will
not see this option if the agency adds users who download attachments to its plan
holder list. The owner-agency may post the plan holders list at any time.
The owner-agency may also give you the option to ask questions about the solicitation
before selecting it for bidding (see Section 10.4).
Once you decide you want to bid on the solicitation, click SELECT FOR BIDDING or
RESPOND. From there, you will be taken to the payment options if you have not yet
subscribed to the Bid Express service (please see the Payments chapter of the Bid
Express Vendor Registration Guide). If you have, the solicitation moves from the
SOLICITATIONS tab to the BIDS tab.
If you do not see the SELECT FOR BIDDING or RESPOND button, then the solicitation has
been restricted by the owner-agency to only invited vendors.
Bid Express Vendor’s Guide 9-5Once you select and pay for a solicitation for bidding, you can submit a bid even if your
subscription ends before the bid deadline.
Exercise 9-2
In the following exercise you will view the details of a solicitation, add yourself as a
plan holder, and select the solicitation for bidding.
1. Log in to the Bid Express service if necessary.
2. Select the SOLICITATIONS tab.
3. Click the number of the solicitation you chose for bidding.
4. Click ADD TO PLAN HOLDER LIST.
5. Read the solicitation details, scrolling down the page as necessary.
6. When you are finished, click SELECT FOR BIDDING.
Note: If this is the first time you’ve bid on a solicitation, you will have to pay for a Bid
Express subscription or select the Pay as you go option.
9-6 Solicitations and Reponses10. Entering Bids or Responses
When you are finished with this section, you should be able to:
Open a solicitation
Lock the solicitation header
Enter unit prices and other bid components
Ask the owner-agency a question
Export and Import a Table or Item List
Save a draft of your bid
Export and Import Draft Bid
Check the bid
Submit the bid
Unless otherwise noted, the actions you take when preparing a bid for a solicitation
can also be taken when you prepare a response to an RFP.
Bid Express Vendor’s Guide 10-1You can also read