Actifio Sky On-Premises Deployment Guide
←
→
Page content transcription
If your browser does not render page correctly, please read the page content below
Actifio Sky On-Premises
Deployment Guide
Updated April 19, 2022

                         Actifio GO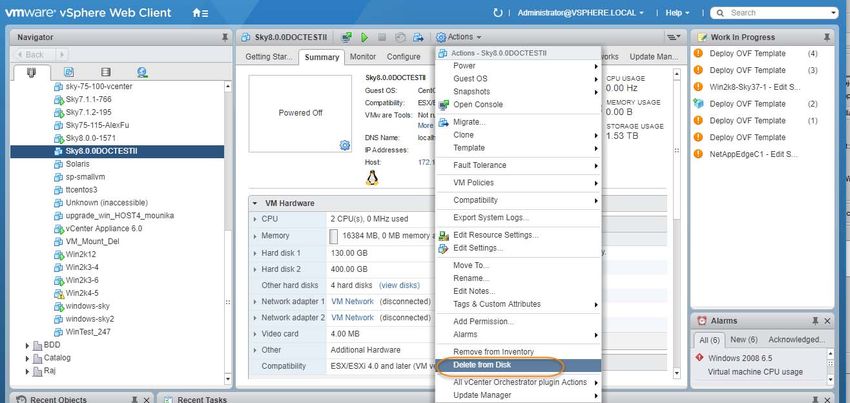
Copyright, Trademarks, and other Legal Matter
     Copyright © 2021 Google LLC. All rights reserved.
     Actifio™, OnVault™, and VDP™ are trademarks of Google LLC.
     All other brands, product names, goods and/or services mentioned herein are trademarks or property of their
     respective owners.

ii                                                                      Actifio Sky On-Premises Deployment Guide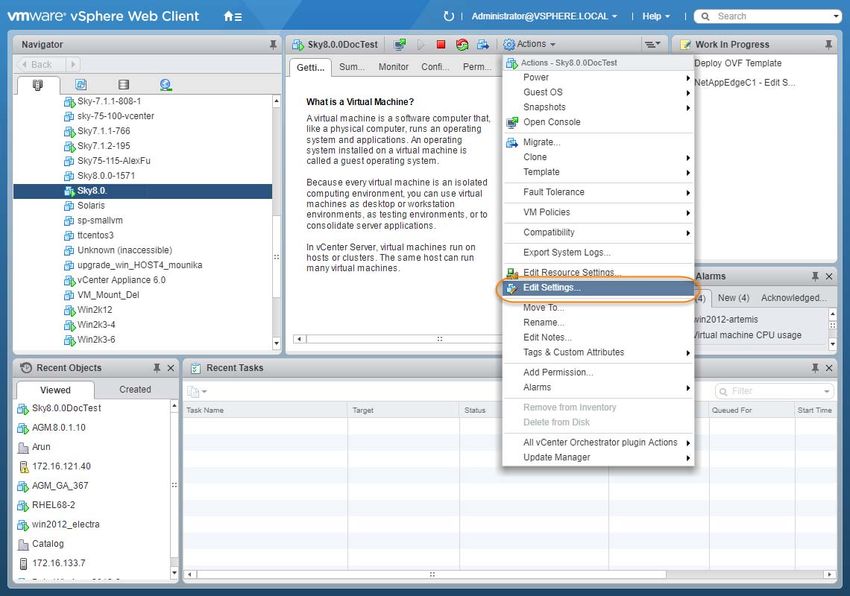
Contents

Chapter 1 - Requirements for Installing an Actifio Sky Appliance on VMware ........................................................................... 1

       vSphere Server Requirements ...................................................................................................................................................................................................................................... 1

              Sky Appliances on Licensed/Unlicensed vSphere Host ....................................................................................................................................................................................................... 1

              vSphere Host Power Management Off...................................................................................................................................................................................................................................................2

              vSphere NTP............................................................................................................................................................................................................................................................................................................................2

       Actifio Sky Appliance Memory Requirements............................................................................................................................................................................................3

       Actifio Sky Appliance Storage Requirements............................................................................................................................................................................................ 4

       Actifio Sky Appliance Networking Requirements.................................................................................................................................................................................. 5

Chapter 2 - Actifio Appliance VMware vSAN Requirements ........................................................................................................................... 7

Chapter 3 - Deploying the Actifio Sky Appliance OVA ...........................................................................................................................................9

       Downloading the OVA........................................................................................................................................................................................................................................................... 9

       Deploying the Sky Appliance OVA.........................................................................................................................................................................................................................10

       Configuring CPUs and Memory ................................................................................................................................................................................................................................12

              Configuring Memory Reservation ..............................................................................................................................................................................................................................................................12

              Configuring CPU Reservation ..........................................................................................................................................................................................................................................................................13

              Configuring CPU Cores Per Socket ............................................................................................................................................................................................................................................................15

       Adding SCSI Controllers .....................................................................................................................................................................................................................................................16

       Adding Disks .................................................................................................................................................................................................................................................................................... 17

       Adding Network Interfaces ............................................................................................................................................................................................................................................18

       Worker Thread Errors.............................................................................................................................................................................................................................................................18

       Turning the Balloon Driver Off.....................................................................................................................................................................................................................................19

       Deleting an Actifio Sky Appliance VM................................................................................................................................................................................................................21

Chapter 4 - Configuring an Actifio Sky Appliance .................................................................................................................................................. 23

Appendix A - Adding and Configuring Additional Network Interfaces ........................................................................................... 25

       Adding a New Network Adapter.............................................................................................................................................................................................................................25

       Configuring a Sky Appliance VM Network Adapter..........................................................................................................................................................................27

Chapter B - Enabling Actifio GO Billing for On-Premises Deployments ......................................................................................... 29

       Before You Begin ...................................................................................................................................................................................................................................................................... 29

       Configuring Consumption Billing for On-Prem AGM .....................................................................................................................................................................30

       Checking the Consumption Billing System Alerts...............................................................................................................................................................................31

             | actifio.com | Actifio Sky On-Premise Deployment Guide                                                                                                                                                                                                                                                                                     iii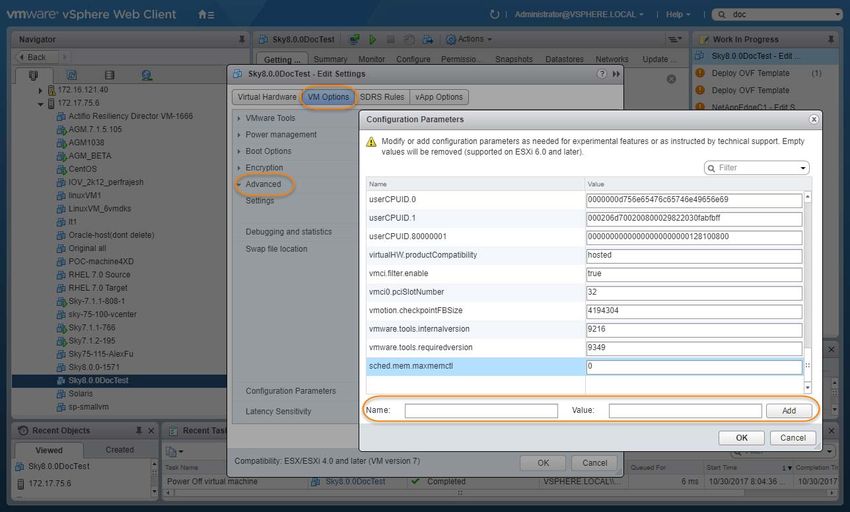
iv Actifio Sky On-Premise Deployment Guide | actifio.com |

1 Requirements for Installing an
  Actifio Sky Appliance on
  VMware
The following sections provide the requirements for installing an Actifio Sky Appliance on a VMware
server:
    •     vSphere Server Requirements on page 1
    •     Actifio Sky Appliance Memory Requirements on page 3
    •     Actifio Sky Appliance Storage Requirements on page 4
    •     Actifio Sky Appliance Networking Requirements on page 5

vSphere Server Requirements
An Actifio Sky Appliance must be installed on a vSphere server configured specifically for a Sky Appliance.
Ensure the vSphere host has sufficient memory and CPUs/Cores reserved to accommodate your Actifio
Sky model. See Actifio Sky Appliance Memory Requirements on page 3 for details.
Do not share the Actifio Sky Appliance’s resources with other VMs. See the A VMware vCenter
Administrator’s Guide to Actifio GO section on Permissions.

Sky Appliances on Licensed/Unlicensed vSphere Host
If an appliance is installed on an unlicensed (free) vSphere host, the Policy Templates for that Sky
Appliance CANNOT capture other VMs and applications installed on that vSphere host.
If an appliance is installed on an unlicensed (free) vSphere host, the Policy Templates for that Sky
Appliance CAN capture and access VMs and applications on licensed vSphere hosts and applications on
physical servers.
If an appliance is installed on a licensed vSphere host, the Policy Templates for that Sky Appliance CAN
capture VMs and applications on the vSphere host on which the Sky Appliance is installed. Policy
Templates for that Sky Appliance can also capture VMs and applications on other licensed vSphere hosts
and applications on physical servers.

                                                                                                              1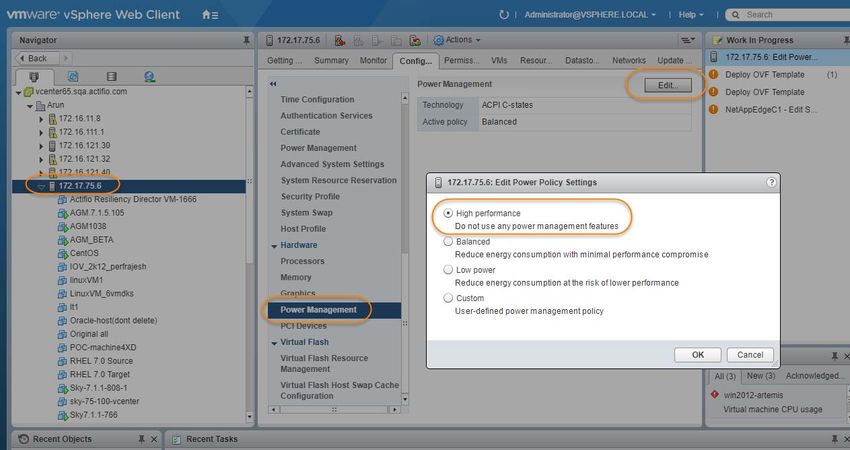
vSphere Host Power Management Off
Power management can interfere with the operation of a Sky Appliance. Ensure that power management
for the ESX host is set to High Performance.

vSphere NTP
Do not use VMware Tools periodic time synchronization for the Sky Appliance’s VM. Use NTP instead.

2
Actifio Sky Appliance Memory Requirements
This table allows you to compare the requirements and capabilities of Sky models.
                                                   s

     Requirement                                                           Model

                                                          60TB             120TB            200TB

     CPUs required.a                                        4                 6               8

     CPUs required for encryption at rest. a                6                 8               10

     Minimum Reserved Memory                               16GiB            32GiB           48GiB

     Minimum Disk Space for Primary Pool b                                 200GiB

     Minimum Disk Space for Snapshot Pool                                   10GiB

     Required Disk Space for Dedup Pool                                    100GiB

     Maximum VDisks                                                        10,000

       a.     Minimum 2 GHz per CPU. The CPUs must be reserved and the balloon driver must be turned
              off. Any paging or swapping will cause significant performance impact and in some cases
              result in the appliance deadlocking.
       b.     See Actifio Sky Appliance Storage Requirements on page 4. Must be Thick Provision Eager
              Zeroed.

                                                                                                        3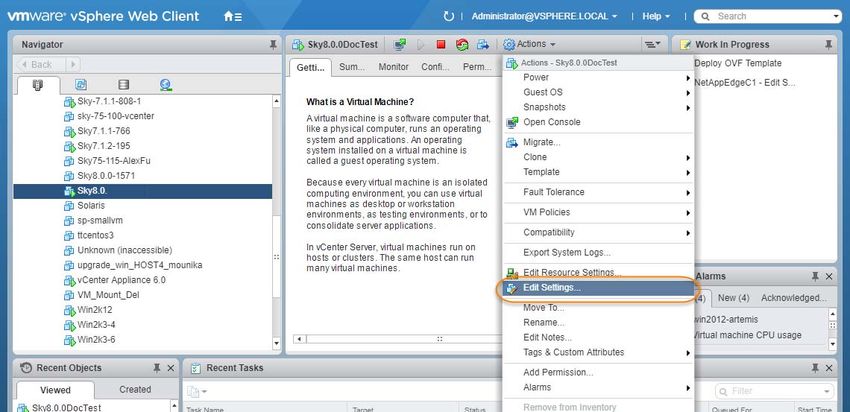
Actifio Sky Appliance Storage Requirements
The Sky Appliance uses three storage pools: Primary Pool, Snapshot Pool, and the Dedup Pool. Each pool
MUST:
    •    Reside on a separate RAID-6 array that supports at least 100 IOPS per disk.
    •    Use 7200 RPM disks, 10,000 RPM disks are preferred.
    •    Have a performance profile of 35 random reads per second per TB with 64KB read size or 10
         random writes per second per TB with 64 KB write size.

         Note: Run the IOPerf tool prior to Sky Appliance installation to ensure adequate performance.
         ActifioNOW contains documentation on how to run IOP.

    •    Use Thick Provision Eager Zero disks.

         Note: Using thin provisioned disks can result in data loss.

To size a Sky Appliance, you must consider the amount of data to be captured, its type, change rate,
growth, and how long it will be retained. These variables and others are considered in the VDP solution
sizing tool.
The sizing tool will recommend how to allocate space for at least three Thick Provisioned Eager Zero
disks:
    •    Primary Pool: One 200 GiB disk used by the Actifio Sky Appliance.
    •    Snapshot Pool: Accommodates the full copies (snapshots) to be retained, plus enough space
         for future growth. A minimum of 10 GiB is required. You can add additional disks in vSphere to
         accommodate growth. The Snapshot Pool requires its own SCSI controller set to VMware
         Paravirtual. See Adding SCSI Controllers on page 16 for details.
    •    Dedup Pool: A minimum of 100 GiB is required. You can add additional disks in vSphere to
         accommodate growth.

         Note: Do not resize disks for Snapshot Pools. If additional storage is needed, add disks.

When creating disks, ensure that the Mode is set to Independent and Persistent.

4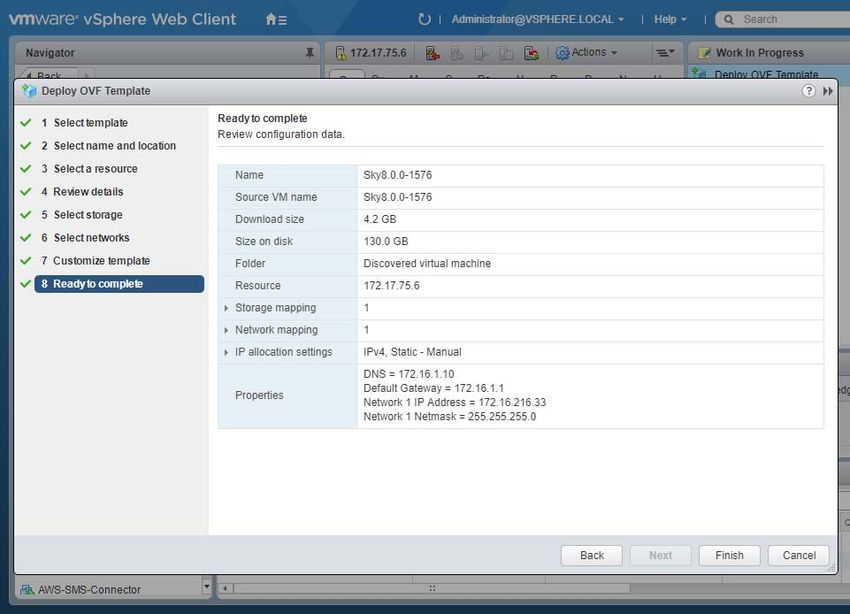
Actifio Sky Appliance Networking Requirements
Sky Appliances require the following network settings:
    •    Static IPs: You must provide static IPs for all NICs on Sky Appliances.
    •    VMXNET3: Sky Appliance models 30, 50, 120, and 200 must use the VMXNET3 Ethernet adapter.
         These adapters enable 10GB performance.
    •    Adding NICs: By default, the Sky Appliance comes with a single NIC. To add additional NICs, see
         Adding and Configuring Additional Network Interfaces on page 25.

Actifio Sky Network Protocol support
Actifio Sky supports storage presentation (as part of backup/recovery and mount operations) over iSCSI
or NFS. The configuration requirements for each of these protocols is detailed below
    •    NFS: As long as you have a network connection from both the Sky Appliance and the vSphere
         host that the VM resides on, all backups and mounts using NFS will proceed normally. You can
         use NFS over your network without configuring iSCSI.
    •    iSCSI: The Sky Appliance uses iSCSI to mount data. Ensure that iSCSI is turned on for the Sky
         Appliance’s vSphere host, and for the servers that host the data the Sky Appliance will capture
         and manage.
         When capturing an entire vSphere VM, iSCSI does not need to be configured on the vSphere
         host that hosts the VM to be captured. Once the VM has been captured, to present the VM to
         another vSphere host, including the vSphere host from which it was captured, the vSphere host
         must have iSCSI configured.
         When capturing individual applications on a VM, rather than capturing the entire VM, iSCSI must
         be configured on the VM’s vSphere host.
         The Snapshot pool and the Dedup pool must each have their own SCSI controller set to VMware
         Paravirtual.

                                                                                                           5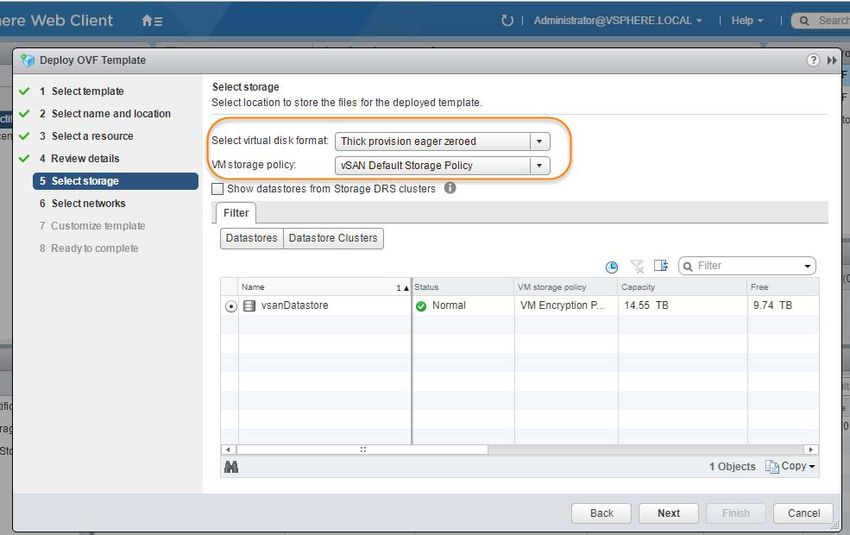
6
2 Actifio Appliance VMware
  vSAN Requirements

If the Actifio Sky Appliance will use VMware’s vSAN storage, then you must consider the VMware vSAN
storage policy used when you deploy the Sky Appliance OVA. The best practice is to use the vSAN Default
Storage Policy.
VMware provides detailed step-by-step instructions on how to create and modify VMware vSAN storage
polices.
   1.    From a vSAN data center’s top bar drop down menu, select Policies and Profiles:

   2.    From VM Storage Policies, either create a new policy or select and edit an existing policy:

                                                                                                          7
3. The vSAN policy sets the rules for fault tolerance (Primary level of failures to tolerate). You must
consider how the fault tolerance settings will impact storage.
A policy with a Primary level of failures to tolerate set to 1 or more will allow the Sky Appliance
fault tolerant operations across the ESX cluster. Setting the value of Primary level of failures to
tolerate to a value of “n” will increase the storage requirements “n” times. For example, if a policy
has 100 GB of storage and a level of 1, then it will require 200 GB of storage.
From the policy editor, set Primary level of failures to tolerate to the required level. Pay attention
to how your setting impacts storage.
4. Make other settings as needed.
5. Click OK and the policy is complete.
83 Deploying the Actifio Sky
Appliance OVA
This chapter provides instructions for deploying and configuring the Sky Appliance Open Virtual
Appliance (OVA) using the best practices detailed in Chapter 1, Requirements for Installing an Actifio Sky
Appliance on VMware.
Deploying the Sky Appliance OVA on page 10
Configuring CPUs and Memory on page 12
Adding SCSI Controllers on page 16
Adding Disks on page 17
Adding Network Interfaces on page 18
Turning the Balloon Driver Off on page 19
Note: At this point the VM must be powered down. Later on, you will power on the VM.
Downloading the OVA
Before you can install a Sky appliance, you must download the OVA file from the portal:
1. Open the dashboard and in the Cloud Production Sky(s) section click Deploy, then select
VMware.
92. Click Download Sky OVA.
Deploying the Sky Appliance OVA
Once you have obtained a copy of the Sky Appliance OVA:
1. From the vSphere web client, select the host for the Sky Appliance VM.
2. From the vSphere web client’s Actions drop-down menu, select Deploy OVF Template.
3. Browse to the OVA file.
4. Complete the deployment like any other OVF template including:
o Enter a name for the Sky Appliance.
o Select the cluster/host to store the Sky Appliance.
105. When selecting storage: Select Thick provisioned eager zero and ensure that the storage
selected has enough room to accommodate the 130 GB OS Volume.
6. If the Sky Appliance uses VMware vSAN (recommended), then select the vSAN policy created for
the appliance’s fault tolerance requirements. See Actifio Appliance VMware vSAN Requirements
on page 7 for details.
7. Select the network for the management interface. For appliances that require multiple
networks, you will add those networks after the Sky Appliance is completely installed.
8. For network settings, enter a static IP, Gateway, DNS, and Netmask. DO NOT use DHCP.
9. Click Next and review your settings:
You can use the Back button to go back and make changes.
10. Click Finish and your Sky Appliance VM will be deployed.
11Configuring CPUs and Memory
Once the VM has been deployed, reserve and configure its CPUs and memory according to your license
requirements. See Actifio Sky Appliance Memory Requirements on page 3 for details.
• Configuring Memory Reservation
• Configuring CPU Reservation
• Configuring CPU Cores Per Socket
Configuring Memory Reservation
1. Select the Actifio Sky VM.
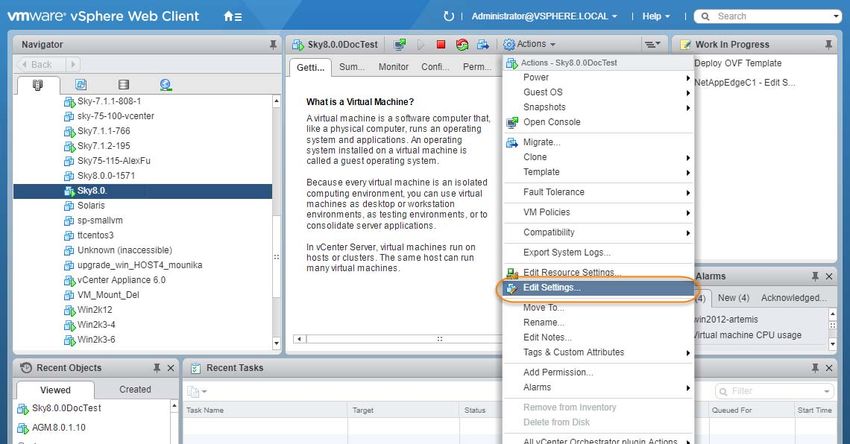
2. From the Actions drop down menu, select Edit Settings. The Edit Settings dialog box is open to
the Virtual Hardware tab:
3. Expand Memory and check Reserve all guest memory (All locked).
124. Select OK.
5. Review the Hardware Summary to ensure you have properly reserved memory.
Configuring CPU Reservation
1. Select the Actifio Sky VM.
2. From the Actions drop down menu, select Edit Settings. The Edit Settings dialog box is open to
the Virtual Hardware tab:
133. Expand CPU, specify the CPU’s reservation value and units.
4. Select OK.
5. Review the Hardware Summary to ensure you have properly reserved CPU.
14Configuring CPU Cores Per Socket
1. Select the Actifio Sky VM.
2. From the Actions drop down menu, select Edit Settings. The Edit Settings dialog box is open to
the Virtual Hardware tab:
3. Expand CPU, click Cores per Socket and select the number of cores from the drop down list.
4. Select OK.
5. Review the Hardware Summary to ensure you have properly reserved cores.
15Adding SCSI Controllers
The Sky Appliance VM requires two disks, each with its own SCSI controller:
• The VM’s operating system and the Primary pool disk can both use the 0:0 controller.
• The Snapshot Pool uses the 1:0 controller. Disks assigned to the Snapshot Pool will use 1:x. The
controller for the Snapshot Pool must be set to VMware Paravirtual.
A controller can accommodate up to 16 disks. If you find it necessary to create more than 15 disks for a
pool, you will need to define a new controller.
To add SCSI controllers as VMware Paravirtual:
1. Select the Sky Appliance VM.
2. From the Actions drop-down menu, select Edit Settings. The Edit Settings dialog box is open to
the Virtual Hardware tab.
3. From the New Device drop down-menu at the bottom of the dialog box, select SCSI controller.
4. Click Add and the options for the SCSI controller are displayed.
5. Expand the options under the New SCSI Controller. Select VMware Paravirtual and then click
OK.
6. Add another SCSI Controller as needed.
7. Click OK to close the Edit Settings dialog box.
Once you have defined the controllers, you can add disks and assign them to their respective controllers.
See Adding Disks on page 17.
16Adding Disks
Once the SCSI controllers are created and are configured, configure the VM’s disks as follows.
Note: The disks defined here will be placed into storage pools later.
1. On the Virtual Hardware tab, select Add:
2. In the Add Hardware dialog, select Hard Disk.
Note: Disks MUST BE THICK PROVISIONED EAGER ZEROED. Thin provisioned disks may cause
capture operations to fail and the loss of data.
3. Your Sky Appliance requires at least three Thick Provision Eager Zeroed disks.
To size your Sky Appliance, you considered the amount of data to be captured, its type, change
rate, growth and how long it would be retained. This same information is required to allocate
space for the Sky Appliance's disks.
o One 200 GiB disk for the Primary Pool. This disk is used by the Sky Appliance.
o One disk for the Snapshot Pool. Allocate enough space to accommodate the full copies
(snapshots) to be retained, plus enough space for growth. A minimum of 10 GiB is
required. You can add additional disks in vSphere to accommodate growth.
o One 100 GiB disk for the Dedup Pool. This disk is used by the Sky Appliance.
Note: The pool names for these disks are used in Configuring an Actifio Sky Appliance.
4. For the disks that will be assigned to the Snapshot Pool from the Virtual Device Node drop down
menu, select the SCSI controller 1:x.
5. Under Mode, check Independent and accept the default of Persistent.
6. Click OK and the disk is configured. Once you have finished configuring all of the disks, you can
power up the VM.
17Note: Do not resize disks for pools. If additional storage is needed, add disks.
Adding Network Interfaces
Once the Sky Appliance is up and running, you can add additional network interfaces. For environments
that require multiple NICs (for example, one NIC for data storage and another NIC for management), you
must manually add network adapters to the Sky Appliance VM and then configure the additional
adapters through the System Management user interface. See Adding and Configuring Additional
Network Interfaces on page 25 for details.
For Sky Appliance network requirements, see Actifio Sky Appliance Networking Requirements on page 5.
Worker Thread Errors
Worker Thread errors such as:
2016-05-26 13:21:39.138 INFO Worker_Thread_Job_0593710 SC6164: Error: 1732: Worker thread
failed: write failed for "\\?\C:\Windows\act\Staging_584181\SPARK CRM04\F_2016-03-
01T211433.vhd": The storage device is unresponsive [0x8003020a]
Indicate either:
• Memory for the Sky Appliance has been incorrectly allocated.
• The bandwidth for the network on which the Sky Appliance resides is consumed by other
devices.
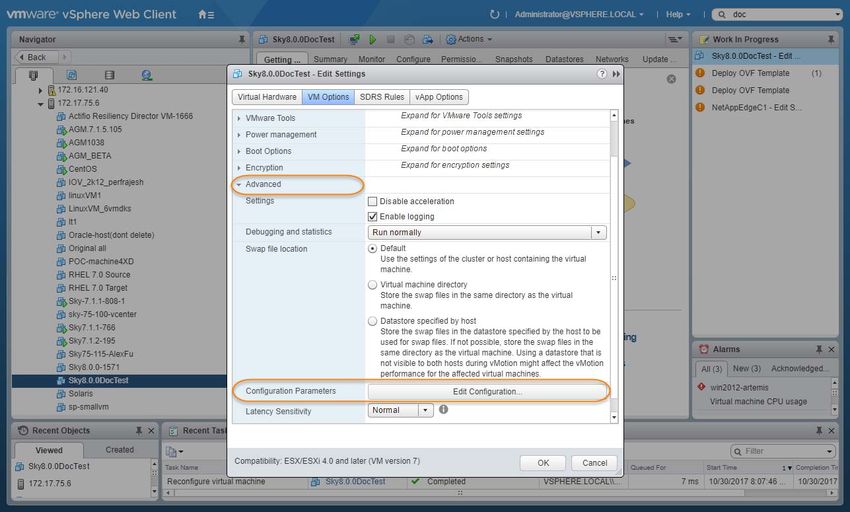
18Turning the Balloon Driver Off
Once the VM has been configured, before you can configure the Sky Appliance, you must power down the
Sky Appliance VM and turn off the Ballooning Driver. The balloon driver must be turned off because any
paging or swapping will cause significant performance impact, and in some cases result in the Sky
Appliance deadlocking.
To turn off the ballooning driver:
1. Log into the vSphere host as a user with administrative rights.
2. Shut down the Sky Appliance.
3. From the Actions drop-down menu, select Edit Settings.
4. Click the VM Options tab.
5. On the left-hand side of the VM Options tab, click Advanced.
6. Click Edit Configuration.
7. In the space provided for Name, enter sched.mem.maxmemctl.
8. In the space provided for Value, enter 0.
9. Click Add. Ballooning is turned off.
1910. Click OK and exit out of the Edit Settings dialog boxes.
11. Power up the Sky Appliance VM and continue on to Chapter 4, Configuring an Actifio Sky
Appliance.
20Deleting an Actifio Sky Appliance VM
To delete an Actifio Sky Appliance VM:
1. From AGM, power down the Sky Appliance VM.
2. From the vSphere Web Client’s left-hand navigation frame, select the Sky Appliance VM to be
deleted.
3. From the VMware Web Client’s Action drop down menu, select Delete from Disk. This option is
only available if the VM is powered down.
4. When you click Delete from Disk, a confirmation message is displayed. Ensure that the VM name
displayed in the confirmation message is the name of the Sky Appliance VM you want to delete.
5. If the name in the confirmation message matches the name of the Sky Appliance VM that you
want to delete, then click Yes and the Sky Appliance VM and its disks will be deleted.
2122
4 Configuring an Actifio Sky
  Appliance

 After the VM is configured and powered up, it is ready to be configured as an Actifio Sky Appliance.

   Note: For the following procedure you will need the IP address of the VM. The VM’s IP is on the VM’s
   vSphere Summary page.

     1.   Open a browser and in the address space, enter the IP of the newly configured Sky Appliance
          VM: http:///.
     2.   The installer opens the first of three tabs:

     3.   If your Sky Appliance will sit behind a firewall, enter the Public IP Address in the spaces provided.
     4.   Ensure that the auto-discovered Sky Appliance IP address is correct.
     5.   In the space provided, enter a name for the Sky Appliance.

                                                                                                             23
6. Ensure that the auto discovered network IP addresses are correct.
7. From the Infrastructure drop down menu, select VMware.
8. Set the time zone as needed.
9. Capture the system UUID and include it in an email license key request for each install to Actifio
Support. Actifio will use the UUID to generate the Sky Appliance license key.
10. In the space provided, paste the license key you obtained from the Actifio representative.
11. Click Validate License to ensure the validity of the license entered.
12. If you are using a Sky model encryption license, a Pass phrase field is displayed. Enter a pass
phrase, record the pass phrase and keep it in a secure location.
13. In the spaces provided create a password for the first Admin user of the Sky Appliance.
14. Click Next, and the Step 2 tab contents are displayed:
15. Select and drag the Available Disks to the pools for which they were created.
16. Click Validate Installation. The Sky Appliance installer validates the settings, and if no issues are
encountered, advances to the third tab. Any issues will appear in a yellow field at the top of the
page 2.
17. The third tab provides the opportunity to review choices and go back to make changes as
needed.
.
18. Once choices are verified, click Complete Installation and the Sky Appliance will reboot. The
reboot may take several minutes. The user interface will become responsive before the
appliance is ready for use. Do not attempt any operations until the Dedup light on the
Dashboard shows green.
24A Adding and Configuring
Additional Network Interfaces
Adding additional network interfaces to an Actifio Sky Appliance requires:
Adding a New Network Adapter
Configuring a Sky Appliance VM Network Adapter
Adding a New Network Adapter
To add a new network adapter to a Sky Appliance VM:
1. In vSphere, select the Sky Appliance VM.
2. From the Actions drop-down menu, select Edit Settings. The Edit Settings dialog box is open to
the Virtual Hardware tab.
3. From the New Device drop-down menu at the bottom of the page, select Network.
254. Click Add.
5. Expand the options under the New Network and ensure it is using the VMXNET3 option.
6. Click OK on the Edit Settings dialog box and the new network adapter is added.
7. Once the network adapter is added, use the System Management user interface to configure
the network. You can reach the System Management user interface from the Actifio Resource
Center (at the IP address of the Sky Appliance).
26Configuring a Sky Appliance VM Network Adapter
The System Management user interface is used to configure Sky Appliance network adapters. You access
the System Management user interface from the appliance’s Actifio Resource Center.
To display the Sky Appliance’s resource page:
1. Open a browser to the Sky Appliance’s Resource Center HTTP:///.
2. Click System & Network Management Login Page.
3. Log in using the Sky Appliance’s administrator credentials, and the System Management
interface is displayed.
4. Ensure that the DNS and NTP settings are correct.
5. Click the IPs and Interfaces tab, and the IP and Interfaces settings are displayed:
276. Click Add and the Configure IP dialog box is displayed:
7. Ensure Type is set to Node.
8. Ensure Node is set to Node0.
9. Select the interface you created on the Actifio Sky Appliance VM. In this example it is eth1.
10. In the spaces provided enter:
o A static IP address
o A network mask
o A Gateway
o MTU (Maximum Transmission Unit) can be used to tune the performance characteristics
of traffic on an interface. There are many dependencies to consider when adjusting the
MTU, as all network devices and servers involved in passing network traffic must support
the specified MTU, and there must be space reserved for protocol overhead. If you are
not sure what value to use, leave this at the default value of 1500.
11. Click Add and the interface is configured.
28B Enabling Actifio GO Billing for
On-Premises Deployments
Your Actifio GO subscription can support consumption billing on multiple AGMs. This tech brief shows you
how to configure consumption billing for your on-prem AGM.
The Billing option appears only for AGM admin users and users with administrator roles. To grant admin
rights, refer to the User Rights and Roles topic in the AGM Online help.
This tech brief includes:
Before You Begin
Configuring Consumption Billing for On-Prem AGM
Checking the Consumption Billing System Alerts
Before You Begin
Before configuring consumption billing, make sure that your support representative has enabled
on-prem billing for your Actifio GO account. Consumption billing for Actifio GO requires AGM to
periodically communicate usage information to the Actifio GO billing service. This requires AGM to be
able to communicate to the billing service on the Actifio GO service side. In order to enable this, ensure
AGM can communicate over port 443 to the following domains:
• www.actifiogo.com
• auth.actifiogo.com
• billing.actifiogo.com
• oauth2.googleapis.com
• storage.googleapis.com
• restricted.googleapis.com
29Configuring Consumption Billing for On-Prem AGM
1. In AGM, click Manage and select Billing from the drop-down menu. The Consumption Billing
Configuration screen is displayed.
2. Enter your Actifio GO credentials in the Actifio GO Username and Actifio GO Password input
fields.
3. Click Register. After the Actifio GO portal credentials are successfully added, a success dialog
box displays.
4. Click Okay.
5. The Consumption Billing Configuration page shows AGM registered details such as AGM ID,
status, and time stamp of the last uploaded data, along with troubleshooting tips.
The Consumption troubleshooting helps to:
o Re-authenticate the communication between the AGM and Actifio GO billing service by
defining the Actifio GO username and password in the Re-Authenticate window.
o Test the configuration between AGM and Actifio GO billing service. Messages will be
displayed based on the status of the configuration - Success or Error.
30Checking the Consumption Billing System Alerts
AGM automatically generates system alerts if the billing data fails to upload. When there is a system alert,
the notification icon turns to orange, and the count of the notification/alert is displayed. Clicking the bell
icon displays the information about the billing alert.
31You can also read