User Guide SMALL BUSINESS ACCOUNTING - Intuit
←
→
Page content transcription
If your browser does not render page correctly, please read the page content below
SMALL BUSINESS ACCOUNTING

User Guide
Welcome to QuickBooks
We're going to help you get paid, pay others, and see how your business
is doing. Use this guide to learn key tasks and get up and running as fast
as possible.

All kinds of help
Help from Intuit and the QuickBooks Community of users is built into
QuickBooks. From the main menu, choose Help > QuickBooks Help.
Visit the QuickBooks Support Website at www.quickbooks.com/helpme
to browse support topics, FAQs or contact an agent (fees may apply).
You can find a local QuickBooks expert by typing in your ZIP code
here: www.findaproadvisor.com.
As your business grows, you may want to add additional users.
You can easily do this from the Help menu by choosing Help >
Manage My License.

ii
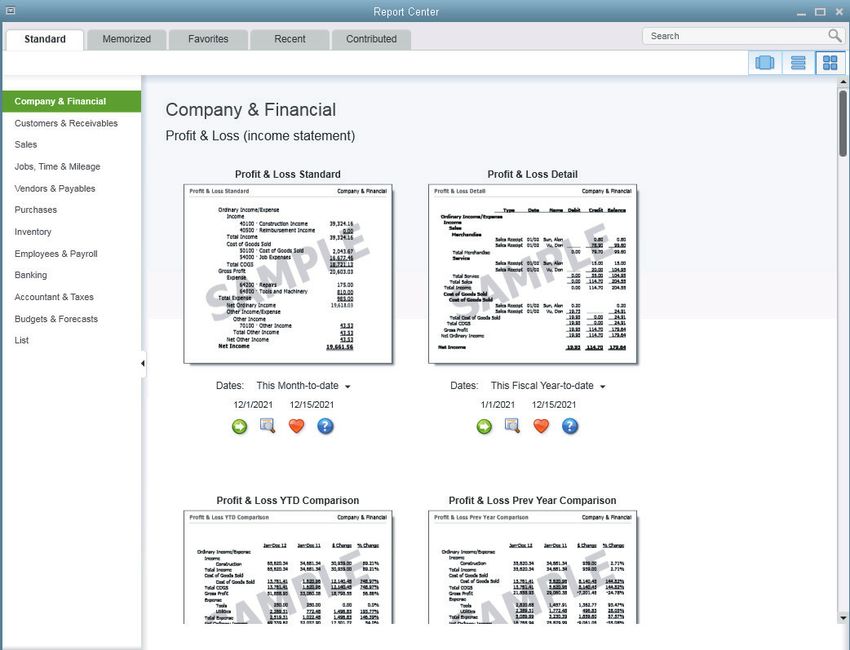
Table of Contents

What’s in this guide

Getting started                                                   2

Getting around                                                    3
  • Using the Home page
  • Using centers
  • Using forms

Everyday tasks                                                    6
  Get paid:                     See how your business is doing:
      • Create sales receipts       • Home Page Insights
      • Create invoices             • Using the Reports Center
      • Receive payments            • Company Snapshot
      • Make deposits               • Profit and Loss
                                    • Balance Sheet
  Pay others:
      • Bill Tracker
      • Write checks
      • Enter bills
      • Pay bills

Keyboard shortcuts                                            19

                                                                      1
Getting started

Getting started
Begin by creating your company file
A QuickBooks company file contains all the financial records for your
business. It’s easy to create using the Setup window, which appears
automatically after you install QuickBooks.
You can also reach this window from the menu by choosing File >
New Company.

                                                    Click here to get started.

Next, add your business info
To save time later, add/import information you'll use often. This includes
the people you do business with, the products and services you sell, and
your bank accounts. No data to enter or import right now? No problem!
You can add it as you work in QuickBooks.

                                            Choose Company > Bulk
                                            Enter Business Details.

2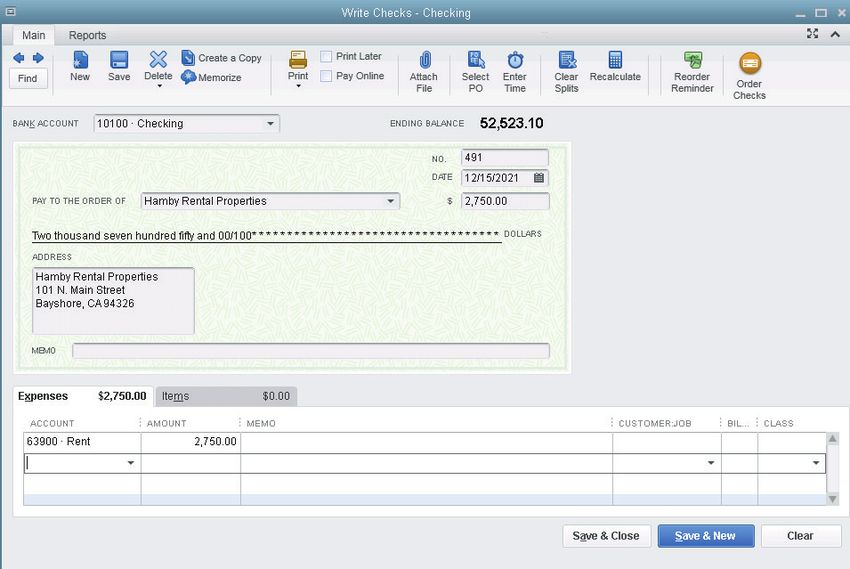
Using the Home page to move around in
QuickBooks
The Home page gives you a big picture
of how your business tasks fit together.
It opens automatically whenever you
open a company file.

                          You can do all your tasks just using the
                          menus. The menus contain the same
                          tasks as the Home page, and more.

The Icon Bar includes shortcuts
to many parts of QuickBooks.
To create your own shortcuts,
click Customize Shortcuts.                            To customize the Home page,
                                                      choose Edit > Preferences >
                                                      Desktop View from the menu,
                                                      and then click the Company
                                                      Preferences tab.

                             Go directly to the centers
                             by clicking on these icons.

                                                                                    3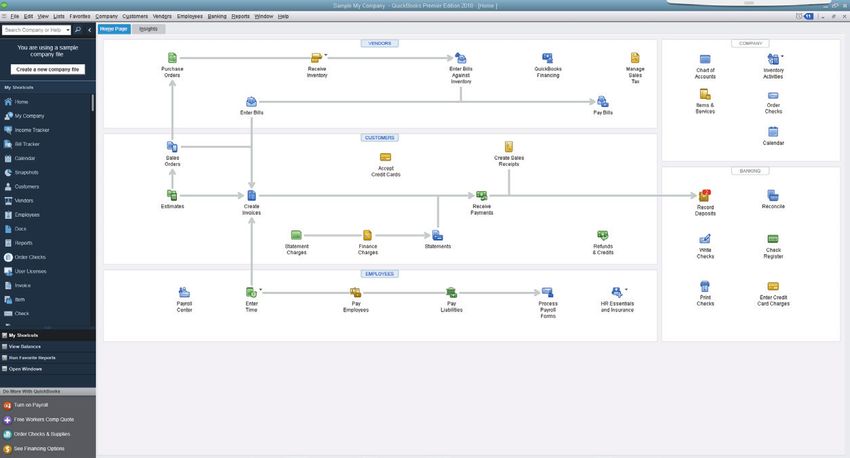
Getting around

Using centers
QuickBooks tracks the people and companies you do business with in
Centers. There is a separate QuickBooks Center for customers, vendors,
and employees. Use the centers to manage and view all information
and transactions associated with customers, vendors, and employees.
All of the centers work the same way. We’ll use the Customer Center to
show you how they work.

    QuickBooks lists the
                                      Click here to see all transactions
    names in the center here.
                                      associated with these names.

        When you click on a name                   Click here to edit the
        to the left, their details                 name's information.
        show up here.

4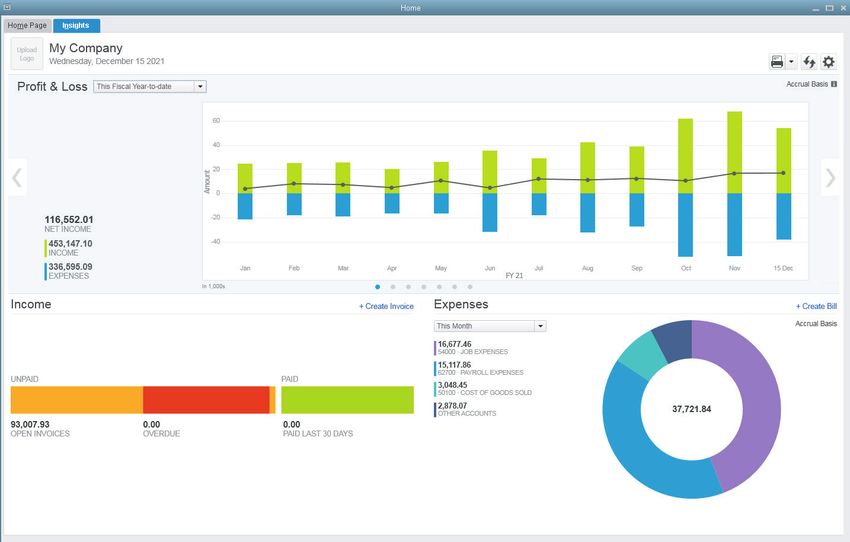
Using forms
All of your everyday QuickBooks tasks, like invoicing, paying bills,
and writing checks, are done on forms. You can reach every form in
QuickBooks from the Home page or the menus. We’ll use an invoice
to show you how forms work.

 Use these arrows or the Find               Click the tabs on this ribbon to
 button to look for invoices                find everything you need to do
 you've already entered.                    on a form.

  If you see an arrow, click it to
  select from a list. If you don’t see   Click here to save your
  what you need, select Add New.         work on a form.

                                                                               5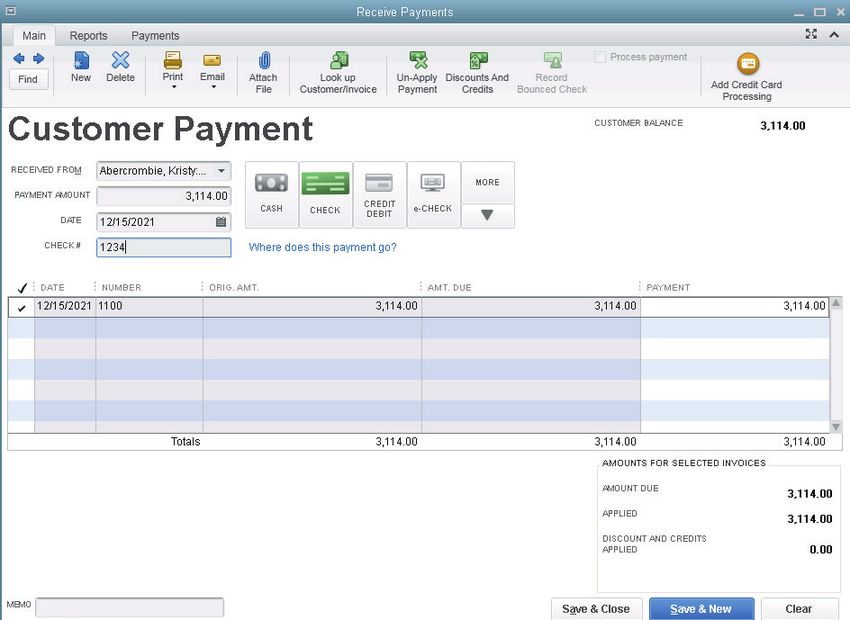
Everyday tasks

Get paid:
There are 2 main ways to record sales in QuickBooks. If your customer
pays in full, use a sales receipt. However, if they still owe you money for
the sale, use an invoice instead.

Create sales receipts
Use a sales receipt if customers pay you in full at the time of sale.
To start, go here: Customers > Sales Receipts.

    ❶ Select a customer.                  ❷ Tell QuickBooks what you’re selling.

    ❸ Enter the quantity.   ❹ QuickBooks fills in     ❺ Enter the customer’s
                            the price you entered     payment information.
                            when you set up the
                            item. You can change
                                                      ❻ Print or email the
                            it here.
                                                      sales receipt.

6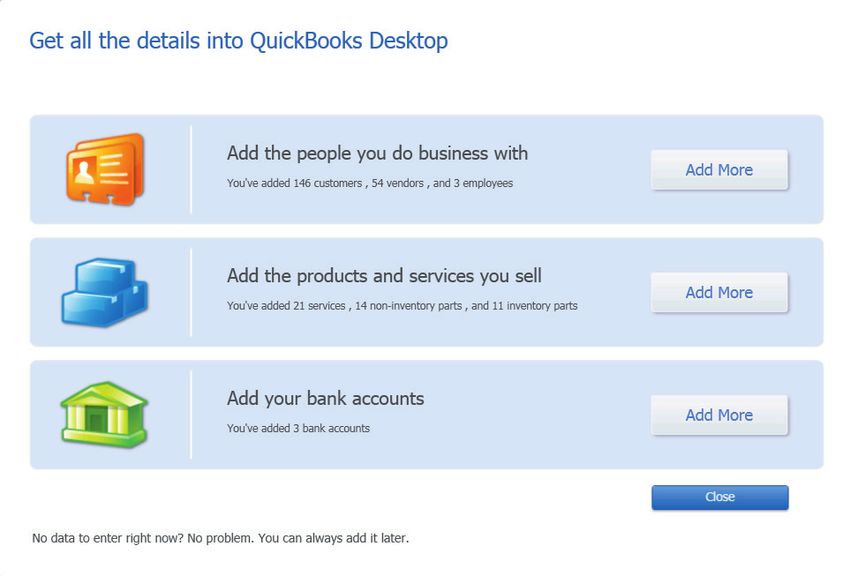
Create invoices
Use an invoice if customers still owe money for the sale.
To start, go here: Customers > Create Invoices.

   ❶ Select a customer.     ❷ Tell QuickBooks
                            what you’re selling.

    ❸ Enter the quantity.    ❹ QuickBooks fills in     ❺ Print or email
                             the price you entered     the invoice.
                             when you set up the
                             item. You can change
                             it here.

                                                                          7
Everyday tasks
Receive payments
When a customer pays you, use the Receive Payments form to apply
it to the right invoice. You don't need to do this if you entered a sales
receipt.
To start, go here: Customers > Receive Payments.
❶ Select a customer. ❷ Enter the amount ❸ Select the payment
the customer paid you. type.
❹ Enter your customer’s ❺ Select the unpaid ❻ Save the payment.
payment information. invoices to apply the
payment to.
8Make deposits
After you record a sales receipt or receive a payment for an invoice,
tell QuickBooks where to deposit the money. The deposit you record in
QuickBooks should match the actual deposit you make at the bank. It
may include multiple payments or sales receipts for the day.
To start, go here: Banking > Make Deposits.
QuickBooks first lists any undeposited payments and sales receipts. If this window
doesn't open, you don't have any undeposited funds. Continue with step 2.
❶ Select the payments ❷ Select the bank account you
to deposit and click OK. want the money to go into.
❺ Save the
deposit.
❻ Enter
any cash
back
received
when
❸ Enter any additional ❹ Print a deposit slip or depositing
money to deposit. summary for your records. to the bank
9Everyday tasks
Pay others:
In QuickBooks, you track purchases in the Write Checks, Enter Bills, or
Enter Credit Card Charges windows.
• If you use a debit card, ATM, or electronic fund transfer (EFT), use the
Write Checks window to record the purchase.
• To track how much you owe, use Enter Bills. When you’re ready to
pay the bill, use the Pay Bills window (not the Write Checks window).
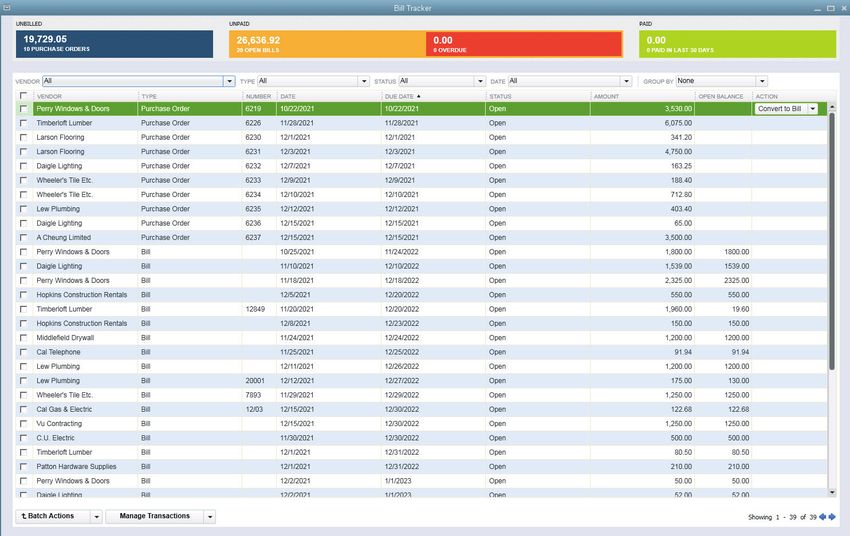
Bill Tracker
Keep on top of all your vendor-related expenses.
To start, go here: Vendors > Bill Tracker.
Click here to group by vendor
Click any colored bar to see and quickly see how much you
only the expenses you want. owe a particular vendor.
Click here to save time by processing
multiple expenses at once. Click here to take immediate action
on the selected expense.
10Write checks
Use the Write Checks window to record checks you print or write, ATM
withdrawals, debit card purchases or electronic fund transfers (EFT). Don’t
use the Write Checks window to pay bills you entered or create paychecks.
To start, go here: Banking > Write Checks.
❶ Select the bank ❷ Select the ❸ If you don't want to print this
account where the payee. check later, uncheck Print Later
money is coming from. and then enter the number of a
handwritten check.
❹ Select an account to tell QuickBooks
what you bought. If you bought ❺ Enter the amount
inventory, use the Items tab instead. of the check. ❻ Save the check.
11Everyday tasks
Enter bills
To track how much you owe, use the Enter Bills window. Entering and
paying a bill is a two-step process:
❶ Enter the bill using Vendors > Enter Bills
❷ Pay the bill using Vendors > Pay Bills
Start by entering a bill.
❶ Select the vendor ❷ Enter the
you need to pay. amount of the bill.
❸ Enter the terms or due ❹ Select an account to tell ❺ Save the bill.
date, and QuickBooks will QuickBooks what you bought.
remind you when the bill If you bought inventory, use
is due. the Items tab instead.
12Pay bills
When you’re ready to pay a bill, use the Pay Bills window.
To start, go here: Vendors > Pay Bills.
❶ Select the bills
you want to pay.
❷ Change the ❸ Select the payment
date if needed. method and account.
❹ QuickBooks shows you how
much you have left in your account ❺ Click here to
if you pay the selected bills. pay the bills.
13Everyday tasks
See how your business is doing
Home Page Insights
Use Home page Insights to see exactly how your business is doing.
To start, click the Insights tab at the top of the Home page.
Place your cursor over any colored area Click the arrows to move between panes.
for a quick look at the numbers, or click to
see a detailed report.
Click the gear icon to choose what
Click here to add your company logo. shows up on this page
Instantly see your open and Track where your money is going and
overdue receivables. Click where you might need to trim expenses.
any colored bar to open the Click a colored section to see more.
Income Tracker for more
detail.
14Using the Reports Center
All of your QuickBooks information can be found, organized, and
presented as a report. QuickBooks has more than 100 reports, and the
Report Center makes it easy to find the right one.
To start, go here: Report > Reports Center.
Choose a type of report. Click these icons to change
how QuickBooks displays
View your memorized and favorite the list of reports.
reports, along with reports contributed
by other QuickBooks users.
Run the report. Read the question Mark the report Get more
this report answers as a favorite. information
about your business. about the report.
15Everyday tasks
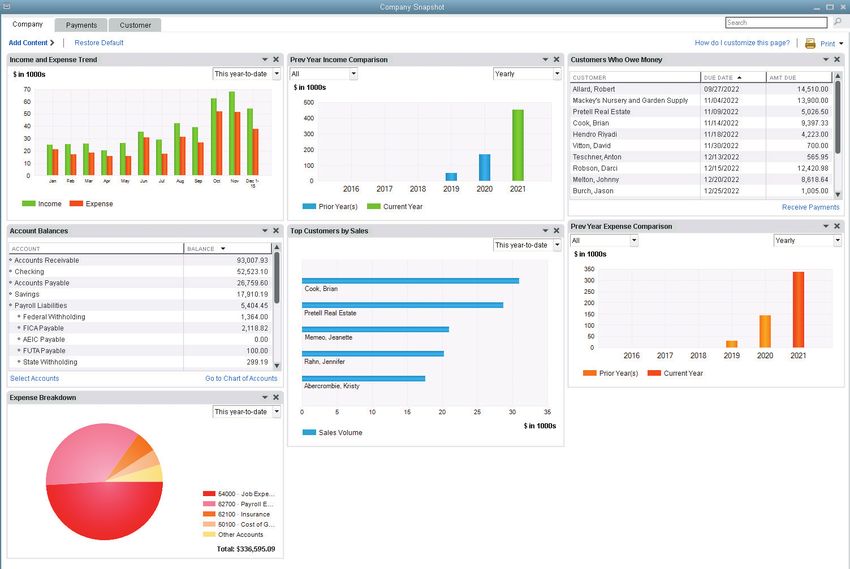
Company Snapshot
Use the Company Snapshot to get real-time company information
and perform tasks from a single place.
To start, go here: Company > Company Snapshot.
This is a snapshot of the money going Click here to learn how to
in and out of your business over time. customize the Company Snapshot.
Use this section to compare monthly
income and expenses.
See what your customers owe you.
Account balances include: all bank, Compare how much you spent this
accounts receivable, accounts year to the same period last year.
payable, credit card, asset, liability,
and equity accounts.
This section shows your top
five customers based on sales
for a given period of time.
16Profit and Loss
This report is also known as an income statement. It summarizes your
income and expenses for a particular period, so you can tell whether
you’re operating at a profit or a loss.
To start, go here: Reports > Company & Financial > Profit &
Loss Standard.
Click here to customize If you’ve customized the report and want to
your report. use it again, click here to memorize the report.
This report shows totals for
each income or expense
account in your chart of
accounts. Double-click
the subtotal to see the
transactions that make up
that amount.
See your net income
(or loss) for the report
period.
17Balance Sheet
This report provides a financial snapshot of your company as of
a specific date.
To start, go here: Reports > Company & Financial > Balance
Sheet Standard.
Assets are everything
your business owns,
including money owed
to you.
Liabilities are
everything your
business owes.
Equity is similar to an
individual's net worth.
It’s what your
company owns
minus what it owes.
18Keyboard shortcuts
General Key Activity Key
To start QuickBooks Create invoice Ctrl + I
without a company file Ctrl (while opening)
Delete check, invoice,
Ctrl + D
To suppress the desktop transaction, or item from list
windows (at Open Company Alt (while opening) Find transaction Ctrl + F
window)
History of A/R or A/P
Display product transaction Ctrl + H
information about your F2 Memorize transaction or
QuickBooks version Ctrl + M
report
Close active window Esc or Ctrl+F4 New invoice, bill, check or list Ctrl + N
Record (when button is blue or a item in context
border surrounds OK, Save and
↵
Open account list Ctrl + A
Close, Save and New, or Record)
Open Customer Center
Record (always) Ctrl + ↵ (Customers & Job list) Ctrl + J
Open Help for active window F1
Dates Key Open list (for current drop-down
menu) Ctrl + L
Next day + (plus key)
Previous day - (minus key) Open memorized transaction
list Ctrl + T
Today T Open split transaction
window in register Ctrl + R
First day of the Week W
Last day of the weeK K Open transaction journal Ctrl + Y
First day of the Month M Print Ctrl + P
QuickReport on transaction
Last day of the montH H Ctrl + Q
or list item
First day of the Year Y QuickZoom on report ↵
Last day of the yeaR R Show list Ctrl + S
Date calendar Alt + ↓ (down arrow) Write new check Ctrl + W
Moving around Key Editing Key
a window
Edit transaction selected in
Next field Tab the list or register Ctrl + E
Previous field Shift + Tab Delete character to right of
Beginning of current field Home insertion point Del
End of current field End Delete character to left of
Line below in detail area insertion point Backspace
Down arrow (↓)
or on report
Delete line from detail area Ctrl + Del
Line above in detail area or Up arrow (↑)
on report Insert line in detail area Ctrl + Ins
Down one screen Page Down Cut selected characters Ctrl + X
Up one screen Page Up
Copy selected characters Ctrl + C
Next word in field Ctrl + →
Previous word in field Ctrl + ← Paste cut or copied
characters Ctrl + V
First item on list or previous
month in register Ctrl + Page Up
Increase check or other
+ (plus key)
Last item on list or next form number by one
month in register Ctrl + Page Down
Decrease check or other - (minus key)
Close active window Esc or Ctrl + F4 form number by one
19© 2018 Intuit Inc. All rights reserved.
STATEMENTS IN THIS DOCUMENT REGARDING THIRD-PARTY STANDARDS OR SOFTWARE ARE
BASED ON INFORMATION MADE AVAILABLE BY THIRD PARTIES. INTUIT AND ITS AFFILIATES
ARE NOT THE SOURCE OF SUCH INFORMATION AND HAVE NOT INDEPENDENTLY VERIFIED
SUCH INFORMATION. THE INFORMATION IN THIS DOCUMENT IS SUBJECT TO CHANGE
WITHOUT NOTICE.
Trademarks and Patents
Intuit, the Intuit logo, and QuickBooks are registered trademarks of Intuit Inc. Other parties’
marks are the property of their respective owners. Features and services within QuickBooks
products may be the subject matter of pending and issued U.S. patents assigned to Intuit Inc.
Important
Terms, conditions, features, service offerings, prices, and hours referenced in this document
are subject to change without notice. We at Intuit are committed to bringing you great online
services through QuickBooks. Occasionally, we may decide to update our selection and change
our service offerings, so please check www.quickbooks.com for the latest information, including
pricing and availability, on our products and services.
20You can also read