Art that Inspires
ART FOR THE CLASSROOM AND BEYOND
←
→
Page content transcription
If your browser does not render page correctly, please read the page content below
Art that Inspires ART FOR THE CLASSROOM AND BEYOND
Art that Inspires
ART FOR THE CLASSROOM AND BEYOND

    Open to students enrolled in Faculty of Education courses, and
    their instructors, this exhibition is a showcase of artifacts of teaching
    and learning which are also works of art. These works represent the
    breadth and depth of media, techniques and ideas explored in courses
    at the Faculty of Education. They reveal the often profound personal,
    technical and professional growth experienced by the artists during
    the creative process. We hope you enjoy the exhibition!
                                   Alan Wilkinson and Angela Solar, Exhibition Curators
Art that Inspires
ART FOR THE CLASSROOM AND BEYOND

    Myka Bélanger              Madelaine Gault               Carol (Xinyue) Liu       Alison Quinn
      Iris Benedikt              Jazz Graham                 Jamie Magerman         Hannah Quinton
    Sonya Ben-Ishai           Jonathan Gysbers            Kate Malenfant-McNeice         Julie Ro
    Alexa Bjerknes             Santina Hughes                   Anisa Malik          Kat Rodrigues
    Angelina Bianco              Alexa Irvine                Derek Manderson             Lilac Toh
     Alyssa Dantes              Natasha Jabre                   Pavit Mann         Julia Van Bommel
    Alicia Debortoli           Aynne Johnston                 Haley Marando             Emily Vilé
                                  (IS Drama Instructor)
  Dominika Dembinski                                            Nina Nissan         Mykelti Whiting
                                  Jane Kerr
  Mark Dickinson (TA Drama)                                 Michelle Nyamekye           Sophia Xia
                              Diana Lawryshyn
    Natalie Fielding                                          Bennett Penner            Dora Yang
                              Delaney Lathigee
       Jamie Fuiza                                              Abby Skene              Julia Yorke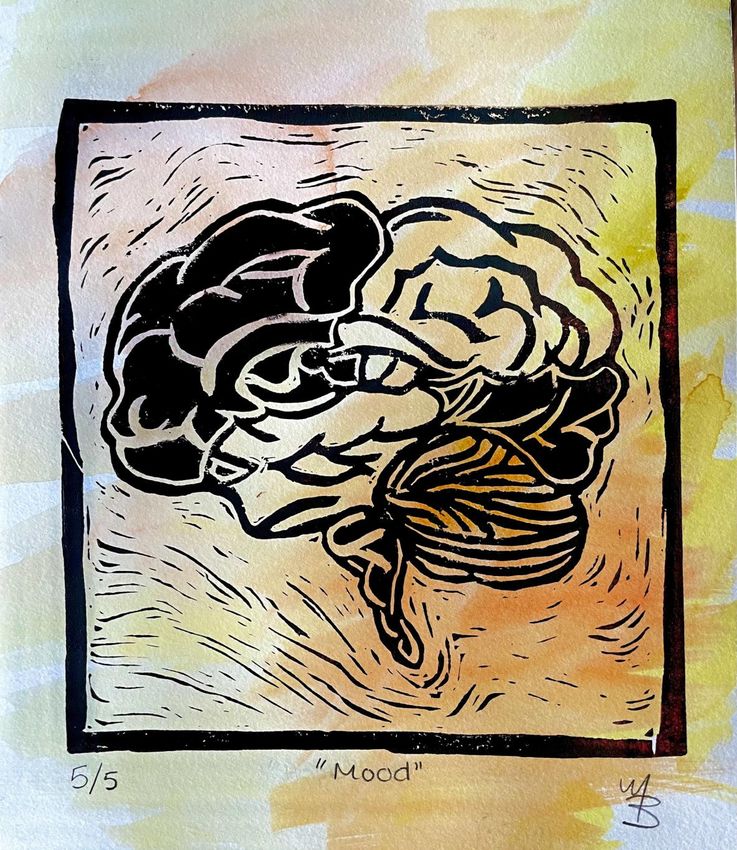
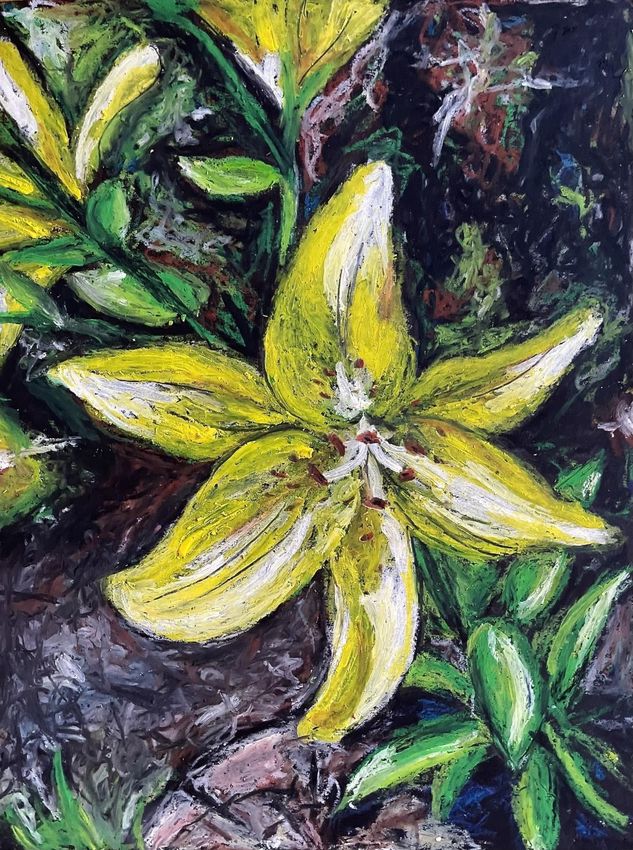
Myka Bélanger

Spring Bloom
oil pastel on card stock
16.5cm x 21.5cm

This painting is the product of a follow-
along video workshop I did on oil
pastel techniques, now posted on
YouTube to demonstrate colour
blending and layering. This painting is
meant to inspire art teachers and
students alike to want to try out oil
pastels. Oil pastels are my favourite
medium for their vibrant colours and
thick layers. My favourite part of
working with oil pastels is the end
where you add thick impasto strokes
to make the painting sparkle. To see
the video workshop click on this link:
https://youtu.be/u8iaKqLtyfU
Myka Bélanger

Dragon Fired
Earthenware glazed
ceramic and acrylic paint
and sharpie marker
finishing.
13cm x 9 cm x 5cm
I decided to make a dragon from
earthenware clay inspired by the name
of the traditional Chinese “Dragon
Kilns” used to fire clay. This dragon
was made using a pinch pot that I
flipped over and squished to form the
body of the dragon. I glazed this
dragon in a two-step process, first
firing an underglaze in a bisque fire
and then firing a coloured glaze to
allow for more solid colours and
combinations. I finished the details of
the dragon by painting the eyes with
acrylic paint and adding fine details
with Sharpies. This dragon could serve
as an example for a pinch pot creature
project to have students think about
sculpting in the round.
Myka Bélanger

Mood
Softoleum print series on
water colour paintings
and black construction
paper
17 cm x 20.1 cm
I made this print series as an exemplar
for my practicum class’s print
assignment. In the assignment I
created, students were asked to create
a print series that represented change
of a subject through the backgrounds
and inks that they used. In this print
series I represent the changes of mood
in the brain from a creative mood, to a
reflective mood, to an agitated mood
to a despondent mood. I did this by
printing on abstract watercolour
backgrounds and a black background
with different ink colours and
combinations including white, black,
black/blue and black/red.
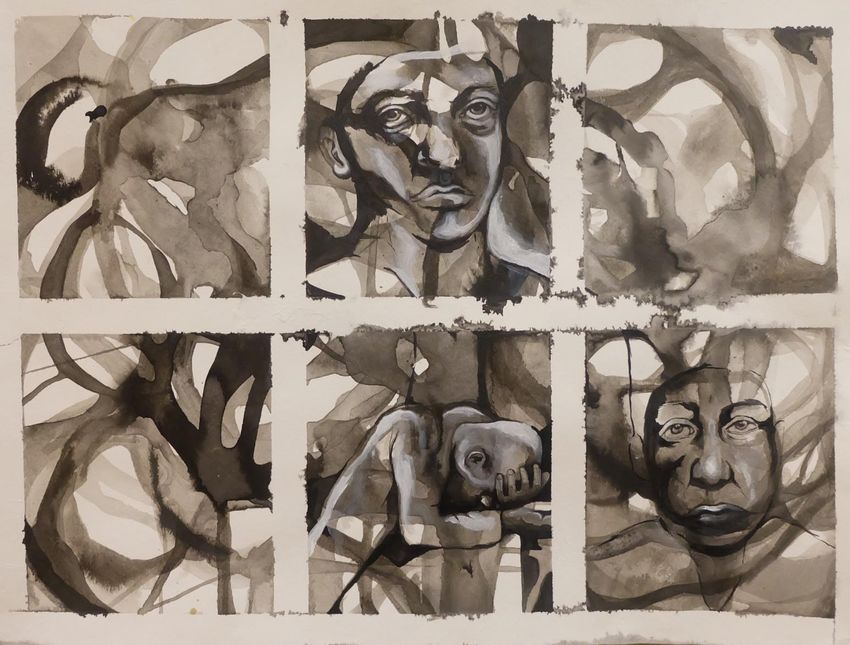
Iris Benedikt

Faces of Stress
Ink on Paper
25”x 17"
This piece was created by first spilling water and
ink onto the paper and gently manipulating
pools of water and ink by responding to gravity,
and the natural shape that the water took on.
The initial technique is a wet-on-wet process
resulting in an abstract image. After the first
layers have dried, I created more controlled
drawings on top of my markings in places that I
saw fit. I chose to create drawings that followed
the lead of the marks that already existed on the
page and chose to express human figures and
faces that represent the stress that I have been
experiencing lately. This art has been helping me
navigate. This technique of free-flowing ink
drawings with an additional layer of more
controlled ink drawing is a method of exploring
ink as a medium that I want to work with
students on. I think this process will allow
students an opportunity to see various ways
they can use the medium, and also allow for
personal expression through the imagery
students decide to include or the feelings that
come up for them in the creative process. I
particularly like this approach since it can give
students a chance to get messy and push
themselves out of their comfort zones. I see this
method as a way to encourage positive mental
health and expression for students, consider the
psychology of art and what we see in
abstraction, or connect them with the water,
land and earth and consider the connection
between the environment and the materials we
use in the studio.
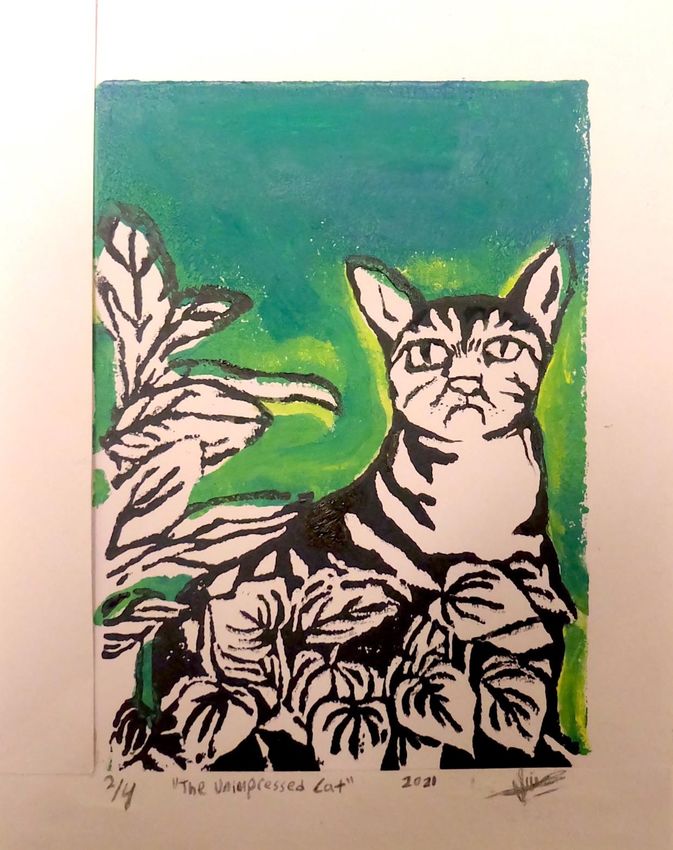
Iris Benedikt

The Unimpressed Cat
Linoleum Print
4” x 6”
This piece is a two-tone linoleum cut print
and was created by using two separate
Linocuts that express positive space and
linework to result in this print. I created this
piece by first doing a drawing on paper, then
tracing the drawing, and doing another
tracing for the negative space where I wanted
the coloured ink and transferring these traces
onto linoleum pieces. After carving into the
pieces, I aligned my paper and printed both
blocks on top of each other to create my two-
tone lino-print. I chose to create an
“unimpressed cat” with plants because that
was something that made me laugh and feel
happy in the moment. I think if I were to
introduce printmaking to students, this
project could be a great initial technical
challenge for students to work on and gives
them a choice of what they would want to
create. I would be interested in potentially
having students create another print later on
that incorporates more intentional messaging
such as a print that expresses a message
around social justice since printmaking has a
strong connection to poster-art, and political
art movements. I could see a linoleum
printing project as being a part of a larger
unit on pop art in general.
Iris Benedikt

Plate of Sushi
Clay
1” x 1” per piece
This piece is my first attempt at working sculpture
that looks like food. I chose to create sushi that I
often eat and have strong memories of returning to
as a comfort food growing up. In addition, I chose
sushi since it is aesthetically pleasing and playful to
create into colourful sculptural pieces. I imagine
that working with students in a classroom, it would
be interesting to have a class work on creating
their own food art that connects to a food that
they have memories of, or that come from an
important part of their personal stories, heritages
or family. This project is a fun way into bringing
students into sculpture and having them create
observational pieces that are also playful and
personal. It also can connect to some practice in
painting and colour theory through the application
of paint on the sculptural works. Additionally, I
would be interested to bring this piece in to larger
conversations around food in art, and food systems
and crises in the world to have students think
intentionally about the foods that they eat and
where their food comes from. It would be
really interesting to have students set up their
work on plates and have a class “feast” as an art
show, where the work is displayed on tables and
plates, and “menus” are drawn up with artists
statements and reflections on food systems,
culture, sharing, community and more.
Alexa Bjerknes

View from the Home
Office
Acrylic Paint on Plexi-glass
5.5” x 6”

Observational drawing using the
drawing glass technique with a direct
application of paint onto glass.
Typically, this technique is used to
translate what a person sees through
the glass onto paper using dry media
(graphite). My process involved
experimenting with the opacity of the
paint, focusing on colour blocking and
outlining or “drawing” what I saw, not
what I thought it should look like.
Drawing is called “mark-making” when
painting.
Alexa Bjerknes

Brody
Watercolour
9” x 12”

Semi-realistic watercolour pet portrait.
My process involved photographing
my grandmother’s dog, uploading the
chosen image to my laptop as a
reference photo, sketching an outline
with defining characteristics on the
watercolour paper, dabbing a
kneadable eraser across the paper to
slightly erase any harsh graphite lines
or lint, and applying my watercolour
paints in layers from light to dark. I
experimented with applying dry brush
techniques for highlights, contrast,
texture, and using a wet-on-wet versus
a wet brush on dry paper process to
achieve different effects.
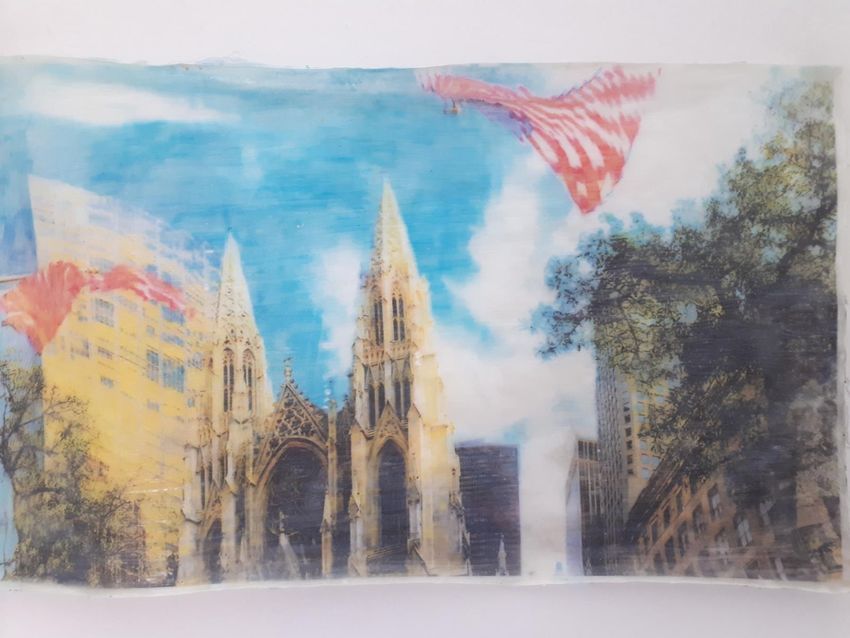
Alexa Bjerknes

A Church in New York City
Acrylic Transfer
8.5” x 14”

Acrylic gel medium applied to an inkjet
print. I selected an image that I had
previously photographed, printed it
using my inkjet printer, applied several
layers of clear, acrylic medium using a
paintbrush to the printed photo, and
dissolved the printer paper in water.
This process resulted in obtaining a
translucent coloured image, on a
textured, flexible, gel surface.
Alyssa Dantes

Nature Mandala
Mixed media
7” x 10”
I gathered the petals and leaves and arranged
them so that the outer circle of petals and
leaves are lively. As the petals get closer to the
center, they begin to decay and in the center is
a completely dried rose. Once arranged, I took
my photographic image. Mandalas are
originally meant to represent the organizational
structure of life itself. A fitting representation
for that structure is the cycle of nature, from
life to death. I believe that this technique could
be used in a classroom because it is an
important skill to know how to take
photographs of art objects. All aspects that go
into consideration are lighting, angles, shadows,
and retouching with edits. Having the capacity
to take digital photographs is a skill that will
serve students throughout their artistic
education, especially if they decide to proceed
into senior art courses. Photographs can elevate
an artwork and it is important to capture the
best possible image.
Alyssa Dantes

Our Story Flowers
Leaves, and poems from “she felt like
feeling nothing” written by r.h. sin
5” x 8”
Inspiration can be tricky. I tend to look inwards and
at personal relationships to inspire my own work. I
also prefer to incorporate text from poems or songs
into my art and an altered book is a great method of
transforming words into a visual artwork. I chose to
accompany the meaning of the text with the
arrangement of the flowers. In the first, “hymn
twenty” the flowers overwhelm page and are
chaotically dispersed and overlapped. In the second,
“scene thirty-three” the flowers on the page are
dried and wilting – this is especially evident in the
roses. In the final, “scene twenty-six”, the tulips have
not fully bloomed and are faced in opposite
directions. Although they are the same type of
flower, they will end up growing apart - heartache
one can experience in a toxic relationship. The
fragile, vibrant and decaying flowers paired with the
sorrowful and yet empowering words creates a
balanced juxtaposition. This process can be used in
the classroom as a book is not necessarily something
that needs to be created from scratch, students can
source the foundation of the artwork quite easily and
draw inspiration from it. Or they can incorporate any
inspiration from their personal lives into their art.
Deeply felt emotions can be powerful and
troublesome, especially for youth, and this presents
them with a healthy, creative outlet.
Alyssa Dantes

Peacock inspired by L7M’s
“Graffiti Birds”
Soft pastel on paper
4’ x 6’
I sourced inspiration from an artist that I
admire, L7M, who typically depicts birds in
a street art style. I sketched out a drawing
of his peacock bird painting and created my
own rendition with slight differences. I
used a variety of coloured soft pastels and
blended them out or sometimes together
or overlapped them, smudged and erased
them. I also did the drawing on quite a big
scale, with the actual drawing being larger
than myself in scale. I believe that this
technique would be useful in the classroom
for multiple reasons. Students should not
be afraid to draw inspiration from existing
artwork and artists, as long as they give
proper credit to their work. One can learn
gain many insights from creating their own
rendition of an artwork. Students will often
work within the style of famous artists, so
this is a good practice for beginners. Doing
this also allows for the opportunity to work
with a medium that a student perhaps has
not used before, like soft pastels, or a
larger scale artwork.
Dominika Dembinski

Mount Currie, Pemberton BC
Ink on paper
8.5” x 11”

This drawing was done based on the
view from an apartment in
Pemberton, just two hours north of
Vancouver. This drawing can serve to
show students that they can find
interesting compositions by drawing
the view from a window. In a class
setting, students could all set up in
front of a found window within their
school, home, etc. and draw what they
see. They could use different drawing
media such as ink, pencil, charcoal,
crayon, etc. to complete their drawing.
Dominika Dembinski

Mount Currie, Pemberton BC
Linoleum print
7” x 6”

This is an example of a simplified
version of the Mount Currie drawing.
Students could use a drawing that they
found successful and recreate it as a
linoleum print. This is a meaningful
activity as students feel comfortable
with the subject matter because they
are recreating something they’ve
already made, but it allows them to
see it in a new way, focusing on
negative vs positive space and
exploring a different medium.
Dominika Dembinski

Saturday Evening
Oil on canvas
9” x 11.5”

This painting is a still life that was set
up from found objects and one light
source: a candle. For an in-class
assignment, students could use found
object from around their home,
classroom, or even nature. These
objects could then be placed in an
interesting way and painted under
candlelight.
Natalie Fielding

Pear Grid Drawing
Graphite and charcoal on
paper
8.5” x 11”

This piece is a drawing of pears
created using a grid-transfer
technique. Observational skills are
fundamental art skills that students
should develop within middle and high
school. This technique is one of many
observational techniques but holds
great value in not only being a method
that allows for students to increase or
decrease the size of a photo and
transfer an image, but in teaching
them to move away from drawing
what they think they see and towards
what they really see.
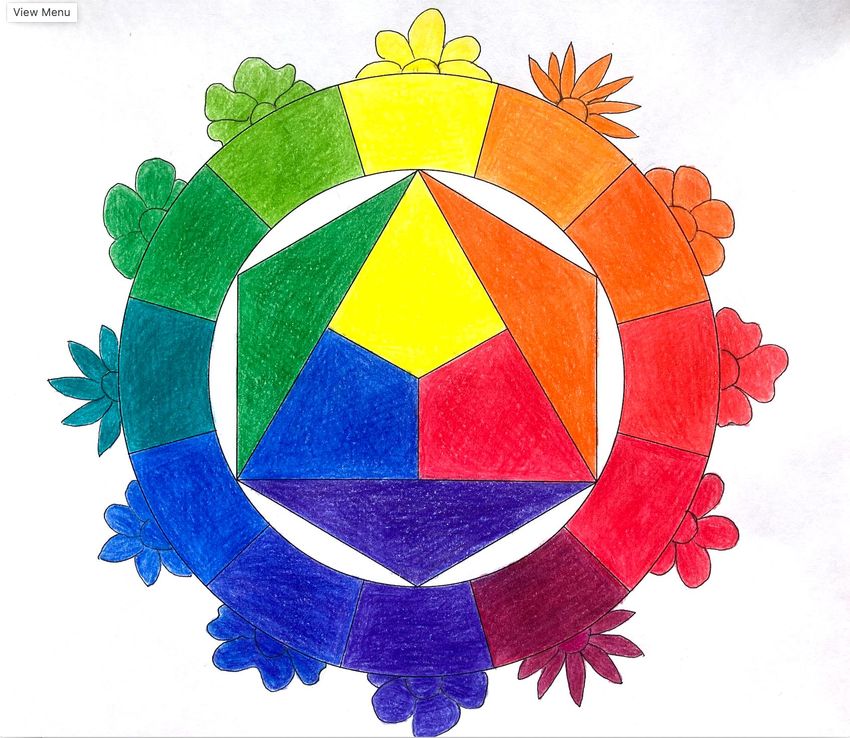
Natalie Fielding

Colour Wheel
Acrylic on paper
8.75" x 8.75", 2D

This piece is a two-dimensional colour
wheel with interchangeable templates
for different colour schemes. The
colour scheme templates include
triadic, complimentary, split-
complimentary, monochromatic, and
analogous (3-5 colours). This piece
could be used as a learning tool for
students. It clearly allows for the
display of a variety of colour schemes
which can be rotated to view any
possible colour combination (within a
12-colour colour wheel) of a colour
scheme.
Natalie Fielding

Colour Sphere
Acrylic, Styrofoam, paper
mâché
12” x 12” x 12”

This piece is a three-dimensional
colour wheel including 12 colours as
well as three tints and three shades of
each colour. This colour wheel not only
teaches students about different
colours, tints, and shades, but shows
them that the colour wheel can be
seen as more of a sphere— with each
colour, regardless of the value,
blending into its neighbour.
Madelaine Gault

Tropical Fish
Acrylic on canvas
9”x 12”
This little project is great for many
different levels of art. The steps for
creating this piece are quite simple: first
pick out an image of fish with cool
colours. Then colour the canvas an
orange-red colour(leave the brushstrokes
visible!). Once the paint is dry, you can
draw with pencil your fish or skip to the
next step and draw the fish with watered
down black. Then you paint in your fish
(again with visible brushstrokes). I
encourage students to leave bits of the
background colour showing through the
fish. The Tropical Fish painting is great for
studying colour, specifically playing with
opposite colours. With younger grades I
would have everyone do the same colour
background, but with students who are
older, I would let them choose which fish
and background colour if the background
is opposite to the main colour in the fish.
Madelaine Gault

Nature inspired coil pot
Earthenware clay and
underglaze
4” x 5”

There are many different techniques
that students can do with this
assignment which gives a lot of room
for creativity for the students.
Students could do imprinted designs,
relief carving, add on additional
pieces, underpainting or create the
vessel into its own organic form.
Definitely a great first step into
sculpture.
Madelaine Gault

Grid drawing (bear)
Digital drawing
8” x 10”

Grid drawing is a classic step for beginner
artist to help them get the hang of
reproducing proper proportions from an
image to a drawing. Typically done on
paper, I found this technique works quite
well for digital drawings. With digital
drawings, you can create multiple layers
which can make the drawing process
easier and allow students to create
different effects. Also, by having the grid
digitally, this removes the common issue
of the grid still being visible even after
erasing. The program I used is called
Sketchbook and is free to download
(though we may need to throw a few
bake sales to save up for the drawing
pads).
Alexa Irvine

Floral Colour Wheel
Recycled coloured pencils
and fine-tip pen on
recycled paper
21.5 cm x 19 cm
I chose to include the colour wheel
because it has always been a classic
element of my art classes. The colour
wheel is a vital tool for learning colour
theory, which is essential knowledge
for any art student and I intend to
always use it in my classes. I added
some floral details to make it my own
and I plan on having students do add
their own unique style to theirs as
well.
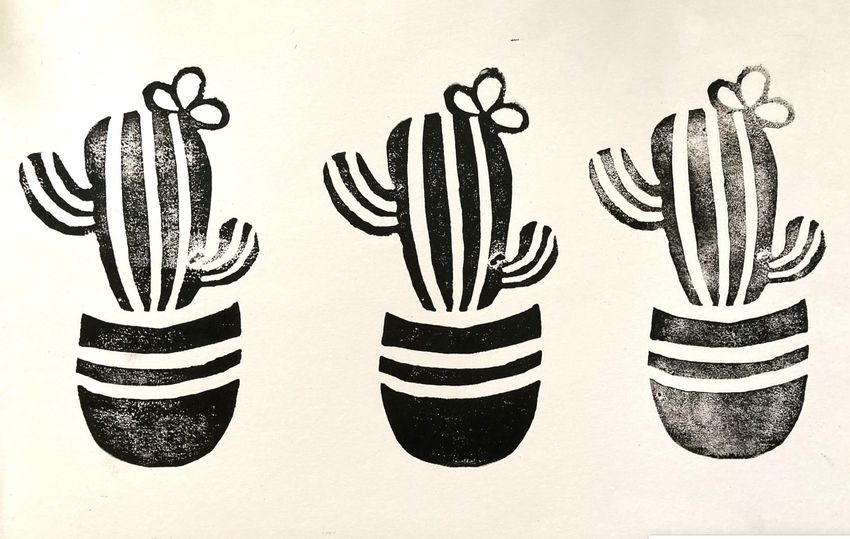
Alexa Irvine

Cactus Print
Black printing ink (printed
with reused linocut) on
recycled mixed media paper
28.5 cm x 16 cm
This piece features a cactus print I had
created for a past class for a more
colourful and complex assignment. In
this piece, I reused it using black ink to
emphasis its own simplicity. This also
is a good demonstration of the art
principle of repetition. I carved out of
the “Speedy Carve” block by
Speedball®, which is very easy to draw
on, cut through, and print with. I
believe would be great for students as
it is meant for beginners. I believe this
is a project that can demonstrate to
students how aspects of their art can
be reused again and again for different
artistic purposes.
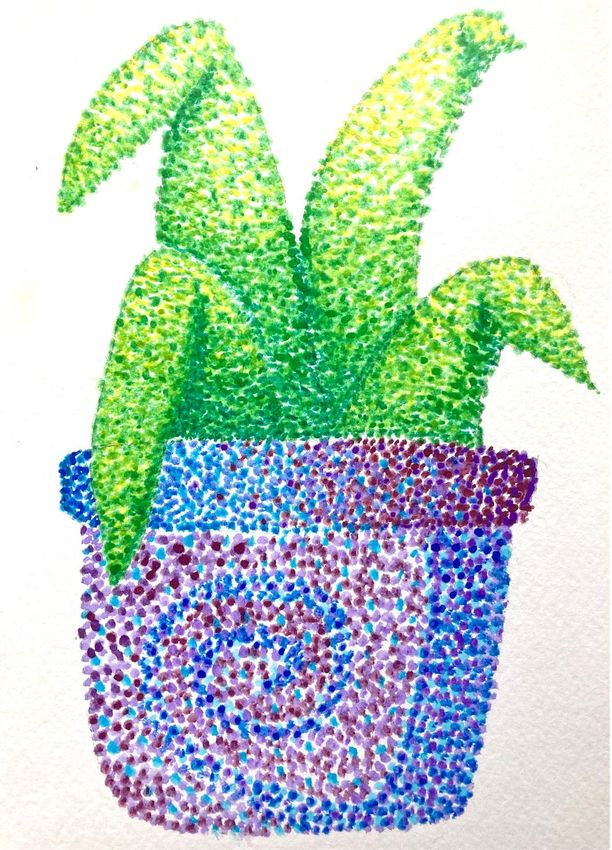
Alexa Irvine

Potted Plant Pointillism
Watercolour paint on
recycled mixed media paper
15.5 cm x 22.5 cm

Watercolour painting and pointillism
are both artistic elements that I have
very little experience with, so I
decided to combine them. I first drew
an outline of a potted plant using
pencil, before using a thin-tipped
water colour brush to create the
individual dots. I am happy with the
outcome, but I realized how truly
persistent one must be to complete
such a time-consuming project. I think
I would have students create
something like this in my future
classroom, just on a smaller scale to
preserve time and teach patience.
Intermediate-Senior Drama Course TCs
Aynne Johnston, Instructor
Nancy Douglas, Teaching-Artist Facilitator

Chicago Map
Collage on Canvas
46" W x 35" H
Studio partner, the Stratford Festival, is planning to
open the musical “Chicago”, directed by Donna Feore, as
a grand post- pandemic return of theatre. For this reason,
Professor Aynne Johnston and Artist-in-Residence Nancy
Douglas collaborated to create an experience to bring a
distanced class together through artwork. Each TC
received a package with a section of the map, curated
images and collage supplies. Upon completion, these
were delivered back to Nancy to assemble as a unified
map of Chicago. “Crime, Liquor and Jazz” reflects the
back story, era and context in which the play, then
musical, were based. The art workshop provided a fresh
approach to studies in text analysis, design, musical
theatre and theatre history. Best of all, the community of
the class at last came together, if only in this work of art.

"This workshop let me use my creativity to building something
beautiful and unique with my classmates. Thank you, Nancy for
facilitating a workshop that defied the boundaries of virtual
learning." Jonathan

"I was able to feel close to my classmates even though we have
not met in person. The collage was able to connect all of us
from a distance and make us realize that we have an impact on
each other’s lives, even though we have never met. Drama is all
about making a connection with your team and creating a
piece together. With Covid-19, that has been extremely hard
this year. However, this experience with Nancy has opened my
eyes as a drama educator and made me realize that we do not
have to be in the same place to feel close with a team." Sophia
Natasha Jabre

Shell Rubbing
Crayon on paper
21.59 cm x 27.94 cm
Water is a natural motif in which to
immerse Kingston-based artists,
surrounded as they are by waves, the
rain, and sea life. Two years ago, I ran a
course through the Agnes Art Camp
based around an underwater theme.
My goal was to engage students on
multiple fronts and offer an activity
that was both formally inspired and
tactilely driven. Among the many
activities I tried, this activity, a
multicolour patchwork of shell
rubbings, proved especially popular.
Students enjoyed the incidental
structure produced from a simple set
of choices: shell, colour, and
placement.
Natasha Jabre
Composition with Rubber
Bands
Water-based ink on
paper
20.32 cm x 20.32 cm
In another Agnes Art Camp lesson,
students were introduced to
abstraction through the collision of
opposing forces. The goal was to
remove the artist’s hand from the
process. First, students created an
array of lines formed from stretched
rubber bands. Next, they charged the
contraption with water-based ink,
which the rubber resisted. The result
was an image created from an
unpredictable jumbling of creative
processes.
Natasha Jabre

Radiating Hand
Acrylic on canvas panel
20.32 cm x 15.24 cm
My goal for this activity was to
introduce students to the visual
principles of repetition, rhythm, and
pattern. Using lollipop sticks, Q-tips,
and toothpicks, students stamped
different shaped circles to create
their desired pattern around their
traced hand. Radiating Hand was
created as an exemplar for this
activity.
Diana Lawryshyn

Dotted Butterfly
Ink on paper
15 cm x 15 cm
This drawing was created for the
course CURR 389 as an exploration
of the dot. In creating this work, I
have learned a mere dot is all that is
necessary to kickstart a journey of
artmaking. The concept of starting
off simple has proven to be
impactful for various subjects in my
practice as an elementary school
teacher.
Diana Lawryshyn

Bloom
Marker on paper
15 cm x 20.5 cm
This image is a result of my
printmaking exploration in the CURR
389 course. The work was created by
drawing with marker on a sandwich
bag and then stamping the bag flat
onto a piece of paper. Interestingly,
the marker ink on the plastic surface
beaded up into many little droplets,
creating the intricate stippled effect
which gives the artwork its distinct
character. Having created this artwork
in a virtual environment, I have
learned that there are effective
methods for teaching printmaking
using materials that can be found at
home. I will certainly use this method
if given the opportunity to teach art
virtually.
Diana Lawryshyn

Piano Books
Conté charcoal and chalk
pastels on grey-toned paper
21.7cm x 28 cm
This drawing was inspired by my
experiences in the Artist in the
Community Education courses (FOCI 222
and EDST 222). These courses
familiarized me with an array of inter-
related elements which make up the
performing and visual arts. I was also
introduced to a vibrant community of
artists, various methods of teaching the
arts in schools, and methods of analyzing
how my past experiences shaped my
development as an arts educator. My
experiences from the Artist in the
Community Education courses inspired
the idea to combine an image of piano
keys with an image of books, illustrating
my strengthened appreciation for the
arts and education. I also decided to
depict a piano, specifically, because it is
an instrument that I have been playing
since childhood and has been influential
to my education.
Carol (Xinyue) Liu

The Lightful
Digital Photography
The Lightful Series is comprised of three
digital photographs that are shot with slow
shutter speed, which is longer than a
second. They are all monochromatic, which
highlights the movement of the light with its
simplicity and delicacy. The use of
monochrome also adds a sense of contrast
between the energy of the moving light with
the serenity that black and white create.
Before the successful shooting of the final
photographs, there are many trials and
errors to reach the satisfactory shutter
speed and aperture and produce the most
balanced exposure for the image. The
experimentation with the movement of light
and seeing the movement recorded in a
photograph is most mesmerizing and
engaging. This could be a small project for
students to learn about shutter speed,
aperture, and exposure and explore the
aesthetic potentials of monochromatic
images. The project’s objective may be for
students to experiment with and explore the
potentials of slow shutter speed using the
manual setting on their DSLR camera,
submit a series of trials and errors, and
submit three ideal monochromatic
photographs that capture the movement of
light.
Carol (Xinyue) Liu

The Medical Dream (triptych)
Lino Print with Acrylic Paint on
Paper
8.25” x 11.75”
The triptych is a series of Lino prints. The process
started with researching Chinese medical herbs,
developing fantastical creatures for the herbs, and
putting the creatures together in an image. The
triptych is connecting to how medical records with
illustrated herbs are usually recorded as printed items,
and they look very formal and delicate. The triptych
wishes to depart from the graveness and the
heaviness that could be related to sickness and
medicine and transcends it to something light and
surreal, so the prints are inked unevenly with light
colour. The prints also encompass a range of printing
explorations: the first image where parts of the paper
are pealed off by the linoleum block, creating a hairy
texture (this is done by pressing the paper very hard to
the block); the second image contains an extended
portion added by a second print, but only half of the
block is printed; the third employs a way to print with
water after the first print with acrylic, where you wash
the surface of the block and gently place the paper on
top until the desired image appear, to create a more
ephemeral element that would eventually disappear.
Overall, the transient or dreamy state of the triptych
also relates to the unexpectedness in and of living a
life. The idea for the project is for students to choose
something meaningful from their lives and experiment
with linoleum printing techniques (and maybe even
invent one). The goal is for them to take risks in art
and be able to analyze how their artwork’s aesthetics
and materials relate to their lives.
Carol (Xinyue) Liu

Landscape of the Past
Watercolour on Paper
5.5” x 8.5”
Landscape of the Past is a study of
watercolour painting, where the
landscape is a customized scene of the oil
painting “Seascape” by Fitz Henry Lane.
The customization is done using the NGA
kids Art Zone application where it allows
you to select the preferred fore-, middle-,
and background of the painting and add
different types of ships and characters to
the image. This study of an oil landscape
and transforming it into a simple
watercolour painting could be a way to
engage students and help them become
familiar with the medium of watercolour.
It is also a great way to practice the wash
in watercolour painting. Moreover, the
project could encompass the
introduction/review of art gallery
interactions and art history alongside
practicing watercolour techniques. It is
interesting to note that using cotton balls
seem effective in removing excess water
in place of a sponge.
Kate Malenfant-McNeice

‘Dee’
Lino Block Print
5”x 7”
Lino block prints are a common first
step into print making. This work
functions as an imperfect exploration
into the medium, with visual flaws that
show missteps I took in this return to
the medium. The ink textured as it was
already semi-dry as I ran off to grab a
spoon to press the paper into the
block; the line on the left is wavy as I
do not have experience using an X-
ACTO knife to cut a block in half. These
imperfections will help me guide my
future learners to have fewer issues in
the printing process.
Kate Malenfant-McNeice

‘Dee Dee’
Digital Painting
8.5” x 11”

Digital art as a medium has grown in
popularity within the visual art high
school classroom since I was a student
and will continue to grow. As well, in
our current remote or hybrid learning
setups, students can have a limited
number of supplies. This medium has
many uses, and can be a stand-alone
project, or an option as one of the
media for a painting project.
This set of three artworks are a set,
that show a range of media, with the
same subject matter. All three offer
different viewing experiences, have
different final aesthetics, and offer
very different making processes.
Kate Malenfant-McNeice

‘Dee Dee Dee’
Clay Sculpture
6” x 6” x 1.5”
An exploration both into the element
of ‘form’, and the media of sculpture.
This sculpture was inspired by relief
sculptures. It was made by forming a
slab of clay and carving into it to
create the physical depth that creates
shadows.
This set of three artworks show a
range of media, with the same subject
matter. As a painter, I explore media
outside of my practice to better the
advice and experiences I can bring to a
classroom. All three offer different
viewing experiences, have different
final aesthetics, and offer very
different making processes.
Anisa Malik

Daydreamer
Photography
4" x 6”

For this piece, I wanted to create a
portrait using direct natural light,
framing my sisters face with the sky as
the background. We waited until
about 2pm when the sunlight was
direct but not too harsh and I asked
her to pose using her arms to create
triangles. It is sometimes difficult to
take flattering photos with direct
sunlight, so the challenge was to use
light and shadows strategically to
create shape. This challenge can be
used in the classroom to encourage
students to think about light intensity
and how it affects a photograph.
Anisa Malik

Hybrid Horse
Graphite
6” x 10”

This hybrid drawing combined a
vintage style motorcycle with a
trotting horse. The juxtaposition of the
animal and motorized vehicle
demonstrates the similarities and
differences between these two
“modes” of transportation. In my
process, I had brainstormed many
different combinations of animal and
vehicle and the way they might work
together. This style drawing can be
used in the classroom to refine
technical drawing skills as well develop
students brainstorming skills.
Anisa Malik

Unama’ki
Altered Book
6" x 9”

This piece was made with the
intention of contrasting human
consumption with nature. I recently
watched a documentary called
Seaspiracy where activists brought
attention to the horrors of commercial
fishing and its impact on wildlife.
Sharks are widely demonized despite
the reality being that they are
relatively harmless, and we enter their
home when we step in the ocean. In
the classroom an altered book can be
used to create an artistic metaphor
about a social justice issue such as this
one.
Pavit Mann

Still life 1
Pencil on mixed media
paper
22.0 cm x 30.5 cm
I got an opportunity to work on my
pieces through course F2020 CURR
389, Art (PJ). My goal was to get back
to art and to still life as well. I had
learnt still life but wanted to practice
pencil sketching. The pandemic really
helped me get back to my long-lost
skill. The objects that I chose, gave me
an opportunity to observe them
closely and represent them on paper.
Through this creative process I learnt
that observation and patience can help
create great pieces. While drawing, I
felt at peace, I felt confident as I still
had the talent.
Pavit Mann

Still life 2
Pencil on mixed media
paper
22.0 cm x 30.5 cm
I got an opportunity to work on my
pieces through course F2020 CURR
389, Art (PJ). My goal was to get back
to art and to still life as well. I had
learnt still life but wanted to practice
pencil sketching. The pandemic really
helped me get back to my long-lost
skill. The objects that I chose, gave me
an opportunity to observe them
closely and represent them on paper.
Through this creative process I learnt
that observation and patience can help
create great pieces. While drawing, I
felt at peace, I felt confident as I still
had the talent.
Pavit Mann

Still life 3
Pencil on mixed media
paper
22.0 cm x 30.5 cm
I got an opportunity to work on my
pieces through course F2020 CURR
389, Art (PJ). My goal was to get back
to art and to still life as well. I had
learnt still life but wanted to practice
pencil sketching. The pandemic really
helped me get back to my long-lost
skill. The objects that I chose, gave me
an opportunity to observe them
closely and represent them on paper.
Through this creative process I learnt
that observation and patience can help
create great pieces. While drawing, I
felt at peace, I felt confident as I still
had the talent.
Nina Nissan

Dragonflower
etching (copper plate)
8” x 10”
This print was done using a copper plate with
beveled edges. The edges of the copper plate were
beveled using a flat file sanding stick to ensure that
the plate edges did not rip the paper when printing.
Carbon paper was first placed on the copper plate
and then the drawing was placed on top to be
traced onto the plate. Once the tracing was
complete, many styles of etching tools were used
on the image to create various textures, depths and
lines. The deeper and wider the line, the more ink it
could hold which would darken the area to create
shadows and dimension. After etching the drawing
on the copper plate, black ink was rolled using an
ink roller onto the plate ensuring that every corner
of the etching was loaded with ink. Before any
printing can occur, the ink was removed from areas
which are not etched with anything. Therefore, a
clean rag must be used in a circulating motion on
the plate to lift off the ink in these untouched areas
to ensure nothing unwanted is transferred onto the
paper. The printing paper used was cut to size and
prepared for printing(dampened in a water bath;
however, dry paper can also work). The paper was
positioned and placed onto the copper plate with
the plate being centered as much as possible and
then large heavy books and pressure was applied.
The books were removed, and a rolling pin was
used with added pressure to ensure that the paper
has soaked up all the ink. (A printing press would be
much suitable to use). The print was then placed in
a cool, dry place until it dried and then was
flattened with heavy objects to ensure that the
paper was not waved from the water bath.
Nina Nissan

Blue Neverland
Print - ink plating on
copper plate
30” x 45”
This print was done using a copper plate
with beveled edges. The edges of the
copper plate were beveled using a flat file
sanding stick to ensure that the plate
edges do not rip the paper when printing.
Using numerous sizes of paint brushes and
various colours of ink, ink was painted
onto the copper plate. Multiple coatings
of the same colour were placed for each
layer or design to ensure that the paint
was thick for printing later on. The
printing paper used was cut to size and
prepared for printing (dampened in a
water bath; however, dry paper can also
work). The paper was positioned and
placed onto the copper plate with the
plate being centered as much as possible
and then large heavy books and pressure
was applied. The books are removed, and
a rolling pin is used with added pressure
to ensure that the paper has soaked up all
the ink. (A printing press would be much
suitable to use). The print is then placed in
a cool, dry place until it has dried and then
can be flattened with heavy objects to
ensure that the paper is not waved from
the water bath.
Nina Nissan

Figures 3
Print - digital drawing
11” x 17”
This print was done using a digital art
software on the Apple iPad with an Apple
pencil. First, the page was set to the
required dimensions and the colour palette
along with the “brushes” were selected. The
background was created with the Salamanca
painting brush using various cool and warm
monochromatic tones of pinks and purples.
The colours were then blended using the
jagged smudge brush to ensure that there
were no harsh lines between each colour
story. After the background completion, a
small sketch of two continuous lined figures
were done using the Derwent brush in a
bright white colour. The sketch was done
with a small pencil size of 3% and 100%
opacity. The sketch served as a template for
using other interesting brushes such as the
Thylacine and the Ink Bleed brushes to
create abstract paintbrush marks that
followed the figure’s outline. Once the
figures were drawn to satisfaction, they
were copied onto new layers, placed around
the page and then distorted using the
Motion Blur adjustment. This adjustment
was created with a lower opacity to allow for
added depth and dimension, but also to
create the illusion of smoke that is
diminishing and diffusing away.
Alison Quinn
Gratitude
Styrofoam Block Print
4.5" x 6”

This piece began with a self-reflection
of three things I am grateful for during
such turbulent times. I symbolized
these elements (the outdoors, my pets
and my health) and constructed a
composition around them paying
special attention to the positive and
negative space used in a relief print. I
transferred my image onto tracing
paper, using the tracing paper as a
guide over a Styrofoam plate. I incised
the Styrofoam with a dull pencil. This
can be great way to incorporate
wellness, art as a conduit for wellness
and self-reflection into the classroom.
Alison Quinn

Dreaming
Lino Block Print
4" x 6"

Linocut can be an easy way to
introduce relief printmaking because
it allows students to begin
experimenting with positive and
negative space as well as contrast.
Depicting wildlife can be a great
excuse to explore how different
mediums can create texture. In this
case I used varying depths and stroke
lengths with a V gouge to create
sense of fur.
Alison Quinn

Blossom
Recycled Plate Dry Point
5” x 6”

Using simple everyday items like a flat
plastic produce container, a sewing
needle and newspaper can make intaglio
accessible. This advanced printing
process is great for student driven work
and can bridge into mixed media by
adding elements like watercolour or
collaging into another piece. It can also
be great for breaking down the idea of
perfection in artwork. I created several of
these prints, but I chose this one as my
favorite for its imperfections, it has more
plate haze than others giving it an almost
antique feeling, resulting in added depth.
There is a shadow double image from
where I dropped the plate before printing
that adds Interest and gives the piece a
touch of movement.
Hannah Quinton

246 Albert Street
Watercolour on Paper
12.7 cm x 17.7 cm

This painting was created using
watercolour paint on watercolour paper. I
began the process by photographing the
façade of my house. I drew the house
with a ruler, taking measurements to
ensure it was proportionate. I then began
the painting process and using my photo
as a reference, replicated the
architectural style and colour of the
building. I would use this project in my
classroom to teach students how to apply
colour theory to achieve realistic colour
and tone gradations with watercolour
paint students would also gain an
appreciation for architecture and the
proportions and measurements involved.
For this project, students will find a
picture of any building they would call
“home” and will paint (and draw) it
entirely in watercolour.
Hannah Quinton

Ink Squid
India Ink on Watercolor
Paper
22.9 cm x 30.5 cm

To create this ink squid drawing, I started
by using a wet-on-wet technique to make
the ink cloud. Having wet the bottom half
of the paper, I added ink on top to
achieve an “ink-bleed”. I then added
water on top of the ink to achieve the
dilution effect. To create the squid, I drew
with ink and used hatching to produce
value and contour. I painted the squid
with various tones of diluted ink. In my
classroom, I would have students use
these two wet-on-wet techniques and
the ink drawing techniques to create an
ink creature of their choice. They would
decide how to integrate these techniques
to create an original and engaging
composition that incorporates ink
painting and drawing.
Hannah Quinton

Bluebird
Linocut Print on Paper
37 cm x 28 cm

This relief print was made using a
linoleum block, acrylic paint, a roller, and
printing press. Three separate reliefs
were made in different shades of blue to
produce three layers – the background,
the base colour and shape of the bird,
and a top layer of detail. The detailed
texture on the wings and breast were
achieved by fluke; I did not apply enough
paint for it to adhere properly. This made
for an interesting textural effect. This
linoleum printing project could introduce
high school students to the relief method
and printing with the printing press. I
would have students select an image of
an animal and isolate three layers for
them to carve out using the linoleum
block. They would then paint and print
the image.
Julie Ro

Rubber Band Study in
Pencil Crayon
Pencil crayon on paper
8.5” x 11”

Inspired by objects lying around my
house for still life 3D detail study
and drawing, I have chosen to use two
rubber bands (one secondary colour,
one neutral primary colour). I
entangled them to create a knot to
examine closely and enlarge on paper.
This assignment can combine several
different concepts in conjunction with
a pencil crayon sub-unit, to form a
solid understanding of how to 1)
accurately depict and capture the
correct colour(s), using tones, shades,
hues (tying in knowledge of colour
theories); and 2) to use the learning
and understanding of still life drawing
strategies to accurately identify the
source of light and shadows.
Julie Ro

Coffee Series
Linoleum block, block
printing ink
 8” x 10”
This series of lino prints were inspired
by a local cafe called Sorry Coffee Co,
who have a fun initiative where staff
can design cup stamps. This kind of
creative project would allow students
to be creative and intentional, while
keeping in mind their knowledge of
the elements and principles of design,
in their printmaking unit. This project
can be altered for the classroom, to
allow students a choice in a local
business, for which they can research
and redesign some aspect of their
visual identity (i.e. logo, stamps,
maybe even wall murals or decals,
etc.), sketch it out, transfer their
chosen design onto a lino block
(reversed), and follow the steps of lino
print successfully and safely.
Julie Ro

A Study of Moth
Ink on paper, calligraphy
brush
8" x 16"

It’s always nerve-wracking to go in
with ink directly on paper without
having any outline or pencil to follow.
This series of insect studies provides
opportunities for practice working
with ink and calligraphy brush to learn
to navigate and create different
textures, pressures, lines and shapes
with the same singular tool. Drawing
insects enlarged will enable students
to not only appreciate the natural
patterns and symmetry in nature, but
also practice working with ink to
derive and create a variety of lines,
textures, washes (vivacity of ink), as a
precursor to the ink or printing unit.
Kat Rodrigues

Palhaço
Digital photograph
1393px x 1821 px

For my 3D colour wheel, I decided
to become the colour wheel and
do a drag-inspired makeup look.
Makeup is such a great medium
for expression, and I think it could
be interesting to explore in the
classroom. I was also inspired by
Alison’s Drag History in Art Critical
Concept. I think that a studio
activity to go along with this unit
could involve students designing
their own drag personas and
mugs.
Kat Rodrigues

Six Palettes
Acrylic on Polaroid film
86 mm x 72 mm

I like the idea of using recycled
materials for art, so for my
paintings I decided to use
expired Polaroid film as my
canvas. These are little abstract
paint palettes, and they were
really fun to make. Painting on
recycled materials could be a
fun studio project and could
involve students getting really
creative with what they paint
on.
Kat Rodrigues

Uglies
Hardcover book, lino
block print
13.34 cm x 20.96 cm

This is a rebinding of one of my
favourite books, Uglies by Scott
Westerfeld. I used two different
lino blocks to create the cover;
one for black and one for colour.
Printing with multiple blocks is a
great next step for students
who really click with this
medium. It’s really fun creating
each layer of the design and
paying close attention to all of
the details.
Lilac Toh

Headstrong in the Clouds
Acrylic on canvas
15.2 cm x 15.2 cm
This artwork was created for my Artist in
Community Education class and inspired by my
experiences completing the B.Ed program during a
global pandemic. I filmed the painting process and
wrote an accompanying piece of music for piano
which I titled Roller Coaster. I recorded the process
of this art making because I see learning as a
lifelong journey. It is less so about the end-product,
and more so about the steps taken, and the
experiences made, in order to get there. Creating
this art was an opportunity for me to reflect upon
my experiences of learning and growth as an arts
educator. I learned that it is through accepting the
chaos and knowing that it is alright to take each
day as it comes, that will set me on the right path
to becoming a better educator, artist, and person.

Click here to see the painting process
Julia Van Bommel

Exploring Magnetawan
Oil on board
18” x 24”

I was instantly captivated from the
beautiful landscape that surrounded
me on my trip to Magnetawan, ON.
The distinguished Group of Seven
artist, A.J. Casson, and his rendition of
the same landscape also influenced
me to paint it for my own. This “Art
that Inspires” piece is a great way to
introduce students to the medium of
oil paint. Students would have a
landscape picture as reference and
interpret it to an abstract landscape.
Julia Van Bommel

The Green Bowl
Earthenware clay
5” in diameter, 3.25” tall
The Green Bowl is my first wheel
thrown pottery piece. I had the
wonderful opportunity to learn from
my mom in this medium. Working with
clay will give students the memorable
hands-on, muddy experience that will
allow them to work though the
creative process and find themselves
with an impressive sculpture.
Julia Van Bommel

Creek Leading to
Conestoga River
B&W film photograph,
silver gelatin print
8” x 10”
This photograph is the beginning to my
self-directed research into black and
white darkroom film photography. I
am passionate about introducing
students into the realms of film
photography and uplift the abandoned
school darkrooms to have them
function once again. There is a tactile
magic that happens in the darkroom
and I want students to have to the
opportunity to explore this not so
“dead art.”
Emily Vilé

Exploring Beyond the
Surface
Mixed Media Altered
Book
6.5” x 9.5”
This creation is meant to spark
imagination and creativity with items
we no longer want or need around us.
I pulled this book out of a box that was
going to be donated. This project was
completed using a variety of at-home
materials. Students could easily
experiment with this type of activity,
by using the scrap supplies they have
in their home.
Emily Vilé

“Seeking Guidance”
Digital Photography Manipulation

We need to look at one object at a
time. We look at an abundance of
objects, images and videos every day,
are we truly consuming the content to
the fullest? We should be looking at its
perfections and imperfections. We
need to examine all the curves and
bold lines in order to really feel,
embrace and understand the work. I
used digital software to skew and alter
the initial sculpture to give viewers
new perspectives.
Emily Vilé
"Seeking Heat, Grass and Juice"
Digital Photography Manipulation

We need to look at one object at a
time. We look at an abundance of
objects, images and videos every day,
are we truly consuming the content to
the fullest? We should be looking at its
perfections and imperfections. We
need to examine all the curves and
bold lines in order to really feel,
embrace and understand the work. I
used digital software to skew and alter
the initial sculpture to give viewers
new perspectives.
Emily Vilé

The Colours We See
Lino Print
7" x 9”

How many faces can you see? Do you
see all faces or just the faces in a
specific colour? Do we see the colours
law enforcement sees, or do we see all
colours. This project was completed
using the traditional linocut
printmaking process the only at home
learning modification was substituting
ink for acrylic paint. This type of art-
making is often explored in traditional
in person art classrooms, however at
home students would need access to
linocut rubber, carving tools, roller,
brayer, paint and paper. That is a lot of
materials to ask students to purchase
but doing it at home is very possible.
Dora Yang

Whale
Linocut Print
21.5 cm x 21.5 cm

I did my summer 1 term in 2019 when we
got to see our peers in person, and this
was a print I made for a PROF 110 show
and tell assignment (B.Ed). We were
asked to find something that represents
the intended, enacted, received, and
hidden curriculum and share with our
table group. I had never done any kind of
printmaking before and wanted to try
something new to represent the
intended curriculum. I had a lot of fun
trying out a new medium, but also got a
bleeding finger (twice) and thought that
no matter how much planning and
research you do beforehand, the enacted
curriculum will not happen 100% like
what you envisioned.
Dora Yang

Koala - Space
Digital Vector Drawing
1080 px x 1080 px
Created at the beginning of the CURR
389 (B.Ed), this image was created
when I was playing around with
negative space for the elements of
design exercise. I ended up with a face
that looked like a koala, and
consequently decided to create more
koalas with different elements of
design. This one remains my favourite
because I think it’s interesting how
simple shapes could remind us of a
certain animal.
Dora Yang

Dog with Flower
Digital Painting
2500 px x 2000 px
For my art portfolio assignment in
CURR 389 (B.Ed), I wanted to learn
more about creating art digitally. This
was the first time I made a digital
painting, so it took me a long time to
finish, but I’m really happy with how it
turned out in the end. Through the
process of creating this painting, I
learned that with digital painting, I am
able to make details that I couldn’t
have otherwise. I’m really glad that I
had the opportunity to explore digital
media and look forward to creating
some more in the near future.
You can also read