BUILD A KEYLESS ENTRY SYSTEM WITH AMAZON CONNECT AND AWS IOT CORE - IMPLEMENTATION GUIDE - AWSSTATIC
←
→
Page content transcription
If your browser does not render page correctly, please read the page content below
Build a Keyless Entry System with
Amazon Connect and AWS IoT Core
Implementation Guide

May 24, 2021
Notices
Customers are responsible for making their own independent assessment of the
information in this document. This document: (a) is for informational purposes only, (b)
represents current AWS product offerings and practices, which are subject to change
without notice, and (c) does not create any commitments or assurances from AWS and
its affiliates, suppliers or licensors. AWS products or services are provided “as is”
without warranties, representations, or conditions of any kind, whether express or
implied. The responsibilities and liabilities of AWS to its customers are controlled by
AWS agreements, and this document is not part of, nor does it modify, any agreement
between AWS and its customers.

© 2021 Amazon Web Services, Inc. or its affiliates. All rights reserved.
Contents
Overview ..............................................................................................................................1
   How it works .....................................................................................................................1
   Use cases .........................................................................................................................2
   Why use Amazon Connect and AWS IoT Core to build this implementation?...............3
Prerequisites ........................................................................................................................5
Cost ......................................................................................................................................7
Architecture overview ..........................................................................................................8
Walkthrough .........................................................................................................................9
   Create the Amazon Connect contact center instance ....................................................9
   Retrieve your AWS IoT Core endpoint value ................................................................11
   Create a secret key for your local devices in AWS Systems Manager ........................11
   Create a certificate .........................................................................................................12
   Deploy the AWS IoT authentication function with AWS CloudFormation ....................13
   Add access codes to the Amazon DynamoDB table ....................................................15
   Set up your microcontroller ............................................................................................17
   Wire the ESP32 microcontroller, relay, and sensor to your door hardware .................28
   Customize your Amazon Connect contact flow.............................................................30
   Test your application ......................................................................................................31
Conclusion .........................................................................................................................34
Next steps ..........................................................................................................................34
   Trigger additional services from AWS IoT actions ........................................................34
   Clean up .........................................................................................................................34
Contributors .......................................................................................................................35
Additional resources ..........................................................................................................35
Document history ...............................................................................................................35
About this guide
This guide walks you through building a self-service, secure, and auditable way to
provide physical access to a home, office, or other location using Internet of Things
(IoT) and a cellular phone. Although this walkthrough focuses on a home automation
use case, this implementation is also applicable to other building management
scenarios.
Amazon Web Services          Build a Keyless Entry System with Amazon Connect and AWS IoT Core

Overview
Have you ever had guests visiting while you were out, expected a delivery during work
hours, or wanted to unlock your home without digging out your keys?

This guide walks you through building a self-service, secure, and auditable way to
provide physical access to a home, office, or other location using Internet of Things
(IoT) and a cellular phone with Amazon Connect and AWS IoT Core. Although this
walkthrough focuses on a home automation use case, this implementation is also
applicable to other building management scenarios.

How it works
The following diagram shows the remote access workflow for this implementation.

                            Figure 1: Remote access workflow

                                                                                            1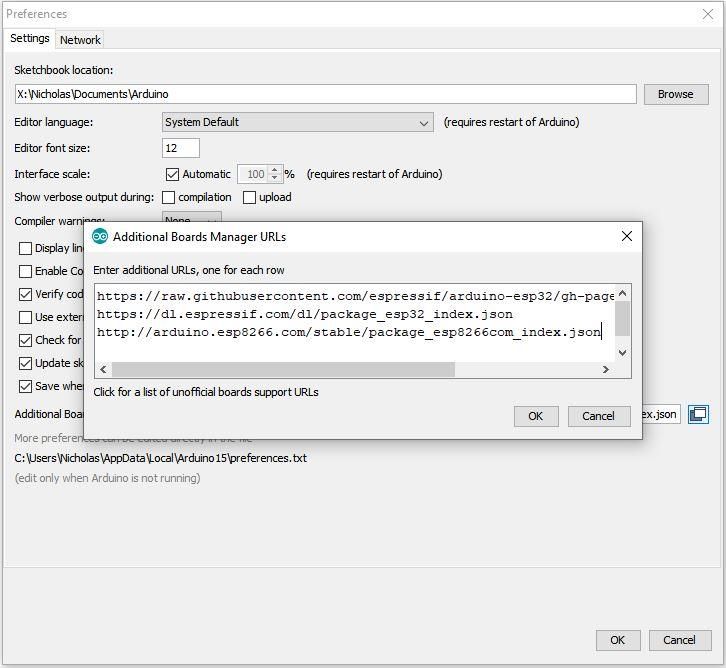
Amazon Web Services            Build a Keyless Entry System with Amazon Connect and AWS IoT Core

  Step     Description

  1        An administrator sets up a unique entry code in Amazon DynamoDB for each
           expected guest, with specific details:
              •   User’s phone number
              •   Unique entry code
              •   Access expiration time
              •   Single use or multi-use code

  2        The admin tells the guest the information for building access, including the Amazon
           Connect phone number, and their unique entry code

  3        The guest calls the Amazon Connect number provided upon arrival to the location.

  4        The Amazon Connect contact flow prompts the user for the code entry process
           before triggering a Lambda function that validates the user’s inputs:
              a) Checks DynamoDB for the combination of caller ID and entry code
              b) Verifies that the code is active and has not expired
              c) Publishes a message to AWS IoT Core if the request is valid

  5        The microcontroller subscribes to AWS IoT Core for updates and unlocks the
           building when the door unlock message is published

Use cases
This implementation guide addresses the following use cases:

      •   Individual access codes for each family member
          You need to grant physical access to a secure location, such as your home, or
          office building and you want an authentication mechanism.

      •   Leave a virtual key for a guest or visitor
          You’re hosting guests and want to provide them with access to your home
          without leaving a physical set of keys, or downloading a proprietary, third-party
          app. You also want to have rules to expire the access after a certain date.

                                                                                                 2
Amazon Web Services          Build a Keyless Entry System with Amazon Connect and AWS IoT Core

    •   You’re expecting a delivery and have a locked location for the deliverer to
        leave the package
        You are expecting a package delivery and want to provide simple instructions
        for a delivery agent to leave a package in a locked, designated location. You
        also need to ensure only a single use of the entry code is possible over a
        specific time window.

    •   You’re locked out or forgot your keys!
        Use your phone as your backup keys to unlock your door.

Why use Amazon Connect and AWS IoT Core to build
this implementation?
The use of AWS services in this implementation provides the following benefits:

    •   Fail safe: Things can fail, especially when building new prototypes. Make sure
        when designing automated IoT solutions, like with everything else on AWS, to
        think about high availability and fault tolerance. If there’s a power outage at the
        local site, this solution will fallback and continue to work with traditional access
        methods, such as your keys. Additionally, you can extend this solution with a
        bridged local MQTT broker to enable the use of a local message queue that
        allows you to continue to electronically trigger your entry in the event on your
        local LAN of an internet outage.
    •   Traceability: When you add new ways of automating tasks don’t forget to collect
        data on usage! This might provide opportunities for new features in the future
        or insights you didn’t know you could collect. In this solution, every sensor
        update and access request can be logged on Amazon CloudWatch, allowing for
        a complete audit trail of access requests and access grants provided through
        the solution. You can store these logs at low cost in Amazon Simple Storage
        Service (Amazon S3) while using Amazon DynamoDB for managing active
        access codes, lowering your costs and gaining single-millisecond performance
        on database transactions.

                                                                                               3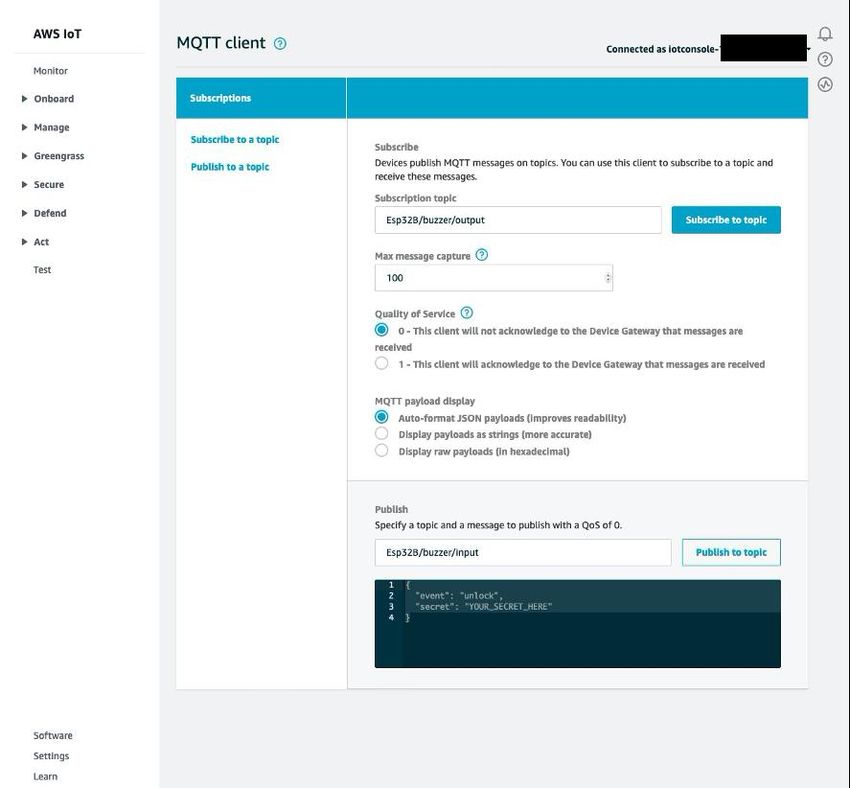
Amazon Web Services          Build a Keyless Entry System with Amazon Connect and AWS IoT Core

    •   User Friendly: Integrating IoT into everyday life should augment existing usage
        patterns without eliminating prior ways of interacting with workflows. Using
        Amazon Connect allows you to build voice or chat based authentication flows
        that can be added to existing ways of gaining access allowing a multitude of
        users to use the solution without concerns for device compatibility or user
        learning curves. With Amazon Connect, you can generate your own user
        friendly contact flows similar to those that are used at Amazon.com.
    •   Customizable: Your user needs can be different than the focus of this project or
        they can change over time. By using AWS services in your solution, you have
        the ability to customize rules for creation, expiry, and management of access
        codes and users, by the multitude of supported programming languages
        supported by AWS Lambda.
    •   Expandable: No reason to stop here! This solution serves as a baseline to
        connect to multiple communication channels and can support many IoT devices
        or locations.

About Amazon Connect
Amazon Connect is an easy to use, omnichannel cloud contact center that helps
companies provide a contact center in the cloud with in the cloud with pay-as-you-go
pricing. With this model, there’s no need to stand up infrastructure for a large call center
if you’re starting small, or in this case, working on telephony enabled IoT project. With
Amazon Connect, you can deploy a fully managed contact center solution and build
automated workflows without the need for code.

Although Amazon Connect is typically used as a managed service for businesses to run
their contact centers, Amazon Connect offers open integration points to extend the
solution for your needs and allows you to use its features for broader solutions than
standard contact centers. In this case, you’re using Amazon Connect as an inbound
phone channel and interactive call flow to trigger your workflow. Amazon Connect
provides these additional benefits for this use case:

    •   Amazon Connect functionality allows you to provide phone and web based
        access to your remote access control system without requiring your users to
        download or learn a new app.
    •   Admins can define your user’s experience using drag and drop configuration for
        contact flows and voice prompts for your users.

                                                                                            4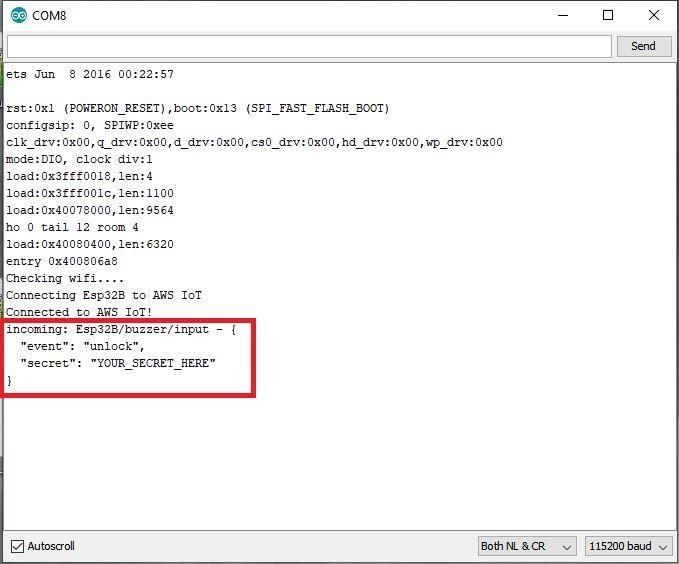
Amazon Web Services          Build a Keyless Entry System with Amazon Connect and AWS IoT Core

    •   Amazon Connect features a tight integration with AWS Lambda for handling
        logic of greater complexity, in this case validating users and limiting access to a
        defined pattern.
    •   There is no requirement for long-term licensing or contracting, you pay for what
        you use.
    •   With the AWS Free Tier, this solution can be deployed and run without fees for
        the first 12 months (depending on usage).

About AWS IoT Core
AWS IoT Core is a fully managed service that lets you connect IoT devices to the AWS
Cloud without the need to provision or manage servers. This helps you manage the
heavy lifting of building and managing a cloud connected IoT solution, including device
provisioning, device monitoring, edge-to-cloud security, and reliable IoT communication
between the cloud and edge devices.

AWS IoT Core can support billions of devices and trillions of messages, and can
process and route those messages to AWS endpoints and to other devices reliably and
securely. Additionally, AWS IoT Core runs within highly-available AWS Regions, across
multiple redundant Availability Zones, ensuring you can maintain device reliability and
connectivity regardless of where you, your customers, and your devices are worldwide.

AWS IoT Core enables low-code solutions for connecting IoT devices with other AWS
services to help you quickly and easily build complete IoT solutions. Example services
that are used in this deployment include:

    •   Amazon Simple Notification Service (Amazon SNS)
    •   Amazon CloudWatch Logs
    •   Message publishing to IoT devices using SDKs in multiple programming
        languages
AWS IoT Core is compatible with existing on-premises IoT devices running locally (e.g.
communicating via the MQTT protocol).

Prerequisites
This implementation walkthrough requires that you have the following prerequisites in
place:

    •   Access to an AWS account with permissions to the following services:

                                                                                            5
Amazon Web Services Build a Keyless Entry System with Amazon Connect and AWS IoT Core
o AWS IoT Core
o AWS Lambda
o Amazon DynamoDB
o Amazon Connect
o Amazon CloudWatch
o Amazon Simple Notification Service (Amazon SNS)
o AWS CloudFormation
o AWS Systems Manager
• The AWS Command Line Interface (AWS CLI) installed and configured to
access your account with full access to the requisite services.
• The Ardunio IDE installed on your development machine:
o MacOS Installation Guide
o Windows Installation Guide
o Linux Installation Guide
• An ESP32 microcontroller. The implementation in this post uses a
Expressif ESP32-DevKitC which comes with native FreeRTOS support. Other
ESP32 board variants may work, but may not have the same capabilities for
connectivity or setup, and are outside the scope of this post.
You can find a number of different models of the ESP32-DevKitC on
Amazon.com.
• Wi-Fi Connectivity for your microcontroller. The ESP32-DevKitC connects on
the 2.4GHz band using WPA2 security (5 GHz is not supported).
• 3.3V Relay. This relay is used to isolate your microcontroller from the door
unlock hardware and allows you to remotely activate your electric strike or door
buzzer.
• 25V Voltage Sensor (optional). This sensor will be connected to PIN34 on the
ESP32 to detect a buzzer or unlock signal from another source (e.g. a local
unlock button or a door buzzer). For this implementation, the voltage sensor is
used to detect door-bell rings.
• An existing location you wish to secure and have the ability to modify or install
the required hardware (e.g. install a 3-Wire Door Buzzer or an Electric Door
Strike).
6Amazon Web Services Build a Keyless Entry System with Amazon Connect and AWS IoT Core
WARNING: Do not attempt any wiring of any kind if you lack the knowledge and
understanding required. Otherwise personal injury and/or death as well as
property damage or loss could occur. Electricity is dangerous and can cause
personal injury or death as well as other property loss or damage if not used or
constructed properly. Please consult with a licensed professional for wiring
assistance. Note that wiring diagrams for your desired hardware is specific to the
unlock mechanism you are using and out of the scope of this paper.
Cost
The total costs for this implementation depends on consumption of the serverless
components featured in this guide. The total services costs will vary based on the
uptime and usage of your solution. For a single door buzzer implementation of this
project (assuming deployment in US-EAST-1) with 1,200 door requests a year, the total
estimated costs are under $5 per month. Additionally, many of these services fall under
the AWS Free Tier, including Amazon DynamoDB, AWS Lambda, and AWS IoT Core.
For more information on estimating the AWS cost for deploying this service in use case,
see the following pricing pages and pricing summary:
Uptime/storage based components
Amazon Connect: Amazon Connect offers a free tier that will cover the assumed use in
this guide, including 90 minutes per month of Amazon Connect service usage, a direct
inward dial (DID) number from the country in which the AWS Region is located, 30
minutes per month of inbound DID calls.
• Beyond the Free Tier, this solution will cost approximately $4.54 per month for a
permanent DID phone number and 100 inbound calls.
• DID Phone Number: As low as $.03 cents a day, depending on country
• Voice usage $0.018 per minute
AWS IoT Core: With AWS IoT Core, you pay only for what you use with no minimum
fees or mandatory service usage. This approach provides you with transparency and a
low price regardless of your workload type, because you only pay for the specific AWS
IoT Core components you use. The cost of this use case is approximately $0.09 per
month.
• AWS IoT Core pricing is based on the number of messages handled from your
IoT devices (In us-east-1, up to 1 billion messages is $1.00)
7Amazon Web Services Build a Keyless Entry System with Amazon Connect and AWS IoT Core
• Additionally, connectivity time is metered in 1-minute increments, and is
based on the total connection minutes your devices are connected to
AWS IoT Core: ($0.08 per million minutes of connection in us-east-1)
• If using IoT Rules to trigger downstream automation or notifications there
is a charge: (In us-east-1, it is $0.15 per million rules triggered / per million
actions executed)
• AWS IoT Core has a Free Tier (12 Months) for up to 250,000 messages
(published or delivered) per month.
Usage based components
AWS Lambda: Less than $0.20 per month
• Lambda is charged based on the number of invocations made to the function
per month, as well as the amount of gigabyte-seconds your function runs for
(based on the memory allocated)
• There is an AWS Free Tier for the first 1 million requests per month
Amazon DynamoDB: Approximately $0.25
• Amazon DynamoDB charges based on the number of read or write requests
invoked, along with storage.
• There is a Free Tier for storing your first 25 GB of data
Note: Review the service pricing pages for the most up-to-date AWS Pricing
information.
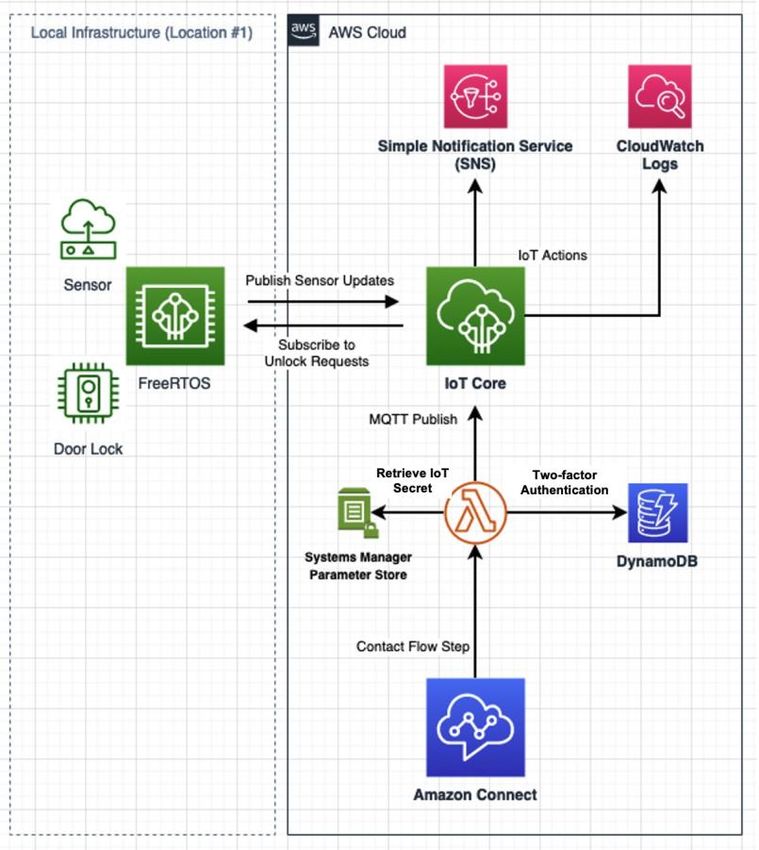
Architecture overview
The following diagram shows the architecture that you build in this walkthrough.
8Amazon Web Services Build a Keyless Entry System with Amazon Connect and AWS IoT Core
Figure 2: Architecture for keyless entry system
Walkthrough
Create the Amazon Connect contact center instance
Note: This service must be deployed in an AWS Region that supports
Amazon Connect.
1. Sign into the Amazon Connect console and choose Get started.
2. On the Identity management page, choose Store users within Amazon
Connect and specify an Access URL. Then, choose Next step.
9Amazon Web Services Build a Keyless Entry System with Amazon Connect and AWS IoT Core
By selecting this option, you are using Amazon Connect to manage users.
Since this isn’t a contact center deployment, you only need a single user for
routing calls. Make a note of the Amazon Connect instance alias; you will need
this for step 5.
3. On the Administrator page, choose Add a new admin and specify the details
for the administrator account. Then, choose Next step.
This administrator account is separate from your AWS account and is used to
maintain your Amazon Connect. You use these administrator credentials in
Step 9.
4. On the Telephony options page, make sure the following options are selected,
then choose Next step.
o I want to handle incoming calls with Amazon Connect
o I want to make outbound calls with Amazon Connect
5. On the Data storage page, choose Next step.
6. On the Review and create page, review your selections and choose Create
instance.
Once created, you will see an Access URL to log into your Amazon Connect
instance as well as a link on your instance alias.
7. Once the Success message appears, choose Get started, and then choose
Let’s go.
8. On the Claim phone number page, select a Country, Type, and Phone
number. Then, choose Next.
Make note of your Amazon Connect phone number, which will be used to test
and use your solution.
9. Optionally, test your phone number. Call your Amazon Connect phone number
to hear a default greeting and explore some of the functionality in the default
contact flows.
10. In the Amazon Connect console, navigate to your instance alias and make
note of the instance alias and instance ID. The instance ID is the final segment
of the instance ARN (e.g., arn:aws:connect:::instance/). You need this information for step 5 in
the process.
10Amazon Web Services Build a Keyless Entry System with Amazon Connect and AWS IoT Core
Retrieve your AWS IoT Core endpoint value
Since AWS IoT Core is a managed service there is an endpoint already set up for you.
This endpoint value is specific to the AWS Region you are currently in. You can find
your endpoint value by running a command in the AWS CLI or through the console.
Run the following command in the AWS CLI:
aws iot describe-endpoint --region YOUR-REGION-HERE
Alternatively, find your AWS IoT Core endpoint using the AWS Management Console:
1. Sign in to the AWS IoT service page and in the left navigation menu, choose
Settings.
2. On Settings page, in the Custom endpoint section, note the Endpoint value.
You will need this value for Step 5 in the process.
Figure 3: Custom endpoint value
Create a secret key for your local devices in AWS
Systems Manager
AWS Systems Manager Parameter Store provides a centralized location for managing
variables used by your applications. Secure String parameters use AWS Key
11Amazon Web Services Build a Keyless Entry System with Amazon Connect and AWS IoT Core
Management Service (AWS KMS) to encrypt your secret values so they do not need to
be hardcoded in your code.
Because Secure String parameters cannot be created through AWS CloudFormation,
you create one manually through the AWS CLI in AWS Systems Manager Parameter
Store.
By using Parameter Store, you avoid hardcoding secret strings in your AWS Lambda
function. Instead, by using the AWS SDK in your Lambda function, you can fetch secret
values during the function run time in a way that is secured with AWS Identity and
Access Management (IAM).
In the following code snippet, replace the value for YOUR_SECRET_HERE with a
secret key that your microcontroller will check before unlocking the door. This key can
be any string you want and is used to ensure that only the Lambda function deployed
for this application triggers a door unlock.
In the AWS CLI, run the following command with your values:
aws ssm put-parameter --name AmazonConnect-IoT-entryCode-mqttSecret
--type SecureString --value YOUR_SECRET_HERE --region
YOUR_REGION_HERE
Make note of the both the --name and --value you used. These values are required in
future steps.
Create a certificate
Create a certificate in AWS IoT to uniquely identify your ESP32 device and authorize it
to subscribe and send messages to AWS IoT Core.
Change directories into a directory set up for this project and run the following
commands to generate and save certificate files on your computer:
wget https://www.amazontrust.com/repository/AmazonRootCA1.pem -O
rootCA.pem
aws iot create-keys-and-certificate \
--set-as-active \
12Amazon Web Services Build a Keyless Entry System with Amazon Connect and AWS IoT Core
--certificate-pem-outfile esp-certificate.crt \
--public-key-outfile esp-public.key \
--private-key-outfile esp-private.key \
--region YOUR_REGION_HERE
Make note of the certificateArn in the response as well as the generated certificates
(which should be downloaded to your project directory)
Deploy the AWS IoT authentication function with AWS
CloudFormation
In this step, you tie together your SSM Parameter Store from Step 3, your IoT
Certificate from Step 4, your AWS IoT Core instance from Step 2, and your Amazon
Connect instance from Step 1 with a single AWS CloudFormation template.
Before starting with the CloudFormation deployment, you should have noted five pieces
of information from the prior steps. If you are missing any of these values, go back to
each of the previous steps and double check your values.
• From step 1: Your Amazon Connect Instance ID and Instance Alias
• From step 2: Your IoT Endpoint URL (e.g. testendpoint.iot.us-east-
1.amazonaws.com)
• From step 3: Your SSM Parameter Name (e.g. AmazonConnect-IoT-entryCode-
mqttSecret)
• From step 4: Your IoT Certificate ARN (e.g. arn:aws:iot:us-east-
1:xxxxxxxxxx:cert/xxxxxxxxxxxxx)
This Cloud Formation template will provision the necessary AWS resources for this
solution’s authentication process, including Amazon DynamoDB, AWS IoT Certificates,
Policies, Things, and an AWS Lambda function to authenticate and authorize the unlock
requests.
1. Launch the template in the AWS Management Console in us-east-1 Region and
follow the instructions to deploy the infrastructure.
(Optionally, you can deploy the template in a different Region.)
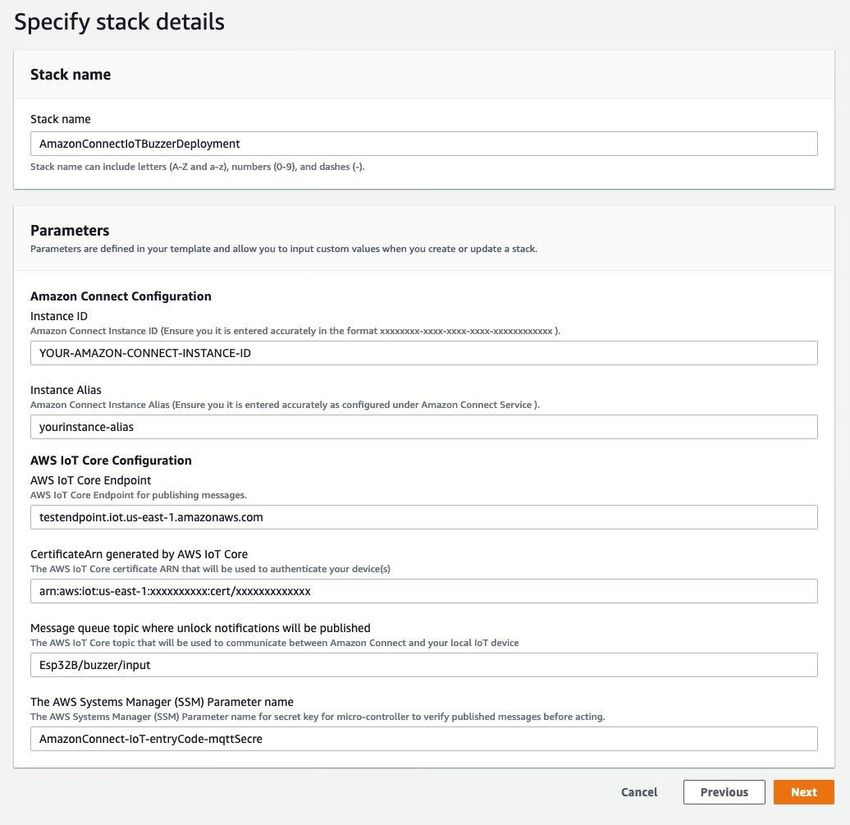
2. On the Specify stack details page, in the Parameters section, enter your
parameter values.
13Amazon Web Services Build a Keyless Entry System with Amazon Connect and AWS IoT Core
3. For Message queue topic where unlock notifications will be published
specify Esp32B/buzzer/input
Note: You can modify this parameter as long as you also adjust the
corresponding variable in the ESP32 sketch to match in step 7. This the
message queue topic is where your ESP32 will look for messages telling it to
take actions.
The CloudFormation template includes an additional parameter for the MQTT topic for
publishing messages back to AWS IoT Core. This parameter is not used in this guide,
but can be used if you implement your ESP32 to detect signals and send notifications,
such as when the buzzer is manually activated on a local circuit.
Figure 4: Parameters required for stack
14Amazon Web Services Build a Keyless Entry System with Amazon Connect and AWS IoT Core
(Optional) Deploy template in a different AWS Region
If you wish to deploy this template in a different AWS Region, modify the bold portion of
this link with your Region and then launch the stack:
https://console.aws.amazon.com/cloudformation/home?region=us-east-
1#/stacks/new?stackName=AmazonConnectIoTBuzzerDeployment&templateURL=http
s://nicklo-cloudformation-templates.s3.amazonaws.com/iot-buzzer-deployment.yaml
For this option, you must also manually host the Lambda function code in your own S3
bucket in the Region of your choice. (Download the Lambda function code.)
In the parameters section of the CloudFormation template, complete the last section
named Override Lambda Code Location [Leave Blank if Deploying in US-EAST-1]
by entering the S3 bucket name and key of the Lambda file you re-hosted.
Figure 5: Required parameters when deploying in different Region
Once your deployment is complete, choose the Resources tab to view the created
resources.
Figure 6: Resources created with CloudFormation template
Add access codes to the Amazon DynamoDB table
In this implementation, Amazon DynamoDB is used to hold the active list of access
codes that is checked by your Lambda function when an access request is made
15Amazon Web Services Build a Keyless Entry System with Amazon Connect and AWS IoT Core
through Amazon Connect. You need to create one or more codes for each guest you
expect to use this system. To add these access codes,
1. On the CloudFormation Resources tab, choose the DynamoDB table.
2. Choose Create item and create one record for each code you want to make
active. There is an example record created by the CloudFormation template.
Take note of the following fields and data types in the DynamoDB table that the
Lambda function requires to work properly:
Table 1: Fields required for Lambda function
Field Required? Type Description
contactAddress Required string Phone number you expect the call to come from.
Must conform to E.164 format standards (+1 for
US based numbers).
active Required boolean Indicates whether active (true or false)
entryCode Required integer Number use must enter into dialpad when
prompted by Amazon Connect Contact Flow.
expiryTime-TTL Optional integer Indicates configured record expiration time for
Unix DynamoDB to automatically remove records and
epoch save on storage costs.
time
oneTimeUse Optional boolean Indicates whether one time use (true or false)
16Amazon Web Services Build a Keyless Entry System with Amazon Connect and AWS IoT Core
Figure 7: Example entry codes in DynamoDB table
Set up your microcontroller
Note: Make sure you have the Arduino IDE installed before continuing. For
installation steps, see Prerequisites.
1. In the Arduino IDE, open Preferences > Settings and in the Additional
Boards Manager URLs field, add the following ESP32 Board Manager URL:
https://dl.espressif.com/dl/package_esp32_index.json
17Amazon Web Services Build a Keyless Entry System with Amazon Connect and AWS IoT Core
Figure 8: Add ESP32 Board Manager URL in Adruino IDE
2. Navigate to the Boards Manager and install the esp32 board.
18Amazon Web Services Build a Keyless Entry System with Amazon Connect and AWS IoT Core
Figure 9: Install the esp32 board
3. Navigate to Sketch > Include Library > Library Manager. Make sure you find
the exact library by verifying both the name and author.
Figure 10: Aduino_JSON library by Adruino
Figure 11: MQTT library by Joel Gaehwiler
4. Make a few configuration changes to the code provided:
a. In the default sketch file, add a new tab and name it Secrets.h. This is
where you will configure the specific variables associated with your AWS
Account, local Wifi network, and the secret code created in AWS SSM in
Step 3.
19Amazon Web Services Build a Keyless Entry System with Amazon Connect and AWS IoT Core
Figure 12: Add new tab in Sketch window
b. Paste the following code into your main sketch.
#include
#include
#include
#include
#include
#include "Secrets.h"
WiFiClientSecure net;
MQTTClient client;
// variables to store the current output state
String output27State = "off";
// variable for storing the potentiometer value
int potValue = 0;
20Amazon Web Services Build a Keyless Entry System with Amazon Connect and AWS IoT Core
// Potentiometer is connected to GPIO 34 (Analog ADC1_CH6)
const int potPin = 34;
// variable for Hall Effect Sensor
int hallValue = 0;
// Assign output variables to GPIO pins
const int output27 = 27;
long lastMsg = 0;
// Check wifi and connection to MQTT on AWS IoT
void connect() {
Serial.print("Checking wifi...");
while (WiFi.status() != WL_CONNECTED) {
Serial.print(".");
delay(1000);
}
Serial.print("\nConnecting ");
Serial.print(THING_NAME);
Serial.print(" to AWS IoT\n");
while (!client.connect(THING_NAME)) {
Serial.print(".");
delay(1000);
}
Serial.println("Connected to AWS IoT!");
client.subscribe(MQTT_SUB_TOPIC);
}
void setup()
{
Serial.begin(115200);
// Initialize the output variables as outputs
pinMode(output27, OUTPUT);
digitalWrite(output27, LOW);
// Configure WiFiClientSecure to use the AWS IoT device credentials
net.setCACert(AWS_CERT_CA);
net.setCertificate(AWS_CERT_CRT);
net.setPrivateKey(AWS_CERT_PRIVATE);
//Connect to wifi and AWS IoT
WiFi.begin(WIFI_SSID, WIFI_PASSWORD);
client.begin(AWS_IOT_ENDPOINT, 8883, net);
client.onMessage(messageReceived);
// Create FreeRTOS Task to listen for voltage on the sensor and
publish a message to MQTT
xTaskCreate(
publishRing
, "publishRing"
, 8192 // Stack size
21Amazon Web Services Build a Keyless Entry System with Amazon Connect and AWS IoT Core
, NULL
, 1 // Priority
, NULL);
connect();
}
// Task to send an unlock door signal when a message is received with
the correct secret from AWS IoT
void messageReceived(String &topic, String &payload) {
Serial.println("incoming: " + topic + " - " + payload);
JSONVar message = JSON.parse(payload);
String event = JSON.stringify(message["event"]);
String secret = JSON.stringify(message["secret"]);
if (event == JSON.stringify("unlock") && secret
== JSON.stringify(SECRET_KEY)) {
Serial.println("Creating Unlock FreeRTOS Task");
xTaskCreate(
unlockDoor
, "unlockDoor"
, 1024 // Stack size
, NULL
, 1 // Priority
, NULL);
}
}
// FreeRTOS task to handle the length of the door unlock signal
and the pin voltage state
void unlockDoor(void * unused) {
Serial.println("GPIO 27 on");
output27State = "on";
digitalWrite(output27, HIGH);
//Unlock for 4000 milliseconds
vTaskDelay(4000);
Serial.println("GPIO 27 off");
output27State = "off";
digitalWrite(output27, LOW);
vTaskDelete(NULL);
}
// FreeRTOS task for listening to the voltage sensor value and
publishing messages if voltage is detected on the connected line
void publishRing(void *unused) {
(void) unused;
for (;;) {
// Reading potentiometer value
potValue = analogRead(potPin);
// Serial.print("/nPotentiometer Value: ");
// Serial.print(potValue);
22Amazon Web Services Build a Keyless Entry System with Amazon Connect and AWS IoT Core
// Depending on your solution, you may need to modify the
Potentiometer value above or below 2000
if (potValue > 2000) {
JSONVar message;
int now = millis();
message["event"] = "Door event";
message["potValue"] = potValue;
// Publish message only if voltage detected more than 5 seconds
ago, avoiding repeat messages for the same notification
if (now - lastMsg > 5000) {
lastMsg = now;
Serial.print("/nDoor detected, Publishing message to MQTT: ");
Serial.print(JSON.stringify(message));
client.publish(MQTT_PUB_TOPIC, JSON.stringify(message)); //
You can activate the retain flag by setting the third parameter to
true
}
}
vTaskDelay(100);
}
}
void loop() {
client.loop();
delay(10);
if (!client.connected()) {
connect();
}
}
c. Paste the following code into your Secrets.h tab and make the following
edits: . You will need to edit this file with the following items under the
matching numbered header in the code comments:
You can optionally rename your device and change the MQTT topics your
device will be subscribing and publishing to. Note that the Lambda function is
pre-set to use the MQTT_SUB_TOPIC listed below; if you change this you will
need to modify the Lambda function.
i. Enter the secret key value you created in the SSM Parameter
Store in Step 3.
ii. Enter your Wifi SSID and password at the location you wish for
your ESP32 to connect to. Also enter the AWS IoT Endpoint you
noted from Step 2.
iii. Enter your Amazon Root Certificate generated in Step 4.
iv. Enter your device certificate generated in Step 4.
v. Enter your device private key generated in Step 4.
23Amazon Web Services Build a Keyless Entry System with Amazon Connect and AWS IoT Core
//1. Define your device name and the AWS IoT Topics your device will
subscribe to and publish messages to
#define THING_NAME "Esp32B" //Optionally, rename the device
#define MQTT_LASTWILL_TOPIC "Esp32B/lastwill"
#define MQTT_PUB_TOPIC "Esp32B/buzzer/output"
#define MQTT_SUB_TOPIC "Esp32B/buzzer/input"
//2. Enter the secret you used for AWS Systems Manager's secret
parameter
#define SECRET_KEY "XXXXXXXX"
//3. Enter your WIFI credentials and your IoT Endpoint
const char WIFI_SSID[] = "XXXXXXXXXXXXX";
const char WIFI_PASSWORD[] = "XXXXXXXXXXXXXX";
const char AWS_IOT_ENDPOINT[] = "XXXXXXXXXXXXXXXX.iot.XX-XXXX-
X.amazonaws.com";
//4. Amazon Root CA 1
static const char AWS_CERT_CA[] PROGMEM = R"EOF(
-----BEGIN CERTIFICATE-----
-----END CERTIFICATE-----
)EOF";
//5. Device Certificate
static const char AWS_CERT_CRT[] PROGMEM = R"KEY(
-----BEGIN CERTIFICATE-----
-----END CERTIFICATE-----
)KEY";
//6. Device Private Key
static const char AWS_CERT_PRIVATE[] PROGMEM = R"KEY(
-----BEGIN RSA PRIVATE KEY-----
-----END RSA PRIVATE KEY-----
)KEY";
5. Flash your ESP32 with the Arduino IDE.
a. Plug the ESP32 board into a USB port on the computer running the Arduino
IDE.
b. Navigate to Tools > Board, and then select the type of ESP32 module you
are using. (This guide uses an ESP32-DevKitC).
c. Choose Tools > Port, and then select the matching port for your device. For
details, see Instructions on how to find the port of your ESP32.
d. In the Arduino IDE, choose Upload.
24Amazon Web Services Build a Keyless Entry System with Amazon Connect and AWS IoT Core
e. Choose the magnifying lens icon on the top right to open the Serial Monitor.
Set the baud rate to 115200.
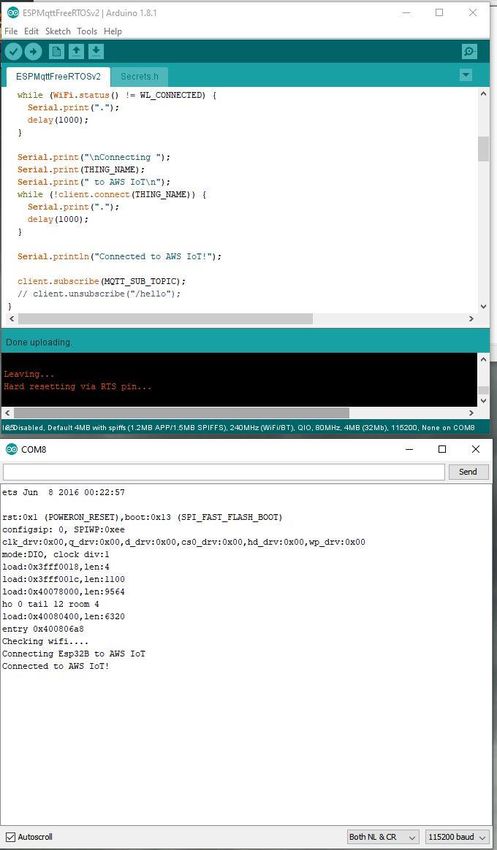
6. Test your connection by connecting your ESP32 to the computer running the
Arduino IDE and opening the serial monitor.
Your serial monitor should display Connected to AWS IoT! if it was successfully
flashed and connected to AWS IoT.
25Amazon Web Services Build a Keyless Entry System with Amazon Connect and AWS IoT Core
Figure 13: Test your connection
26Amazon Web Services Build a Keyless Entry System with Amazon Connect and AWS IoT Core
7. In the AWS Management Console, open AWS IoT Core and in the left menu,
choose Test.
8. On the MQTT client page, in the Publish section, enter Esp32B/buzzer/input
and specify the following message:
{
"event": "unlock",
"secret": "YOUR_SECRET_HERE"
}
9. Choose Publish to topic.
Figure 14: Send a test message
27Amazon Web Services Build a Keyless Entry System with Amazon Connect and AWS IoT Core
If connectivity has been established, you should receive a similar message on your
ESP32’s serial monitor.
Figure 15: Received message on serial monitor
If your secret matches what you have included in the Arduino Secrets.h sketch file, you
will also receive a message of Creating Unlock FreeRTOS Task followed by GPIO
27 on and GPIO 27 off.
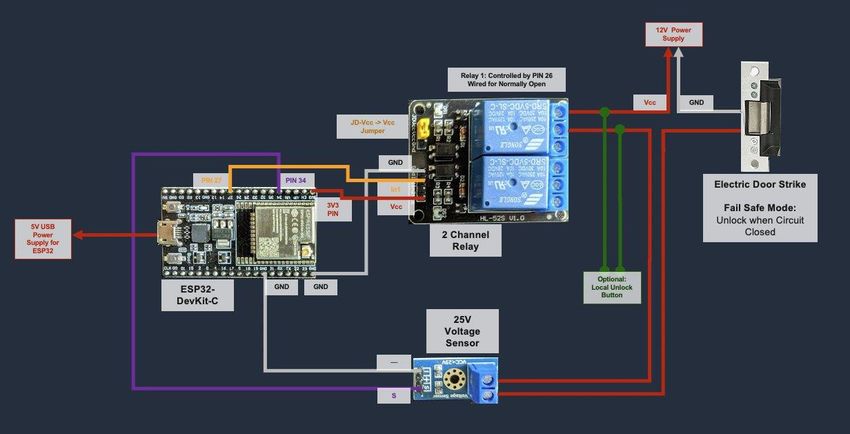
Wire the ESP32 microcontroller, relay, and sensor to
your door hardware
WARNING: Do not attempt any wiring of any kind if you lack the knowledge and
understanding required. Otherwise personal injury and/or death as well as
property damage or loss could occur. Electricity is dangerous and can cause
28Amazon Web Services Build a Keyless Entry System with Amazon Connect and AWS IoT Core
personal injury or death as well as other property loss or damage if not used or
constructed properly. Please consult with a licensed professional for wiring
assistance. Note that wiring diagrams for your desired hardware is specific to the
unlock mechanism you are using and out of the scope of this paper.
Although each door lock mechanism will be different, most mechanisms work by
unlocking the door (or in fail-open scenarios, locking the door) when the door lock circuit
is closed. In the case of typical electric door strikes or door buzzers, the door will fail in
a locked state when no power is supplied.
Figure 16: Wiring diagram
Follow these steps to wire your ESP32 with the rest of the components:
1. Connect Pin 27 to the relay’s In pin. The provided Arduino sketch uses Pin
27 of the ESP32-DevKitC to trigger the relay to closed when voltage is
applied.
2. Connect the 3V3 Pin on the ESP32 to the Vcc Pin on the relay and GND on
the ESP32 to GND on the Relay. You can supply power to the relay by connect
the 3V3 Pin of the ESP32 to the 2 Channel Relay’s VCC pin or use an external
power supply. With the jumper on the JD-Vcc → Vcc Pins this Relay allows
the ESP32 to provide both the relay signal and power.
29Amazon Web Services Build a Keyless Entry System with Amazon Connect and AWS IoT Core
3. Splice your electric door strike’s 12V line to the Relay’s NO (normally open)
and COM ports. Using the NO port, the relay will close the circuit when the
ESP’s Pin 27 is set to High Voltage.
4. Optionally, wire a 25V Voltage Sensor to detect local door unlocks for logging
purposes:
a. Connect your 25V Sensor’s S Pin to the ESP32’s Pin 34 which we are using
in our sketch to detect voltage on the connected line. Connect the — Pin to a
ground on the ESP32.
b. On the other end of the 25V Sensor, splice the hot wire of the electric door
strike and connect the two ends.
5. Optionally, add a local push button solution for bridging the circuit in your local
environment to trigger door unlocks manually. This option is highlighted as
Optional on the wiring diagram.
Customize your Amazon Connect contact flow
In this step, you create a contact flow that sets the experience for your callers when
they call into your phone number. You download a sample contact flow template and
then associate the Lambda function deployed by CloudFormation to be usable in your
Amazon Connect contact flows.
1. Download and save the contact flow template.
2. In the AWS Management Console, open Amazon Connect and choose your
Instance alias.
3. In the left navigation menu, choose Contact flows > AWS Lambda > Function
> iot-buzzer-deployment-WriteToIoTBuzzerRequest-.... > + Add Lambda
Function.
4. On the left navigation menu, choose Overview > Login URL and choose the
link on your login URL. Log in with the admin credentials you set up in Step 1.
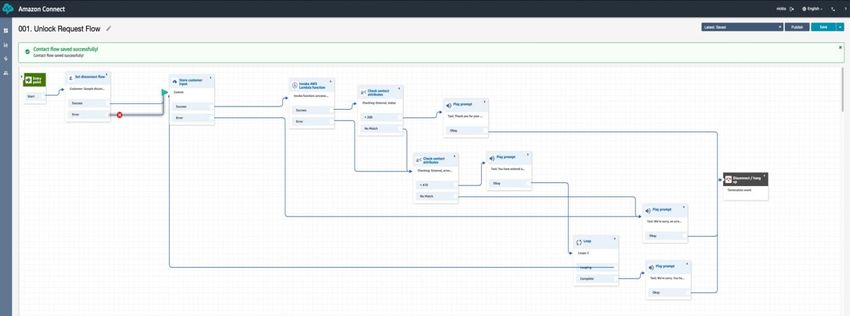
5. Choose Contact Flows > Create contact flow and choose Import flow (beta).
Choose the contact flow template you downloaded.
Once the flow is imported you should see the following flow.
30Amazon Web Services Build a Keyless Entry System with Amazon Connect and AWS IoT Core
Figure 17: Sample contact flow template
6. Choose the Invoke AWS Lambda Function step (4th block from the left) and
ensure the function selected is your Buzzer function. This step’s selection drop-
down list will only display Lambda functions that you have associated with your
Amazon Connect instance.
7. Choose Save and Publish.
8. In the left Amazon Connect navigation menu, choose Routing > Phone
Numbers.
9. Make note of your phone number and then choose the number to modify the
default flow.
10. Choose 001. Unlock Request Flow and choose Save.
Amazon Connect may take a few minutes to propagate changes made to the Contact
flow.
Test your application
All done! Try your solution by dialing the number you choose in Step 1.
Note: You must call from a phone number that exists as a contactAddress in
your DynamoDB table for the Lambda function to validate your passcode.
If you find something isn’t working, turn on logging for all steps in the process where
logs are not on by default (including turning on CloudWatch logging for Amazon
31Amazon Web Services Build a Keyless Entry System with Amazon Connect and AWS IoT Core
Connect contact flows and turning on CloudWatch logging for IoT Core) and checking
for each of the following potential points of failure:
• Is your Amazon Connect Contact Flow triggering you Lambda function? Double
check your Lamba Function’s CloudWatch Logs and see if it’s executing
properly.
• Does your ESP32 connect to AWS IoT Core?
o Check the metrics of AWS IoT Core in the console to receive a count of
connected AWS IoT Core devices.
o Check the serial monitor of the ESP32 by connecting it to your computer via
USB.
• Is the Lambda function publishing to AWS IoT Core?
o Subscribe to the topic Esp32B/buzzer/input in the IoT Core → Test
section of the AWS Management Console and subsequently run your
Lambda function manually using a test payload.
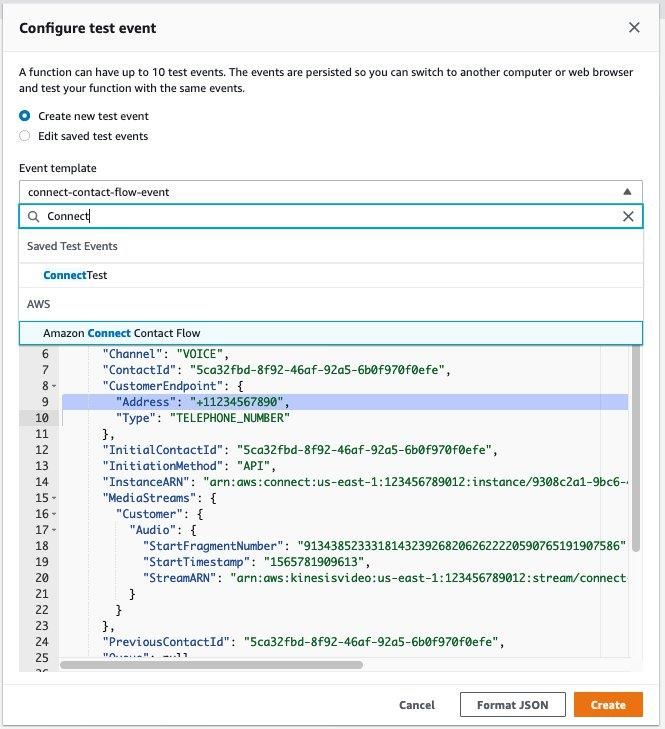
o Create a test payload using the standard Amazon Connect template in the
Lambda test configuration page. Modify the payload to include an Address
and parameter of EntryCode matching your DynamoDB records, like the
following example:
32Amazon Web Services Build a Keyless Entry System with Amazon Connect and AWS IoT Core
Figure 18: Example test event
"Parameters": {
"EntryCode": "12369874"
}
• Is the SSM secret parameter what you have included in the ESP32’s Arduino
Sketch Secrets.h file?
• Are the certificates for your ESP32 IoT thing correctly pasted into the Arduino
sketch and active in AWS IoT Core?
33Amazon Web Services Build a Keyless Entry System with Amazon Connect and AWS IoT Core
• Does your ESP32 code work without errors?
Check the serial monitor and make sure the expected serial logs are appearing
when you restart your device.
• Is your ESP32 wired properly?
Replace the relay with an LED to test the wiring to the relay. If the LED
connected to PIN 27 turns on when activating the Amazon Connect flow, the
function is working.
Conclusion
This guide walked you through a working door buzzer solution triggered by Amazon
Connect and managed through AWS IoT Core. This deployment can be a foundation for
a multi-device setup across a single location or multiple locations. Additionally, there are
unlimited options for additional services, interaction channels, and hardware devices
that you can consider to build upon your solution.
Next steps
Trigger additional services from AWS IoT actions
If you would like to be notified when the workflow is triggered, you can create rules in
AWS IoT Core using the AWS Management Console. To do so, refer to the following
resources:
• Add HTTP actions to your IoT Core workflows
• Create alerts when your device sends messages to IoT Core
Clean up
If you would like to shut down this solution to avoid recurring costs, clean up the
following resources:
• AWS CloudFormation: Navigate to AWS CloudFormation and delete the stack.
• Parameter Store: Although standard parameters that are not actively used do
not incur a charge, you may delete your parameters in the AWS SSM
Parameter Store through the AWS Management Console.
34Amazon Web Services Build a Keyless Entry System with Amazon Connect and AWS IoT Core
• Amazon Connect: In the Amazon Connect console page, choose Remove
Instance
Contributors
Contributors to this document include:
• Nicholas Loek, Partner Solutions Architect, AWS
Additional resources
For additional information, see:
• AWS IoT
• AWS Solutions Library
• AWS Architecture Center
Document history
Date Description
May 24, 2021 First publication
35You can also read