CYMBALS - 2021 AUDITION PACKET - Pacific Crest Youth Arts Organization PO Box 5409
←
→
Page content transcription
If your browser does not render page correctly, please read the page content below
2021 AUDITION PACKET

  CYMBALS
     Pacific Crest Youth Arts Organization
                  PO Box 5409
            Diamond Bar, CA 91765
             www.pacific-crest.org
Welcome to Pacific Crest!

We’ve assembled a group of excellent instructors, and I’m really looking forward to
producing the best percussion section that this corps has ever had. Of course, that’s easy to
say… now it’s time to get to work.

This will be a first draft of the technique program. We will adjust, add, and subtract to what is
here throughout the entire year. Some exercises are new, and some are things I’ve used in the
past. The technique description is written by Murray Gusseck. It gives an in depth look into
the way we will be playing.

For snare players, we will be playing on tilted drums. How much will be determined at a later
date. A slight tilt will do when you practice.

Overall, what we will be working to achieve, is to give you the best experience possible. This
means creating the best musicians, and humans. We want you to understand what it takes to
be successful in all endeavors, through music. Developing life skills will be as important as
developing chops, and musicianship.

One of the first steps in our journey will be to create a culture of honesty and accountability.
All of us will be reinforcing those concepts all year. The ONLY way we move forward is to
always have an honest dialogue about where we’re at , and where we want to go, and for
everyone (staff included) to be accountable for the work we do.

We will communicate with you more as we get closer to auditions.

Now, get to work!!

Glen Crosby
Program Coordinator & Percussion Director
Background
Every style of crash in this packet has 2 important components to help produce the best sound possible.
Those 2 components are the grace note, and the primary note. In the rudimental drumming community,
this is called a Flam. There will always be one part of the cymbal that makes contact before the remainder
of the cymbal actually hits. A fast and small flam produces a brighter, richer sound. A wide, slow moving
flam produces a dark and dull sound. If you attack with 2 parallel cymbals and there is no flam at all, the
cymbals will only release the air that was trapped inside, creating a “pop” sound.
Another very important tool to improve your sound quality, minimize finger contact with the cymbal on
the crash. When you play your crash, lift your fingers and get them off the cymbals. Your finger tips cut
off more sound than you think. They are a dampening system. Work on keeping your fingers on the
cymbals for better control of pictures, but when you play a crash, stretch your fingers and get them off the
cymbal.
Unlike the rest of the battery section, the weight of our instrument rests solely on our hands and arms.
Though they do not weigh much, the cymbals do start to put on some mass as time goes on. There is a
physical demand on this instrument, be mindful of that.
If you have the opportunity to pick up a set of cymbals, know that the images you will see in first-person
are different from an outside perspective. What I mean by that, many positions in this packet, from your
point-of-view behind the cymbals, they will never be bladed angles. This applies mainly to the Port Set,
Drop Crash, Tap Set, and Gong Set. Be sure to practice in front of a mirror to see and feel the difference
of first-person perspective, and an outside eye’s perspective. You should always see the inside of the
cymbal, everyone else should see a blade.
In this packet, there are a lot of images that show the moment of contact with the ‘Flam’ attack. Know
that there is no stopping point on those images. For example, Image 2 of the Medium crash. That still
image is to demonstrate the Flam attack. That is not a stopping point in the technique. In real world
application, you would go from Image 1, straight to Image 3. But understanding what happens between
Image 1 and 3 is more important than any picture we can hit. This applies to the Full, Orchestral, Port,
Drop, any crash with that still image of the ‘Flam’
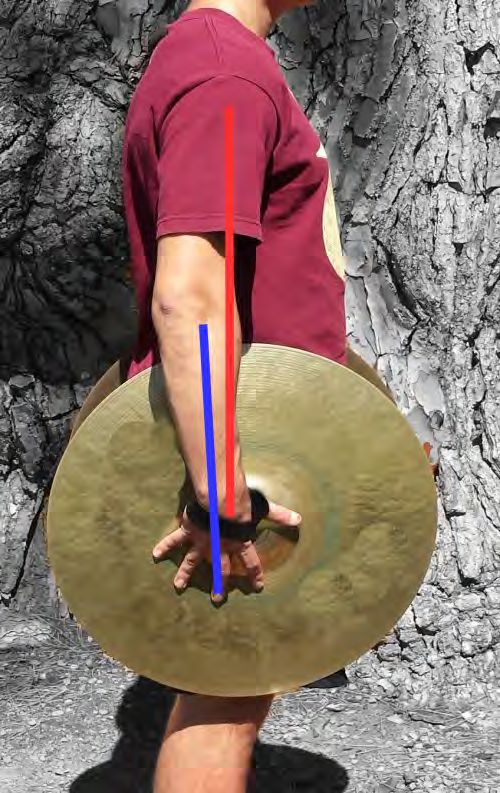
One common misconception about cymbals is that your hands need to be in line with each other, pointed
forward, False. Be sure, as you will see in the images, to maintain a straight line from your middle finger,
all the way down to your elbow. I say this to avoid pain and injury of the wrist. Your fingers should never
deviate from the angle your elbow and forearm create. I cannot stress this enough, please, please focus on
this as we go on.
And lastly, in cymbal-land, this instrument requires more of a mental demand than a physical demand.
They get heavy yes, but your mind is much stronger than your body. Remember,
“Whether you think you can, or you think you can’t – you’re right.” –Henry Ford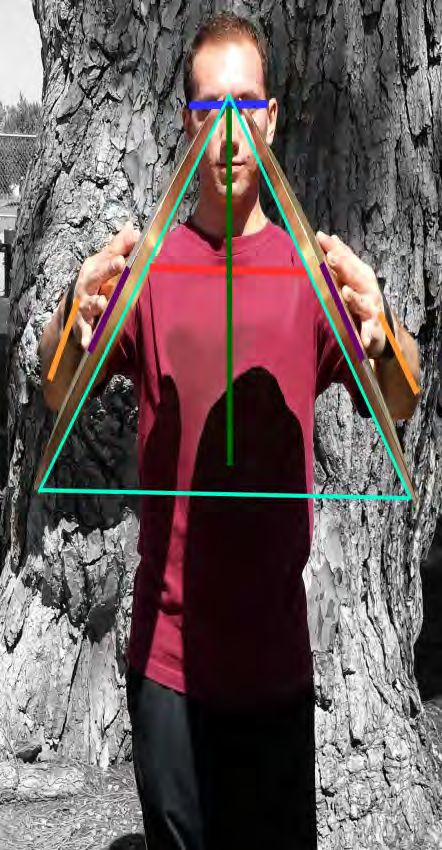
The Turkish Knot
The Turkish Knot will secure the strap so the cymbal does not fall off. Be sure to place a penny on the center of the
strap to help create a perfect square once the knot is complete.
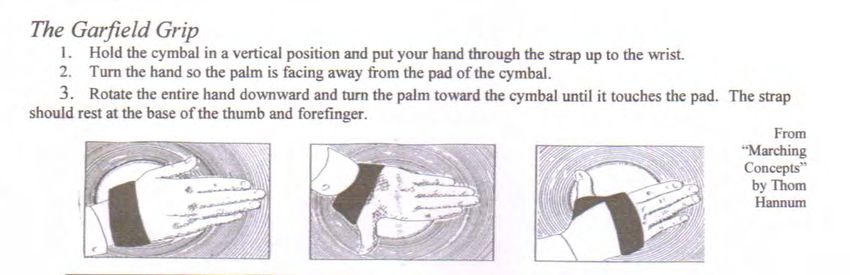
The Garfield Grip
The Garfield Grip gives the best handle of the cymbals. With this, we can treat the cymbals as an extension of our
hands and body. We will do a slight adjustment from this grip. Refer to image 3, the strap will not be lying parallel
to our knuckles, and the strap over the thumb will be closer to the wrist, I do not want any stress on any knuckle.
Get the strap higher on the wrist to avoid being over the thumb knuckle, and get the point of the strap closer to the
pointer knuckle.

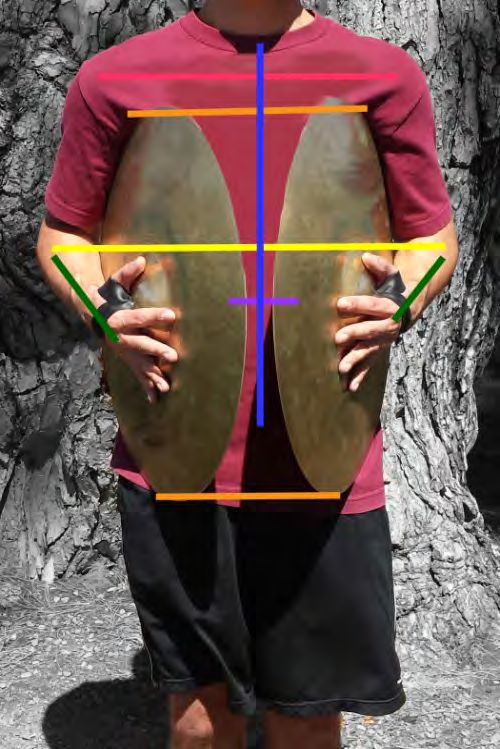
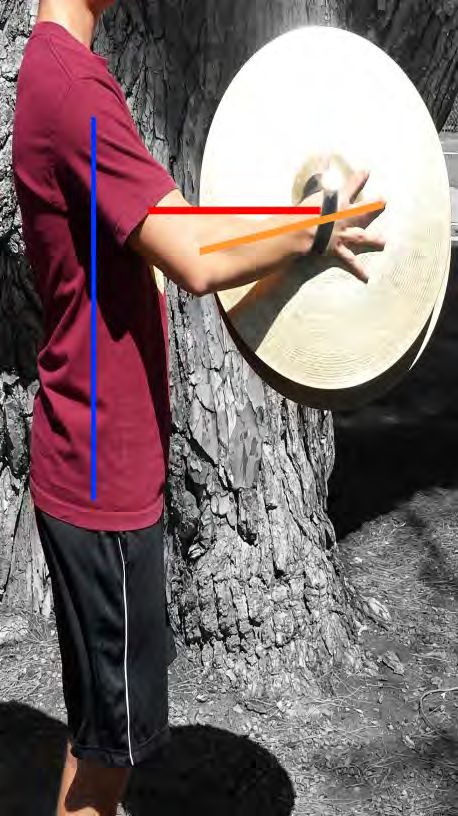
                                      Attention/Stand-By
       This position, the Attention/Stand-By, is one of the two main images we will hold when called to attention by
       the Drum Major, Corps Director, any Caption Heads, or any Staff Member. When we, the instructional staff,
       see you in this position, we will know that you are prepared for the next repetition, or that you are engaged to
       receive any comments or information after the repetition is completed. This is a very symmetrical image,
       making it very easy to locate differences and errors.

                                              Image1: Front Profile
                                                  •    Hands will be about mid-thigh level, think of pant pockets
                                                  •    Cymbals are resting on your legs, against your body
                                                  •    Cymbals must be same level on both sides
                                                  •    Parallel cymbal angles to show the least amount possible
                                                  •    Elbows will be off the body
                                                  •    Shoulders are square and relaxed

                                              Image 2: Side Profile

                                                  •    Hands will be underneath/ in-line with your shoulder
                                                  •    Keep your hands relaxed, no tension
                                                  •    Keep your hands open and fingers separated
                                                  •    Maintain a straight line from elbow to middle finger
                                                  •    No wrist bend
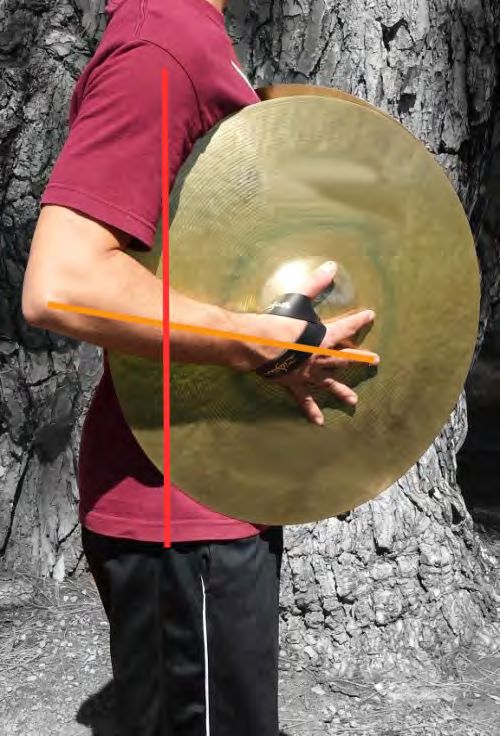
                                        Choke Position
The Choke Position is the second image that will be held when called to attention or stand-by. Again, as with the
Attention/Stand-By set, this shows us that you are fully engaged and attentive. This is called the Choke position
because this is how we cut off any extra undesired ring from a regular open-ended crash. As we proceed through this
packet, know that many crashes will have a choke ending to them, given the musical requirements.

                                          Image 1: Front Profile
                                            •     Cymbals resting on your torso
                                            •     Tucked into the arm pits
                                            •     Cymbals are leveled with each other
                                            •     Separated by no more than 3 inches in the front
                                            •     Separation is down the midline of the body
                                            •     Elbows and forearms are pressing against the body
                                            •     Hands relaxed, Fingers separated
                                            •     Straight wrist with forearm
                                            •     Shoulders squared and relaxed

                                          Image 2: Side Profile
                                            •     Hips under the shoulders
                                            •     Cymbals tucked into the arm pits
                                            •     Cymbals tips are equal distance from the torso
                                            •     Straight line from Elbow to Middle Finger
                                            •     No Wrist Bend

                                          *Here we can also play the ‘Click’ sound. All you need to do is,
                                          keeping the cymbals on your body; the right cymbal opens as if
                                          on a door hinge, going no further than past a vertical blade.
                                          Once reached, attack the left cymbal about 3 inches inside
                                          the edge of the right cymbal and return back to the choke
                                          image. Left hand does not move.
                                              Orchestral Set
This is the picture that will be held the most throughout the show and your cymbal career. This is our “Home Base”.
A majority of what we do as cymbal players begin and end at this set. Using the proper mechanics in this set will
help develop muscle memory, which in turn, will set you up for success in every aspect of cymbal technique and
playing. So please be meticulous with the details on this position.

                                       Image 1: Front Profile

                                          •     Hands will be in front of Sternum
                                          •     Cymbal ANGLE will be from Left Trapezius to Right Hip Cavity
                                          •     Left Forearm is Parallel with the ground
                                          •     Cymbals are parallel angles with each other
                                          •     CENTER AND EDGES will be matched on the respective angle
                                          •     EDGES WILL NOT be matched laterally nor vertically
                                          •     Keep the shoulders relaxed and squared
                                          •     Straight wrist

                                       Image 2: Side Profile

                                          •     HANDS in front of the sternum
                                          •     STRAIGHT LINE elbow to finger
                                          •     HIPS underneath the shoulders, DON’T lean back b/c of weight
                                          •     ELBOW forms an obtuse angle to further distance from torso
                                          •     Cymbals are same distance front to back

                                       *From this set we can also play what’s called a ‘Sizz-Suck’. Drop the right
                                       cymbal into the left (left hand stays in place, does not move) while also
                                       starting to move forward at the set angle. There needs to be constant contact
                                       between the cymbals to produce the ‘sizz’ sound. If you put too much
                                       pressure on the cymbals as you travel, you will stop the vibrations cutting
                                       the sound short. Too little pressure and it will have too much ring of a crash
                                       and not enough vibrations to create the ‘sizz’. Get the fingers off for a better
                                       sound. The ‘Suck’ is a quick, retracting motion pulling the right cymbal
                                       back, and also pushing it down into the left to cut all sound completely.
                                       Think of cupping your palms together on the ‘Suck’, but make sure you do
                                       not break your wrist to point forward on the ‘Suck’.
                                                   Medium Crash
       The Medium Crash starts at the orchestral set, but 1 count before the written note in the music, we hit the prep for
       the Medium crash which is Image 1. Image 2 shows how the attack works going into the actual crash, and Image
       3 demonstrates the follow-through after the crash. There is no pause between images 2 and 3. It is a straight-lined
       path, in one fast motion. After the Follow-Through, the cymbals will return back to set, two counts after the attack.
       This crash can have a choke ending. Images 1&2 are the same, but there is no follow-through, instead you bring in
       the cymbals to the choke position. Return to Set 2 counts after the choke.

                                                                       Image 1: The Prep
                                                                       -Vertical Cymbals
                                                                       -Bells of the cymbals are leveled
                                                                       -Square Shoulders
                                                                       -Right Cym is pointed to edge of Left Cym
                                                                       -Straight wrists
                                                                       -Hips under the Shoulder
                                                                       -Cyms are Same Height

                                                                       Image 2: The Attack

                                                                       -Cyms / Bells are Same Height
                                                                       -Square Shoulders
                                                                       -Straight Wrists
                                                                       -Hips under Shoulders
                                                                       -Drive Straight

                                                                       *Notice the open space in the back end, there is the
                                                                       Flam setup

                                                                       Image 3: The Follow-Through
                                                                       -Square Shoulders
                                                                       -Cyms splitting midline
                                                                       -Straight right arm
                                                                       -Hands are leveled
                                                                       -Hips under Shoulder
                                                                       -Bells are in front of Sternum
                                                                       -Push with the elbow
                                                                       -Keep the shoulder back and relaxed

                                                                        *DO NOT THROW THE SHOULDER
                                                                        FORWARD WITH THE HAND
                                              Full Crash
The Full Crash is a Lateral version of the Medium crash. Starts at Orchestral Set, Prep 1 count before the attack,
reset 2 counts after the attack. As with the Medium crash, this can also end with a choke. The prep and attack are the
same, but go to the choke instead of doing the follow-through. This crash is very Black-and-White as far as pictures
go, maximize the flat images.

                                                                   Image 1: The Prep
                                                                   -Bell of right cym chin level
                                                                   -Right cym on right bicep
                                                                   -Right cym pointed 2 inches in left cym edge
                                                                   -Left hand will be at midline of the body
                                                                   -Left hand in front of sternum
                                                                   -Left cym on left forearm
                                                                   -Hips under the Shoulder

                                                                   Image 2: The Attack
                                                                   -Hand will start to travel down vertically
                                                                   -Attack 2 inches from edge
                                                                   -Attack at midline of body
                                                                   -Shoulders over hip
                                                                   -Keep shoulder back and relaxed
                                                                   -Left hand at Sternum
                                                                   -Move fast by driving with the elbow

                                                                   Image 3: The Follow-Through
                                                                   -Shoulders squared
                                                                   -Hands over each other
                                                                   -Cyms completely flat
                                                                   -Left wrist straight
                                                                   -Arm forms 90degree angle with shoulder and
                                                                   hip
                                                                   -Left hand stays at sternum

                                                                   *DO NOT THROW THE SHOULDER
                                                                   FORWARD WITH THE HAND
                                      Orchestral Crash
The sound produced by this crash is very delicate and bright. Very fine touch and attack speed is required in this
technique. This crash has 2 images before the attack but only has 1count to do so. After the attack, the prep is
repeated called ‘The Reset’. This is to allow the sound to travel. The reset will also be 1 count. This crash has no
staccato moments; it flows from one image to the other in an organic motion. There will always be a “connection”
with the cymbals throughout the movements. When practicing this one, smaller motions are better than bigger. If I
call for a ‘Dead Orchestral’ it just means there is no reset after the crash.

                                   Image 1: The Prep
                                   -Shoulders square
                                   -Maintain a ‘Hinge’ at the top end of the cymbals
                                   -Bottom of the cyms move first in a lateral motion
                                   -Right Hand presses down to maintain the blade
                                   -Left hand presses up to maintain the blade
                                   -Angle is smaller than 90 degree’s

                                   Image 2: The Turn
                                   -Lead with the bottom of the cymbals to smooth the rotation
                                   -Make the ‘connection’ with the bottom of cyms
                                   -Shoulders remain square
                                   -Press up and inward with the right hand for the blade
                                   -Press up with the left hand for the blade
                                   -Angle is just shy of 90 degrees

                                   Image 3: The Attack
                                   -Bring the cyms back in to set
                                   -Attack begins at the bottom
                                   -Right hand is displaced upwards a bit
                                   -Attack as if you were to clap really fast, not hard, fast and move out instantly
                                   -Straight wrists
                          Full-Prep Orchestral Crash
The Full-Prep Orchestral Crash has the brightest and fullest sound that can be produced from the cymbals. This
crash has 2 preparatory pictures before the attack, each of which having 1 count. Image 1 hits two counts before
the attack, Image 2 hits one count before the attack. Image 3 shows the set-up for the crash. As with the orchestral,
there is a reset with the same images, but do not hit image 3. After image 2, it returns back to set. If I say a ‘Dead
Full-Prep’ it just means there is no reset after the crash.

                                                                    Image 1: The Prep
                                                                    -Right hand at shoulder level
                                                                    -Shoulders square
                                                                    -Flat angle with the cyms
                                                                    -Space b/w the cyms down midline of body
                                                                    -Space is no more than 3 inches
                                                                    -Left hand drops from set for steeper angle
                                                                    -Hands in line
                                                                    -Wrists straight
                                                                    -Hips and shoulders

                                                                    Image 2: The Turn
                                                                    -Hands stay at same location just rotate
                                                                    -Press down for blade on right hand
                                                                    -Shoulders relaxed
                                                                    -Hands in line
                                                                    -Wrists straight
                                                                    -Hips and shoulders

                                                                    Image 3: The Attack
                                                                    -Right hand moves up to create displacement
                                                                    -Bottom attacks first, then top
                                                                    -Shoulders relaxed
                                                                    -Wrists straight
                                                                    -Hands in line
                                                                    -Hips and shoulders
                                                                    -Right Knot attacks at left bell
                                                 Port Set
This is the best set to give off a strong and determined presence just by virtue of the image. It is very straight
forward with the placement and angles. On this set, focus on having ‘tunnel-vision’ so the outside eye will only see
a blade. You should see the entire inside of the cymbal. The shoulders will start to get tense and begin rising, just
keep breathing and try to relax.

                                                                       Image 1: Front Profile
                                                                       -Cyms splitting midline of body
                                                                       -Hands at mouth level
                                                                       -Shoulders square and relaxed
                                                                       -Elbows in front the shoulders
                                                                       -Straight wrists
                                                                       -Press in with the fingers for the blade image

                                                                        Image 2: Side Profile
                                                                        -Hips and shoulders
                                                                        -Do not lean back
                                                                        -Wrists straight
                                                                        -Obtuse angle at the elbow for distance
                                                                        -Hands at mouth level
                                                                        -Cyms at same height and distance
                                             Port Crash
Also called the ‘A-V Crash’ this technique is very symmetrical, making it easy to clean but obvious for exposure.
Another 2-prep crash, image 1 will prep to an ‘A’ shape, 2 counts before the attack. Image 2 will prep to the letter
‘V’. The flam for the crash is image 3. This is the most demanding set because the weight is suspended in mid-air,
that being said, fight the tendency of leaning back to balance out the weight. This crash does have a reset, a choke
and a dead crash finish.

                                                                     Image 1: Prep A
                                                                     -Hands stay mouth level
                                                                     -Shoulders down and relaxed
                                                                     -Wrists/Elbows straight and symmetrical
                                                                     -Cymbal space at top no more than 3 inches
                                                                     -Cyms splitting midline of the body
                                                                     - Press down to keep the blade
                                                                     -Open with the elbows
                                                                     -Hips and shoulders in line
                                                                     -Keep space between the cyms and your head
                                                                     -Cyms are same height and distance away

                                                                     Image 2: Prep V
                                                                     -Hands stay mouth level
                                                                     -Shoulders square
                                                                     -Cyms are same level
                                                                     -Elbows same height
                                                                     -Splitting midline of body
                                                                     -Keep Distance from face
                                                                     -Press up to keep blade
                                                                     -Straight wrists
                                                                     -Hips and shoulders

                                                                     Image 3: The Attack
                                                                     -Hands at mouth level
                                                                     -Flam begins here
                                                                     -Displacement occurs going to the attack
                                                                     -Shoulders and hips
                                                                     -Elbows and wrists
                                                                     -Cyms have the same front to back relation
                                            Drop Crash
As the name states, the Drop Crash begins with the right cymbal suspended in front of the player’s faces, and drops
onto the left with speed and force. The Drop Crash has a darker sound that requires a great deal of touch but when
developed, adds a great punch. The prep for the drop crash, Image 1, hits 1 count before the attack. Image 2 shows
the attack at the moment of impact. After the impact, the cymbals maintain that slight displacement that can be seen
in Image 2. The Drop Crash has no reset, but it can end with a choke.

                                                                    Image 1: The Drop Prep
                                                                    -Right hand at eye level
                                                                    -Straight wrist
                                                                    -Keep shoulder down
                                                                    -Right cymbal in line with left edge
                                                                    -Shoulders and hips in line
                                                                    -Bell need to be in line
                                                                    -Straight lined path down
                                                                    -Left hand drops slightly below sternum

                                                                    Image 2: The Drop Attack
                                                                    -Shoulders stay squared
                                                                    -Create the displacement
                                                                    -Attack knot to edge of bell
                                                                    -Wrists are straight
                                                                    -Attack happens in front of body midline
                                                                    -Shoulders over hips
                                                                    -Hands in front of Sternum
                                                                    -Get the displacement
                                                                    -Bells are in line vertically
                                                     Tap Set
My personal favorite, the Tap set is another strong image that again, is hanging in mid-air. Dependent on the music,
this has two options. 1: Play what’s call a ‘Tap’ simulating a drum set player hitting the ride cymbal. 2: playing a
‘Tap Choke’. The difference is speed, dynamic and velocity. Image 3 demonstrates the prep for the ‘Tap Choke’ if
being asked for a ‘Tap’, the prep is half that distance in the image. The prep is a smooth and growing motion that
initiates 1 count before the attack.

                                      Image 1: Front Profile
                                      -Top of cyms are at eye level
                                      -Image is an equilateral triangle
                                      -Shoulders are squared and relaxed
                                      -Cym separation is no more than 2 inches from each other
                                      -Straight wrists
                                      - Press forward with with the hands to get blade image

                                      Image 2: Side Profile
                                      -Tips are at eye level
                                      -Cyms are same distance away
                                      -Hip under shoulders
                                      -Press down to create the blades
                                      -Obtuse angle at the elbow to create distance

                                      Image 3: Tap Choke Prep
                                      -Right hand lifts up and away
                                      -Pressing down to keep the blade
                                      -Rotate at the wrist (as if turning a door knob)
                                      -Left tip stays at eye level
                                      -Shoulders square
                                      -DO NOT LET THE RIGHT SHOULDER RISE
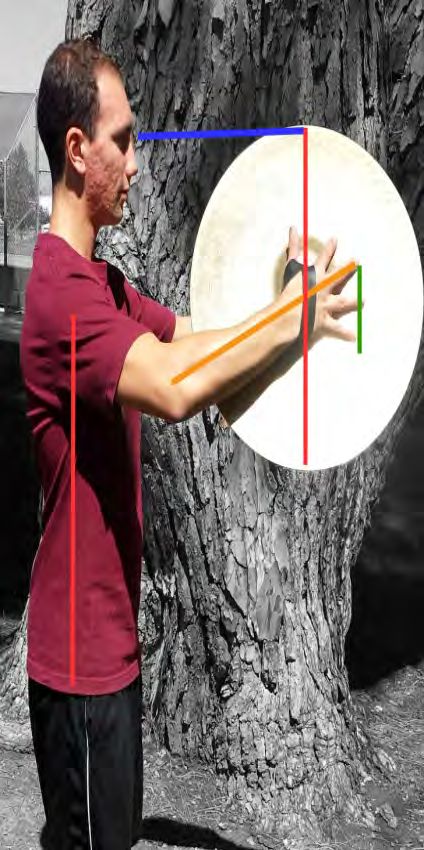
Gong Set
The Gong set forms a 90 degree angle, the attack point is just
above or below the bell of the cymbal, the right cym moves
away in a smooth manner but no more than 4 inches away
attacking the left at the 90 degree angle. The Left hand does
not move.

                                                                           Hi-Hat
                                                                 With the cymbals pressed on each other
                                                                 and against the body, the back end will
                                                                 remain closed acting as a hinge and only
                                                                 the front end will open no more than 6
                                                                 inches and close mimicking the hi-hat on
                                                                 a drum set. Only the right hand will move,
                                                                 left hand will hold the foundation.
Crash Technique Breakdown
  q= 120
                                                 Pacific Crest

                                  - Œ Ó                           - Œ Ó                  œ Œ - Œ
                                                 move to
           Begin at Flat                                         Contact point
              4
                                Prep Position    Contact Point                   Prep   Crash   Flat

Cymbals      /4            ∑                       ∑                              ∑

                                                Version 2
Crash Choke Breakdown
Pacific Crest
q= 120
/4œ Œ - Œ Œ - œ Œ - Œ Œ -
4
Flat Prep Flat Prep
Cymbals Ó Ó
Full Extension Full Extension
Crash Crash
/ œ Œ - Œ Œ - œ Œ - Œ Œ -
5 Flat Prep Flat Prep
Cym. Ó Ó
Dead Dead
Crash Crash
O Œ - Œ Œ - ˙ O Œ - Œ Œ -
9 Choke Flat Prep Choke Flat Prep
Cym. / ˙
Crash Crash
/ œ O Œ - Ó Œ - œ O Œ - Ó Œ -
13 Flat Prep Flat Prep
Cym.
Crash Crash
/ œOŒ - Œ Œ - œOŒ - Œ Œ -
17 Flat Prep Flat Prep
Cym. Ó Ó
Crash Crash
- Œ Œ - œj ‰ Œ - Œ Œ -
21
j‰ Œ Flat Prep Flat Prep
Cym. / œ Ó Ó
Crash Crash
Choke ChokeWalking 8ths
Pacific Crest
q= 120
4 ¿ Œ - Œ ‰ ¿j Œ - Œ Œ ¿ Œ - Œ ‰ ¿j Œ -
Flat
Cymbals /4
Hi Hat Press
- - Œ Œ ¿ Œ - Œ ‰ ¿j
jŒ
¿ Œ Œ ‰
5
Cym. / Ó ¿
/ Œ - Œ ¿ Œ - ‰ ¿j Œ - Œ ¿ Œ - ¿ -
9
‰ jŒ
Cym.
/ Œ Œ - ‰ ¿j Œ - Œ Œ
13
Cym. ¿ ¿ ÓPractice this piece at the same tempos as Page 1, but on this one, work staff by staff. For example, practice the entire ‘E’ staff, from measure 1 to the end of the piece, at all the tempos, and do the same for the ‘C’ staff, and again with the ‘A’ staff, and finish with the ‘F’ staff. So you will have one part at a time per repetition. Again, as with Page 1, practice this exercise at Hi-Hat. Click, Gong, and Tap.
For this piece, different sets will have different tempos.
        For Hi-Hats and Gongs, start at 130bpm, 140, 150, and finish at 160bpm.

       For Clicks and Taps, 145bpm, 155, 165, and finish with 175bpm.
You can also read