Science of Space Educator Guide
←
→
Page content transcription
If your browser does not render page correctly, please read the page content below

GSK Science in the Summer™

Science of Space
Educator Guide
GSK Science in the Summer™

Science of Space
Table of Contents

Note to Educators                                             2
Master Supply List                                            3
Introduction                                                  4
STEM Showcase Overview                                        5
Virtual Reality Overview                                      5
Session 1: The Sun & Stars                                    6
Session 2: Earth’s Moon                                       15
Session 3: Space Travel                                       21
Session 4: Liftoff!                                           26
Alternate Activities                                          34
Background Information                                        45

The Franklin Institute in Philadelphia, Pennsylvania is proud to support
the implementation of the national GSK Science in the SummerTM program.

Questions about the Science of Space content or about the program?
Contact: NationalSIS@fi.edu

                                                                           Page 1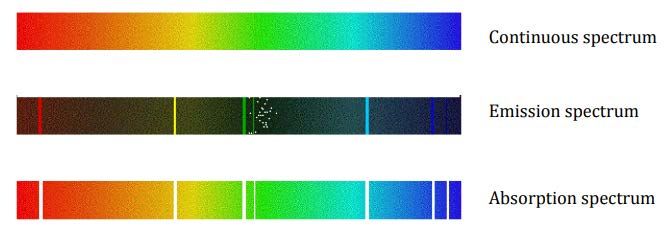
GSK Science in the Summer™

Science of Space
Note to Educators
The curriculum for this topic is divided into four parts with discussions and hands-on activities. Each
day’s content builds on the previous day. You can differentiate the activities to meet the readiness
and capabilities of the age levels within your class where needed. You can extend an activity if there
is interest from the students and skip other activities if you run out of time. The goal of the program
is to engage student interest and provide an enriching experience. If students want to continue with
a particular activity, by all means let them, even if it means another activity is missed.

An estimated time to complete each activity has been provided. Level one students tend to need
more time to complete the activities than the level two students. Please alter these times as needed
for your group of students. These times are estimates provided to assist you with planning the day’s
activities and help with time management.

We encourage you to ask the students open-ended questions and guide conversations so the
students are interacting instead of being passive listeners. If the students have an interest in a
particular subject that relates to the overall topic, feel free to extend the activity and discussion if
you feel comfortable with the information. If you are not knowledgeable about a particular subject in
which the students are interested, please ask the children’s librarian to find a book about it for the
students to learn more or visit a reputable website for additional information that you can share with
the students.

Important Safety Notice

GSK has adopted a set of safety standards, one of which deals with the requirement that eye
protection be worn in all laboratories. The GSK Science in the SummerTM program aligns with these
standards and strives to instill an appropriate awareness of the importance of safety by providing
program participants with safety glasses. A goggle icon will be next to the activities that absolutely
require the use of safety glasses. Please enforce student use of safety glasses when noted in this
guide. Where the goggles icon does not appear, wearing them is optional. Use your discretion.

At the end of part four, students should be encouraged to create an expression of thanks to express
what they enjoyed about the program. This is intended not just as a way to express gratitude to GSK,
but also to provide the program administrators with information about which activities were more
memorable for the students.

Your feedback is also welcome, of course. Please contact the program administrator at
NationalSIS@fi.edu with comments and suggestions.

Thank you for all your hard work to make the GSK Science in the Summer™ program a success.

                                                                                                  Page 2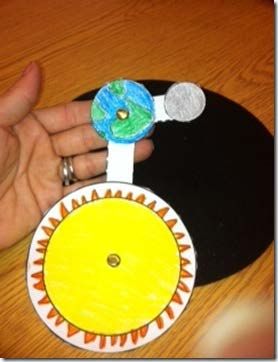
MASTER SUPPLY LIST
     •     Safety poster
     •     Flipchart paper & markers for teacher use
     •     Safety goggles & labels
     •     Student bags & pencils
     •     Profile Cards 1 through 8
     •     Petri dishes (one per student)
     •     Sunglass lenses (one per student)
     •     Fabric squares (one per student)
     •     UV beads (five per student)
     •     Pipe cleaners (one per student)
     •     Craft sticks (one per student)
     •     Sunscreen
     •     Lotion
     •     UV flashlights (one per pair of students)
     •     Sun sensitive paper (one sheet per student)
     •     Leaves, grass, flowers (or other objects you’d like to make prints of)
     •     Tray with water (one per four students)
     •     Timer
     •     Paper towels
     •     Big Dipper constellation poster
     •     Big Dipper pattern (one per student)
     •     Pipe cleaners per student: eight @ 4”, one @ 5”, one @ 6”
     •     Rulers
     •     Scissors
     •     Beads (eight per student)
     •     Sun/Earth/Moon template
     •     Brads (three per student)
     •     Crayons
     •     Oak tag rectangles (two per student: one @ 4” x 1” and one @ 3” x 1”)
     •     Moon phase poster
     •     Phases of the moon placemats (one per student)
     •     Oreo cookies (two per student)
     •     Plastic knives (one per student)
     •     Plastic frame (one per four students)
     •     Unwrapped plastic straws (one per student)
     •     Tissue paper (two sheets per four students)
     •     Tape (one per two students)
     •     Popcorn kernel (one per student)
     •     Crash Landing Supply Cards (one set per two students)
     •     NASA Key
     •     Paper-wrapped plastic straw (one per student)
     •     Film canisters (one per student)
     •     Squeeze bottles for water (one per group of three students)
     •     Trays (one per group of three students)
     •     Antacid tablets (one per student per launch)
     •     Bucket

Note: Supplies for the alternate activities are NOT included on this list or in the kit. Refer to each alternate activity for its required supplies.

                                                                                                                                             Page 3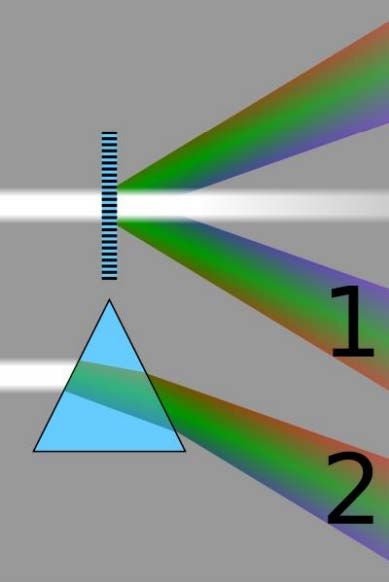
GSK Science in the Summer™
Science of Space
Introduction
The Science of Space content is intended to be presented in four, one-hour blocks. Each
session is designed to serve a group of sixteen children at the same level—either level one or
level two. Level one children are entering grades two or three. Level two children are
entering grades four, five, or six.
The content invites children to explore this big idea:
How do human beings on Earth understand the space above?
While exploring this idea, children will learn that:
Earth’s sun is a star. Stars provide light and heat—forms of energy.
Earth’s moon orbits it while it rotates. These movements cause the moon to look
different throughout the month. These appearances are called phases of the moon.
Human beings have traveled in space—but at great risk. Spacesuits are one
important form of protection, but they do not completely eliminate the risk.
In order to explore space, human beings had to find a way to overcome Earth’s
gravity. Rocket science made it possible.
Astronauts are the celebrities of space science, but there are many different paths to
careers in space science.
The Science of Space content is designed with this presentation plan in mind.
Science of Space Session – Level 1 or 2 – 16 children
Part 1 – 60 minutes Part 2 – 60 minutes Part 3 – 60 minutes Part 4 – 60 minutes
The Sun & Stars Earth’s Moon Space Travel Liftoff!
Stars of the show! It’s just a phase! Suit up! It IS rocket science!
STEM Showcase – Featured Roles for STEM Professionals
Virtual Reality – Exploring Space through VR
Page 4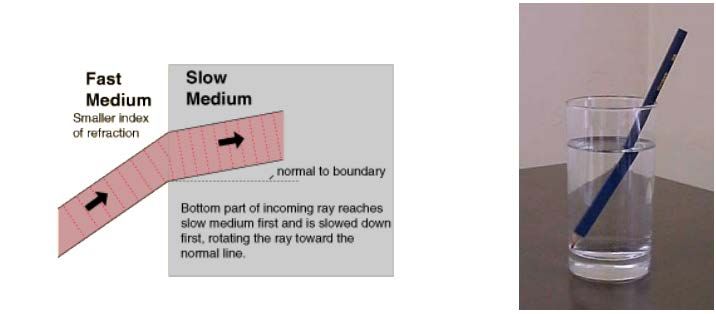
GSK Science in the Summer™

Science of Space
STEM Showcase Overview

Included in the Science of Space kit are eight large “profile cards” that showcase imaginary
characters working in various careers associated with space science. These are intended to show
students that space science is actually a very big industry with a diverse workforce with varied
skillsets.

The content outline suggests using two cards in each session to connect the session’s activities with
actual STEM professions. Please feel free to adapt and use the profile cards differently. For example,
you may run short of time during one session and “double up” on the cards the next day.

Virtual Reality Overview
Included with each Science of Space kit is one virtual reality device and viewer. The availability of
rich, vivid, no-cost space content for VR viewers made it a natural complement to the activities. We
do recognize that the logistics of having sixteen kids “take turns” using the VR viewer presents
classroom management challenges. We hope that you find a way to give the students an opportunity
to experience VR. Here are some suggestions for how we envision it being possible.

If you have a volunteer available, have the VR gear serve as a “station” within the classroom. Have
the volunteer manage turn-taking so that each student has two or three minutes per session.
Alternatively, each student’s turn could be ten minutes once during the week.

If using the VR gear is logistically impossible during the actual class sessions, you can offer it as
something special to do on Family Day.

                                                                                                        Page 5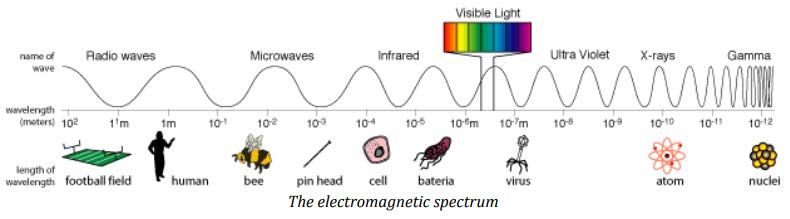
GSK Science in the Summer™

Science of Space
Part 1 – The Sun & Stars
OVERVIEW

Part one begins by inviting students to look up—safely—to explore the sun and stars. Our sun is our
nearest star and it provides both light and heat energy for us here on Earth. Our sun’s ultraviolet light
is easily seen, but light from distant stars is more difficult to see and understand.

TIME MANAGEMENT

        Introduction & Safety Guidelines = 10 minutes
        Ultraviolet Light = 20 minutes
        Sun Prints = 20 minutes
        3D Constellation: The Big Dipper = 20 minutes [alternate for Sun Prints]

        STEM Showcase = 10 minutes
        VR Experience = 2 minutes per student

MATERIALS & SUPPLIES

    •   Safety poster
    •   Safety goggles & labels
    •   Profile Cards 1 & 2: Computer Technician & Astronomer
    •   16 petri dishes
    •   16 sunglass lenses
    •   16 fabric squares
    •   80 UV beads (5 per student)
    •   16 pipe cleaners
    •   16 craft sticks to spread lotion
    •   Sunscreen
    •   Lotion
    •   8 UV flashlights (1 per pair of students)
    •   Sun sensitive paper
    •   Leaves, grass, flowers (or other objects you’d like to make prints of)
    •   Tray with water
    •   Timer
    •   Paper towels
    •   Big Dipper constellation poster
    •   Big Dipper pattern
    •   Pipe cleaners per student: 8 @ 4 inches, 1 @ 5 inches, 1 @ 6 inches
    •   Rulers & Scissors
    •   8 Beads per student

                                                                                                  Page 6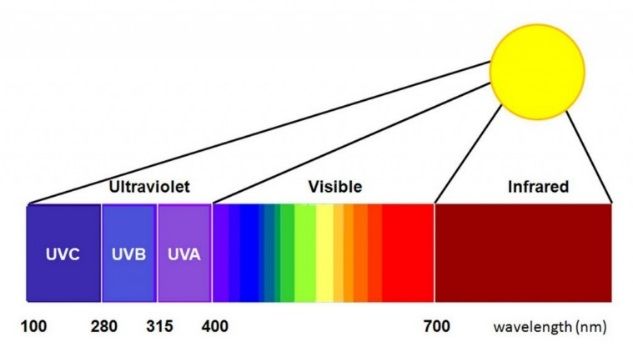
•   Flipchart paper & marker for teacher use

PREPARATION & SET-UP

Post the safety poster in a prominent location near the flipchart.

For level one students, you may want to prepare the petri dishes in advance by spreading the layer of
regular lotion and sunscreen on each. This should not be done too far ahead of your session as it
needs to remain moist for the activity. Level two students should prepare their own petri dishes.

For the Sun Prints activity, prepare the water trays. Fill each tray halfway with water and place near
paper towels.

For the 3D Constellation activity, either prepare 10 pre-cut lengths of pipe cleaners per student or
else distribute uncut lengths with ruler and scissors for students to cut themselves.

                                                                                                 Page 7
Introduction & Safety Guidelines = 10 minutes

Begin by introducing yourself to the students and share with them why you enjoy science. Orient
them to their surroundings. Establish appropriate rules. These will vary according to the space.

Give students a general overview of the four-part program. By the end, we hope that the students
will find science interesting and will consider science as a possible career. Also, we hope to
encourage students to visit your museum to learn more about science or visit their local library to
take out books about science and attend future programming.

Safety First

    •   Safety Poster
    •   Safety Goggles & labels

    1. Talk to the students about the importance of following laboratory safety rules and directions.

    2. Distribute safety goggles to the students and show them how to vent them. Show the
       students how to adjust the straps to fit comfortably. Attach a label to each pair of goggles
       and write the student’s name/initials as a way to identify them.

    3. Remind the students that during some of the activities, the safety goggles will need to be
       over their eyes for protection. Tell them that you will instruct them when goggles must be
       worn. Throughout this guide, note the times when goggles are required.

    4. Scientists do not taste substances even when they may look like food because the substances
       could be harmful or even poisonous.

    5. Discuss the need for closed-toed shoes and remind them not to wear sandals or flip-flops
       during the program.

                                                                                                Page 8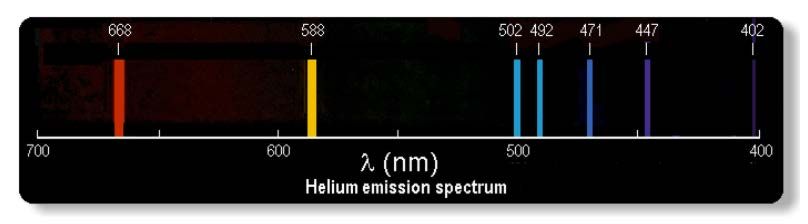
Ultraviolet Light = 25 minutes

Overview

In this activity, students will learn that the sun gives off different wavelengths of light, including
ultraviolet (UV) light. Too much exposure to UV light can be dangerous. Some materials will block UV
rays better than others. Students will explore how materials can block UV rays.

Materials

    •   16 petri dishes
    •   16 sunglass lenses
    •   16 fabric squares
    •   80 UV beads (5 per student)
    •   16 pipe cleaners
    •   8 UV flashlights (1 per pair of students)
    •   16 craft sticks to spread lotion
    •   Sunscreen
    •   Lotion
    •   Flipchart paper & marker for teacher use

Background

The sun emits light in all different wavelengths, including ultraviolet light. Even though UV light is
invisible to our eyes, overexposure can be dangerous for your body—it can burn our skin, hurt our
eyes, cause cancer, etc. To protect our bodies, we need to take special safety precautions, including
wearing sunglasses and sunscreen when out in the sun. In this activity, students will test the
effectiveness of certain protective gear (clothes, sunscreen, sunglasses—and regular lotion for
comparison) to see if they block UV rays.

Procedure

    1. Ask students what they like to do when they go outside. Ask them if they ever wear any kind
       of protectant when they are out in the sun. Talk about how the sun emits all different
       wavelengths of light, including ultraviolet light. Talk about some of the dangers of
       overexposure to UV light, etc.

    2. Divide the students into pairs. Distribute a few UV beads. Explain that the beads change color
       when exposed to ultraviolet light from our closest star—the sun. Have students either go
       outside and use the sun or, if not practical to do so, use UV flashlights to explore. SAFETY
       NOTE: Inform students that they must never point these (or any) flashlights at another
       person’s eyes.

    3. Distribute regular lotion, sunscreen, sunglass lenses, and fabric squares to the students. Have
       them place a dollop of regular lotion on one of the petri dishes, and spread it around so it
       creates a layer. Hold the petri dish above the UV beads, and place in direct sunlight or shine
       the UV flashlight through the petri dish, onto the beads. Do the UV beads change color? (In
       other words, are they still exposed to UV rays?)

                                                                                                 Page 9
4. Repeat the step above with sunscreen. Students should apply the sunscreen layer on top of
the lotion layer. Students should find that sunscreen will block UV rays, while the regular
lotion did not.
5. Repeat using the fabric square as a protector, as well as with the sunglass lenses.
6. After students have had time to investigate, call their attention to your flipchart where you
have drawn a data table similar to the one below. Poll the students to decide collectively
which materials were best at blocking UV rays. Discuss how they can use this knowledge to
protect themselves in the future.
Material Did the UV beads change color?
(Does this material blocks UV rays?)
Fabric Square
Sunscreen
Regular Lotion
Sunglasses
Level One Discussion
The sun gives off invisible light that can be potentially harmful. Emphasize that the sun gives off
invisible light that can be harmful, and that we’re going to explore ways to protect ourselves through
this activity. You’ll also need to help level one students put the lotion on petri dishes. Be sure to help
the kids with their UV flashlights to make sure they don’t point it at their peers. After the activity, if
time allows, allow students to make UV bracelets with their beads and pipe cleaners.
Level Two Discussion
Level two students may be ready for more advanced explanations. UV light can be broken up into
three types based on wavelength:
Ultraviolet A is on the long wavelength end of the ultraviolet spectrum, and makes up approximately
95% of the UV radiation we experience from the sun. It penetrates through the skin, and is
responsible for immediate tanning, wrinkling/premature aging of the skin, and skin cancer, but it also
necessary for our bodies to be able to synthesize Vitamin D.
Ultraviolet B is considered the most destructive form of UV radiation, and is responsible for long-
term tanning, advancement of skin cancer, and cellular damage to DNA – but is also needed to
synthesize vitamin D. Most UV B radiation is blocked by our atmosphere.
Ultraviolet C has the shortest wavelengths of the ultraviolet spectrum. It is almost entirely absorbed
by our atmosphere.
Page 10Sun Prints = 20 minutes
Overview
In this activity, students use sun-sensitive paper to “take pictures” of objects.
Note: If cloud cover blocks sunlight, use the alternate activity: 3D Constellation.
Materials
• Sun sensitive paper
• Leaves, grass, flowers (or other objects you’d like to make prints of)
• Tray with water
• Timer or watch
• Paper towels
Procedure
1. Place a sheet of sun sensitive paper, with the color side up and the white side down, on a flat
surface in direct sunlight.
2. Place a leaf, flower, or other object on top of the paper. (Note: if it is breezy, be sure your
object is heavy enough to remain in place for the full 8 minutes.)
3. Leave the paper still in the sunlight for 8 minutes.
4. Remove the object and immediately submerge the paper into the tray of water. Shake it
gently underwater.
5. Lay the paper flat on a stack of paper towels and blot both sides.
6. Let dry.
Discussion Questions
1. Would it take longer for a sun print to appear in the winter? Why or why not?
2. What would happen if you put sunscreen on the paper?
Background
Everything we see either reflects or gives off light. Sun print paper is coated with light-sensitive
chemicals, which react to light waves when exposed to light. When you place objects on the paper,
they block the light and the paper remains white. The paper around them absorbs heat energy and
becomes hotter than light objects. Water stops the process and fixes your images on the paper.
The sun is a powerful star made up of hydrogen and helium that burns at almost 25 million degrees
Fahrenheit at its core. Nuclear fusion reactions caused by the sun’s massive gravitational field fuse
the hydrogen into helium. The sun gives energy to life on Earth. It allows plants to grow, which are
eaten by animals, which are then eaten by people. The sun also gives the earth its seasons and drives
the water cycle. Without the sun, the earth would be a lifeless rock. The sun also emits UV radiation
that can be harmful to your skin, so it is important to wear sunscreen. The sun also gives off solar
radiation, which can blind you if you look directly into the sun.
Page 113D Constellation: The Big Dipper = 20 minutes
Overview
This activity demonstrates how the constellations and asterisms we recognize in the sky are
dependent on our place in space. Although these stars appear close to each other, they can be quite
far apart.
Materials
• Big Dipper pattern
• Pipe cleaners per student: 8 @ 4 inches, 1 @ 5 inches, 1 @ 6 inches
• Rulers & Scissors
• 8 Beads per student
Preparation
Either prepare 10 pre-cut lengths of pipe cleaners per student or else distribute uncut
lengths with ruler and scissors for students to cut themselves.
Procedure
1. Ask students what they know about constellations, and if they know any. Continue asking
until someone mentions the Big Dipper. Ask if they think all the stars in constellations are the
same distance from Earth. Would constellations look different if we were looking at them
from another planet? Explain that in this activity, we’ll be making 3D models of a
constellation to help us understand the position of the stars in the Big Dipper.
2. Pass out pipe cleaners. Explain that we will be using scaled distances for our models,
comparing the distance of a light year to the distance of one inch. Ask students if they know
what a light year is. Discuss how a light year is a unit of distance: exactly how far light can
travel in a single year. To put this into perspective, the distance between the earth and the
sun (93 million miles) takes about 8 ½ minutes for light to travel. Pass out the charts of scaled
distances for each constellation.
3. Each student will need 8 pieces of pipe cleaners that are each 4 inches long. They will also
need 1 piece that is 5 inches, and another piece of pipe cleaner that is 6 inches long.
4. Stick the pipe cleaner pieces into the appropriate star points on the foam board. Attach the
beads to the top of pipe cleaners.
5. After assembly, ask students what these constellations would look if we were observing from
somewhere other than Earth. By observing their models from different perspectives,
students will recognize that they would see different constellations and different patterns in
the sky.
Page 12The Big Dipper Constellation Poster
Star Name Distance [light years] Approx. Scaled Distance [inches]
Alkaid 101 5
Mizar 78 4
Alioth 81 4
Megrez 81 4
Phecda 84 4
Merak 79 4
Dubhe 124 6
Scale: 20 light years = 1 inch
Page 13STEM Professionals = 10 minutes
• Profile Cards 1 & 2: Computer Technician & Astronomer
Throughout the week, students will learn about STEM professionals involved in space science.
• Explain to students that many different kinds of people work in space, not just astronauts.
Today, we will look at two of the jobs that people do behind the scenes in space.
• Display and read aloud profile cards 1 and 2. Ask students to think about why that job is
important. Ask students if they know anyone with those jobs.
Wrap-Up
• Ask the students to recall the activities from today involving safety and other topics.
• If the program is happening at a library, show the students the books the children’s librarian
has collected for them.
• Distribute the student bags. Tell them that they will carry their goggles and pencils in it.
Remind them that they need to bring their bag with them tomorrow.
Page 14GSK Science in the Summer™
Science of Space
Part 2 – Earth’s Moon
OVERVIEW
Part two continues to invite students to look upward and outward. Today’s activities focus on the
appearance of Earth’s moon throughout the month.
TIME MANAGEMENT
Introduction & Review = 5 minutes
Outrageous Orbits = 30 minutes
Phases of the Moon = 15 minutes
STEM Showcase = 10 minutes
VR Experience = 2 minutes per student
MATERIALS & SUPPLIES
• Safety poster
• Sun/Earth/Moon template
• Three brads per student
• Crayons
• Scissors
• Two oak tag rectangles per student
o One 4” x 1”
o One 3” x 1”
• Moon phase poster
• Phases of the moon placemats (one per student)
• Oreo cookies (two per student)
• Plastic knives (one per student)
• Profile cards 3 & 4: Geologist & Meteorologist
PREPARATION & SET-UP
If you removed the safety poster yesterday, return it to its location. Pre-cut the oak tag rectangles for
the students.
Page 15Introduction & Review = 5 minutes
Welcome students back and remind them that yesterday we learned about the sun—our nearest
star. What else can we see in space while standing here on Earth? When someone mentions the
moon, explain that today’s activities will help us understand how the earth and its moon are both
moving. That movement causes the moon to look different throughout the month. Those changes in
appearance are known as the phases of the moon.
Page 16Outrageous Orbits = 30 minutes
Overview
Students will learn the basics of the orbital mechanics between Earth and its moon.
Materials
• Sun/Earth/Moon template
• Three brads per student
• Crayons
• Scissors
• Two oak tag rectangles per student
o One 4” x 1”
o One 3” x 1”
Preparation
• Pre-cut the two oak tag rectangles for each student
Procedure
1. Distribute templates. Students should color the sun, moon, and Earth before cutting them
out. Refer to the photo below for how the final product should look.
2. Place the larger rectangle in the center of the sun. Poke a hole with the brad through the
center of the sun and the leftmost side of the rectangle.
Place the earth on the opposite end of the rectangle.
Place the shorter rectangle next to where the longer one ends.
Poke a hole with the brad through the both rectangles and through the earth.
Place the moon under the shorter rectangle.
Poke a hole with the brad through the rectangle and through the moon.
Page 173. When everyone is ready, have students stand in a circle with their Outrageous Orbits.
4. Demonstrate the rotation and revolution of each orbit.
Every day the earth completes one rotation. (Spin Earth in circle.) This is what makes day and
night.
If I were the sun, how would the earth rotating look? (Students spin themselves in a circle.)
When you are facing me, it’s daytime. When you face away from me, it’s nighttime.
Each year, the earth revolves around the sun one time. (Spin Earth around the sun.)
If I were the sun, how would the earth revolving look? (Students walk in a circle around you.)
The earth rotates and revolves at the same time! (Students spin in a circle and walk around
the sun.)
Background
The sun is not moving. It remains in its fixed location.
Planet Earth revolves around the sun once every 365 days.
Planet Earth rotates on its axis once every 24 hours.
At any moment in time, Earth is both rotating and revolving.
Likewise, the earth’s moon is revolving around the earth while rotating.
These movement cause the moon to look different in the sky based on where both are in their
circuits.
Page 18Phases of the Moon = 15 minutes
Overview
Students will use Oreo cookies to model the phases of the moon.
Materials
• Moon phase poster
• Phases of the moon placemats (one per student)
• Oreo cookies (two per student)
• Plastic knives (one per student)
Procedure
1. Give each student a placemat.
2. Introduce the moon phases using the poster, referencing the previous activity.
3. Give each student two cookies.
4. Carefully, open the cookies and use the plastic knife to remove filling to match the pictures
on the placemat.
5. When everyone has successfully created the moon phase models, use your own discretion as
to whether or not they can eat their work.
Level Two Extension
Challenge the students to find out which phase of the moon is happening today. If the sky is clear,
they should be able to find out after dark.
Background
Looking up, the moon looks different to us throughout the month because it has phases.
The moon has no light of its own. Moonlight is sunlight bouncing off the moon’s surface. As the
moon orbits Earth, the sun lights up whichever side of the moon is facing it. To the sun, it’s always a
full moon! We see the moon from the center of its orbit. So we see different portions of the lit side
of the moon.
Page 19STEM Professionals = 10 minutes
• Profile Cards 3 & 4: Geologist & Meteorologist
Throughout the week, students will learn about STEM professionals involved in space science.
• Explain to students that many different kinds of people work in space science, not just
astronauts. Today, we will look at two more of the jobs that people do behind the scenes.
• Display and read aloud profile cards 3 and 4. Ask students to think about why that job is
important. Ask students if they know anyone with those jobs.
Wrap-Up
• Ask the students to recall the activities from today.
• If the program is happening at a library, remind the students that books are available to learn
more.
• Remind the students to put their things in their bags before they go.
Page 20GSK Science in the Summer™
Science of Space
Part 3 – Space Travel
OVERVIEW
Part three turns attention to human beings in space. From here on Earth, we look up and see the sun,
stars, and moon. It is only within the past sixty years that human beings have been able to seriously
consider life in space. Today’s session introduces just a few of the many dangers humans face in
space. Students will also continue to encounter roles for STEM professionals in space science.
TIME MANAGEMENT
Introduction & Review = 5 minutes
Space Suit Protection = 25 minutes
Crash Landing = 20 minutes
STEM Showcase = 10 minutes
VR Experience = 2 minutes per student
MATERIALS & SUPPLIES
• Safety Poster
• Plastic frame (one per four students)
• Plastic straws (one per student)
• Tissue paper (two sheets per four students)
• Scissors (one per two students)
• Tape (one per two students)
• Popcorn kernel (one per student)
• Crash Landing Supply Cards (one set per two students)
• NASA Key
• Profile Cards 5 & 6: Astronaut & Materials Scientist
PREPARATION & SET-UP
Today’s activities require students to work in small groups. If you removed the safety poster
yesterday, return it to view for your discussion. At the end of the session, if the safety poster cannot
be left in place for tomorrow’s session, remove it carefully for storage overnight.
Page 21Introduction & Review = 5 minutes
Welcome students back and explain that they are going to learn about how human beings can
survive in space.
In sessions one and two, we learned about the parts of space that human beings see when we look
up from here on Earth. There is little risk associated with studying space by looking up. But, since the
1950s when human beings first started to figure out how to launch living things safely into space, the
risks of studying space while actually in space became a challenge to solve.
So far, human beings have safely orbited the earth, landed on the moon, walked in space, and lived
in a space station. Each one of these accomplishments took many years of preparation by many
people working to make sure that the brave explorers called astronauts would survive and return
safely to Earth. The next challenge for space scientists is how to send human beings to explore other
planets like Mars.
For all of these accomplishments, human beings depended on spacesuits to protect them from the
many dangers in space. Today we will explore how spacesuits protect astronauts from one of those
dangers: puncture by micrometeoroids. We will also plan for surviving a mission to the moon.
Page 22Space Suit Protection = 25 minutes ►GOGGLES ON◄
Overview
In this activity, students simulate micrometeoroids in space to understand why spacesuits need
several protective layers. The object of the activity is to compare the effect on tissue paper
penetration between high and low speed projectiles and to explore how that might be prevented.
Materials
• Plastic frame (one per four students)
• Plastic straws (one per student)
• Tissue paper (two sheets per four students)
• Scissors (one per two students)
• Tape (one per two students)
• Popcorn kernel (one per student)
Procedure
1. Divide students into groups of four to work together around one frame.
2. Students should cut each piece of tissue paper in half so that there are four pieces.
3. Have students attach one layer of tissue paper to the frame by spreading it across the frame
and taping the ends to the sides.
4. Taking turns, each student experiments using the kernel as a projectile to see how much
energy is needed to puncture the tissue. Begin by just dropping the kernel from a short
distance above the paper. Increase the distance. Increase the energy.
5. Then, have the students use the plastic straw as a “shooter” to “launch” the projectile
against the paper.
6. After experimenting with the first layer, have students attach a second layer and continue
experimenting. Add a third layer. Finally, add the fourth layer.
Discussion Questions
If you were an astronaut, would you want to have more than one layer of material in your spacesuit?
Why do you think spacesuits look so bulky?
Safety Notes
Goggles must be worn at all times!
Caution students not to inhale through the straw.
Background Information
The kernel represents a micrometeoroid—a tiny piece of space debris. Tiny fragments of rock moving
through the empty space of our solar system present great danger to humans in space. Today, there
are also risks from tiny pieces of space junk—old, broken satellites and debris from space launches.
These pose an even greater risk. (If you or the students have seen the movie “Gravity,” that risk is
real.) If a micrometeoroid punctures the spacesuit, the astronaut is unlikely to survive.
Page 23Crash Landing = 20 minutes
Overview
In this activity, students will think like space scientists and prepare astronauts to survive on the moon
while learning the difference between useful tools on Earth and in space.
Materials
• Crash Landing Supply Cards (one set per two students)
• NASA Key
Procedure
1. Divide students into pairs for this activity.
2. Challenge students to imagine that we have just landed on the moon—but we missed our
target landing site! We are miles away from where NASA was prepared for us to land, so we
must put on our spacesuits and walk to our shelter. Before we leave our spacecraft, we must
decide what to carry with us to survive the walk to our shelter.
3. There are fifteen items. You can only bring five items with you. Working with your partner,
decide which five items are most important and why.
4. Remember, just because something is useful on Earth, doesn’t mean it is useful on the moon.
a. Think about: How can I use this? In what situation would this be important? How can
I repurpose this to fit a need other than its intended use? (For example, the self-
inflating life raft can be used for the material/air pumps.)
5. Arrange your cards from most important to least important. Remember, you can only bring
your top five with you.
6. When the pairs seem ready, begin to poll the teams to compare their top five items. There
will likely be much overlap, but if a team picks something unexpected, ask them to explain
why they valued that item.
7. Finally, read the order NASA suggests for these item to see how close the students came to
the experts.
Background
Astronauts need to plan ahead carefully when they are packing their supplies. Once they are in
space, they need to use whatever they have to solve any problems that arise. Mission control cannot
bring them the lunch they forgot on the counter on Earth!
Page 24STEM Professionals = 10 minutes
• Profile Cards 5 & 6: Astronaut & Materials Scientist
Throughout the week, students will learn about STEM professionals involved in space science.
1. Explain to students that many different kinds of people work in space, not just astronauts.
Today, we will look at two of the jobs that people do behind the scenes.
2. Display and read aloud profile cards 5 and 6. Ask students to think about why that job is
important. Ask students if they know anyone with those jobs.
Wrap-Up
1. Ask the students to recall the activities from today.
2. If the program is happening at a library, remind the students that books are available to learn
more.
3. Remind students to take their bags.
Page 25GSK Science in the Summer™
Science of Space
Part 4 – Liftoff!
OVERVIEW
Part four focuses on the rocket science that enables human beings to escape Earth’s gravity and
reach outer space. While you are preparing for the rocket blasts, students will explore the simplest
example of the principle: soda straw wrapper rockets. The majority of this session’s time is intended
to be spent launching plastic rockets using the energy that results from the release of an Alka Seltzer
tablet’s stored gases. Finally, the end of session activities bring the week of science exploration to a
close.
TIME MANAGEMENT
Introduction & Review = 5 minutes
Soda Straw Rockets = 5 minutes
Alka Rockets = 30 minutes
STEM Showcase = 10 minutes
VR Experience = 2 minutes per student
Conclusion = 10 minutes
MATERIALS & SUPPLIES
• Safety Poster
• One paper-wrapped soda straw per student
• Film canisters (one per student)
• Squeeze bottles for water (one per group of three students)
• Antacid tablets (one per student per launch)
• Trays (one per group of three students)
• Paper towels
• Bucket
• Profile cards 7 & 8: Rocket Scientist & Photographer
Page 26PREPARATION & SET-UP
Today’s activities will be messy. Be sure to have paper towels handy in case of spills. If you removed
the safety poster yesterday, return it to view for your discussion.
If doing the Alka Rockets indoors, pre-break antacid tablets into quarters or thirds.
At the end of the session, the safety poster should be returned to the kit with all other supplies.
Page 27Introduction & Review = 5 minutes
Welcome students back and explain that they are going to learn about rockets today.
As the earth rotates on its axis, it creates the force of gravity which gives everything weight and
prevents it from floating upward. In order to reach outer space, like the Astronauts do, the force of
gravity must be overcome. Something must push an object—like a space ship—up away from Earth’s
surface. Rockets do that, but they require a lot of fuel to do so.
For today’s activity, we will use simple fuel supplies to show how a rocket works, but, of course, our
rockets will not go nearly as far as a real rocket needs to go.
Remind students about safety behaviors. Refer to the safety poster and be clear that today students
who do not follow safety rules will not be able to launch rockets.
Page 28Soda Straw Rockets = 5 minutes ►GOGGLES ON◄
Overview
In this quick introductory activity, students use a wrapped soda straw as a very simple example of
how a rocket works. Explain that the paper wrapper is like a space ship. The plastic straw inside is like
a rocket. When you blow into the rocket, you are adding energy to push the space ship up and away.
The fundamental concept of blowing into the straw to project the wrapper forward is foundational to
the rocket activity that will follow.
Materials
• One paper-wrapped soda straw per student
Procedure
1. Carefully open one end of the paper wrapper. For level one students you may want to have
already snipped open one end of the paper wrapper. Level two students should be able to
open one end by gently tearing the paper.
2. Use your fingers to slip the wrapper slightly forward along the straw so that there is room to
place the straw against your lips.
3. Launch the wrapper by blowing into the straw.
4. If the wrapper lands safely, it can be slid back onto the straw for a repeat launch.
Page 29Alka Rockets = 40 minutes ►GOGGLES ON◄
Overview
In this activity, students will explore Newton’s Third Law of Motion by launching a rocket powered by
an antacid tablet.
Materials
• Film canisters (one per student)
• Water bottles or squeeze bottles for water (one per group of three students)
• Antacid tablets (one per student per launch)
• Trays (one per group of three students)
• Paper towels
• Bucket
Safety Notes
Water is likely to spill on the table or surfaces being used. Clean up large spills to avoid slipping and
keep materials such as laptops and electronics at a safe distance.
Objects will be flying upward with some speed! Be sure the students are wearing SAFETY GOGGLES
AT ALL TIMES!
DO NOT put your face, or allow students to put their faces, directly over the canisters while waiting
for them to launch.
Reaction time is typically between 5 and 45 seconds, so patience is essential. If students are
becoming impatient, they may want to lean over. Emphasize patience!
Procedure
Have students put on their safety goggles.
Demonstrate the activity first:
Place a film canister on a tray and fill one quarter of the way with water. Drop in half of a tablet.
Quickly snap the lid onto the canister tightly, flip it over, and stand back!
Allow students to work in small groups (2-3 students) to create their own rockets and experiment.
Level Two Extension
Have students vary the amount of water in the canisters. How does this affect the blastoff?
Change the amount of antacid tablet used. How does this affect the blastoff?
Discussion Questions
Think about rockets. What makes them go? Usually when we think about rockets soaring into space
we think about the fire and smoke coming out of them. What direction is all that energy and gas
Page 30going when it comes out of the rocket? What direction does the rocket go in return? This is known as
Newton’s Third Law of Motion: every action creates an equal and opposite reaction!
Background
Newton’s Third Law of Motion says that for every action or force, there is an equal and opposite
reaction or force. In this activity, one force is generated downward toward the table (expanding
gases pushing downward out of the canister) while the opposing reaction pushes the rocket up in the
opposite direction. When water is added to the antacid tablet, bubbles of carbon dioxide gas are
created. When the lid is fitted tightly to the canister, this expanding CO2 gas is contained within an
enclosed space. As more gas is created, the pressure inside the canister rises until there is enough
force to overcome the seal of the lid. The built-up pressure exerts enough force to shoot the canister
into the air, forming the rocket. In an actual rocket, heat from ignition of the rocket fuel causes gases
inside to expand rapidly and be forced out of the tail of the rocket, creating the downward force. In
opposition, the rocket is forced upwards away from the exhaust of the tail.
Special Notes
• If possible, do this activity outside. The activity can be done indoors if necessary, but ceilings
and other obstacles may interfere with observing and comparing the maximum heights of
each launch.
• Make sure the canister lid has a tight seal and is closed all the way.
• DO NOT put your face, or allow students to put their faces, directly over the canisters while
waiting for them to launch. Goggles are to be worn at all times to protect against unexpected
projectiles.
• Use the dump bucket to collect the watery mess in the trays.
• The water from the experiment stays in the tray and any undissolved tablet will ooze out
onto the tray.
• Use one tray for each three rockets.
• If your ceiling is low, the tray can be placed on the floor, but be sure students stand back.
• If doing this activity indoors, do not use more than one-half of a tablet! One-quarter or one-
third of a tablet is better in small spaces.
Page 31STEM Professionals = 10 minutes
• Profile Cards 7 & 8: Rocket Scientist & Photographer
Throughout the week, students have been learning about STEM professionals involved in space.
• Explain to students that many different kinds of people work in space science, not just
astronauts. Today, we will look at two more of the jobs that people do behind the scenes.
• Display and read aloud profile cards 7 and 8. Ask students to think about why that job is
important. Ask students if they know anyone with those jobs.
Page 32Conclusion = 10 minutes
• Paper
• Pencils
• Crayons
Invite level one students to draw a picture of their favorite part of the week.
Invite level two students to write a thank-you note to GSK about their favorite part of the week.
Collect the pictures/notes at the end of the session for return to The Franklin Institute.
Distribute certificates, take-home activity books, and Family Day flyers. Encourage the students to
show the flyers to their parents so that they can come to the event. Remind the students to take
their goggles, pencils, and bags with them.
Thank the students and anyone else who is present for participating in the GSK Science in the
SummerTM program. See you next year!
Page 33GSK Science in the Summer™
Science of Space
Alternate Activities
These activities are provided as alternates to the standard activities or as supplemental activities to
extend the learning if your session time extends beyond one hour.
Alternate Activity to Support Session 1: The Sun & Stars
Spectroscopy: Secrets of the Stars = 40 minutes
Alternate Activity to Support Session 2: Earth’s Moon
Paper Plate Phases = 25 minutes
Alternate Activity to Support Session 3: Space Travel
Shuttle on a String = 20 minutes
Alternate Activity to Support Session 4: Liftoff!
Straw Rockets = 40 minutes
Page 34Alternate Activity to Support Session 1: The Sun & Stars
Spectroscopy: Secrets of the Stars = 40 minutes
Note that this activity may be too difficult for level one students. You can use it as a demonstration
for them instead.
This activity requires access to more sophisticated equipment, but if it is available it is an excellent
way to engage level two students with space observation.
This hands-on activity introduces spectroscopy and its uses in astronomy. It includes building a
simple spectroscope and observing gas spectra.
The Big Ideas
• Light comes in different colors. A light source (star, light bulb, etc.) may emit many different
colors which are mixed together; tools such as a prism or spectroscope can be used to
separate the different colors, making a spectrum.
• Different colors of visible light have different wavelengths and different energies. The red
end of the spectrum has longer wavelengths/lower energy, while the blue end has shorter
wavelengths/higher energies. Prisms and spectroscopes create spectra because they
bend/scatter different wavelengths by different amounts.
• Each chemical element emits a unique combination of light wavelengths, called a spectrum.
Astronomers use these spectra to determine what distant stars or planets are made of by
analyzing the light coming from them.
Materials & Supplies
• Per student:
o Pre-cut and hole-punched spectroscope box
o Black paper to fit interior of box
o Small piece of diffraction grating (approx. ¾ to 1 in. square)
• Per table:
o tape dispensers
o Spectral Emissions Charts (available via the Google Group)
o pencils (optional, for marking boxes)
• Pre-made sample spectroscope (optional)
• Small spotlight or clip-lamp with incandescent bulb
• Two gas tube power supplies, positioned on opposite sides of room (ideally such that each
student is within 20 ft. of one)
• Gas tubes for each power supply, at least 3 of the following: Helium, Neon, Nitrogen,
Hydrogen, Oxygen, Air, Water
• Gloves or cloth for handling gas tubes
Outline
1. Introduction (~10 minutes)
Page 35What is spectroscopy? Let’s find out!
Spectroscopy is the study of light, and finding ways to spread out the different colors of light
so we can see them.
Demonstrate diffraction grating, a tool for studying light.
That piece of plastic is called diffraction grating, and what makes it special is that it has
thousands of little tiny scratches on it which help to spread the different colors of light out so
we can see them. That’s the most important piece of your spectroscope, so don’t lose it!
What are rainbows? How are they made?
Light is energy; different colors have different energies.
2. Building/Using Spectroscopes (~10 minutes)
Attach diffraction grating.
Add black paper.
Close and test.
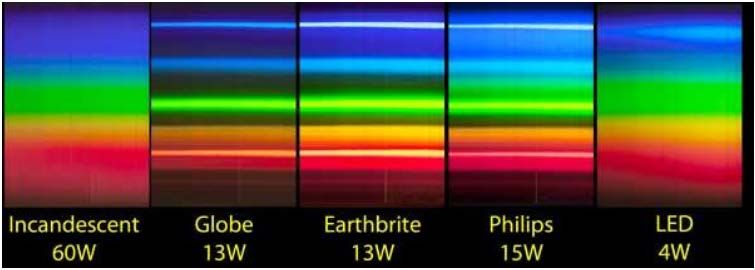
Demonstrate incandescent vs. fluorescent bulbs.
Different types of light have different spectra.
Open the cardboard box so it is box-shaped, and find one of the flaps with the hole punched
in the middle. Use two small pieces of tape to tape your piece of diffraction grating over the
hole on the inside of that flap (the side that would end up inside the box); be sure the tape
does not go across the hole.
Fold the small side flaps in and close the flap. (Put an X on the outside of that flap so you can
remember which end has the diffraction grating.)
Roll the black paper the short way (toilet paper roll, not paper towel) and put it all the way
down inside your box. Let it unroll so it is “coating” the inside of the box with black, then
close up the second side of the box (including the side flaps). Your spectroscope is finished!
Here are some tips for using it: make sure you put the side with the diffraction grating (and
the X) closest to you; hold it right up to one eye and close the other eye; be sure the light you
are looking at is directly in the little hole on the other end. You should see the spectrum
inside the box; it might be sideways or up-and-down, depending on how you are holding the
spectroscope. Practice using your scope with the lights in the ceiling, and ask for help if you
have trouble seeing your spectrum.
Have students look at fluorescent lighting using their scope and then darken the room and
have them look at an incandescent light. Have them compare the spectra.
3. Identifying Mystery Gases (~20 minutes)
Each element has a unique “fingerprint” spectrum.
Why is this useful? Space is big. We can use light to find out what distant stars are made of.
Astronomers identify gases by looking at their spectra and comparing what they see to a
reference chart.
Test hydrogen, helium, and one other gas; vote on the identity of each.
Page 36Emphasize to students that they didn’t get to touch the different lights or take out the light
bulbs and examine them. They figured out that the bulbs were different without even
touching them, just by using your spectroscope to look at the light they gave off!
Getting information about things without being able to get close to them is pretty important
when it comes to studying space because space is really big, and everything in space is really
far away—so far away that we don’t measure distance in miles but in light-years (how far
light can travel in a whole year!).
If something is 200 light-years away, it means that even if we could travel as fast as light does
(which we can’t), it would take us 200 years to get there—and 200 years to get back! So it’s
not possible to study those things close up, and that’s where spectroscopy comes in: we can
get a lot of information about stars and other objects in the universe by studying the light
they give off—just like you did with the light bulbs.
The universe is made up of about a hundred different kinds of stuff, called elements, which
are mixed and matched and combined in different ways to give us trees, people, rocks, air,
stars, and everything else. You’ve probably heard of some of them: oxygen, carbon, iron,
gold, calcium, etc. It turns out that each separate element, when you get it hot enough, will
give off light that has a unique spectrum—almost like a fingerprint for that element. You can
see some of the spectra for some elements (and other things) on the laminated sheets at
your table. If an astronomer is looking at the light coming from a faraway star, and sees that
it has the spectrum of, say, hydrogen, then we know that that star must be made of
hydrogen—because only hydrogen will give off that particular pattern of colors.
Imagine that you are looking at the light from a distant mystery object and trying to figure
out what it is made of. We have here some tubes with different elements in them, which are
going to be our mystery space objects, and your job is to use your spectroscope to look at
the light coming from them, compare it to the spectra you see on the sheets, and figure out
which element is making the spectrum. Some things to look for: how many different colors
are there? Which colors are missing? Which are the brightest?
Start with hydrogen or helium. Switch off overhead lights; turn gas tube power on for ~1
minute, then switch off. Give 1-2 minutes. to look at chart and find the correct spectrum.
Which element do you think this has inside it? Gather answers; if possible ask students to
explain why they chose that spectrum.
If children guess wrong, remind them that their spectroscopes are made of plastic and
cardboard, so the spectra isn’t quite as clear as if we had one of the high-tech, computerized
ones astronomers use.
Repeat with one or two more tubes depending on time/interest/ability.
4. Conclusion (~5 minutes)
Light is an important tool for studying space. It travels where we can’t!
Spectroscopy tells us the composition of stars and their planets—potentially those that might
support life.
Page 37Even though you were using a spectroscope made of cardboard, you were doing pretty much
the same thing that astronomers do with their big computerized spectroscopes—analyzing
the light from an object to learn what it’s made of. Astronomers can even use the light from
stars to learn things like how fast they are moving, or whether they have planets orbiting
them. Take your spectroscopes home with you; they’re good for looking at lights around you
and seeing what kind of spectra they have. It’s a great way to tell whether people are using
regular light bulbs or energy-saving bulbs!
Caution students: DO NOT USE THE SPECTROSCOPE TO LOOK AT THE SUN! These scopes
don’t have anything to filter the light and protect your eyes, so it’s just as bad as looking at
the sun with your bare eyes.
Page 38Alternate Activity to Support Session 2: Earth’s Moon
Paper Plate Phases = 25 minutes
Overview
Students use paper plates with various phases to create a three-dimensional model of the lunar
phases relative to the earth and sun.
Materials
• A chair (preferably one that swivels)
• 8 paper plates
• Yellow and black markers
• 8 popsicle sticks
• Tape
• A large ball to represent the sun
Preparation
Prepare the paper plates for this activity: use yellow and black markers to draw each of the 8 phases
on the paper plates (yellow to denote the bright area and black for the dark regions). Tape a popsicle
stick as a handle at the bottom of each plate.
Procedure
1. Discuss the moon phases with the students. What are the names of the phases? What do
they look like? What causes the moon to change phases?
2. Explain to the students that they will build a new model of lunar phases, using paper plates
to represent the different phases.
3. Divide the class into groups of 9 to 10 students. Designate an area for each group to conduct
this activity, and place a chair at the center of that space.
4. Hand out the paper plate moon phases to 8 of the students in each group. One other student
will be the earth and should sit in the chair (optional: the earth can rotate in the chair). The
remaining student will be the sun and should stand holding the ball at a more distant
location in the classroom. (Note: groups can all share the same “sun.”)
5. Ask each of the students holding a paper plate to examine it and determine which moon
phase that plate represents, and then walk to the correct spot relative to the earth, sun, and
other moon phases.
6. As the students arrange themselves out into a circle around the Earth, ask them to hold their
plates so that the Earth can see them (facing the earth). Are the plates in the correct order?
Is the part of the moon (paper plate) in the direction of the sun bright or dark? (For instance,
is the bright right half of the first quarter moon plate closer to or further from the “sun”
compared to the dark left half of the plate?) Do all of the students in the group agree that
this is correct, or should someone move?
7. Ask the students to trade roles so that each student in turn can be the “earth” and spin
around to observe the phases.
8. Invite the students to suggest how they could alter this model, and then proceed to make
changes. (For example, students may reposition the “sun” or the “earth,” or may have the
Page 39earth spin once for each day, altering which lunar phase is showing. Students may wish to
add multiple phases for each crescent and gibbous phase.)
Discussion Questions
What phenomenon does this model simulate? What are the limitations of this model?
What does your model demonstrate about the components of your system?
How does the pattern of lunar phases relate to the cause of lunar phases?
Background
The “amount” of moon that we see as we look from Earth changes in a cycle that repeats about once
a month (29.5 days). The relative positions of our sun, the earth, and moon, cause these changes.
The side of the moon facing the sun is always illuminated, just like Earth’s daylight side is illuminated
by the sun. From our perspective on Earth, we see different parts of the moon’s illuminated surface
as the moon orbits the earth.
Page 40Alternate Activity to Support Session 3: Space Travel
Shuttle on a String = 20 minutes ►GOGGLES ON◄
Overview
In this activity, students will explore orbital mechanics using a paper model of a space shuttle
attached to a string.
Materials
• Paper space shuttle (template is available in Google Group folder)
• Scissors
• Hole punch
• String
• Plastic drinking straw, cut in half
• Paper clip
• Washer
Procedure
1. Cut the space shuttle out of the paper and punch two holes where indicated on the
template.
2. Thread a piece of string through the holes and tie off, leaving a long thread hanging from the
bottom of the shuttle.
3. Thread the string through half of a drinking straw.
4. Tie a paper clip to the non-shuttle end of the string.
5. Hang a washer off the paper clip.
6. Now launch your shuttle! Hold the straw without touching the string and begin swinging the
shuttle so it flies in a circle around your hand. Even though you are not touching the string,
the shuttle orbits your hand because the weight of the washer supplies a force that pulls on
the string. Without this centripetal force, the shuttle would fly off in a straight line. In space,
the gravitational attraction of massive bodies like the sun provides a force toward the center
of the orbit. In the classroom, the inward pull created by the weight on the string produces
the orbit.
Discussion Questions
What happens if you add more washers?
Are there any other forces at work on your shuttle?
Do those forces affect the real space shuttle?
Background
This activity simulates an object in orbit. A paper space shuttle is swung in a circle on a string. The
string provides a pull toward the center of the orbit, simulating the force of gravity. (This force
toward the center is called a centripetal force). Whether the centripetal force is provided by gravity,
as with the real space shuttle, or by a string, as in this simulation, centripetal forces are what cause
the shuttle’s path to curve in an orbit instead of continuing in a straight line.
Page 41You can also read