An Introductory Guide:
Navigating Ohio History Day 2019
←
→
Page content transcription
If your browser does not render page correctly, please read the page content below
An Introductory Guide: Navigating Ohio History Day 2019
Table of Contents

Getting Started ...................................................................................................... 3
         What is National History Day
         The Annual Theme

Pinpointing a Topic .................................................................................................4
         Selecting a Topic
         Narrowing your Topic

Finding Information ............................................................................................... 6
         Primary & Secondary Sources
         Research Strategy & Finding Sources
         Research Strategy & Staying Organized

Developing a Thesis Statement… ........................................................................... 8
         Thesis Statements

Presentation .......................................................................................................... 9
         Choosing a Category
         The History Day Rule Book
         Project Categories: Exhibit, Documentary, Performance, Website, Paper
         Evaluating Projects

Process Paper and Annotated Bibliography… ...................................................... 16
         Title Page
         Process Paper
         Annotated Bibliography
Getting Started
What is National History Day?
Participating in National History Day is most likely something you’ve been assigned by your
teacher, but this is not your typical class project. For History Day, you will pick a historical topic
that you’re interested in, connect it to the annual theme and then develop and argument using
primary and secondary source materials. The best part about History Day? You can decide how
you want to show your research through a paper, website, documentary, performance, or
exhibit.
The Annual History Day Theme
Each year National History Day selects a theme. Every student who participates in History Day
has to pick a topic connected to this theme. Themes are designed to be very broad. You can
pick topics connected to local, state, national, or world history. Why do you need a theme? The
theme unites all History Day students around the country and world. The annual theme will also
help you to see the connections between your topic and bigger issues in history. Your History
day project will be about more than dates and facts. It will be about the historical significance
of your topic.
National History Day 2019: Triumph & Tragedy in History: This
year’s theme, Triumph & Tragedy will inspire students to research a variety
of different topics. All History Day students are encouraged to find a person
or event related to the theme and describe to us how the course of history
was altered as a result of their actions. The theme connection is an
important part of your project so make sure to include it in your thesis
statement and throughout your project.
Definitions:
Triumph: a victory or conquest by or as if by military force
Tragedy: a disastrous event
Remember that you want to choose people and events that have left behind a lasting legacy.
For this year’s theme, you want to look at events and people who show examples of both
triumph and tragedy. Consider topics where there was a triumph but it didn’t come easy.
Think about moments in time where a tragedy has been the catalyst for change. Are there
examples of times when there was triumph without any tragedy?Pinpointing a Topic
Selecting a Topic
The key to an effective History Day entry is the combination of a good topic with good research.
Here are some characteristics to think about in selecting a topic for History Day.
• Theme Connection. Your topic needs to have a connection to the History Day theme. If
nothing comes to mind at first, you can start researching your interests and see where
you find a connection.
• Topic Selection. Your project will require a lot of research, so make sure to choose a
topic that you are interested in and want to learn more about. If you’re working in a
group, all members should agree on the topic.
• Available Information. For some topics it can be difficult to find primary sources. This is
especially true of really old topics, obscure topics, and topics where most of the
information is in a different language. Make sure you can gather enough info to make an
argument.
• Your topic has historical significance. In a successful History Day project, you should
pick something that happened at least 20 years ago. You’ll also need to be able to make
an argument about how your topic was important in history. This doesn’t mean you
need a world-famous topic. Even local history topics had an impact in history.
WORKSHEET: TOPIC BRAINSTORM
Use this worksheet to help determine if your topic is a good fit for the theme. Choose a few different topics
you’re interested and try to answer each of the questions. Then you can choose the answers you find the most
interesting to focus your project.
Topic What issue is being Who is addressing What actions were What change
addressed? the issue? taken? occurred due to the
actions?
1.
2.
3.Narrowing your Topic
Once you know generally what you’re interested in researching, the next step is to narrow and
focus your topic. Why? Because History Day topics are pretty small. If you choose a topic that
covers too much information, you will run out space and time to include all of the information
you find.
Theme Triumph and Tragedy
In the example
shown here, the
group has a general General Interest Women’s Suffrage
interest in women’s
rights. They decided
to focus on how the Broad Topic 19th Amendment
role women played
in passing the 19th
amendment (giving Narrow Topic Alice Paul & Hunger Strikes
women the right to
vote). This is their
broad topic. The Thesis So What?
19th amendment
took over 70 years to become a reality —way too much time to try to cover– so they decided to
narrow their topic way down to Alice Paul and specifically her use of hunger strikes as protest
strategy. Even though they’ve found a good History Day topic, this group is not finished. They
still have to prove what difference this topic made in history.
Once you’ve narrowed your topic to a manageable size, you’ll keep sharpening your focus by
developing research questions. Why did Alice Paul use such drastic measures? Did everyone
agree with her? What were some alternate tactics used?
WORKSHEET: THE TOPIC NARROWING FUNNEL
Using the funnels below, try narrowing down two of your general interests into more focused topics.
Triumph & Tragedy in History Triumph & Tragedy in HistoryFinding Information Primary & Secondary Sources When historians study a topic, they try to gather a wide variety of sources during their research. Historians use sources like a lawyer uses evidence. Both need information to “make their case”. But not all sources are the same. Historians classify their sources in two categories: Primary and Secondary. You are going to need to use both types of sources for a successful History Day project. Secondary Sources Secondary sources are usually published books or articles by an author who makes a personal interpretation about a topic based on primary sources. The writer is not an eyewitness to, or a participant in, the historic event. Most books, encyclopedias, and websites are secondary sources. Secondary sources are useful because they provide important background information about your topic. The footnotes and bibliographies of secondary sources will also lead you to primary sources. Examples of Secondary Sources • Biographies • Books about the topic • Encyclopedias • Interviews with scholars/experts • History textbooks • Articles about the topic • Media documentaries • Websites Primary Sources Primary Sources are materials directly related to a topic by time or participation. They provide a first-hand account about a person or an event because they were written or produced in the time period you are studying, are eyewitness accounts of historic events, are documents published at the time of specific historic events, or are later recollections by participants in historic events. Examples of Primary Sources • Historic objects • Newspapers from the era • Manuscript collections • Letters • Interviews with participants • Photographs • Autobiographies • Music of the era • Government records • Original film footage Research Strategy & Finding Sources In order to be able to use your research later, you need to decide on a way to organize it. You should think about: 1. How and where you’re going to look for information. 2. What you’ll do to record what you find.
Where should I start?
A good place to start is in your school library. The librarian there can help you find reputable
sources to help get you on the right track. Here are some other places to check out:
   • Municipal, County, or College Libraries: These libraries have more resources than
     school libraries. They are especially helpful because they have primary sources, such as
     old newspapers.
   • Historical Societies. If your topic is on Ohio history, a historical society may be helpful.
     State and local historical societies specialize in collecting information about Ohio. Some
     historical societies and archives also have specialized collections that relate to national
     topics.
   • Historical Sites. If you topic is local, you may be able to visit the place where it
     happened. A lot of sites have restored or recreated areas so that you can get a feeling of
     what it was like during the time period. You may also have the opportunity to see
     objects and images from the time which can help you understand historical context.
   • Interviews. If people connected to your topic are still living, you can conduct oral history
     interviews with them. Contact your interview subject to set up a time and place to
     meet. Write your questions in advance and be prepared to take notes or record the
     interview. If you cannot meet in person you can send them questions in the mail, by e-
     mail, or over the phone. Make sure to send a thank you note to them after the
     interview.

Using the Internet for History Day Research
The internet is a valuable tool for your History Day research. You can use the internet to gather
general information, narrow your topic, and locate some primary source materials.
Sites such as the Library of Congress, the Digital Public Library of America, Smithsonian
Learning Lab, and Ohio Memory are good examples of reputable websites that house a lot of
primary source materials. You can also use the internet to take a look at library and archive
collections before you go visit.
Be Careful!
There are a lot of websites out there that do not have reliable information. When you’re
looking at websites, make sure you can verify the site’s author and where they are getting their
information from. You should check all of the information against at least one other source.
Here are some questions you can ask yourself about websites:
   •   What is this site about?
   •   Who created the site and where are they getting their information from?
   •   When was this site created?
   •   How accurate or credible is this page?

Research Strategy & Staying Organized
Information is only valuable if you can record it and use it later. One of the most popular ways
to organize your research is to use note cards. Use one set of cards to record notes and quotes
that you find in your sources. Use another set of cards to record the information about your
sources that you will need for your annotated bibliography. Here are examples of index cards
for a bibliographic entry and research notes about investigative journalist Nellie Bly.
Bibliography Cards track the sources you used. Fill
these out as you use each source. It will make your life
easier when you go to create your bibliography later.
Groppo, Martha. “Uncovering Nellie Bly.” Note Cards track your notes, ideas, and quotes
Kaleidoscope 10.41 (2012): 1-12. Print.
Nellie Bly’s career as an investigative reporter
This source is a peer-reviewed article published in the
University of Kentucky journal, Kaleidoscope. This is a Nellie Bly was one of the first female investigative
biography about Nellie and specifically mentions reporters and went to great strides to make her
information about her detractors. I will use this source case to the reader.
to talk about her detractors in my paper. “Bly's investigative journalism captured the minds
and hearts of her readers” (Stevens)
Note: This is only one way to organize information. If you have another way that works for
you (NoodleTools, Google Docs, a notebook etc.) that’s great! As long as you choose a
strategy and stick to it so that when it comes time to put your project together, you have all
the information you need.
DEVELOPING A THESIS STATEMENT
For a History Day project to be successful, you need to do more than report facts. Strong
History Day projects make an argument, and back up their argument with facts. This argument
is the basis of your thesis statement, and will be at the center of your project.
Thesis Statements
A strong thesis statement will address the following things:
• Presents a focused, narrow topic.
• Makes a claim about the significance of the topic in history.
• Has a strong connection to the History Day theme.
Focus Your Thesis
By the time you’re done with all of your research it’s likely that you’ll have a lot of information,
and it may be hard to decide what you should include. If your thesis addresses a clear, narrow
topic, the job of editing information will be much easier. The only material you need will
directly support your thesis.
Historical Significance
This is your opportunity to state your informed opinion (or argument) about what you’ve been
researching. Your opinion should be supported by credible sources and make a claim about how
your topic changed the course of history.
Connect to the Theme
It’s important to revisit your connection to the History Day theme in your thesis. The strongest
History Day projects will weave the central ideas of the theme into the thesis as well as the
project itself.PRESENTATION
The last thing you will do for your History Day project is develop your presentation. You can
choose from the following five categories:
• RESEARCH PAPER
• EXHIBIT
• DOCUMENTARY
• PERFORMANCE
• WEBSITE
Exhibits, documentaries, performances, and websites may be created as individual or group
entries. The research paper is only open to individuals. Ask your teachers for rules about how
many members you can have in a group. The included suggestions about building your projects
are not your only options. You can use these as a starting point, but be creative and feel free to
develop your own strategies for building your project.
Choosing a Category
When selecting a category it is important to consider the following:
• Which category best suits your interests and skills (of yourself and your group members)
• Will you have access to the equipment and materials you need to present your entry?
Consider this particularly if you are thinking about a documentary or website.
• Does your research fit one category better than another? For example, do you have
enough pictures and illustrations for a documentary?
Once you have selected category, try to look at examples created by other students. Go to
http://nhd.org/contest-affiliates/examples/ to see examples from students all over the
country. This may help give you ideas about the best way to present your topic. Your own
creativity, in combination with good research, will make your presentation stand out.
The History Day Rule Book
After choosing your category make sure that you review the History Day Rule Book for
complete information on the rules that relate to your category. The contest rule book will
also describe the judging criteria for evaluating History Day entries. Your teacher may be
able to supply you with a Contest Rule Book or you can download one from our website.
Got to http://ohiohistory.org/historyday and click on About/Contest Info.Category: Exhibit
Exhibits are visual representations of your research and
analysis. They are easy to understand and attractive, similar to
exhibits in a museum. To be successful, an exhibit must create
an effective balance between visual interest and historical
explanation.
Size Requirements
The overall size of your exhibit when displayed for judging
must be no larger than 40 inches wide, 30 inches deep, and 6
feet high. Measurement of the exhibit does not include the
table that it sits on; however it would include any stand that
you create and any table drapes. Circular or rotating exhibits
or those meant to be viewed from all sides must be no more
than 30 inches in diameter.
Word Limit
There is a 500 student-composed word limit. This applies to
any text that is not a direct quote or photo credit. It includes
any captions, graphs, timelines, words included on media devices, and any supplemental
materials that are included.
Common Exhibit Types
There are two common ways that students design their exhibits:
• Three-panel Exhibit
• Three-dimensional Exhibit
Three-panel exhibits use each panel to explain an aspect of their topic. This display style is
simple and effective, and is usually easy and inexpensive to build.
Three-dimensional exhibits are more complicated to construct. They can be useful in
explaining a topic where change over time is an important part of the project. For these
designs, make sure that you have each aspect of your exhibit distinctly displayed on each side.
These exhibits are not required to spin. They can be set on the floor or the edge of the table so
people can move around them.
Planning Your Exhibit
A successful exhibit entry must be able to explain itself. The judges shouldn’t need to depend
on your interview to understand your argument. It is important that you design your exhibit in a
way that your photographs, written materials, and illustrations are easy to understand and to
follow.Avoiding Clutter
It is always tempting to try to get as much onto your exhibit as possible, but this usually makes
for a cluttered and confusing display. Try to select only the most important items for your
exhibit.
Plot it Out in Advance
It’s important to plan out your exhibit in advance. Each section should be labeled. These labels
for your title and main ideas are very important because they direct the viewer’s eye around
your exhibit. Figure out what you want in each section, including drafts or your text and ideas
for quotes, photos, and other illustrations. Be sure to lay everything out BEFORE you glue it
down.
Exhibits Must Include Credits for All Visual Sources
Students must include a brief credit, on the exhibit itself, for all visual sources (e.g. photographs, paintings, charts,
graphs, etc.). They must also fully cite these sources in their annotated bibliography. (See: IV. Individual Category Rules –
B. Exhibit, Rule B4 pages 24-25)
• Keep in mind that a credit will be much briefer than a full citation. For example: The credit below includes the
organization where this picture can be found (Library of Congress), but does NOT include the details that are part
of the bibliographic citation.
• Students may consider including these credits in a smaller font, below the image on the exhibit, similar to how a
credit appears in a book.
• These brief credits do NOT count toward the student-composed word count.
A brief, factual credit
Alice Paul, 1918, Library of Congress
is required and does
not count toward the
500- word limit.
Consider including your
credit in a smaller font
either below or along
the side of the image.
A student-written caption
does count toward the 500
word limit.
Alice Paul was responsible for A caption is not required, but
the campaign for women’s is sometimes a good idea to
suffrage and the introduction help show how the image
of the Equal Rights supports your argument.
Amendment.Category: Documentary
In the documentary category you will create a ten-minute film like the ones on PBS or the
History Channel. Two popular technologies used for documentaries are computer-generated
slide presentations and digital video presentations. Whichever technology you choose, keep the
following in mind:
• Make a storyboard of the types of images you want to use to explain your topic.
• Collect a large number of images to avoid too much repetition. You’ll need about 100
images for a ten-minute documentary.
• Use appropriate music as an important addition to your recorded script.
• Write your script or narrative first and then add images.
• Make sure that the script fits with image on the screen.
• Preview early and re-edit at least once.
Video Presentations
The availability of home video cameras and easy-to-use digital video editing computer
software, such as iMovie or Windows MovieMaker, has made this type of documentary the
most popular. Here are some suggestions for video presentations:
• Remember: Students must operate the camera and the editing equipment.
• Stay organized. Draw up a storyboard of the schemes you will be shooting.
• Present a variety of panning shots, interviews, original footage, and still photographs.
• Appropriate music is an effective addition to your soundtrack, but remember that the
music match your presentation. Do not let it overshadow the verbal presentation.
• Watch professional documentaries for ideas.
• At events, be sure to test the available equipment so that your DVD works correctly.
• If you are burning your documentary to a disc, make sure you burn the whole video, not
just the file!
Storyboards
Storyboards are a great tool to help you to combine the audio and visual elements of your
project. Doing some advance planning will save you time when you go to create your final
product.
You can make a storyboard form by creating a three column table. Label the columns, Notes,
Visual, and Audio. Use the Visual and Audio columns to match your narrative with the images
you intend to use to illustrate your points. Use the Notes column to add any information about
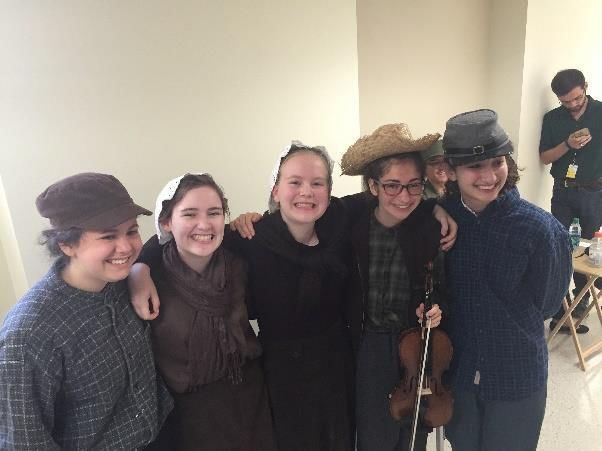
the section that will help you during the production stage.Category: Performance
The performance category allows you to create a
historical argument using acting. It will be a dramatic
portrayal of your topic’s significance in history. Entries
in this category must have dramatic appeal, but not at
the expense of historical information.
Basic Rules
• No longer than 10 minutes
• Must be an original production
• You must set up the props yourself.
Research Comes First
Don’t jump right in and start writing a script. Do good research first. This is the foundation for
your entire project.
Develop a Thesis
It’s still important that you are discussing the significance of your topic in history. After you’ve
done your research, develop your thesis before you start planning your performance.
Brainstorm Scenarios
Once you have a thesis, it’s time to figure out how best to portray this for your viewers. Be
creative! What people were connected to this topic that might provide an interesting point of
view on the issue? Remember: You want to avoid presenting a dry oral report on a character.
Become the historical figure and write your script around an important time or place that will
explain your ideas.
Write the Script
The average script for a ten-minute performance is four to five double-spaced pages. Make sure
your thesis is clear in your performance, ideally incorporated into the beginning and ending of
your performance. Make sure your script contains references to the historical evidence,
particularly the primary source material you found in your research. Using actual dialogue,
quotations, or taking excerpts from speeches are good ways to put historical detail into your
performance.
Practice!
Once you have solid script you can begin practicing. This will include blocking, memorizing,
costumes and set design. Often times the more simple props and costumes are the better.
Good costumes help make you convincing, but be sure they are appropriate to your topic.
Consult photographs or costume guides if you are unsure about appropriate dress. See
examples of historical plays to get ideas about stage movements, use of props, etc.
Remember What’s Important
Content is the most important factor in your performance and any props you use should be
directly related to your theme. Props should help you to emphasize the key concepts of your
performance. Remember, you only have five minutes to put up and take down your propsCategory: Website
The website category allows you to create an interactive, education website. The key to the
website category is a strong historical argument and evidence supported by clear organization,
simple navigation tools, and interactivity without glitz.
The NHD Website Editor
Students creating a website must build their site using the NHD Website Editor, a free, online
web-building tool. You can access this at http://nhd.weebly.com
Students can save and edit their website throughout the History Day year, though you will be
locked out of editing your website while judging is taking place. At the end of the school year,
you can save or convert your website before they are cleared from the system on August 1.
General Technical Specs
• No more than 1,200 visible, student-composed words. This doesn’t count words you
don’t write (such as quotes or words in primary sources). It also does not count
recurring menus and titles in the navigational structure of your site.
• Sites cannot be larger than 100 MB. The NHD Website Editor will automatically limit you
to this amount of space.
• Your use of multimedia clips may not exceed 4 minutes. It’s up to you if you do multiple
short clips, or a few longer ones. You may not narrate audio/video clips.
• All visual and multimedia material must include a brief credit on your website and be
included in your annotated bibliography. These do not count towards your word limit.
• Your process paper and bibliography must be included as an integrated part of your
website. They do not count towards your total website word limit.
• Make sure to publish your website as you make changes.
Research and Planning out Your Website First
It may be tempting to begin using the NHD Website Editor right away, but actually building your
website is one of the final steps in your process. You will want to do your research and develop
a thesis first. Once you have an idea of what you want to say, plan your website out on paper.
Decide on the pages you need, how they will be organized, and what sort of supplemental
media content you might want to use.
Consider Including…
The most successful websites are more than just a paper on a computer screen. This category
gives you the opportunity to share your ideas in a variety of engaging formats, including
multimedia clips, images, and primary sources within your website. As you decide which
elements to include, remember to only include those that relate most directly to your
argument.
Competing with Websites
• After your website is built be sure to test it on a number of browsers to ensure that it
has the visual impact you expect.
• Keep track of your project’s assigned web address as you will need this to register.Category: Research Paper
The process of writing a paper is similar to the writing of articles and books by college
professors. Throughout your schooling, you will be expected to write research papers.
A research paper requires three basic steps.
1. Collection of Information
2. Organization of Information
3. Presentation of the topic in an interesting way.
There are many books available on how to write research papers and you may find it helpful to
look at one or more of them before you begin. Ask your history or English teacher to suggest
some useful guides. Here are some of the most common questions about research papers:
What is a footnote?
Footnotes are explanations provided by writers about ideas or quotations presented in the
paper that are not their own. Footnotes not only give credit to the originators of ideas, but also
serve as evidence in support of your ideas. Usually footnotes occur in three situations:
1. Quoting a Primary Source: An example of this would be including a selection from a
speech or interview.
2. Quoting a Secondary Source: If you take a direct quotation from someone’s book, you
must footnote it.
3. Paraphrasing a Secondary Source: Even if you change an author’s ideas into your own
words, you must footnote where you found this information.
How long does this paper have to be?
History Day papers are 1,500 to 2,500 words in length (approx. 6 – 10 pages). The word limit
does not apply to: notes, annotated bibliography, illustration captions, and supplemental
appendix materials.
Must the paper be typed?
No, but typing is always best, and you may have someone type your paper for you. Be sure to
reference your Contest Rule Book for more information about title pages, footnote style, and
entry requirements.
Evaluating History Day Projects
At all levels of History Day competition, judges are looking at the following criteria, which
heavily focuses on the history behind your project.
• 60% Historical Quality: Historical accuracy, analysis and interpretation,
historical context, wide research, uses available primary sources, research is
balance.
• 20% Connection to Theme: Clearly relates topic to theme, demonstrates significance of
topic in history, draws conclusions.
• 20% Clarity of Presentation: Uses the category effectively to explain ideas.
• Rules Compliance: Project follow s general guidelines for History Day as well as
category-specific rules.PROCESS PAPER & ANNOTATED BIBLIOGRAPHY
All History Day students must submit an annotated bibliography, and all categories except
papers must submit a process paper as well.
Title Page
The title page includes the following information. Do not include any additional information or
illustrations on the title page.
• Title of the entry
• Name(s) of the student(s) who developed the entry
• Age division and category of the entry
• Word count
o Exhibit: Include the student-composed word count for the exhibit and the total
word count in the process paper
o Documentary and Performance: Include the total word count in the process
paper
o Paper: Include the total word count in the process paper
o Paper: Include the total word count in the paper.
o Website: Include this information on the homepage of your website. Include the
student-composed word count for website and the total word count in the
process paper
It is important to come up with a good title for your entry. A good title will quickly introduce
your topic, but also adds wording that helps the viewer understand your point of view.
Title Title Title Title
Name Name Name Name
Junior Division Junior Division Junior Division Junior Division
Historical Paper Group Exhibit Individual Performance Individual Documentary
Paper Length: 2,234 words Student-Composed Words: 489 words Process Paper: 425 words Process Paper: 410 words
Process Paper: 410 Words
Process Paper
Students creating entries in all categories except the paper category must also write a process
paper. It is important to do a good job on this part of the project because it is the first thing that
people look at when evaluating History Day entries. The research paper category requires a title
page and annotated bibliography, but does not include a process paper.
The process paper is not a summary of the topic, but an essay that describes the process of how
the students developed the entry.This paper is no longer than 500 words, usually 4-5 paragraphs addressing:
• How did you get the idea for this topic?
• Where did you go for your research? What types of
sources (newspapers, documents, interviews, etc,) did you
use?
• How did you put your presentation together? What skills did you learn?
• How did you put your presentation together? What skills did you learn?
• How does your topic relate to the theme? Why is this topic important in
history?
Annotated Bibliography
A bibliography is an alphabetized list of the sources used in
developing a historical project. An annotated bibliography not only
list the sources, but also gives a short description of each source and
how you used it in your entry. A History Day bibliography should be
separated in to primary and secondary sources. For guidelines on
bibliographic style refer to A Manual for Writers of Term Papers,
Theses, and Dissertations by Kate L. Turabian, or the style guide of
the Modern Language Association of American (MLA).
Happy History Day!
We’re so happy that you’re participating in History Day this year,
and can’t wait to see your final project! Remember that if you need
help along the way, you can always ask your teacher for help. Ohio
History Day staff are also available to answer questions and give
feedback, so feel free to contact us at any time.
Oh
io
His
tor
y
Da
y is
loc
ate
dat: Oh io His tor y Co nn ect ion 800 E. 17th Ave Columbus, OH 43211 ph: (614) 297-2526 e-mail: historyday@ohiohistory.org
You can also read