Bugaboo frog instructions for use
←
→
Page content transcription
If your browser does not render page correctly, please read the page content below
Z00389 - UG NA eng rv3 0506.qxp            5/17/2006         11:50 AM    Page 1

   bugaboo frog instructions for use
          Dear Parents and other users,
   Congratulations on your purchase of this Bugaboo Frog. We took great care to make it safe, comfortable and
   easy to use; please read these instructions carefully before you use it the first time. We would love
   to hear your comments on its design, use, instructions or anything else you feel would improve it.
   Also, Bugaboo Customer Service at service@bugaboo.us can answer questions about your new Bugaboo
   Frog.

   important information
   This user guide is only valid for Bugaboo Frogs with Item Code 38022201, which can be found on the serial
   number sticker on the central axle of the undercarriage.
   Pram, pushchair, buggy compliant with standard ASTM F833-05a.
   Your child's safety may be affected if you fail to follow these instructions. Read them carefully before using
   your Bugaboo Frog and keep them for future reference.
   Familiarize yourself with the operation of your Bugaboo Frog before using it.
   Never use force on your Bugaboo Frog. If you have problems, recheck the instructions or call Bugaboo
   Customer Service at 1-310-372-2976.
   The brake must only be used as a parking brake.
   Always engage the parking brake before you adjust your Bugaboo Frog.
   Your Bugaboo Frog is designed to carry one child who weighs less than 40 pounds.
   The Bugaboo Frog with bassinet is designed to carry one child who is under 6 months old, who weighs less
   than 20 pounds, and who is less than 28 inches tall.
   The Bugaboo Frog under-carriage bag is NOT designed to transport more than 8 lb.
   Total weight suspended from handlebar should never exceed 8 lb.
   The Bugaboo Frog is designed to carry only one child.
   The Bugaboo Frog is NOT A JOGGER. DO NOT JOG OR RUN with the Bugaboo Frog.
   Do not let children play with or near the Bugaboo Frog.
   Use the wrist strap attached to the handlebar AT ALL TIMES.
   Always remove your child when adjusting positions or configurations of your Bugaboo Frog. Adjusting while
   the child is in place may cause serious injury.
   THE BUGABOO FROG SEAT/BASSINET IS NOT A CAR SEAT. Use an approved car seat when your child travels in
   a car. Graco and Peg Perego car seats are approved, and are compatible with the Bugaboo Frog chassis
   using the Bugaboo adaptor*. See Section L (Optional Accessories).
   Remove your child from your Bugaboo Frog before going up or down stairs, escalators or steep slopes.
   Lift the front wheels of your Bugaboo Frog to move it up or down curbs.
   The crossbars between the wheels are not designed to support weight. Standing on them is unsafe and can
   damage your Bugaboo Frog.
   Keep your Bugaboo Frog away from heat sources or open flame. Be especially careful near burning ciga-
   rettes. The fabric used in your Bugaboo Frog meets the flammability requirements of the California Bureau of
   Home Furnishings Technical Bulletin 117.
   Use only the Bugaboo-recommended products and accessories described in Section L (Optional Accessories)
   with your new Bugaboo stroller.
   Extended exposure to sunlight can slightly discolor some parts of your Bugaboo Frog.
   Do not expose your Bugaboo Frog to extreme heat or cold.
   Your Bugaboo Frog's warranty is voided in the event of damage due to overload, improper folding or use of
   non-Bugaboo-recommended accessories. See the Warranty Form for more information.
   Do not assemble your Bugaboo Frog in the presence of small children.
   Check regularly to be sure that all safety devices work properly.
   Only use spare parts supplied or approved by Bugaboo.
   BugabooTM and FROGTM are trademarks of Bugaboo Design & Sales USA, Inc., subject to license. Such marks
   may not be used without express permission.
                                                         1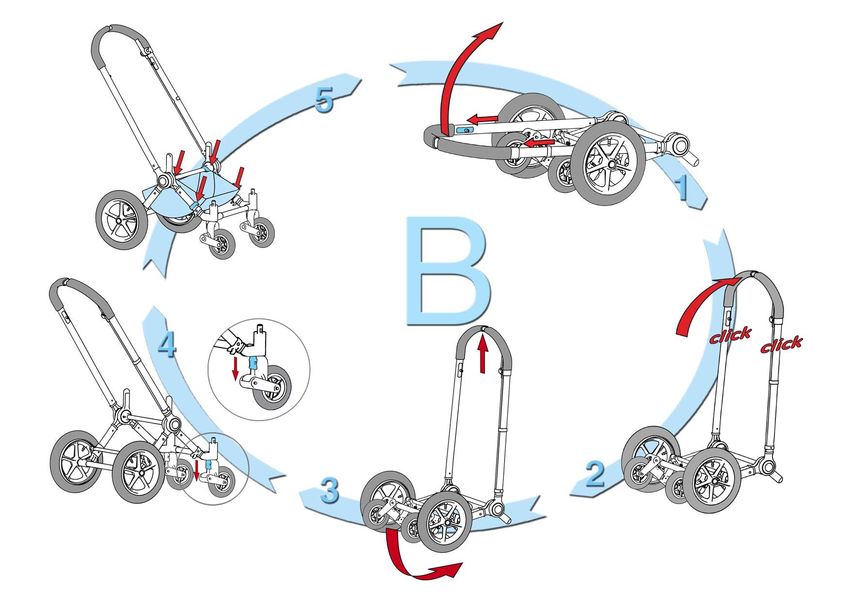
Z00389 - UG NA eng rv3 0506.qxp                       5/17/2006          11:50 AM       Page 2

   The Bugaboo Frog is patented and the design is protected.
   *   Graco and Peg Perego are the trademark of Graco and Peg Perego, Inc, and is not associated with Bugaboo Design & Sales USA, Inc. No
       approval or endorsement by them is to be implied.

        WARNING                     Do not use your Bugaboo Frog if any part is broken, cracked, incomplete
                                    or worn out.

        WARNING                     Never leave any child unattended.

        WARNING                     Infants and young children can suffocate and die if their faces are in or
                                    next to a plastic bag. Discard this bag immediately.
                                    Keep this bag away from children, infants, cribs, beds, playpens or car-
                                    riages.

        WARNING                     Any load attached to the handlebar will affect the stability of the stroller
                                    and may cause tipping or loss of control.
        WARNING                     Wear wrist loop at all times
        WARNING                     Do not run, jog or skate with the Bugaboo Frog

        WARNING                     When the seat / bassinet frame / car seat adaptors are properly
                                    attached to the Bugaboo Frog chassis it prevents the undercarriage from
                                    folding.

        WARNING                     Bags and other items should never be suspended from the Bugaboo
                                    Frog handle bar by any means other than the Bugaboo diaper bag, the
                                    Bugaboo bag clips and the Bugaboo parasol, because the stroller could
                                    become unstable. Please refer to corresponding user guides before
                                    these Bugaboo products.

        WARNING                     Audible 'click' must be heard in order to determine that each lock is in
                                    proper position. To ensure proper locking engagement, check to see that
                                    the seat / bassinet / car seat adaptors / carry handle cannot be disen-
                                    gaged from the stroller without unlocking the device. Failure to attach
                                    properly could result in serious injury or death to your child.
        WARNING                     Always remove child from the seat / car seat / bassinet before
                                    making adjustments to stroller.

        WARNING                     Suspending more than 3.6 kg/8 lbs from the handle bar could cause
                                    your Bugaboo Frog to tip over and seriously injure your child, especially
                                    when the stroller is used on grades or inclines. Suspending more than
                                    2.5 kg/5.5 lbs is not recommended.

        WARNING                     Care must be taken when folding and unfolding the product to
                                    prevent finger entrapment.

        WARNING                     The product will become unstable if a parcel bag or rack is used when
                                    there is no provision for one.

        WARNING                     The product will become unstable if the manufacturer's
                                    recommended load is exceeded.

                                                                     2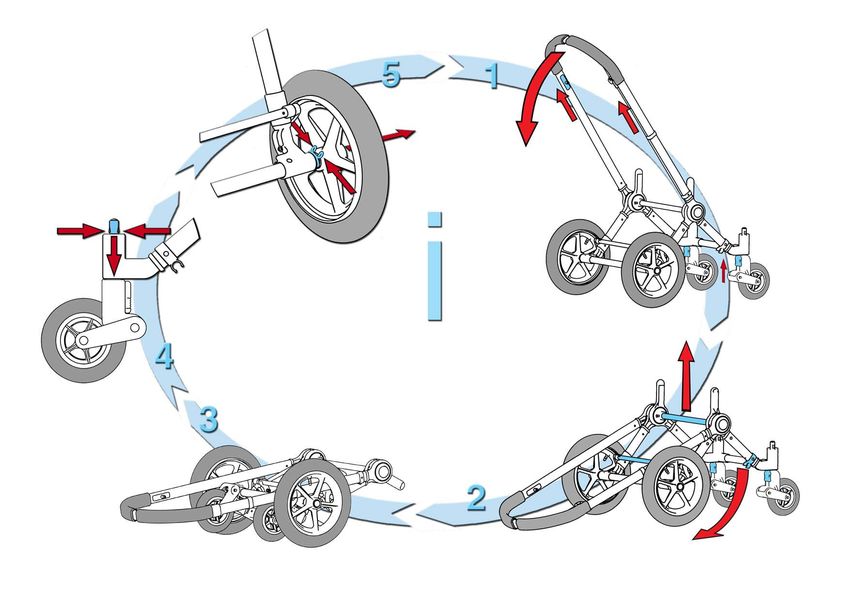
Z00389 - UG NA eng rv3 0506.qxp            5/17/2006         11:50 AM    Page 3

   preparing and using your bugaboo frog
      Follow these instructions carefully and observe the sequence of the diagrams and text. The letters and
   numbers of the diagrams and text correspond.

       WARNING               Failure to follow these instructions may result in death, serious injury or
                             harm to your child.

       WARNING               Always remove your child from the seat and/or bassinet before you
                             adjust it. Never lift, reverse or carry your Bugaboo Frog with a child in the
                             seat.

       WARNING               The brake is for parking only. The brake lever must be in its lowest posi-
                             tion to lock. Use it only when your Bugaboo Frog is completely stopped,
                             and any time you adjust your Bugaboo Frog.

        WARNING              All babies have highly sensitive skin. NEVER leave a baby unprotected in
                             the sun! Use the Sun Canopy or Bugaboo Parasol shown in Section L
                             (Optional Accessories).

   A     to fit the wheels to the chassis
          Fitting the wheels
   1   Place the chassis as shown with the plastic parts on the ground.
   2   Slide swiveling wheel blocker upwards.
   3   Push the swivel hubs into the sockets as shown until you hear a click from each one. Be careful not to put
       the swivel hubs into the wrong end of the sockets. Now push the large wheels with pneumatic tires into
       the sockets as shown until you hear a click from each one.

       WARNING               Ensure that the valve caps and nuts are firmly tightened so
                             children cannot swallow them.
       WARNING               Do not put the swivel hubs into the wrong end of the sockets.

   B     to unfold the chassis and attach the bag
          Unfolding the chassis
   1   To unlock the handlebar, pull the two release knobs towards you and lift. Do not press on the handlebar
       while pulling the knobs.
   2   Release the knobs and raise the handlebar to the position shown in Diagram B until you hear a click on
       each side.
   3   Place your foot on the crossbar between the swivel hubs and gently push the crossbar away from you
       while raising the handlebar.
   4   Place the chassis on all four wheels and pull the swivel hub locking switch down.
          Attaching the Bugaboo Frog Bag
   5   Attach the luggage bag to the undercarriage by fastening the 4 hook & loop fasteners on the aluminum
       frame. The bag may remain in place when the undercarriage is folded.

                                                         3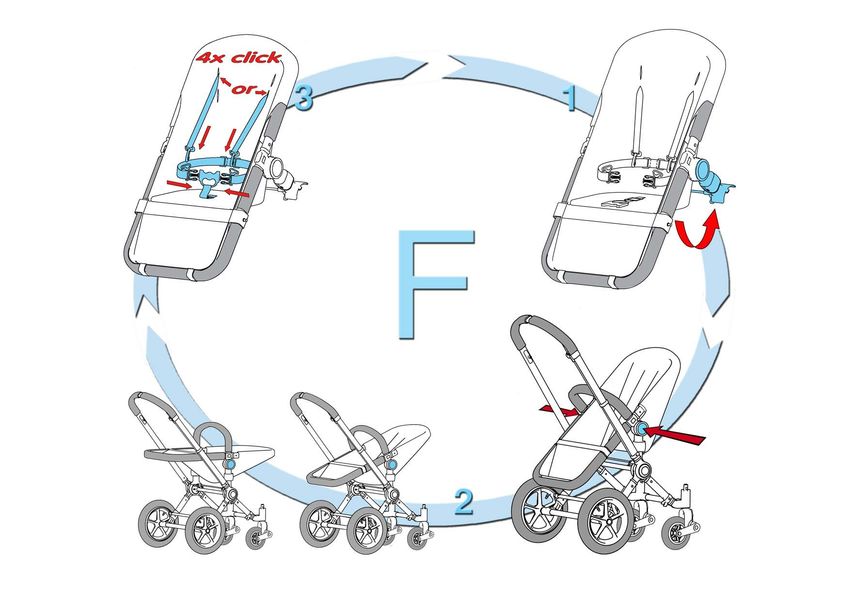
Z00389 - UG NA eng rv3 0506.qxp             5/17/2006         11:50 AM    Page 4

       WARNING                The Bugaboo Frog underseat bag is designed to carry a maximum of 8
                              lbs.

        WARNING               Pneumatic tires and spring swivel hubs provide cushioning.
                              Do not inflate them above 15 PSI / 1 bar.

        WARNING               Ensure that all locking devices are engaged before you use your
                              Bugaboo Frog.

   C     to prepare your bugaboo frog bassinet
           The bassinet is a freestanding unit that can be used without the frame. To prepare it for use, fit the
   bassinet liner to the seat/bassinet frame. The liner is supplied complete with mattress and apron. The seat
   cover can also be fitted to the seat/bassinet frame, but you must remove the seat cover to use the bassinet.
   To do this, carry out the instructions in Diagram E in reverse order. THIS BASSINET IS NOT A CAR SEAT. Children
   must ride in an approved car seat while traveling in a car.
           Fitting the bassinet liner to the seat/bassinet frame
   1 The bassinet upholstery is fastened to the seat/bassinet frame with hook & loop fasteners. Ensure that the
       round side of the bottom plate of the bassinet upholstery corresponds to the round side of the
       seat/bassinet frame. The numerical order shows you how to attach the bassinet upholstery. First position
       the plastic slats (No. 1) in the pocket. Then attach the hook & loop fasteners (No. 2-7). Make sure to
       observe the numerical order of the hook & loop fasteners. Attach the hook & loop fasteners at the lower
       end of the sides of the bassinet upholstery tightly to the side supports of the seat/bassinet frame.
           Attaching the sun canopy
   2 Attach the supplied sun canopy with stiffeners and fabric by clicking the two clips onto the seat/bassinet
       frame.
           Attaching the carry handle
   3 Attach the carry handle by pressing the small square buttons and sliding the ends into the slots until you
       hear a click on each side. Always check to ensure that the carry handle is fitted correctly before you use it
       to lift the bassinet.
           Removing the carry handle
   4 To remove the carry handle, press the small square buttons firmly and pull the ends out of the slots.
           Fitting the apron
   5 The apron can be attached to the bassinet to protect your child against wind and weather. Fit it to the foot
       end of the seat/bassinet frame by hooking the elastic bands at the ends of the cover to the hooks on the
       canopy clips.

       WARNING                Do not add a mattress thicker than 1.2 inches.

       WARNING                Never put the seat/bassinet in a high place such as a table, bed, etc.

       WARNING                Always keep the bassinet horizontal when in use.

       WARNING                Always check to ensure that the carry handle is fitted correctly before you
                              use it to lift the bassinet. Failure to do so could cause harm, serious injury
                              or death to child.

                                                          4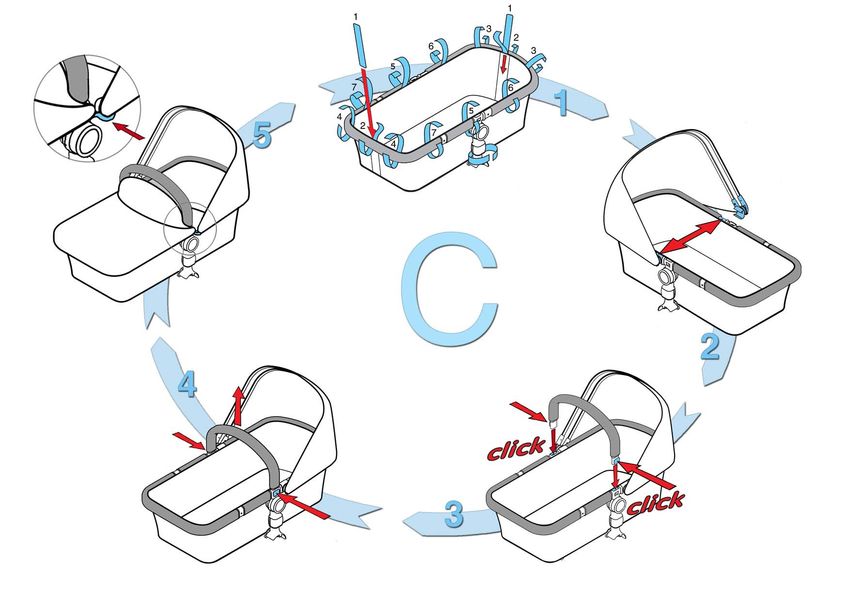
Z00389 - UG NA eng rv3 0506.qxp             5/17/2006         11:50 AM    Page 5

   D     to use the bassinet freestanding and on the chassis
          Using the bassinet
   The bassinet is designed for infants who are younger than 6 months, who weigh less than 19 pounds, and/or
   who are shorter than 28 inches. It is designed solely for infants who cannot sit up and/or push themselves up
   using their hands and/or knees. In the bassinet your baby can lie completely flat, taking the load off the spine
   completely and allowing your baby to stretch its legs. The bassinet is a freestanding unit and can be used as
   a bassinet on the Bugaboo Frog chassis.
          Attaching the bassinet to the chassis
   1 Slide the side brackets of the bassinet onto the legs sticking up from the chassis until you hear a click on
       each side.
          Removing the bassinet from the chassis
   2 Press the large white square buttons on both sides of the bassinet at the same time, then lift it by the carry
       handle.
          Reversing the bassinet
   3 The bassinet can be fitted to the chassis facing either way. To change the direction, remove it, turn it
       around and reinstall it.

       WARNING                Ensure that all locking devices are engaged before use.

       WARNING                Always use the bassinet on a horizontal, firm, flat surface, whether or not
                              it is attached to the Bugaboo Frog.

       WARNING                Keep the bassinet horizontal at all times when in use.

       WARNING                Always remove your child before adjusting the seat/bassinet.
       WARNING                Before lifting the bassinet by the carry handle always check that the carry
                              handle is fitted correctly. Failure to do so could cause harm, serious injury
                              or death to your child.

       WARNING                Read parts G & H of these instructions before using the bassinet with the
                              Bugaboo Frog chassis.
       WARNING                To avoid serious injury or death to child do not use this bassinet as a car
                              bed.

       WARNING                Audible 'click' must be heard in order to determine that each lock is in
                              proper position. To ensure proper locking engagement, check to see that
                              the seat / bassinet / car seat adaptors / carry handle cannot be disen-
                              gaged from the stroller without unlocking the device

   E     to prepare your bugaboo frog seat
         Prepare your Bugaboo Frog seat by attaching the seat cover and the carry handle to the seat/bassinet
   frame. The seat/bassinet frame can also be used with the bassinet liner, but the bassinet liner must be
   removed before you can use it as a seat. To do this, carry out the instructions in Section C in reverse order.
         Fitting the seat cover to the seat/bassinet frame
   1 Stand the seat/bassinet frame as shown in Diagram E1.
   2 Slide the sleeve of the seat cover over the top of the seat/bassinet frame with the Bugaboo logo at the
      front. Ensure that the rounded top of the sleeve is at the rounded end of the seat/bassinet frame. Pull the
      sleeve down tightly. Fasten the sleeve of the backrest at the bottom and sides with the hook & loop fas-
                                                          5
Z00389 - UG NA eng rv3 0506.qxp               5/17/2006         11:50 AM     Page 6

      teners. Fold the seat portion inwards to convert the unit into a seat.
   3  Position the O-ring over the projecting pin (see diagram E3 ,red arrow A). This is easiest when the carry
      handle is not connected, as the frame can flex slightly. Then position the seat onto the side. Bend the
      seat/bassinet frame inwards by pushing on the side of the seat/bassinet frame (see red arrow B). Pull the
      ties and position the O-ring over the projecting pin (see red arrow C).
   4 Click the ties together under the seat (see diagram E4 , red arrow A). Fasten the two hook & loop fastener
      strips at the foot to the underside of the seat/bassinet frame (see red arrow B). Ensure that the hook &
      loop fasteners and the ties are properly fastened.
          Attaching the sun canopy
   The sun canopy attaches to the seat and to the bassinet in the same way. See Diagram C2.
          Attaching the carry handle
   5 Attach the carry handle to the seat by pressing the small white square buttons and sliding the ends into
      the slots until you hear a click on each side.
          Removing the carry handle
   6 Push down slightly on the carry handle, then press the small square buttons firmly and slide the ends of
      the carry handle out of the slots.

       WARNING                 Always check to ensure that the carry handle is fitted correctly before you
                               use it to lift the bassinet.
       WARNING                 Avoid serious injury from falling or sliding out. The occupant restraint sys-
                               tem is to be used.
       WARNING                 When locking the carry handle, you must hear a click on each side.
                               Failure to properly attach the carrying handle could result in the serious
                               injury or death of your child.

   F      to use the seat freestanding and on the chassis
          Your Bugaboo Frog seat is designed to carry one child who weighs less than 37 pounds. When using
   your Bugaboo Frog freestanding, put the backrest in the semi-reclining position. When using the seat on the
   chassis, the backrest can be adjusted to sitting, semi-reclining and reclining positions, and the angle between
   the backrest and the seat of your Bugaboo Frog seat unit will remain constant. With infants younger than six
   months, do not use the seat in the sitting position. Use it only in the reclining and semi-reclining position, and
   then for not more than two hours at a time.
          Seat used freestanding with backrest in semi-reclining position
   1 The seat can only be placed freestanding on the ground when the backrest is in the semi-reclining posi-
       tion. To set this position, open out the seat adaptors completely backwards.
          Attaching the seat to the chassis
   Slide the side brackets of the seat onto the lugs sticking up from the chassis until you hear a click on both
   sides, in the same way as with the bassinet. See Diagram D1.
          Changing the position of the seat after attaching it to the chassis
   2 To change position, press the round buttons on the side brackets and tilt the seat as desired.
          Removing the seat from the chassis
   To remove the seat from the chassis, press the large white square buttons on each side of the seat at the
   same time, then lift it by the carry handle. See Diagram D2.
          Reversing the seat
   The seat will fit the chassis facing either way. To reverse it, remove it from the chassis, turn it around, and rein-
   sert it until you hear a click on both sides. (See Diagrams D3 and D4.) The sitting, reclining and
   semi-reclining positions can be set with the seat facing either way.

                                                            6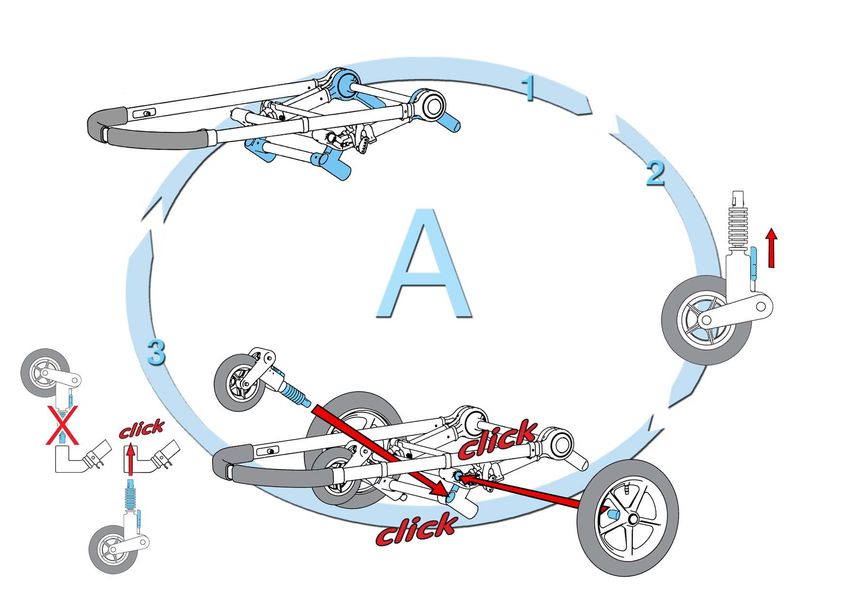
Z00389 - UG NA eng rv3 0506.qxp             5/17/2006         11:50 AM    Page 7

          Using the seat harness
   3   Always use the five-point harness to secure your child in the Bugaboo Frog seat. The shoulder straps,
       crotch strap and waist straps are already fitted. Position the waist straps as shown in Diagram F3, then
       place your child in the Bugaboo Frog seat. Pull the crotch strap out between your child's legs. Pull the
       shoulder straps over your child's shoulders and attach them to the crotch strap. Pull the waist straps
       across your child's waist and attach them to the crotch strap. You should hear a click each time you attach
       a strap to the crotch strap. Tug on each strap to ensure it is firmly attached.
   4   Your child is now secured in your Bugaboo Frog seat. If your child tends to slip down, pull the crotch strap
       through the black loop on the seat before attaching the shoulder and waist straps.

       WARNING                     Your child may fall backward if the seat adaptors are not pulled
                                   straight backward for support when the seat is used separately.

       WARNING                     Always use the crotch strap and the waist belt to avoid serious injury
                                   from falling or sliding.

       WARNING                     Ensure that all locking devices are engaged before use.

       WARNING                     Always check to ensure that the carry handle is fitted correctly before
                                   you use it to lift the seat.

       WARNING                     Always use the crotch strap AND the waist belt.

       WARNING                     Use the five-point harness as soon as your child can sit
                                   unaided.
       WARNING                     Don't let your child surprise you with unexpected movements:
                                   ALWAYS use the harness.
       WARNING                     The harness must be adjusted to fit your child and properly fastened.
       WARNING                     If your child tends to slip down, pull the crotch strap through the black
                                   loop on the seat before attaching the shoulder and waist straps.

       WARNING                     Read Sections G and H of these instructions before using the seat
                                   with the Bugaboo Frog chassis for the first time.
       WARNING                     Audible 'click' must be heard in order to determine that each lock is in
                                   proper position. To ensure proper locking engagement, check to see
                                   that the seat / bassinet / car seat adaptors / carry handle cannot be
                                   disengaged from the stroller without unlocking the device

   G     to use the swivel hub lock/brake and parking brake
          Swivel hub lock/brake
   1   To keep the wheels from swiveling, raise the white locking switch on the swivel hubs until it fits into the
       black holder.
   2   For best maneuverability, slide the white locking switch fully downward so the small wheels can
       swivel.
          Operating the parking brake.
   3   Your Bugaboo Frog parking brake acts on the rims of the large wheels and is operated by a lever on the
       handlebar. To engage the parking brake, push the lever to its lowest position.

                                                          7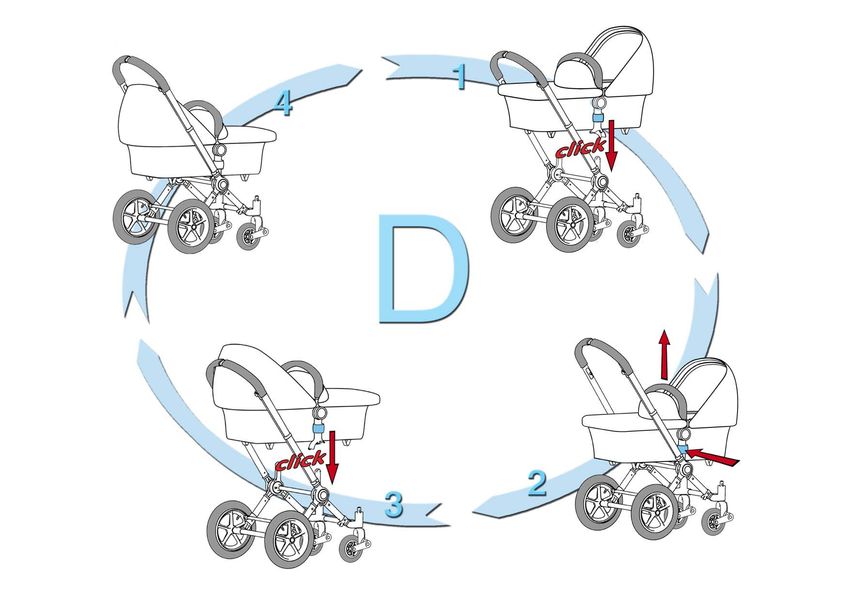
Z00389 - UG NA eng rv3 0506.qxp 5/17/2006 11:50 AM Page 8
4 To disengage the parking brake, push the white button on the lever. The lever will spring back.
5 Use the brake cable spanner to adjust the brake cable. Screwing the nut upwards loosens the cable;
screwing it downwards tightens it.
WARNING Ensure that your Bugaboo Frog parking brake is properly engaged.
WARNING Always apply the parking brake when parking or adjusting your
Bugaboo Frog.
WARNING Brake is parking brake only. To be used only when completely
stopped. Brake must be in furthest downward position to be locked.
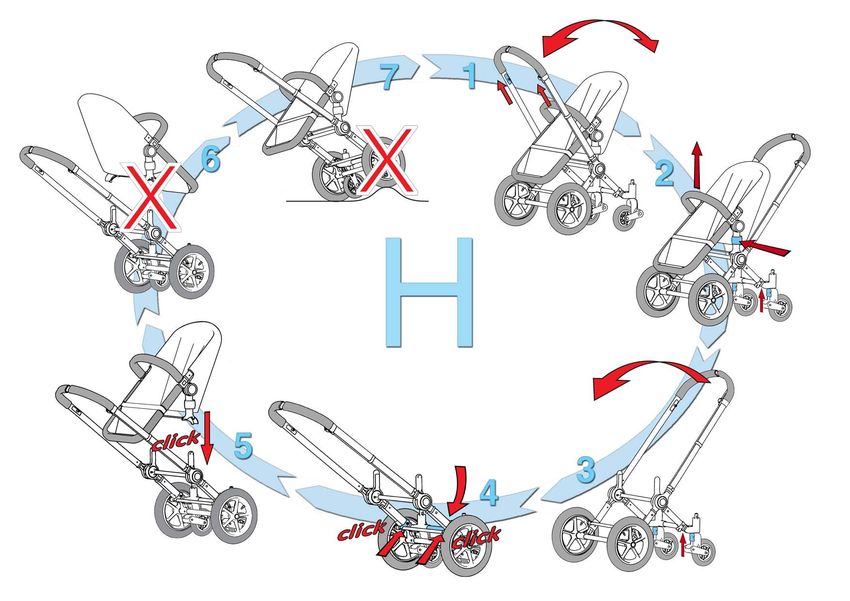
H to use your bugaboo frog in town, in the woods
and on the beach
Read the following diagrams and text in sequence to best understand the various ways of using your
Bugaboo Frog in town, in the woods and on the beach.
Using the Bugaboo Frog in town (four-wheel position)
1 When using your Bugaboo Frog in town, place the handlebar is over the large wheels and unlock the
swivel hubs. (See Diagram G2.) This gives your Bugaboo Frog maximum maneuverability and lets you
negotiate pavement with ease. To move the handlebar over the large wheels, pull the two release knobs
on the inside of it towards you, then pull the handlebar across. Do not exert force on the handlebar while
pulling the knobs.
Using the Bugaboo Frog off-road (four-wheel position)
2 When using your Bugaboo Frog in the woods or on bumpy surfaces, place the handlebar over the swivel
hubs. This puts the large wheels in front to let you negotiate bumps with ease. Lock the swivel hubs by
fully raising the locking switch. (See Diagram G1.) To move the handlebar over the swivel hubs, pull the
two release knobs on the inside of it towards you, then pull the handlebar across. (See Diagram H1.) Do
not exert force on the handlebar while pulling the knobs.
Using the Bugaboo Frog on the beach or other difficult terrain (two-wheel position)
3 When using your Bugaboo Frog on a level beach, place the chassis in the two-wheel drive position. To do this,
remove the seat from the chassis, lock the swivel hubs and put the handlebar over the swivel hubs.
4 Once you have pulled the handlebar over, push the crossbar between the swivel hubs down until you hear
a click.
5 You can now put the seat on the chassis in the two-wheel position.
6 When the buggy is in the two-wheel position, the seat can only face the direction of travel.
7 Lateral stability is substantially reduced in the two-wheel position. Take care not to let your Bugaboo Frog
fall over when using it this way on rough terrain.
WARNING Ensure that all locking devices are engaged before use.
WARNING Remember that the seat is not reversible in the two-wheel position. It
can only face in the direction of travel.
WARNING Do not use two-wheel position with the bassinet or car seat, as the
child cannot be secured to it with the harness.
WARNING Your Bugaboo Frog is much less stable in the two-wheel mode.
You must take extra care that it does not tip over sideways. Your
Bugaboo Frog is safe only on a level surface. Ignoring this warning
could result in loss of control and tipping of stroller, and death or seri-
ous injury to your child.
8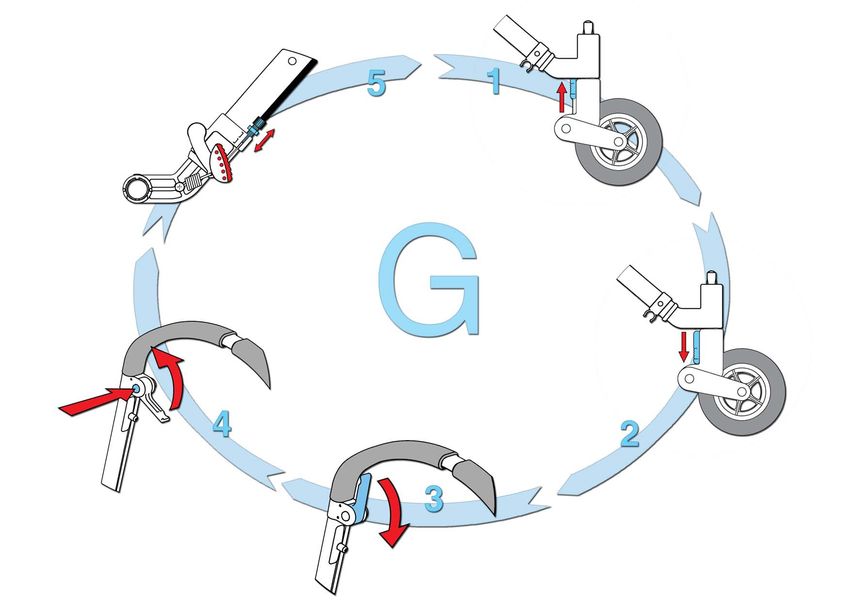
Z00389 - UG NA eng rv3 0506.qxp              5/17/2006         11:50 AM    Page 9

       WARNING                     Use the wrist strap attached to the handlebar at all times.

       WARNING                     Always pull Your Bugaboo Frog in the two-wheel mode; pushing
                                   may tip it over.

       WARNING                     The swivel hubs of your Bugaboo Frog will become extremely dirty
                                   on the beach. Remove them when using the buggy in the two-wheel
                                   drive position.

       WARNING                     The Bugaboo Frog is not saltwater-resistant.

       WARNING                     The two-wheel position of the Bugaboo Frog chassis is to be used on
                                   horizontal surfaces only. Ignoring warning could result in loss of con-
                                   trol or tipping and death or harm to your child.

   I     to collapse the bugaboo frog and remove the
         wheels
          Removing the seat/bassinet from the chassis
   Before collapsing your Bugaboo Frog, you must remove the seat/bassinet from the chassis. (See Diagram D2.)
          Folding the chassis in two-wheel drive position
   Set the chassis to two-wheel drive. (See Diagrams H3 and H4.) You can now put the chassis away or simply
   hang it from the handlebar.
          Fully collapsing the chassis with wheels
   1 Place the Bugaboo Frog chassis in the four-wheel drive position with the handlebar over the large wheels. Lock
       the swivel hubs. Move the handlebar down by pulling the two release knobs on the inside of it towards you.
   2 Lift the Bugaboo Frog chassis by the central crossbar and fold the wheels together until you hear a click.
   3 Your fully collapsed Bugaboo Frog should look like Diagram I3.
          Fully collapsing the chassis without wheels
   4 Remove the swivel hubs from their sockets by holding in the two plastic spring clips and pulling the whole
       unit out of the socket.
   5 Remove the large wheels by squeezing the ends of the metal spring clip together and pulling the wheel
       out of the socket.
          Collapsing the seat/bassinet
   To make the seat totally flat, fold the side supports completely against the seat/bassinet frame. (See Figure F1.)
   Then lift the seat bottom (See Figure E2.) and disassemble the carry handle (See Figure E5.).
   To make the bassinet totally flat, detach the hook & loop fastener straps at the foot and head of the bassinet
   (See Figure C1 No. 2.) and remove the plastic slats (See Figure C1 No. 1.). Then fold the side supports com-
   pletely against the seat/bassinet frame (See Figure F1.) and dismount the carry handle (See Figure C4.).

                                                           9
Z00389 - UG NA eng rv3 0506.qxp 5/17/2006 11:50 AM Page 10
J maintenance
General points
Regularly check whether all safety devices are working correctly.
Regularly check the carry handle and the base of the seat or bassinet for damage.
Only use spare parts supplied or approved by Bugaboo.
Folding up the Bugaboo Frog or accessories while still wet or storing them in a damp place can cause mildew.
If the inner tubes of the large wheels develop leaks you can repair them in the same way as a bicycle inner
tube. Well-stocked bicycle shops sell new inner tubes and tires of the correct size.
Cleaning
Clean your Bugaboo Frog with a damp cloth and a mild detergent.
The swivel hubs are particularly susceptible to dirt. Clean them regularly by removing them as described
above, rinsing them in lukewarm water, then lubricate them with silicone or Teflon spray and reinstall them.
The wheel bearings must not be lubricated.
All Bugaboo Frog covers and liners are removable and MACHINE-washable at max. (30C). Do not bleach,
iron, dry-clean or tumble-dry liners or covers. ALWAYS remove stiffeners and removable foam parts before
washing.
WARNING Always observe the washing instructions.
accessories
K accessories supplied as standard
Bugaboo Frog Under Seat Bag
The Bugaboo Frog under seat bag designed to carry a maximum of 8 pounds. For fitting, see Diagram B5.
Sun Canopy
All babies have highly sensitive skin. NEVER leave a baby unprotected in the sun! Use the Sun Canopy or
Bugaboo Parasol shown in Section L (Optional Accessories).
Mosquito Net
The mosquito net keeps flies, mosquitoes and other insects away from your child. Attach it to the foot end of
the seat/bassinet over the sun canopy.
Rain Cover
The rain cover protects your child from rain and wind. Attach it to the foot end of the seat/bassinet frame over
the sun canopy. Remove the textile from the sun canopy to give your child an unobstructed view. The rain
cover has a prefixed rib; slide the holes on either end of it across the pins sticking out on the side of the
seat/bassinet frame. At the front of the rain cover is an air vent; for optimal ventilation ensure that the hook &
loop fastener strips of the air vent meet well when pressed together.
WARNING Under direct sunlight, temperatures under the sun canopy can
become uncomfortably warm.
WARNING To avoid uncomfortable heat build-up, lower the rain cover when the
rain stops.
WARNING Ensure optimum ventilation by firmly pressing the hook & loop fas-
teners of the rain cover air vent together.
10Z00389 - UG NA eng rv3 0506.qxp 5/17/2006 11:50 AM Page 11
L optional accessories
Parasol
A wheeled board enabling you to transport a second toddler
Footmuff
Car Seat Adaptor
Diaper Bag
Transport Bag
Bag Clips
WARNING Suspending more than 3.6 kg/8 lbs from the handle bar could cause
your Bugaboo Frog to tip over and seriously injure your child, espe-
cially when the stroller is used on grades or inclines. Suspending
more than 2.5 kg/5.5 lbs is not recommended.
warranty
Terms of Warranty
1 These terms apply to all pushchairs manufactured by Bugaboo, unless otherwise agreed with the supplier.
2 The warranty commences on the date of purchase and is valid for a period of twentyfour months.
3 In the event of defects the owner should contact the supplier.
4 If the supplier is unable to remedy the problem he shall send the product to the manufacturer with a clear
description of the problem and a copy of the dated purchase receipt. In the case of repairs under the
terms of the warranty, transport is at the manufacturer's cost and risk.
5 The manufacturer is under no obligation to replace or take back the product.
6 The warranty applies solely to products to which the user has not made any modifications.
7 The warranty is valid for the first owner only and is not transferable.
8 Repairs do not entail any right to an extension of the warranty period.
9 Bugaboo accepts no liability whatsoever for damage other than to the product manufactured by Bugaboo.
The warranty is invalid if
1 The warranty card has not been correctly completed and returned to Bugaboo.
2 The product is not offered to the manufacturer with the purchase receipt and warranty card.
3 Defects are due to incorrect use or maintenance contrary to the instructions.
4 Repairs to the product have been effected by a third party without the manufacturer's prior consent.
5 The defect is due to neglect or the result of an accident.
6 The serial number is found to have been damaged or removed.
7 There is wear and tear due to daily use of the product.
8 The terms of the warranty have not been observed.
9 purchased from any and all unauthorized retailers or sellers
important
The warranty period for the Bugaboo stroller is two years from the date of purchase. The warranty is only valid
if you complete the warranty form and send it to Bugaboo. You should also make a note of the BUGABOO
FROG serial number on this warranty: you will find it on the outside of the frame just above the large wheels.
Keep the warranty and purchase receipt in a safe place.
Unless otherwise specified on the warranty card, the information you supply will also be used to keep you
informed of special offers on Bugaboo products.
11You can also read