Click Floating Luxury Vinyl Installation Instructions - Timeless Designs ...
←
→
Page content transcription
If your browser does not render page correctly, please read the page content below

Click Floating Luxury Vinyl Installation Instructions

Thank you for choosing one of Timeless Designs click floating luxury vinyl products. Properly installed and cared for, your
new flooring will be easy to maintain and will keep its great look for years. For current warranty and maintenance
information please visit timelessdesignsflooring.com.

Acclimation of Material Before Installation
To ensure a problem free installation, all areas where flooring will be installed should have a working heat and air
conditioning source operational a minimum of forty-eight (48) hours prior to installation and remain in operation during
and after installation. Conditions should be at the same temperature and humidity level expected during normal use
(between 65-85 degrees F with a relative humidity no greater than 65%). Ensure subfloor and flooring are fully acclimated
to these conditions for a minimum of 48 hours prior to installation. For best results, open the cartons at the beginning of
the acclimation period.

Timeless Designs rigid core products are designed to require less acclimation when compared to traditional PVC based
floating floor. However, extreme differences in temperature and humidity between the flooring product and job site may
result in gapping, buckling or joints which are difficult to properly engage. Improper locking of the flooring may cause
joints to be distressed resulting in a “peaked” appearance, delamination due to ledging, separation of joints from normal
environmental temperature changes, cupping or side joint failures.

Pre-Installation Jobsite Requirements
Timeless Designs cannot be held responsible for site conditions that do not conform to requirements as indicated in
these instructions including but exclusive to vapor transmission, moisture permeation, contaminated or damaged
subfloors, etc.

Floating vinyl floors should be protected from direct sunlight and not exposed to direct sunlight for extended periods of
time. Excessive temperatures will cause the product to expand and buckle. Timeless Designs recommends blinds, drapes,
window films or suitable window coverings in areas where there is a large exposure to direct sunlight.

It is the installer’s responsibility to examine the flooring prior to installation for color, finish, sheen and quality, and to
ensure that jobsite and subfloor meet the requirements of these instructions. Ensure adequate lighting for proper
inspection. If flooring is not deemed acceptable, contact your supplier immediately for resolution. Timeless Designs
flooring cannot be held responsible for flooring installed with visible defects.

Subfloor Preparation
Warning: If the existing resilient floor covering is being removed, see current edition of the Resilient Floor Covering
Institute publications recommended work practices for removal of resilient floor coverings for instructions on
removing all resilient floor covering structures.

NOTE: All subfloors must be clean, smooth and level to within 1/8” in 10 ft., and dry*. Dust, scale, and loose particles must
be removed. The surface must be free of solvents, paint, grease, oil, wax, alkali, sealing or curing compounds, and any
other foreign material.

*Failure to properly level the subfloor to manufacturer specifications can cause additional stress on the tongue and
 groove resulting in plank separation.
                                                                                                                           1/2021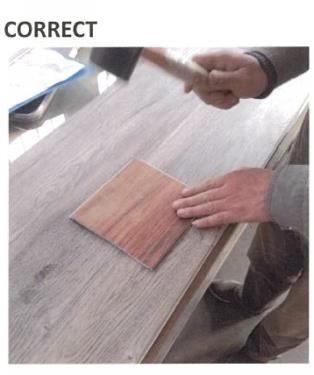
Timeless Designs click floating floors are designed to “float” over the subfloor. Proper preparation of the subfloor
is a critical part of a successful installation. Roughness or unevenness of the subfloor may telegraph through to
the flooring product resulting in an unsightly surface and can cause excessive wear on high spots.
Concrete on or above grade must be free of moisture or high alkalinity. A concrete slab shall be cured a minimum of
90 days before performing moisture tests prior to the installation of your new flooring. The concrete may require
additional drying time dependent upon local environmental conditions.
All wood subfloors shall have at least 18” of well-ventilated space below. The ground under crawl spaces must be
covered with 6- mil polyethylene sheeting to reduce moisture vapor transmission. Wood floors must be a minimum
thickness of 3/4” with 16” on center floor joist, such as APA underlayment Grade Plywood without voids, and with
a fully sanded face.
Concrete/Screeds: All cracks and joints should be filled. Prepare concrete subfloors according to ASTM F710
Standard Practice for Preparation of Concrete Floors to Receive Resilient Flooring. The surface of the concrete
must be dry, clean, smooth, level and structurally sound. The slab must be swept, damp mopped and/or
vacuumed to remove any dust OR the subfloor should have a moisture reading of less than80% RH
(Reference: ASTM F 2170-02 Standard Test Method for Determining Relative Humidity in Concrete Floor Slabs
Using in situ Probes). The PH level should be between 7 and 9. Testing should be performed and documented
prior to beginning installation.
Wood Floors: Wood floors must be solid and flat with no deflection. All loose boards must be firmly
fastened.
Existing Resilient Floors: Existing resilient tile and sheet vinyl floors must be in good condition and
thoroughly bonded to the structural floor. Any tile or sheet that is of a soft cushion construction or loose
lay must be removed.
Existing Ceramic Tile: Grout lines must be skim coated with a floor leveler. If you install the flooring over an
existing floor that has an embossing or grout line on it, we recommend you skim coat with a floor leveler.
Check for any dips or humps in the subfloor that can create a void or peak underneath the floor, the acceptable
1/8” in 10’ tolerance. If found, please fill in and level the subfloor with embossing leveler. For high spots, grind
down the peak or simply knock them off with a hammer and chisel and fill in the holes.
Timeless Designs cannot be held responsible for failure of the subfloor.
Radiant Heat: Subfloors should be operating for at least 3 weeks prior to installation to drive out moisture and
calibrate temperature settings. Maximum operating temperature should never exceed 85°F. Radiant heat
components must be a minimum of 1/2” away from the flooring.
1/2021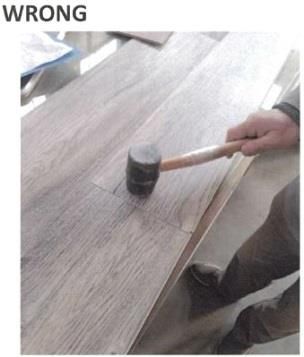
Installation
Do not secure individual planks of the flooring to the subfloor as it is designed to be a floating floor. All doorjambs
should be undercut and cabinets, heavy furnishings, fireplaces or other built-ins must not be installed on top of
flooring, as it restricts the floor’s ability to expand. Wall moldings and transition strips should be installed at any
exposed plank edges but should not be fastened through the planks.

The maximum room size suggested is limited to 30 linear feet with perimeter expansion space of 5/16”. For
installations larger than 900 square feet or runs longer than 30 linear feet, control joints (T-Mold) must be installed
with a minimum of 5/16” gap between the installed molding.

    1. First, determine the orientation of the flooring in the area. Typically for plank products, the flooring runs
       the length of the room. There may be exceptions since it is all a matter of preference.
    2. To avoid narrow plank widths or short plank lengths near the walls/doors, it is important to do some pre-
       planning. Using the width of the room, calculate how many full boards will fit into the area and how much
       space remains that will need to be covered by partial planks. Divide the remaining space by two to calculate
       the width of the partial planks. Do the same along the length.
    3. Note that if the first row of planks does not need to be trimmed in width, it will be necessary to cut off
       the unsupported tongue so that a clean, solid edge is toward the wall.
    4. 5/16” expansion gaps should be planned for and maintained from the wall during the installation. This will
       allow space for the natural expansion and contraction of the planks.
    5. The planks should be installed from left to right. From the top left corner of the room, put the first plank
       in place so that both the head and side seam grooves are exposed.
    6. Install the second plank in the first row by aligning the end joints and pushing down until the plank/tile
       snaps into place. Continue installing additional planks along the first row using the same aligning method.
       Make sure to align the planks to prevent gaps throughout the installation.
    7. To start the second row, cut a plank that is at least 9” shorter than the first plank in the first row (you may
       use the left over from the last plank of the first row). Install this first plank by inserting the long side tongue
       into the groove of the plank in the first row. Lower the plank/tile with firm pressure to the floor. Always
       stagger end joints from row to row a minimum of 9” apart.
    8. Install the second plank in the second row by inserting the long side tongue into the previously installed
       first plank groove.

        Figure 1A (Stagger End-Joints) to create a random pattern
        CORRECT

                                                                    Figure 1C (Avoid Stairs Step Patterns)
                                                                    INCORRECT

        Figure 1B (Avoid “H” Joints) INCORRECT

                                                                                                                   1/2021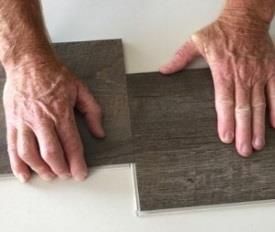
Installation, cont.
9. Install the second plank/tile of the second row. Position the long side of the plank/tile with the tongue side,
fully engage into the groove of the first row of product. Lower the plank/tile with firm pressure to the floor,
ensuring that the end joint is overlapping and perfectly aligned; push the end joint downward until the end of
the plank/tile snaps in place.
NOTE: this may require the use of a rubber mallet for it to completely lock in place. See Below Diagram:
Place a scrap piece of plank over the end joint seam
and tap LIGHTLY with a rubber mallet. NEVER strike
the planks directly as this may fracture the locking
system and eventually cause end joint failure.
10. The remaining planks can be installed in the room using the same technique. Make sure the required
expansion gaps are maintained against all fixed vertical parts (such as walls, doors, cabinets etc.).
11. The planks can be cut easily with a utility knife, just score the top of the plank and snap the plank in two.
Do not install Timeless Designs flooring over expansion joints.
Plank Removal
Do not lift plank ends when attempting to remove planks.
Planks must remain flat and then slid apart. (see picture to the right)
Attempting to remove planks by lifting will damage the end joint and compromise
the locking mechanism.
Repairs
In the unlikely event that a plank is damaged for whatever reason, the simplest method is to disconnect the plank
carefully (protecting the tongue and groove edges) until the damaged plank can be removed. Then replace the
damaged plank with a new one and reassemble the disconnected planks. This typically works for planks that are
closest to the two long walls of a room. For damaged planks that are not close to the perimeter, you may have to
remove the damaged planks and insert new pieces without the short and long end grooves.
1/2021Floor Maintenance and Protection
Furniture should be moved onto the newly installed floor using an appliance hand truck over
hardboard runways.
Avoid exposure to long periods of direct sunlight. Close blinds or drapes during peak sunlight hours. Floor
covering subjected to excessive heat and light is subject to thermal degradation. Use appropriate precautions
to minimize potential effects on the floor covering.
Oil or petroleum-based products can result in surface staining. Do not track asphalt-driveway sealer
or automobile oil drips onto the vinyl floor covering.
Caster wheeled chairs should have wide, rubber casters. Protective mats are required under office chairs.
Use non-staining mats. Rubber may discolor the floor.
Frequently moved furniture should be equipped with felt pads to avoid scratching the floor. Heavy furniture
and appliances should be equipped with non-staining large surface floor protectors. Furniture with castors or
wheels must be easy swiveling, large surface non-staining and suitable for resilient floors. Do NOT use ball
type castors as they can damage the floor.
Use floor protectors under furniture.
Use walk off mats at entrances to prevent dirt and grit from being tracked on to the floor.
Sweep or vacuum the floor regularly to remove loose dirt. Do NOT use vacuums that use a beater bar or
turn beater bar off.
Do NOT use electric brooms with hard plastic bottoms with no padding.
Clean up spills immediately.
Damp mop as needed using clean water and a diluted floor cleaner suitable for Luxury Vinyl. Do NOT use
harsh cleaners or chemicals on the floor. Do NOT use abrasive scrubbing tools. Do NOT use detergents,
abrasive cleaners or “mop and shine” products.
Vinyl flooring, like other types of smooth floors, may become slippery when wet. Allow time for floor to dry
after cleaning. Immediately wipe up wet areas from spills, foreign substances or wet feet.
1/2021WARRANTY
Our guarantee is for replacement or refund of the vinyl plank flooring only, not labor. Labor cost will only be covered
when professionally installed. It does not cover costs incurred with loss of time, incidental expenses or any other
damage from improper installation or maintenance (including side or end gapping), burns, tears, indentations stains
or reduction in gloss level due to normal use and/or exterior applications. Gapping, shrinkage, squeaks, fading or
structural and sub floor related issues are not covered under this warranty.
Timeless Designs Collection Residential Limited Warranty Light Commercial Limited Warranty
Everlasting / Everlasting XL 25 Years 10 Years
Irresistible 25 Years N/A
Irresistible SP 20 Years N/A
Grand 15 Years N/A
Grand XL 15 Years N/A
LIMITED WARRANTY EXCLUSIONS AND CONDITIONS
The limited Warranty applies only to the original purchaser and the original installation site and is not transferable.
The Limited Warranty does not cover conditions caused by improper use or maintenance, such as:
Loss of gloss or build-up of dulling film due to lack of maintenance or improper maintenance.
Damage resulting from failure to follow floor care instructions.
Scuffs, scratches, cuts, staining from rubber-backed mats, damages or discoloration from carpet dyes, and
fertilizer or other chemicals.
Damage caused by flooding, fires and other accidents.
Damage caused by abuse (i.e. dragging heavy or sharp objects across the floor without proper protection).
Damage caused by wheeled chairs, caster wheels or vacuum cleaner beater bars.
Failure to support furniture with floor protectors made of non-staining felt or non-pigmented hard plastic.
Protectors must be of adequate diameter of the object and rest flat on the floor.
For purposes of the Limited Warranty of Residential Use, “wear through” Means complete loss of the wear
layer so that the printed pattern or design of the floor is altered.
The Limited Warranty does not cover discoloration or other problems resulting from excessive exposure from heat or
sunlight, including side and end joint gapping.
The Limited Warranty does not cover variations of color, shade or texture which may be different from those shown
on samples or photographs.
The limited warranty does not cover discoloration from mold, flooding, leaking plumbing or appliances, leaking water
or similar conditions.
UNDER THE TERMS OF THE LIMITED WARRANTY, MANUFACTURER WILL NOT BE LIABLE FOR INDIRECT,
SPECIAL, INCIDENTIAL OR OTHER DAMAGES OF ANY KIND NO MATTER WHAT THE CAUSE.
1/2021You can also read