Demonstrate Knowledge of Carpentry Hand Tools Unit Standard - 12998 Level 3, Credit 4
←
→
Page content transcription
If your browser does not render page correctly, please read the page content below
National Certificate in Carpentry

Demonstrate Knowledge of Carpentry

Hand Tools

Unit Standard – 12998

Level 3, Credit 4
12998 – Demonstrate knowledge of carpentry hand tools
What you must do to achieve this unit
Correctly describe hand tools in terms of work operations each can complete.
Correctly describe care and maintenance of hand tools (including cutting edges) in
accordance with manufacturer’s recommendations.
Correctly describe the use of hand tools in terms of safety requirements. Includes:
work methods; plant; equipment; identification of hazards and controls.
Note: The level of detail asked for in the worksheets shows the depth of knowledge you should have about all
the hand tools covered.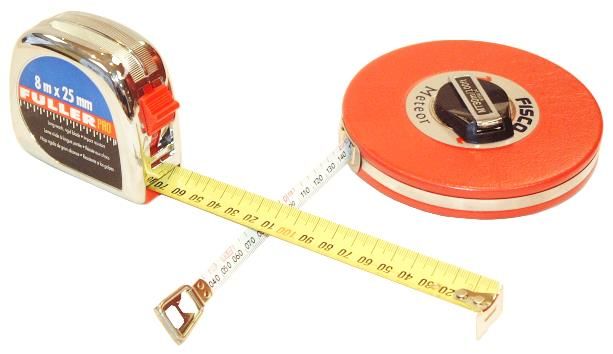
Contents

Reference                                                                                                      Page

Introduction                                                                                                       1
Setting-out Tools                                                                                                  2
Worksheet 1                                                                                                        9
Cutting Tools                                                                                                      10
Worksheet 2                                                                                                        20
Impelling Tools                                                                                                    21
Holding Tools                                                                                                      25
Worksheet 3                                                                                                        29
Grinding and Sharpening Tools                                                                                      30
Grinding                                                                                                           32
Hand Tool Hazards and Controls                                                                                     34
Care, Maintenance and Safety of Carpentry Hand Tools                                                               35
Worksheet 4                                                                                                        37

   Published by: Building and Construction Industry Training Organisation
                    Level 6, 234 Wakefield Street
                    PO Box 2615
                    Wellington
   © Building and Construction Industry Training Organisation
   All rights reserved.
   No part of this work may be reproduced, adapted, modified, copied or transmitted in any form or by any means,
   including by way of example only, written, graphic, electronic, mechanical, reprographic, photocopying,
   recording, taping or information retrieval systems, without the written permission of the publisher.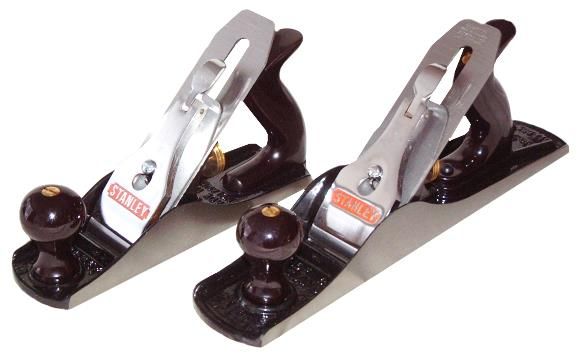
CARPENTRY                                                                                                                  12998

Introduction

There is a large range of carpentry hand tools available on the market. Trainees will need to
become thoroughly familiar with the selection, maintenance and operation of these tools as they
progress through their training. Expert advice should be obtained when planning and purchasing a
basic tool kit. This basic tool kit will be added to as your training progresses and the need for new
tools arises. (You will continue to purchase carpentry hand tools during your time in the trade, and,
over time, your collection will grow.)

           Note: Considerable savings can often be made by purchasing good-quality hand tools at second-hand shops
           and local garage sales. A small amount of maintenance may be all that is necessary for the tool to perform as
           well as a new one.

The skilled carpenter must have a thorough understanding of the tools they are using and the
mechanical principles underlying their design and construction. They will also need to know how to
care for, maintain and use them properly.

Hand tools can be classified into four areas according to their particular use:

   Setting-out Tools                                             Cutting Tools
   Folding rule                   Butt gauge                     Crosscut saw                    Plane
   Measuring tape                 Steel square                   Panel saw                       Drill bits (standard)
   Carpenter's pencil             Plumb bob                      Rip saw                         Drill bits (auger)
   Combination square             Chalk line                     Combination saw                 Drill bits
   Sliding bevel                  String line                    Wallboard saw                   (counter sink)
   Spirit level                   Dividers                       Hack saw                        End cutting nippers
   Marking gauge                  Straight edge                  Coping saw                      Tinsnips
                                                                 Hole saw                        Cutting knife
                                                                 Chisels

   Impelling Tools                                               Holding Tools
   Hand drill                                                    Sanding block
   Brace                                                         Apron
   Hammers                                                       Adjustable spanner
   Nail punch set                                                Pliers
   Pinch bar (wrecking bar)                                      Cramps and clamps
   Screwdrivers                                                  Pop riveter
                                                                 Socket sets

You will learn about all these tools as you work your way through this resource.

© BCITO, NCC v10.0        May 2008                                                                                            1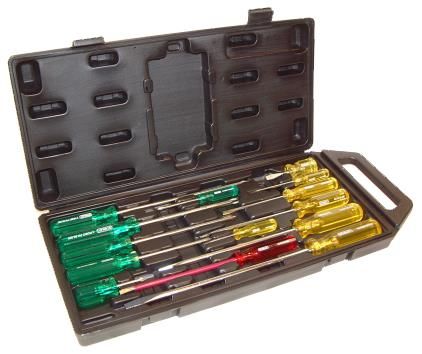
12998                                                                                                           CARPENTRY

        Setting-out Tools

         Folding Rule

                                                                Hinge

         Description                                Use                                   Care and Maintenance
         Folding rules are made from                Used flat on the surface for an       Lubricate hinges and keep ruler
         wood, metal or plastic and are             average reading and used on its       clean.
         designed with a hinge for folding.         edge for accuracy so the              Always fold up when not in use.
         The standard length is 1m long             measurements can be marked
         and measurements are                       exactly with a sharp pencil.
         graduated in millimetres.

         Measuring Tape
           Tape Lock
           and Retracting
           Mechanism                                                                                       Tape
                                                                                                           Rewinding
                                                                                                           Mechanism

                                          8m Tape                                                      30m Tape
                                                                        Blade

         Description                                Use                                   Care and Maintenance
         A measuring tape is a flexible             Used for accurately measuring         Avoid loops in the tape as they
         strip of steel divided into                long lengths.                         may cause the tape to snap
         millimetres, centimetres and               When measuring, hold the tape         when pulled taut.
         metres. Common lengths used by             taut and support it to prevent        Keep the tape dry and lightly
         carpenters are 5m, 8m and 30m.             sagging.                              oiled, free from grit, which may
         Tapes are equipped with a power            Rewind after use.                     scratch the enamel surface and
         return spring that automatically                                                 make reading and rewinding
         returns the tape to the housing.                                                 difficult.
         The lock attached to the tape can
         hold the blade in an open
         position.

2                                                                                     May 2008           © BCITO, NCC v10.0
CARPENTRY 12998
Carpenter’s Pencil
Lead
Description Use Care and Maintenance
The carpenter’s pencil has a Used for marking measurements Keep the lead sharp and to a
rectangular-shaped lead and on timber. chisel-shaped point. A fine
comes in hard, medium or soft accurate line can only be
grades. produced by using the correct
They are colour coded for ease grade of pencil for the material
of lead identification. being marked.
Combination Square Blade
Thumb
Screw
Stock
Description Use Care and Maintenance
The combination square Used for marking angles of 45o, Keep clean and free of rust. For
consists of two components – o o
90 and 135 . Can be set and easy movement of the stock on
stock and blade. The stock fixes used as a gauge for awkward the blade, lightly oil the thread
the blade in position and is held places and for measuring the screw.
firmly by tightening the thumb depths of rebates.
screw. To check if a square is accurate,
complete the following:
Place the stock firmly against
the edge of a dressed piece of
timber and mark a pencil line
across the face of the timber.
Rotate the stock of the square
180o and check that the blade
corresponds with the original
marked line.
If it does, the square is accurate.
© BCITO, NCC v10.0 May 2008 3
12998                                                                                                              CARPENTRY

        Sliding Bevel

          Locking Screw
                                                                                                           Blade

                                                                                      Stock

        Description                          Use                                        Care and Maintenance
        The sliding bevel consists of two    Used for marking angles, testing           Keep clean.
        components – stock and blade.        bevel cuts and mitres.                     Lightly oil the thread at the
        The blade of the bevel can be                                                   thumb screw.
        adjusted to any required angle. It
        can also be lengthened or
        shortened from the stock.
        The blade is held in position by a
        thumb screw.

        Spirit Level
                                                          Light Weight Aluminium Body
                  Graduation Lines
                      Vapour
                      Bubble

            Bubble fits evenly between
                Graduation Lines
                                                                                      Level Vials

                                                                                         Aluminium Box Type Spirit Level

        Description                          Use                                        Care and Maintenance
        Spirit levels are made of either     Levels are used for testing                Treat carefully.
        wood or metal and some have          horizontal and vertical surfaces for       Do not drop or jar level.
        as many as six level tubes or        level and plumb. Levels are also           Regularly check the level’s
        vials contained within them.         available which digitally display          accuracy by placing on fixed
                                                                      th
        These levels are available in        degrees, to within 1\10 degree             points at each end and reading
        varying lengths. The most            accuracy.                                  the level tube or vial. Turn level
        convenient length for carpentry                                                 end for end. If the reading in the
        use is between 900mm and                                                        vial is the same on both
        1200mm.                                                                         occasions the level is accurate.
                                                                                        If not, the level requires
                                                                                        adjustment.

4                                                                                   May 2008               © BCITO, NCC v10.0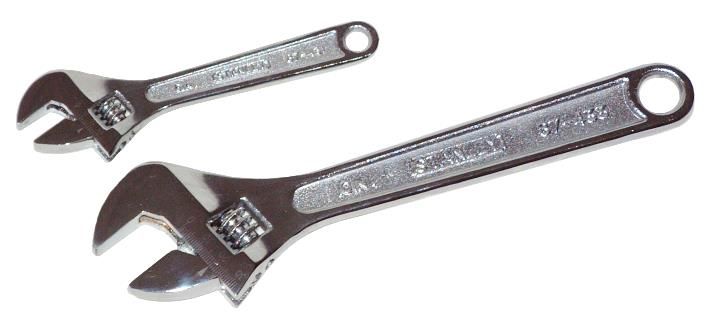
CARPENTRY                                                                                                               12998

   Marking Gauge
                                                                 Thumb Screw

                                                                                                              Stem
               Fixed Steel
               Spur

                                                                            Stock

   Description                          Use                                         Care and Maintenance
   The stem and stock are made of       Used to mark a line parallel to a           Keep clean and dry to allow easy
   hardwood. The stock is held at       face or edge of a piece of timber.          sliding of the stock on the stem.
   the required setting by tightening   Double spurs are often used for
   the thumb screw. A fixed             marking mortice and tenon joints.
   tempered steel spur scores a
   line.
   A combination gauge has two
   tempered steel spurs on one
   side of the stem and a single
   spur on the other. Where there
   are two spurs, one is fixed and
   the other is movable. This allows
   parallel lines to be scribed at
   varying distances apart without
   having to adjust the gauge.

   Straight Edge

   Description                          Use                                         Care and Maintenance
   A straight edge can be made          Transferring level points from site         Care must be taken not to
   from either timber or metal and      datums together with a spirit level.        damage the edges of the
   has one or both edges perfectly      Testing a surface for level by              straight edge.
   straight.                            identifying high or low areas.
   If the straight edge has two
   edges straight then the edges
   must also be parallel.

© BCITO, NCC v10.0           May 2008                                                                                      5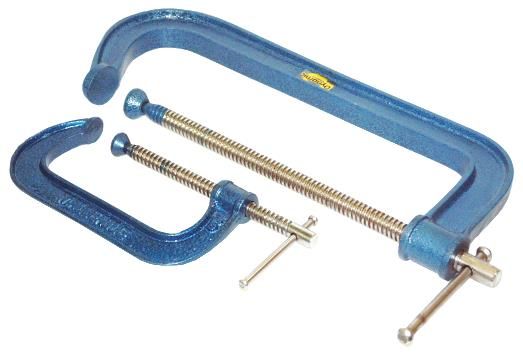
12998 CARPENTRY
Butt Gauge
Lock Screw
Marks the hinge
width from the
back of a rebate
on a jamb
Scriber marks
the hinge width
on a jamb and
door or sash Marks the
hinge depth
Description Use Care and Maintenance
The block and scribers are made The main function of a butt gauge Keep clean and free of rust.
of metal. is for marking the width and depth Lightly oil moving parts to
They are fitted with two scriber of housing for butt hinges on maintain free movement.
bars and three scribers. doors, sashes and jambs. Scribers are sharpened on one
These are arranged so that The butt gauge does the following: side only.
there is no need to change the marks the hinge width on a
settings when hanging doors or jamb and door or sash; and
windows. marks the hinge width from the
back of a rebate on a jamb.
Steel Square
Tongue Body
Description Use Care and Maintenance
Made from steel, the square Used for setting out roofs and Keep clean and free of rust so
consists of a body and tongue. stairs. that figures and tables can be
The body is approximately It also can be used to mark a easily read.
600mm long x 50mm wide and right-angled square.
the tongue approximately
450mm long x 40mm wide.
Unlike its smaller counterparts,
the steel square is not
adjustable.
6 May 2008 © BCITO, NCC v10.0CARPENTRY 12998
Plumb Bob
Temporary Block
Threaded Top Top Plate
Equal
measure
Stud
when
plumb
Bottom Plate
Heavy Framing Plumb Bob
Plumb
and String
Bob
Description Use Care and Maintenance
A plumb bob is a metal weight Used for testing vertical surfaces Keep the plumb bob clean.
suspended by a line. for plumb (vertical), by hanging Ensure the line is securely
The plumb bob is available in plumb bob out from surface being attached to the top of the plumb
various shapes, sizes and plumbed and checking that the bob.
weights. measurement between the line
Normally the plumb bob is cone and the surface at the bottom
shaped with a point at the lower corresponds with the
end. Weights vary from 170 - measurement at the top between
340 grams. the line and the surface.
The accuracy of a vertical surface
is particularly important in building
work.
Chalk Line
Winder
Chalk
Bottle
Chalk is poured in here and
sealed Line
Description Use Care and Maintenance
This is a line wound onto an When a straight line is required on Keep dry.
enclosed spool containing a surface, the line is stretched taut Keep the container filled with
coloured chalk powder. between two points. chalk.
Replacement line and chalk At the midpoint, the line is raised
powders are available. and allowed to snap back, leaving
a straight chalk marked line on the
surface.
The line is retrieved using a
winder which folds away when not
in use.
© BCITO, NCC v10.0 May 2008 712998 CARPENTRY
String Line
Dowel
Line
Description Use Care and Maintenance
This is a nylon line, wound on a Must be pulled taut to give When not in use, the string line
timber or plastic dowel. String accurate alignment. should be rewound onto the
lines are available in various Used for setting out and checking dowel.
lengths and colours from 50m to straightness on such things as Continual use may cause
100m. formwork, wall frames, fascia deterioration of the first section
lines, etc. of the line. (Remove the
damaged section of line as
required.)
Dividers
Thumb Screw
Legs
Description Use Care and Maintenance
Dividers consist of a pair of steel Used for scribing a board to match Keep clean and free of rust.
legs hinged at the top and held at an uneven surface. Also used for Lightly oil the top hinge. Maintain
the required setting by a thumb marking circles and arcs. the points in sharp condition to
screw. provide for precise scribing.
8 May 2008 © BCITO, NCC v10.0CARPENTRY 12998
Worksheet 1
Apprentice Name:
1. What steps should be taken to check a combination square for accuracy?
2. Select the most appropriate tool required to complete the following operations:
a) Transfer the plumb cut to the bottom of a barge board.
b) Check a vertical wall frame for plumb.
c) Identify the building line between profiles.
d) Check that a framing member is horizontal.
3. List the uses for a butt gauge.
WORKSHEET 1 Assessor Initials: Date:
© BCITO, NCC v10.0 May 2008 912998 CARPENTRY
Cutting Tools
Hand Saws
Handle
Blade
Heel
Toe
Points or Teeth
Crosscut Saw
Gullet Point
45
15
60 Cross Cut Saw Teeth (view from above)
Cross Cut Saw Teeth
Description Use Care and Maintenance
Crosscut saws are normally 500 Used for general purpose cutting Keep clean and free of rust.
– 700mm long with 6 – 9 points across the grain of timber (known Send the saw to the saw doctor
per 25mm of blade. as cross cutting). for sharpening and setting when
A six-point saw is considered to required. Keep a blade guard
be the most suitable for general over the teeth when not in use or
sitework. place saw in saw bag.
Panel Saw
Description Use Care and Maintenance
The smallest of the hand saws is Used for fine cross cutting on Keep clean and free of rust.
the panel saw. It is normally 450 finishing timber such as: Send the saw to the saw doctor
- 600mm long with 10 - 12 points skirtings; for sharpening and setting when
per 25mm of blade. architraves; required. Keep a blade guard
or any other timber requiring a fine over the teeth when not in use or
finish such as panelling. place saw in saw bag.
10 May 2008 © BCITO, NCC v10.0CARPENTRY 12998
Rip Saw
52
8
60 Rip Saw Teeth (view from above)
Rip Saw Teeth
Description Use Care and Maintenance
The rip saw is the largest in the The rip saw is used for cutting Keep clean, sharp and free of
range of hand saws with a blade timber lengthwise along the grain rust.
length of 600mm to 700mm. (known as ripping). Lightly oil the blade before storing.
It has large chisel-edged teeth (3 Send the saw to the saw doctor
to 6 points per 25mm) with the for sharpening and setting when
cutting edge at right angles to required.
the saw. Keep a blade guard over the teeth
when not in use or place saw in
saw bag.
Combination saw
Description Use Care and Maintenance
A combination saw has the teeth The combination saw can be used Keep clean and free of rust.
of both a cross cut and a rip to cut with, or across the grain. It Send the saw to the saw doctor
saw. is a popular “all purpose” saw. for sharpening and setting when
required. Keep a blade guard
over the teeth when not in use or
place saw in saw bag.
Note: Hand saws are referred to by their point number. This is the number of teeth per 25mm of length. Today,
many saws are purchased as inexpensive items and are considered a disposable item. When purchasing these
saws their intended purpose (eg. for ripping or cross cutting) should still be considered.
© BCITO, NCC v10.0 May 2008 1112998 CARPENTRY
Wallboard Saw
Blade
Self
starting
point Handle
Description Use Care and Maintenance
These have a tapered blade with Designed especially for plaster Keep clean and free of rust.
teeth designed to cut fast and board for making cutouts for Send the saw to the saw doctor
prevent clogging. electric and other outlets. for sharpening when required or
The blade length of 152mm is There is a self-starting point for replace the blade.
either epoxy bonded to the plunge cuts.
handle or detachable for easy
replacement.
Hack Saw
Frame Handle
Blade Retaining
Lugs Tensioning
Screw
Blade
Description Use Care and Maintenance
Hack saws have a heavy duty Used for cutting metal or plastic. Keep clean and free of rust.
metal frame, which allows for the Change blade as required.
blade to be tensioned, to prevent
it twisting and bending.
The detachable blade is mounted
on anchor pins. Blade lengths
vary from 225mm to 305mm.
12 May 2008 © BCITO, NCC v10.0CARPENTRY 12998
Coping Saw
Spring Steel Frame
Threaded
Levers to Alter the Handle
Blade Position
Blade
Description Use Care and Maintenance
These have a fine blade, held in Used for scribing the ends of Keep clean and rust free.
tension in an adjustable frame. mouldings and for cutting curves Change blade as required.
The replaceable blade length is in thin timber.
160mm long with up to 24 points Maintain the correct tension on
to 25mm. the blade.
The handle tensions the blade by Keep the adjustable levers
screwing “on” to tighten and “off” parallel.
to loosen.
Two adjustable levers alter the
blade position.
Hole Saw
Diagram of assembled saw,
Hole saw blades – 3 sizes Arbour and pilot drill bits arbour and bit ready to use
Description
Hole saws are essentially drill attachments. They are made up of three pieces: an arbour that attaches to a standard
drill bit, a pilot bit and the circular cup-shaped cutting blade.
The pilot bit protrudes through the centre and beyond the teeth of the saw and stabilises and guides the saw during
operation. While a hole saw will attach to most drills, care should be taken so that the power drill used operates with
in the RPM range of the hole saw.
A common problem when using a hole saw is that it tends to tear out as the saw exits on the opposite side. To
prevent this from happening, begin drilling from the first side as usual, but after the pilot bit breaks through (but before
the saw goes all the way through) go around and finish the hole from the other side. The result is a clean hole on both
sides.
© BCITO, NCC v10.0 May 2008 1312998 CARPENTRY
Chisels
Set of Chisels
Ground and Sharpened
Cutting Edge
Chisel Blade
Description Use Care and Maintenance
A chisel consists of a blade of Chisels have a wide range of Keep clean and free from rust.
tempered steel and a shaped applications in building including Grind and hone to produce
plastic or wooden handle. checking out (hinges etc.), forming sharp edge.
One end of the blade is ground and levelling joints. Store chisels in roll-up pouch or
and sharpened to produce the carrying case to shield cutting
cutting edge and the other has a edge when not in use.
sharpened tang to which the Keep both hands back from the
handle is fitted. cutting edge at all times when
Chisel blades are heat treated, using chisels.
bevelled and polished and Never place a wood chisel in
available individually or as a set. your pocket.
The width identification is scribed
on its shatter-resistant handle for
quick selection.
The width of the blade can vary
from 6mm to 50mm whilst the
overall length might be from
188mm to 228mm.
Note: There is a wide range of chisels, designed for different purposes. A set of the standard bevel-edged type is
suitable for most carpentry work.
Common Types of Chisels
Bevel Edged Firmer Chisel Mortise Chisel
The edges of the blade are A general purpose chisel with a Mortise chisels are designed to
ground away so that it can be square edge strong enough to remove waste wood from narrow
used to cut into corners. withstand the force of being hit trenches.
with a hammer.
14 May 2008 © BCITO, NCC v10.0CARPENTRY 12998
Planes
Smoothing Plane Jack Plane
No. 4 No. 5 / 5½
Plane Blade
Cap Iron
Cam Lateral Adjustment Lever
Lever Cap Handle
Escapement
Adjustment Lever
Knob
Depth Adjustment Nut
Toe Heel
Sole Mouth Frog
Description Use Care and Maintenance
Planes have a cast steel body Planes are used to produce Keep clean and free from rust by
and an adjustable cutting blade planed or flat surfaces, smooth applying a light oil. Do not drop.
o
or iron held at 45 . timber surfaces, straighten timber When not in use rest the plane
There is a range of planes and reduce timber to a required on its side or retract the blade.
available which include: width.
Smoothing plane - Number 4.
Jack or bench plane - Number
5 or 5½ .
Rebate plane - Number 10.
Block plane.
Adjustment can be made in
depth using a thumb screw and
laterally using the adjustment
lever.
Too much of the blade is Correct lateral adjustment, but Correct adjustment of the plane
exposed. (The blade requires there is too much of the blade blade.
lateral adjustment.) showing.
© BCITO, NCC v10.0 May 2008 1512998 CARPENTRY
Drill Bits (Standard)
Twist Bits Flat Bits
Description Use Care and Maintenance
Standard drill bits are available in Used for drilling holes in a range Keep in drill set case when not
a range of types and sizes for use of materials including timber, in use.
in portable power tools, including: metal and concrete. Sharpen when required.
twist; and Grinding angle from centre point
flat. is:
The chuck size will determine the Wood drill bits 40o.
maximum diameter drill that can Metal drill bits 59o.
be used. Use the correct drill cutting
The bit sizes used by carpenters speed to suit the drill bit and the
generally range from 1mm to material being drilled.
13mm. Drill bits go up in size in
1mm increments.
Range includes:
masonry;
metal; and
timber.
Drill Bits (Auger)
Spur
Threaded
Point
Tip Auger Shank
Description Use Care and Maintenance
Auger bits have a threaded point Auger bits are used for boring Keep bit clean and free from
to draw the bit into the timber and clean-cut holes in timber and rust. For easy, clean cutting
a twisted shank that ejects the wood-based sheet materials. keep the spurs and cutting
waste wood and keeps the hole edges sharp.
aligned. When not in use store bits in a
The bit for soft textured woods roll-up pouch or specially
has spurs or scribes at the outer designed container.
ends of the cutting edges. The
size range varies from 6mm to
30mm.
16 May 2008 © BCITO, NCC v10.0CARPENTRY 12998
Drill Bits (Countersink)
Countersink Bit
Counterborer Bit
Description Use Care and Maintenance
Countersink bits are available in Countersinks are used to enlarge Keep clean and free from rust.
two types: the top of the screw hole so that
countersink for wood and the head of a wood screw can be
metal; and recessed.
counterborers for when the Counterborers are used to drill the
screw head is to be seated hole and countersink the screw
flush or below the surface of hole so that the screw head can
the timber. be recessed.
End Cutting Nippers
Handles
Jaws
Description Use Care and Maintenance
End cutting nippers are available Used for tying and cutting Keep clean and free of rust, lightly
in varying sizes for different reinforcing ties, cutting wire and oil scissor joint.
applications: cutting and withdrawing nails.
nail pulling; The bevelled cutting edges are
cutting and tying; and machined smooth to protect
reinforcing tie wires (102mm to surface when extracting nails.
245mm). (Use a wooden block to increase
leverage and protect the timber
surface when extracting nails.)
© BCITO, NCC v10.0 May 2008 1712998 CARPENTRY
Tinsnips
Aviation Snips
Insulated Handles
Cutting Jaws
Cutting Jaws
Description Use Care and Maintenance
Tinsnips are available in varying Used for cutting thin sheet metal Keep clean and free of rust.
styles such as: such as: Lightly oil scissor joint.
straight cutting; roofing iron; and
curved cutting; flashings.
offset handles; For ease of work and quality of
spring open action; finish always select and use the
straight cuts; appropriate pair of snips for the
left and straight cuts; job.
right and straight cuts;
left curve; and
right curve.
18 May 2008 © BCITO, NCC v10.0CARPENTRY 12998
Cutting Knife
This is the screw that holds
the two-piece handle
together. Inside the handle
is where the spare blades
Blade are stored.
Description Use Care and Maintenance
Cutting knives are available in Used for cutting building papers, Ensure that blades are properly
many: surface paper on plaster board seated in position and that knives
sizes; and insulation. are properly closed when not in
colours; Always pull the knife towards the use.
handle and blade shapes; and body when making a cut on a flat Never leave the knife with the
fixed or retractable blades. surface. A pulling motion is blade exposed.
Accessories available: stronger and more positive than Always use sharp blades. A dull
knife holster; and pushing the knife away from you, blade requires more force and is
insulation cutting shield. and the knife is less likely to slip. more likely to slip.
Replacement blades are stored When using a straight edge to Change the blade when it starts to
in the handle and are easily guide a cut, either clamp it down tear the material.
replaced. or keep your free hand well away
from the cutting path of the knife.
Be sure the straight edge is thick
enough to prevent the knife from
“riding up” over the edge.
Don’t bend or apply side loads to
blades by using them to open
cans or pry loose objects. Blades
are brittle and can snap easily.
When using a knife to cut through
thick material, make several
passes – cutting a little deeper
into the material each time.
Retract the blade back into the
handle when it is not in use.
Caution: The cutting blades used in these knives are extremely sharp. They should always be handled with care.
They have the potential to cause serious injury if not handled and used correctly.
© BCITO, NCC v10.0 May 2008 1912998 CARPENTRY
Worksheet 2
Apprentice Name:
1. List the care and maintenance requirements for a hand saw.
2. On the drawing below identify and label the following parts of a smoothing plane:
Toe.
Lever cap.
Cap iron.
Depth adjustment nut.
3. List three (3) safety precautions to be observed when using a cutting knife.
4. List three (3) types of chisels.
WORKSHEET 2 Assessor Initials: Date:
20 May 2008 © BCITO, NCC v10.0CARPENTRY 12998
Impelling Tools
Hand Drill
Frame
Detachable Side Handle Stationary
(Obscured) Handle
Chuck
Crank
Handle
Description Use Care and Maintenance
Hand drills can have the The hand drill is used to hold a Keep clean and free of rust.
following features: range of metal wood and Lightly oil crank, gear wheel and
double pinion gears; countersink bits. pinion with thin oil.
three jaw self-centring chuck
up to 6mm diameter capacity;
steel frame; and
wooden handles.
Brace and bit
Crank
Head
Handle
Chuck Collar
Ratchet Mechanism
Jaws
Description Use Care and Maintenance
The hand brace is used to hold Used to hold bits in alligator jaws Keep clean and free of rust.
bits providing leverage in a for the purpose of drilling holes. Lightly oil moving parts at:
continuous rotary motion to the head bearing;
bit. handle; and
A ratchet is fitted, which enables ratchet wheel.
the handle of the brace to be For ease of use ensure bits are
moved in a small arc as well as sharp.
in a full circle.
© BCITO, NCC v10.0 May 2008 2112998 CARPENTRY
Hammers
Claw
Non-slip Handle
Tempered Tubular Shaft
Striking Head
Description Use Care and Maintenance
A hammer is a driving tool that Used for driving and withdrawing Always discard hammer when
consists of a steel head which is nails, driving chisels and set face shows excessive wear,
fitted to either a wooden, steel or punches. Always strike securely mushrooming, chipping or dents.
fibreglass shaft. A rubber grip and avoid glancing blows. Never strike with the side of the
handle is fitted to the shaft. Select the appropriate hammer hammer.
One end of the head has a striking considering: Never strike one hammer head
face and the other a claw to head design; with another hammer head.
withdraw nails. claw design; Never use a hammer with a
Available in various: weight; loose or damaged handle.
head styles; and handle length; and Do not use for driving masonry
claw shapes. the job being undertaken. nails, cold chisels and other
Features also include: hardened metal tools.
the weights varying from
200gms to 937gms or from 7ozs
to 33ozs. Most commonly used
is a 20oz hammer (560 gm); and
handles of different design and
length (varying from 290mm to
460mm).
22 May 2008 © BCITO, NCC v10.0CARPENTRY 12998
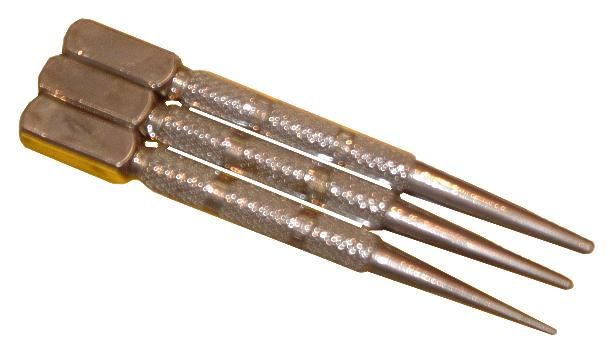
Nail Punch Set
Description Use Care and Maintenance
A nail punch is a hardened Used with a hammer to drive the Remove burrs.
piece of steel with a knurled heads of nails below the surface of Discard if the point becomes
body for grip, designed to drive the timber. chipped or when the cupped point
nail heads below the surface of Ensure the correct size punch is wears.
the timber. used.
Nail punches have the following The nail punch point should be
features: slightly smaller than the nail head
the tip sizes are between being punched.
0.08mm and 3.2mm; Keep the nail punch in line with the
an overall length of 100mm or direction of the nail.
127mm;
the size is stamped on the
head and / or colour coded for
easy selection; and
the tips are cupped and
chamfered for ease of
alignment. (The tip shape is
designed to reduce slipping
on nail head.)
Pinch Bar or Wrecking Bar
Bevel Chisel Claw
Description Use Care and Maintenance
Wrecking bars are made in Used for withdrawing nails from Always choose the correct size for
many sizes and shapes with a timber, levering and moving heavy the job to be completed.
slotted claw at one end and a objects.
sharpened bevel chisel at the
other.
Lengths vary from 180mm to
915mm.
© BCITO, NCC v10.0 May 2008 2312998 CARPENTRY
Screwdrivers
Standard Screwdriver Set
Ratchet Setting
Lock
Ratchet Spiral
Chuck
Screwdriver Bit Spiral Screwdriver
Description Use Care and Maintenance
Screwdrivers are available in Used for driving or withdrawing Lightly oil ratchet mechanism.
various sizes to suit screw head screws. Screwdriver safety tips:
configurations. Select the appropriate size Never use a screwdriver as a
Ratchet screwdrivers work in the screwdriver to suit screw head cold chisel, or for prying,
forward, reverse and fixed blade width and configuration. punching, chiselling, scoring or
positions. The spirals are spring scraping.
loaded to keep the blade in the Make sure the tip fits the slot of
screw slot and automatically the screw; not too loose or
return the handle into the driving tight.
position after each stroke. Never expose a screwdriver to
excessive heat or cold.
Always discard a screwdriver
with a worn or broken handle.
Never use a screwdriver on a
work piece held in your hand.
A slip could cause serious
injury.
Never depend on a
screwdriver’s handle or
covered blade to insulate from
electricity. Vinyl covered
blades are intended only as a
protective measure against
shorting out.
Common Types of Screw Head
Slotted Pozidriv Square
Phillips Clutch head Torx
24 May 2008 © BCITO, NCC v10.0CARPENTRY 12998
Holding Tools
Sanding Block
Spurs to Hold
Sandpaper
Cork Sanding Block Rubber Sanding Block
Description Use Care and Maintenance
Sanding blocks vary in size but Used to hold abrasive papers Discard worn sanding blocks.
are usually 85mm long, 65mm when hand sanding timber.
wide and 40mm thick.
They are generally made from
cork, rubber or a similar soft
material. This extends the
usable life of the abrasive paper.
Apron
Belt
Carry Strap for
Hammer
Pockets
Description Use Care and Maintenance
Aprons are made from leather or Used for: Keep the apron clean on the
nylon with a varying number of protection when carrying items; exterior and in the pockets. Have
stitched and riveted pockets, carrying nails; and any repairs that may be required
including nail set and tool carrying tools. carried out as early as possible.
carrying pockets. Accessories Only carry items needed for the
can be added to the belt such task being undertaken.
as:
cordless drill holder;
hammer holster; and
cutting knife holster.
© BCITO, NCC v10.0 May 2008 2512998 CARPENTRY
Adjustable Spanner
Jaws
Screw for Jaw Adjustment
Description Use Care and Maintenance
Adjustable spanners are made Used for fastening or holding nuts Keep the spanner clean and free
from strong tempered steel and and bolts. of rust.
have a precision machined screw Use the correct size spanner for Lightly oil the screw mechanism.
for jaw adjustment. the job so that the right amount of
These are available in varying torque can be applied.
sizes from 100mm to 300mm. Always locate an adjustable
spanner with the solid section
taking the majority of force being
applied.
Pliers
Vinyl Grip Handle
Cutting
Edge
Jaws
Description Use Care and Maintenance
Pliers are manufactured from Used for holding, cutting wire and Keep pliers clean and free from
tempered alloy steel with a bending metal. rust. Lightly oil the scissor joint.
serrated jaw providing grip and Do not depend on the vinyl grip
leverage. handle to insulate from
Pliers also have a finely honed electricity. These coverings are
cutting edge used to cut most intended to improve grip only.
types of wire.
Usually pliers are fitted with a
bonded vinyl grip attached to the
handles.
26 May 2008 © BCITO, NCC v10.0CARPENTRY 12998
Cramps
Screw Shoe
Adjustable Shoe
Tee Bar
Crossbar Locking Pin
G Cramps Sash Cramp
Description Use Care and Maintenance
There is a wide range of holding To hold materials together until Keep clean and free from glue
tools for use on construction they can be permanently fixed. and other residue.
sites. Each has a specific use in Keep the screw lightly oiled.
a variety of situations which
require materials to be held in
position until they can be fixed
permanently.
A G cramp consists of a G
shaped section with a long
screw which can be adjusted to
hold material.
A Sash cramp consists of a T
section bar with an adjustable
shoe which can be fixed at
positions along the bar. An
adjustable screw with a fixed
shoe can be tightened to hold or
draw work together.
Quick Release Clamp
Description
There are a number of styles, models and sizes on the market. Their common factors are a handle arrangement that
you squeeze to make the tool grip and hold onto the material you are working on and a quick release lever to allow
the tool to be released and moved easily.
© BCITO, NCC v10.0 May 2008 2712998 CARPENTRY
Pop riveter
Hand Riveter
Jaws and Scissor Tong Riveter
Nose-tip
Jaws and Nose-tip
Handles
Spare Nose- Handles
Tips of
Different Spare nose-tips of different
Sizes sizes
Description Use Care and Maintenance
The pop riveter pulls on the It is used to secure (mainly) sheet Keep clean and be sure that the
shaft of a “blind rivet” making metal, flashings, guttering, etc. A nose-tips are tightly locked in
the sleeve expand and lock into hole (the same size as the rivet) place. A stuck rivet shaft can be
the hole. The shaft then snaps is drilled first. Rivets come in removed by pushing another
off leaving the rivet in place. various lengths, diameters and shaft into the tip.
materials (stainless steel,
aluminum, etc.) for different jobs.
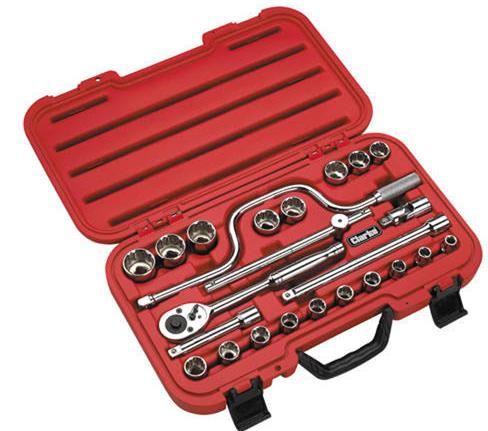
Socket set
Sockets
Speed Bar (Crank)
Ratchet Driver
Extension Bar
Description Use Care and Maintenance
A socket set contains a range of A socket set is used to tighten Keep clean and be sure to put
hexagonal sockets to fit various and loosen nuts and bolts, eg: each part back in its correct
nut sizes. The set will also dyna-bolts, coach bolts, fittings space after use. Do not use the
contain a driver to turn the and attachments. A ½ inch drive ratchet for final tightening or initial
sockets and extension bars. A set will be tougher (but more loosening – it is not as tough as
ratchet driver enables the expensive) than the smaller ¼ the other, solid bars.
handle to be moved in a small inch drive sets available. Metric
arc as well as in a full circle. sets are more useful than the
older “imperial” type sets.
28 May 2008 © BCITO, NCC v10.0CARPENTRY 12998
Worksheet 3
Apprentice Name:
1. Why is the tip of a nail punch cupped?
2. Give two (2) uses for a pinch bar or wrecking bar.
3. In the space below, draw the screw heads to match the named screwdrivers.
Slotted Phillip Pozidriv Squar
s e
4. List three (3) safety precautions which should be observed when using a hammer.
WORKSHEET 3 Assessor Initials: Date:
© BCITO, NCC v10.0 May 2008 2912998 CARPENTRY
Grinding and Sharpening Tools
Grindstone
Light
Grinding Wheel Eye Shield
Adjustable Tool Rest
On / Off Switch
Description Use Care and Maintenance
Grindstones are available in a Used for grinding a sharp edge on Ensure guards and tool rests are
variety of different sizes and to: in the correct position prior to use.
motor powers. chisels; and Always wear suitable Personal
They generally have a coarse plane blades. Protective Equipment and
grinding wheel on one end of the clothing.
spindle and a fine grinding wheel Check the condition of the
on the other. grinding wheels prior to operation.
Note: Grindstones are covered in more detail in the module for Unit Standard 13000 (Demonstrate knowledge of
portable power tools used on construction sites).
30 May 2008 © BCITO, NCC v10.0CARPENTRY 12998
Oilstone
Oilstone Box
Combination Stone
Description Use Care and Maintenance
Oilstones are available in coarse, Used for honing a sharp edge on Care is required in the use of
medium and fine grades. There to: oilstones in order to:
are also combination stones that chisels; retain the life and sharpness of
are usually fine on one side and plane blades; and grit;
medium or coarse on the other. knives. keep the surface flat and even;
The usual size required for Tools should be sharpened over and
carpentry tools is 200mm x 50mm the whole surface of the stone to prevent the surface of the
x 25mm. prevent uneven wear. stone from glazing.
To obtain a razor-like edge Oilstones should be kept moist
quickly: and clean in a box with a cover.
the oilstone must be clean and After use, a few drops of fresh,
of fine grain; clean oil should be applied to the
the surface of the oilstone surface of the stone.
should be kept lubricated with a The use of the correct oil
light oil-based lubricant while prevents a stone from glazing.
sharpening; Oil is used to float away the
pressure must be even and particles of steel from the tool
applied over the full length of the being sharpened, thus
stone; preventing them from filling the
use a coarse stone first if spaces between the crystals. To
rubbing is likely to be prolonged; prevent further glazing, dirty oil
and should be wiped off the stone
use a fine stone if rubbing is after use. A dirty or clogged
likely to be brief. oilstone can be cleaned with
The use of a honing guide will kerosene to restore its cutting
produce the correct bevel for a qualities.
sharp cutting edge.
© BCITO, NCC v10.0 May 2008 3112998 CARPENTRY
Grinding
A keen cutting edge is produced on a plane iron or chisel by first grinding the edge to shape on a
grindstone and then producing the cutting edge by sharpening or honing it on an oilstone.
After a cutting edge has been resharpened several times, it becomes rounded and the edge must
be reground. Unless the edge is damaged, it will only need grinding until approximately 1mm of the
old sharpening bevel remains. This avoids damage to the cutting edge and excessive wear on the
blade. If the cutting edge is damaged, it must be reground so that any “gaps” are entirely
eliminated.
Grinding on a grindstone will produce the correct bevel, but the edge will not be sharp enough for
use. The grinding bevel of plane irons and chisels is usually between 20 o and 25o. Before the tool is
ground, the cutting edge should be squared to the side of the blade.
When grinding the bevel, the blade of the tool is held to the grinding wheel at the required angle
and moved lightly across the face of the wheel. An angled tool rest can be used to hold the tool at
the correct angle. Care is necessary to prevent the edge from overheating, indicated by a bluish
colour, which “draws the temper” of the steel and softens it. The blade should be kept cool by
regularly dipping it in water.
Manufacturer’s instructions state to never use the side of the wheel for grinding.
Oilstone Honing
30 Angle
25
Grinding
Grinding
Angle
Wheel
Note: Always use appropriate PPE when grinding.
32 May 2008 © BCITO, NCC v10.0CARPENTRY 12998 Sharpening or Honing A tool must have a sharp edge if it is to produce a smooth, true surface quickly and easily. Grinding does not produce the fine edge required, so the finished ground edge must be done on an oilstone. Sharpening or honing is done more frequently than grinding – in fact, whenever the edge needs to be “touched up”. The surface of the oilstone needs to be kept wet with light non-drying oil during sharpening. The correct pitch for sharpening may be obtained by bedding the ground bevel of the blade on the oilstone and then slightly raising the back edge of the bevel. The usual practice is to make the sharpening bevel about 5o greater than the grinding bevel. (If the grinding angle is 25o then the honing angle will be 30o.) With an even pressure and using a sliding rotary motion, the blade is rubbed back and forth along the full length of the stone and should be continued until no line of reflected light is visible on the cutting edge. When examining the blade for the “white edge”, it is best to tilt it backwards and forwards to catch the light. If the sharpening is continued, the “white edge” will disappear, and a burr, or “wire edge” will form on the flat side of the blade. This must be removed. To do this, the blade is turned over and held absolutely flat on the oilstone, and then rubbed backwards and forwards two or three times. At no stage should the blade be raised when the back face is on the oilstone. Finally, the blade can be stropped on a piece of leather. Test the Sharpness The cutting edge of a tool is sharp when it cuts a piece of timber cleanly and with very little effort. © BCITO, NCC v10.0 May 2008 33
12998                                                                                                                 CARPENTRY

        Hand Tool Hazards and Controls

        The use of any hand tool has its own hazards, and every hazard has a control. As users of hand
        tools we need to be aware of the hazards and use the appropriate controls. This example may help
        to make the process clearer.

        Before I use the table saw, I think about the hazards and make sure I control each. The process is:
        1.          I think about what might happen.

        2.          I take action to ensure that it doesn’t happen (or if it does happen, I make sure no one will
                    get hurt).

                             What might happen?                                       What do I need to do?

                                     Hazards                                                     Controls

             Damage to hearing from noise                               Wear ear muffs

             Electric shock from water, cutting the cord, faulty saw,   Use an isolating transformer or cut-out switch
             etc.

             Damage to eyes from flying chips and dust                  Wear goggles, check that guard is in place and
                                                                        operating properly

             Cutting hands/fingers                                      Keep hands clear of blade, use a push stick

             Timber kicking back, flying off                            Do not cut shorts, see that wood is placed firmly
                                                                        against the back plate

        Every tool has hazards. You could probably come up with a dozen hazards for the hammer alone!
        This manual cannot hope to list every possible hazard associated with every possible hand tool,
        and if it did, it would make for some pretty boring reading.

        Common sense tells you what might go wrong, and common sense also tells you what to do to
        protect yourself and others. If in doubt, ask a more experienced workmate.

        Work Methods, Plant and Equipment
        There is a saying in America about the dangers of guns, the saying goes: “Guns don’t kill people,
        people kill people.” The same can be said of our hand tools. A nail gun won’t kill you, but someone
        operating it improperly might.

        When you are thinking about hazards (and you should be thinking about them all the time), don’t
        just think about the tools themselves – remember a hammer sitting on the bench isn’t dangerous.
        The hazards arise from our work methods – how we use the tools and what we use them for.

        Remember too, that all plant and equipment also provide hazards, and these need to be
        controlled the same way, by thinking about the hazards, and acting to make sure no one gets hurt.

34                                                                                       May 2008            © BCITO, NCC v10.0
CARPENTRY 12998
Care, Maintenance and Safety of Carpentry Hand
Tools
Good-quality work is impossible to achieve with blunt or badly sharpened tools. Tools with broken
handles also impede the quality of work and are dangerous. Careless use of sharp tools can result
in serious accidents. Methods that promote safety should be adopted at all times.
It is important to keep tools sharpened and in good condition at all times as this allows for good-
quality work as well as easy and safe use of the tool. Any timber that has soil, sand or concrete
adhering to it should be thoroughly cleaned before any tools are used on it.
Cutting tools can lose their edge when they are in contact with metal, so care must be taken when
handling, packing or transporting tools. When tools are being packed away, plane irons should be
withdrawn from the cutting position. The cutting edges of chisels and saws should be kept away
from other metal tools; bits should be kept in a roll or container and not left loose. At all times, tools
should be kept free of moisture and from time to time rubbed over with light machine oil to prevent
rust. When transporting tools store them carefully in a kit bag or tool box.
Apprentices should regularly inspect their tool kit and check that all tools are accounted for and any
maintenance required is carried out promptly.
The Dos and Don’ts of Carpentry Hand Tools
Hand tools should always be kept in good working order. Use them correctly, carry them carefully
and store them safely.
Always:
select the right tool for the job;
use a hammer for driving punches and similar tools;
start hand saws on the back stroke, guiding the saw with the thumb of the other hand
slightly raised;
carry sharp-edged or pointed tools carefully, hold firmly, close to the body and point
downward;
pass sharp or pointed tools handle first;
store dangerous tools carefully and considerately;
follow manufacturers’ instructions carefully; and
select and use the appropriate Personal Protective Equipment (PPE) for the job.
Never:
use hammers with loose heads or damaged or chipped faces;
use tools with damaged handles;
use cold chisels or punches with mushroom ferruls or ends;
check the depth of cut of a plane with the hand; or
use a tool for a job that it is not designed for.
© BCITO, NCC v10.0 May 2008 3512998 CARPENTRY
Carrying and Storing Hand Tools
Your must carry and store these hand tools in the correct manner.
Don’t carry too many tools at once.
Don’t carry sharp-edged or pointed tools in a nail pouch or apron pockets unless the
pockets are specifically designed for that purpose.
When carrying sharp-edged or pointed tools such as chisels and bits, hold them firmly
and close to the body. Point them down to the floor and keep them pointed downward.
When passing sharp-edged or pointed tools to a fellow worker, pass them handle first.
Manufacturers’ Instructions
Whenever you purchase a hand tool, read the manufacturer’s literature to get a clear
understanding of the tool’s:
intended use;
limitations;
safe use; and
maintenance requirements.
Reference
For more detailed information on safety when using tools, refer to the following module:
12997 (Demonstrate knowledge of safe working practices on construction sites).
36 May 2008 © BCITO, NCC v10.0CARPENTRY 12998
Worksheet 4
Apprentice Name:
1. List three (3) things that the manufacturer’s instructions will clarify about a tool.
2. Why is it important that the cutting edges of tools are maintained in a sharp condition?
3. What are the recommended grinding angles and honing for plane blades and chisels?
a) Grinding angle.
b) Honing angle.
4. What steps should be taken to obtain the best results from an oilstone?
© BCITO, NCC v10.0 May 2008 3712998 CARPENTRY
5. List the steps required to check the accuracy of a spirit level.
6. Different tools are used for different tasks. Complete the table below to match a task (work
operation) to the correct tool. In some cases the tool name is missing, in other cases it is the
task that is missing.
Tool Task Tool Task
Folding rule Attaching flashings with blind
rivets
Measuring lengths over one Pliers
metre
Carpenter’s Adjustable
pencil spanner
Combination Worn around the waist to
square hold hand tools and fixings
Marking angles and testing bevel Sanding block
cuts
Spirit level Screwdriver
Marking gauge Pinch bar
Butt gauge Nail punch
Steel square Driving in and pulling out
nails
38 May 2008 © BCITO, NCC v10.0CARPENTRY 12998
Tool Task Tool Task
Plumb bob Brace and bit
Chalk line Sharpening chisels
String line Tinsnips
Dividers Cutting reinforcing ties, wire,
nails
Panel saw Plane
Cross cut saw Chisel
Wall board saw Rip saw
Combination Hand drill
saw
Hack saw Coping saw
Holding items while glue dries Straight edge
Drill bits Cutting knife
Socket set Hole saw
WORKSHEET 4 Assessor Initials: Date:
© BCITO, NCC v10.0 May 2008 3912998 CARPENTRY
Assessor’s comments:
Sign off check
The apprentice has successfully completed all the worksheets and answered all the questions correctly.
Checklist:
Worksheet 1 Worksheet 2 Worksheet 3 Worksheet 4
Where reassessment of certain questions has occurred, the correct answers were:
Re-written by the apprentice
Confirmed through oral questioning and noted next to the answer
The apprentice has correctly answered a selection of oral questions
1 2 3 4 5
6 7 8 9 10
Other (specify):
In signing off this unit standard, the apprentice can:
correctly describe hand tools in terms of work operations each can complete;
correctly describe care and maintenance of hand tools (including cutting edges) in accordance with
manufacturer’s recommendations; and
correctly describe the use of hand tools in terms of safety requirements. Includes: work methods; plant;
equipment; identification of hazards and controls.
UNIT Assessor
STANDARD Signature: Date:
12998
Moderator
COMPLETED
Signature: Date:
40 May 2008 © BCITO, NCC v10.0You can also read