DRRACKET: THE RACKET PROGRAMMING ENVIRONMENT - ROBERT BRUCE FINDLER AND PLT SEPTEMBER 21, 2023
←
→
Page content transcription
If your browser does not render page correctly, please read the page content below
DrRacket: The Racket Programming Environment
                                  Version 8.10.0.4

                              Robert Bruce Findler
                                   and PLT

                               September 21, 2023

DrRacket is a graphical environment for developing programs using the Racket program-
ming languages.

                                         1
Contents

1   Interface Essentials                                                                      5

    1.1   Buttons . . . . . . . . . . . . . . . . . . . . . . . . . . . . . . . . . . . .     6

    1.2   Choosing a Language . . . . . . . . . . . . . . . . . . . . . . . . . . . . .       8

    1.3   Editing with Parentheses . . . . . . . . . . . . . . . . . . . . . . . . . . .      8

    1.4   Searching . . . . . . . . . . . . . . . . . . . . . . . . . . . . . . . . . . .    10

    1.5   Tabbed Editing . . . . . . . . . . . . . . . . . . . . . . . . . . . . . . . .     10

    1.6   The Interactions Window . . . . . . . . . . . . . . . . . . . . . . . . . . .      10

          1.6.1   Errors . . . . . . . . . . . . . . . . . . . . . . . . . . . . . . . . .   11

          1.6.2   Input and Output . . . . . . . . . . . . . . . . . . . . . . . . . . .     11

    1.7   Graphical Syntax . . . . . . . . . . . . . . . . . . . . . . . . . . . . . . .     14

          1.7.1   Images . . . . . . . . . . . . . . . . . . . . . . . . . . . . . . . .     15

          1.7.2   XML Boxes and Racket Boxes . . . . . . . . . . . . . . . . . . . .         15

    1.8   Graphical Debugging Interface . . . . . . . . . . . . . . . . . . . . . . . .      15

          1.8.1   Debugger Buttons . . . . . . . . . . . . . . . . . . . . . . . . . .       16

          1.8.2   Definitions Window Actions . . . . . . . . . . . . . . . . . . . . .       16

          1.8.3   Stack View Pane . . . . . . . . . . . . . . . . . . . . . . . . . . .      17

          1.8.4   Debugging Multiple Files . . . . . . . . . . . . . . . . . . . . . .       18

    1.9   The Module Browser . . . . . . . . . . . . . . . . . . . . . . . . . . . . .       19

    1.10 Color Schemes . . . . . . . . . . . . . . . . . . . . . . . . . . . . . . . .       19

    1.11 Creating Executables . . . . . . . . . . . . . . . . . . . . . . . . . . . . .      20

    1.12 Following Log Messages . . . . . . . . . . . . . . . . . . . . . . . . . . .        22

2   Languages                                                                                23

    2.1   Language Declared in Source . . . . . . . . . . . . . . . . . . . . . . . . .      23

                                               2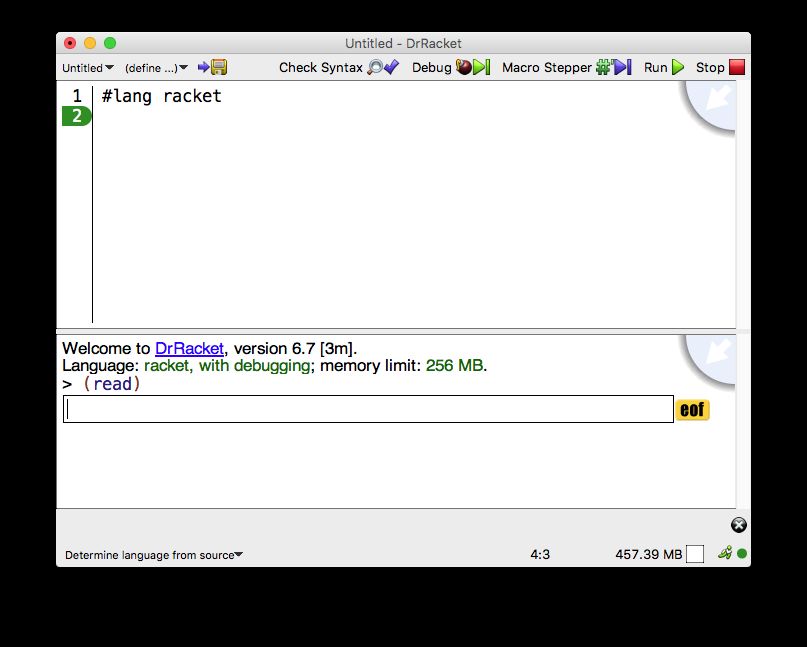
2.1.1   Initial Environment . . . . . . . . . . . . . . . . . . . . . . . . . .    23

          2.1.2   Details Pane of Language Dialog . . . . . . . . . . . . . . . . . .        24

    2.2   Legacy Languages . . . . . . . . . . . . . . . . . . . . . . . . . . . . . .       25

    2.3   How to Design Programs Teaching Languages . . . . . . . . . . . . . . . .          25

    2.4   Other Experimental Languages . . . . . . . . . . . . . . . . . . . . . . . .       29

    2.5   Output Printing Styles . . . . . . . . . . . . . . . . . . . . . . . . . . . . .   29

3   Interface Reference                                                                      31

    3.1   Menus . . . . . . . . . . . . . . . . . . . . . . . . . . . . . . . . . . . . .    31

          3.1.1   File . . . . . . . . . . . . . . . . . . . . . . . . . . . . . . . . . .   31

          3.1.2   Edit . . . . . . . . . . . . . . . . . . . . . . . . . . . . . . . . . .   32

          3.1.3   View . . . . . . . . . . . . . . . . . . . . . . . . . . . . . . . . .     34

          3.1.4   Language . . . . . . . . . . . . . . . . . . . . . . . . . . . . . . .     35

          3.1.5   Racket . . . . . . . . . . . . . . . . . . . . . . . . . . . . . . . .     36

          3.1.6   Insert . . . . . . . . . . . . . . . . . . . . . . . . . . . . . . . . .   37

          3.1.7   Windows . . . . . . . . . . . . . . . . . . . . . . . . . . . . . . .      37

          3.1.8   Help . . . . . . . . . . . . . . . . . . . . . . . . . . . . . . . . . .   38

    3.2   Preferences . . . . . . . . . . . . . . . . . . . . . . . . . . . . . . . . . .    38

          3.2.1   Font . . . . . . . . . . . . . . . . . . . . . . . . . . . . . . . . . .   39

          3.2.2   Colors . . . . . . . . . . . . . . . . . . . . . . . . . . . . . . . . .   39

          3.2.3   Editing . . . . . . . . . . . . . . . . . . . . . . . . . . . . . . . .    39

          3.2.4   Warnings . . . . . . . . . . . . . . . . . . . . . . . . . . . . . . .     42

          3.2.5   General . . . . . . . . . . . . . . . . . . . . . . . . . . . . . . . .    43

          3.2.6   Profiling . . . . . . . . . . . . . . . . . . . . . . . . . . . . . . .    44

          3.2.7   Browser . . . . . . . . . . . . . . . . . . . . . . . . . . . . . . . .    44

          3.2.8   Tools . . . . . . . . . . . . . . . . . . . . . . . . . . . . . . . . .    44

                                               3
3.3 Keyboard Shortcuts . . . . . . . . . . . . . . . . . . . . . . . . . . . . . . 44
3.3.1 Moving Around . . . . . . . . . . . . . . . . . . . . . . . . . . . . 45
3.3.2 Editing Operations . . . . . . . . . . . . . . . . . . . . . . . . . . 46
3.3.3 File Operations . . . . . . . . . . . . . . . . . . . . . . . . . . . . 49
3.3.4 Search . . . . . . . . . . . . . . . . . . . . . . . . . . . . . . . . . 49
3.3.5 Evaluation . . . . . . . . . . . . . . . . . . . . . . . . . . . . . . 49
3.3.6 Documentation . . . . . . . . . . . . . . . . . . . . . . . . . . . . 49
3.3.7 Interactions . . . . . . . . . . . . . . . . . . . . . . . . . . . . . . 49
3.3.8 LaTeX and TeX inspired keybindings . . . . . . . . . . . . . . . . 50
3.3.9 Defining Custom Shortcuts . . . . . . . . . . . . . . . . . . . . . . 54
3.3.10 Sending Program Fragments to the REPL . . . . . . . . . . . . . . 57
3.4 Status Information . . . . . . . . . . . . . . . . . . . . . . . . . . . . . . 59
3.5 DrRacket Files . . . . . . . . . . . . . . . . . . . . . . . . . . . . . . . . 60
3.5.1 Program Files . . . . . . . . . . . . . . . . . . . . . . . . . . . . . 60
3.5.2 Backup and First Change Files . . . . . . . . . . . . . . . . . . . . 61
3.5.3 Preference Files . . . . . . . . . . . . . . . . . . . . . . . . . . . . 62
4 Extending DrRacket 63
4.1 Teachpacks . . . . . . . . . . . . . . . . . . . . . . . . . . . . . . . . . . 63
4.1.1 Adding Your Own Teachpacks to the Teachpack Dialog . . . . . . 65
4.1.2 Extending Help Desk Search Context . . . . . . . . . . . . . . . . 65
4.2 Environment Variables . . . . . . . . . . . . . . . . . . . . . . . . . . . . 65
Index 68
Index 68
41 Interface Essentials
The DrRacket window has three parts: a row of buttons at the top, two editing panels in the
middle, and a status line at the bottom.
5The top editing panel, called the definitions window, is for defining programs. The above
figure shows a program that defines the function square.
The bottom panel, called the interactions window, is for evaluating Racket expressions in-
teractively. The Language line in the interactions window indicates which primitives are
available in the definitions and interactions windows. In the above figure, the language is
determined from the program source’s #lang line. The interactions
window is
Clicking the Run button evaluates the program in the definitions window, making the pro- described further in
§1.6 “The
gram’s definitions available in the interactions window. Given the definition of square as Interactions
in the figure above, typing (square 2) in the interactions window produces the result 4. Window”, later in
Clicking the Run button again resets the interactions window and re-evaluates the definitions this manual.
window.
The signature boxes (available via the blue quarter circle in the upper right corner) provide
access to the summary information from the documentation. The status line at the bottom of
DrRacket’s window provides information about the current line and position of the editing
caret, whether the current file can be modified, and whether DrRacket is currently evaluating
any expression. The recycling icon flashes while DrRacket is “recycling” internal resources,
such as memory.
1.1 Buttons
The left end of the row of buttons in DrRacket contains a miniature button with the current
file’s name. Clicking the button opens a menu that shows the file’s full pathname. Selecting
one of the menu entries produces an open-file dialog starting in the corresponding directory.
Beside the filename button is a (define ...) button for a pop-up menu of names that are
defined in the definitions window. Selecting an item from the menu moves the insertion
point (blinking caret) to the corresponding definition.
The Save button appears whenever the definitions window is modified. Clicking the button
saves the contents of the definitions window to a file. The current name of the file appears to
the left of the Save button, but a file-selection dialog appears if the file has never been saved
before.
The Step button—which appears only for the How to Design Programs teaching languages
Beginning Student through Intermediate Student with Lambda—starts the Stepper, which
shows the evaluation of a program as a series of small steps. Each evaluation step replaces
an expression in the program with an equivalent one using the evaluation rules of DrRacket.
For example, a step might replace (+ 1 2) with 3. These are the same rules used by Dr-
Racket to evaluate a program. Clicking Step opens a new window that contains the program
from the definitions window, plus several new buttons: these buttons allow navigation of the
evaluation as a series of steps. The debugging
interface is
described further in
§1.8 “Graphical
Debugging
6 Interface”, later in
this manual.The Debug button—which does not appear for the How to Design Programs teaching
languages—starts a more conventional stepping debugger. It runs the program in the def-
initions window like the Run button, but also opens a debugging panel with several other
buttons that provide control over the program’s execution.
Clicking the Check Syntax button annotates the program text in the definitions window. It
adds the following annotations:
• Syntactic Highlighting: Imported variables and locally defined variables are high-
lighted with color changes. Documented identifiers are hyperlinked (via a right-click)
to the documentation page.
• Lexical Structure: The lexical structure is shown with arrows overlaid on the pro-
gram text. When the mouse cursor passes over a variable, DrRacket draws an arrow
from the binding location to the variable, or from the binding location to every bound
occurrence of the variable.
In addition to indicating definite references with blue arrows, DrRacket also draws
arrows to indicate potential references within macro definitions. Potential arrows are
drawn in purple and annotated with a question mark to indicate uncertainty, because
DrRacket cannot predict how such identifiers will eventually be used. Their roles may
depend on the arguments to the macro and the context the macro is used in.
Additionally, right-clicking (or Control-clicking on Mac OS) on a variable activates
a pop-up menu that lets you jump from binding location to bound location and vice
versa, α-rename the variable, or tack the arrows so they do not disappear.
• Tail Calls: Any sub-expression that is (syntactically) in tail-position with respect to its
enclosing context is annotated by drawing a light purple arrow from the tail expression
to its surrounding expression.
• Require Annotations: Right-clicking (or Control-clicking on Mac OS) on the argu-
ment to require activates a pop-up menu that lets you open the file that contains the
required module.
Passing the mouse cursor over a require expression inside a module shows all of the
variables that are used from that require expression. Additionally, if no variables are
used from that require expression, it is colored like an unbound variable.
Finally, passing the mouse cursor over a variable that is imported from a module shows
the module that it is imported from in a status line at the bottom of the frame.
Check Syntax also runs automatically as you edit your program, and the bottom, rightmost
corner of the DrRacket window shows its status. A red dot means that something has gone
wrong; move your mouse over the dot to find out what is wrong.
When nothing goes wrong, the colors indicate the stages processing of the program: blue
(expanding), purple (computing check syntax information), orchid (updating the editor with
the check syntax information), and green (finished).
7Also, right-clicking (or control clicking) in that area yields a menu that lets you disable (or
re-enable) automatic Check Syntax.
The Run button evaluates the program in the definitions window and resets the interactions
window.
The Break button interrupts an evaluation, or beeps if DrRacket is not evaluating anything.
For example, after clicking Run or entering an expression into the interactions window, click
Break to cancel the evaluation. Click the Break button once to try to interrupt the evaluation
gracefully; click the button twice to kill the evaluation immediately.
1.2 Choosing a Language
DrRacket supports multiple dialects of Racket, as well as some non-Racket languages. You
specify a language in one of two ways:
• Select the Use the language declared in the source option (via the Language|Choose
Language... menu item), and then specify a specific language as part of the program
usually by starting the definitions-window content with #lang.
• Select the Language|Choose Language... menu item, and choose a specific language.
After changing the language, click Run to reset the language in the interactions win-
dow. The bottom-left corner of DrRacket’s main window also has a shortcut menu
item for selecting previously selected languages.
Using a language declared in a program’s source is the recommend mode, and it is described
further in §2.1 “Language Declared in Source”.
The Language|Choose Language... dialog contains a Show Details button for configuring
certain details of the chosen language. Whenever the selected options do not match the
default language specification, a Custom indicator appears next to the language-selection
control at the top of the dialog.
See §2 “Languages” (later in this manual) for more information on the languages that Dr-
Racket supports.
1.3 Editing with Parentheses
In Racket mode, especially, DrRacket’s editor provides special support for managing paren-
theses in a program. When the blinking caret is next to a parenthesis, DrRacket shades
the region between the parenthesis and its matching parenthesis. This feature is especially
helpful when balancing parentheses to complete an expression.
8Although whitespace is not significant in Racket, DrRacket encourages a particular format
for Racket code. When you type Enter or Return, the editor inserts a new line and automati-
cally indents it. To make DrRacket re-indent an existing line, move the blinking caret to the
line and hit the Tab key. (The caret can be anywhere in the line.) You can re-indent an entire
region by selecting the region and typing Tab.
DrRacket also rewrites parenthesis as you type them, in order to make them match better. If
you type a closing parenthesis ), a closing square bracket ], or a closing curly brace }, and
if DrRacket can match it back to some earlier opening parenthesis, bracket, or brace, then
DrRacket changes what you type to match. DrRacket also rewrites open square brackets,
usually to an open parenthesis. There are some exceptions where opening square brackets
are not automatically changed to parentheses:
• If the square bracket is after cond-like keyword, potentially skipping some of the sub-
expressions in the cond-like expression (for example, in a case expression, the square
brackets start in the second sub-expression).
• If the square bracket begins a new expression immediately after a local-like keyword.
Note that the second expression after a local-like keyword will automatically become
an ordinary parenthesis.
• If the square bracket is after a parenthesis that is after a letrec-like keyword,
• If the square bracket is in a sequence and the s-expression before in the sequence is a
compound expression, DrRacket uses the same kind parenthesis, brace, or bracket as
before, or
• If the square bracket is in the middle of string, comment, character, or symbol.
The upshot of DrRacket’s help is that you can always use the (presumably unshifted) square
brackets on your keyboard to type parenthesis. For example, when typing
(define (length l)
(cond
[(empty? l) 0]
[else (+ 1 (length (rest l)))]))
If you always type [ and ] where any of the square brackets or parentheses appear, DrRacket
will change the square brackets to match the code above.
Of course, these features can be disabled and customized in the preferences dialog; see §3.2
“Preferences”. Also, in case DrRacket does not produce the character you want, holding
down the control key while typing disables DrRacket’s parenthesis, brace, and bracket con-
verter.
91.4 Searching
DrRacket’s search and replace feature is interactive, similar to those in Safari, Firefox, and
Emacs, but with a few differences.
To start a search, first select the Find menu item from the Edit menu. This will open a small
editor at the bottom of the DrRacket window. Start typing in there and, as you type, all
occurrences of the string you’re searching for will be circled in the editor window. Watch
the space right next to the search window to see how many occurrences of the search string
there are in your file. When you’re ready, you use the Find Again menu item to jump to the
first occurrence of the search string. This will color in one of the circles. Use Find Again a
second time to jump to the next occurrence.
If you click back into the definitions window, the Find Again menu item, DrRacket will
move the selection to the next occurrence of the search string.
DrRacket also supports a mode where typing in the search editor takes you directly to the
next occurrence of the search string, without selecting the Find Again menu item. In the
preference dialog, in the Editing section and then in the General Editing section is a check-
box labeled Search using anchors. When it is checked, DrRacket shows a little red dot and
a red line indicating where the search anchor is. When the search anchor is enabled, typing
in the search window jumps to the first occurrence of the search string after the anchor.
1.5 Tabbed Editing
DrRacket’s allows you to edit multiple files in a single window via tabs. The File|New Tab
menu item creates a new tab to show a new file. Each tab has its own interactions window.
In the General pane of the the preferences window, a checkbox labeled Open files in separate
tabs causes DrRacket to open files in new tabs in the frontmost window, rather than opening
a new window for the file.
The key bindings Control-Pageup and Control-Pagedown move between tabs. On Mac OS,
Command-Left-Square-Bracket and Command-Right-Square-Bracket also move between
tabs.
1.6 The Interactions Window
The interactions window lets you type an expression after the > prompt for immediate evalu-
ation. You cannot modify any text before the last > prompt. To enter an expression, the blink-
ing caret must appear after the last prompt, and also after the space following the prompt.
When you type a complete expression and hit Enter or Return, DrRacket evaluates the ex-
10pression and prints the result. After printing the result, DrRacket creates a new prompt for
another expression. Some expressions return a special “void” value; DrRacket never prints
void, but instead produces a new prompt immediately.
If the expression following the current prompt is incomplete, then DrRacket will not try to
evaluate it. In that case, hitting Enter or Return produces a new, auto-indented line. You
can force DrRacket to evaluate the expression by typing Alt-Return or Command-Return
(depending on your platform).
To copy the previous expression to the current prompt, type ESC-p (i.e., type Escape and then
type p). Type ESC-p multiple times to cycle back through old expressions. Type ESC-n to
cycle forward through old expressions. There are other keys that have these same functions;
see §3.3 “Keyboard Shortcuts” and the menu item Show Active Keybindings menu item in
the Edit menu.
Clicking the Run button evaluates the program in the definitions window and makes the
program’s definitions available in the interactions window. Clicking Run also resets the
interactions window, erasing all old interactions and removing old definitions from the inter-
action environment. Although Run erases old > prompts, ESC-p and ESC-n can still retrieve
old expressions.
1.6.1 Errors
Whenever DrRacket encounters an error while evaluating an expression, it prints an error
message in the interactions window and highlights the expression that triggered the error.
The highlighted expression might be in the definitions window, or it might be after an old
prompt in the interactions window.
For certain kinds of errors, DrRacket turns a portion of the error message into a hyperlink.
Click the hyperlink to get help regarding a function or keyword related to the error.
For some run-time errors, DrRacket shows a bug icon next to the error message. Click the
bug icon to open a window that shows a “stack” of expressions that were being evaluated
at the time of the error. In addition, if the expressions in the stack appear in the definitions
window, a red arrow is drawn to each expression from the next deeper one in the stack.
1.6.2 Input and Output
Many Racket programs avoid explicit input and output operations, obtaining input via di-
rect function calls in the interactions window, and producing output by returning values.
Other Racket programs explicitly print output for the user during evaluation using write or
display, or explicitly request input from the user using read or read-char.
Explicit input and output appear in the interactions window, but within special boxes that
11separate explicit I/O from normal expressions and results. For example, evaluating
> (read)
in the interactions window produces a special box for entering input:
12Type a number into the box and hit Enter, and that number becomes the result of the (read)
expression. Once text is submitted for an input box, it is moved outside the input box, and
when DrRacket shows a new prompt, it hides the interaction box. Thus, if you type 5 in the
above input box and hit Return, the result appears as follows:
> (read)
5
5
> _
In this case, the first 5 is the input, and the second 5 is the result of the (read) expression.
The second 5 is colored blue, as usual for a result printed by DrRacket. (The underscore
indicates the location of the blinking caret.)
Output goes into the interactions window directly. If you run the program
#lang racket
(define v (read))
(display v) (newline)
v
and provide the input S-expression (1 2), the interactions window ultimately appears as
follows:
(1 2)
(1 2)
'(1 2)
> _
In this example, display produces output immediately beneath the input you typed, and
the final result is printed last. The displayed output is drawn in purple. (The above example
assumes default printing. With constructor-style value printing, the final before the prompt
would be (list 1 2).)
Entering the same program line-by-line in the interactions window produces a different-
looking result:
> (define v (read))
(1 2)
> (display v)
(1 2)
> v
'(1 2)
> _
13Depending on the input operation, you may enter more text into an input box than is con-
sumed. In that case, the leftover text remains in the input stream for later reads. For example,
in the following interaction, two values are provided in response to the first (read), so the
second value is returned immediately for the second (read):
> (read)
5 6
5
> (read)
6
> _
The following example illustrates that submitting input with Return inserts a newline char-
acter into the input stream:
> (read)
5
5
> (read-char)
#\newline
> _
The eof button that appears beside an input box inserts a single eof-object into the input
stream, but more IO may follow in a later sequence. For example, in the following interac-
tion, the user typed 1 and then clicked the eof button:
> (read-char)
1#\1
> (read-char)
#
At this point, however, future interactions can still take place: new calls to input functions
with open a new input box and new characters will come from the same port.
Within a #lang racket module, the results of top-level expression print the same as the re-
sults of an expression entered in the interactions window. The reason is that #lang racket
explicitly prints the results of top-level expressions using (current-print), and DrRacket
sets (current-print) to print values in the same way as for interactions.
1.7 Graphical Syntax
In addition to normal textual program, DrRacket supports certain graphical elements as ex-
pressions within a program. Plug-in tools can extend the available graphical syntax, but this
section describes some of the more commonly used elements.
141.7.1 Images
DrRacket’s Insert|Insert Image... menu item lets you select an image file from disk (in
various formats such as GIF, PNG, and BMP), and the image is inserted at the current editing
caret.
As an expression an image behaves like a number or string constant: it evaluates to itself.
DrRacket’s interactions window knows how to draw image-value results or images displayed
via print.
A program can manipulate image values in various ways, such as using the htdp/image
library or as an image-snip% value.
1.7.2 XML Boxes and Racket Boxes
DrRacket has special support for XML concrete syntax. The Special|Insert XML Box menu
item inserts an embedded editor into your program. In that embedded editor, you type
XML’s concrete syntax. When a program containing an XML box is evaluated, the XML
box is translated into an x-expression (or xexpr), which is an s-expression representation of
an XML expression. Each xexpr is a list whose first element is a symbol naming the tag,
second element is an association list representing attributes and remaining elements are the
nested XML expressions.
XML boxes have two modes for handling whitespace. In one mode, all whitespace is left
intact in the resulting xexpr. In the other mode, any tag that only contains nested XML
expressions and whitespace has the whitespace removed. You can toggle between these
modes by right-clicking or Control-clicking (Mac OS) on the top portion of the XML box.
In addition to containing XML text, XML boxes can also contain Racket boxes. Racket
boxes contain Racket expressions. These expressions are evaluated and their contents are
placed into the containing XML box’s xexpr. There are two varieties of Racket box: the
standard Racket box and the splicing Racket box. The standard Racket box inserts its value
into the containing xexpr. The contents of the splice box must evaluate to a list and the
elements of the list are “flattened” into the containing xexpr. Right-clicking or control-
clicking (Mac OS) on the top of a Racket box opens a menu to toggle the box between a
Racket box and a Racket splice box.
1.8 Graphical Debugging Interface
Tip: Changing the
name of a file in the
Like the Run button, the Debug button runs the program in the definitions window. However, middle of a
instead of simply running it from start to finish, it lets users control and observe the program debugging session
will prevent the
as it executes. The interface includes a panel of buttons above the definitions window, as debugger from
well as extensions to the definitions window itself. working properly
on that file.
15The program starts out paused just before the first expression is executed. This is indicated
in the definitions window by the presence of a green triangle over this expression’s left
parenthesis.
1.8.1 Debugger Buttons
While execution is paused, several buttons are available:
• The Go button is enabled whenever the program is paused. It causes the program to
resume until it either completes, reaches a breakpoint, or raises an unhandled excep-
tion.
• The Step button is enabled whenever the program is paused. It causes the program to
make a single step and then pause again.
• The Over button is only enabled when execution is paused at the start of an expression
that is not in tail position. It sets a one-time breakpoint at the end of the expression
(represented by a yellow circle) and causes the program to proceed. When execution
reaches the one-time breakpoint, it pauses and removes that breakpoint.
• The Out button is only enabled when execution is paused within the context of an-
other expression. Like the Over button, it sets a one-time breakpoint and continues
execution. In this case, the program stops upon returning to the context or raising an
unhandled exception.
If the program is running (not paused), then only the Pause button will be enabled. Clicking it
will interrupt execution and pause it. In this case, the current expression may only be known
approximately, and it will be represented as a gray triangle. The other features described
above will still be available.
At any time, execution may be interrupted by clicking the Stop button. However, unlike with
the Pause button, stopped execution cannot be continued.
1.8.2 Definitions Window Actions
When execution is paused, the definitions window supports several additional actions:
• Hovering the mouse cursor over a parenthesis may reveal a pink circle. If so, right-
clicking or control-clicking (Mac OS) will open a menu with options to Pause at
this point or Continue to this point. The former sets an ordinary breakpoint at that
location; the latter sets a one-time breakpoint and resumes execution. An ordinary
breakpoint appears as a red circle, and a one-time breakpoint appears as a yellow
circle.
16Tip: If the debugged program is not a module, then the first time it is debugged, break-
points will only become available in expressions as they are evaluated. However, the
next time the program is debugged, the debugger will remember the set of breakable
locations from the previous session.
Tip: Clicking the Run button after a debugging session will cause all breakpoints
to disappear from the definitions window. These breakpoints are not forgotten, and
clicking Debug again will restore them. However, breakpoints do not persist across
restarts of DrRacket.
• If execution is paused at the start of an expression, then right-clicking or control-
clicking (Mac OS) on the green triangle opens a menu with the option to Skip expres-
sion.... Selecting this opens a text box in which to enter a value for the expression.
The expression is skipped, with the entered value substituted for it.
• If execution is paused at the end of an expression, then the expression and its value
are displayed to the left of the button bar. Right-clicking or control-clicking (Mac
OS) on the green triangle opens a menu with options to Print return value to console
and Change return value.... The former displays the return value in the interactions
window; the latter opens a text box in which to enter a substitute value.
• Hovering the mouse cursor over a bound variable displays the variable’s name and
value to the right of the button bar. Right-clicking or control-clicking (Mac OS) opens
a menu with options to Print value of ăvarą to console or (set! ăvarą ...). The
former displays the variable’s value in the interactions window; the latter opens a text
box in which to enter a new value for the variable.
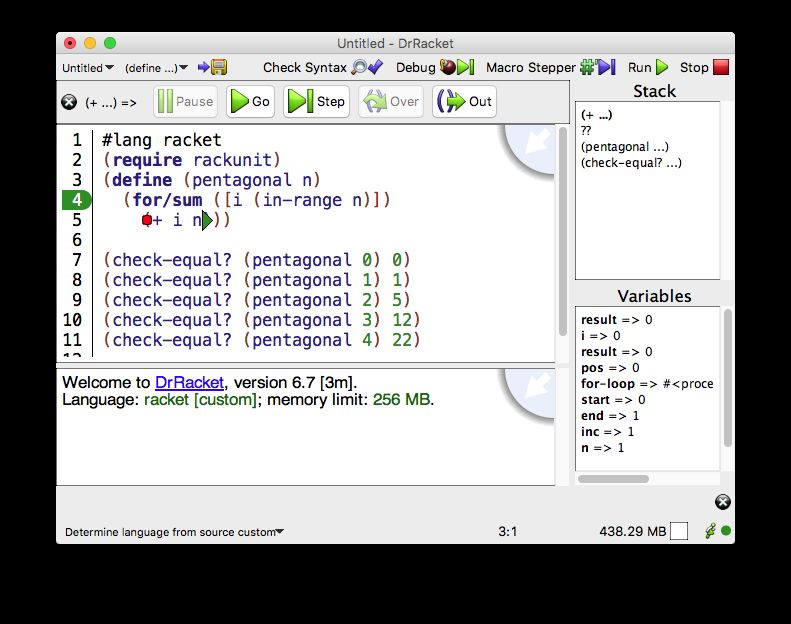
1.8.3 Stack View Pane
In addition, while execution is paused, the stack view pane at the right of the DrRacket
frame is active. The top of the pane shows a list of active stack frames. Mousing over a
frame produces a faint green highlighting of the corresponding expression. Clicking on the
frame selects that frame, which makes its lexical variables visible. The selected frame is
indicated by a bold font.
The bottom of the pane shows the lexical variables in the selected stack frame.
The following screenshot illustrates several aspects of the debugger interface. The red circle
in the body of for/sum is a breakpoint, and the green triangle at the end of the (+ i n) is
where execution is currently paused. The expression’s return value is displayed at the left of
the button bar, and the value of i and other variables are displayed in the stack view pane.
171.8.4 Debugging Multiple Files
To debug a program that spans several files, make sure that all of the files are open in Dr-
Racket. Click the Debug button in the window containing the main program. As this pro-
gram loads additional files that are present in other windows or tabs, message boxes will
pop up asking whether or not to include the file in the debugging session. Including the file
18means that it will be possible to set breakpoints, inspect variables, and single-step in that
file.
Tip: A file may only be involved in one debugging session at a time. If you try to debug a file
that loads another file that is already being debugged, a message box will pop up explaining
that the file cannot be included in another debugging session.
1.9 The Module Browser
The module browser shows you the structure of all of the files in your program. It can be
opened via the Show menu, or via the Module Browser menu items in the Racket menu. It
is also available from the command-line via raco dependencies-graph.
A module browser window contains a square for each module. The squares are colored
based on the number of lines of code in the module. If a module has more lines of code, it
gets a darker color. If a module is red, it means that DrRacket did not find a source file for it.
In addition, for each normal import, a blue line drawn is from the module to the importing
module. Similarly, purple lines are drawn for each for-syntax, for-template or for-meta
import. In the initial module layout, modules to the left import modules to the right, but
since modules can be moved around interactively, that property might not be preserved.
To open the file corresponding to the module, double click on the box for that module.
The module browser will also show you the phases that each module is loaded in; choose the
Long, with phases menu item in the Names pop-up menu. The integers indicate the phases
and if #f is present, it means the module is loaded for-label.
The bar along the bottom helps you find your way in a module graph. Specifically, if you
type something there, then all of the modules whose filenames match what you type will
turn green in the module window. This bar is only visible in the stand alone module browser
window (via the Racket menu).
The Visible Packages menu controls which subset of the files are visible. To start, all of the
files in the same package as the package that the initial file are shown.
1.10 Color Schemes
DrRacket comes with a selection of color schemes, available in the preferences dialog’s color
panel.
You can add your own color schemes to DrRacket, too. The first step is to create a package
(see §1.7 “Creating Packages”) and add an "info.rkt" file to it. The file should define
framework:color-schemes as a list of hashes that describe the color schemes.
19As an example, this is the specification of the "Modern" style:
#lang info
(define framework:color-schemes
'(#hash((colors
.
((framework:syntax-color:scheme:string
#(211 72 255))
(framework:syntax-color:scheme:constant
#(211 72 255))
(framework:syntax-color:scheme:comment
#(194 158 31))
(framework:syntax-color:scheme:parenthesis
#(0 150 255))))
(name . "Modern"))))
Each of the keys, e.g., ’framework:syntax-color:scheme:string, maps to a color and
possibly to some style information. All keys accept colors (the vectors shown above rep-
resent colors in red–green–blue format), but only some accept style information. To find
out which are which and to get a complete list of the possible keys, click the button labeled
Style & Color Names at the bottom of the Color Schemes tab of the Colors tab in the pref-
erences dialog. If one can accept style information, then you may include any of 'bold,
'underline, 'italic or `#s(background ,color ) in the list with the color.
Full details on the specification of the info files can be found in the documentation for the
function color-prefs:register-info-based-color-schemes.
You may have to restart DrRacket (and, at least the first time after you add the "info.rkt"
file, re-run raco setup) to see changes to your color scheme.
Color schemes are not limited only to the colors that DrRacket already knows about. If you
are adding your own plugin to DrRacket, you can add new names that can be mapped in the
color scheme. See color-prefs:register-color-preference for more information.
1.11 Creating Executables
DrRacket’s Create Executable... menu item lets you create an executable for your program
that you can start without first starting DrRacket. To create an executable, first save your
program to a file and set the language and teachpacks. Click Run, just to make sure that
the program is working as you expect. The executable you create will not have a read-eval-
print-loop, so be sure to have an expression that starts your program running in the definitions
window before creating the executable.
Once you are satisfied with your program, choose the Create Executable... menu item from
20the Racket menu. You will be asked to choose an executable file name or an archive file
name. In the latter case, unpack the generated archive (on this machine or another one) to
access the executable. In either case, you will be able to start the executable in the same way
that you start any other program on your computer.
The result of Create Executable... is either a launcher executable, a stand-alone executable,
or a distribution archive, and it uses either a Racket (textual) or GRacket (graphical) engine.
For programs implemented with certain languages, Create Executable... will prompt you
to choose the executable type and engine, while other languages support only one type or
engine.
Each type has advantages and disadvantages:
• A launcher executable uses the latest version of your program source file when it
starts. It also accesses library files from your DrRacket installation when it runs. Since
a launcher executable contains specific paths to access those files, launchers usually
cannot be moved from one machine to another.
• A stand-alone executable embeds a compiled copy of your program and any Racket
libraries that your program uses. When the executable is started, it uses the embedded
copies and does not need your original source file. It may, however, access your
DrRacket installation for DLLs, frameworks, shared libraries, or helper executables.
Consequently, a stand-alone executable usually cannot be moved from one machine
to another.
• A distribution archive packages a stand-alone executable together with any needed
DLLs, frameworks, shared libraries, and helper executables. A distribution archive
can be unpacked and run on any machine with the same operating system as yours.
DrRacket’s gives you the most options when it infers a language from a program’s source.
Most other languages only allow one type of executable. The teaching languages, for ex-
ample, create stand-alone executables in distributions. The legacy languages create only
launchers.
Tip: Disable debugging in the language dialog before creating your executable. With de-
bugging enabled, you will see a stack trace with error messages, but your program will run
more slowly. To disable debugging, open the language dialog, click the Show Details button,
and select No debugging or profiling, if it is available.
When you create an executable in some languages, you can supply additional files to de-
termine the executable’s icon and similar properties, depending on the platform. The file’s
purpose is determined by its suffix:
• On Windows, supply an ".ico" file for an icon. Only 16x16, 32x32, or 48x48 images
from the ".ico" file are used.
21• On Mac OS, supply an ".icns" file for an icon. You can set the application’s creator
with an ".creator" file (whose first four bytes are used), and you can set documents
for the application through a ".utiexports" file (see 'uti-exports in create-
embedding-executable for more information).
• On Unix, supply a ".png" or ".ico" file for an icon.
1.12 Following Log Messages
The Show Log menu item in the View menu opens a pane in the DrRacket window showing
log messages.
Along the top of the window is a text field that should be filled with a description of which
log messages are interesting, as described in the §15.5 “Logging” section of The Racket
Reference.
222 Languages
This chapter describes some of the languages that are available for use within DrRacket. The
list here is potentially incomplete, because new languages can be added through DrRacket
plug-ins.
2.1 Language Declared in Source
The The Racket Language mode in DrRacket is a kind of meta-language, where the program
itself specifies its language, usually through a #lang line.
More generally, when using this mode, the definitions window must contain a module in
some form. Besides #lang, a Racket module can be written as (module ...); aside from
comments, the definitions window must contain exactly one module.
2.1.1 Initial Environment
DrRacket initializes the environment before it starts running the program in ways slightly
different than the racket command-line binary does to reflect the extra GUI capabilities
that it provides. Using the default settings in the language dialog, it initializes the parame-
ters described in this subsection. Changing the defaults can result in additional parameters
changing, as described in the next subsection.
DrRacket initializes the pretty-print-size-hook and pretty-print-print-hook to
specially recognize
• snip%s, which it just inserts into the editor
• convertible values from pict/convert
• convertible values from file/convertible (which it converts to png images)
• numbers that are exact? and real?, but not integer?, which it prints specially to
allow showing repeating decimal representations and mixed fractions, and
• values that match the predicates passed to drracket:language:add-snip-value.
It also initializes the global-port-print-handler to use pretty-print instead of just
print.
DrRacket initializes the error-display-handler to specially highlight the source loca-
tions of the errors and to include icons that provide access to the stacktrace.
232.1.2 Details Pane of Language Dialog
In the details pane of the language dialog, some of the configuration options correspond to
using various libraries and thus can be used without DrRacket. Here’s how, for the ones that
are straightforward (the ones not mentioned here require more sophisticated configuration
of various libraries).
• Dynamic Properties: The radio buttons corresond to various uses of the
errortrace/errortrace-lib library.
The No Debugging or profiling option means not to use the library at all.
The Debugging option means (current-compile (make-errortrace-compile-
handler)) as well as adding (build-path "compiled" "errortrace") to use-
compiled-file-paths.
The Debugging and profiling option means to use errortrace/errortrace-lib
library’s profiling-enabled in conjunction with current-eval.
The Syntactic test suite coverage option means to use test-coverage-enabled in
conjunction with current-eval.
The other three checkboxes save compiled .zo files and adjust the compiler.
The populate compiled/ directories option corresponds to
(current-load/use-compiled
(make-compilation-manager-load/use-compiled-handler))
(manager-skip-file-handler
(λ (p)
(file-date-in-paths
p
(cons (CACHE-DIR) (current-library-collection-paths)))))
plus adding either (build-path "compiled" "drracket") or (build-path
"compiled" "drracket" "errortrace") to the front of use-compiled-file-
paths, depending if the Debugging option is set or not.
The Preserve stacktrace option corresponds to
(compile-context-preservation-enabled #t)
The Enforce constant definitions (enables some inlining) option corresponds to call-
ing compile-enforce-module-constants; checking it passes #t and leaving it
unchecked passes #f.
• Output Syntax: The output syntax options correspond to settings in the
racket/pretty library and the mzlib/pconvert library.
• Collection Paths: This corresponds to setting the current-library-collection-
paths parameter.
24• Command-line arguments: This corresponds to setting the current-command-
line-arguments parameter.
• Automatic #lang line: This panel controls the default #lang that DrRacket inserts
into new windows (or tabs). If the top option of the radio box is chosen (the default),
DrRacket uses the last #lang that was edited in a definitions window. If the lower
option of the radio box is chosen, DrRacket always uses the same #lang line, as given
in the text field.
2.2 Legacy Languages
DrRacket supports several historically useful variants of Scheme without a #lang prefix:
• The R5RS language contains those primitives and syntax defined in the R5 RS Scheme
standard. See the r5rs library for details.
• The PLT Pretty Big language provides a language roughly compatible with a
language in earlier versions of DrRacket. It evaluates a program in the same
way as load, and it starts by importing the following modules: mzscheme,
racket/gui/base, mzlib/class, mzlib/etc, mzlib/file, mzlib/list,
mzlib/unit, mzlib/include, mzlib/defmacro, mzlib/pretty, mzlib/string,
mzlib/thread, mzlib/math, mzlib/match, and mzlib/shared.
• The Swindle language starts with the same bindings as swindle, and evaluates the
program like load.
2.3 How to Design Programs Teaching Languages
Five of DrRacket’s languages are specifically designed for teaching:
• The Beginning Student language is a small version of Racket that is tailored for be-
ginning computer science students.
• The Beginning Student with List Abbreviations languages is an extension to Begin-
ning Student that prints lists with list instead of cons, and accepts quasiquoted
input.
• The Intermediate Student language adds local bindings and higher-order functions.
• The Intermediate Student with Lambda language adds anonymous functions.
• The Advanced Student language adds mutable state.
The teaching languages are different from conventional Racket in a number of ways:
25• Case-sensitive identifiers and symbols — In a case-sensitive language, the variable
names x and X are distinct, and the symbols 'x and 'X are also distinct. In a case-
insensitive language, x and X are equivalent and 'x and 'X represent the same value.
The teaching languages are case-sensitive by default. Case-sensitivity can be adjusted
through the detail section of the language-selection dialog.
• All numbers are exact unless #i is specified — In the Beginning Student through
Intermediate Student with Lambda languages, numbers containing a decimal point
are interpreted as exact numbers. This interpretation allows students to use familiar
decimal notation without inadvertently triggering inexact arithmetic. Exact numbers
with decimal representations are also printed in decimal. Inexact inputs and results
are explicitly marked with #i.
• Procedures must take at least one argument — In the Beginning Student through
Intermediate Student languages, defined procedures must consume at least one ar-
gument. Since the languages have no side-effects, zero-argument functions are not
useful, and rejecting such function definitions helps detect confusing syntactic mis-
takes.
• Identifier required at function call position — In the Beginning Student through In-
termediate Student languages, procedure calls must be of the form (identifier
...). This restriction helps detect confusing misuses of parentheses, such as (1)
or ((+ 3 4)), which is a common mistake among beginners who are used to the
optional parentheses of algebra.
• Top-level required at function call position — In the Beginning Student languages,
procedure calls must be of the form (top-level-identifier ...), and the num-
ber of actual arguments must match the number of formal arguments if top-level-
identifier is defined. This restriction helps detect confusing misuses of parenthe-
ses, such as (x) where x is a function argument. DrRacket can detect such mistakes
syntactically because Beginning Student does not support higher-order procedures.
• Primitive and defined functions allowed only in function call position — In Begin-
ning Student languages, the name of a primitive operator or of a defined function
can be used only after the open-parenthesis of a function call (except where teach-
pack extensions allow otherwise, as in the convert-gui teachpack). Incorrect uses
of primitives trigger a syntax error. Incorrect uses of defined names trigger a run-time
error. DrRacket can detect such mistakes because Beginning Student does not support
higher-order procedures.
• lambda allowed only in definitions — In the Beginning Student through Intermediate
Student languages, lambda may appear only in a definition, and only as the value of
the defined variable.
• Free variables are not allowed — In the Beginning Student through Advanced Stu-
dent languages, every variable referenced in the definitions window must be defined,
pre-defined, or the name of a local function argument.
26• quote works only on symbols, quasiquote disallowed — In the Beginning Student
language, quote and ’ can specify only symbols. This restriction avoids the need
to explain to beginners why 1 and '1 are equivalent in standard Racket. In addition,
quasiquote, `, unquote, ,, unquote-splicing, and ,@ are disallowed.
• Unmatched cond/case is an error — In the Beginning Student through Advanced
Student languages, falling through a cond or case expression without matching a
clause signals a run-time error. This convention helps detect syntactic and logical
errors in programs.
• Conditional values must be true or false — In the Beginning Student through
Advanced Student languages, an expression whose value is treated as a boolean must
return an actual boolean, true or false. This restriction, which applies to if, cond,
and, and or expressions, helps detect errors where a boolean function application is
omitted.
• +, *, and / take at least two arguments in Beginning languages. — In the Beginning
Student and Beginning Student with List Abbreviations languages, mathematical
operators that are infix in algebra notation require at least two arguments in DrRacket.
This restriction helps detect missing arguments to an operator.
• and, or, nand, and nor require at least 2 expressions — In the Beginning Stu-
dent through Advanced Student languages, the boolean combination forms require
at least two sub-expressions. This restriction helps detect missing or ill-formed sub-
expressions in a boolean expression.
• set! disallowed on arguments — In the Advanced Student language, set! cannot
be used to mutate variables bound by lambda. This restriction ensures that the substi-
tution model of function application is consistent with DrRacket’s evaluation.
• Improper lists disallowed — A proper list is either an empty list or a list created
by consing onto a proper list. In the Beginning Student through Advanced Student
languages, cons constructs only proper lists, signaling an error if the second argument
is not a proper list. Since beginning students do not need improper lists, this restriction
help detect logical errors in recursive functions.
• Dot is disallowed — In the Beginning Student through Advanced Student languages,
a delimited period . is disallowed, (e.g., as an improper-list constructor in a quoted
form, or for defining multi-arity procedures).
• Syntactic form names disallowed as variable names — In the Beginning Student
through Advanced Student languages, all syntactic form names are keywords that
cannot be used as variable names.
• Re-definitions are disallowed — In the Beginning Student through Advanced Student
languages, top-level names can never be re-defined.
• Function definitions are allowed only in the definitions window — In the Beginning
Student languages, function definitions are not allowed in the interactions window.
27The teaching languages also deviate from traditional Racket in printing values. Different
printing formats can be selected for any language through the detail section of language-
selection dialog.
• Constructor-style output — See §2.5 “Output Printing Styles”.
• Quasiquote-style output — See §2.5 “Output Printing Styles”.
• Rational number printing – In the teaching languages, all numbers that have a finite
decimal expansion are printed in decimal form. For those numbers that do not have
a finite decimal expansion (such as 4/3) DrRacket offers a choice. It either prints
them as mixed fractions or as repeating decimals, where the repeating portion of the
decimal expansion is shown with an overbar. In addition, DrRacket only shows the
first 25 digits of the number’s decimal expansion. If there are more digits, the number
appears with an ellipses at the end. Click the ellipses to see the next 25 digits of the
expansion.
This setting controls only the initial display of a number. Right-clicking or Control-
clicking (Mac OS) on the number lets you change from the fraction representation to
the decimal representation.
• write output — Prints values with write.
• Show sharing in values — Prints interaction results using the shared syntax, which
exposes shared structure within a value. For example, the list created by (let ([lt
(list 0)]) (list lt lt)) prints as
(shared ((-1- (list 0))) (list -1- -1-))
instead of
(list (list 0) (list 0))
A program in the teaching languages should be tested using the check forms —
(check-expect value value), (check-within value value value), or (check-
error value string). Tests are evaluated when running the program: when there are no
tests, a warning appears in the interactions window; when all tests succeed, an acknowledge-
ment appears in the interactions window; otherwise, a testing window appears to report the
results. See §3.1.3 “View” for details on configuring the report behavior.
Tests can be disabled if necessary, see §3.1.5 “Racket” for details.
One final difference between these teaching languages and other languages is the way they
save files. That is, when DrRacket saves a file and the current language is one of these
five teaching languages, it inserts three lines of metadata that record the precise language
(including any options set) and the teachpacks. This has two benefits: opening the file later
restores the settings and the metadata is formulated in such a way as to be executable code
28so running racket or gracket on the file in a shell will run the program in the appropriate
language.
This meta data always consists of exactly three lines, and so can be stripped out by three
calls to read-line.
2.4 Other Experimental Languages
For information on Lazy Racket, see the Lazy Racket documentation.
For information on FrTime, see the FrTime documentation.
For information on Algol 60, see the Algol 60 documentation.
2.5 Output Printing Styles
Many Racket languages support a Output Syntax choice that determines how evaluation
results are printed in the interactions window. This setting also applies to output generated
by calling print explicitly.
The print style is the normal Racket output style. The following table illustrates the other
output styles:
Input expression Constructor Quasiquote write
(cons 1 2) (cons 1 2) `(1 . 2) (1 . 2)
(list 1 2) (list 1 2) `(1 2) (1 2)
'(1 2) (list 1 2) `(1 2) (1 2)
(list (void)) (list (void)) `(,(void)) (#)
`(,(void)) (list (void)) `(,(void)) (#)
(vector 1 2 3) (vector 1 2 3) (vector 1 2 3) #(1 2 3)
(box 1) (box 1) (box 1) #&1
(lambda (x) x) (lambda (a1) ...) (lambda (a1) ...) #
'sym 'sym 'sym sym
(make-s 1 2) (make-s 1 2) (make-s 1 2) #(struct:s 1 2)
'() empty `() ()
add1 add1 add1 #
(delay 1) (delay ...) (delay ...) #
(regexp "a") (regexp "a") (regexp "a") #rx"a"
The Constructor output mode is similar to Rackets normal print mode, except that even
quotable are still printed with constructors, constructor functions and forms are used to ap-
proximate some otherwise unprintable values. For example, Constructor output prints a
procedure in a lambda form. For output to a graphical context, rational numbers are printed
29using a special snip% object that lets the user choose between improper fractions, mixed
fractions, and repeating decimals.
The Quasiquote output mode is like Constructor output, but it uses quasiquote (abbre-
viated with `) to print lists, and it uses unquote (abbreviated with ,) to escape back to
Constructor printing as needed.
The write output mode corresponds to traditional Scheme printing via the write procedure.
For example, lists print by parenthesizing the printed form of the list elements, without a
leading quote mark or a constructor name.
The print output mode corresponds to Racket’s default printing via the print procedure.
Output via print is further configurable through run-time settings, such as the print-as-
expression parameter, and it may be adjusted by a #lang-specified language. For example,
the scheme language sets the print-as-expression parameter to #f, which essentially
makes print mode act like write mode.
The Constant Style option, when present, controls how true, false, and empty print; for
the booleans, it determines if there is a # prefix and for the empty list, determines if it prints
as empty or '().
For any of the output styles, DrRacket sets the global-port-print-handler so that the
print procedure produces output as selected.
303 Interface Reference
3.1 Menus
3.1.1 File
• New : Creates a new DrRacket window.
• New Tab : Creates a new tab in the current DrRacket window.
• Open... : Opens a find-file dialog for choosing a file to load into a definitions window.
• Open Recent : Lists recently opened files. Choosing one of them opens that file for
editing.
• Open Require Path... : Opens a dialog where you can enter in a require-like module
path (e.g., racket/base.rkt or data/splay-tree.rkt or "x.rkt") and edit the
corresponding files in the definitions window.
• Reopen Closed Tab : Opens previously closed tabs. If no tabs were closed in current
session, files from previous sessions are opened.
• Install PLT File... : Opens a dialog asking for the location of the ".plt" file (either
on the local disk or on the web) and installs the contents of the file.
• Install Package... : Opens a dialog asking for the name of a package to install. See
Package Management in Racket for more information on packages.
• Package Manager... : Provides a graphical interface to the command-line tool raco
pkg.
• Revert : Re-loads the file that is currently in the definitions window. All changes since
the file was last saved will be lost.
• Save Definitions : Saves the program in the definitions window. If the program has
never been saved before, a save-file dialog appears.
• Save Definitions As... : Opens a save-file dialog for choosing a destination file to save
the program in the definitions window. Subsequent saves write to the newly-selected
file.
• Save Other : Contains these sub-items
– Save Definitions As Text... : Like Save Definitions As..., but the file is saved
in plain-text format (see §3.5.1 “Program Files”). Subsequent saves also write in
plain-text format.
– Save Interactions : Saves the contents of the interactions window to a file. If the
interaction constants have never been saved before, a save-file dialog appears.
31You can also read