Explore Naturally Brilliant Colour in the Shirley Sherwood Gallery - A trail for families and schools 1 May - 26 September 2021
←
→
Page content transcription
If your browser does not render page correctly, please read the page content below
Explore Naturally
Brilliant Colour in the
Shirley Sherwood Gallery
A trail for families and schools
1 May – 26 September 2021
Art trail
This booklet will help you to understand some of the
themes in the Naturally Brilliant Colour exhibition that
link art with science.
The booklet is designed to be used by families and school
groups. It highlights a number of artworks to look at more
closely and poses questions for you to think about.
There are also some ‘wow facts’ as well as a few activities
to do in the Gardens and glasshouses.

Introduction
You will see throughout this exhibition that
colour is vitally important for all living things.
Different people often see colours differently.
Is the dress cream and gold or blue and black?
Do you remember this photograph that
appeared on the internet a few years ago?
Some people saw the colours of the dress
as cream and gold, while others thought it
was blue and black.
This shows that humans sometimes see
                                                              © Cecilia Bleasdale
colours differently.
In this exhibition you will see how animals’
experiences of vision and colour have evolved
over millions of years, before humans even existed!
Gallery 1
Vision and colour evolve

Sir Isaac Newton, the famous scientist and
mathematician, found that he could split sunlight
into the seven colours of the rainbow by shining
sunlight through a glass prism.                                © Godfrey Kneller/Creative Commons

White light
White light is ordinary daylight from the sun. It appears colourless, but is actually
made up of the seven colours of the rainbow.

                                                                                                    © Spigget/Creative Commons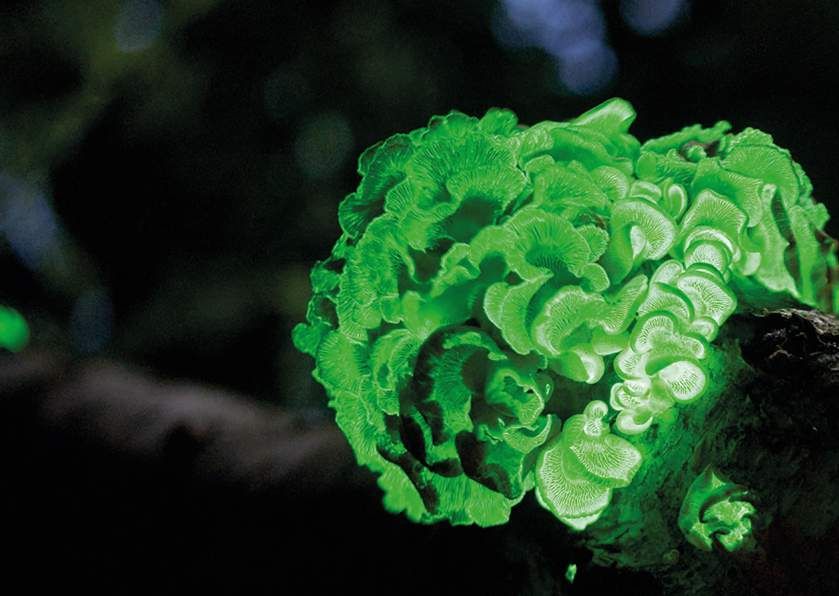
Light from the sun travels in waves like the waves in the sea. Rainbows are formed
when light travels through water droplets in the air and splits into different colours.
This is why rainbows sometimes appear when the sun comes out after a rain shower.
Sunlight also produces ultraviolet light waves which are invisible to humans but
can be seen by insects and some birds. Ultraviolet light waves can damage our skin,
which is why we protect ourselves by wearing sun cream.

          Can you name the                                              How many different
          colours of the rainbow                                        colours can you see
          in their correct order?                                       in this painting?

                                                                                              © Andrew Parker/Lifescaped
                                          © Kevinsphotos/Pixabay

In the centre of this artwork (below left) is a painting of an extinct Pikaia, a marine
animal that lived over 500 million years ago.

                                                                                              © NobuTamura/Creative Commons
                                           © Andrew Parker/Lifescaped

   Wow fact
   Millions of years ago, before plants existed on land, life on earth changed.
   This was known as the Big Bang of animal evolution. Scientists call this the
   ‘Cambrian explosion’.
            At this time animals evolved eyes and were able to recognise colours.
            They also evolved the ability to move quickly to find food, and were
            able to protect themselves against predators.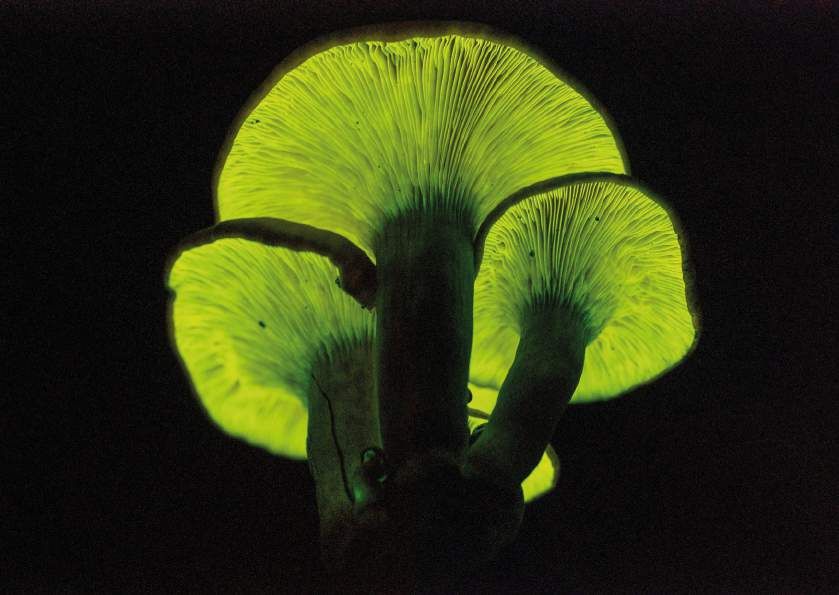
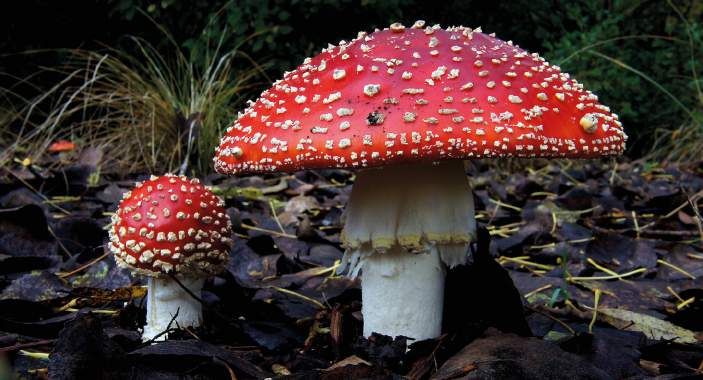
Colour is important
Plants and animals use colour to survive. They can use it as camouflage to hide
from other animals or as a means of attracting animals to them for reproduction.
Colour is often used as a warning to scare away animals that are threatening. For
example, some types of fungi have red markings to show that they are poisonous.

                                                                                    © Bernard Spragg/Creative Commons
  Amanita muscaria

Things to do in the Gardens
            • Visit the dry desert zone in the Princess of Wales Conservatory,
              to see how the amazing Lithops plants use colour as part of their
              camouflage. Find out why these plants are known as ‘living stones’.

                                                                                    © Andrew McRobb/RBG Kew

  Lithops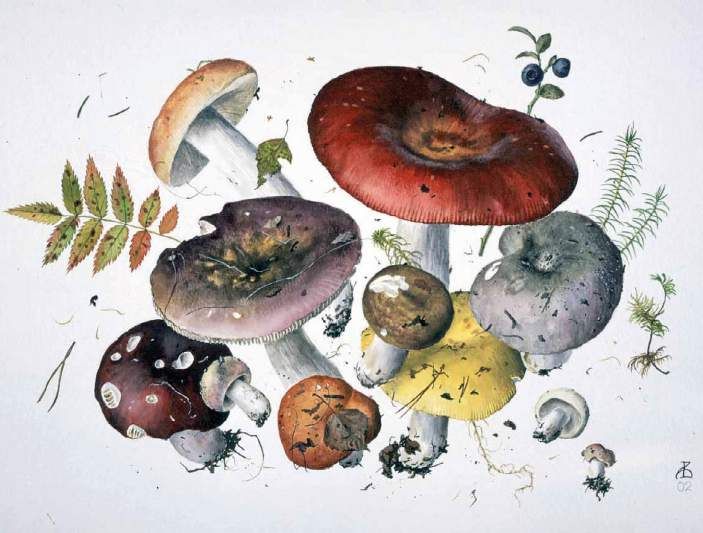
Colour types
In this exhibition you will see artworks showing
the four different types of colour.
Type 1: pigment colour

                                                                                           © Evan-Amos/Creative Commons
Pigment colour, the most common type of colour in
nature, is found in most paints and dyes. Pigment colours
were traditionally made from powdered materials found
in the earth, such as clay and rock, or from other natural
materials. Methods of producing coloured pigments
artificially, using chemicals, have been in existence
for many hundreds of years.
We see pigment colours when certain light waves are
reflected from the object and all other light waves are absorbed by the object.
When we look at a banana, for example, we are seeing the yellow light waves
reflected from the banana and all the other light waves absorbed by the banana.

Type 2: fluorescent colour
We see fluorescent colour when certain light waves, called ultraviolet waves, that
can’t be seen by humans, are absorbed by the object and changed into light waves
that can be seen by humans. Fluorescent colours are often very bold and bright
because compared with pigment colour, many more light waves are absorbed
and then reflected by the object. Looking at so many light waves at the same
time means fluorescent colours appear more intense than pigment colours.
Fluorescent colours are often added to pigment colours, making the overall
appearance brighter than if using pigments alone.

Type 3: bioluminescent colour

                                                                                           © Alexey Sergeev/Mushroom Observer
Bioluminescent colour is produced in living things, through
a series of chemical reactions, without using sunlight. It’s
a little bit like a glow-stick you might see at a birthday or
other celebration. Some plants and animals make their
own chemicals to produce bioluminescent colour, while
others may have bacteria living in them that produce the
bioluminescent light. This type of colour is often seen in
the dark or under the sea.

Type 4: structural colour
Structural colour is seen when some wavelengths (or colours) in white light
are reflected off very tiny structures. A hummingbird has these tiny light-reflecting
structures, so small they can only be seen with a microscope, buried under the
surface of its feathers. Its colour and brightness changes when you look at it from
different angles. This is referred to as iridescence. Structural colour is the brightest
form of colour in nature.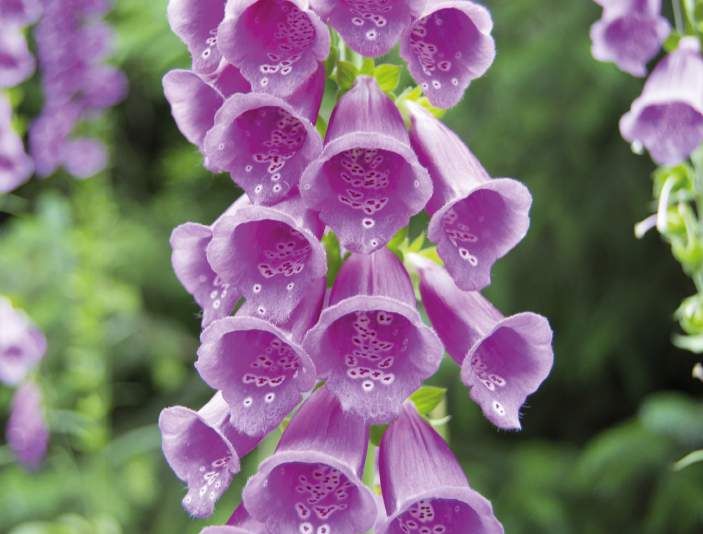
Gallery 2
From light rays to colour

© Andrew Parker/Lifescaped
• Look at these dot paintings from a distance.
          • How do the colours in each painting look different?
          • Without looking at the labels, can you guess which type of colour
            was used to make the dots?
          • Which painting do you think has the brightest colour?

   Wow fact
             Some flowers use ultraviolet or fluorescent colour markings to
             guide insects to their nectar. Humans can’t always see these
             markings, because ultraviolet light is invisible to us and the
             fluorescent colour is not bright enough for us to see in ordinary
             daylight. These markings are called nectar guides and although
             humans can’t see them, they are visible to insects and some birds.

A hoverfly (Eupeodes corollae) finding the nectar in a flower by following the nectar
guide markings.

                                                                                        © Thomas Bresson/Creative Commons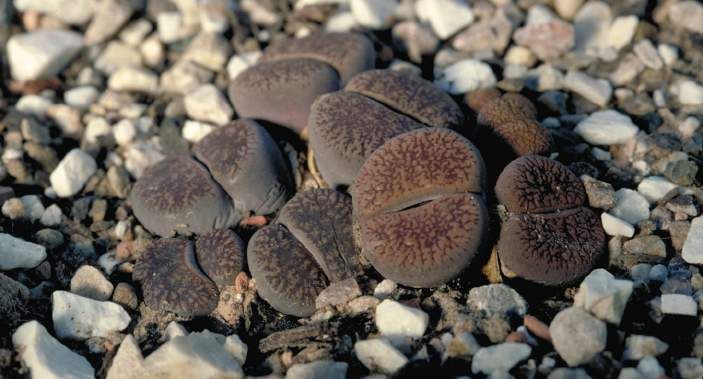
Things to do in the Gardens
        • As you walk around the Gardens and the glasshouses, take
          a closer look at the flowers, making sure not to damage them.
        • Try to find flowers in the Gardens that have nectar guides.
          Here are some to look out for.

                                                                                  © Igor Sheremetyev
                                      © Egon Krogsgaard

 Penstemon digitalis                                      Calendula officinalis

 Digitalis purpurea
Have you ever tried to paint a picture but had trouble
getting the colour just right?
These hummingbird artworks show how hard it is to reproduce the exact colours
of nature using pigment colours on paper.
© John Gould (1804–1881)
© John Gould (1804–1881)
Lesbia nuna (the green-tailed trainbearer) Cynanthus smaragdicaudus (the green-
tailed sylph)
• Compare these two artworks by John Gould.
• The artwork on the left is unfinished and has not been painted.
You can see how the gold leaf was added before the paint.
• Look carefully at the second artwork. Can you see the gold leaf
underneath the paint? Do you think it makes the colours look bright?Heliconia bihai with female hummingbirds Heliconia caribaea with male
Eulampis jugularis hummingbirds Eulampis jugularis
© Bryan Poole/Shirley Sherwood Collection
© Bryan Poole/Shirley Sherwood Collection
• Take a look in the display cases.
• How is the colour of the taxidermy hummingbirds in the cabinets
different from the colour of the hummingbirds in the artwork on the wall?
• Why do you think this is?
Things to do in the Gardens
Although we don’t have hummingbirds in the United Kingdom, we do have plants
from all over the world – and some of them are loved by hummingbirds.
© Egon Krogsgaard
© Sheila Gregory
Salvia fruticosa Fuchsia fulgens
• Look around the Gardens and the glasshouses to see if you can find them.
• Use the plant labels nearby to help you identify them.
• You may be able to spot some of them on The Broad Walk, in the Agius
Evolution Garden or by the wall along the side of the Rock Garden.Pollia
Micro-technology, here in the form of using extremely
small pieces of colour, has been used to produce
this painting. The colour is made from Pure Structural
Colour flakes that copy the structural colour of the real
© Coral G Guest/ Lifescaped
Pollia fruit.
• Use the mirror on the wall to look
at the Pollia fruit.
• Does the colour look different when
you look at it in the mirror?
• Why do you think this is happening?
Wow fact
This is the first painting ever to use Pure Structural Colour.
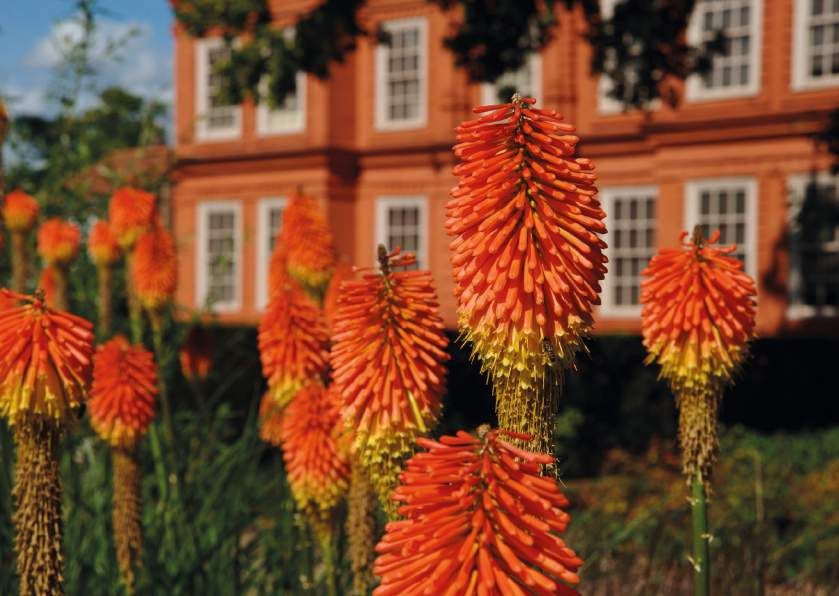
Kniphofia uvaria ‘Nobilis’ © Andrew McRobb/RBG KewGallery 3 Explore more about colour Panellus stipticus © Ylem/Creative Commons Omphalotus subilledens © Alexey Sergeev/Mushroom Observer
Pigment colour has been used in this watercolour painting of fungi.
© Alexander Viazmensky/Shirley Sherwood Collection
The Colours of Brittlegills
Wow fact
There are at least 75 species of fungi that produce bioluminescent
colour. They all produce the same green glowing colour.
Scientists are researching ways that bioluminescent colour can be used to help
the survival of the planet, by producing light that can be made without damaging
the environment. They are developing ways to alter plants so they can naturally
make the chemicals needed to produce bioluminescent colour.
In the future, bioluminescent trees could be used to light up roads instead of
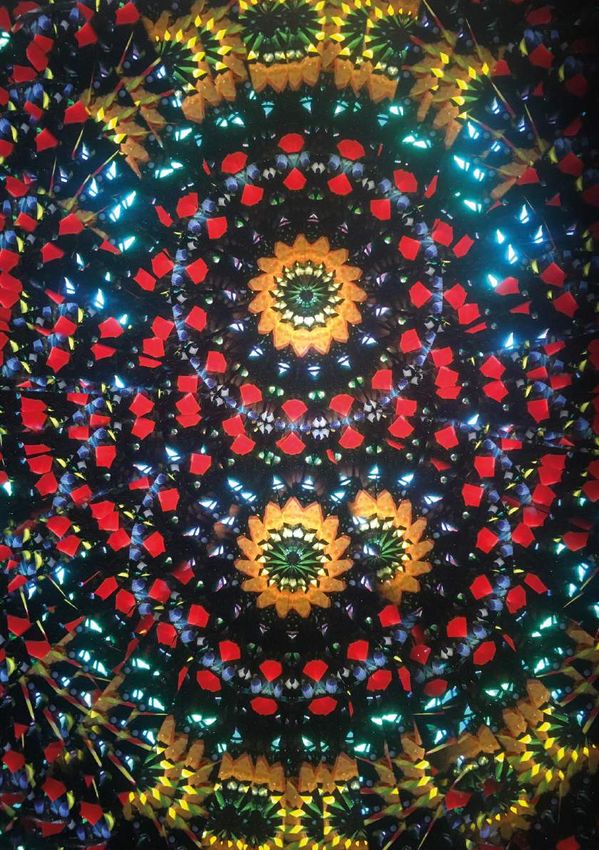
street lamps.Gallery 4 A kaleidoscope of nature’s colours Kaleidoscope of Nature’s Colours © Lifescaped
This kaleidoscope was made using lenses and glass
pieces. Each piece of glass is coloured with structural
colour or pigment colour. A ring of white lights is used
to light up each of the coloured pieces equally.
A camera captures images through the eyepiece as the kaleidoscope turns –
producing live images that are projected onto the screen.

                            • Can you identify any differences between the colours in the kaleidoscope?
                            • Can you spot which are the structural colours and which are the
                              pigment colours?

Something to do at home
                            Try making your own kaleidoscope using recycled materials.
                            You will find the instructions for making a homemade kaleidoscope
                            available to download from kew.org.
                                                                                                                         © Lifescaped

 Make your own kaleidoscope                                                                                                             3. Score and fold along the edges of these strips to create
                                                                                                                                        a triangular prism. Make sure the shiny mirrored surface
                                                                                                                                                                                                      4. Push the prism inside your decorated tube so that the
                                                                                                                                                                                                      end of the prism is flush with the end of the tube. Unfold the
                                                                                                                                        is on the inside of the prism. Use tape to secure the long    paper clip and tape it securely to the cardboard tube, so that
                                                                                                                                        edges of the prism together.                                  half of the paper clip is sticking out from the edge.

    What you need:
    • a cardboard tube, such as a toilet roll tube
    • a circle of thin card divided into sections (a printable
      template is provided with these instructions)
    • a square of foil or shiny paper 12 cm x 12 cm
    • a square of thin card 12 cm x 12 cm
    • scissors
    • a ruler
    • a pencil
    • sticky tape
    • glue
    • a paper clip
    • a small piece of Blu Tack or plasticine                                                                                           5. Cut out a circle using the template that came with these   6. Bend the paper clip over so that the circle is secure
    • different bright-coloured pens such as fluorescent                                                                                instructions. Decorate each section of the circle using the   but able to turn, making sure the decorated side of the
      markers and felt pens                                                                                                             pens and other materials. Make a hole in the centre of the    circle is touching the end of the tube. Put a piece of Blu
    • paints, sequins and other bright, shiny materials                                                                                 circle and push the paper clip through, with the decorated    Tack or plasticine on the tip of the paper clip to cover
      for decorating your tube                                                                                                          side of the circle facing towards the cardboard tube.         the sharp point.

        Instructions:                                                                                                                                                                                     Once you’ve made your kaleidoscope
                                                                                                                                                                                                          why don’t you share it with your friends
                                                                                                                                                                                                          and family?
                                                                                                                                                                                                          You could take it into school and
                                                                                                                                                                                                          have a class ‘kaleidoscope exhibition’.
                                                                                                                                                                                                          If you enjoyed this activity and would like
                                                                                                                                                                                                          some more nature-inspired things to do,
                                                                                                                                                                                                          go to kew.org/kew-gardens/school-visits.

                                                                                                                                        7. Look through the other end of the tube and turn the
                                                                                                                                        circle. Look at all the patterns created by your design.
                                                                                                                                        Are some brighter than others? Try holding the tube up
 1. Decorate your cardboard tube and leave to dry.               2. Cut a 12 cm x 12 cm square of foil or shiny paper.                  to the light to see if the patterns look brighter.
                                                                 Glue this onto the thin card square. Use a ruler and
                                                                 pencil to divide the square into three 4 cm strips.
Gallery 5 Pure Structural Colour in art Emerging Fern © Andrew Parker/Lifescaped
• Which of the four types of colour do you think have been used
           in these artworks?
         • What colours can you see when you look at them from the front?
         • Does the colour look different when you look at it in the mirror?

                                                                                      © Andrew Parker/Lifescaped
 Stimulus

Bio-inspiration
Bio-inspiration is when something originally evolved in nature inspires humans
to develop something new for our own purposes.
Many commonly used items have been inspired by nature. Velcro was invented
when an engineer, George de Mestral, noticed that his dog was covered in seeds
after a walk in the woods. Inspired by the way the seeds attached to his dog’s fur,
he went on to design a product that we use every day – your first pair of shoes
might have used Velcro!
Pure Structural Colour is an example of bio-inspiration. It can be used as an
alternative to the traditional pigments found in paints and dyes, and in some
cases it has the advantage of being better for our environment.
Nature can help us to develop products that are biodegradable and less harmful
to the environment. Can you think of anything like this that you use?
Finally…
This exhibition highlighted four types of colour found in nature.
• Can you remember all four?
They are:
© Alexey Sergeev/Mushroom Observer
© imalabstudio/Pixabay
Pigment colour Fluorescent colour
© Eirik Solheim/Creative Commons
© Stux/Pixabay
Bioluminescent colour Structural colour
The exhibition has shown us how humans are inspired by nature to develop
resources that we can use.
The development of Pure Structural Colour is an example of art and science coming
together to develop brand new bright colours that mimic the colours found in the
natural world.
As you walk around the Gardens, think about how nature could inspire you.
Keep your eyes open for interesting shapes, colours, patterns, textures or
any other parts of a plant that could be the inspiration for a new product
design for the future.
Naturally Brilliant Colour
Order your copy of the book from kew.org/shop
and read more about the amazing colours of the
natural world.
Printed on uncoated, 100% recycled paper.You can also read