Interface Overview Microsoft Teams - Kennesaw State
←
→
Page content transcription
If your browser does not render page correctly, please read the page content below
Interface Overview Microsoft Teams

Copyright © 2020 KSU Division of University Information Technology Services
This document may be downloaded, printed, or copied for educational use without further permission
of the University Information Technology Services Division (UITS), provided the content is not modified
and this statement is not removed. Any use not stated above requires the written consent of the UITS
Division. The distribution of a copy of this document via the Internet or other electronic medium
without the written permission of the KSU - UITS Division is expressly prohibited.

Published by Kennesaw State University – UITS 2020
The publisher makes no warranties as to the accuracy of the material contained in this document and
therefore is not responsible for any damages or liabilities incurred from UITS use.

Microsoft Teams is a trademark of Microsoft.
University Information Technology Services

                                                            Interface Overview
                                                               Microsoft Teams

  Table of Contents
  Introduction ................................................................................................................................................ 3
     Learning Objectives................................................................................................................................. 4
  Accessing Microsoft Teams through the Web ............................................................................................ 5
  Microsoft Teams Interface .......................................................................................................................... 6
    Logging Out ............................................................................................................................................. 8
  Activity Interface ......................................................................................................................................... 9
  Chat Interface ........................................................................................................................................... 10
    Managing Who Can Contact You Through Chat ................................................................................... 11
  Teams Interface ........................................................................................................................................ 13
    Things to Know...................................................................................................................................... 13
     Scheduling a Meeting ........................................................................................................................... 16
         Details Tab......................................................................................................................................... 16
     Scheduling Assistant Tab ...................................................................................................................... 17
     Joining a Meeting Organized by Someone Else .................................................................................... 18
     Using Background Effects in Teams Meetings ...................................................................................... 18
     Raising Your Virtual Hand in a Meeting ................................................................................................ 19
  Calls Interface............................................................................................................................................ 20
    Things to Know...................................................................................................................................... 20
     Make a Call ............................................................................................................................................ 20
     Speed Dial ............................................................................................................................................. 21
     Contacts ................................................................................................................................................ 22
     History ................................................................................................................................................... 23
     Voicemail............................................................................................................................................... 24
  Additional Help ......................................................................................................................................... 25

Introduction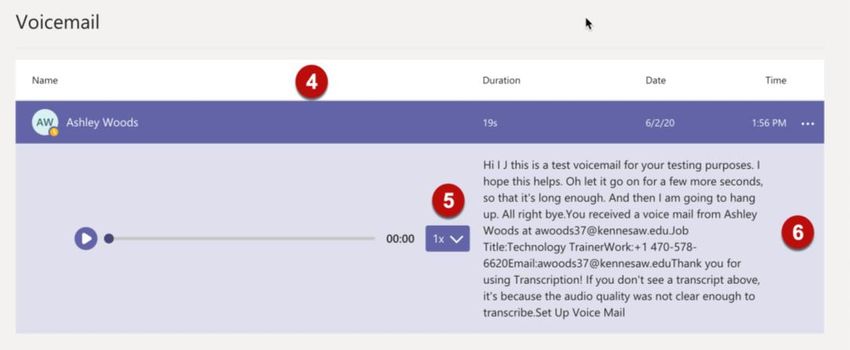
Microsoft Teams is a chat-based workspace that makes collaboration teamwork easy, with the ability to co-
author and share files using popular Office 365 apps like Word, Excel, PowerPoint, and OneNote.

This booklet is a brief introduction to the Microsoft Teams interface and highlights some of its key features.

Microsoft Teams works with Firefox, Chrome, Safari, and Edge web browsers, but full functionality of the web
version of Microsoft Teams is currently only available in Edge. Edge fully supports most of the features offered
in the web version of Microsoft Teams, including video and audio calls.

Learning Objectives
After completing the instructions in this booklet, you will be able to:
    • Access Microsoft Teams from a variety of web browsers
    • Navigate the general, high-level interface of Microsoft Teams
    • Change your availability status in Microsoft Teams
    • Add people to your priority access list
    • Discover more features in Microsoft Teams

                                                                                                    Page 4 of 25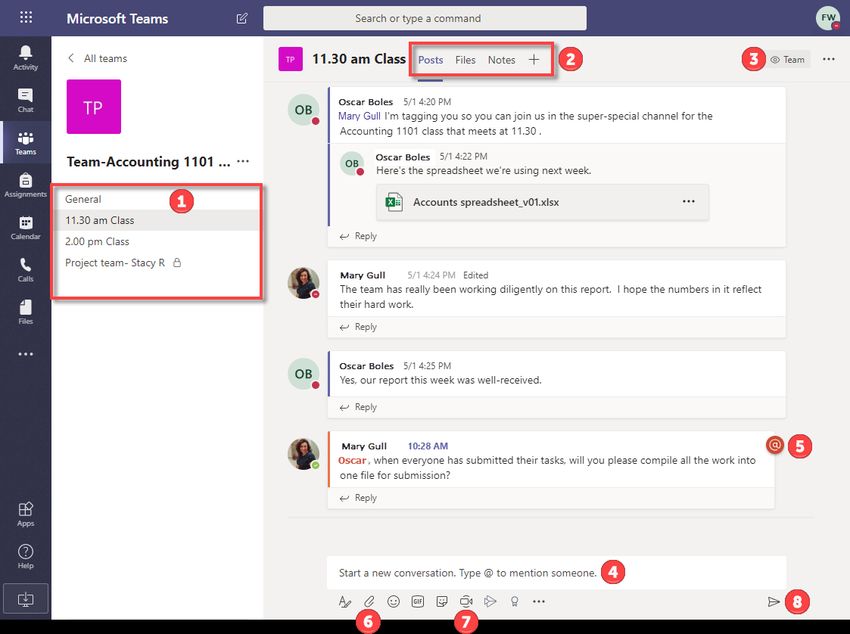
Accessing Microsoft Teams through the Web
You can access Microsoft Teams using your KSU Mail account, or by accessing Office 365.

   1. Navigate your web browser to ksumail.kennesaw.edu or o365.kennesaw.edu.
   2. Log-in to your account using your KSU Email Address credentials.
   3. In the upper-left corner, click the App Launcher.

                                                  Figure 1 - App Launcher
   4. Select Teams from the list of available apps.

                                              Figure 1 - Select Teams

   5. The first time you open Teams, the Microsoft Teams Download the Teams desktop app will appear. You
      have the following options:
      a. Get the Windows App: This option will install the Windows app on your pc or Mac (See Figure 2).
      b. Use the web app instead: This option opens the Microsoft Teams app online. (See Figure 2).

                                            Figure 2 - Select Teams App

   6. Once you make your selection the Microsoft Teams Interface will open.

                                                                                            Page 5 of 25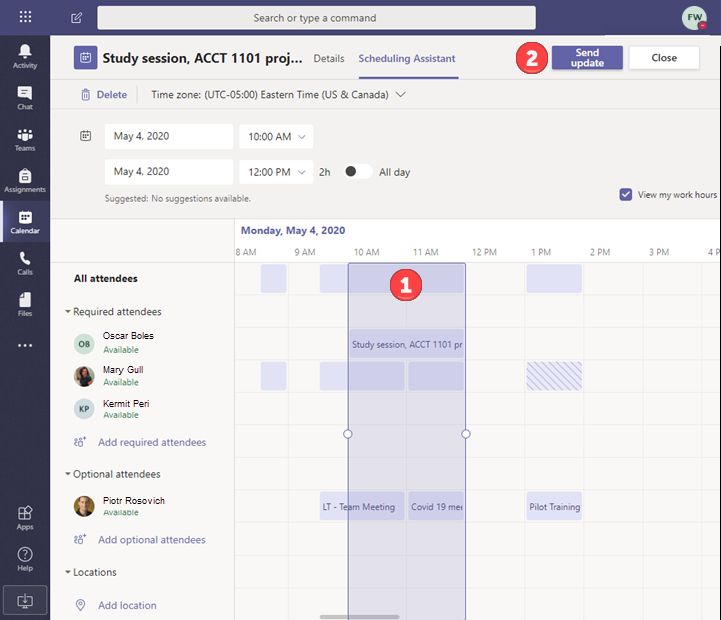
Microsoft Teams Interface

                                             Figure 3 - Teams Interface

When you first open Microsoft Teams, the following apps display by default:
  1. New Chat: Click the icon at any time to create a new chat (See Figure 3).
  2. Profile Icon: Click to set your status, access saved messages, adjust your Teams settings, change your
      profile picture, sign out, and more (See Figure 3).
  3. Activity: Details of your contacts’ activity, such as mentioning your name in a post, replies to threads,
      or an item has been posted to one of your Teams. Click the Filter icon to search for a specific activity
      (See Figure 3).
  4. Chat: This real-time function is great for 1-on-1 communication, and you can create group chats for
      projects for which dedicated Team has not been created (See Figure 3).
  5. Teams: Organize conversation around a topic or group of people. Create and use channels within a
      Team for categorized communication; any member of a team can leave messages, notes, files, and
      other content for all other members (See Figure 3).
  6. Calendar: The Teams app automatically syncs with your Outlook calendar. Schedule a video call or
      meeting here or join one by clicking the Join button at the time a meeting begins. Enable push
      notifications to receive a notification when a team member starts a meeting. Click that notification and
      Teams opens the audio or video call for you.

                                                                                                  Page 6 of 25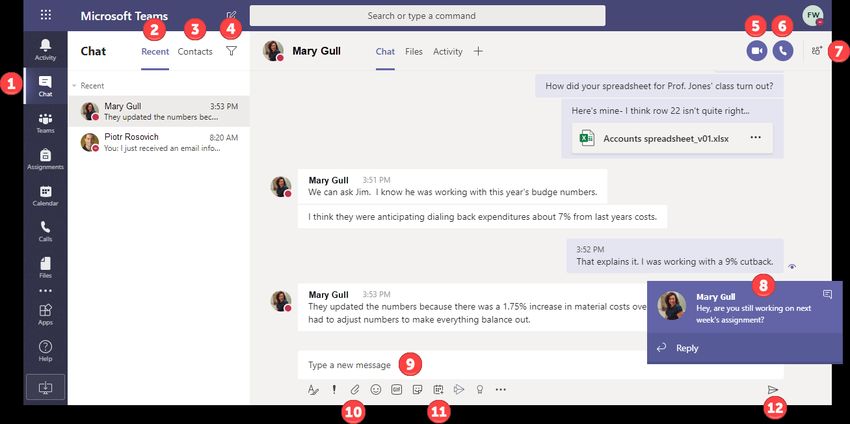
7. Calls: Displays details of your Teams call history, contacts, speed dial, and voicemail (See Figure 3).
   8. Files: Access files shared with any of your Teams or in a chat. You also have access to items stored on
       OneDrive and you can choose additional cloud storage (See Figure 3).
   9. More: Allows you to add apps available through the tenet for which we are licensed (See Figure 3).
   10. Filter: Click the filter to filter for a specific type of team (See Figure 3).
   11. Settings: Allows you to manage teams, switch views, and change basic settings such as notifications
       (See Figure 3).
   12. Join or create team: Allows you to create a new team or join a team by searching or entering a code
       provided by the Team Owner (See Figure 3).
   13. Apps: Click to see a list of non-Microsoft apps and connect them to the Teams app (See Figure 3).
   14. Help: Click to see a menu offering Help topics, training resources, an option to ask a question of the
       global Teams user community, and more (See Figure 3).

Setting Your Teams Status
By default, your status updates automatically based on your status for events on your calendar (free, busy,
tentative, out of office, etc.). You can change your status at any time, and other people see a brief
explanation. You can also set a customized message under your status if you wish as well.

   1. Click your profile icon (See Figure 4).
   2. Hover your mouse over your current status to see a list of status options (See Figure 4).
   3. Click a different status to select it (See Figure 4).

                                              Figure 4 - Teams Status

                              Your Status                          Others See
                           Available
                           Busy
                           Do Not Disturb
                           Away
                                              Figure 5 – Status Levels

Note: When your status is Do Not Disturb, only people on your Priority Access list can send you messages.

                                                                                                   Page 7 of 25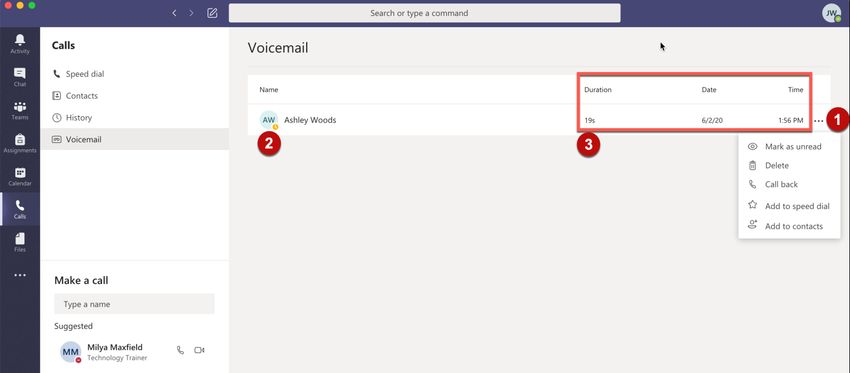
Logging Out
  1. Click the profile icon (See Figure 6).
  2. On the drop-down, click Sign out (See Figure 6).

                                            Figure 6 - Logging Out

                                                                     Page 8 of 25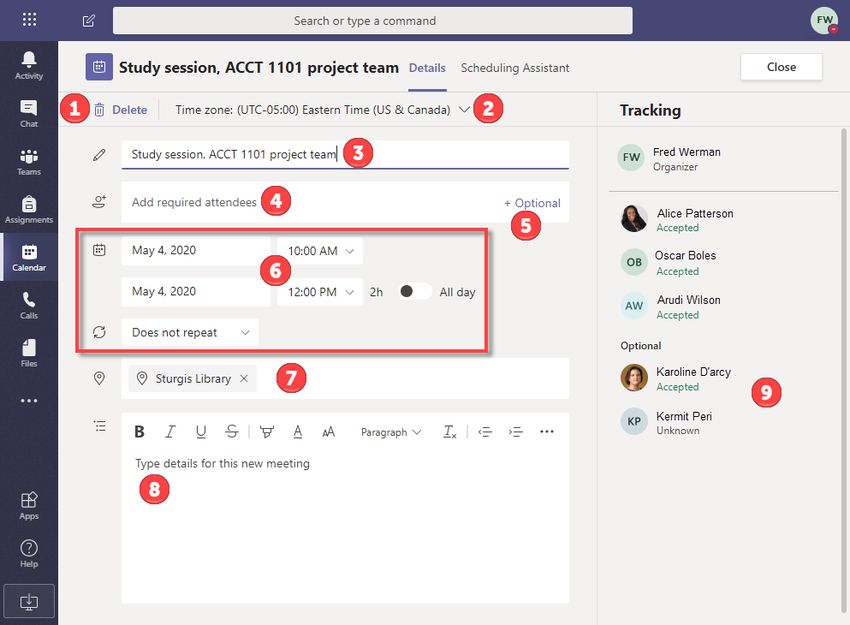
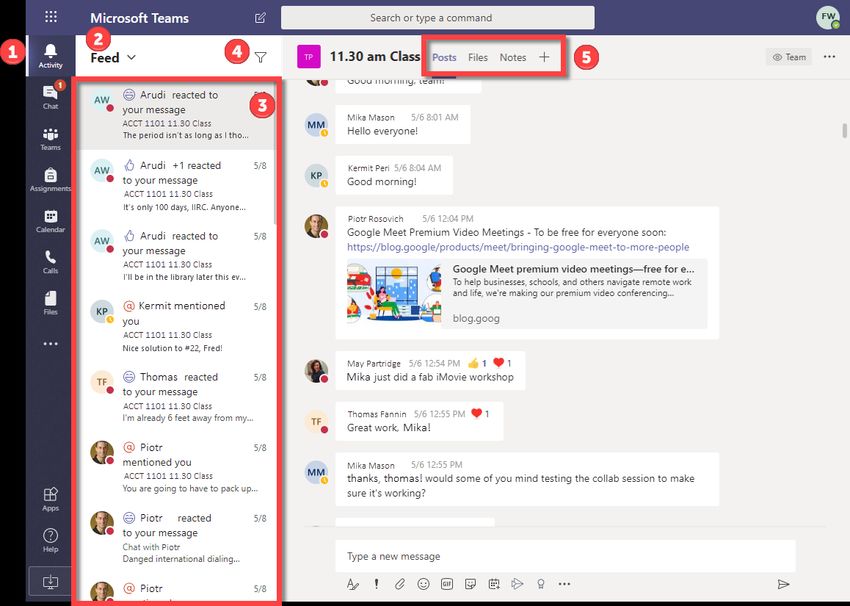
Activity Interface
  1. Activity: Click to display a list of items related to you, such as Mentions and Replies.
     A number on the Activity icon tells you how many unread items are waiting (See Figure 7).
  2. Feed/My Activity: Click to switch between viewing a summary of everything that's happened in the
     team channels you follow (Feed) and viewing only your activity (My Activity) (See Figure 7).
  3. Activity feed panel: A list of Activity items. Click an item and jump to the Team Channel where that
     activity is located (See Figure 7).
  4. Filter: Filter activity items by type (Unread, Mentions, Missed calls, etc.) (See Figure 7).
  5. Tabs: Click the tabs at the top of a Team Channel to access posted chat messages, shared files, and
     notes in the OneNote app. Customized tabs can be added (See Figure 7).

                                           Figure 7 - Activity Interface

                                                                                                Page 9 of 25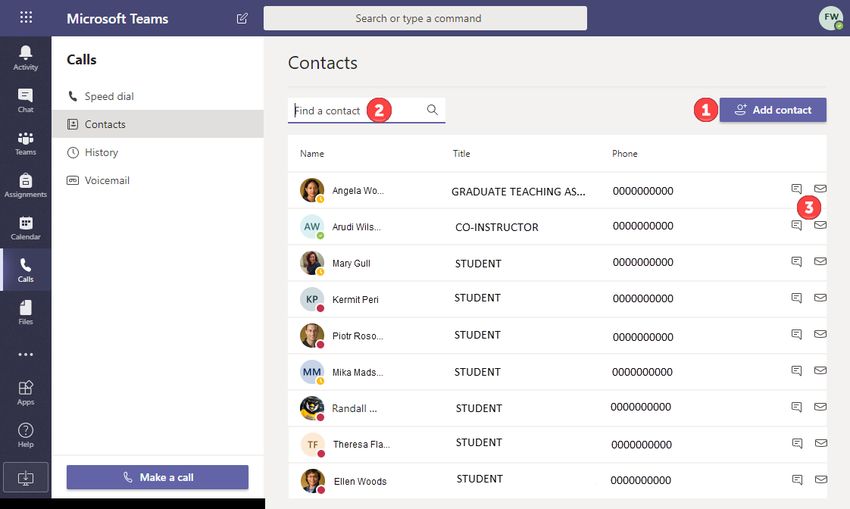
Chat Interface
Chats are useful for general communication, such as planning an event or asking a simple question. For more
focused communication, use a Channel within a Team.

   1. Chat Panel: Click to display your recent chats. A number on the Chat icon tells you how many unread
       messages are waiting (See Figure 8).
   2. Recent: Click to see a list of your recent chats. You can pin a chat to this list so it is always visible
       (See Figure 8).
   3. Contacts: Click to see contacts you’ve added to the Teams app (See Figure 8).
   4. Filter: Search for a person’s name in your chats (See Figure 8).
   5. Video Call: Click to start a video call with everyone in the chat that’s currently selected in the Chat
       panel (See Figure 8).
   6. Audio Call: Click to start an audio call with everyone in the chat that’s currently selected in the Chat
       panel (See Figure 8).
   Note: Video and audio calls are currently only available in the desktop version of Microsoft Teams, or
   while using the Microsoft Edge browser.
   7. View and add participants – Click to see a list of people in the current chat or to add more people
       (See Figure 8).
   8. Chat notification – Appears when a new chat message arrives (See Figure 8).
   9. Chat message field – Text and attachments within this field are sent to everyone in the chat
       (See Figure 8).
   10. Attach – Click to attach files from your OneDrive storage space or from your computer (See Figure 8).
   11. Schedule a meeting – Click to schedule a meeting and invite all members in the chat (See Figure 8).
   12. Send – Click to send what’s in the Chat message field. Or, press the Enter key to send (See Figure 8).

                                              Figure 8 - Chat Interface

   Note: A chat is limited to 250 participants at a time. File attachments are limited to a maximum of ten (10).

                                                                                                   Page 10 of 25
Managing Who Can Contact You Through Chat
Everyone currently in the KSU email system has access to the chat feature. To allow only certain people to
contact you, add them to your priority access list and then set your status to Do Not Disturb:
1. Click your profile icon (See Figure 9).
2. Click Settings. (See Figure 9).
Figure 9 - Chat Settings
3. Click Privacy (See Figure 10).
4. Click Manage priority access (See Figure 10).
Figure 10 - Settings
Page 11 of 255. In the Add people field, begin typing the person’s name (See Figure 11).
Note: Names auto-populate from the KSU directory.
6. Clicking the person’s name adds them to your priority access list (See Figure 11).
7. To remove someone from the list, click X on their row (See Figure 11).
Figure 11 - Add People
8. Set your Teams status to Do Not Disturb.
Figure 12 - Do Not Disturb
Page 12 of 25Teams Interface
A lot of collaboration happens on the Teams panel. You can create Teams, and Channels within a team so
members can post messages specifically for other channel members, upload files, and access apps added to
the channel by an administrator. You can hide or show teams as needed on this screen.
Things to Know
• A team can be private or public.
• A team is limited to 5,000 members, and all members must be in the KSU organization.
• If a team owner allows it, team members can create private channels within the team.
1. Teams list: Teams you are on. You can show or hide a team as necessary. A red @ symbol on the Team
icon tells you that you’re tagged (or “@mentioned”) in a message, but you haven’t read it yet
(See Figure 13).
2. Join or create team: Join an established team or create your own team, such as a team for a specific
course and instructor (See Figure 13).
3. Click a Team to see activity in its channels and its general chat (See Figure 13).
Figure 13 - Teams Interface
Page 13 of 251. Channel panel – A list of channels within a team, such as a channel for each class time. Click a channel
to see its activity. A private channel has a lock icon next to it. You can show or hide a channel on your
list as necessary (See Figure 14).
2. Tabs – Access posted messages, shared files, and the OneNote app. Other apps can be added to the
channel (See Figure 14).
3. Visibility – Tells you if the entire team can see content of a selected channel, or only members of the
channel can see it (private channel) (See Figure 14).
4. Chat field – Text/attachments within this field will be sent to the chat session. To get someone’s
attention in a message, type “@” then the person’s name (See Figure 14).
Note: At “@ notifications” are not private- they are visible to everyone in the channel.
5. @ notification – When someone “@ notifies” you in a message, a red “@”symbol helps that message
stand out (See Figure 14).
6. Attach – Attach files from your computer, OneDrive account, other teams and channels, or from a list
of recent files (See Figure 14).
7. Meet now – Start a video call with everyone named in the chat (See Figure 14).
8. Send – Post messages or attachments that are in the chat field. Or, press Enter to post them
(See Figure 14).
Figure 14 - Channel Panel & Posts
Page 14 of 25Calendar Interface
The Teams calendar automatically syncs with Microsoft Outlook’s calendar (if you use Outlook). See and
manage upcoming meetings and schedule new meetings. Teams uses the time zone identified in your
computer’s system setup.
1. Meet Now: Click to instantly begin hosting/organizing a meeting. You can share video and audio if you
wish and select which camera and microphone to use if you have more than one (See Figure 15).
2. New Meeting: Click to see the screen for scheduling a meeting, inviting attendees, and more meeting-
related controls. The Details field an attendee sees automatically includes a link to join the meeting
(See Figure 15).
3. Week and month: Click the arrows to cycle through weeks and select a particular month
(See Figure 15).
4. Day/Week view: Click to switch between viewing your calendar as a single day, a 5-day work week, or
a full 7-day week (See Figure 15).
5. Event: Appointments and meetings appear as blocks on your calendar. Click one to see more
information and adjust times, dates, locations, and details, or delete the event if you’re the organizer
and no one has been invited yet (See Figure 15).
6. Current time & day: Indicates the current day and approximate time, so you can quickly see what’s
next for you (See Figure 15).
Figure 15 - Calendar Interface
Page 15 of 25Scheduling a Meeting
Details Tab
1. Click Delete to remove the meeting (See Figure 16).
2. Teams defaults to the time zone identified in your computer’s system setup. Click the drop-down
arrow to select a different time zone (See Figure 16).
3. Click the Add title field and type a title or purpose for the meeting (See Figure 16).
4. Click the add required attendees field, type the name or NetID of a person to add them
(See Figure 16).
5. Click Optional+ to add an additional field for optional attendees. Click on the add optional attendees
field, type the name or NetID of a person to add the (See Figure 16).
6. Click on the date and start/end times to edit, click on the switch to toggle this meeting to be an all-day
event, or click the drop-down arrow to change the meeting occurrence (See Figure 16).
7. Click the Add location field to add an address or type in a building and room on campus
(See Figure 16).
8. Click on the Type details for this new meeting box, add details important to the meeting. You can
format the information in this field using the toolbar (See Figure 16).
9. Review the status of each attendee invited to this meeting: accepted, tentative, declined, or unknown
(See Figure 16).
Figure 16 - Calendar Details
Page 16 of 25Scheduling Assistant Tab
The Scheduling Assistant tab shows you the availability of invited attendees. You can change the date and
times here, and you can send an update to all attendees.
1. Attendee availability – See who is unavailable during the proposed time frame of your meeting
(See Figure 17).
2. Send Update – Click send update to share the updated meeting information to all attendees
(See Figure 17).
Figure 17 - Scheduling Assistant
Page 17 of 25Joining a Meeting Organized by Someone Else
When you click a link to join a Teams meeting, you’re invited to, you can choose how to join the meeting.
1. Click one of three (3) choices for joining the meeting.
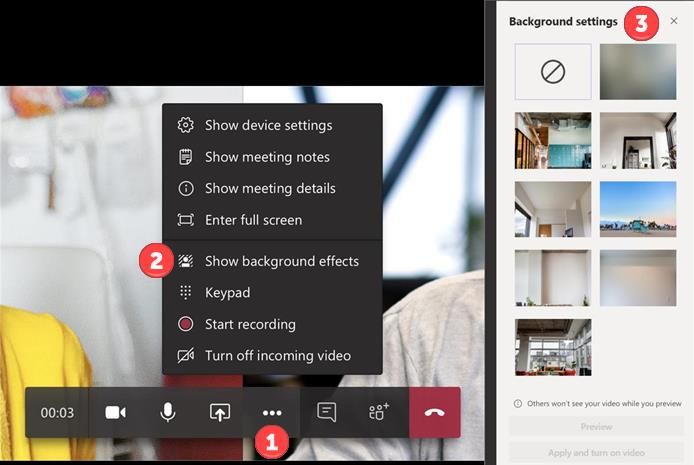
Using Background Effects in Teams Meetings
Before or during a video call you can select from background images provided by Microsoft.
1. Click the triple-dot icon on the meeting control bar (See Figure 18).
2. Click Show background effects on the menu (See Figure 18).
3. Click a background setting to select it (See Figure 18).
Figure 18 - Background Settings
Page 18 of 25Raising Your Virtual Hand in a Meeting
Attendees can tell a presenter they would like a turn to speak by raising their hand.
1. Click the hand icon on the meeting control bar (See Figure 19).
2. An icon appears next to the attendee’s name in the presenter’s roster view AND on the attendee’s
picture or video on the main meeting stage (See Figure 19).
Attendees can lower their hand by clicking the hand icon again, and any presenter can lower individual hands
during the meeting.
Note: this feature is not yet available for mobile applications.
Figure 19 - Virtual Hand
Page 19 of 25Calls Interface
The Calls panel provides an easy location to access all of your recent files, files that have been
uploaded/posted across teams that you are a member of, and files within your OneDrive for Business account.
Things to Know
• Video or audio calls are limited to a maximum of twenty (20) participants.
• Video from only nine (9) participants is shown on the meeting stage, and the Teams app optimizes that
video.
• For more than nine participants, the Teams app prioritizes those who are sending video. Participants
sending only audio are listed below the meeting stage.
• The Teams app considers user bandwidth and alters the number of videos shown to provide the best
balance of quality audio and video.
• The Make a call button is available on each screen of the Calls interface.
Make a Call
1. Make a call button – Click the Make a call button to open the panel and search for a person’s name.
Note: This panel closes when you leave the Calls interface (See Figure 20).
2. Suggestions are presented as you type. Click the person’s name to select it (See Figure 21).
3. Click the icon for video or audio call (See Figure 21).
Figure 20 - Make a Call
Figure 21 - Make a Call Drop-down
Page 20 of 25Speed Dial
1. Add people to this list by clicking the triple-dot icon (See Figure 22).
2. Quickly start a call by clicking the video or audio call icon on a person’s row (See Figure 22).
(Notice that each contact has a current status indicator- Away, Available, etc.) (See Figure 22).
Figure 22 - Speed Dial
Page 21 of 25Contacts
1. Click to add a contact (See Figure 23).
2. Click to search the list for a contact (See Figure 23).
3. Start a chat or send email to someone by clicking the icons on their row (See Figure 23).
Figure 23 - Contacts
Page 22 of 25History
Your call history is cumulative. Items cannot be deleted from the History list.
1. Click the triple-dot icon on a person’s row, and then click an icon on the menu to call them back or
start a chat (See Figure 24).
2. Or, hover your mouse over their name to see a pop-up card (See Figure 24).
3. Click an icon on the pop-up card to start a chat, send email, or start a video or audio call. You can also
type a message in the message field and then press the Enter key to send it (See Figure 24).
Figure 24 - Call History
Page 23 of 25Voicemail
Centralized place where voice recordings and transcripts are found for only missed calls.
1. Click the triple-dot icon on a person’s row, and then click an icon on the menu to mark the voicemail as
unread, delete, call back, add person’s to speed dial, or add person’s to contact (See Figure 25).
2. The person’s who left you the voicemail (See Figure 25).
3. An information area that tells you the duration (how long the voicemail is), date and time when the
voicemail was left (See Figure 25).
4. Person’s bar when selected turns blue and displays more information about the voicemail
(See Figure 26).
5. The speed at which the voicemail will play back (See Figure 26).
6. Transcript from the voicemail (See Figure 26).
Figure 25 - Voicemail
Figure 26 - Person Detail
Page 24 of 25Additional Help
For additional support, please contact the KSU Service Desk:
KSU Service Desk for Faculty & Staff
• Phone: 470-578-6999
• Email: service@kennesaw.edu
• Website: http://uits.kennesaw.edu
KSU Student Helpdesk
• Phone: 470-578-3555
• Email: studenthelpdesk@kennesaw.edu
• Website: http://uits.kennesaw.edu
Page 25 of 25You can also read