June 2019 - Model Flying NZ
←
→
Page content transcription
If your browser does not render page correctly, please read the page content below
June 2019
Over 9000+ pictured products including radio control helicopters, planes, cars,
                  boats, yachts, quadcopters and all the accessories.
       Money Back Guarantee Online Parts Request Form Standard Freight $5.

                           VQ Model DC-3 - 1.8m Wingspan
                          Rosinen or US Army versions - $420

          WEBSITE: www.rcnz.com EMAIL: sales@rcnz.com
        811 Jones Road, Rolleston, Christchurch (Warehouse only)

June 2019                                                                               Page 1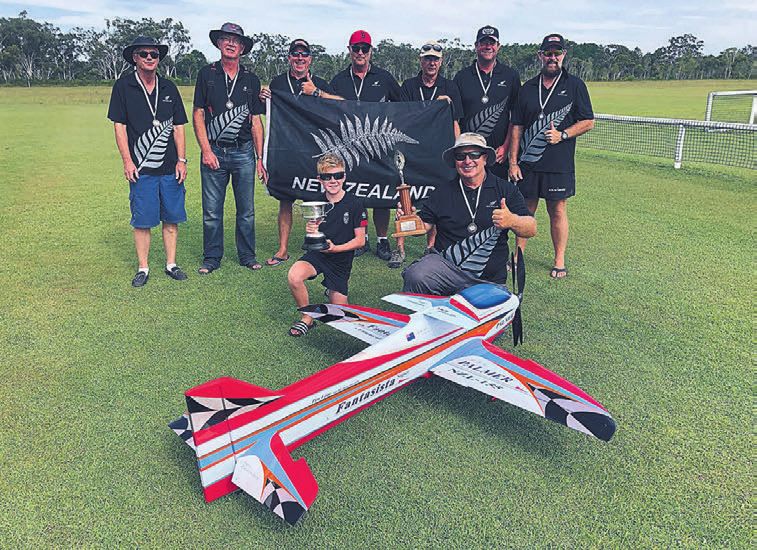
Editor
Murray Race Model Flying New Zealand Council Contents
6 Stevenson Street 3 Council Report
Ph: 03 418 0969 President 3 External Affairs
Mobile: 027 418 0969 Len Drabble 4 AGM
5 Candidate Profile
Balclutha 9230 04 526 2622 Wings Proficiency Scheme
5
race.m@xtra.co.nz President@modelflyingnz.org 6 Glider C of G Jig
7 Another Fire Risk
Advertising Manager 8 Free Flight Catapult Glider
Vivienne Race 9 Auster’s Attempt at Agriculture
Ph: 03 418 0969 Secretary 10 Fibreglassing & Painting with Water Based Products
12 Snow White
v.race@xtra.co.nz Jonathan Shorer Rolls Royce Viper
15
21 Emma Drive 17 ARFs, Whats the Best Way to Go
Copy Deadlines RD31 Levin 5573 20 Wings Over Wairarapa - Daily Diary of Len Drabble
027 225 1952 22 Control Line Experience (Wings Over Wairarapa)
March Issue Secretary@modelflyingnz.org 24 Classic Fighters Omaka
31st January 25 F3B Weekend
27 Lost Hills
June Issue
Treasurer 28 RC Aerobatics at the 71st Nationals
Fran Roulston 30 Awatoto Flood Recovery
30th April
Treasurer@modelflyingnz.org 31 Wings Over Awatoto (also pages 36 & 55)
September Issue 33 Milang Open
34 Round 1 Hand Launch Glider F3K
31st July 35 North Island RC Vintage Championships
37 Waikato Pylon Champs
December Issue 28 Australian Masters & World Cup Aerobatics
30th October Northern North Island 40 North Island Free Flight Championships
Chris Jackson 41 Vintage SIG Report
021 0729 458 44 Control Line SIG Report
Front Cover NNIRep@modelflyingnz.org 46 Soaring Scribe
Top: 48 RC Scale SIG Report
49 Free Flight SIG Report
Graham Lovejoy competing NDC
50
in the maxmen contest with 53 Classifieds
Paul Squires timing his Central North Island
flight. Scott Spooner Special Interest Groups
027 696 1269
Bottom: CNIRep@modelflyingnz.org Pylon Aerobatics
John Danks Frazer Briggs
The F3A team (left to right) Ph 09 432 2071 021 288 9455
P a u l To m l i n s o n , E w a n theteam@airsail.co.nz frazer@pbgsoftware.co.nz
Galloway, Frazer Briggs,
John Knox, Brian Dooley, Southern North Island LMANZ Control Line
Hamish Galloway and Graham Job Hamish Loveridge Dave Thornley
hamishloveridge@hotmail.com Ph 07 349 3719
Andrew Stiver. Front row: 027 357 5638 027 460 3848
Sean Galloway holding the SNIRep@modelflyingnz.org Free Flight
team trophy and Andrew Large Model Co-Ordinator Rob Wallace
Palmer with the individual Rene Redmond Ph 06 878 4993
trophy. Ph 06 356 5861 ffonzrjw@xnet.co.nz
largemodelpermits@
Northern South Island modelflyingnz.org Free Flight &
The Opinions expressed in this Suetonia Palmer
publication are not necessarily Control Line Scale
those of the editor or
021 626 008 Radio Control Scale Ricky Bould
Model Flying New Zealand. NSIRep@modelflyingnz.org Gwyn Avenell Ph 09 478 8949
Ph 09 298 4819 unimec1994@gmail.com
Neither this publication nor avenellsnz@gmail.com
MFNZ are responsible for the Helicopter
contents or services advertised Soaring Allen James
within these pages.
Southern South Island David James 027 580 5630
Daniel Munro Ph 06 354 3452 allenjames@orcon.net.nz
All advertising is accepted 027 474 3316 nzsoaringtc@hotmail.com
on the integrity of those SSIRep@modelflyingnz.org Vintage
placing the advertising. NZ Jet Turbine Allan Knox
Craig Abbott 04 238 2752
Printed by president@NZJMA.com aalan.j.knox@gmail.com
Fisherprint Ltd
Competitions Manager FPV & Multirotors
Kevin Botherway Mathew Wellington
mat_wellington@yahoo.co.nz
027 5570 470
CompMan@modelflyingnz.org
Recording Officer
Allan Knox
mfnz.recordingofficer@gmail.com
Administration/Membership Manager
Paul Clegg
The body Governing 021 986 566
Model Aeronautics in New Zealand members@modelflyingnz.org
Recognised by
The Royal New Zealand Aero Club (Inc)
New Zealand Representatives of the F.A.I
Page 2 Model Flying World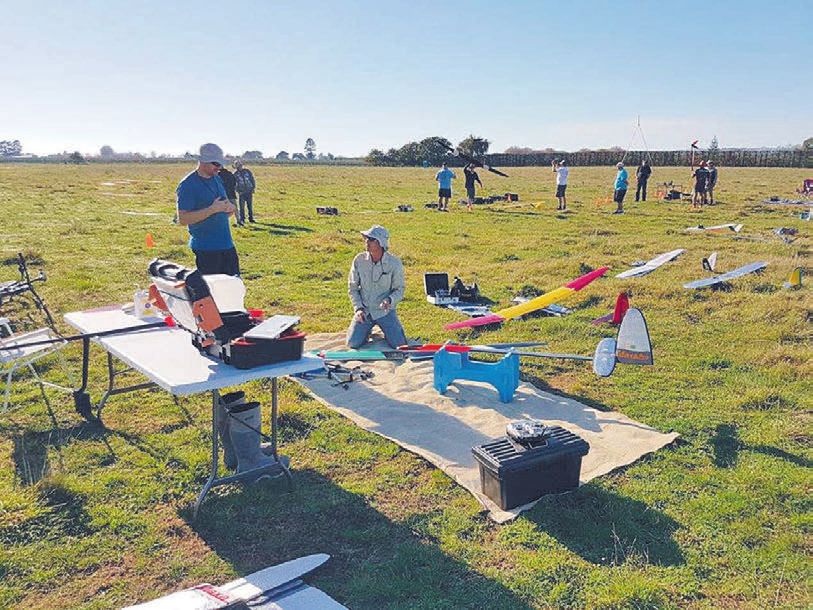
Council Report

Wings over Wairarapa has happened and a full report is elsewhere in         Annual General Meeting
the magazine. We had a fantastic MFNZ display with lots of activity.        You will see in the magazine the notice for the AGM. We have one new
We were visited by thousands of school children on the first day and         person seeking to join the Council. It is excellent to see Dave Griffin
after about 5 hours of intense activity a whole bunch of us knew why we     volunteering to be the NSI Rep. As well as being a very keen modeller,
hadn’t decided to be school teachers. From watching them use the two        his day job is as a pilot with Air NZ. Grateful thanks are due to Suetonia
radio control flight simulators, a couple of highlights came out. What a     Palmer for her term of office. She brought and very positive and
tiny fraction had a drone at home and how many, particularly girls          refreshing perspective to the Council but her demanding job means
demonstrated quick skills learning when handed the transmitter. By          that she has been unable to continue in the role.
having a big display we achieved two aims. To showcase the hobby to
current and future generations as well as demonstrating to the wider        Subscriptions
aviation community that we have a national organisation that is
                                                                            As we prepare next year’s budget we will have to evaluate the outcome
competent to manage the hobby without interference from a
                                                                            of the large rise in subscriptions last year and our expenses for 20/21.
Government driven by drone phobia.
                                                                            There was some discussion about fees for similar organisations and
                                                                            the following table was discovered:
Safety                                                                                NZ Airline Pilots Association $300 - $1000, salary related
Part of our continuous responsibility is to keep reminding members                    NZ Hang glider pilots Association $160
about safety. In previous years, we have averaged about 1 insurance                   Recreational Aircraft Association $150
claim each year and usually fairly close to the threshold created by our              Sport Flying NZ $100
$1000 premium excess. This year we have had three claims                              NZ Parachute Federation $100
submitted. Two have been processed and one rejected because the                       UAV NZ $220
flyers were not conforming to MFNZ procedures. These two incidents
involved models striking expensive stuff. One a car and the other a          Last year, our insurance premium went up by around $25,000 and
microlight, both resulted in damage costing around $5000 to repair.         costs for printing and mailing the magazine also increased significantly.
The question that we’d like everyone to consider is how well is our         Although we increased subscriptions by $13 last year, it is not enough
flying site arranged and used to eliminate these risks. At fullsize          to allow us to keep the accounts in the black, never mind accumulating
airshows, the golden rule is that no maneouvre should be made               any surplus. We will therefore, be recommending to the members that
towards the crowd line so that if something did go wrong the result         we increase subscriptions again this year by $7 for both Seniors and
would not be an aeroplane landing in the crowd. Take a look at your site    Families. This will make the renewal next year $95 and $100
and ask “if we had a control failure now, where would the bits land?” If    respectively.
the answer is “somewhere expensive”, take another look at how you
operate.                                                                    Disputes Tribunal
                                                                            Your Council has had to devote quite a bit of time in the early part of this
Whilst safety is the topic, perhaps even more important is personal
                                                                            year defending a charge of breach of contract raised by the previous
safety. We must never forget that we are users of equipment which can
                                                                            administrator at the Disputes Tribunal. The charge was heard on 24
cause serious injury. Most long time flyers will have the odd scar from a
                                                                            April and has been dismissed. A copy of the finding is available from the
propeller, but as we use more powerful motors it is easy to forget that a
                                                                            Secretary upon request.
spinning prop can amputate a finger or sever an artery. There has been
a recent incident where a model has struck another pilot on the head
casing him to be hospitalised. Every club should have a person in           Are you Average?
charge of making sure that we all follow the rules but we are all safety    According to a poll in UK, the average reader of the RCM&E magazine
officers responsible not only for ourselves but our fellow flyers. If you      is 55 years old, spends $1500 per year on the hobby and spends 3
see something dangerous. Speak out.                                         hours a week at the club.

                                    External Affairs
The way in which New Zealand develops aviation regulations is by            In New Zealand, we are free to create our own rules for Unmanned
watching what is happening overseas and, hopefully taking the best          Aircraft and we know that our CAA and the Ministry of Transport are
lessons to adopt. Rules for airlines have to keep in step with              watching closely developments overseas as they formulate their
international rules so that our planes are properly equipped to fly in       plans. We expect to hear some outline of their plans in the next few
other people’s airspace but where activity is contained locally, we can     months and are working as hard as possible to ensure that whatever
make our own rules. Drones continue to attract headlines In the UK          they devise has minimal effect on our members.
there is a desperate rush to be seen to be doing something in response
to the closure of an international airport (Gatwick) for three days just    There are two critical questions:
before Christmas. After 18 months of productive negotiation with the        Will a registration system improve safety and reduce disruption to
UKCAA, our sister organisation, the British Model Flying Association,       manned aviation?
thought that they were well placed. In late April, the UKCAA went
completely against previous agreements and decided that they would          Will answering a few questions on a smartphone produce a better
ignore the BMFA registration system, their membership register and          model aircraft pilot than our Wings Proficiency scheme?
their training standards. Instead, UK will introduce a system that will
require both drone flyers and model aircraft owners to take an online        We will keep you posted, but there may come a time when we email
competency test, obtain a registration number and pay a fee                 every member to ask you to take part in some kind of government
equivalent to $32 per year. Failure to comply is punishable by a $2000      consultation exercise. If that happens, it is vital that we have the
fine. There is no clue as to whether they will see policemen turning up      maximum possible response. If you would like to look at what is
at flying fields and checking that club members have got their                happening in UK and respond to their consultation request, it is open
registration details on their smart phones. Also, no hint as to whether     until June 7th. https://consultations.caa.co.uk/finance/drone-
such a system would have prevented Gatwick being disrupted.                 registration.

June 2019                                                                                                                                      Page 3
ANNUAL GENERAL MEETING
                    Butterfly Creek, Tom Pearce Drive, Near Auckland Airport
                    Saturday July 27th 2019 at 1pm
                    Free parking

  Agenda:                             Council Officers for 2018/19:                  How can I vote?
  1. Apologies for absence            1. President             Len Drabble         1.By attending in person.
  2. Roll call                        2. Secretary             Jonathan Shorer     2.By sending in the form in this
  3. Minutes of previous meeting      3. Treasurer             Fran Roulston         magazine electronically or surface
  4. Matters arising                  4. Competition Manager Kevin Botherway         mail to the Secretary.
  5. Presidents report                5. Northern North Island Chris Jackson       3.By using the form in this magazine
  6. Treasurers report                6. Central North Island  Scott Spooner         to nominate a proxy holder to vote on
  7. 2020/2021 Budget                 7. Southern North Island Graham Job            your behalf. All forms must be with
  8. Review of 2018/2019 accounts     8. Northern South Island Dave Griffin            the Secretary five (5) days before the
  9. Subscriptions for 2020/2021      9. Southern South Island Daniel Munro          meeting.
  10. Election of Council members
  11. Motions to be considered       At the time of publication of the magazine there are no contested positions on the
  12. General business               Council and no Notices of Motion. Proxy votes are needed for the purposes of
                                     establishing a quorum.

                PROXY VOTING FORM
    FOR THE MFNZ/NZMAA ANNUAL GENERAL MEETING
            BEING HELD ON JULY 27th 2019
 This form is to be with the Secretary not later than five (5) days prior to the day of the meeting

  To: Paul Clegg, Secretary of MFNZ/NZMAA
  (Postal & email address as per Web & Model Flying World)

  Dear Sir,

  I, (print full name)

  being member number                  of

  MFNZ/NZMAA hereby nominate (print name)

  to vote on my behalf at the MFNZ/NZMAA Annual General Meeting on 27.7.2019.

  Signed                                              Date

     I accept the nomination as proxy holder

     (print full name)

     Member No.            Signed                            Date              Contact number

Page 4                                                                                                  Model Flying World
ANNUAL GENERAL MEETING CANDIDATE PROFILE
                   David Griffin
                   Candidate for Northern South Island Representative
I have been flying RC since the mid 70's and early on I realised that      I have served on the CMAC Committee and more recently on our
most other forms of model flying were not as challenging as Soaring        MFNZ Soaring Committee for many years
and have largely built and flown Sailplanes for the last 30 years or so.
Over the years I have enjoyed Thermal and Slope flying, Scale and the      Aviation runs in the blood… I fly as a Captain with Air New Zealand
many forms of soaring competition flying. I have been NZ Soaring           flying the A320 based in Christchurch.
Champion several times and represented N Z at 2 world
championships. In the 90’s John Ensoll and I established Canterbury       I look forward to representing the interests of Northern South Island
Sailplanes bringing the fun of soaring to many new fliers.                 Clubs on our national MFNZ committee. I also hope to promote
                                                                          connections between our various flying interests and clubs.

                                      PROFICIENCY SCHEME
All Radio Control flyers should either hold a Wings qualification or be     Club Number & Name                     Members No Wings       Wings %
actively working towards it. There are plenty of competent flyers who      11 Dunedin M.A.C (INC)                    57      18          68.42%
have never got around to completing the process. To maintain the          34 RNZAF Base Auckland M A C              22      7           68.18%
credibility of the system, clubs must ensure that uptake is as good as    50 Thames Blackfeet M.A.C.                12      4           66.67%
possible. The target is not 100% completion as there are some non-        19 Kaiapoi M A C (INC)                    12      4           66.67%
flying members, some beginners and some non-radio members, but             77 Aucklandsoar                           12      4           66.67%
generally we expect the ratio to be over 80%. Please look at the          96 Kaipara Flats Model Flyers             6       2           66.67%
attached table as see how your club scores.                               15 Hamilton Model Aero Club (INC)         67      23          65.67%
                                                                          18 Model Flying Hawkes Bay Inc            78      27          65.38%
Club Number & Name                      Members No Wings      Wings %     59 Whakatane Model Aircraft Club          28      10          64.29%
69 McLeans Island Scale Flyers (INC)       50      4          92.00%      57 Wellington Radio Flyers (INC)          11      4           63.64%
61 Wigram Model Aero Club                  21      2          90.48%      13 Gisborne Model Aeroplane Club          20      8           60.00%
95 Kaitaia Flyers                          8       1          87.50%      49 Bush Fliers M A C                      5       2           60.00%
74 Open Skies Radio Flyers                 19      3          84.21%      70 Western Bay Model Flyers Inc           15      6           60.00%
17 Hawera M A C (INC)                      6       1          83.33%      94 Southern Lakes Model Fliers Club       10      4           60.00%
65 Mercury Bay Aero Club (INC)             17      3          82.35%      93 Waimak Radio Flyers                    24      10          58.33%
31 Papakura Manukau Aeromodellers Club 22          4          81.82%      22 Marlborough Associated Modellers (INC) 12      5           58.33%
14 Gore Model Aero Club (INC)              11      2          81.82%      56 Wellington M A C (INC)                 83      35          57.83%
23 Matamata-Piako M A C (Inc)              30      6          80.00%      26 North Shore M A C                      87      37          57.47%
55 Wanganui Aero Modellers Club            20      4          80.00%      88 Tuakau Model Aero Club                 16      7           56.25%
78 Kapiti Aeromodellers Club (INC)         75      16         78.67%      44 Tauranga M A C (INC)                   68      30          55.88%
35 Blenheim Model Aero Club                14      3          78.57%      25 New Plymouth M A C (INC)               38      17          55.26%
53 Wairarapa M A C                         23      5          78.26%      24 Nelson Model Aero Club (INC)           53      24          54.72%
58 Western Districts M A C                 9       2          77.78%      62 South Canterbury MAC (INC)             13      6           53.85%
67 Northern Helicopter Modellers Club      9       2          77.78%      64 Airsail Model Aviation Club            6       3           50.00%
43 Taupo Model Fliers (Inc)                30      7          76.67%      38 Feilding Model Flying Circle           6       3           50.00%
9 Christchurch M A C (INC)                 47      11         76.60%      27 Oamaru Power Model Aero Club (INC)     9       5           44.44%
10 Christchurch Radio Flyers Club (INC)    46      11         76.09%      37 Rotorua M A C (INC)                    25      14          44.00%
12 Egmont Modellers Club                   12      3          75.00%      39 South Otago M A C (INC)                16      9           43.75%
68 Springhill Aviation Club (INC)          23      6          73.91%      84 SAM 1928                               8       5           37.50%
71 Hibiscus Coast Radio Fliers             26      7          73.08%      4 Auckland Model Aero Club (INC)          17      11          35.29%
79 Ashhurst Model Fliers                   25      7          72.00%      80 Rural Flying Corps                     6       4           33.33%
30 Palmerston North Aeroneers (INC)        39      11         71.79%      54 Richard Pearse M A C                   12      8           33.33%
66 Palmerston R-C Model Flying Club        7       2          71.43%      60 Whangarei Model Aircraft Club (INC)    29      20          31.03%
72 Model Aviation Northland Inc            21      6          71.43%      76 The Whangarei Blue Goose Flying Group 12       9           25.00%
36 Highbrook Aero Modellers (INC)          68      21         69.12%      41 Tamaki Model Aircraft Club (INC)       16      12          25.00%
21 Levin Model Aeroplane Club (INC)        32      10         68.75%

June 2019                                                                                                                               Page 5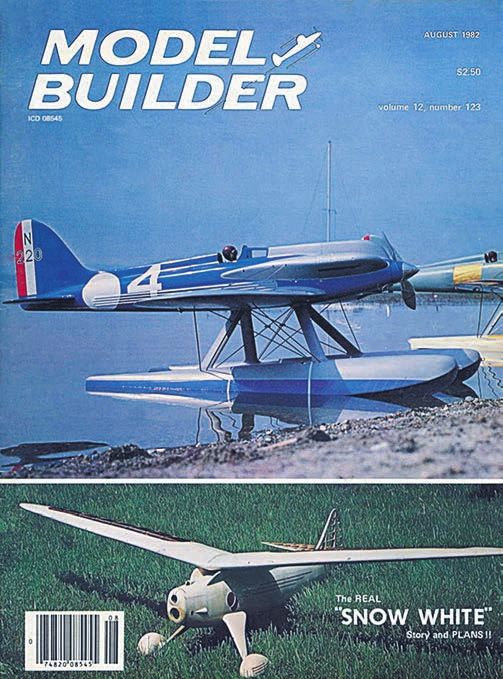
Rex Ashwell
                                          Like most of you, I like to         The initial version had lower support pillars and the bearings were fitted
                                          know where the C of G               in holes in the tray sides - you can see one in the first photo. Set up like
                                          (centre of gravity) of my           that the C of G is well above the pivot point and the jig is unstable and
                                          models is located and with          impossible to balance. The changes made bring the C of G below the
                                          my competition gliders I            pivot bearings and now it’s easy to use. Most of my gliders fit on this as
                                          really want to know that point      is, although I needed to make some packers to raise the Aloha due to
within a millimetre or so if I can. Also probably like most of you, I’ve      it’s skinny fuselage (the wings need to clear the pillars) and a Radian is
struggled to balance my models precariously on top of a couple of             a bit too wide to fit.
columns and to use a ruler to try to measure the distance from the
leading edge back to the point of balance. Devices for doing this vary
greatly in complexity and my version was at the crude end of the range
and consequently required a degree of finesse to come up with a
reasonably accurate figure.

When I realised that this “jig” was leaving dents in the lower wing
surface on the brand new glider I was building I decided there had to be
a better way to do this and, since I’m too frugal to splash out for the
whizzy electronic unit that’s currently on the market, I put some
thought into how the problem might be overcome. Because of the
damage to my new Aloha and previous experience with mylar covered
open structure wings, I figured it made more sense for my gliders to be
supported from the fuselage, so after scratching my noggin a bit and
digging around in my scrap wood bin, I came up with this idea:

                                                                              There is nothing sophisticated about this fixture and I’ve made
                                                                              alternative vee saddles out of some pink foam to adapt it for my DLGs.
                                                                              These work fine but need to be equal weights to keep the tray itself in
                                                                              balance - note the holes drilled in the wooden saddles to achieve this.
                                                                              I’ve found it handy to have a couple of wedges to fit under the tray
                                                                              which hold it steady should you want to make an adjustment on the
                                                                              model, like changing battery types for instance. That's a big plus over
                                                                              what I was using before as I had to lift the model down before I could
                                                                              touch it - this is like a small work stand.

                                                                              I make no excuses for he rough looking woodwork but this is a
                                                                              prototype which only took a couple of hours to cobble together and
                                                                              there’s been no attempt to make it aesthetically pleasing. Perhaps I’ll
                                                                              find time to make something a bit fancier now that I know the design
                                                                              works - it’s another round-tuit job though so may never happen. There
As you can see it’s a tray hung from support pillars using a couple of        you have it, a simple device that can be built out of scraps and never
bolts and two ball bearings. The idea is that you slide the model along       needs new batteries.
the tray until it’s in balance then run the vertical up against the leading
edge and read off the C of G on the scale. It’s simple and works well for
the high winged gliders that I normally fly. This version is compact,
important in a small workshop like mine, but easily handles big(ish)
models like the 3.2 metre Muller Esprit in the photo below.

Page 6                                                                                                                           Model Flying World
Another Fire Risk
                          Proven True
   RISK OF                David Thornley
     FIRE

In the Dec MFW, there was a report
of a fire nearly being caused by
sunlight shining through F P V
goggles. Here is another proven
risk.
Have you ever read about the risk of a workshop
fire being caused by sunlight shining through a
work bench mounted magnifying glass, which
by coincidence happened to be focused on
inflammable material?

I have, and dismissed it as being so improbable
it would never happen. Well now I have changed
my mind.

One of our club members returned from the
flying field this summer and opened his shed
workshop to be greeted with a strong smell of      had shone through the window and lens and set the nearby shipping box from an internet
burning. After the initial moments of panic he     vendor on fire. By a miracle nothing in the box caught alight and the fire did not spread.
found the box in the picture on his work bench.
Nearby was one of those "third hand" holding       So there you are, there is a real risk from this scenario. In future this modeller will be more
things with a built in magnifying glass. The sun   careful.

June 2019                                                                                                                                Page 7
FREE FLIGHT CATAPULT GLIDERS                                                                          Graham
                                                                                                       Job

Sowing the seeds for future aeromodellers
After seeing a competition series advertised in the last “Fliers World” for free flight catapult gliders I
figured this was something my son and I could have a go at. I asked a couple of other family members if
their kids would like to join in, and was mildly surprised when they agreed but I had just put it out there
as something new to try.
I asked Graham Lovejoy for suggestions on a good design and he recommended the tried and
true Papanui Tavern, reduced in size for the kids with a little extra past the tail to hang on to. I
printed the plans, ordered some wood and arranged a Saturday with three kids in the
workshop…

We had our 8-year-old niece, 10 year old nephew and 5 year old son. It was interesting to watch
where each one’s skills were the strongest. Our niece was far better at
cutting out the parts with a knife while our nephew was patient and had
a good eye for sanding the wing section, he really seemed to
understand what we were working towards and our son who has made
gliders before and already knew what he was doing, sort of. While they
sanded, I cut the hardwood fuselages on the scroll saw.

With the help of some CA and kicker we had all three gliders finished by
lunchtime. There is a large field near home, so we got pies, hot chips
and ate while launching gliders. We nearly lost one on the supermarket
roof near the park and another was averaging over 30 seconds per
flight!

In the end it was a thoroughly enjoyable day for me introducing some
kids to aeromodelling that would never have thought twice about it
before. Our nephew said it was, “Really satisfying watching something
I made flying around”. I found it equally satisfying seeing how much fun
these kids were having, and will probably do it again sometime.
Unfortunately my work commitments meant we never made it to the
competitions but we might have a couple of family rounds instead,
have to finish my one too!

Page 8                                                                                                          Model Flying World
Bruce Pickering Following my trend to make unusual agricultural aircraft, after the Airtruk I started on the Auster B8 Agricola. Produced in the 1950’s primarily for the New Zealand market, only 9 were built before production ceased. It could not compete with the bigger Fletcher—with its greater load capacity—which had appeared a few months earlier. Today only one flying Agricola remains in the world, ZK-BXO, owned by Griffin Ag Air, in Palmerston North. Auster employed some rather innovative ideas with this design. To reduce pilot workload the flaps and hopper gates were hydraulic. The pilot sits above the hopper, making it safer in a crash. The 4.4 metre track undercarriage makes ground handling easy. Flat cockpit glazing could be cut from standard sheets, without having to shape it. Legs, wheels and elevators were interchangeable, lessening capital tied up in spares, and removing worry whether it is right or left, as can be seen on BXO—the trailing link on the left hand oleo faces forward! Auster opted for fabric covering in the belief that it resisted damage from fertilizer better than aluminium and that it was easy to repair. Apparently they also had the butyrate dope specially formulated to resist the corrosive effects of fertilizer. Double split-flaps, one either side of the hopper in the centre section, consist of a main flap having an auxiliary flap on its trailing edge. For take-off the combined flap is lowered through 25 deg, giving maximum lift. To provide the additional high drag required for landing the flap is lowered to 30 deg, and the auxiliary flap depresses a further 45 deg. Engine cooling is automatic—being proportional to engine power. A “Jet Cooling” system has 3 exhaust pipes each side led into large- diameter augmentor tubes, which act as venturis. The exhaust creates a low pressure, which sucks air into the front of the engine and out through the augmentor tubes. This provided the right amount of cooling air, even when the aircraft was idling while being loaded. Control cables to the rudder and elevators were mounted externally for ease of maintenance. The standard factory colour scheme was silver and green—as one pilot noted, “These are most effective camouflage colours”—making it very difficult to spot other aircraft from above. Fortunately, although BXO is now painted original factory colours, I found a photo of it in yellow and green when it was operated by Associated Farmers. Auster claimed that the Agricola’s direct aircraft operating costs were as low as £6.16s.4d ($13.63) per hour, or 2s-2½d (22c) per acre when topdressing. Pilots reported that it was a “delight to fly, very responsive by Auster. Covering is Koverall, painted with Dulon acrylic lacquer, to the controls, especially ailerons.” Hal Griffin also says that it is much over coated with Dulon clear-coat. Finished weight is 7.5kg, giving a more comfortable to sit in than the Fletcher. wing loading of 28 oz/sq ft. So, armed with all of the above, how could anyone resist the urge to How does it fly? Well, just like the real one. Hal Griffin displays the build an Agricola? I decided on a wingspan of 2440mm (96 in), with the aircraft at various air shows and skilfully shows off the aircraft’s two outer panels separated from the centre section. I also thought that handling ability. The model is easy to handle, very manoeuvrable in the would be big enough for the 20cc gas engine I already had. It actually air and the wide track makes it stable on the ground. The 20cc engine is was very easy and inexpensive to build; the fuselage is mostly just more than enough power, with lift off at about 75% throttle; straight and sticks and I made the wing from foam, veneered with 1.5mm wood up level flight around 40%. A hopper full of fertilizer would really add to its to the main spar, with “cap strips” to simulate the trailing edge ribs. It realism. took a while to figure out how to articulate the flaps so that the secondary flap would extend a further 45 degrees, but after I had made (This article originally appeared in Flight Lines Bulletin, of Hamilton them I was rather chuffed to see that it was exactly the way it was done MAC) June 2019 Page 9
FIBREGLASSING & PAINTING                                                   Arjen Vissor
                                                                                                                     Highbrook Aero Modellers

                                                                  with water based products

Owner with captured butcher birds. Photo taken by Andy Dodson
(NPMAC Photos)

I have purchased the Top Flite FW-190 from Steve Wilson at Firebrand
back in 2016. At the time Steve helped me to make the FW-190 look
more scale and authentic with some great tips on drawing panel lines,
roughing up the plastic covering and then spraying the overall plane
with a 2 pot matt clear coat to take the shine off and increase the
durability. This was a great first step to make the model more scale and
more unique.
                                                                             Fuselage fibreglassed and filled with putty
I have very much enjoyed flying the FW-190 with the Saito 84 Radial
engine for more than 50 flights. It is a beautiful model to fly and it looks
and sounds amazing in the sky. I was fortunate enough to win the
WW2 category in 2017 at the Warbirds over Awatoto with the stock
model. So as a stock model it is certainly a beautiful and well sorted
model. It is very robust. But I always had the plan of taking the plastic
covering off and fiber glassing and painting the aircraft.

Then one winter’s day in 2017 when our field at Highbrook in Auckland
was nice and soggy, on landing, one of the wheels dug in and the plane
ground looped and damaged the wingtips. This was the incentive I
needed to start my recovering project.

Approach
I wanted to use all water-based products to recover the FW-190. This
includes using water based resins and paints. This is for health (fumes)     Tail feathers fibreglassed
reasons but also the environment. So this was going to be a bit of an
experiment to see if it was possible and if it was going to be durable. I
spoke to Gwyn Avenell from Avetek and he said to try a new product
from the UK he has been distributing called Deluxe Eze-Kote. This is a
water based type polyurethane specifically designed for modeling and
fiberglass. It does not need mixing and comes ready to go. This
product is used instead of polyester or epoxy to cover the fiberglass. It
is also used to seal the balsa. It is very easy to use, and there are some
videos that shows how to use it: https://youtu.be/yP05qv3QtUk or just
search Deluxe Eze-Kote on Youtube.

For paints, I used regular Dulux water based household paints. For
primer I used Dulux Acrylic Sealer Undercoat.

Colours
Gwyn also helped me with choosing a paint scheme for my FW-190. I
choose a captured butcherbird as the colour scheme. The RAF
captured a number of FW-190 during the Second World War to learn a           Painting done, ready for graphics

Page 10                                                                                                                      Model Flying World
thing or two about them and why they were so successful. In order to fly
them and not get shot down by their own troops, they painted them in
RAF colours, with a yellow underneath. I thought this would make for
an interesting and unusual colour scheme.
Adam Butler helped me in matching the colours to the Tamiya colour
pots. With these Tamiya colour pots, I went to a Dulux professional
store to get them to mix up the colours. If you go to the Dulux shop
between 10 am and 3pm, they are usually not busy and will help you
mix the colours. I needed 3 colours and a test pot was more than
enough. Each test pot is about $8 so for $24 I had my three colours.
For the finish I used a water based flooring based polyurethane from
Cabots. This was sprayed on.
For the primer I mixed some micro balloons (you can also use talcum
powder) into the primer paint to make it thicker and then used a
paintbrush to brush it on. It does not matter that there are streaks as
you are going to sand this off anyway. Make sure the primer is nice and
hard before you start sanding. I would leave it for a week so it gets nice
and hard. The harder the better. Making the graphics look weathered
The process:
I peeled and striped off all of the plastic and gave everything a good
sanding. The FW-190 is fully covered in balsa (except for elevator) and
so the surface was ready for fibreglassing. The balsa has to be sealed
and the Deluxe Eze-Kote can be used for this. Just brush it on with a
brush. It dries very fast and then give it another light sand and it is
ready for the fiberglass.
Cut out the ¼ ounce cloth about 1 inch bigger than the size of the area
you are covering and then with a brush paint the Eze-Kote onto the
fiberglass. Make sure you spread it out nice and evenly. You can paint
out all the wrinkles with the brush. You can use a credit card to scrap off
any excess. Once dried, then you can use sandpaper to trim away the
excess cloth around the edges. Very easy to do. Check our the earlier
listed Youtube video if you want to see how this is done. Very lightly
sand and then apply a second cote of Eze-Kote with a brush. Lightly
sand then apply a third and final coat of Eze-Kote. All in all I used 3
coats. After it has dried sand with wet and dried sandpaper 300 grit. Do
not sand too much as it is easy to sand through the to the balsa. Be FW-190 In action. Photo taken by Andy Dodson (NPMAC Photos)
very careful. This is not like epoxy resin which goes extremely hard
and difficult to sand. This is very easy to sand and will not need a lot of Top Flite are now selling some of their giant warbird kits as Ready To
sanding. You will find that the fiberglass will still need filling. This is Cover (RTC) which comes without the plastic covering. I particularly
where the Dulux primer paint mixed with micro balloons comes in. like the look of the Hellcat, so who knows what the future holds.
Make a nice think consistency, like yoghurt and paint it on with a brush. Contact Steve Wilson at Firebrand if you are interested in one of these.
Don’t worry about any paint brush streaks. You will sand all that out. It
is important that you leave it to dry properly (I suggest a week) so that I am very glad that I have done this. I am very pleased with the results.
the primer paint is nice and hard before sanding. Then sand and No more plastic covering to deal with that goes all wrinkly in the sun.
smooth with sand paper and wet and dry to a smooth finish for spray Because I have covered the model myself (but still an ARF) I can
painting. At this stage you will see some imperfections and they can be compete in the new scale competition class F4H.
filled by using putty. I used an automotive putty called Pro form Glazing
and Spot putty. This is not the lightest putty, but it dries fast and is not The paint scheme is very unique and I enjoy the bewildered look from
brittle. You can use it for relatively large areas. people who recognize the British Air force colours but then get
confused because it is on a German war plane.
Now it is time for spraying. I am new to spraying paints so Stewart
Irvine, who flies the beautiful jets, gave me some very good advice. He Summary
mixes the paint with 50% EasyFlow and 50% Bar’s Bugs Windscreen This is a durable and safe way to recover your ARF in fiberglass. No
Cleaner until it is a watery consistency. I wanted a weather look and so nasty smells and fumes. It was an experiment, but it has proven
the spraying took some time as I am new to all of this. I used the successful so I am doing it on my current project as well. This is a
Toolshed spray gun touch-up gravity feed hvlp. This has a nozzle size Frisch Wilga ¼ scale model. The body is fiberglass but the wings and
of 1mm. tailfeathers are all balsa which I will fiberglass using the same method
as described here. Thanks to Avetek for offering Ezi-Kote to the NZ
After painting I added the graphics. The graphics can be ordered from market.
Callie Graphics in the US. This is another tip from Steward Irvine. Just
send her the photos and the scale and she does all the rest including Summary of materials:
matching the colours. The graphics are outstanding and does not Delux Eze-Kote from aveteknz.com
include any transparent parts like some of the cheaper graphics use. I Topflite FW-190 from firebrandaerorc.co.nz
paid US$37 total including shipping. Her website is www.callie- Saito Radial from firebrandaerorc.co.nz
graphics.com. Floetrol Acrylic Paint conditioner from Bunnings
Cabot's Cabothane Clear Matt Water Based Polyurethane from
For finish, I used a water based polyurethane for wooden floors. This is Bunnings
a one pot finish and I sprayed it on. I used Cabot's Cabothane Clear Bar’s Bugs Windscreen Cleaner from any auto shop or garage
Matt Water Based Polyurethane. Pro form Glazing and Spot putty from wyatt.co.nz
¼ ounce fiberglass cloth from hobby shop
I forgot to weigh my model before I did this work, so I do not know how Dulux water based paint wash&wear low sheen
much weight I added. But I can say that I have not noticed any real Dulux acrylic sealer undercoat
difference between flying before and after. Toolshed spray gun touch-up gravity feed hvlp. Code TSAHV2
Graphics from www.callie-graphics.com
June 2019 Page 11SNOW WHITE
20 years in the making
David Thornley
Visitors to the Clareville Nats in 2018 will surely have noticed the large partly built
vintage model that was for sale and languishing in the upstairs control room. I gazed
at the model over the Nats and kept trying to convince myself that I really didn't need
it, but on the last day Jonathon Shorer put on his salesman hat and my lowball offer
of $35 was accepted. Fortunately the whole thing including the 8ft, one piece wing
just squeezed in my car, together with my other Nats models for the trip home.
It turned out to be a 1937 USA design by Joe Raspante called Snow White. The
design featured an 8ft span, highly under cambered elliptical wing, a really shapely
balsa planked fuselage and engine cowl, an equally shapely empennage and a fully
faired undercarriage complete with vintage type spats. In its day it won a number of
the beauty and flying contests that were held in those days. As found at the 2018 Nats. Note the strange offset engine
mounts. Couldn't work out the logic in those. The awful
The model came to be at the Nats because it was in the estate of John Selby, who in covering doesn't luck too bad in this shot!
turn had obtained it from the estate of Ivan Treen. I think Ivan may have been the
original builder because his name was on the envelope of plans (that were with the
model) when they were posted from the Sates in 1998 for the sum of $25 by the USA
Model Builder magazine plan shop.
Once I got home, my intention was to finish it slowly, as time and other models
allowed. An internet search found some pics and comments from people who had
built one to the Model Builder plans. The pictures really did show off the beauty of the
art deco lines and design, and convinced me that instead of leaving it on my top shelf
to become one of MY estate sales, I really should finish it, and get it flying.
The internet also threw up an interesting explanation of how the plans came into
existence. During the 1970's there had developed a dispute in the USA over who
had created the original model, so in August 1982 the USA Model Builder magazine
published an article entitled "The Real Snow White". The article author had tracked
down and spent days with Joe Raspante (who had long since given up modeling) to
establish the facts in the design. Joe told the build story, and after saying that no
permanent plans had ever been made, the original model was given to the author by
Joe, who was letting it rot in his attic.
Model Builder was determined to create a permanent record of the model and the Re-worked engine mounts mark 1, with shiny new Saito. Note
author did this by using acetone or similar, to dissolve ALL the balsa cement joints the plug in U/C.
thus separating the parts. He then drew the structure and separately detailed the
pieces. This took five years! The "Real" part of the article title came about because
some other person who had helped Joe in the original construction was selling
smaller size kits of the design and claiming they were his own work. The American
modeling community was of course incensed by this, hence the article which put the
history right, and confirmed Joe as the original designer.
The article provided some useful information to help me finish the model, in
particular advice on CG location and engine sizing.
When I bought it, I thought it would be the perfect plane to use my 0.6cu.in Ohlsson
and Rice Sparkie that I had bought in moment of madness at a TMAC auction 4
years prior. Unfortunately the article showed that Joe Raspante had started with a
0.6cuin engine and found that a 0.9cu.in was needed for reasonable flight
performance. Not surprising, when one considers the draggy airfoil section, the
large faired undercarriage and the enormous cross-sectional area of the fuselage.
Re-worked engine mounts, mark2, after the first attempt the
I decided that a modern, second hand 0.8cu.in four stroke would be about right and balance the model. Remote glow connector needs relocating
set about getting a used one. This proved impractical, no one in the USA would ship to the non muffler side!
Page 12 Model Flying Worldone to NZ and there were no second hand ones available locally. Fortunately a local
vendor had a new Saito FA82 in stock at a very reasonable price so I jumped at that.
Now I had a $35 model with an engine worth many hundreds of dollars, however the
purchase did allow me to get ahead and rework the very strange offset engine
mounting that had been built in the model, also make a fibreglass cowl using the lost
foam method.
The model was strange in that the fuselage was nicely made and planked, the
wings although far from perfect were reasonably made and fair, but the empennage
was a real mess. It was almost as if the original builder had started with the
fuselage, built the wings and then either lost patience or threw the tail feathers
together in a desperate attempt to finish it (maybe before he died!)
I decided to first fix the tailplane unit first which is rubber banded to the fuselage in
typical vintage fashion. The existing silk covering was stripped off and the whole
thing sanded and built up as needed to give a reasonably fair set of surfaces. The
two piece elevators and two piece rudders (one above and one below) were then
properly hinged and linked to give a good working assembly. I also braced the Undercarriage foam blanks before fibreglassing
bottom rudder post to prevent it being accidentally snapped off when the assembly
was separate from the fuselage. This alone took three months of intense work.
Attention then turned to the wings. These had also been silked and doped and whist
being far from fair I decided that they didn't warrant a complete strip down so I
cleaned them up and sealed the ragged edges ready for painting. With hindsight, I
should have paid more attention to them.
The original fuselage had a number of hatches to access the engine ignition and
batteries. With compact modern RC gear, I only needed one hatch, so a shaped
foam plug with glass fibre facing was made for the fuselage bottom and the other
hatches planked over. The tailplane mounting was then altered to be properly
functional and after filling and fairing the planking, a reasonable surface was ready
for painting.
Anyone want a short cowl? Not now needed.
The original wire, plug in U/C was then reworked and corrected so that the model
stood properly on some nice 4ins balloon tire wheels donated by friend. There was
no way to secure each side of the plug in U/C to prevent them coming away from
fuselage and nothing shown on the plans. A way of securing the two sides had to be
devised. This was eventually achieved by making wire loops that were connected to
the inside of each U/C leg. A cord tie (Not visible with the model rigged) then links
each opposite loop and after pulling tight it also holds the bottom hatch in place.
Plans and pictures of finished Snow White models show that the whole thing is set
off by the attractive U/C fairing and wheel spats. Although these do nothing to
improve the flying performance they simply had to be included if the model was to
look properly finished. They were therefore carved in PS foam, covered in
glassfibre and then the foam dissolved out in the typical way for lost foam
construction. The loose one piece U.C fairing around the wire legs was then
Tail assembly before covering. The two part fin AND
secured by jamming some foam rubber between the wire and the glassfibre fairing.
elevators gave some build tribulations.
In this way the legs could flex inside the fairing. Not very vintage, but it works, and
probably better than the 1937 solid carved balsa design.
Normally I lose patience when painting a model and just slap on enamel with a
brush. For the Snow White I decided that maybe a bit more effort was warranted,
and so I invested in a $35 spray gun from Super Cheap. To ensure that the paint on
the wing surfaces was flexible I decided to use water based material. Resene high
build primer was therefore brush applied and this sanded down to a reasonably
smooth surface for a sprayed enamel finish coat. The great thing with this system
was that the doped silk wing covering tightened nicely as the primer dried. The
overall finish came out much better than any of my previous modeling efforts. The
empendage was covered in white shrink film.
All the radio gear was installed and the model balanced. In 1937 it seems that the These balsa models make for a messy workshop.
way model CG's were set up was to slide the wing back and forwards on the
fuselage top rails until the best location was determined, then fix the dowels and
rubber band them on. I tried this and discovered that the model CG was about
35mm too far back. This was obviously due to the much lighter modern engine and
no ignition accessories. All the radio gear was then re-located forward but there was
no way that I could get a reasonable balance and I certainly wasn't going to load her
with lead.
There was nothing that could be done apart from going right back and re-working
the engine mount again to give a 35mm increase in nose moment. The battery was
also mounted in the engine extension box and a second cowl made and finished.
Another two months work, but after this the model did balance properly and it was
finally made ready for the maiden flight.
Anyone who flies "proper" vintage models will know that the wings and tail are
usually rubber banded on. The traditional way is to use rings of car or truck inner Underside hatch, I'll Bet Joe never used glass fibre and EPS.
June 2019 Page 13Finished and ready to fly
tube. These are becoming increasingly scarce and having seen a
couple of club models lose wings in mid flight due to standard rubber
bands letting go, I decided something better and more stylish was
needed for the 15inch wing chord of Snow White. 6mm dia white shock
cord formed into a loop, the ends overlapped, then stitched and bound
with white thread and finally sealed with CA produced an elastic band
that has 30plus individual strands and a nice protective woven cover.
The model graphics loosely followed the original Raspante ones
with a friend creating some nice lettering from the internet and
printing on water transfer film.
The maiden flight was successful except that the model
would barely turn right and was a real handful to fly, not at all
the relaxed flying that I had hoped for. It seemed very touchy
in the roll but would not turn easily and suddenly dropped a
wing when the rudder was pushed over to force the turn. In
short she was a dog to fly.
A knowledgeable club member who was able to calmly watch
the model whilst I was struggling to fly it commented that it
was flying sideways as it went down the strip. Careful Model Builder
examination on the ground showed that something was front cover.
Those were the
definitely amiss with the wing alignment. Attempts to mitigate the fault
days!
with TE wash in wedges (on the washed out wing) and tip weights etc
proved totally unsuccessful and after nearly writing her off during a
cross wind landing I decided she had to be properly dealt to.
I eventually made a heavy and rigid holding fixture for the wing centre
so that it could be mounted upside down. Then using a digital level I
measured each half and discovered that one wing had wash in and the
other the same amount of twist, but washed out. No wonder she was
tricky to fly! To fix the problem, I stripped the underside covering off the
washed in wing, saturated the structure with water, then twisted it back
using weights and a moment arm to produce wash out that matched
the other side and left it to dry. The tip needed removal of its balsa
sheeting and a repeat of the process. After re-bonding a few loosened
joints and improving the fairness of the rib surfaces the wing relaxing to fly and turn as a competition vintage model, at least it was
incidences at least matched the other side. Additional vertical web enjoyable.
pieces were also added to the spar and the LE sheeting (which
strangely does not reach back to the spar) to form proper torsion boxes Once in the air, the throttle is only about 25% open to cruise around
and thus lock in the new twist. and she must be kept moving or she will still tend to tip stall. I doubt that
she will thermal, but she does look good in the air and on the ground.
The covering was then reinstated with Solartex and painted to match
the other wing half. All this happened a week before the NI vintage Beauty lies in the eye of the beholder, I reckon it's the most beautiful
meeting at Kapiti. I took the model down and flew her again and flying machine I have ever seen and definitely worth the effort
success! She flew as I had hoped for and although nowhere near as expended.
Page 14 Model Flying WorldViper....
yes, but why?
Rene Redmond
To follow on from the Wings over Wairarapa report elsewhere in
the magazine. I thought it may be of some interest as to how one
acquires a Rolls Royce jet engine and the simple answer is….
During one of my senior moments I decided it would be a “shits n
giggles” exercise to obtain a jet engine (full size) to have as a “man The Tierney APU below
cave” item and relive a bit of past life experience. rated at 150HP drives a
generator to produce
I have been on the lookout for some years for a RR Viper 535 engine 28v DC @ 350 amps
used for starting
used in the BAC 167 Strikemaster because of time spent overhauling
aircraft engines and
them during my RNZAF career. As these engines are still in service providing ground
flying civilian restored aircraft the availability is limited, with owners power during main
choosing to keep spare engines even time expired ones for spares. engine
Late 2015 I finally gave up on the 535 thinking it just wasn’t going to
happen so instead settled on a little Tierney TT-10 APU (auxiliary
power unit) http://jetpropulsion.co.uk/jet-engine-projects/tiernay-tt10-
turbine-engine sourced after a few months searching on EBay. The
APU was extremely low hours and came out of Phoenix AZ having
been used for starting UH-1’s / UH60’s plus a range of other USAF
aircraft.
Then “murphy” struck…whilst the APU was on a slow boat from Long
Beach LA I got a text from a well-known Christchurch jet modeller
telling me a Viper 601 3800LB thrust (uprated 535) had been removed
from an ex Reno raced L29 now based in Wanaka and was sitting on its
nose in a hanger corner up for grabs….buggar!
As background the RR Viper series engine was originally designed for
Oh well only one thing for it, do a deal with the Aussy owner, buy it sight the Australian Jindivik target drone in the 50’s. It went on to have a long
unseen, drive to Wanaka with a trailer and pick it up all within the service career in aircraft such as Jet Provost, Strikemaster, Aermacchi
week…to easy! 339/326 amongst others and the very successful Hawker Siddley
HS125 passenger aircraft which is where my engine originated from
And that’s exactly what Tarquin, Joyce and I did back in late Feb 2016! starting life in March 1973.
Being a considerate father-in-law I thought it would be nice to show
Tarqy the West Coast on the way home so came via Haast Pass…well The L29 owner did tell me that rumour has it my engine came off the
that was a waste of time as Tarq had his head stuck in the Rolls Royce port side of a HS125 owned by the notorious Panamanian dictator
engine manuals all the way to Blenheim! General Noriega…but that’s a whole nuther story…
The British Aerospace 125 is a twin-engine mid-size corporate jet.
Originally developed by de Havilland and initially designated as the DH125
Taking a break from engine loading Brassed up with the “full 9 yards”! Jet Dragon, it entered production as the Hawker Siddeley HS.125 and was
For real! known in the RAF as the Dominie. Powered by two rear mounted RR Viper
power plants.
As an aside Reno organisers decided in 2011 that the L29 & L39 raced
at Reno went too fast (really) so banned Viper jet power participation. We knew the engine had some minor compressor blade damage (main
The now Wanaka based L29 that was home to my engine has since reason for removal from L29) missing starter and Ignition units but
been fitted with a de-rated Viper 522, the 601 was considered apart from that complete… in running order, well almost! A couple of ex
overpowered as it was to be used for tourist flights around the region. Harrier jump jet ignitor units were tracked down from Everett Aero a UK
Sadly CAA regulations has not permitted this and the aircraft has been based aircraft wrecker’s yard and a starter/generator was also sourced
mothballed! from the same place. Some broken NGV segments were found when
June 2019 Page 15we inspected the hot end but after a bit of research and a few emails a
very kind engine overhaul shop in Indiana USA sent me 6 serviceable
replacements…for the price of postage! .. How good is that!
Completed engine with Wren 44 alongside. The 601 rotates max speed
Once home with our new toy an ex air force mate welded up a nice 13,760 RPM and the Wren 44 does 195,000, guess which is loudest…
stand we designed and Tarq machined up some mounting trunnions to
allow securing to the stand. We made everything robust because we
plan getting her running to Idle Only…well maybe a touch more. It was
about this time we realised this APU still in transit was actually going to
come in very useful starting the Viper so not a wasted exercise after all!
1st Stage turbine wheel exposed
after removing 2nd stage wheel and
NGV's (Nozzle guide vanes) for
repair.
Tarquin explains gas turbine theory 101 to Laurie Gudsall owner of the
Allison V12 in the background...
Top case removed
giving access to
compressor rotor for
minor blade repair
done with fine Riffler
files.
Houston………..we have a start!
Ta r q fi t t i n g f u e l
system blanking
plugs.
Never short of a crowd when we run the beast!
The end result after 18 months of rebuild is a running RR Viper engine
that is now attracting a range of interest from air show promoters to
vintage car clubs! A fitting tribute to a fine piece of Rolls Royce
To p c o m p r e s s o r engineering and history.
case half showing
stator assy
Was it all worth it? Hell yes, would we do it again? Hell no…or possibly
To spare those that have glazed over by now the story with pictures maybe.
continues on the following forum for those interested in the techy side
and seeing more of the “guts” of a multi stage axial flow gas turbine PS: we recently rolled out the door another Viper this time a 540 series
engine.http://jetandturbineowners.proboards.com/thread/828/l29- in now running condition for a Nelson based owner…guess we couldn’t
reno-raced-viper-601 resist!
Page 16 Model Flying WorldREADY TO F
ARFS
ALMOST
LY K
ITS
What’s the best way to go?
Steve Wilson
FirebrandAeroRC
Introduction
Some traditional builders may knock Almost Ready to Fly models
(ARF’s) but the reality is ARF’s make up the vast majority of new
models sold these days and have enabled a huge number of
people who otherwise might not have become involved in RC
aircraft with the ability to participate.
ARF’s come in all sizes from 40 size trainers to 100cc plus scale
models.
Blackhorse Models are producing some excellent mid-
There are literally hundreds of ARF’s to choose from by the larger price point ARF’s. Pictured is a friend and customers
manufacturers like Topflite, Seagull, VQ, Great Planes, Hangar 9, pride & joy, his Blackhorse 30/40cc Chipmunk. Note the
addition of Unilights & custom SAAF markings which
Blackhorse & Phoenix, and several more from small niche players really set it off
such as Legacy Aviation, Sebart, Premier Aircraft & TopModel.
Brands & Manufacturers
Most ARF’s are produced in China or Vietnam using traditional
construction techniques and film covering. The same factory that
produce models for Seagull (Vietnam), may also produce ARF’s for
Graupner (German) and Hangar 9 (USA) but it is a mistake to
conclude the end product is therefore the same.
Most ARF’s are well finished in Monokote, Oracover or Ultracote and
even the lower cost models look pretty good, indeed its not hard to see
why some people may conclude they are all the same. But it’s what we TopModel™ specialise in
can’t see or may have limited appreciation of, that we need to consider. power gilders and are
some of the best quality
ARF’s we have seen. The
I don’t have any official stats but I think it’s fair to say low cost brands TM Sport is $695 & the
such as Seagull have dominated ARF sales both globally and in NZ Malabu $795
over the last few years. Well respected brands that many of us grew
up with and still rate highly have really struggled as buyers flock to
lower price point options. One only has to look at the number of
discontinued models by Hangar 9, Topflite & Great Planes and the
permanent closure of a number of other manufacturers such as
Aeroworks to see the pressure these brands have been under.
The “Price” Verses “Quality” Trade Off
The obvious question is, are the more expensive brands worth the
premium price? The answer of course depends on one’s perspective,
available budget and definition of value. I use the term “quality” at
Firebrand often, but what does quality actually mean when talking
about ARF’s? The Topflite 60 Corsair, AT6 Harvard & P47 have all recently been
For me quality means: discontinued. FirebrandAeroRC secured several of each before it was to
1. The ARF assembles easily. Bits fit as they should and the build is late but is now down to one or two of each left in stock then that’s that.
free of frustration; Real shame!
June 2019 Page 172. The ARF flies really well & has impeccable manners in the air,
thereby helping me look remotely competent;
3. The ARF is robust. The structural design and material used can
handle my frequent less than perfect landings;
4. The ARF is durable. I spend a lot of time trying to do a good job
finishing my models, and use good motors, electronics &
accessories. I therefore want a model that still looks good when it
is well past new.
This means I personally favour the more expensive brands because
they tend to meet my quality expectations and therefore represent
value to me. Price is of course a factor, but it doesn’t sit ahead of
quality, indeed it is a secondary consideration.
Seagull’s Stuka, Lysander and Mosquito are all models Firebrand has Premier Aircrafts Mamba 70 is
chosen to stock in the past because they are unique, and represent a amazing. At about $2200 its
lot of model for the money. not going to be for everyone,
but it is without doubt a
p r e m i u m q u a l i t y A R F.
The trade-off is owners of these lower cost models have to accept that Stunning, and in the hands of
catching a wing tip on take-off or a poorly timed flare on landing may a capable pilot is a serious 3D
end in structural damage, whereas the owner of a more durable ARF model. However, that does
may get away with a similar case of “dumb thumbs”. not mean that some lower
price point models are not
great “bang for bucks”.
Increasing Durability of Lower Price Point ARF’s
While FirebrandAeroRC stocks primarily the more expensive brands Seagulls 80” Mosquito. Only about $750 which is quite extraordinary.
like Topflite, Great Planes, Hangar 9, Blackhorse, Legacy Aviation, Anyone who has built a Mosquito from plans will appreciate this fully!
Premier Aircraft etc. the reality is the bigger market is lower price point
options such as Seagull, VQ, Phoenix & “unbranded” models by the
likes of Hobby King.
If going with one of the lower price point ARF’s there are a few things
you may like to consider/watch for and try to rectify if practical:
Undercarriage Bearers.
When a model touches down hard or with excessive speed (and a
resulting bounce!) the tyres, undercarriage & airframe have to absorb
and dissipate a lot of excess energy.
Make sure the model you are considering has been designed and built
so that landing loads are spread & absorbed across the airframe or
wing structure. This becomes increasingly important as a model’s
relative size/weight increases. If you’re unsure ask a good traditional The retract bearers on the Topflite Giant Warbirds are incredibly strong.
builder for comment and advice; These models are examples of superior structural design - robust &
durable
Fixed Undercarriages.
Watch out for low-grade alloys. Thickness and grade (and therefore
strength) are not the same. Again, this is really important as a models’
size/weight increases. Low grade alloy will bend, fatigue, break, shear
more easily and the risk of resulting secondary damage is always very
real;
Retracting Undercarriages.
There is no way to sugar coat this – cheap retracts of the type you find
included in a lower price point ARF are likely to disappoint. When a
60/120 size Warbird complete with retracts is priced at about the price
of a set of 60/120 size EFlite or Robart alone one has to ask the
question why. If buying a warbird that comes with retracts budget on
upgrading them sooner rather than later;
Firewalls.
Firewalls letting go over time are not uncommon in some ARF’s,
particularly cheaper models. Check the quality of the woods, glue Above: If mid-size warbirds are your thing, I recommend EFlite. They are
reliable, strong and available in standard & rotating configurations.
joints etc. Strengthening in this area may be warranted even if it’s as
simple as the addition of triangle stock to the firewall joints or adding Below: Big models need serious gear. The Topflite 50cc Spitfire retracts
doublers. However, be aware it is hard to deal with poor underlying by Robart are an example.
structural design, or poor quality materials. Strengthening a firewall
with triangle stock may be better than doing nothing, but in isolation will
likely only lead to stress, compression or vibration damage at the next
weakest point in the structure;
Engine Mounts. The writer is an advocate of using quality isolation
mounts and balanced propellers to minimise vibration. Most of us
expect our car engine to be isolated from the chassis - why not our
delicate models?! If selecting a lower price point ARF in particular, it
may be a good idea to use a quality Dubro Vibration Isolation Mount or
Richter Stand Off Isolation Bushes to reduce vibration and possible
resulting damage over time;
Page 18 Model Flying WorldYou can also read