Kitchen Renovation Project Equipment, Instructions & Tips - monarchpainting.com.au/house-of-monarch - Monarch Painting
←
→
Page content transcription
If your browser does not render page correctly, please read the page content below
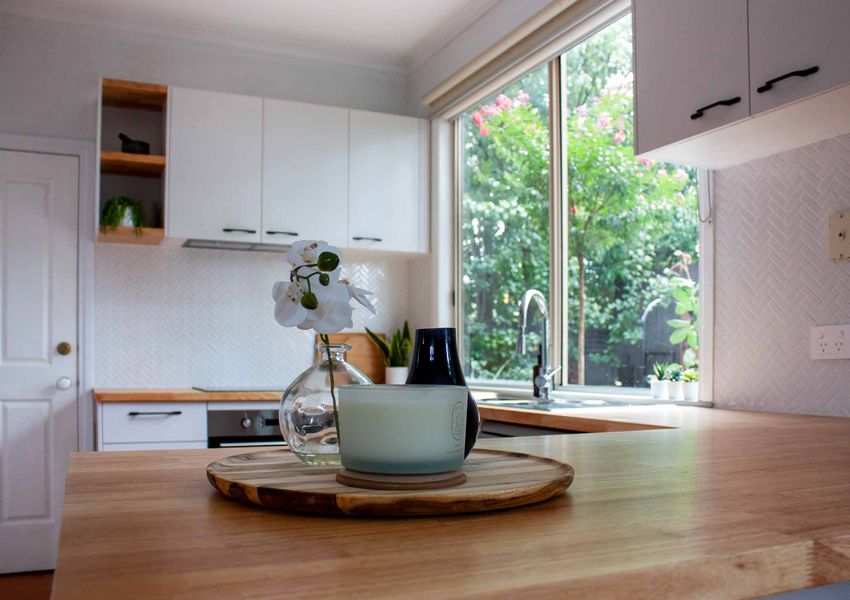
Kitchen Renovation
  Project Equipment, Instructions & Tips

     monarchpainting.com.au/house-of-monarch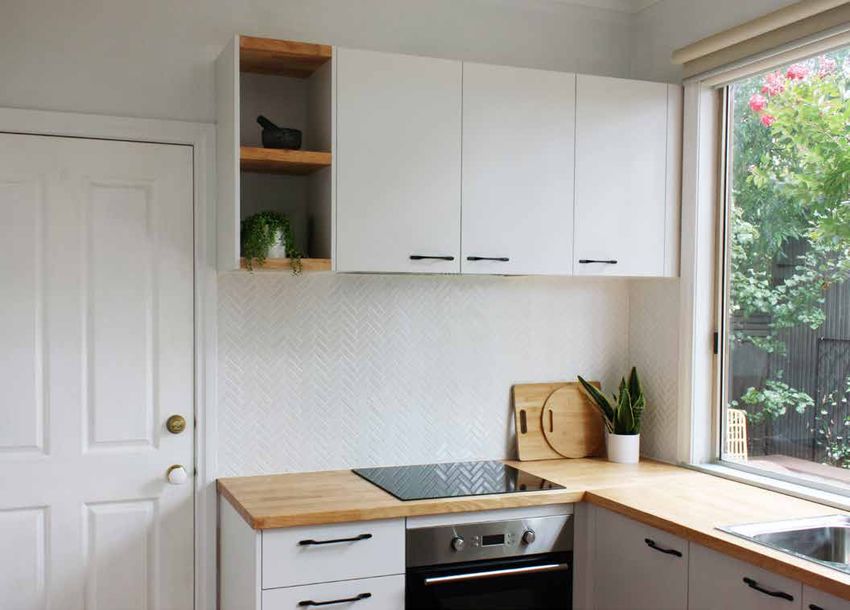
Kitchen Renovation
Sometimes the only choice with
a room is to rip it out and start            Equipment & Products                                                                                       Good
                                                                                                                                                        Good to
                                                                                                                                                             to
fresh. Maybe the colours are                                                                                                                             Have
                                                                                                                                                         Have
tired, maybe your cabinets are
damaged or maybe the layout
just isn’t working for you.
Today in House of Monarch, we
get some help from Kaboodle
to fully renovate a kitchen, add                120/240 Grit     Hand Sander            Vacuum           Microfibre Cloths       Monarch 38mm            Paint Tin
some natural beauty with an oiled                Sandpaper                                                                      Moulding & Skirting      Opener
                                                                                                                                      Brush
timber benchtop and refresh the
walls and ceilings with a fresh
coat of paint.

    12                  Mid                   Kaboodle Clear
                                               Hardwax Oil
                                                               Monarch Smartlock
                                                                Foam Mini Roller
                                                                                        Monarch
                                                                                     Disposable Tray
                                                                                                        Monarch Leak Proof
                                                                                                        Canvas 3.6 x 3.6m
                                                                                                                                   Step Ladder          Paint Stirrer

    STEPS              DIFFICULTY

  High                 1-2
                      Weeks
                                                Paint Bucket   Monarch Advance      Monarch 230mm       Monarch Razorback       Monarch Aluminium     Plastic Wrap and
   BUDGET                 TIME                                 Plus 63mm Brush     Comfort Grip Frame     230mm Walls &           Extension Pole       Aluminium Foil
                                                                                                        Ceilings Roller Cover

Kitchen Renovation - Project Equipment, Instructions & Tips                        monarchpainting.com.au/house-of-monarch/kitchen                                 Next...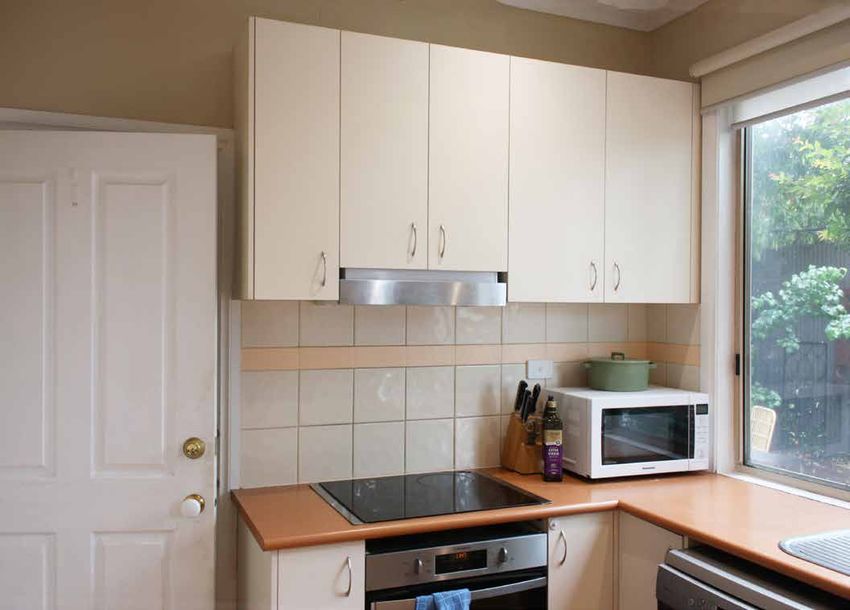
Kitchen Renovation
 Part 1: Renovate                           Part 2: Benchtop

  1     Redesign
        the Space
   The kitchen was looking tired and
                                              2      Prepare the
                                                     Benchtop
                                              Before the tiled splashback is installed
                                                                                            3     Cut In the
                                                                                                  Benchtop
                                                                                            We’re using the Kaboodle Clear
                                                                                                                                    4      First
                                                                                                                                           Coat
                                                                                                                                    Use a Monarch Smartlock Foam
   run-down and it was time for a full        it’s time to tackle the benchtop.             Hardwax Oil to protect the surface      Mini Roller to apply a thin coat of
   redesign. We worked with our friends                                                     of our benchtop and to preserve the     oil up and over the cut-in line. You
                                              Kaboodle timber benchtops come as
   at Kaboodle to completely redo                                                           look of the timber.                     can apply the oil in any direction as
                                              untreated wood so they need a bit
   the space including updating the                                                                                                 long as you ‘lay-off’ the oil with the
                                              of work before they’re ready to use.          If your benchtop is made up of more
   plumbing, electrical and appliances.                                                                                             mini roller once the whole panel is
                                              Prepare the benchtop by sanding the           than one panel you’ll need to do each
   We also increased the bench space                                                                                                painted. ‘Laying-off’ is the process of
                                              top and sides with 120 grit sandpaper,        one separately.
   by moving the kitchen island back                                                                                                smoothing the newly applied oil in
                                              following the grain of the wood. This
   about a meter to improve the flow                                                        Start by cutting in using a Monarch     the direction of the timber grain to
                                              can be done by hand but will be much
   from the garage through to the rest of                                                   38mm Moulding & Skirting Brush          get a smooth finish.
                                              easier with an electric sander attached
   the house.                                                                               against the walls, around the cut-out
                                              to a vac to keep the dust to a minimum.                                               Keep an eye out for any drips on the
                                                                                            for the sink and anywhere else a mini
   A full kitchen renovation is something                                                                                           edges and wipe them away. Leave the
                                              Once the full surface has been                roller won’t fit.
   that can be DIY’d but it will be                                                                                                 first coat to dry for 12 hours.
                                              sanded, wipe it down with a damp
   faster and less disruptive to get the                                                    You’ll also need to cut in along the
                                              cloth to remove any lingering dust.
   professionals in.                                                                        edge between benchtop panels            Pro Tip...
                                              Make sure the benchtop is completely
                                                                                            since you’ll be painting each one
                                              dry before moving to the next step.                                                   When a sealant like the Hardwax Oil
                                                                                            separately.
                                                                                                                                    is applied to raw timber, the grain
                                              Pro Tip...                                                                            of the wood will rise while it dries.
                                                                                                                                    Sanding between coats (then wiping
                                              Always sand in the direction of the
                                                                                                                                    up the dust) will ensure you get a
                                              grain. Sanding against the grain will
                                                                                                                                    silky-smooth finish when it’s dry.
                                              rip the wood fibres and give you a
                                              rough surface.

Kitchen Renovation - Project Equipment, Instructions & Tips                              monarchpainting.com.au/house-of-monarch/kitchen                               Next...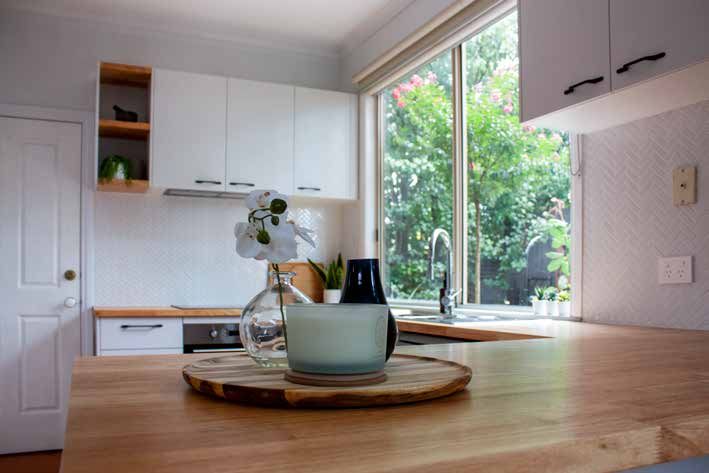
Kitchen Renovation
                                            Part 3: Painting

   5     Second
         Coat
   After 12 hours, sand the surface of
                                             6      Prepare
                                                    the Room
                                              Cover the floors and furniture with
                                                                                           7      Cut In the
                                                                                                  Ceiling
                                                                                            Use a step ladder, a paint bucket and
                                                                                                                                      8      Rolling the
                                                                                                                                             Ceiling
                                                                                                                                      You’ll want to start rolling the ceiling
   the benchtop with 240 grit sand            a Monarch Leak-Proof Canvas                   a Monarch Advance Plus brush to cut       while the cutting in paint is still wet.
   paper then vacuum and wipe down            dropsheet to protect them from paint          in around the ceiling. Make sure to       While it’s possible to paint a ceiling
   the surface. Apply a second coat of        splatters. Give your walls and ceiling a      also cut in the cornice which should      on a ladder, the safer and faster way
   the Hardwax Oil to the top and sides,      wipe down to remove any dust, grime           be the ceiling colour, not the wall       is to use a roller frame attached to an
   working one panel at a time.               and spiderwebs.                               colour.                                   extension pole to be able to reach
                                                                                                                                      the ceiling while standing on the
   To get the best results, we
                                                                                            Pro Tip...                                floor. Ensuring there is nothing to trip
   recommend two coats on the top and
                                                                                                                                      over (keep your paint tray out of the
   all sides, allowing the benchtop to                                                      If you’re painting the walls as well as   way), load your roller and apply paint
   completely dry.                                                                          the ceiling, there’s no need to tape      in smooth strokes from one side of
                                                                                            when cutting in. Any overlap that         the room to the other.
                                                                                            ends up on the walls will be covered
                                                                                            up when they get painted in the next      We recommend using a Monarch
                                                                                            steps.                                    Razorback Walls & Ceilings roller
                                                                                                                                      cover which will hold more paint to
                                                                                                                                      get the job done faster.

Kitchen Renovation - Project Equipment, Instructions & Tips                              monarchpainting.com.au/house-of-monarch/kitchen                                  Next...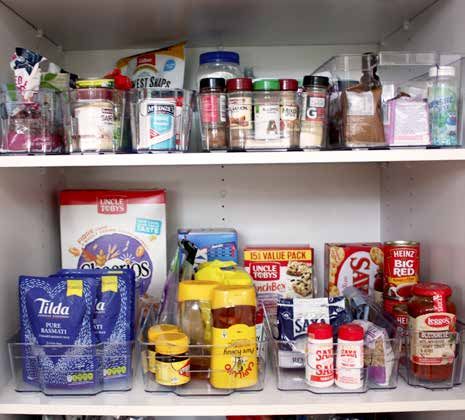
Kitchen Renovation
Part 4: Final Touches
9 Paint
the Walls
Use the same method to paint the
10 Finished
Painting!
Now that the painting is done, pour
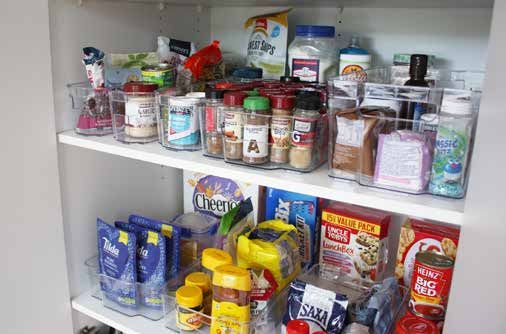
11 Pantry
Organisation
Getting a new pantry as part of a
12 Styling
Shelves
If you’ve opted for some open
walls as you did for the ceiling; start any left-over paint back into the tin, kitchen renovation is the perfect shelving in your kitchen this is the
by cutting in around wall features, wash out your brushes, rollers and reason to do some reorganisation. perfect opportunity to add some style
then roll with a quality Walls & trays and store for next time. Use some clear storage tubs to group with display items, ornaments, or
Ceilings roller cover. items into categories that work for cookbooks. If you need some help,
Pro Tip... your home. Clear tubs are great check out our Kitchen Design Ideas
Keep in mind the areas that will be
because they don’t obscure the items document!
covered by the tiled splashback as Worried about dried paint or pet hair inside them and can help you reach
they won’t need to be painted. contaminating your paint? Strain your things at the back of shelves more
paint through a cheesecloth or panty easily.
hose when you pour the leftovers
back into the tin.
Kitchen Renovation - Project Equipment, Instructions & Tips monarchpainting.com.au/house-of-monarch/kitchen Next...
Kitchen Renovation

 Before                                                              After

Thanks for reading!
Even when you’re opting for a full-on renovation, painting walls,       For more House of Monarch projects, tips and inspiration, visit:
benchtops and ceilings yourself is easy with Monarch.
                                                                                    monarchpainting.com.au/house-of-monarch

Kitchen Renovation - Project Equipment, Instructions & Tips         monarchpainting.com.au/house-of-monarch/kitchen                   Next...
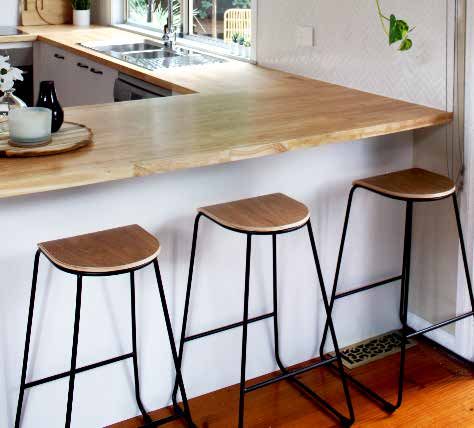
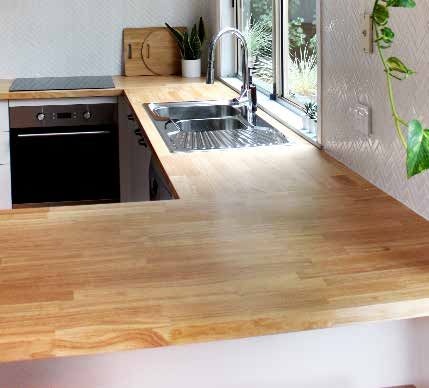
Kitchen
Renovation
Design Ideas & Inspiration
Effective styling is all about picking a theme
and building towards it. Because we’re using
the same benchtop and splashback as the
laundry re-design, we decided to keep the
style uniform between the two rooms.

Natural Timber Benchtop                           Herringbone Tile Splashback                Black Cabinet Handles
Timber is a great choice for a benchtop as        We went with the simple white tile in a    Add some contrast to the kitchen with
it’s sturdy, beautiful, and can last for years.   herringbone pattern to compliment the      black cabinet handles which perfectly
It has enough character that it doesn’t           wooden benchtop and add some texture       off-set the white/grey cabinet doors.
need a lot of dressing up to look lovely.         to the space.

Open Shelving                                     Pantry Organisers                          Wooden Bar Stools
Open shelving is the perfect way to               Using clear organiser tubs can help keep   We’ve chosen some barstools that
display items, ornaments, or cookbooks            your pantry under control by grouping      perfectly match the rest of our kitchen;
in your kitchen. Using the same timber            items like spices, condiments or sauces    black legs to match the cabinet handles
as the benchtop keeps the room unified.           and help keep your pantry organised.       and timber seats to match the benchtop.

Kitchen Renovation - Design Ideas & Inspiration                                   monarchpainting.com.au/house-of-monarch/kitchen
You can also read