MINECRAFT: EDUCATION EDITION - User Manual - Nina Žibert Digital School d.o.o - Digital ...
←
→
Page content transcription
If your browser does not render page correctly, please read the page content below
MINECRAFT: EDUCATION EDITION

                        User Manual

Nina Žibert
Digital School d.o.o.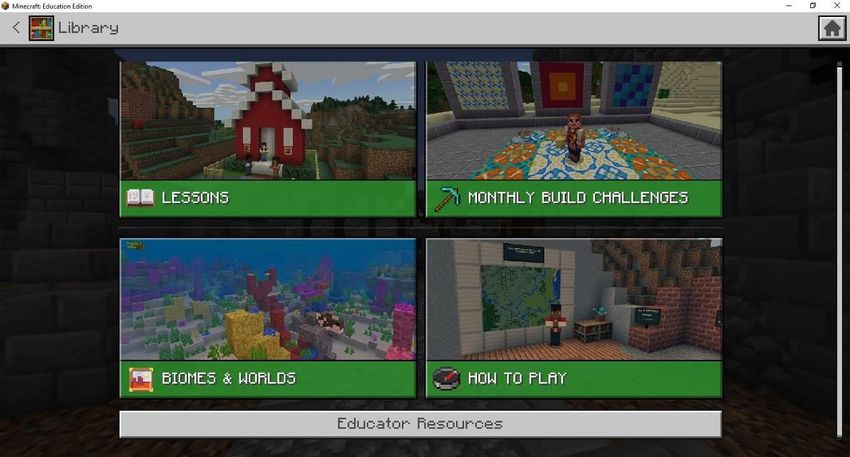
Table of contents
General information ...................................................................................................................... 3
   What is Minecraft? .................................................................................................................... 3
   Why Minecraft: Education Edition? ............................................................................................ 6
   Rules of engagement ................................................................................................................. 8
   Setting learning objectives ......................................................................................................... 8
   Resources for teachers .............................................................................................................. 9
   Tips for using Minecraft in the classroom .................................................................................... 9
Menus .........................................................................................................................................12
   Play .........................................................................................................................................12
       View my worlds ....................................................................................................................13
       View Library .........................................................................................................................13
       Create new...........................................................................................................................19
       Join world ............................................................................................................................19
       Import .................................................................................................................................20
   Hour of Code............................................................................................................................20
   Settings....................................................................................................................................20
   Switch accounts .......................................................................................................................25
   The clothing hanger icon ...........................................................................................................25
   The help icon ...........................................................................................................................25
New world settings ......................................................................................................................25
Game modes ...............................................................................................................................28
World type ..................................................................................................................................29
Import .........................................................................................................................................29
Export .........................................................................................................................................30
Copy world ..................................................................................................................................30
Sharing worlds .............................................................................................................................30
Multiplayer mode ........................................................................................................................31
Immersive reader.........................................................................................................................37
Chat and Commands ....................................................................................................................37
   The /setworldspawn command .................................................................................................38
   The World Builder status...........................................................................................................38
The main elements of the game ....................................................................................................40
   Heads-up-display ......................................................................................................................40
   Movement ...............................................................................................................................41
   Inventory .................................................................................................................................42
The building block tab...............................................................................................................43
   Placing and breaking blocks ......................................................................................................43
Assessment tools .........................................................................................................................45
   Chalkboards .............................................................................................................................45
   Signs ........................................................................................................................................48
   The camera ..............................................................................................................................49
   The portfolio ............................................................................................................................50
   Book and quill ..........................................................................................................................50
Banners .......................................................................................................................................51
Sample lessons and the use of grading tools ..................................................................................51
Lighting .......................................................................................................................................53
Special blocks ..............................................................................................................................54
   Allow block ..............................................................................................................................54
   Deny block ...............................................................................................................................54
   Border block ............................................................................................................................55
   Structure block .........................................................................................................................55
NPC (non-player character)...........................................................................................................56
Entities ........................................................................................................................................58
Redstone .....................................................................................................................................58
Help and support .........................................................................................................................63
Additional sources .......................................................................................................................64
Sources .......................................................................................................................................64

General information

What is Minecraft?
Minecraft is a computer game, in which the player is set in a randomly generated world. It is an open
world game, which means that the player can do whatever they want in the world. They are not limited
by rules or non-playable characters. Each element of the game is made up of blocks that represent
different types of materials, such as water, rocks, lava, grass or fire. Players can gather blocks by
chopping trees, mining ore, picking up items, etc. Blocks can be placed, destroyed or transformed into
different materials. Players can make various types of tools or weapons, which can be used for building
or combat. Minecraft is suitable for elementary school students of all ages.

Minecraft encourages creativity, cooperation, and problem solving in an immersive environment. The
only limit is your imagination and the imagination of your students. There is also a version called
Minecraft: Education Edition, which is a version of Minecraft that is made to be used in education. It
contains all the main elements of Minecraft that many of your students might already be familiar with,
however, it also contains additional features, which facilitate learning and cooperation in a classroom
setting. The game offers teachers support, which allows them to efficiently incorporate different
educational activities. With the Code Builder expansion, students can connect to other popular
platforms such as Scratch, Tynker and MakeCode. The educational version is not available in Slovenian,
however, some worlds are translated to the aforementioned language.

How to download and setup of the application

First you need to download the educational version of the game and set it up on your device. The link
for the download can be found on the official website for Minecraft: Education Editio n:
https://education.minecraft.net/

This is also where you can find additional information about the game, the pre-prepared material and
worlds that can be used in class. In the tabs labelled “Community” and “Support”, you can find
technical information and tips provided by other teachers.

1.      Open the website https://education.minecraft.net/get-started/download/

2.       The game is available on Windows operating systems, macOS and iOS. On the left side under
the library icon you will see the suggested version of the game that is the most suitable for your
operating system. Click the “Download now” button.

3.      When the download is done, run the game.

4.      A new window will pop up that will allow you to choose your language settings. The game is
not available in Slovenian, however, we translated a couple of worlds and prepared them for you.

5.      Follow the setup instructions.

6.      When the application is set up it will automatically start up. If the application does not open
on its own, you open it by double-clicking the icon of the bookshelf.

System Requirements

Minecraft: Education Edition can be used on the following types of devices:

1.      Computers with Windows operating systems,

2.      Computers with macOS operating systems,

3.      iPad tablets.

If you want to use the multiplayer mode, you also need an internet connection. If you want to host a
multiplayer session, your broadband speed must be at least 1.5 Mbps.

Installing Minecraft: Education Edition on devices that use a Windows operating system

1.      Go to the website: https://education.minecraft.net/get-started/download/

2.      Choose “Download now”.

3.      A popup window will open and ask you if you want to install the application. Make sure that
the option “Launch when ready” is checked. Click “Install”.

4.      Wait for the application to finish installing.
5.      After it has finished installing, the game will start up and ask you for your sign-in information.
Sign in with your Office 365 account.

6.      After successfully signing in you will be redirected to the home screen for Minecraft.

Installing Minecraft: Education Edition on devices that use the macOS operating system

1.      Open system settings.

2.      Check whether your device is ready to install programmes by known developers. Click on
“Security and privacy”, then click the tab named “general” and make sure, that the field “Allow apps
downloaded from Mac App Store and recognized developers” has a checkmark. If this option is
disabled, the user with admin rights needs to enable it before installing the game.

3.      Go to the website https://education.minecraft.net/get-started/download/

4.      Choose “Download now”.

5.      Open the downloaded file, drag the icon of Minecraft: Education Edition to the folder named
“Applications”.

6.       Open Minecraft: Education Edition. If your system asks you for permission, confirm it by
clicking the “Open” Button.

7.      After running the game executable choose “Sign in” and sign in with your Office 365 account.

8.      After successfully signing in you will be redirected to the home screen for Minecraft.

Installing Minecraft: Education Edition on iPad devices

1.      Open the App Store.

2.      Search for the Minecraft: Education Edition app.

3.      Click on the button to download the application and wait for it to finish installing.

4.      Click on the “Open” button.

5.      When the game asks for your sign-in information, sign in with your Office 365 account.

6.      After successfully signing in, you will be redirected to the home screen for Minecraft.
User accounts

To sign in to the game, you need a user account that allows you to sign in to the Microsoft 365 services.
An account is available to both teachers and students at school. In case you don’t have access to this
account, contact your local Microsoft representative.

Why Minecraft: Education Edition?
Minecraft: Education Edition is not just a game, it is also a tool for teaching and studying. It offers
teachers the unique opportunity to introduce elements of play into the learning process.

Cooperation and communication

Minecraft: Education Edition is set up so that the students can problem solve in smaller groups or in a
class setting. Group work in this kind of an environment allows students to improve their cooperation
and                                         communication                                        skills.

Creativity and critical thinking

Students learn naturally through observation and trial and error. The game provides them with the
freedom to use independent thought and allows them to try out different approaches to problem
solving. As in real life, the game does not come with instructions that would lead them straight to the
solution. Students need to solve the problem on their own, which typically requires multiple attempts.
When they make a mistake they can use it as a learning experience and keep trying, until they reach
their desired goal.

Inclusivity

If the teacher wants to create an inclusive class, they must prepare activities that are tailored to
different kids. These activities provide them with the opportunity to learn in different ways and at
different speeds. Modern pedagogics promote learning that provides the students with a sense of
accomplishment, and at the same time offers them opportunities to show off and use their knowledge.
The educational version of Minecraft can be used by teachers to put together projects and activities
that guide the students to specific goals. This facilitates the realisation of the prescribed curriculum.
What does the science say?

A Canadian study has shown that the use of known and popular settings in education, such as
Minecraft, has many benefits for the students:

1.     higher motivation to learn,

2.     better communication,

3.     better knowledge of information technology,

4.     better perception of your own academic efficacy,

5.     developing your independence.

Seymour Papert, an expert in the field of education, discovered in his research, that the effect of
studying is better when:

1.     students use technical learning tools and computer-generated environments,

2.     students take on the active role of a designer or a builder,

3.     students learn in a social environment with mentors, trainers, or through networks,

4.     students learn through play.

The human brain tends to make learning enjoyable, when people explore and find new ways to reach
set goals. When students use Minecraft: Education Edition they learn:

1.     how to solve problems,

2.     how to prevent potential problems from occurring,

3.     how to find help and information from their classmates, teachers, or the online Minecraft Wiki,

4.     how to use critical thinking when designing new builds.

Growth mindset

Studies (http://www.dlib.si/details/URN:NBN:SI:doc-B6NOTLPM ) have shown that the students who
have a greater growth mindset typically have better learning outcomes and a better learning self -
image compared to students with a fixed mindset. Children with a fixed mindset think that their
capabilities are fixed in stone and unchangeable. This can lead to feelings of inadequacy when faced
with new challenges, and a diminished motivation to learn. When talking about growth mindsets we
refer to kids who believe that they can develop their capabilities and improve them through practice
and effort. Kids who think this way are often more motivated to problem solve and more likely to
choose tasks that help them improve their learning capabilities.

How can Minecraft: Education Edition influence the growth mindset?

Students with a growth mindset don’t see failure as an obstacle. They see it as an opportunity to grow
and learn. Carol Dweck, one of the leading researchers in the field of motivation
(http://osazilb1.splet.arnes.si/files/2018/03/RAZVIJANJE-MISELNE-NARAVNANOSTIRASTI_splet.pdf )
has said in an interview:
“Students who are mastery-oriented think about learning, not about proving how smart they are.
When they experience a setback, they focus on effort and strategies instead of worrying that they are
incompetent.”

Teachers can encourage their students to develop a growth mindset by helping them embrace the
belief that they themselves can improve their capabilities.

Students are often more familiar with Minecraft and its mechanics than the teachers, but don’t let that
discourage you. Your role is not to be an expert in Minecraft, but to lead a learning process: prepare
the materials and help the students explore the new contents. The feeling that you’re letting the kids
learn on their own by taking advantage of their interest in play and their own capabilities, can be
intimidating at first. But you shouldn’t worry.

Of course, do not forget to learn alongside your students. Join them in the game world and help them
create. The students should show you what they’ve been building and explain how they’ve built it. Ask
them to share the tips and tricks about Minecraft that they’ve discovered with you and with the rest
of the class. When you are unsure about how to do something, ask your students for help.

Rules of engagement
Before using Minecraft: Education Edition it is important that you set the basic rules of cooperation.

Creating a positive learning environment in the class is crucial, especially when the students are
introduced to new learning processes. Students need to feel secure enough to risk facing a challenge
that they might not solve on their first try. They shouldn’t be scared to fail. They should have the
courage to try again in a non-judgemental and understanding environment.

Clear-set expectations and class rules will help your students to communicate and participate in online
learning processes.

Even though using the game in class may seem chaotic, it needs to follow four main guidelines that are
important for interpersonal relationships and learning through play:

1.      all the usual rules for conducting classes are still valid,

2.      the students are given different roles,

3.      you participate as a moderator,

4.      at the end of the lesson, set aside some time for feedback and reflection.

Setting learning objectives
When you choose to use Minecraft, do not forget to set your lesson goals. A clear definition of your
learning objectives will help you link all the tasks that your students will be completing within the
game. You do not need to adjust your curriculum to use Minecraft. You should try to use Minecraft for
topics that happen to match the activities that the game provides. You can use teaching in Minecraft
as an activity that adds some excitement to your lessons. This way you build an interest in specific
topics and create a more comfortable learning environment.

In general, kids tend to see studying as a boring and monotonous activity. You’ve surely all faced the
challenge of presenting a topic in a way that the students find interesting. Learning through play
enables students to have a detailed and personalized learning experience. This individualised approach
is crucial if you want your pre-planned lesson to have a greater impact.
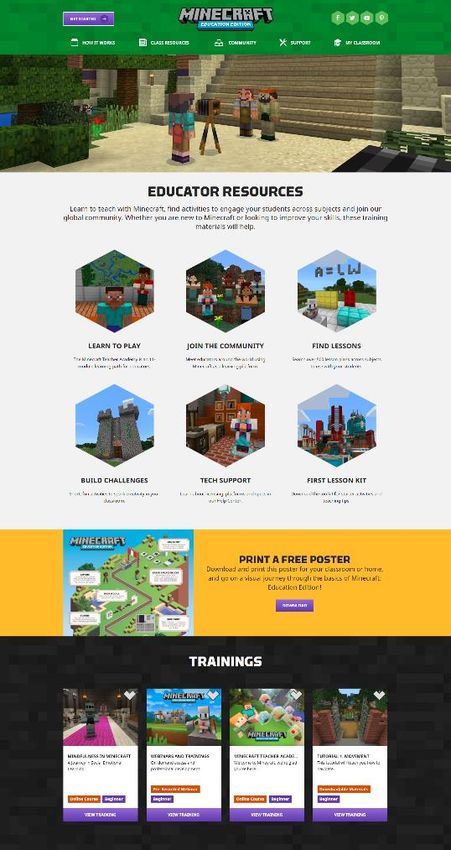
Resources for teachers
Teachers can access pre-prepared materials, lesson plans, and worlds on this website:
education.minecraft.net

In the “Class resources” tab, you can find several types of materials. In the “Subject kits” tab, you can
find pre-prepared lessons. The contents of this tab are divided into several topics, such as language
arts, science, history and culture, computer science, math, and art and design.

Each of these topics contains several units. Most of the units’ websites also list the learning objectives
and provide you with sample questions. These help you with your lesson. You can use the ideas and
suggestions for activities that your students participate in. On the right side, there is a button that lets
you download the world. Once the world has been downloaded, you need to import it into your game.
The unit’s website also includes other content such as worksheets and additional materials. It should
list all the competencies that the kids will be developing.

In the “Subject kits” tab, you can find a browser that lets you sort all the learning units by using specific
parameters that are relevant to you. You can type in specific key words that are connected to your
desired topics. You can select the kids’ age, and the subject that you are interested in.

On the website you can find technical support, and support provided by other teachers who use
Minecraft in class. You can find more information about this topic in the “Help and support” section.

Tips for using Minecraft in the classroom
1.      Don’t be afraid to learn from your students.

Accept that it’s impossible to be omniscient. There will come a time when your students know more
than you, especially when it comes to the game. Be ready to learn and ask your students for assistance.

2.      Allow yourself to take some time to reflect.

In each lesson, it is important that your students have the time to reflect on the things that went well
and the things that they could improve on next time.

3.      Do not overdo it.

You do not have to include Minecraft in every single lesson. You do not want to reduce the effect that
the game has on your students’ motivation.

4.      Set clear expectations.

The concept of learning through play may be as new to your students as it is to you. Share your
expectations with your students. Make sure that the people who are in charge of the school, the
students, and their parents understand why Minecraft is being used in the classroom.

5.      Set some ground rules.

When students think about playing games at school they can get overly excited. It is good to set some
ground rules. You can make a list of rules and the consequences of breaking the said rules together
with your students. This lets kids express their opinions and have a say in their own learning process.
At the same time, it teaches them how to make decisions and face the consequences of their actions.

6.      Give your students some freedom.
If you want your students to have an authentic Minecraft learning experience, they should be allowed
to make attempts and to solve the tasks on their own. Let them make mistakes and make sure they
know that it is acceptable to make mistakes, as long as they learn from them.

Using the Classroom mode companion application

Whenever you as a teacher host a multiplayer session of the game, Classroom mode offers you several
opportunities to interact with your students. The game can be controlled using the settings located in
the main user interface.

Teachers can simultaneously use both MEE and the Classroom mode application. Students can use
their MEE account to sign in and join the multiplayer game. They can also use the Code Builder update.
Teachers cannot use all three functionalities at once.

Installing Classroom mode

       1. Go       to      the      website      https://education.minecraft.net/get-started/download/
          Click the link to download the version of the application that will work on your operating
          system. The link is located at the bottom of the page.
       2. Open the downloaded file and follow the instructions to install it.

Using multiple instances of Classroom mode

If the teacher wants to use several multiplayer games at once, they can open multiple instances of the
Classroom mode application. You need one instance of Classroom mode per multiplayer game.

1.        Restart the Classroom mode application.

2.        Sign in with your account.

3.    From the list of servers, choose the multiplayer game you want to join. If you can’t see the
game on the list, join the waiting room and ask the host of the game to type “/connect” into the
command line.

4.        For each additional use of the application, repeat the steps listed above.

Controlling the game settings

The Classroom mode application enables you to toggle different game options that influence the game
world.

•         PAUSE - pauses the game for each player within a chosen multiplayer world (default setting:
off)

•        CHAT – allows the players within the world to communicate with each other by using a chat
client (default setting: off)

•         PERFECT WEATHER – disables weather effects such as rain, snow or storms (default setting:
off)
• ALLOW MOBS – mobs are living moving beings found within Minecraft worlds. This includes friendly characters (animals and villagers) as well as enemies (zombies, skeletons, etc.). (default setting: on) • ALLOW DESTRUCTIVE ITEMS – Players can use destructive blocks such as TNT blocks. You can limit the potential damage to your world by using deny, allow, and border blocks. (default setting: on) • ALLOW PLAYERS TO TAKE DAMAGE – Players can take damage in an unsafe environment, enemy characters can cause damage to players. (default setting: on) • WORLD MODIFICATION – Players can change what the world looks like, and they can control the NPCs. (default setting: off) • ALLOW PLAYERS TO DAMAGE EACHOTHER – Players can damage each other either intentionally or by accident. (default setting: on) On the right side of the user interface you will see two information windows. The player roster also includes a list of players which are colour coded. Each player has his or her own colour that is displayed on the map. Beneath the player roster there is a window that displays the online chat, if the chat is enabled. This is where you can see the player names, which are displayed in their set colour. On the left side you can locate the world map. You can zoom in by using your mouse wheel. Above the map there are the X, Y, and Z coordinates, which show the current location of your pointer. The areas that are black on the map are the areas that have not been loaded or that the players have not explored. They will be displayed only when the players visit them. Communicate with your students As a teacher you can use the chat line to enter text or commands, which lets you communicate with your students and manage your world. The chat log is saved locally to your computer in this folder: Documents\Minecraft Education Edition\ChatLogs Teleport students As a teacher, you can teleport your students within the world. Right clicking the map allows you to move all the players to a specific location. You can teleport them individually, by dragging their icons to a specific location, or you can use the command “/tp” combined with the player name and the chosen location.
Menus
After signing in to Minecraft: Education Edition, you will see the main menu with the following options:
Play, Hour of Code, Settings, and Switch accounts. You will also see a clothing hanger icon and a help
icon.

Play
Clicking “Play” opens a new menu, which contains the following options:

-       View my worlds,

-       View library,

-       Create new,

-       Join world,

-       Import.
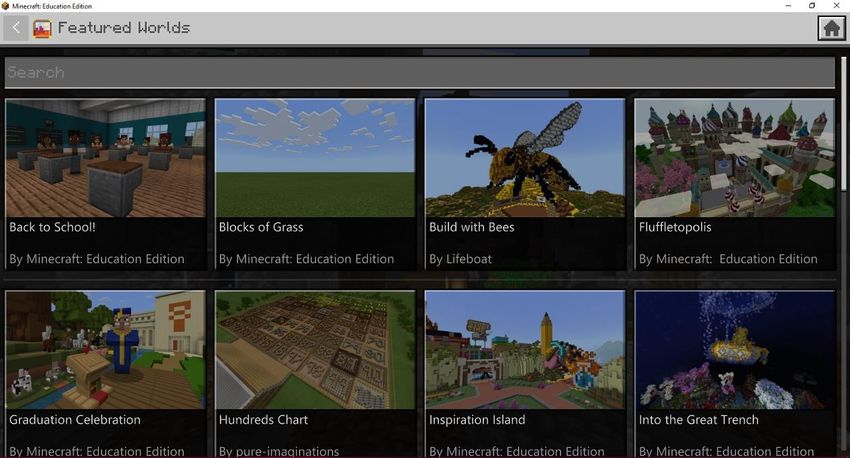
View my worlds
In this menu, you can access the search bar, the “New World” button, which lets you create a new
world, and a list of all the worlds that you’ve played in the past. In case you’re playing for the first time,
the menu will show you only the “New world” option. If your list contains a large number of worlds,
you can enter some key words into your search bar. These usually include world names. This allows
you to sort through the list and find the world that you are looking for.

View Library
The library contains all the existing worlds that you can use in class. The library is separated into four
sections.
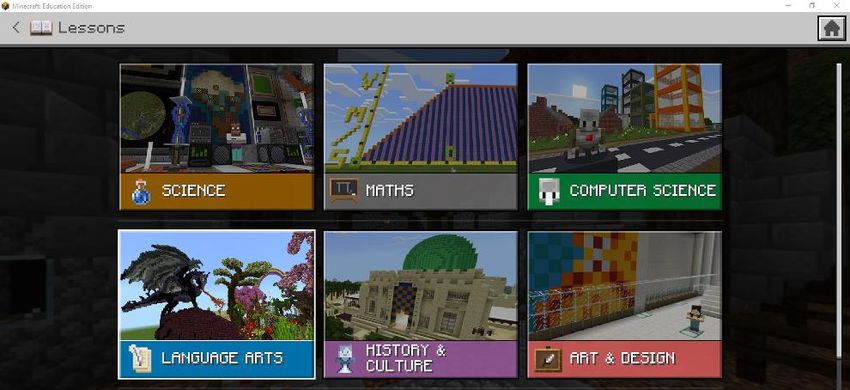
Lessons

This section contains lessons which are sorted by subject, such as Science, Math, Computer Science,
Language Arts, History & Culture, Digital Citizenship, Social Emotional, and Equity and Inclusion. Each
of these sections contains sample worlds that can be used in your lessons.

Monthly build challenges

This section contains the worlds that are dedicated to monthly build challenges. This includes an
extensive list of worlds and prepared lessons that can be used in class.
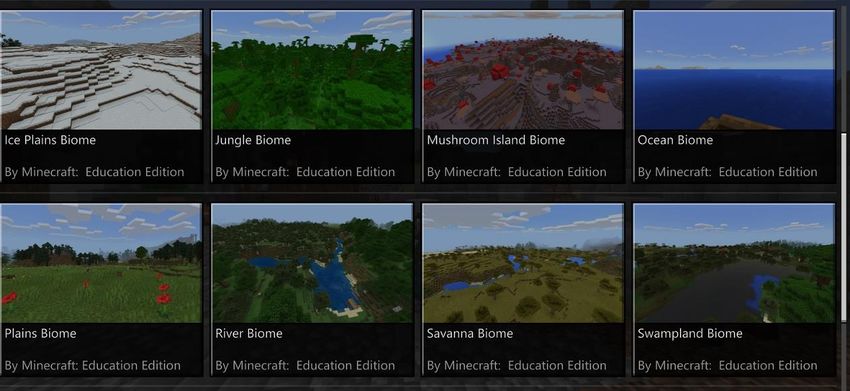
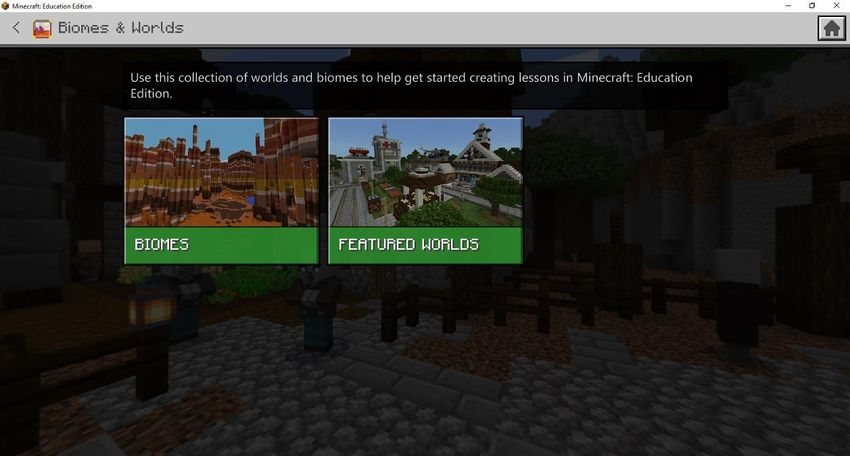
Clicking on the world shows you a detailed description of the world, the main objectives of the lesson,
and potential additional tasks for the fastest of your students. These worlds can be used whenever you
desire, they are not tied to the time limits of the build challenge.

Biomes and worlds

This section contains world templates which can be used to build a personalised world. Before getting
started, you should always set the objectives for your lesson or the Minecraft world that you are trying
to create. You should modify your settings based on those goals. When you choose the option “Create
New World”, you do not get to choose which types of biomes will be generated. You are provided with
a world with randomly generated biomes. Biomes are different regions that have distinct geographical
features, flora and fauna. In the “Biomes” menu you will find 15 different regions. Most worlds are
diverse, with the exception of the world called “Blocks of grass”, which is made up entirely of grassy
plains, with no other geographical features.
Featured worlds

This section features pre-built worlds that can be used in class.
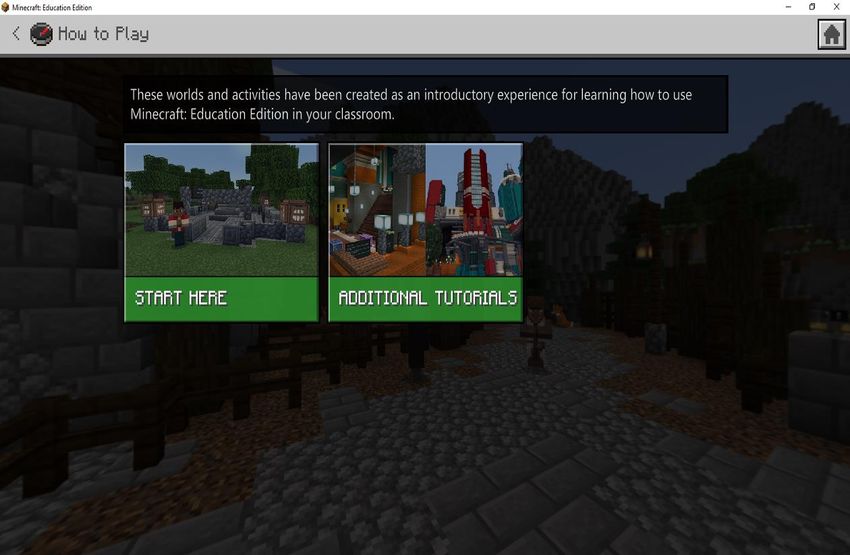
How to play

This section contains tutorials that can help you understand the game better.

The submenu “Start here” provides you with basic tutorials: movement, place and break, interact,
camera and portfolio, chalkboards, and NPC.
In the “Additional tutorials” submenu, you can find the Chemistry tutorial and the Code Builder
Tutorial.

Educator resources

Clicking this button redirects you to the official Minecraft: Education Edition website which contains
additional resources for educators: https://education.minecraft.net/class-resources/trainings/
Create new
Clicking “Create new” opens a window that lets you select whether you want to create an entirely new
world or use a pre-made template of a world. Clicking the button “New” shows you the settings that
you can adjust before creating a new world.

In the game settings menu, you can rename your world, select the game mode, and the difficulty of
your world. You can change the permission level for the players and set the world seed. You can choose
to show the coordinates and activate cheats, which allows you to use commands. Using the setting
“Always day” means that it will always be daytime in your game. If you do not toggle this option, the
game will cycle between daytime and night time every few minutes.

Join world
Clicking this button starts the process of joining an existing multiplayer game.
Import
Minecraft: Education Edition allows you to import a world that is saved as a .mcworld file. Every file
you download from the website education.minecraft.net will be in this form, if it contains a world.

Hour of Code
 Since the 1.14.50 version update, the main menu contains a button called “Hour of Code”. This gives
you access to three different worlds that can be used to teach the basic concepts of programming.

Settings
This menu allows the player to change and adjust the settings that influence the gameplay in Minecraft.
The settings, which can be toggled on or off by clicking a grey button, are enabled when the grey
rectangle is on the right side. When the rectangle is on the left side, the setting is disabled.
Keyboard and mouse hints

Choosing the setting “Hide Keyboard and mouse hints” hides the hints for your keyboard and mouse.
This setting should always be turned off. Having the hints enabled allows the players to have directional
keys displayed on the left side of their screen, which helps them move and build in-game. The students
who are already familiar with Minecraft might not need these tips, but they will help the less skilled
players and make their user experience more pleasant.
Video settings

Fullscreen   –   Enabling   this   setting   will   make   the   game    run   in   fullscreen   mode.

View Bobbing – This setting should always be disabled. When turned on, the in-game character bobs
up and down a bit when walking. This can cause some players to experience motion sickness.

Audio settings

This is where you can change your sound settings. The slider called “Music” controls the volume of the
music that plays in the background of the game. “Sound volume” controls the volume of players and
animals. Students should turn off all sounds, since it would be too noisy to have sounds turned on in a
classroom full of children.
Storage

Each time you play in a specific Minecraft world, all the changes get saved. Eventually you can end up
with a large number of saved worlds that you might want to delete. You can do this in the “Storage”
menu.

Worlds – This is where all the worlds you’ve played are stored. Clicking the world that you do not want
to keep makes the delete icon show up. Click on it if you wish to confirm that you want to delete the
selected world.

Multiselect – If you want to delete more than one world, you should click this button. Squares will
appear on the left side of the list. You can check several squares to select multiple worlds. You delete
these worlds by clicking the “Delete” button.
Language

This menu contains a list of all the languages that Minecraft: Education Edition has been translated to.
Only the Java version of the game has been translated to Slovenian and Croatian. The educational
version is not available in these languages. Choosing a different language changes the names of the
blocks in the game world, but does not change the texts.

How to play

This section contains tips concerning different aspects of the game. This includes movement, the basics
of survival, basic gameplay tips, and the special features that appear in the educational edition of the
game.
Switch accounts
Clicking this button lets you switch between different user accounts, if you happen to have more than
one.

The clothing hanger icon
In the bottom right hand corner, under the player icon, there is a clothing hanger icon. Clicking this
icon allows you to change your appearance. You are provided with several different settings and
options that let you personalize your gaming experience. You can choose the appearance you desire
and click the button “Confirm” to confirm your selection and return to the main menu. Clicking the
arrow next to the “Confirm” button lets you revert to your old appearance.

The help icon
In the bottom left corner you will find an icon of a person with a speech bubble. Clicking on this icon
opens the official website for Minecraft: Education Edition, where you can ask for help.

Game version

In the bottom right corner, you can find the information about the current version of Minecraft that
you are using.

New world settings
In this pop up window you will be able to adjust your settings. This chapter describes the most
important and the most commonly used settings.
World Name – Enter your world name into this field. Naming your world makes it easier to find it in
your library later on. When you export your world you will have a file that is already named.

Default Game Mode - This lets you choose the game mode setting. You can choose between survival
and creative mode.

Difficulty – The game allows you to choose between 4 different difficulty settings. The difficulty named
“Peaceful” is the most casual setting, in which mobs do not appear and cannot be summoned by
players. Health and hunger continuously regenerate, so it is almost impossible to die. The other three
settings, named “Easy”, “Normal” and “Hard”, include mobs that spawn within the world and attack
players, who can die in game.

Permission level for students who join your world – This is where you can find all types of permission
levels for students who want to join your world.

Visitor – A visitor can move around the world unimpeded, but cannot use blocks or items. They can’t
interact with entities.

Member – A member is an active player in your world that can create and break blocks. They can attack
animals, mobs or other players.

Operator – An operator is a player who can set player permissions. They can use commands and have
more control over the world.
Seed – This is the identification number of the world that is automatically generated when you export
the world. If you know of a specific world, that seems suitable for your lesson, you need to know its
seed code to use it.

Show coordinates – You can enable this setting when you wish to have your in-game coordinates
displayed on the screen. It is considered good practice to have this setting permanently enabled.

Immediate respawn – This allows the player to reappear in the game immediately after dying.

Activate cheats – This setting allows you to use commands and turn on the World Builder status.

Random tick speed – This controls the speed at which the trees and other plants grow.

Always day – If this setting isn’t enabled, the game will cycle between daytime and night time every
20 minutes. Enabling this setting ensures that it is always daytime in-game. It is recommended that
you enable this setting, as it allows you to avoid poor player and mob visibility at night.

Export world – Clicking this button allows you to export a world that you’ve previously created.

Delete world – Clicking this button deletes the world.

Copy world – This allows you to make a copy of your world. This comes in handy when you want to
have several copies of the same world. This also allows you to make changes without risking a pre-built
world. You can use this feature when you want to make changes in your world, but are not sure which
version of the build you want to keep.
Game modes
Minecraft: Education Edition currently has three different game modes. Children are often already
familiar with the survival and creative mode, as they are available in the original game of Minecraft.

1.      Survival mode

Players must explore the world, collect building materials and other items that can be used to build,
create various tools, and survive. Players can get hurt due to hunger, fall damage, fire damage or
drowning. Players can also be damaged by their opponents. If a player takes too much damage they
can die.

This mode provides the players with the most authentic gaming experience.

2.      Creative mode

Players do not need to gather resources. At any given moment they have access to an unlimited
number of all the available blocks. Players do not take damage from hunger or injuries and cannot die.
Players can fly and instantly destroy blocks.

This mode is most suitable for lessons that require a lot of building.

3.      Adventure mode

Players cannot place or break blocks, and they cannot take damage. Their gaming experience is limited
to movement and pressing buttons, switches and other similar objects.

This mode is the most suitable one when dealing with a structured lesson plan that asks the students
to explore the world.
World type
There are 3 different types of worlds.

-      Flat – The flat world is only 4 blocks deep. The top layer of blocks is made up of grass.
Underneath the grass there are 2 layers of dirt and 1 layer of indestructible bedrock. The world does
not contain any special biomes. Animals and mobs spawn as usual.

-       Infinite – This is an infinite type of world. It is made up of different types of landscapes and it
is deeper compared to the previously mentioned flat world. The world never ends. New sections
continuously appear if you explore.

-      Old – This is an old world that measures 256 by 256 blocks. When you reach the last block the
game does not load a new section of the world. There is an invisible border that you cannot cross.

Import
You can create worlds on your own or you can import them. This allows you to choose between pre-
made worlds or lessons that are available on the Minecraft: Education Edition website.

Importing worlds

1.      Click “Play” on the home screen of Minecraft.

2.      Click the “Import” icon.

3.      Search for the world that you want to import in the file browser.

If you open the .mcworld file in your file explorer, the game will automatically start up and create a
copy of the world.
Export
The worlds that you have used in-game can be exported. This allows you to create safety copies of
your worlds. It is recommended that you make safety copies before updating your game. The files can
be damaged when you install updates.

Exported worlds can be shared with other users. You can use them to measure progress and you can
save them so you can use them again. This allows you to restore your worlds if you encounter errors
in your class.

If you want to export a world, you need to name it without using any punctuation or special characters
in the name.

How to export a world:

1)     Press “Play” on the home screen of the application.

2)     Click the “View my worlds” icon.

3)     Click the world that you want to export, then click the “Settings” button.

4)     Scroll down through all the options on the right side of the menu. Click “Export world” which
is         located         on            the          bottom           of           the          list.

5)     Save the world to your desired location. The exported .mcworld file can be saved wherever
you want, including a network drive or a USB drive.

The worlds made in Minecraft Bedrock can easily be converted into .mcworld files. Worlds created in
Minecraft: Education Edition, however, cannot be converted into files that can be used in the Bedrock
edition.

Copy world
Clicking the “Copy world” button allows you to create a copy of the world. The copy will be an exact
replica of the world as it was at the moment of saving.

Sharing worlds
Teachers can now share their worlds and lessons with their students using the Microsoft Teams
program. This application is available on devices that use the Windows 10 OS or Chrome OS. iOS users
and macOS users can copy and paste a link to the world.

The teacher can share all the lessons located in the game library by clicking the “Share link” button.
This opens a new popup window with three icons. The blue icon is linked to Microsoft Teams. The
teacher can share the world as an “Assignment”. They can also share it with an individual or a group in
the channel.

Students can access the world by clicking the link in Microsoft Teams. This opens a browser, which
starts up the game. If the student does not have the game installed, a pop up window will appear that
allows them to download it.

Multiplayer mode
The multiplayer mode enables several players to interact with the same world simultaneously.
Multiplayer mode can be hosted locally (in the same room, such as a classroom), or online. Multiplayer
mode enables players to play on their own or cooperate with other players to achieve common goals.
Multiplayer mode allows players to communicate and interact with other players.

The multiplayer mode is one of the most popular Minecraft modes that get used in a classroom setting.
It encourages communication, cooperation, and the exploration of new and creative ways to solve
problems. The educational edition of Minecraft allows you to host a multiplayer game for players who
are using the same network, or are within the same tenant. This is the part of the username that
follows the @ symbol. All players need to be running the same version of Minecraft: Education Edition.
A single multiplayer game can be joined by up to 30 players, including the teacher. The same
multiplayer game can be joined by players from any of the supported platforms. Multiplayer mode was
designed to be used in the same classroom, where all the players are on the same network. It is
possible to run a multiplayer game from home, however.

Additional information about this will be available in a different section the manual. Before you use
multiplayer mode it is vital that you set lesson objectives, prepare tasks for your students, and set a
time limit to complete them.

Requirements

-       Multiplayer is available to all players who use the same tenant.

-       All players need to be using an up to date version of the game.

-       All players must be running the same version of the game.

How to host a game

A multiplayer game can be hosted by any player, however, we would recommend that the teacher
hosts the game.

Click the “Play” button on the home screen.
You can create a brand new world. You do this by clicking the “Create New” button that can be found
by clicking the “Play” menu, followed by clicking “New”. This opens a new window with all the game
settings that you can adjust before hosting the world. When you finish adjusting the settings, click on
the “Host” button, which is located below the picture of the world.

You can also host a world that already exists. You do this by choosing a pre-existing world from the
“View My Worlds” menu. Use your left mouse button to click on the world that you want to host a
multiplayer game in, and choose the option to “Host”. This creates a new game in your chosen world.

You can import and host worlds from your "View Library" menu. Choose a world from the library and
click on it. This will open a new window that contains a description of the world. On the upper right
side of the screen you will find the “Create world” button. Clicking on it lets you enter the world.
You can also host a game that you’re already in. To host a multiplayer game press the “Escape” key.
Several new options will show up. Click the “Friends” tab, which has an icon made up of four faces.
Click the “Start hosting” button.

A new dialogue box will show up. You must confirm that you want to create a multiplayer game by
clicking the “Confirm” button.

Beneath the “Join Code” text you will see 4 pictures of objects or beings that can be encountered
within the game. This is the picture based code that your students will need to enter to join your world.
The code must be entered in order from left to right, as shown on your screen.

If a student enters the wrong code several times in a row they will get a warning after three failed
attempts. After five failed attempts they will need to wait a few minutes before they can attempt to
join again. This prevents students from guessing the join codes and joining sessions that they haven’t
been invited to join.

Clicking the “Refresh” button lets you generate a new code. The button is located to the right of the
picture based code.

Players who have joined the world before a new code was generated do not need to leave the world
while you do this.

How to join a multiplayer game

Click the “Play” button on your home screen.

In the following menu click the “Join World” button.

Students must now enter a code made up of four different icons and click the “Confirm” button if they
want to join. If the student makes a mistake while entering the code, he or she can delete it by clicking
the “Clear” button.

Multiplayer game settings

The settings menu allows you to change the permission level for players who join the world. The host
of the game will always have the role of the operator. Operators are players who have more control
over the world. They can set player permissions and remove players from the game.
If you do not want anyone to join an existing game, you can change the join code by pressing the “Esc”
key and clicking the “Refresh” button that is located to the right of the code in the “Friends” tab. The
operator can set the maximum number of players in the game. To do this you need to press the letter
“t” and type in the command /setmaxplayers. After typing the command, you must enter the maximum
number of players in the game e.g. /setmaxplayers 10.

Most frequently encountered problems while hosting multiplayer games

Issues with minimum requirements.

If you can join a multiplayer game but encounter problems when more people join after you, consider
the following points.

1.      If you want to host a multiplayer game, your internet bandwidth must be at least 1.5Mbps.

2.      You can change your graphics settings in the video settings menu (reduce the render distance
and turn off the “Fancy Graphics” option).

Connection issues.

1.      Close Minecraft and then restart the game. Hosting a multiplayer game should be the first
thing you do once the game loads.

2.      Host a new world. Do not use a world that has already been used for multiplayer mode.

3.      Your network must allow communications with https://meeservices.azurewebsites.net This
URL should be whitelisted on all devices and systems that can block your access to the internet. Check
your router, your antivirus, and your firewall settings. This step usually isn’t required.

You can find the instructions on how to use whitelisting in this article:

https://jackboxgames.happyfox.com/kb/article/28-how-to-whitelist-and-resolve-issues-in-antivirus-
software-and-firewalls/

4.      It is vital that all the players use the same version of Minecraft. It is recommended that you
use the most up to date version. If your players do not have the same version of the game installed ,
they will get a “Could not connect. Outdated server” error message. The newest version is available on
this website: education.minecraft.net
5.      If the host loses his or her connection, all the players will get disconnected as well. The host
will need to host the session again and all the players will need to re-join the world.

6.     Connection quality can often be a problem with Wi-fi. It is advisable to connect using a network
cable.

7.      Make sure that port 19132 is not blocked in your network configuration. It is recommended to
set up port forwarding on your router as well. This is something that only the host of the game needs
to do. This setting allows players to connect and makes the connection faster and more stable. To set
up port forwarding, you need to know the IP address of your router and the IP of your device.

You can find your router’s IP using various websites such as myip.com

Visiting this website will give you information about your router’s IP number. The IP address will be
made up of 11 numbers, separated by dots (e.g. 123.456.789.01. )

The next step involves signing in to your router. You do this by entering the IP address that you acquired
in the previous step, into your browser. This will open a new window where you must enter yo ur
username and password. You can typically find the username and password on the sticker that is on
your router or the papers that came with the router. On the website you will find a tab called “Port
forwarding”, which contains the TCP and the UP. In the “Local start point” you need to enter 19132, in
the “Local end port” tab you enter 19133, in the “External start port” tab you enter 19132, and in the
“External end port” you enter 19133. Below this text you will find a picture that will help you set up
port forwarding. The website that lets you access your router may look different than the example
given, however, the functionality should be the same or at least very similar.

8.      Students should try to join the game by typing in the IP address. The drawback of using this
method is that you will have to generate new join codes for each multiplayer game. Using this method
requires you to go through the port forwarding process described in the previous section. Players can
join your game by clicking the “More options” icon that looks like a triple dot button.

This opens a new window where they can enter the IP address of your router and the port number
(Port   19132).   Students  then    click the      “Join” button      to    join the      game.
9.      If you need additional            help,   this   website     is   available   to    all   users:
https://aka.ms/MEE_New_Request

There is another way for you to interact with your students using the same world. However, this does
not include using the multiplayer mode. The teacher can give the student a task that involves building
a specific thing within a selected world. The student exports the world and sends it to the teacher. The
teacher can then send that same world to the next student and repeat the process until everyone’s
had their turn.

Immersive reader
The immersive reader is an integrated tool that helps students read or translate text in-game. This
includes character dialogue, boards and settings. The immersive reader includes a picture dictionary
that contains the images of characters specific to Minecraft (e.g. Creepers or Mo oshrooms).
The immersive reader can read text out loud, however, that feature is currently not available in
Slovenian or Croatian. It includes features such as changing the font size, changing the font, and word
type recognition (noun, verb, adjective). Foreign language teachers can use these features in their
lessons.

Chat and Commands
Minecraft has a chatroom that can be used to message other players or type in commands. You can
access the chatroom by pressing the letter T, which opens a new window that lets you enter your
messages. You can send messages by typing them in the bottom section of the window and either
clicking the “Send” button or pressing enter.

Commands start with the slash (/) symbol. Each time you enter a command it shows up in the upper
left corner of your screen. You will notice that entering the slash symbol shows you some suggestions
for various commands. Commands let you change things within the world, such as time, weather,
and game mode. You can change the spawn location of your players, teleport your players, or give
players the World Builder status.
The /setworldspawn command
This is the command that lets you set the spawn point for all your players. This location is where they
will appear when they first join the world. When you create your world the game decides where to
spawn you. While playing and building, your location changes. If you want your students to appear in
a different part of the world, you can change this by using the /setworldspawn command in the Chat
and Commands window. Entering the command will make the players appear at your location. If you
want your players to appear at specific coordinates you can enter them like this:

/setworldspawn 21 75 6 – this command uses specific X, Y, and Z coordinates.

/setworldspawn ~9 ~~-6 – this is what the command should look like when you want to appear 9 blocks
to the east and 6 blocks to the north of your current location.

The World Builder status
The world builder status allows the player to place all types of blocks. This option can be set to either
“true” or “false”.
You can also read