OpenCL Basic Tutorial for Android* OS - User's Guide Compute Code Builder - Samples
←
→
Page content transcription
If your browser does not render page correctly, please read the page content below
OpenCL™ Basic Tutorial for
Android* OS
User's Guide

Compute Code Builder - Samples
Document Number: 330185-002US
Android OpenCL Tutorial

Contents
  Contents ........................................................................................................................ 2
  Legal Information ............................................................................................................ 3
  Introduction ................................................................................................................... 4
  What Is OpenCL™? .......................................................................................................... 4
  Running and Controlling the Tutorial .................................................................................. 5
  OpenCL in Android* Applications ....................................................................................... 6
  OpenCL Implementation................................................................................................... 7
  Choosing OpenCL Device Type ......................................................................................... 11
  Building the Tutorial ....................................................................................................... 11
  Tutorial Application Structure........................................................................................... 12
  Separating OpenCL and UI Processing .............................................................................. 12
  Android Application Lifecycle Events ................................................................................. 13
  Limitations .................................................................................................................... 13
  APIs Used ..................................................................................................................... 14
  References .................................................................................................................... 14

                                                                                                                                   2
Legal Information
Legal Information
INFORMATION IN THIS DOCUMENT IS PROVIDED IN CONNECTION WITH INTEL PRODUCTS. NO LICENSE,
EXPRESS OR IMPLIED, BY ESTOPPEL OR OTHERWISE, TO ANY INTELLECTUAL PROPERTY RIGHTS IS GRANTED BY
THIS DOCUMENT. EXCEPT AS PROVIDED IN INTEL'S TERMS AND CONDITIONS OF SALE FOR SUCH PRODUCTS,
INTEL ASSUMES NO LIABILITY WHATSOEVER AND INTEL DISCLAIMS ANY EXPRESS OR IMPLIED WARRANTY,
RELATING TO SALE AND/OR USE OF INTEL PRODUCTS INCLUDING LIABILITY OR WARRANTIES RELATING TO
FITNESS FOR A PARTICULAR PURPOSE, MERCHANTABILITY, OR INFRINGEMENT OF ANY PATENT, COPYRIGHT OR
OTHER INTELLECTUAL PROPERTY RIGHT.
A "Mission Critical Application" is any application in which failure of the Intel Product could result, directly or
indirectly, in personal injury or death. SHOULD YOU PURCHASE OR USE INTEL'S PRODUCTS FOR ANY SUCH
MISSION CRITICAL APPLICATION, YOU SHALL INDEMNIFY AND HOLD INTEL AND ITS SUBSIDIARIES,
SUBCONTRACTORS AND AFFILIATES, AND THE DIRECTORS, OFFICERS, AND EMPLOYEES OF EACH, HARMLESS
AGAINST ALL CLAIMS COSTS, DAMAGES, AND EXPENSES AND REASONABLE ATTORNEYS' FEES ARISING OUT OF,
DIRECTLY OR INDIRECTLY, ANY CLAIM OF PRODUCT LIABILITY, PERSONAL INJURY, OR DEATH ARISING IN ANY
WAY OUT OF SUCH MISSION CRITICAL APPLICATION, WHETHER OR NOT INTEL OR ITS SUBCONTRACTOR WAS
NEGLIGENT IN THE DESIGN, MANUFACTURE, OR WARNING OF THE INTEL PRODUCT OR ANY OF ITS PARTS.
Intel may make changes to specifications and product descriptions at any time, without notice. Designers must not
rely on the absence or characteristics of any features or instructions marked "reserved" or "undefined". Intel
reserves these for future definition and shall have no responsibility whatsoever for conflicts or incompatibilities
arising from future changes to them. The information here is subject to change without notice. Do not finalize a
design with this information.
The products described in this document may contain design defects or errors known as errata which may cause
the product to deviate from published specifications. Current characterized errata are available on request.
Contact your local Intel sales office or your distributor to obtain the latest specifications and before placing your
product order.
Copies of documents which have an order number and are referenced in this document, or other Intel literature,
may be obtained by calling 1-800-548-4725, or go to:
http://www.intel.com/design/literature.htm.
Intel processor numbers are not a measure of performance. Processor numbers differentiate features within each
processor family, not across different processor families. Go to:
http://www.intel.com/products/processor_number/.
Software and workloads used in performance tests may have been optimized for performance only on Intel
microprocessors. Performance tests, such as SYSmark and MobileMark, are measured using specific computer
systems, components, software, operations and functions. Any change to any of those factors may cause the
results to vary. You should consult other information and performance tests to assist you in fully evaluating your
contemplated purchases, including the performance of that product when combined with other products.
Intel, Intel logo, Intel Core, VTune, Xeon are trademarks of Intel Corporation in the U.S. and other countries.
* Other names and brands may be claimed as the property of others.
OpenCL and the OpenCL logo are trademarks of Apple Inc. used by permission from Khronos.
Microsoft product screen shot(s) reprinted with permission from Microsoft Corporation.
Copyright © 2014 Intel Corporation. All rights reserved.
Optimization Notice
Intel's compilers may or may not optimize to the same degree for non-Intel
microprocessors for optimizations that are not unique to Intel microprocessors. These
optimizations include SSE2, SSE3, and SSSE3 instruction sets and other optimizations.
Intel does not guarantee the availability, functionality, or effectiveness of any optimization
on microprocessors not manufactured by Intel. Microprocessor-dependent optimizations in
this product are intended for use with Intel microprocessors. Certain optimizations not
specific to Intel microarchitecture are reserved for Intel microprocessors. Please refer to
the applicable product User and Reference Guides for more information regarding the
specific instruction sets covered by this notice.
Notice revision #20110804
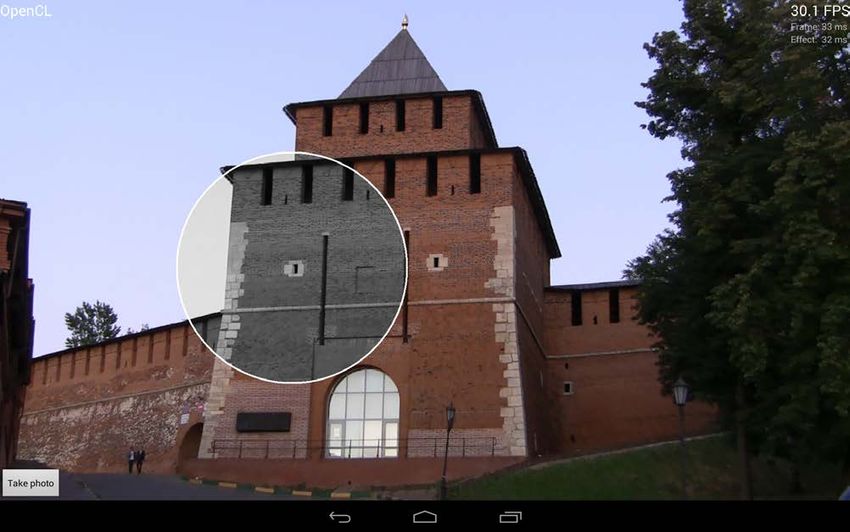
3Android OpenCL Tutorial Introduction OpenCL™ Basic Tutorial for Android* OS provides guidelines on using OpenCL in Android applications. The tutorial is an interactive image processing Android application. The main focus for the tutorial is to show how to use OpenCL in an Android application, how to start writing OpenCL code, and how to link to OpenCL runtime. The tutorial shows a typical sequence of OpenCL API calls and general workflow to get a simple image processing kernel running with an animation on an OpenCL device. Advanced topics like efficient data sharing or Android OpenCL performance BKMs are out of the scope of this tutorial. The tutorial is a minimalistic GUI activity that displays the computation results and statistics, and implements a simple full-screen image processing algorithm, with which you can interact through screen touches. After launching the tutorial application, a built-in image is displayed, and no post- processing happens until user interaction begins. When you touch the screen, an animated growing circle, centered at coordinates of the touch, appears, and all pixels that are inside the circle become black and white. The circle continues to grow each frame until the complete picture becomes black and white. Look into README.TXT for more details on the tutorial file structure and build/run steps. What Is OpenCL™? OpenCL™ (Open Computing Language) is an open standard for general-purpose parallel programming for a diverse mix of multi-core CPUs, graphics processors, coprocessors, and other parallel processors. OpenCL provides a flexible execution model and uniform programming environment for software developers to write portable code for systems running on CPU, GPU, and/or other devices. OpenCL is used to accelerate compute operations in various domains, including image and video processing, computer vision, game engine acceleration, and so on. OpenCL can also be effective for reducing power consumption. It achieves this by allowing the programmer to schedule compute work on the best suitable device where it may be executed faster and/or with lower power consumption. An OpenCL device is an abstraction for hardware which can perform compute operations. Typical examples of OpenCL devices include CPUs, GPUs, and specialized hardware modules like DSPs. OpenCL programs consist of two parts: a host side and a device side. The host side is written in C/C++ language and includes a sequence of OpenCL API function calls to select/create OpenCL objects like devices, contexts, queues, buffers, and so on. The host code is responsible for initiating and controlling kernel execution on the device side. The device side is a program written in OpenCL C language, which is C with extensions. The program consists of one or more kernels. Each kernel is intended to run on an OpenCL device. OpenCL program is loaded in a textual form and compiled at run-time or loaded in pre-built binary format by the running host program. In this tutorial, the program is loaded from source. Roughly speaking, each kernel invocation runs several work-items – one work-item for each point in the iteration space for the kernel. The iteration space is a 1-, 2-, or 3-dimensional grid, which is called NDRange in OpenCL. You may look at each work-item as being on a thread that executes OpenCL C code. For example, each work-item may process a single pixel in a 2D NDRange which is mapped to all pixels in a given image. So all work-items in one kernel invocation process a complete image. 4
Running and Controlling the Tutorial

Data processed in the OpenCL kernels are placed in OpenCL buffers. Each buffer can be read and/or
written in a kernel on the device. The results then can be retrieved on the host side by means of
calling one of the OpenCL API calls.

Running and Controlling the Tutorial
If you compile the tutorial using the Eclipse IDE, you should be able to run the tutorial on the device
directly from the IDE. Refer to Building the Tutorial section and Android documentation for details on
building and running from Eclipse with ADT. Alternatively, you can use the ADB utility from the
Android SDK platform-tools to install the pre-built executable yourself from
bin/AndroidBasicOpenCL.apk.

Finally, if you have neither IDE nor even Android SDK (and thus no ADB) you may still copy the pre-
built APK to the device over regular USB and install it directly on the device using any file manager for
Android OS.

After successful installation, the tutorial application becomes available on the device with the following
icon:

Upon launching, the tutorial starts in the full-screen mode and displays an image, which is being
updated with the results of applying the OpenCL kernel to each frame. On the right-top corner you can
find the current FPS and corresponding frame time (tagged “Frame”) and the time taken by the
OpenCL kernel itself (tagged “Effect”). The compute API itself is also shown at the left topmost corner
(“OpenCL”).

NOTE:   The sample requires OpenCL runtime installed on the device or the emulator. If your
        device/emulator doesn’t have OpenCL runtime you will see an error message upon
        application start and then the application will be terminated. To install OpenCL runtime,
        refer to dedicated chapter in the Intel® SDK for OpenCL™ Applications – User’s Guide.

The effect or processing that applies to the input image originally loaded from the application
resources is computing the “circle of black-and-white” with the dedicated OpenCL kernel. The effect
becomes apparently visible upon a screen touch. Specifically, the origin of the circle is the point of
touch, so when you touch the screen the new circle appears and expands over time. For each input
pixel, the OpenCL kernel determines if the pixel is inside or outside the circle. It then outputs the
outer pixels untouched, while converting the inner pixels to the black-and-white for the output and
also draws a thin circle border.

                                                                                                          5
Android OpenCL Tutorial The TakePhoto button enables you to replace the default image for processing with the picture taken from the camera of your device. For details and the general machinery of this functionality, refer to the tutorial code. The code that handles the camera is intentionally simplified (for example it does not handle camera orientation) to keep focus on the core tutorial topic, which is OpenCL. OpenCL in Android* Applications Though it is possible to use other programming languages (Java* OpenCL bindings) for writing the host side, the tutorial uses true native OpenCL interface using C/C++. Therefore it is required that application use Java Native Interface (JNI) and is built with Android Native Development Kit (Android NDK). The picture below shows a high-level architecture of the OpenCL Android application. It essentially consists of two parts: a Java part and a Native part. The Java part controls the UI, receives input from the user, loads the text of the OpenCL program from assets, and calls the native function from the native part to do actual image processing using OpenCL. Communication between the Java part and the native part is performed via JNI, which is typical for any Android application that includes native modules. The native part contains all of the OpenCL calls. The native part is linked against the libOpenCL.so library, where all OpenCL entry points reside. The libOpenCL.so library is a dispatcher, which passes OpenCL API calls to a specific implementation of OpenCL dedicated to a particular device, for example CPU or GPU. The libOpenCL.so library should already be installed on the target device before an application can be deployed. In case you don’t have the OpenCL runtime installed on your Android device, refer to the Compute Code Builder or Intel® SDK for OpenCL Applications 2014 Beta at http://software.intel.com/en-us/vcsource/tools/opencl-sdk. 6
OpenCL Implementation

                                                Dalvik/ART VM

                            Java part of
            Text of
           OpenCL
                            your application
           program
                                 MainActivity
            assets/
            step.cl

                                                                                                  JNI

                           Native part of                                  Preinstalled on your device
                           your application

                            initOpenCL                            libOpenCL.so
                                                                  Entry points for
                            stepOpenCL                             OpenCL API

                            shutdownOpenCL

       Content of the APK file
                                                            OpenCL CPU          OpenCL GPU
                                                          implementation       implementation
                                                                                   / driver

OpenCL Implementation
The OpenCL implementation consists of the following parts:

   •     initOpenCL - where all the OpenCL objects are created and initialized
   •     stepOpenCL - where the host to device communication and the actual OpenCL image
         processing happens
   •     shutdownOpenCL - where cleanup of the OpenCL objects happens
Each of the above parts has a dedicated native function implemented in jni/step.cpp file. The first
function, initOpenCL is called from MainActivity.onCreate method. Then, in the background
thread, stepOpenCL function is called to perform image processing each frame in a loop.

InitOpenCL
The initOpenCL performs the following steps:

   1. Pick the OpenCL platform. Your mobile device may support more than one platform, and the
         code by default looks for Intel OpenCL platform.

                clGetPlatformIDs(0, 0, &num_of_platforms);
                clGetPlatformIDs(num_of_platforms, &platforms, 0);
                // then go across all platform and search for Intel platform
                // . . .
   2. Create an OpenCL context from a particular device type. All other objects are created in this
      context.
         context = clCreateContextFromType(context_props, primary_device_type, …);

                                                                                                         7
Android OpenCL Tutorial
Where primary_device_type is a supported OpenCL device type on your Android device,
typically CL_DEVICE_TYPE_CPU or CL_DEVICE_TYPE_GPU. Please see Choosing OpenCL
Device Type section for basic guidelines about how to choose between CPU and GPU.
NOTE: The code in the sample attempts to create OpenCL context with primary_device_type
first. If it is not available (for example, in the emulator), secondary_device_type is used.
This is a part of flexibility implemented in the code, which shows you how to avoid crashes
in case of using diverse types of hardware (or the emulator).
3. Obtain the OpenCL device ID, which was selected during context creation in the previous step.
The device ID is needed for building the OpenCL program (in one of the following steps). This
is achieved by calling the clGetContextInfo function.
4. Create an OpenCL program from the source text. The source text is obtained as an argument
of initOpenCL and passed from Java part of application. First, it is converted from a Java
string to a native string and then passed to clCreateProgramWithSource.
5. Build the OpenCL program. In case of build errors, the build log is printed to LogCat:
cl_int err = clBuildProgram(program, . . .);
if(err == CL_BUILD_PROGRAM_FAILURE)
{
clGetProgramBuildInfo(
program, device, CL_PROGRAM_BUILD_LOG,
log_length, &log, …);
}
6. Extract (create) an OpenCL kernel from the program specifying the name of the kernel:
kernel = clCreateKernel(program, "stepKernel", …);
7. Create an OpenCL command queue, which is used to enqueue the OpenCL kernel to target
OpenCL device.
queue = clCreateCommandQueue(context, device);
After completing the steps above, you are ready to enqueue the kernel to perform the image
processing. This happens for each frame in stepOpenCL native function.
stepOpenCL
Two buffers are created in this function: one is for input image and the second is for output image.
Images are stored as OpenCL buffers, not as OpenCL images, because they are obtained from the
Java part of the application as arrays of pixels.
Input buffer is created only once since it doesn’t change every frame. In the code the input buffer is
conditionally created in case when Java part updates its content.
if(!isInputBufferInitialized || updateInputBitmap)
{
. . .
/* You receive input buffer as a Java bitmap object.
* To use it in the native part, lock it and obtain a native pointer
* to the area with pixels.
*/
void* inputPixels = 0;
AndroidBitmap_lockPixels(env, inputBitmap, &inputPixels);
inputBuffer =
clCreateBuffer
(
context,
CL_MEM_READ_ONLY | CL_MEM_COPY_HOST_PTR,
8OpenCL Implementation
bufferSize, // Buffer size in bytes.
inputPixels, // Bytes for initialization.
&err
);
. . .
AndroidBitmap_unlockPixels(env, inputBitmap);
}
AndroidBitmap_lockPixels and AndroidBitmap_unlockPixels are standard native Android
functions which enable accessing bitmaps passed from the Java side of the application directly in the
native part of the application. These functions can be used by including header
file.
The output buffer, on the other hand, is created each frame, because it is created on top of pixels that
need to be drawn on the screen.
The output buffer is created using CL_MEM_USE_HOST_PTR, which means that the application enables
OpenCL implementation to use the output array of pixels in the bitmap as the storage bits for the
OpenCL memory object:
void* outputPixels = 0;
AndroidBitmap_lockPixels(env, outputBitmap, &outputPixels);
cl_mem outputBuffer =
clCreateBuffer
(
context,
CL_MEM_WRITE_ONLY | CL_MEM_USE_HOST_PTR,
bufferSize, // Buffer size in bytes, the same as input buffer.
outputPixels, // Area on top of which buffer is created.
&err
);
. . .
/* Set the arguments for kernel, execute it, and retrieve data back. */
. . .
clReleaseMemObject(outputBuffer);
// Now make output content visible at Java side by unlocking
// pixels in output bitmap.
AndroidBitmap_unlockPixels(env, outputBitmap);
NOTE: According to the OpenCL specification section “Creating buffer objects”, OpenCL
implementations are allowed to cache the buffer contents pointed to by outputPixels in
device memory even if CL_MEM_USE_HOST_PTR parameter is used. This cached copy can be
used when kernels are executed on a device.
In order to execute the OpenCL kernel all the required arguments need to be passed to it. Specifically
for this tutorial, inputBuffer and outputBuffer need to be passed together with other necessary
arguments (see complete source code for details):
clSetKernelArg(kernel, 0, sizeof(inputBuffer), &inputBuffer);
clSetKernelArg(kernel, 1, sizeof(outputBuffer), &outputBuffer);
. . . // Setting the rest of arguments.
These arguments directly correspond to OpenCL kernel arguments defined in assets/step.cl file:
kernel void stepKernel
(
9Android OpenCL Tutorial
global const int* inputPixels,
global int* outputPixels,
. . . // The rest of arguments.
)
{
// Source code of OpenCL kernel.
. . .
}
After setting the appropriate arguments, the application is finally ready to enqueue kernel to the
device queue:
// Define global iteration space for clEnqueueNDRangeKernel.
// Every work-item running the kernel will process a single pixel in the
image.
size_t globalSize[2] = { /* Image width */, /* Image height */ };
clEnqueueNDRangeKernel
(
queue,
kernel,
2, // Dimension of iteration space: 2D.
0,
globalSize, // Dimenstions of iteration space: picture dimensions.
0,
. . .
);
The above command only enqueues the kernel but doesn’t guarantee the execution on the device
immediately. To immediately start execution and block until kernel is completely executed, the
following call is used:
clFinish(queue);
The last remaining step is to retrieve the processed data back and populate outputPixels. Recall that
CL_MEM_USE_HOST_PTR was used, the best method to retrieve the data from such a buffer is using the
map/unmap idiom:
clEnqueueMapBuffer(queue, outputBuffer, …, CL_MAP_READ, …);
clEnqueueUnmapMemObject(queue, outputBuffer, outputPixels, …);
// And call clFinish to guarantee that output region is updated.
clFinish(queue);
After releasing outputBuffer and unlocking outputPixels the code returns to the Java part and
publishes the processed image content on the display.
NOTE: Two clFinish calls are used in the code. The first one is not needed for correct program
execution, but it is used for correct measurement of time spent in the kernel execution.
Refer to source code for details.
shutdownOpenCL
The last function, shutdownOpenCL implements a regular sequence of calls to deallocate all of the
OpenCL resources created in initOpenCL.
The deallocation can be done anytime during application execution if the OpenCL processing/objects
are no longer required by the application in order to free some memory or to recreate OpenCL objects
with different parameters.
Calling this function before application termination may not be so useful since Android doesn't
guarantee such notification of termination to the application, rendering the call useless.
10Choosing OpenCL Device Type
Choosing OpenCL Device Type
In OpenCL the device type, on which the kernel is executed, needs to be specified explicitly. Intel
OpenCL implementation for Android devices supports CPU and GPU devices of the Intel® Atom™
processors (formerly codenamed Bay Trail).
NOTE: OpenCL is relatively low-level tool and it requires you to make this selection manually.
One may consider choosing the GPU device as a default device for image processing, computer vision
algorithms, media and other similar tasks, since GPUs are optimized/designed for such tasks.
But most generally, the selection highly depends on the compute algorithm. The ultimate method to
determine the right device for your compute kernel is experimentation. Run your application with
kernel enqueued to CPU one time and to GPU another time. Compare the performance and power
consumption, then select the best OpenCL device for your needs and code its type in the
clCreateContextFromType call.
In case you want your application to run well on diverse hardware platforms like smartphones and
tablets, you need to be careful and make sure that the application works on Android platforms with
different combinations of OpenCL devices, or even Android platforms with no OpenCL devices. The
right selection is dependent on target Android device hardware capabilities.
The Intel SDK for OpenCL Applications - Optimization Guide provides general guidelines that help in
making the right choice during the OpenCL device selection.
Building the Tutorial
To be able to build the tutorial you need everything that is needed for development of a regular native
application for Android OS. Refer to the Android standard documentation to see the complete list of
required software.
You also need to install the Intel SDK for OpenCL Applications software with Android OS support. The
latter is needed to build the native part because it includes OpenCL headers and links against
libOpenCL.so.
NOTE: The native part of the application is built by means of a makefile: jni/Android.mk. Please
consider looking into this file to learn how to write one. This is an essential part of the
OpenCL application for Android OS.
NOTE: The makefile has a hardcoded path to the place where Intel SDK for OpenCL Applications
software with Android support is installed. The path is assigned to INTELOCLSDKROOT
variable. This path is used to locate the OpenCL header and library files. You need to check
if the path matches the installation location of OpenCL on your system. If it doesn’t match,
you need to change INTELOCLSDKROOT variable in jni/Android.mk to set your custom
path.
Several manual steps are required to build the native part of the tutorial, while Java part is built
automatically inside your Eclipse IDE. The following are the steps to build a regular Android application
with native part:
1. Go to the tutorial root directory in a terminal and issue the ndk-build command. This
should build native part of your application. For details refer to the Android NDK
documentation.
2. Then you are able to build the final APK file (or it is built automatically by Eclipse depending
on your settings).
NOTE: Initial archive with tutorial project files already includes a pre-built APK file, which is ready
to be installed on a device. Make sure that OpenCL is installed on this device before
installing APK file.
11Android OpenCL Tutorial
Tutorial Application Structure
Generally, the structure of tutorial application is quite similar to any other Android application. So the
tutorial comprises the single Activity (sub-classed in the MainActivity.java) that interacts with the
user. The activity takes care of creating a (full-screen) window to place UI:
• TextViews to print performance statistics on the screen
• An ImageView to output the result of the computations that OpenCL produces
The visual structure of the GUI elements and the associated logic (like the relative layout) is declared
in XML (refer to the activity_main.xml in the res/layout folder).
Separating OpenCL and UI Processing
One particularly important concept in the mobile domain is “Keeping Your Application Responsive”.
Android applications typically run in a single thread, which is by default the "UI thread", which is the
thread that handles the UI events. Any heavy calculations within this thread should be minimized, in
order to keep the app (GUI) responsive.
Thus the first important tip is to utilize the rich set of task/threading primitives in the Android API to
execute any potentially long running operations such as computationally intensive OpenCL kernels via
some sort of asynchronous requests.
To express the producer-consumer relations between the UI and the OpenCL, a scheme with a
dedicated “worker” thread is implemented. This thread computes the updated images and notifies the
UI thread upon completion, so the UI thread updates the screen with the result. In this tutorial
application the producer-consumer relations are presented by the UI thread displaying or “consuming”
bitmaps that OpenCL kernel updates or “produces”.
Unlike potential alternatives based on any notion of an “async task issued by the UI thread” which
would essentially inverse the producer-consumer relations, the worker thread is not popping up each
time the UI thread needs an updated image. Instead, it produces the images and waits for the UI
thread to consume them. This is implemented through a couple of conditional variables, discussed in
details below.
The lifetime of the worker thread spans the lifetime of the Activity itself, so this ensures no expensive
thread creation/deletion happens behind the scene. Similarly, the double-buffering scheme prevents
the intensive resource manipulation for the output Bitmaps.
Here is the loop the worker thread executes (simplified to the pseudo-code for brevity):
public void run()
{
// Check if the application is exiting, so you don’t need frames anymore.
while(!isShuttingDown)
{
// Conditional that allows the thread to sleep when
// the application is not in focus.
isGoing.block();
// Conditional that prevents output to the bitmap the UI thread
// displays now.
isRendering.block();
{
// Check if you need to update the input image (after
// photo).
. . .
12Android Application Lifecycle Events
// Swap bitmaps used for processing and displaying.
. . .
// Actual call to the kernel
step();
// Block the thread from computing next
// frame to the same bitmap.
isRendering.close();
// issue the Bitmap/View update on behalf of
// UI thread via post
outputImageView.post
(
outputImageView.setImageBitmap(outputBitmap);
outputImageView.invalidate();
// allow the worker thread to process the next frame
isRendering.open();
);
}
}
}
Android Application Lifecycle Events
From the purposes of this tutorial, there are few important methods that your Activity needs to
implement:
• onCreate - where the activity is initialized. Most importantly, beyond actually setting Views
with the resources defining UI, the general OpenCL initialization (calling initOpenCL native
function) is handled here.
• onStart/onStop () - where the application becomes visible and invisible to the user. Most
importantly this is the place where “worker” thread is paused and resumed.
• OnWindowsFocusChanged(boolean) which is called (with ‘true’) when all of the UI have been
successfully loaded and created properly.
o In this function it is safe to initialize corresponding bitmaps for double-buffering,
because here you already know your widgets dimensions.
o This is also a place where a dedicated “worker” thread is spawned, since the memory
resources are already initialized at this point.
• OnDestroy, the final call to the application to release resources and enable the “worker”
thread to exit.
Limitations
The main focus of this tutorial is OpenCL APIs and its place in an Android application. More advanced
topics like Android application lifetime caveats, advanced efficiency are out of the scope of this
tutorial. So for simplicity this tutorial uses screen orientation fixed to the ‘landscape’, so images taken
with camera might be rotated.
Using bitmaps without efficient surface handling is also for simplicity. In real performance/power
oriented application one may want to use OpenGL surfaces.
13Android OpenCL Tutorial
APIs Used
This tutorial uses the following OpenCL host functions:
• clGetPlatformIDs
• clGetPlatformInfo
• clCreateContextFromType
• clGetContextInfo
• clCreateProgramWithSource
• clBuildProgram
• clGetProgramBuildInfo
• clCreateKernel
• clCreateCommandQueue
• clCreateBuffer
• clSetKernelArg
• clEnqueueNDRangeKernel
• clFinish
• clEnqueueMapBuffer
• clEnqueueUnmapMemObject
• clReleaseMemObject
• clReleaseKernel
• clReleaseProgram
• clReleaseCommandQueue
• clReleaseContext
References
• Intel® SDK for OpenCL™ Applications – User’s Guide
• Intel SDK for OpenCL Applications – Optimization Guide
• OpenCL 1.2 Specification at http://www.khronos.org/registry/cl/specs/opencl-1.2.pdf
• Android* Development Tools at http://developer.android.com/tools/sdk/eclipse-adt.html
• Android NDK at http://developer.android.com/tools/sdk/ndk/index.html
• Installing OpenCL* Runtime on Android* Emulator
14You can also read