SPINAL SURGERY Patient Booklet - Northwest Specialty Hospital
←
→
Page content transcription
If your browser does not render page correctly, please read the page content below

SPINAL SURGERY
Patient Booklet
TA B L E O F C O N T E N T S
1 . ABOU T U S
  Welcome Letter                   1.1
  Our Hospital                     1.1
  Facility Maps                    1.2

2 . OVER VI EW
  Spinal Anatomy                   2.1
  Cervical Spine                   2.1
  Thoracic Spine                   2.2
  Lumbar Spine                     2.2
  Types of Surgery                 2.3
  Frequently Asked Questions       2.5

3 . PRE- SU RG ICAL PLANNING
  Preparing for Your Surgery       3.1
  Your Coach                       3.1
  Home Care                        3.2
  Pharmacy                         3.4
  Equipment                        3.7
  Hygiene                          3.8
  Preparing for Your Surgery       3.9
  What to Bring                    3.10

4 . YOU R SU RGERY
  Preparing for Surgery            4.1
  Parking                          4.1
  Checking In                      4.1
  The Operation                    4.1

5 . POST-SU RGICAL CARE
  The Consultation                 5.1
  Recovery                         5.1
  Discharge                        5.1
  Home Care                        5.2
  Exercise                         5.3
  Rehabilitation In the Hospital   5.5
  Assisted Home Care               5.6
  When to Call Us                  5.6

6 . I MPORTANT INF O RM AT IO N
  Contact Information              6.1

ABOUT US
Northwest Specialty Hospital

WELCOME
At Northwest Specialty Hospital our motto is Patients First. It defines our
hospital, our culture and our life’s work. The safety and satisfaction of our
patients is at the core of everything we do. As one of the few remaining
hospitals in the nation owned and operated by surgeons, our decisions
as an organization are guided by their real-life experience with patients
like you. We hope that you will enjoy our five star cuisine and relaxing
atmosphere as you receive care from some of the best surgeons in the
area and our compassionate staff. Our goal is to provide you with the best
experience possible, so we designed this document to help guide you
through your upcoming surgical procedure. If there are any questions you
may have about your procedure, please feel free to let a member of our
team know. It is truly an honor that you have chosen us to care for you,
and we would like to thank you for your trust in us.

Sincerely,

Rick Rasmussen
CHIEF EXECUTIVE OFFICER

OUR HOSPITAL
Northwest Specialty Hospital is owned and operated by a team of local physicians, with a shared mission of
delivering patients superior care at an affordable rate. Our physicians have invested personally, professionally
and financially in your care. They have dedicated their lives to creating a hospital that allows them to practice
on their own terms and do what’s best for patients. Instead of dealing with complicated bureaucratic issues of
the big-hospital system, our physicians run Northwest Specialty Hospital in a way that allows them to focus on
what matters most, delivering excellent patient-centered care.

                                    NORTH IDAHO’S ONLY 5-STAR HOSPITAL
                                    By the Centers for Medicare and Medicaid for Patient Satisfaction

                                                                                                                    1.1
FACI L IT Y MAPS

               NORTHWEST SPECIALTY HOSPITAL

                 NORTHWEST URGENT CARE
1.2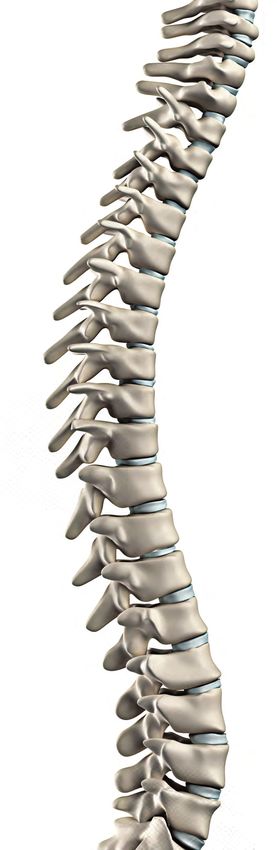
OVERVIEW
Spinal Structure

SPINAL ANATOMY
To understand the different types of spinal surgery, you must
first understand the structure of the spine. The three areas of
the spine are the top cervical spine, the middle thoracic spine,
and the bottom lumbar spine.

CERVICAL SPINE
The cervical spine is made up of the first seven vertebrae in
the spine. It starts just below the skull and ends just above
the thoracic spine. The cervical spine has a lordotic curve, a
backwards “C” shape, just like the lumbar spine. The cervical
spine is much more mobile than both of the other spinal
regions. Unlike the rest of the spine, there are special openings
in each vertebra in the cervical spine for arteries (blood
vessels that carry blood away from the heart). The arteries
that run through these openings bring blood to the brain.
The cervical spine is very flexible, but it is also very much
at risk for injury from strong, sudden movements, such as
whiplash-type injuries. This high risk of harm is due to the
limited muscle support that exists in the cervical area, and
the fact that this part of the spine has to support the weight of
the head, an average of 15 pounds. This is a lot of weight for a
small, thin set of bones and soft tissues to bear. Sudden, strong
head movements can cause also damage.

                                                                    2.1
OVE RVI EW (CO NT.)

  THORACIC SPINE
  The thoracic spine is made up of the middle twelve vertebrae.
  These vertebrae connect to your ribs and form part of the
  back wall of the thorax (the ribcage area between the neck and
  the diaphragm). The thoracic spine’s curve is kyphotic, a “C”
  shaped curve with the opening of the “C” in the front. This
  part of the spine has very narrow, thin intervertebral discs.
  Rib connections and smaller discs in the thoracic spine limit
  the amount of spinal movement in the mid back compared
  to the lumbar or cervical parts of the spine. There is also less
  space inside the spinal canal.

  LUMBAR SPINE
  The lowest part of the spine is called the lumbar spine. This
  area usually has five vertebrae, however, sometimes people
  are born with a sixth vertebra in the lumbar region. The base
  of your spine (sacrum) is a group of specialized vertebrae
  that connects the spine to the pelvis. When one of the bones
  forms as a vertebra rather than part of the sacrum, it is
  called a transitional (or sixth) vertebra. This occurrence is
  not dangerous and does not appear to have any serious side
  effects. The lumbar spine’s shape has a lordotic curve, shaped
  like a backwards “C”. The vertebrae in the lumbar spine area
  are the largest of the entire spine. The lumbar spinal canal is
  also larger than in the cervical or thoracic parts of the spine.
  The size of the lumbar spine allows more space for nerves to
  move about. Low back pain is a very common complaint for
  a simple reason. Since the lumbar spine is connected to your
  pelvis, this is where most of your weight bearing and body
  movement takes place. Typically this is where people tend to
  place too much pressure, such as when lifting up a heavy box,
  twisting to move a heavy load, or carrying a heavy object.
  These activities can cause repetitive injuries that can lead to
  damage to the parts of the lumbar spine.

2.2

T Y P E S OF SURGE RY

ANTERIOR CERVICAL DISCECTOMY ARTHROPLASTY (ACDA)
Cervical disc replacement surgery involves removing a diseased cervical disc from the front of the neck and
replacing it with a prosthetic disc. It is inserted into the space where the unhealthy disc was. No bone graft
is used and no motion is lost at that level, as the prosthetic disc allows for forward, backward and sideways
motion of the neck.

ANTERIOR CERVICAL DISCECTOMY FUSION (ACDF)
This procedure removes damaged discs from the front of the neck to help relieve spinal cord or nerve root
pressure. A spacer, cage, or bone graft is inserted into the open disc space, serving as a bridge between the
two vertebrae, creating a spinal fusion. The bone graft and vertebrae are fixed in place with screws and
sometimes a plate.

POSTERIOR CERVICAL FUSION (PCF)
This procedure involves a posterior incision with screws and rods used to fuse the cervical (and possibly
thoracic) spine together to form one solid segment. This stabilizes the spine by reducing mobility. Its goal is
to alleviate corresponding pain, weakness, numbness, and tingling.

THORACIC FUSION
This procedure fuses two or more thoracic bones, joining them together to eliminate the movement between
them. Bone grafts are placed between the affected vertebrae to stimulate bone healing. This promotes bone
growth and eventually fuses the vertebrae into a single solid bone, permanently. Screws and/or plates are used
to hold the vertebrae together while the bone graft heals and the body fuses them together.

                                                                                                                  2.3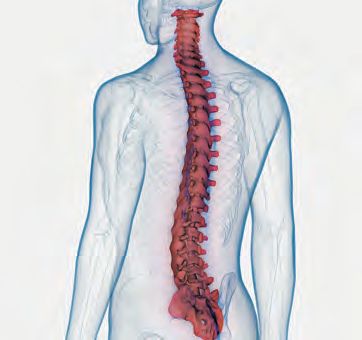
T Y P E S OF SURGE RY (CONT.)

  INTERBODY FUSION
  The fusion involves removing the disc in between two vertebrae and replacing it with an implant containing
  a bone graft, allowing for the two vertebrae to fuse together through the disc space. This is typically combined
  with PSIF, which involves placement of screws and rods through the back of the spine to stabilize and fuse two
  or more segments. Indications for surgery are lumbar disc degenerative disease, spondylolisthesis, scoliosis,
  lumbar herniated disc, and lumbar stenosis. Some situations require a two phase surgical approach requiring
  a longer stay.

      • LLIF (Lateral Lumbar Internal Fixation): Spine approached through the side (lateral)
      • ALIF (Anterior Lumbar Interbody Fusion): Spine approached through the front (involves bowel prep)
      • PLIF (Posterior Lumbar Interbody Fusion): Spine approached through the back
      • TLIF (Transforaminal Lumbar Interbody Fusion): Spine approached through the back
      • PSIF (Posterior Spinal Interbody Fusion) Spine approached through the back

  DECOMPRESSIVE LUMBAR LAMINECTOMY
  Decompressive laminectomy helps alleviate pressure on nerve roots within the spinal canal. This pressure
  typically develops as a result of age-related degeneration, but can also be caused by spinal injury, tumors or
  herniated discs. The surgery increases available space for the nerves to move by removing the back portion of
  the vertebra covering the canal itself.

2.4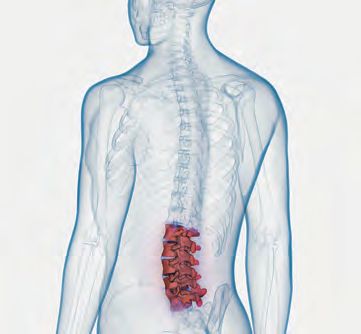
F RE Q UENT LY ASKED Q UESTIONS

What are the risks involved?
Infection: As with all surgery, there is the risk of infection. Your pre-admission test results will confirm you
have no active infections before surgery. Antibiotics administered before and after surgery, along with other
precautions such as cleaning the surgical site with antimicrobials, will further help prevent infection.

Blood Clots: To reduce the risk of blood clots and promote circulation, you will be asked to pump your feet
and exercise your ankles following surgery and during your recovery. You will also be instructed to ambulate
often for further blood clot prevention.

Congestion: Breathing deeply after surgery and coughing frequently are important ways to prevent congestion
from building up in your lungs, which could lead to pneumonia. You will also be given a breathing device
called an Incentive Spirometer, to use after surgery to help improve lung function.

Numbness: You will experience some numbness on both sides of your incision following surgery. This is
normal and should not cause you concern. During surgery, the nerves around the joint are disturbed, and as
these heal, you may experience a tingling sensation. You may experience permanent numbness in a small area
around your incision.

Complications: As with all surgery, there is the possibility of complications from any of the above or from
anesthesia, and could be severe enough to result in death. Please discuss all concerns with your surgeon and
anesthesiologist before surgery.

How long is the procedure?
The length of your procedure will be dependent on the type of surgery. Your physician will educate you on the
average length to expect.

                                                                                                                   2.5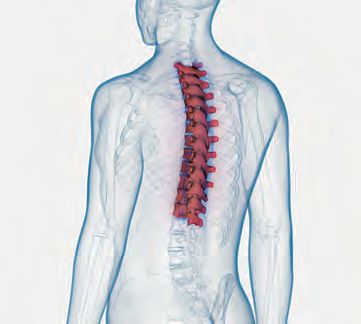
PRE-SURGICAL PLANNING
  Making Sure You are Ready for Surgery

  PREPARING FOR YOUR SURGERY
  Our preoperative clinic is designed to make sure you are ready for surgery. They are responsible for collecting,
  reviewing and getting approval from your surgeon, anesthesia, and the hospital, prior to giving you the green
  light for surgery. They will also help you understand how to prepare for your surgery, including: what to wear,
  what to eat, what to drink, what medications you can or cannot take, and answer any questions that you might
  have. The appointment should take approximately 30-60 minutes.

  If you live out of town, request your pre-op appointment for the same day as your spinal class (if available).

  750 North Syringa Street, Suite 190, Post Falls, ID 83854
  P: (208) 262-2328
  F: (208) 619-5057
  H: 8:00AM - 4:30PM

  YOUR COACH
  The person you select as your coach is critical to your success. This person needs to understand their directions
  and knowledgeable in the aspects of your surgery.

  In addition, this person needs to be willing to do the following:

      • Commit to attending your education class with you
      • Assist you with your pre-surgical preparation (home preparation, exercises, appointments, etc.)
      • Transport you to and from your surgery
      • Assist you with post-surgical instructions
      • Stay with you for the first 24 hours at home

3.1
HO ME C ARE
HOME CARE TIPS
You and your family may want to consider these tips to help make your home safe and comfortable when you
return from your surgery.
BATHROOM
Purchase a nonslip bath mat for inside your tub or shower. A shower hose, shower chair and seat riser for your
toilet might be helpful. These may be obtained at a local medical supply company or secondhand thrift store.
You may want to install grab bars, as well.
CLEAR THE WAY
You may find it helpful to re-arrange furniture and other household items to make it easier for you to move
around your home. Clearing the way of tripping hazards like rugs and cords will make it easier for you to
maneuver around.
CONCENTRATE ON CONVENIENCE
Remember to put your most frequently used items within easy reach. No bending or lifting. Remotes, phones
and chargers may be items that you’ll want to have easy access to when needed.
STAIRS
If you have to climb stairs to get home, or they are in your home, please discuss that with your physical therapist
after your surgery. Make sure stairs that have handrails are secure.
FURNITURE
A bed or chair that has a firm back and/or armrests, is recommended to achieve supported reclined positions.
Limit your sitting for long periods in “traditional” chairs. If you plan on using your home recliner, please inform
your physical therapist of what type of recliner you have (electronic vs. non), to ensure you are using proper
body mechanics with use. Chairs with wheels should not be used under any circumstances.
FIRM FOOTWEAR
You should avoid slippers, or shoes with open backs as they do not provide adequate support and can lead to
slips and falls.
3.2HO ME C ARE (C ONT.) REST AND RELAX Avoid yard work or heavier chores for 10 days prior to surgery. Make other arrangements for outdoor work, such as gardening, mowing the grass, snow shoveling, or snow removal, for at least 2 weeks after surgery. Do laundry ahead of time and put clean linens on your bed. FOOD PREPARATION In order to minimize cooking, prepare meals in advance and freeze them. CLEAR LINES OF SIGHT Nightlights are helpful in bathrooms, bedrooms, and hallways to avoid the risk of tripping or other injuries. NEWSPAPER DELIVERY Contact your newspaper provider to request off-the-ground delivery to avoid bending for 2 weeks after surgery. ANIMALS If you have pets, you may want to consider boarding them for a few days after you return home. No leash-walking pets for at least the first 2 weeks. 3.3
PHARMAC Y

MEDICATIONS
Our goal at Northwest Specialty Hospital is to empower you with knowledge and understanding of your
medications, including why you may be taking medications and what side effects you might experience.
For your pain and muscle spasm treatment, NWSH uses the multimodal approach. This includes multiple
agents used to reduce the need for more opioids during the recovery process.

   • Tylenol (acetaminophen) helps with pain relief
   • Anti-inflammatories (dexamethasone) helps with pain relief and inflammation
   • Muscle relaxants (methocarbamol, tizanidine, diazepam) helps with muscle spasms
   • Neurontin (gabapentin) helps with nerve pain

We want you to feel as much a part of your treatment plans as possible! Our goal is to provide the best outcome
by utilizing the most advanced treatments available, including ones that have been studied and recommended
by clinical organizations.

PAIN CONTROL USING THE MULTIMODAL APPROACH
Tylenol (acetaminophen) is a medication available over-the-counter, typically given around the clock for the
first two to three weeks. Acetaminophen (APAP) is broken down in the liver; if you have a healthy liver you
can have 4000 mg of acetaminophen per 24 hours. If you have an unhealthy liver the recommended maximum
daily dose is 2000 mg. It is important to check the labels of any products you are taking, over-the-counter
products often have acetaminophen in them (cough and cold products). Some pain medications already have
acetaminophen in them as well, (Norco/hydrocodone/APAP) and Percocet (oxycodone/APAP). Alcohol is
also metabolized in the liver. Discuss your alcohol consumption with your provider. Taking more than the
recommended daily dose of acetaminophen can cause liver damage.

Anti-inflammatories (Corticosteroid Anti-Inflammatory Drugs) are medications that work by decreasing
inflammation, which decreases pain. They are available in intravenous (IV) and oral formulations. The usual
option at NWSH is dexamethasone. It can be stimulating, which means you may feel agitated or find it difficult
to sleep. It can also cause genitourinary pruritus (itching/burning in the genital region) if administered
through your IV, but dissipates approximately 30 minutes after administration.

Muscle relaxants (methocarbamol, tizanidine, diazepam) are medications that work by decreasing
muscle contraction signals from the brain to the muscle. Some common side effects include sleepiness,
lightheadedness, or dizziness.

                                                                                                                 3.4
PHARMAC Y (CO NT.) PAIN CONTROL USING THE MULTIMODAL APPROACH (CONT.) Neurontin (gabapentin) is a medication that helps with nerve pain. It decreases neuropathic pain through slowing of the nerve signals. A common side effect of gabapentin is dizziness. Opioids are medications used for pain. There are different categories of opioids used at NWSH. Ultram (tramadol) is used for less severe pain. Rescue or stronger opioids used for more severe or breakthrough pain include Roxicodone (oxycodone), Norco (hydrocodone + acetaminophen), Percocet (oxycodone + acetaminophen), and Dilaudid (hydromorphone). OPIOID SIDE EFFECTS There are some common side effects of opioids you should be aware of. They can cause some drowsiness or dizziness, dry mouth and eyes, nausea and vomiting, and urinary retention. If you notice any of these side effects while at the hospital, communicate with the nursing staff. It is best to get up slowly from seated or lying positions to avoid falls associated with dizziness. Taking your pain medication with a little bit of food can help reduce nausea and vomiting if you experience those side effects. Another side effect is constipation. Opioids decrease bowel mobility. It is recommended you have a combination of a stool softener (Colace – 100 mg by mouth twice daily) and a stimulant laxative (Milk of Magnesia – 30 ml by mouth twice daily, or Senna – 8.6 mg by mouth twice daily). An osmotic laxative option is MiraLAX (polyethylene glycol – 17 grams (1 capful) mixed with 8 ounces of liquid by mouth once daily), if you don’t experience a bowel movement within two days of surgery. PAIN MANAGEMENT OVERVIEW Along with following your pain medication regimen, it is important to utilize other alternative therapies to reduce pain and muscle spasms. This involves placing ice over your incision area often. Movement is the key for muscle relaxation and it also helps with the resumption of normal bowel movements. Remember to walk often, but keep distances shorter than longer at the beginning of your healing process. COMMON MEDICATIONS GOING HOME The pain medication regimen that worked best for you at the hospital will be prescribed for home usage, as well as any anti-inflammatory, muscle relaxer, and nerve pain medications. You will need to pick up your constipation prevention medications over the counter, and continue taking them as long as you are taking your pain medications. These are common medications for home discharge dispensing, but this does not mean every patient will go home with these medications. Each patient’s discharge medications are individualized to them based on surgeon preference, patient allergies/intolerances and other factors. 3.5
PHARMAC Y (CO NT.)

PRE-OP
Pre-operatively, we will administer an antibiotic to prevent surgical site infections. The recommended
antibiotic for back and neck surgery is Ancef (cefazolin). We may change your antibiotic due to potential
allergies or health history.
These medications will be explained more in depth in the pre-op area. All treatments are designed to
minimize post-operative pain or nausea.

OPERATING ROOM
Anesthesia will provide sedation, and pain medications will be administered, as well as medications to
prevent nausea.

RECOVERY
During the recovery process, pain control and treating nausea are the focus areas. Pain control is achieved
utilizing short acting intravenous (IV) pain medications if necessary. The goal is to utilize the previously
mentioned multi-modal pain control approach to prevent pain in order to reduce the amount of opioid pain
medications you may be exposed to during your hospital stay, while maintaining tolerable pain levels.

INPATIENT
If you are staying overnight, you may receive a number of medications/therapies to prevent infection, control
pain and treat nausea. The nursing staff should explain why you are taking a medication, as well as any possible
side effects. You will be visited by a member of the pharmacy team, who will go over the medications you have
been receiving at the hospital, discuss the possible side effects and review new medications with you to avoid
harmful side effects. The pharmacist’s goal is for you to feel comfortable with the medications at home, how
and when to take medications, and understand potential side effects with new medications.
Managing your pain is a top priority. You will be asked to assess your pain often in the hospital and rate your
pain on a pain scale of 0-10. 0 is no pain, while 10 is the worst pain. Expect that your pain will increase with
activity. It will typically be 2-3 points higher than your resting pain goal, and you should still have enough pain
relief to participate in therapy and ambulate. Once back at rest, you pain should start to return to baseline in
about 30 minutes.
You will have ongoing medication education from your primary RN who will also give you a handout to
reference on the side effects of medications, or why certain medications are being given at the hospital. If
you have any further questions or concerns regarding your medications, please ask your nurse or request the
pharmacist to speak with you. We are happy to clarify any questions you might have.
Most surgeries require a follow-up x-ray of the surgical site on the morning following your surgery. Your nursing
staff will escort you to our imaging department for the ordered imaging.
                                                                                                                  3.6
E Q UI PMENT
FOLEY CATHETER
A Foley catheter might be placed during your surgery to keep the bladder empty during and after the procedure.
During the procedure, you are unconscious and unaware of the need to urinate. Most catheters are removed
prior going to recovery, but if you are having a two phase surgery, the catheter will remain in place and then
removed the second post-op day.
JACKSON PRATT & HEMOVAC DRAINS
Jackson Pratt and Hemovac drains are often placed in wounds during surgery
to prevent the collection of fluid underneath the incision site. This is a closed,
air-tight drainage system which operates by self-suction. The drain(s) promote
healing by keeping excess pressure off the incision and decreasing the risk of infection. J A C K S O N P R AT T D R A I N
The drain is sutured (stitched) in place in the skin at the site of insertion to promote
stability. Clots in the tubing are expected as long as they do not interfere with the
drainage collection. The fluid which collects in the bulb is normally very red at first,
changing to more orange or straw-colored the longer it is in place.
H E M O VA C D R A I N
NECK AND BACK BRACES
A brace may be prescribed following spinal surgery with the goal of providing muscle support. They limit
movements and micro-motions to provide optimal tissue healing.
Unless otherwise directed, neck braces are not to be worn when sleeping and may be removed for eating,
dressing care, and showering. Back braces are to be worn when out of bed, moving up and about, and may be
removed for dressing care, showering and when in bed.
FRONT WHEELED WALKER
A front wheeled walker may be prescribed following spinal surgery to provide additional support, and to maintain
balance and stability while walking. You may obtain one prior to surgery at a local medical supply company or
secondhand thrift store. Your physical therapist at the hospital can also supply one for you.
3.7HYG I ENE
HAND WASHING
Hand washing will be critical. A serious form of bacteria known as MRSA frequently inhabits the skin or nose
of healthy people and when introduced into the home setting during recovery, it can be harmful. Hand hygiene
is the single most important method of controlling the spread of bacteria. We ask all visitors and caregivers to
wash their hands before and after contact with patients and their surroundings.
USING THE RESTROOM
Do not attempt to use your walker to pull yourself up to stand. Instead, push up from the seat reaching forward
with one hand at a time to your walker. When out in the community, use bathrooms that accommodate people
with disabilities. They will have grab bars to help you.
SHOWERING INSTRUCTIONS
Follow these directions the evening before, and the morning of, your surgery.
STEP 1: The night before your surgery, shower using regular shampoo and soap, wash hair and entire body,
rinse thoroughly.
STEP 2: Wet the provided shower sponge and apply 1/2 the bottle of CHG to the shower sponge. Turn OFF
the water.
STEP 3: Firmly massage all areas of the body below the chin with the shower sponge. Pay attention to your
surgical sites and surrounding areas. Wash groin and buttocks last.
STEP 4: Wait 2 minutes before rinsing off.
STEP 5: Dry off with a clean towel.
STEP 6: Wear clean clothes and use clean bed linens.
STEP 7: Repeat the morning of your surgery with the other 1/2 of the CHG bottle. Do NOT shampoo hair
or apply any lotions, creams, body sprays, perfume, or powder after using the CHG soap, it will
decrease the desired effects.
3.8PRE PARI NG F OR YO UR SURGE RY
UPON RECEIPT OF BOOKLET DATE:_______________
☐ Contact your Registered Nurse Navigator prior to surgery and schedule a spinal education class to help
prepare you for your surgery, who will continue monitoring your progress for 1 year after your surgery.
Your Registered Nurse Navigator may be reached at (208) 500-9813.
4 WEEKS PRIOR TO SURGERY DATE:_______________
☐ Follow your doctor’s preoperative orders
☐ Complete any lab work or other assessments (chest x-ray, etc.), ordered by your surgeon
☐ Schedule and attend your spinal education class
☐ Begin your daily exercise program
☐ Stop smoking
2 WEEKS PRIOR TO SURGERY DATE:_______________
☐ Stop taking prescription diet medications and herbal medications
☐ Stop any yard work or heavier chores
☐ Start making home preparations
7-10 DAYS PRIOR TO SURGERY DATE:_______________
☐ Stop taking blood thinners, aspirin, or medications containing aspirin, and anti-inflammatory medications
such as Ibuprofen, Motrin, Advil, Aleve, Naproxen, Relafen, and hormone replacement therapy, unless
otherwise instructed by your surgeon
☐ Do not shave the area of your body where surgery will be performed, your underarms or your groin area for
1 week prior to surgery
☐ Do not get a pedicure or paint your toenails
☐ Complete any additional testing or labs recommended by your surgeon
☐ Notify your doctor’s office if you become ill, have broken skin, or a rash
☐ Prescriptions will be determined by your doctor
☐ Keep doing your exercises as instructed by your physician and/or physical therapist
3.9PRE PARI NG F OR YO UR SURGE RY (CONT. )
4 DAYS PRIOR TO SURGERY DATE:_______________
☐ Reduce alcohol consumption
☐ Begin to pack your bag for your surgery
☐ Your coach should pack a bag of items to keep them occupied at the surgery center
☐ Review preoperative instructions for showering and medications
THE DAY BEFORE SURGERY DATE:_______________
☐ Fill the new prescriptions (if any) given to you by your doctor
☐ Change your towels and the linens on your bed
☐ Complete house preparations like grocery shopping, meal preparation, etc.
☐ Don’t eat or drink anything after midnight unless otherwise instructed by your surgeon
☐ Skin preparation reduces the risk of infection. See showering instructions on page 3.8
WHAT TO BRING • Toiletries
• Eyeglasses, hearing aids and extra batteries
• Any information and paperwork provided
• Phone charger
before your surgery
• Remove all rings and piercings
• Photo ID and insurance card
• Bring any medical devices such as a CPAP
• Telephone numbers of support contacts
• Bring any durable medical equipment you are
• Robe, socks, underwear, and night wear of choice
using, such as a walker
• Loose, comfortable clothes (You may obtain a front wheeled walker prior to surgery
• Non lace-up, closed toed, loose fitting shoes with at a local medical supply company or secondhand thrift
store. Your physical therapist at the hospital can also
non-slip soles supply one for you at the hospital.)
3.10YOUR SURGERY
Spinal Surgery
PREPARING FOR SURGERY
☐ Shower as instructed
☐ Do not use lotions, talcum, perfume, make-up, or nail polish
☐ Take your heart and blood pressure medications with a sip of water – do not take insulin or diabetes
medications unless instructed to do so (no diuretics)
☐ DO NOT eat or drink
PARKING
Northwest Specialty Hospital has free and convenient parking close to the main entrance.
NORTHWEST SPECIALTY HOSPITAL
1593 East Polston Avenue, Post Falls, ID 83854
P: (208) 262-2300
H: Monday - Friday: 5:00AM - 5:00PM
nwsh.com
CHECKING IN
Welcome to Northwest Specialty Hospital! Once you have arrived at our facility, please check in with our
reception desk. After you have been completely checked in, we will escort you back to the preoperative
evaluation area where we will begin the process of preparing you for surgery.
THE OPERATION
Your physician will explain the estimated time the surgery will take. The person(s) responsible for your
transportation and home care following your procedure can either choose to leave or stay on campus. Should
they decide to leave, they have the option of receiving a call once you are about to be discharged. Should
they decide to stay, we offer gourmet coffee, free Wi-Fi, television and access to our award winning café to
make their stay more comfortable. Your guest can check the status of your surgery on a board, or receive a
notification device alerting them when your procedure has been completed.
4.1POST-SURGICAL CARE
The Recovery Process
THE CONSULTATION
Friends, family members, your coach or anyone else you designate, may speak with your surgeon following
your procedure to receive a summary of how the procedure went, and what to expect post-surgically.
POST-OP AND RECOVERY
At the end of the surgery, the anesthesia will be reversed, and you will be transferred to the recovery room.
In the recovery area, the nurses will monitor your vital signs and keep you comfortable. Medications will be
administered as necessary for pain or nausea.
You will then be moved to a room for Phase 2 and will be monitored for a few hours, or transferred to the
inpatient unit. You will be discharged home once you are stable. For most patients, this is post-op day one.
This could be the same day if you are stable enough for a safe transition home. The medications administered
after the surgery center should provide excellent pain relief at home.
PAIN LEVEL ASSESSMENT
Managing your pain is a top priority. You will be asked to assess your pain periodically in the hospital and
rate your pain on a pain scale of 0-10. 0 is no pain, while 10 is the worst pain. Expect your pain to be between
a 4-5 while resting and that your pain will increase with activity. It will typically be 2-3 points higher than
your resting pain number. You should still have enough pain relief to participate in therapy, and you WILL be
expected to ambulate the day of your surgery.
Most pain medications are taken as needed. You are required to communicate with your nursing team when
you are beginning to experience a need for another dosage. Once back at rest, your pain should start to return to
baseline in about 30 minutes.
DISCHARGE
It is extremely important to follow the postoperative pain management protocol to ensure ongoing pain relief.
Unless otherwise indicated, home medications are as needed. If you aren’t having pain, you don’t need to take
pain medications. Prior to discharge, a physical therapist or one of the members of the nursing team, will have
you walk and confirm that you are stable for discharge. You will be given a brief home instruction sheet, as well
as detailed home instructions found on the next several pages of this booklet. Incision care and monitoring at
home will be discussed with you by your primary RN. Any dressings required will be sent home with you.
Make sure to have your stool softeners/laxatives available for constipation prevention while you are taking
pain medications. Some of these are Colace, MiraLAX, Milk of Magnesia, Dulcolax, Senokot, and Senna.
5.1HO ME C ARE
YOUR DISCHARGE CHECKLIST
☐ All home medication prescriptions are filled ☐ OK to shower on the 3rd day post-op
☐ All necessary home equipment has been acquired or as directed by your physician
☐ Post–op appointment scheduled ☐ Your coach will be with you for 24 hours
after discharge
ICE
Icing the surgical area is critical to the post-operative period. It helps reduce swelling and inflammation.
This should be done often or frequently for the first 2-3 weeks.
INCISION CARE
• If your incision was closed with glue, your discharge nurse will educate you on dressing changes (if any) and
how long to keep your incision(s) covered per your MD orders.
• If your incision was closed with steri-strips or sutures, keep a dressing over the wound for 5 days after
surgery. You will have to cover this to shower. After 5 days, you can remove the dressing and allow shower
water to run over the steri-strips or sutures at the incision site, and pat dry. Do not pull off the steri-strips,
they will fall off naturally on their own.
• Bruising is to be expected and there may be drain insertion site leakage for up to 24 hours.
• Do not soak the wound for 4 weeks (eg: shower only).
• If the wound appears to be draining, cover with gauze and tape and call your surgeon’s office.
• Do not apply ointments, creams, lotions, or alcohol to the incision site.
• Wash your hands prior to touching your incision, sutures, or glue.
5.2E X E RC I S E
BACK REHABILITATION EXERCISES
Exercise is essential to strengthen your back and ensure that you maintain your range of motion. Your physician/
physical therapist recommends you perform the following exercises as part of your rehabilitation program.
Your physical therapist will instruct you on which ones to follow. It is important that you maintain your
movement restrictions and go for frequent walks.
ANKLE PUMPS
Move both of your ankles up and down in a toe tapping fashion.
REPS: 15 | TIMES PER DAY: MANY
QUAD / GLUTE SETS
Tighten the muscles on both of your thighs and glutes.
Hold for 5 seconds.
REPS: 15 | TIMES PER DAY: 3-5
ABDOMINAL BRACE
Tighten your abdominals by pulling your belly button
towards your spine. Hold for 5 seconds.
REPS: 15 | TIMES PER DAY: 3-5
HEEL SLIDES
Slide your foot back towards your buttocks,
allowing your hip and knee to bend.
REPS: 15 | TIMES PER DAY: 3-5
HIP ABDUCTION / ADDUCTION (LEG SLIDES)
Keeping your leg straight, move your leg out to the side and back.
REPS: 15 | TIMES PER DAY: 3-5
SHORT ARC QUAD
With your knee bent over a pillow, straighten your leg,
keeping the back of your knee on the pillow at all times.
REPS: 15 | TIMES PER DAY: 3-5
5.3E X E RC I S E (CO N T.) NECK REHABILITATION EXERCISES Exercise is essential to strengthen your neck and ensure that you maintain your range of motion. Your physician/ physical therapist recommends you perform the following exercises as part of your rehabilitation program. Your physical therapist will instruct you on which ones to follow. It is important that you maintain your movement restrictions and go for frequent walks. NECK FLEXION Drop your chin towards your chest and return to neutral. REPS: 15 | TIMES PER DAY: 3-5 NECK EXTENSION Look up towards the ceiling and return to neutral. REPS: 15 | TIMES PER DAY: 3-5 NECK ROTATIONS Turn your head to the right, and then to neutral. Then turn your head to the left, and then to neutral. REPS: 15 | TIMES PER DAY: 3-5 NECK SIDE BENDING Drop your ear towards your shoulder and then return to neutral. Repeat on the other side. REPS: 15 | TIMES PER DAY: 3-5 SCAPULAR RETRACTIONS, SHRUGS & SHOULDER ROLLS Keeping your elbows at your sides, squeeze your shoulder blades together and then relax. Then raise your shoulders, keeping your arms at your sides and then relax. Then roll your shoulders forward and backwards in a circular fashion, elbows at your sides. REPS: 15 | TIMES PER DAY: 3-5 5.4
RE HABI L I TAT I ON IN THE HOSPITA L

DRESSING
 • Loose fitting clothes are recommended

RESTRICTIONS
 • Avoid lifting any object weighing more than 5 pounds, or as instructed by your physician. You may perform
   light activities of daily living.
 • No bending or lifting
 • No driving until approved by your physician
 • Continue log-rolling in and out of bed as taught at the hospital for thoracic and lumbar surgeries
 • Try to avoid using recliners due to excessive motion to raise/lower leg portion
 • No hot packs/heating pads to the surgical area

GUIDELINES
 • Once released by your physician for physical therapy sessions, your exercise program should be carried out
   3 (three) times per day or as directed by your physical therapist.

                                                                                                                5.5
AS S I S TED HOME CA RE
GETTING A LITTLE HELP AT HOME
Sometimes it’s nice to obtain a little extra help (housekeeper, grab bars, walkers, etc.) either before surgery to
prepare your home, or after your return from the hospital. Companies that provide related services:
HOUSE CLEANING AND MEAL PREPARATION MEDICAL ASSISTIVE DEVICES
• Comfort Keepers (208) 357-4295 • Soper’s Mobility Aids (208) 772-6474
• Home Helpers (208) 769-9560 • Bellevue (208) 676-1768
WHEN TO CALL US
Call your doctor's office if:
• You have a fever of over 101 degrees • You have side effects from your medications,
• Your incision becomes more red, swollen, such as nausea, a rash, or itching
painful, or if it has a discharge that has an odor • You have sudden numbness, weakness, or severe pain
• Your incision opens or bleeds excessively in your upper or lower extremities
• Your pain medication is not controlling your pain • You have lost control of your bowel, bladder, or both
• You have fallen • You are unable to urinate or have a bowel movement
GENERAL GUIDELINES
Week 1-2: In the first couple of weeks you should be able to move around and care for yourself with some
assistance. Discuss your specific restrictions with your physician. You should walk around every couple of hours
during the day to help prevent blood clots, respiratory problems, and constipation. No lifting greater than 5-10
pounds for 4 weeks, or until cleared by your physician.
Week 2-3: You should be making improvements in your motion and overall strength. Continue walking
around every couple of hours when awake. No lifting greater than 5-10 pounds for 2 weeks, or until cleared by
your physician.
Week 4-6: You should be feeling stronger and more mobile, returning to normal activities of daily living, such
as driving, taking long walks, and be able to tolerate full days out of the house. No lifting greater than 5-10
pounds or until cleared by your physician.
Week 10-12: You should be able to tolerate more physically intensive activities, such as golfing, dancing, hiking,
and riding a bike.
Always discuss any specific restrictions/concerns with your physician prior to initiating activity. Use the
above as a guideline only.
5.6IMPORTANT INFORMATION
Healthcare Contacts
REGISTRATION LIAISON INPATIENT
Wendy Burlingame P: (208) 262-2398
P: (208) 262-2259
F: (208) 262-2390 PRE-OPERATIVE DEPARTMENT
P: (208) 262-2328
HOSPITAL F: (208) 619-5057
Northwest Specialty Hospital (NWSH) nwshpreop@surgerypartners.com
1593 East Polston Avenue, Post Falls, ID 83854
P: (208) 262-2300 URGENT CARE
F: (208) 262-2390 Northwest Urgent Care
nwsh.com 750 North Syringa Street, Suite 100, Post Falls, ID 83854
P: (208) 262-2600
IMAGING F: (208) 262-2700
Northwest Specialty Hospital (NWSH) nwurgent.com
1593 East Polston Avenue, Post Falls, ID 83854
P: (208) 262-2333 NURSE NAVIGATOR
F: (208) 262-2380 P: (208) 500-9813
nwsh.com
Thank You
When you make the decision to have surgery, you place your life in the hands of the surgeon and their care
team.
At Northwest Specialty Hospital, one of the highest honors we can receive is to know that we have your trust in
us to provide that care. It is a responsibility we take seriously.
We would like to take this moment to show our sincere appreciation to you, and thank you for choosing us.
6.1nwsh.com
You can also read