Sugar unit plan LEVEL 2 - heartfoundation.org.nz - Heart Foundation NZ
←
→
Page content transcription
If your browser does not render page correctly, please read the page content below
Sugar unit plan
 LEVEL 2

heartfoundation.org.nz

Contents

Lesson 1: Introduction to sugar ...................................................................................................................... 1

Lesson 2: How are added sugars produced? ................................................................................................ 8

Lesson 3: Learn how much sugar is in food & drink ................................................................................. 15

Lesson 4: Why is sugar added to food & drinks? ..................................................................................... 22

Lesson 5: What happens in my body when I eat sugar? ......................................................................... 27

Lesson 6: Sugar in drinks ............................................................................................................................. 33

Lesson 7: How does sugar affect my teeth? ............................................................................................. 39

Lesson 8: How does advertising affect our sugar intake? ...................................................................... 46

Lesson 9: Practical lesson: How can we reduce the amount
of added sugar we eat and drink in our community? ............................................................................... 51
Lesson 1:
    Introduction to sugar
In this lesson, students will begin their investigation into sugar and the different forms it takes.
This will give students a base of information to use in the lessons that follow and build on their
prior knowledge and experience.
You can adapt and adjust the content where necessary to support your students as they carry
out their inquiries.

         Key competencies             Thinking, relating to others, participating and contributing.

         Possible achievement Science: Level 2
         objectives & learning Students will explore and act on issues and questions that
         outcomes              link their science learning to their daily living.
                                      Students will extend their experiences and personal
                                      explanations of the natural world through exploration,
                                      play, asking questions and discussing simple models.
                                      Learning outcome
                                      Students will explore their knowledge about sugar and
                                      understand the difference between natural and added sugars.

         What you need                Photo cards: Added sugar, foods and drinks containing
                                      only added sugar, foods and drinks containing only natural
                                      sugars, foods and drinks containing both natural and
                                      added sugars.

         Key vocabulary               Words that are important to this lesson are: icing sugar,
                                      brown sugar, refined sugar, added (free) sugars, natural
                                      sugars. These can be defined and explored in context as
                                      you discuss the topic with your students.

Learning opportunity
The purpose of this learning opportunity is to identify students’ prior knowledge about the every
day use of sugar. Their ideas can be collated and revisited during later modules to determine if
they want to change any statements they made and to self-assess their learning.
1.	Start by asking students about the different kinds of sugar they know about.
2 List their ideas on the board or a large sheet of paper.
3.	Introduce the photo cards one by one and see if students can match the sugars with the names
    on their list. Are there any photos of sugars that they haven’t listed?
4.	With the students, carry out a quick Internet search to find a definition for any they have missed.

1   heartfoundation.org.nz | 2020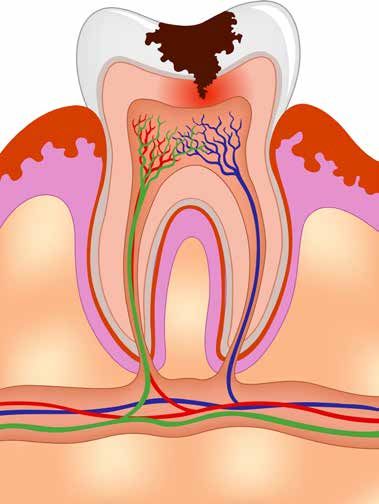
Lesson 1:
    Introduction to sugar
5. Ask the students to work in pairs and use the following questions to guide a five-minute discussion.

    • How do these sugars look different? (colours, textures, stickiness)
    • Why
         are there different types of sugar, like regular sugar and icing sugar?
      (Sugar is used for different things, like icing cakes and as a sweetener in hot drinks)
    • Why
         do the sugars look different? (They are made in different ways and come from different
      sources. For example, white sugar comes from cane, honey is produced by bees).

6. Explain to students these sugars are all known as ‘added’ or ‘free’ sugars.
7.	Look again at the photo cards and see how each sugar fits with the definition.
    Next, draw the table below on a whiteboard or flipchart.

               Added sugars                     Natural sugars           Both added and natural sugars

8.	Ask students to place the photo cards that show added sugars in the appropriate column.
    (They all go in the ‘Added sugar’ column, even though they may come from natural sources).
9.	Think about food and drinks that only have added sugar in them. Add the appropriate photo
    cards to the table.
10.	Have students think about the name of the second column (Natural sugars) and about food or
    drinks that may belong there. These are foods and drinks that taste naturally sweet but have
    no added sugars in them. Look at the natural sugar photo cards and have students add these
    to the appropriate columns of the table.
11.	Explain to students the foods and drinks that only have natural sugars are a healthy option to
     have every day. The foods and drinks that have only added sugars should be eaten occasionally,
     not every day.
12.	Focus on the third column in the table – those foods that have both natural and added sugars.
    Brainstorm some of these and then add the photo cards to the table.

    Definition: Added or free sugars are sugars that have been added to foods and drinks by the
    manufacturer, the cook or the consumer, plus sugars that are naturally present in honey,
    syrups and fruit juices.

2    heartfoundation.org.nz | 2020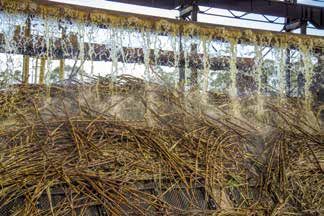
Lesson 1:
    Introduction to sugar
13. Ask the students:

    • Can
        you think of some other foods and drinks that include sugar? Where do they
      belong on the table? (For example, muesli bars and dairy food both contain natural
      and added sugars).

	Reinforce the fact that children need healthy food most of the time. Foods and drinks that
  contain only natural sugars are good for us and should be included in our every day diet. Our
  bodies don’t need any added sugar.
	The World Health Organisation recommends children eat less than 5tsp of added sugar per
  day (less than 20g/day).
    Water and plain milk are the best drinks for children as they have no added sugars.

Reflect on the learning
This is the time to reflect on the learning outcomes for the lesson. Students can also talk about
any ideas that are still unclear. When reflecting on this lesson, focus the discussion on the
possible achievement objectives and learning outcomes. By asking key questions, allow students
to articulate their learning.

    Lesson 2 preview: How are added sugars produced? Ask some of the following questions to
    promote discussion and preparation for the next lesson.
    • Where does sugar come from?
    • How is it made?
    • How was it made in the past?

3    heartfoundation.org.nz | 2020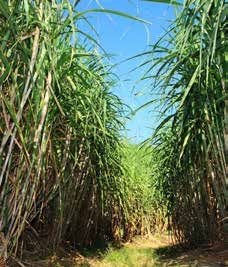
Lesson 1:
    Photo cards: Added sugars

     Raw brown sugar                Soft brown sugar   White refined sugar

         Icing sugar                 Golden syrup            Honey

        Maple syrup

4   heartfoundation.org.nz | 2020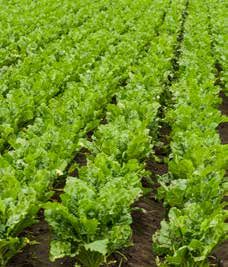
Lesson 1:
    Photo cards: Foods and drinks with
    added sugars only

       Sports drinks                Fruit juice   Fizzy drink

       Fruit ice block               Sweets

5   heartfoundation.org.nz | 2020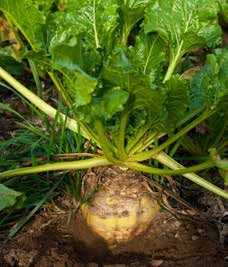
Lesson 1:
    Photo cards: Foods and drinks with
    natural sugars only

                  Plain milk        Plain unsweetened yoghurt

                     Apple                   Banana

                    Carrots          Kūmara (sweet potato)

6   heartfoundation.org.nz | 2020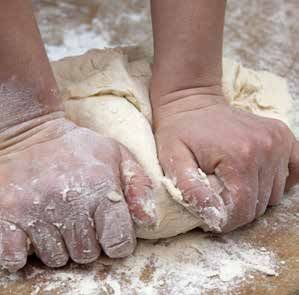
Lesson 1:
    Photo cards: Foods and drinks with
    both natural sugars and added sugars

                 Fruit muffin       Flavoured milk

                   Fruit jam

7   heartfoundation.org.nz | 2020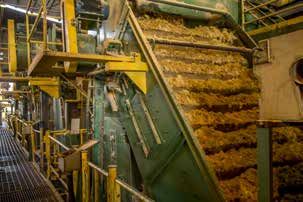
Lesson 2:
    How are added sugars produced?
In this lesson, students explore how added sugars are produced from raw materials such as cane
and beet.
You can adapt and adjust the content of this lesson where necessary to support your students as
they carry out their inquiry.

         Key competencies           Thinking, using language, symbols and texts.

         Possible achievement Social studies: Level 2
         objectives &         Students will understand how time and change affect
         learning outcomes    people’s lives.
                                    Learning outcome
                                    Students will understand how the production and use of
                                    sugar has changed over time and discuss the impact on
                                    people’s well-being.
                                    Technology: Level 2
                                    Students will understand that technology both reflects and
                                    changes society, the environment and increases people’s
                                    capability to produce more and focus on other tasks.
                                    Learning outcome
                                    Students will understand the impact that technology has
                                    had on the production and use of sugar.

         What you need                Photo cards: Cane and beets, sugar production, old and
                                    •
                                      new, added sugar (from Lesson 1).
                                      Graphic organiser: Technology, then and now.
                                    •
                                    •	Video clips (preview before lesson).

         Key vocabulary             Words that are important to this lesson are: sugar cane,
                                    sugar beet, technology, tools.
                                    These can be defined and explored in context as you
                                    discuss the topic with your students.

8   heartfoundation.org.nz | 2020
Lesson 2:
How are added sugars produced?
Learning opportunity
The purpose of this lesson is to help your students generate rich questions about sugar production,
and to understand where sugar comes from and how it is manufactured. The lesson will also look at
the impact of technology used in sugar production, and how this has changed over time.
1. Start by asking students if they can name some of the different types of sugars – natural and
added, discussed in the last session.
2. Show the Photo cards: Added sugars from Lesson 1. Explain we usually buy these added sugars
from a shop or supermarket. Ask:
• How does it get there?
• Does anyone know where sugar comes from?
Sugar has been produced in different ways over time. Determine if students know how sugar is
made from sugar cane or beets. Students may also talk about where honey and natural maple syrup
come from.
3. After the discussion, share the Photo cards: Cane and beets, starting with the cane plantation
and the rows of beets. The students can talk in pairs. Ask:
• How might you get sugar from these plants? Which part of the plant might you use?
4. Explain that you’re going to watch a video called The Sugar Trail 1920s, which tells the story
of how sugar cane and beets were grown, harvested and processed to make sugar in the past
(approx. 12 minutes). Explain that it is a silent movie, which was made in the 1920s.
www.youtube.com/watch?v=wfPOcqTLxxw
As you watch the clip together, you can provide commentary to answer questions or explain
some of the detail. You may wish to pause the video at certain points to allow time for
reflection and thinking forward. Encourage students to read out the text when it appears, and to
contribute ideas.
Definition: Added (or free) sugars are sugars that are added to foods and drinks by the
manufacturer, the cook or the consumer, plus sugars that are naturally present in honey,
syrups and fruit juices.
9 heartfoundation.org.nz | 2020Lesson 2:
How are added sugars produced?
5. After watching the video, ask:
• What
technology, machines and tools were used to produce the sugar?
(machete, horses, carts)
• What did you find interesting or surprising?
7. Instruct students to now independently complete the “Then” column of the Graphic organiser:
Technology, then and now. They can write down or draw examples of the machines and tools
that were used from the growing stage to production. Encourage them to check in with their
peers if they need to discuss or clarify what they have seen.
8. As a class, use the information the students have recorded on the graphic organisers to discuss:
• How were sugar cane and beets grown?
• How were they gathered or harvested? What was done differently in each process?
• How were they used to make sugar?
9. Now share the Photo cards: Old and new, which depict sugar production from long ago.
Be aware that both images show slave labour harvesting and processing the cane. Ask:
• What
technology or machinery can you see in the pictures? (Wheels and presses
are used to crush the cane, fires heat and reduce the juice from the cane to form
crystalised raw sugar).
Allow time for students to add or change aspects on their Graphic organiser as a result of the
discussion.
10. Now we are going to look at the ways we produce sugar from cane and beet today.
• What
tools and technology for growing, harvesting and producing sugar do you think
will have changed?
Together watch some or all of the videos you previewed earlier:
Sugarcane Australia: Paddock to plate – designed for children. This video tells the story of
sugar cane from planting through to processing into granules (approx. 5 minutes).
www.youtube.com/watch?v=IovvM0v4vYQ
10 heartfoundation.org.nz | 2020Lesson 2:
How are added sugars produced?
Planting sugar beets in North Dakota. This short video shows beets being planted. As the
Sesame Street video below starts at the harvesting stage, students need to see this first step
so they can complete Graphic organiser 2 (approx. 1 minute 30 seconds).
www.youtube.com/watch?v=E4Inj9hJdZU
Sesame Street: Sugar beets. This short clip shows how sugar beets are harvested and
processed into sugar. It is accompanied by a song rather than a narrative, so you may like to
watch it on mute and provide some commentary yourself (approx. 1 minute).
www.youtube.com/watch?v=KuZNSGdg2ms
As you watch each clip, you can pause to answer questions or explain some of the detail.
11. At the end of the videos, ask:
• What
technology was used to produce the sugar? (Machines were used to plant
cane and beets, harvest them, cut them up, mix them, spin them like a tumble dryer;
chemicals were added).
• What did you find interesting or surprising? (The number of steps involved, adding chemicals).
12. Students can now independently complete the “Now” column of the graphic organiser. They
can write down or draw examples of the technologies that were used from the growing stage
to production. Encourage them to check with their peers if they need to discuss or clarify what
they have seen.
Additional inquiries that students could undertake include:
• How is honey is produced?
• Where does maple syrup come from?
• How do we get fruit juice? (Juicing five oranges to make one glass juice)
• How
have the amounts of sugar produced changed over time? (To show there have been
huge increases).
Reflect on the learning
This is the time to reflect on the learning outcomes for the lesson. Students can also discuss
any ideas that are still unclear. Focus the discussion on the possible achievement objectives and
learning outcomes. By asking key questions, allow students to articulate their learning.
Lesson 3 preview: Learn how much sugar is in food and drink. Ask some of the following
questions to promote discussion, research, and preparation for the next lesson.
• What do food labels show us?
• Where do we find information about sugar on a label?
11 heartfoundation.org.nz | 2020Lesson 2:
Photo cards: Cane and beets
12 heartfoundation.org.nz | 2020Lesson 2:
Photo cards: Sugar production,
old and new
Sugar production in the Caribbean, 1590s. Sugar production in the Caribbean, 1800s.
Washing cane Cane crushing machine
Recycling stalks into biofuel
13 heartfoundation.org.nz | 2020Lesson 2:
Graphic organiser: Technology,
then and now
THEN NOW
Sugar cane
Grown
Harvested
Processed
Sugar beets
Grown
Harvested
Processed
14 heartfoundation.org.nz | 2020Lesson 3:
Learn how much sugar is in food & drink
In this lesson, students will investigate the sugar in foods they eat and how they can use this
information to make healthier choices.
You can adapt and adjust the content where necessary to support your students as they carry
out their inquiries.
Key competencies Thinking, using language, symbols, texts and relating to
others.
Possible achievement Science: Level 2
objectives & Participating and contributing
learning outcomes Students will explore and act on issues and questions that
link their science learning to their daily living.
Investigating in science
Students will extend their experiences and personal
explanations of the natural world through exploration,
play, asking questions and discussing simple models.
Learning outcome
Students will understand the purpose of the nutrition
information panel found on food products and be able to
use them to make healthier food choices.
Mathematics and statistics: Level 2 Statistics
Students will conduct investigations using the statistical
enquiry cycle.
Learning outcome
Students will use ‘Problem, Plan, Data, Analysis, and
Conclusion’ to analyse the sugar content of various foods
and convert the amount to a teaspoon equivalent.
15 heartfoundation.org.nz | 2020Lesson 3:
Learn how much sugar is in food & drink
What you need • E
nlarged nutrition information panel and ingredient list
showing sugar and common names for sugar listed.
• P
hoto cards: Food items (with and without nutrition
information panels).
• G
raphic organiser: Sugar detective
• S
everal real food items that children commonly eat with
their packaging and nutrition information panel, such as
a muesli bar, a weighed serving of breakfast cereal or a
chocolate biscuit.
• W
hite sugar and a teaspoon (1 tsp of sugar weighs about
4 grams).
Key vocabulary Some of the words that are important to this lesson are:
nutrition information panel, free sugar, added sugar,
grams, serving, energy, protein, sodium, fat.
These can be defined and explored in context as you
discuss the topic with your students.
Learning opportunity
Allow students to investigate the sugar that is in foods they eat and how they can use this
information to make healthier food choices.
The World Health Organisation recommends reducing the intake of ‘free sugars’ (which is added
sugar, plus honey, syrups, fruit juices and fruit juice concentrates) to less than 5% of total energy
intake. For a 10-year-old child this equates to less than 5 teaspoons per day (less than 20g/day).
This doesn’t include natural sugars from things like whole fruit, vegetables and plain milk.
Water and plain milk are the best drinks for children as they have no free sugars.
1. Begin the lesson by holding up the enlarged nutrition information panel. Ask:
• Do you know what this is? Where could you find one?
Note: All packaged foods are required by law to have this information listed clearly. Exceptions are herbs and
spices, water, foods that are sold unpackaged, and foods made on a premise, such as bread made at the local
bakery.
Detailed information about nutrition information panels:
www.foodstandards.gov.au/consumer/labelling/panels/Pages/default.aspx
16 heartfoundation.org.nz | 2020Lesson 3:
Learn how much sugar is in food & drink
Further information on using nutritional panels to make healthy choices:
www.heartfoundation.org.nz/wellbeing/healthy-eating/how-to-read-food-labels
• Does anyone know what the words on the nutrition information panel mean?
2. Allow the students to discuss the words on the panel (for example, energy, protein) and offer
suggestions that you can record on the whiteboard. Explain that the panel allows us to check
what nutrients a food item contains, and also to compare it with similar foods. Some of the
terms on nutrition information panels are complex and you don’t need to delve into these too
deeply, for example, saturated fat, sodium.
3. Hand out the first set of Photo cards: Food items (without nutrition information panels).
All of these products contain some sugar. Ask:
• Which do you think has the most? Which has the smallest amount?
4. First compare three ‘like’ products here (for example breakfast cereals like fruit loops, wheat
biscuits and coco rice cereal). Have students work in small groups to put the products in order
of which contains the highest and lowest amounts of sugar.
5. Next, work with the second set of Photo cards: Food items (with nutrition panels).
Work with the students to again order the items with the product they think contains the
highest and lowest amounts of sugar, this time using the amounts of sugar listed on the panels.
6. Compare the order of the photo cards from this activity with the group’s photo card order
from the first activity.
7. Discuss:
• Which foods are in a different place in your orders?
• Which foods surprised you by the amount of sugar they contain?
8. Now bring out the real foods and their food labels. Have the students look at the nutrition
information panels to identify how much sugar is in each, using the amount of sugar listed in the
‘per 100 grams’ column.
9. Convert the weight to teaspoons (1tsp = 4g) and measure the teaspoons of white sugar onto a
small dish. Depending on time and the students’ abilities, it may be simpler to do the conversions
before the lesson and look at the amount of sugar per serve.
17 heartfoundation.org.nz | 2020Lesson 3:
Learn how much sugar is in food & drink
10. Talk about the pile of sugar compared with the product.
• What would it be like to eat that pile of sugar?
• What would it do to your body?
Note: Some students may talk about the effects of sugar on body size. Engage with this if it arises but note the
purpose of these lessons is to make better choices to live a healthier life, rather than changing body size.
Sugar detective
11. Give each student a copy of Graphic organiser: Sugar detective. Explain that they need to find
five packaged products at home that contain sugar (foods and/or drinks). They can then write
the name of the product and the amount of ‘sugar per 100 grams’ on the chart.
Note: Because serving sizes differ between products, using the ‘per 100 grams’ calculation is an easier way to
compare the sugar content of two products.
12. The next day, have students work in pairs to calculate the teaspoons of sugar in these
products. Ask if they were surprised to find sugar in some products or by the amount of sugar
that was in a product.
13. As a class, find out which three products contain the most sugar per 100 grams. Measure the
amount of white sugar (1 tsp of sugar weighs about 4 grams) to see what it looks like.
14. Revisit the discussion from lessons 1 and 2 about different names for sugar on food packaging.
Together, make a list of some of the different names. Next, show the students the enlarged
ingredient list. Explain that:
• the ingredients list shows everything that has been used to make the food or drink
• ingredients are listed in a descending order (the ingredient present in the greatest quantity
listed first)
• if sugar is in the first three ingredients listed, then the product is usually high in sugar
• generally, the less ingredients listed, the less processed the food.
Reflect on the learning
This is the time to reflect on the learning outcomes for the lesson and to signal the next lesson
focus, where students will explore the different reasons that sugar is added to foods and drinks.
Students can also talk about any ideas that are still unclear.
When reflecting on this lesson, focus the discussion on the possible achievement objectives and learning
outcomes for the inquiry question. By asking key questions, allow students to articulate their learning.
Lesson 4 preview: Why is sugar added to food and drinks?
Ask students to think about this question. Most will suggest that the reason is to make the prod-
uct sweet. However, in the next lesson they will discover sugar is added for a number of reasons.
18 heartfoundation.org.nz | 2020Lesson 3:
Photo cards: Food items
(without nutrition panels)
Corn flakes Wheat biscuits
Fruit loops Rolled oats
Coco rice cereal
19 heartfoundation.org.nz | 2020Lesson 3:
Photo cards: Food items
(with nutrition panels)
Muesli bar Nutrition Facts
Nutrient Per Serving Per 100g
Calories 90 470
Fat 3.4g 9.8g
Saturated fat 1.0g 2.9g
Carbohydrates 17.4g 49.7g
Sugars 6.6g 18.9g
Sodium 11mg 32mg
Energy 534kJ 1496kJ
Protein 2.7g 7.9g
Cereal Nutrition Facts
Nutrient Per Serving Per 100g
Calories 111 370
Fat 0.1g 0.3g
Saturated fat 0.1g 0.3g
Carbohydrates 24.3g 81.0g
Sugars 2.0g 6.5g
Sodium 0.5g 1.2g
Energy 471kJ 1570kJ
Protein 2.2g 7.3g
Chocolate biscuit Nutrition Facts
Nutrient Per Serving Per 100g
Calories 84 494
Fat 5.7g 27.1g
Saturated fat 3.1g 14.8g
Carbohydrates 12.6g 60.0g
Sugars 6.4g 30.5g
Sodium 0.1g 0.4g
Energy 453kJ 8400kJ
Protein 1.5g 7.3g
20 heartfoundation.org.nz | 2020Lesson 3:
Graphic organiser: Sugar detective
Look in the cupboards and fridge at home.
Check the nutrition panel on as many foods and drinks as you can.
How much sugar does each item have per 100 grams?
Bring your survey back to class to discuss your findings.
Product Amount of sugar per 100 grams
21 heartfoundation.org.nz | 2020Lesson 4:
Why is sugar added to food & drinks?
In this lesson students will explore the various reasons that sugar is added to food and drinks.
You can adapt and adjust the content where necessary to support your students as they carry
out their inquiries.
Key competencies Thinking, using language, symbols and texts.
Possible achievement Science: Level 2
objectives & Students will observe, describe and compare physical and
learning outcomes chemical properties of common materials and changes
that occur when materials are mixed, heated or cooled.
Learning outcome
Students will understand that sugar has many uses, other
than being used as a sweetener.
What you need • Samples of jam and chutney
• Tin of fruit
• Teaspoons
• Active dried yeast
• Sugar
• Warm milk
• Fact files: Lasting longer, It’s alive!
Key vocabulary Words that are important to this lesson are:
preservative, acidic, yeast.
Learning opportunity
This learning opportunity will help students understand the different reasons for adding sugar to foods:
• sweetener
• bulking agent
• preservative
• flavour enhancer
• colourant
• thickener
22 heartfoundation.org.nz | 2020Lesson 4:
Why is sugar added to food & drinks?
These can be defined and explored in context as you discuss the topic with your students.
You can find a lot of useful information about the functional properties of sugar in food.
www.srasanz.org/sras/basics-sugar/functionsuses-food/
1. To begin the lesson, look at the samples of jam and chutney. If possible, use commercial
products so you can ask the students to investigate the nutrition information panels after
the taste test. These two food products are high in sugar.
• Do you think they taste the same?
2. Have several students try the jam and then the chutney, and report on what they taste. If there
is time, allow other students to taste and compare opinions.
3. Now get the students to look at the nutrition information panels on the products and use the
amount of sugar “per 100 grams” to compare the sugar content of both foods. If possible, use
the teaspoon conversion (1 teaspoon is about 4 grams) to show students the actual amount of
white sugar in 100 grams of each food.
• Why do you think there is so much sugar in the jam and the chutney?
Note: Students will probably suggest that sugar adds sweetness to jam. Jam usually contains more sugar than
chutney, but fruit chutney still contains a lot of sugar, along with the natural sugars from the fruit. However,
jam and fruit chutney taste very different. Jam is mainly sugar and fruit and will last a long time because of the
preservative effect of the sugar. As well as needing sugar for its preservative qualities, chutney needs sugar to
balance the sharp taste of other ingredients, such as vinegar and hot spices.
4. Have students research the other reasons for the added sugar, using the infographic,
‘Why is there sugar in my food’?
www.srasanz.org/files/1614/4697/0063/Why_is_there_sugar_in_my_food_FINAL.pdf
Depending on time and interest level, students could explore and discuss more reasons for
adding sugar to food. Activities could include experiments, like how yeast works more efficiently
when it has sugar to feed on, or how yeast rises and adds lightness to bread.
You can also include the experiment shown in the video as an option, so students can see the
effect of sugar on yeast.
www.youtube.com/watch?v=FYClCHVT00M
Freezing fruit juice with no added sugar, some added sugar and lots of added sugar to see the
effects on the frozen product (rock hard vs soft compared to soft and unfrozen).
For the above activities, students can work in groups with the Fact files: Lasting longer, and It’s
alive! Have them share the outcomes of their discussions with the rest of the class as a verbal
description of how sugar is used or in written or poster form (diagram, step-by-step, mind map).
23 heartfoundation.org.nz | 2020Lesson 4: Why is sugar added to food & drinks? Reflect on the learning This is the time to reflect on the learning outcomes for the lesson and to signal the next lesson focus, where students will explore what happens in our bodies when they eat sugar, and how our bodies use sugar. Students can also talk about any ideas that are still unclear. When reflecting on this lesson, focus the discussion on the possible achievement objectives and learning outcomes for the inquiry question. By asking key questions, allow students to articulate their learning. 24 heartfoundation.org.nz | 2020
Lesson 4:
  Fact file: It’s alive!
A teaspoon of dried yeast might not look alive…but it is! Yeast is a kind of fungus that is used to
make bread. When you add it to warm water or milk, it starts to grow. If you add sugar, the yeast
eats it and grows. As it does, it makes a gas called carbon dioxide and the bread dough starts to get
bigger. This gas is what makes bread light and fluffy because it gets caught in the dough and leaves
tiny holes. When the bread is put in a hot oven, the yeast dies, so the bread stops rising.

                 1. Dried yeast                              2. Yeast + sugar + warm milk

                  3. Kneading                                       4. Baked bread

25 heartfoundation.org.nz | 2020
Lesson 4:
Fact file: Lasting longer
Most jam is made from half
fruit and half sugar. But if jam
is made from fresh, sweet-
tasting fruit, why does it need
all that sugar?
When the jam and sugar is
boiled, the sugar helps the
jam to ‘set’ or become thick.
Without the sugar, it’s hard to
+
get a firm jam that will stay on
your toast!
All this sugar means that it’s
hard for bacteria to grow and
spoil the jam. Most jam doesn’t
need to be kept in the fridge
because it lasts a long time
after it’s opened without going
mouldy. So, sugar in jam acts
as a preservative.
26 heartfoundation.org.nz | 2020Lesson 5:
What happens in my body when I eat
sugar?
This lesson will help students understand how our bodies use sugar and the different effects of
eating sugar.
You can adapt and adjust the content of this lesson where necessary to support your students as
they carry out their inquiry.
Key competencies Thinking, self-management, using language, symbols
and texts.
Possible achievement Science: Level 2
objectives & Students will recognise that all living things have certain
learning outcomes requirements so they can stay alive.
Learning outcome
Students will begin to understand the process of digestion
that begins with carbohydrates and how this is essential for
the energy our bodies need.
Students will extend their experiences and personal
explanations of the natural world through exploration,
play, asking questions and discussing simple models.
Learning outcome
Students will understand that we need energy to function
and that sugar (a carbohydrate) in its many forms,
provides the raw material for that energy.
Our bodies convert sugar into glucose and there are
different parts of the body that play a role in this process.
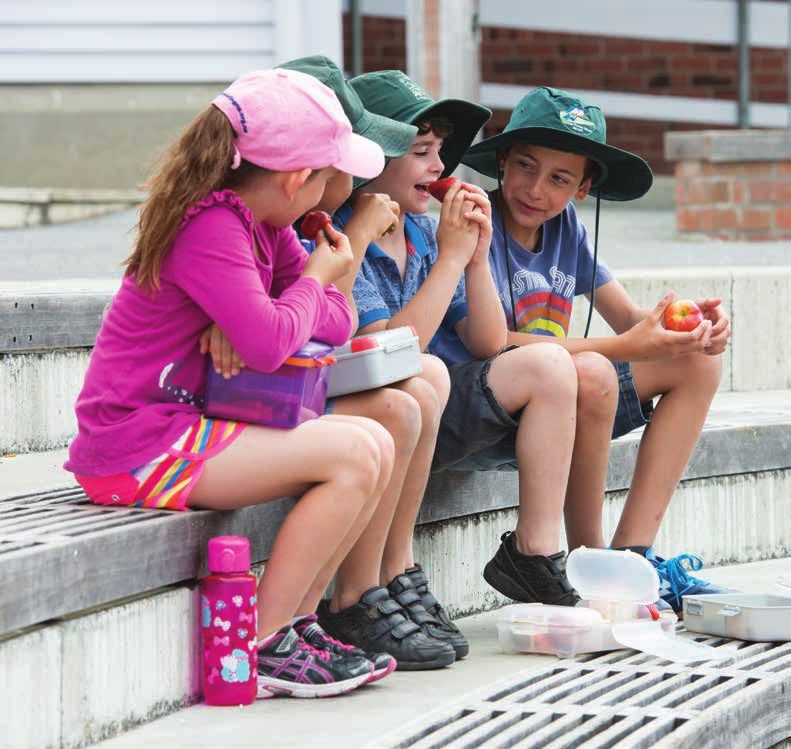
What you need • Photo card: Body diagram, with name cards
• Fact file: How carbohydrates are digested
• Graphic organiser: The sugar journey.
Key vocabulary Words that are important to this lesson are:
glucose, carbohydrate, energy, digest, digestive system,
blood sugar, intestine.
These can be defined and explored in context as you
discuss the topic with your students.
27 heartfoundation.org.nz | 2020Lesson 5:
What happens in my body when I eat
sugar?
Learning opportunity
Students will explore how our bodies process and use sugar. Do we actually need sugar? How much
is a healthy amount?
Students will begin to understand how our bodies process the carbohydrate within food so that
glucose can be released to provide the energy we need. Support students to become familiar with
the ideas and the vocabulary involved.
1. To begin the lesson, touch on the concept of a balanced diet, which includes a range of food types
and focuses on eating mostly foods and drinks that are close to how they are found in nature.
2. Discuss the concept that for a healthy diet we eat all kinds of whole and less processed foods,
such as;
• vegetables and fruit
• grain foods and starchy vegetables
• legumes, fish, eggs, poultry and meat
• milk, yoghurt and cheese
• healthy oils, nuts and seeds.
You’ll find information on the Heart Foundation’s Healthy Heart visual food guide.
w
ww.heartfoundation.org.nz/healthy-living/healthy-eating/healthy-heart-visual-food-
guide/about-the-healthy-heart-visual-food-guide
3. Ask:
• W
hat things are not part of a healthy diet if we eat too much of them?
(Occasional foods such as sugary drinks, ice cream, biscuits, lollies).
4. Write the students’ suggestions on the whiteboard.
Fuelling our bodies
5. Explain that, like a car, our bodies need fuel. It’s important for us to have the right kind of fuel
for our bodies to work well and have the energy to learn, move, grow and play.
Imagine that your family is taking for a trip in the car and your mum or dad fills the car with
diesel petrol instead of regular unleaded petrol.
28 heartfoundation.org.nz | 2020Lesson 5:
What happens in my body when I eat
sugar?
• W
hat do you think will happen? (The car won’t run well, it will have less power and
produce smoke).
• How is this like the way your body uses food for energy?
• W
hat happens if you put lots of sugary food and drinks into your body’s ‘tank’, instead of
healthy food? (Your body won’t run well. You may have a burst of energy, but it won’t last long).
6. Look at the photo card Body diagram with the students. Ask them to work in small groups with
a copy of the photo card and the cards showing the names of the body parts (mouth, brain,
stomach and intestine, blood).
7. Ask students to place their cards in the correct place. Knowing about these organs and where
they are in the body will help students to understand the part that each organ plays to digest
food and provide energy to the body.
8. Afterwards, allow students to compare their results and make changes as appropriate.
The digestive process
9. Tell the students that when we eat sugar our bodies digest and break the sugar foods down
into smaller simple sugars (like glucose) quickly.
Other foods like pasta, rice, bread and fruit are also broken down to smaller, simple sugars.
However, the digestion process usually takes longer and provides a sustained amount of energy
when compared to free sugar, which is digested quickly and enters the blood stream quickly.
10. Share the Fact File: How carbohydrates are digested with the students. Talk them through the
process, clearly identifying the organs they have named on the body diagram. Ask questions
such as:
• Where does the journey start for food?
• Where is your stomach? What does it do?
29 heartfoundation.org.nz | 2020Lesson 5:
Fact file: How carbohydrates are
digested
Key words What happens?
Mouth Your teeth grind up food.
Stomach and small intestine Carbohydrate foods are broken down or
digested into smaller simple sugars, which are
used as fuel in the body.
Blood The simple sugars (like glucose) then move
from the intestine to the blood and are used
by the body and brain for energy.
Brain and body The cells of your body and your brain take
the simple sugar (like glucose) they need for
energy.
Liver and Muscle Any extra sugar that is not used by the body
or brain is then stored as glycogen in the liver
and muscle, and then body fat.
Fat stores Excess energy is stored as body fat.
11. Give students copies of the Graphic organiser: The sugar journey which they can complete in
pairs or small groups, showing the knowledge they’ve gained from the lesson.
Note: The World Health Organisation recommends that children eat less than 5 teaspoons (20g) of free sugar per
day. Currently in NZ, children are having between 15-17 teaspoons of added sugar per day, about three times more
than the recommendation. This works out to be on average 23kg of added sugar per year, or the equivalent of a
seven-year-old child eating their own body weight in added sugar each year! If you have time, you can show this
visually by asking students to use teaspoons and two bowls. Have one student spoon the recommended 5 teaspoons
into one bowl, and another spoon 14 teaspoons into the other, and together count up to 17 teaspoons as the extra
five teaspoons are added.
Reflect on the learning
This is the time to reflect on the learning outcomes for the lesson and to signal the focus for the
next lesson, where students will learn how sugar affects our teeth. It is also a time for students to
talk about any ideas that are still unclear.
In reflecting on this lesson, focus the discussion on the possible achievement objectives and learning
outcomes for the inquiry question. By asking key questions, allow students to articulate their learning.
Definition: Free sugars are sugars that are added to foods and drinks by the manufacturer, the
cook or the consumer, plus sugars that are naturally present in honey, syrups and fruit juices.
30 heartfoundation.org.nz | 2020Lesson 5:
Graphic organiser: The sugar journey
Mouth
Stomach and intestine
Blood
Brain and body cells
Liver and muscle stores
Fat Stores
31 heartfoundation.org.nz | 2020Lesson 5:
Photo card: Body diagram
Stomach and
Mouth Blood Brain
intestine
32 heartfoundation.org.nz | 2020Lesson 6:
Sugar in drinks
In this lesson students will begin their investigation into the amount of sugar found in drinks.
You can adapt and adjust the content where necessary to support your students as they carry
out their inquiries.
Key competencies Thinking, self-management, using language, symbols and texts.
Possible achievement Science: Level 2
objectives & Students will explore and act on issues and questions that
learning outcomes link their science learning to their daily living.
Learning outcome
Students will know how to use a food label to determine
the amount of sugar in a drink. They will understand that
drinks like fizzy drinks, sports drinks and flavoured milks
contain large amounts of sugar, while water and milk have
very little or none.
Students will extend their experiences and personal
explanations of the natural world through exploration,
play, asking questions and discussing simple models.
Learning outcome
Students will understand the purpose of nutrition
information panels on food products and will be able to
use them to make healthier food and drink choices.
Health and Physical Education: Level 2
Students will describe their stages of growth and
their development needs and demonstrate increasing
responsibility for self-care.
Learning outcomes
Students will understand that most drinks contain more
sugar than the daily recommended amount and that water
and milk are healthier options.
Mathematics and statistics: Level 2 Statistics
Students will conduct investigations using the statistical
enquiry cycle.
Leaning outcome
Students will use ‘Problem, Plan, Data, Analysis, and
Conclusion’ to analyse the sugar content of various foods
and convert it to a teaspoon equivalent.
33 heartfoundation.org.nz | 2020Lesson 6:
Sugar in drinks
What you need • Infographic How much sugar is in that drink?
www.hpa.org.nz/sites/default/files/images/How%20
much%20sugar%20do%20you%20drink_a4.pdf
• Photo card: Drinking fizzy drinks
• S
ome empty bottles of sugary drinks such as fizzy drink,
sports drink, flavoured water, flavoured milk, juice,
cordial packets.
• White sugar, a teaspoon, and 4 or 5 small bowls
• Graphic organiser: Survey of favourite drinks
Key vocabulary Words that are important to this lesson are:
natural sugar, added sugar, flavoured, balanced diet,
artificial sweetener.
These can be defined and explored in context as you
discuss the topic with your students.
Learning opportunity
Students will explore how much sugar is in fizzy drinks, sports drinks, flavoured water, flavoured
milk, juice and energy drinks. To ask ‘Are these drinks a healthy choice?’ Students will understand
that these drinks contain a lot of sugar and are not an every day choice.
1. To begin the lesson, ask students the following questions:
• Have
you seen sugary drinks for sale in the supermarket or at your local dairy
or petrol station?
• What types of drinks have you seen or tried?
2. Brainstorm the names of sugary drinks and write the students’ suggestions on the board.
Make sure they have the complete list of the different types:
• Fizzy drinks (eg. Coke/Pepsi/Sprite/Fanta/L&P/Mountain Dew)
• Sports drinks (eg. E2/Powerade/Gatorade/Loaded/G-force)
• Flavoured waters (eg. Pump/H2go/Homebrand)
• Flavoured milks (eg. Primo/Calci-Yum/Mammoth/Oke/Nippys)
• Juices and fruit drinks (eg. Just Juice/Fresh Up/Keri/Cordial/powdered sachets(eg. Raro))
• Energy drinks (eg. Mother/Demon/V/Red Bull/Lift Plus).
34 heartfoundation.org.nz | 2020Lesson 6:
Sugar in drinks
3. Show students empty drink bottles and talk about the different kinds of drinks, ensuring they
know what a sports drink and an energy drink is and the difference between regular milk and
flavoured milk.
• Why is sugar added in drinks? (for taste)
• Do you think these drinks have a lot of sugar in them?
4. Ask students to order the drinks from least, to most amount of sugar (comparing per 100ml).
5. Choose one of the empty sugary drink bottles and show it to the students. Ask:
• How much sugar do you think is in this drink?
6. Point out the nutrition information panel on the bottle, which shows how much sugar is in each
serving and per 100 grams. Remind students that the way to compare the amount of sugar
between drinks is to read the amount from the ‘per 100 grams’ column.
7. Convert the amount of sugar per 100 grams to teaspoons (1 tsp = 4g).
8. Then measure the number of teaspoons of white sugar into the small bowl. For more information
on using nutrition information panels to make healthy choices go to
www.heartfoundation.org.nz/wellbeing/healthy-eating/how-to-read-food-labels/
9. Ask your students:
• Does that surprise you?
• Can you tell that this drink has a lot of sugar in it by reading the label?
10. Support the students to understand that because fizzy drinks contain a lot of added sugar, they
should be an occasional treat and not a regular part of a diet.
11. Next, ask a volunteer to choose another of the other empty drink bottles, convert the serving
measurement on the nutrition panel into teaspoons, and then put this amount of sugar into
another bowl.
12. Now have students pair up or get into small groups. Give them printouts of the infographic
‘How much sugar is in that drink?’ They can discuss the information in the chart and then
report back to the class on what they observed and any questions they have about the
information. You can also display the infographic on the classroom wall for students to refer to.
13. When the students have finished looking at the infographic, show the World Health Organisation
recommended daily consumption of added sugar for children as 5% total energy intake for a
10-year-old (no more than five teaspoons or 20 grams of added sugar per day).
35 heartfoundation.org.nz | 2020Lesson 6:
Sugar in drinks
14. Ask one of the students to put five teaspoons of sugar into an empty bowl to show this amount.
15. Now direct the student’s attention back to the infographic and point to the soft drink.
• How many teaspoons of sugar are in this bottle of soft drink? (16)
• How does a soft drink compare with your recommended sugar intake for the day?
16. Support the students to work out that a typical soft or fizzy drink has three times the amount
of added sugar recommended every day. Encourage them to do the maths and figure out
approximately how the other drinks on the infographic (fruit juice, sports drink and flavoured
milk) compare with this daily recommended amount.
Guide them to understand that most of these drinks on the chart have double or triple the
recommended amount.
17. Explain that regularly having drinks with a lot of sugar causes tooth decay (learn more about
sugar and dental health in lesson 7). This is a result of the large amounts of sugar in these drinks,
which we know damages the enamel of teeth. All sugary drinks also contain acids that eat away at
the tooth’s enamel.
18. Show the students an empty bottle of water, then an empty milk bottle or carton.
• Which are the healthiest drinks?
19. Show students relevant materials on choosing water and
plain milk: Guide to becoming a
www.nutritionandactivity.govt.nz/nutrition/100-water- water
resources
and plain
ww.nutritionandactivity.govt.nz/sites/default/files/3%20
w
0%20NPA158%20Water%20and%20plain%20milk%20
milk only
only%20guide%20for%20Schools_FA_Online.pdf school
Students may bring up ‘diet’ drinks as a healthier option as they Sugary drinks1 are one of the most significant
causes of poor oral health and contribute to
childhood obesity and type 2 diabetes.
don’t have added sugar. Schools can provide healthy environments for
staff, students and their whānau, and being a
water and plain milk only school for students is
Explain: a great place to start.
1
Any beverage that contains added caloric sweetener, usually sugar. The main
categories of sugary drinks include soft-drinks/fizzy-drinks, sachet mixes,
• W
ater is the best drink for us all and plain milk is also a great
fruit drinks, cordials, flavoured milks, flavoured waters, iced teas/coffees, and
energy/sports drinks
choice.
• ‘Diet’ drinks are still not as good as water and plain milk because:
It’s easy! Follow these three
steps and use these practical
ideas to help you get started »
- They taste sweet so they make us want more sweet foods and drinks.
- They are acidic and damage our teeth.
- Too much artificial sweetener can be bad for our bodies.
36 heartfoundation.org.nz | 2020Lesson 6: Sugar in drinks Reflect on the learning This is the time to reflect on the learning outcomes for the lesson, and to signal the next lesson focus for this module, where students will learn other ways that drinks are sweetened. It is also a time for students to talk about any ideas that are still unclear. In reflecting on this lesson, focus the discussion on the possible achievement objectives and learning outcomes for the inquiry question. By asking key questions, allow students to articulate their learning. 37 heartfoundation.org.nz | 2020
Lesson 6:
                 Amount of sugar in drinks
                 40

                 36

                  32

                  28

                 24
Grams of sugar

                 20

                  16

                  12

                  8

                  4

                  0

                       Water   Flavoured   Fizzy drink   Sports drink   Flavoured   Juice & fruit
                                 water                                     milk        drinks

                                                  Types of drinks

 38 heartfoundation.org.nz | 2020
Lesson 7:
How does sugar affect my teeth?
In this lesson, students will explore the effects of added sugar on their dental health and discuss
ways they can avoid damage.
You can adapt and adjust the content of this lesson where necessary to support your students as
they carry out their inquiry.
Key competencies Thinking, self-management, participating and contributing.
Possible achievement Science: Level 2
objectives and Students will recognise that all living things have certain
learning outcomes requirements so they can stay alive.
Learning outcome
Students will understand that sugar added to food and
drinks can harm your teeth.
Students will explore and act on issues and questions that
link their science learning to their daily living.
Learning outcome
Students will understand how sugar damages their teeth.
Health and Physical Education: Level 2
Students will describe their stages of growth and
their development needs and demonstrate increasing
responsibility for self-care.
Learning outcome
Students will understand how to follow a regular dental
hygiene routine in order to have healthy teeth.
Social Sciences: Level 2
Students will understand how people make choices to
meet their needs and wants.
Learning outcome
Students will understand that to maintain healthy teeth
the best choice of drink is water or plain milk.
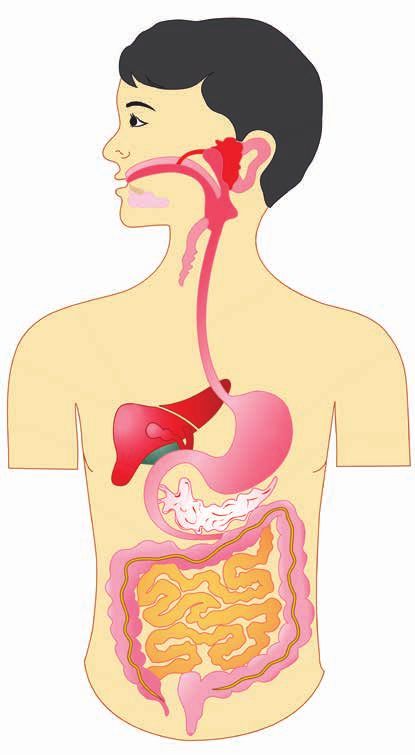
What you need • Photo cards: Healthy teeth/unhealthy teeth
• Fact file: How sugar harms our teeth
• Graphic organiser: Taking care of your teeth
• Pencils, pens, crayons, glue
• Toothbrush
• Bee Healthy: 5 Tips to Keep You Smiling poster.
39 heartfoundation.org.nz | 2020Lesson 7:
How does sugar affect my teeth?
Key vocabulary Words that are important to this lesson are:
Bacteria, acid, saliva, enamel, cavity.
These can be defined and explored in context as you
discuss the topic with your students.
Reflect on the learning
This is the time to reflect on the learning outcomes for the lesson and to signal the focus for the
next lesson.
It is also a time for students to talk about any ideas that are still unclear.
Learning opportunity
Students will build on the learning from previous lessons and explore how sugar affects their teeth.
1. In the last lesson we learned that some drinks contain a lot of sugar.
• How often should we have these kinds of drinks?
• What is the best drink to have?
2. We also learned that some foods are high in sugar.
• How often should we have these kinds of foods?
• What are healthier alternatives to those foods?
3. Show the students the first photo card ‘Unhealthy teeth’. Prompt the students to describe
what they see.
• What has happened to this child’s teeth?
• What might cause this? (Too much sugar/not brushing their teeth regularly)
• Where do you think this child needs to go? (the dental clinic)
Definition: Free sugars are sugars that are added to foods and drinks by the manufacturer,
the cook, or the consumer, plus sugars that are naturally present in honey, syrups and fruit
juices. The World Health Organisation recommends a 10-year-old child eats less than 5
teaspoons (20g) of added sugar per day (5% of total energy intake). Currently in NZ children
are having between 15 and 17 teaspoons of added sugar per day.
40 heartfoundation.org.nz | 2020Lesson 7:
How does sugar affect my teeth?
4. Then show the second photo card ‘Healthy teeth’.
• What kind of teeth does this child have?
• Why
do you think they have such healthy teeth? (Doesn’t have much sugar, brushes teeth
regularly).
5. Emphasise to students that sugar can harm our teeth and cause tooth decay such as cavities,
which will require a trip to the dental clinic.
6. Share the Fact File: How sugar harms our teeth with the students and discuss the diagram.
Encourage students to share their experiences of visiting the dental clinic and having to have
a filling to repair a cavity. Prompts could include:
• Who has had a cavity in their tooth?
• What happened?
• Did you know you had a cavity? How?
• What did the dental nurse do?
• How did you feel? Did it hurt?
• How can we avoid getting holes or cavities in our teeth? (brush teeth regularly)
• What is the best drink to have? (water)
7. Next, discuss the student’s dental hygiene routine and write their comments on the board.
You could also demonstrate with a toothbrush, showing a circular motion to brush your teeth,
brushing front and back, and brushing the gums as well as the teeth.
• How often should we brush our teeth?
• When is the best time to brush our teeth?
• Where do we brush? (teeth, gums, and tongue)
• How do we brush? (circular motion)
• What do we use to brush our teeth? (toothpaste/toothbrush)
• How long should we brush for? (at least two minutes)
• W
hat’s another really important way of taking care of our teeth? (drink water rather than
sugary drinks)
41 heartfoundation.org.nz | 2020Lesson 7:
How does sugar affect my teeth?
8. Discuss the Bee Healthy poster, which you can find and print
www.beehealthy.org.nz/library/6499fa1e-a68c-43c8-9843-811f57524bed.cmr
9. Remind the students also that they should visit the school dental clinic once a year.
10. Finally, give students a copy of the graphic organiser ‘Taking care of your teeth’ and ask them
to look at each photo and write a sentence about how it relates to the way they look after
their teeth.
11. Review the students’ sentences together. Conclude by encouraging students to bring water
to school rather than juice, cordial, sports or energy drinks.
42 heartfoundation.org.nz | 2020Lesson 7: Photo card: Unhealthy teeth Lesson 7: Photo card: Healthy teeth 43 heartfoundation.org.nz | 2020
Lesson 7:
  Fact File: How sugar harms our teeth
When you drink sugary drinks or eat foods high in added sugar, the bacteria in your mouth feeds
on the sugar and produces acid.
If there is too much acid, it attacks the teeth and eats away the enamel. This can cause cavities
(or holes).

                                                              enamel, decay (cavity)

44 heartfoundation.org.nz | 2020
Lesson 7: Graphic Organiser: Taking care of your teeth Write a sentence about each picture. Describe how it relates to looking after your teeth. 45 heartfoundation.org.nz | 2020
Lesson 8:
  How does advertising affect our
  sugar intake?
In this lesson, students will explore how companies’ market food and drink products and how
messages and packaging may have an influence on their choices.
• What is advertising, and what kinds of foods and drinks do you see in advertisements?
• What do we need to know about marketing messages in order to choose healthier food?
• What changes can we make to reduce the amount of added sugar we eat?
The learning opportunities in this module are suggestions. You can adapt and adjust the content
as needed, to support your students as they carry out their inquiries.

        Key competencies            Thinking, using language, symbols and texts.

        Possible achievement English: Level 2
        objectives and       Students will show some understanding of how language
        learning outcomes    features are used for effect within and across texts.
                                    Students will show some understanding of how to shape
                                    texts for different purposes and audiences.

        What you need               • Fact file: Ads are everywhere
                                    • Graphic organiser: Who is it for?
                                    • E
                                       xamples of advertisements – three or four aimed at
                                      different age groups (younger children, teens, adults,
                                      older people) with features that can help identify the
                                      target audience.
                                    • Magazines that contain advertisements.
                                    • A
                                       ds for two products that demonstrate the child/adult
                                      focus, such as yoghurt aimed for kids (colourful, known
                                      pictures) and one for adults, a drink aimed for kids and
                                      one for adults (ensure that students are easily be able to
                                      identify which ones are aimed at children).

        Key vocabulary              Words that are important to this lesson are:
                                    appeal/attract, packaging, products.

46 heartfoundation.org.nz | 2020
Lesson 8:
How does advertising affect our
sugar intake?
Learning opportunity
This learning opportunity explores advertising and the product packaging of food and how it is
designed to appeal to children.
1. Explain to the students that you’re going to talk about how companies tell people about the
things they sell (advertise), and how some ads are made to attract children to particular products.
2. Have the students’ brainstorm where they see ads, such as online, on TV, at the movies, in
supermarket flyers and magazines, and on billboards and buses.
3. Show the students a selection of ads for different food products. If possible, include a range of
media such as a supermarket flyer, online (search on YouTube) or TV ads, bus stop posters or
billboards. For each ad, ask:
• What is this ad for?
• Does the ad make you want to buy this product? Why/why not?
• What words or pictures are on the product?
• Who
do you think would be attracted by this ad and these words? (children, teens, adults,
older people)
• Do
you think this would be a good product to eat or drink? Why? (Taste/because it’s
healthy/because everyone else at school has it/because it looks fun to eat or drink)
• Just
because the food company tells us it’s healthy (saying it has wholegrains, is ‘natural’
or comes from whole fruit), does that mean it’s actually healthy?
4. Point out the words, catch phrases and pictures that are used in each ad.
• Which things in the ad make you want to buy this product?
5. Next, talk about foods and drinks the students have seen advertised on TV or at the movies.
List these on the board.
• W
hat ads have you seen? Are some of these ads made for children? What makes you
think that?
6. Prompt the students to say why they think these ads appeal to children, for example, they
come with a toy, the ad has a cartoon character.
• Do these ads make you want to buy the product? Why?
47 heartfoundation.org.nz | 2020You can also read