Your Guide to Breast Reconstruction - MedStar Health
←
→
Page content transcription
If your browser does not render page correctly, please read the page content below
Your Guide to Breast Reconstruction
       -   Free Flap Reconstruction
       -   Prosthetic Based Reconstruction
       -   Oncoplastic Reconstruction
       -   LIFT Procedure
       -   Enhanced Recovery After Surgery (ERAS)

David H Song MD MBA                         David.H.Song@medstar.net
Sarah R Sher MD                             Sarah.R.Sher@medstar.net
Kenneth L Fan MD                           Kenneth.L.Fan@medstar.net
MedStar Plastic & Reconstructive Surgery
(P) 202-444-8751 (F) 866-990-5516

                                                                  1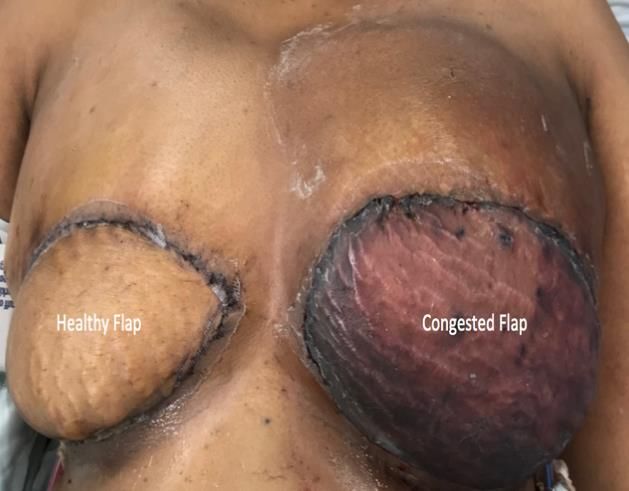
Welcome to MedStar
Plastic & Reconstructive Surgery
______________________________
Patient Name
______________________________
Surgery Date/Time to Arrive
______________________________
Surgeon
We are honored that you have given us the privilege of participating in your care. Preparing for surgery
can be overwhelming. At MedStar Health, we incorporate the latest techniques in reconstruction and
anesthesia to provide world-class care. This booklet is a primer on the most up-to-date, evidence-based
options that we offer -- with a focus on safety.
Our surgeons and anesthesiologists are pleased to include you in our Enhanced Recovery After Surgery
(ERAS) program. Our enhanced recovery program combines several strategies aimed at minimizing the
stress of surgery on your body, expediting recovery, and reducing length of stay in the hospital. The
material included in this educational book will provide you with an overview of the exceptional surgical
experience we offer at MedStar Health through our ERAS program.
It is important to remember that every patient is different. Your care team will tailor your recovery
program to your needs. You will be receiving a lot of information – please know that the MedStar Plastic
Surgery team is here to help you from beginning to end.
This handbook should be used as a guide to help you through your recovery and answer questions that
you may have. Please give us any feedback that you think would make your experience even better.
Please try to read this handbook as soon as you are able, keep track of your questions, and be sure to
ask your surgical team when you see them or call our office at 202-444-8751. It is important for you,
your family, and your friends to understand what to anticipate so that everyone can fully participate in
your recovery.
Please bring this book with you to:
Every office visit
Your admission to the hospital
Follow-up visits
2
Contact Information
MedStar Georgetown University Hospital (MGUH)
3800 Reservoir Road NW
Washington, DC 20007

MedStar Health at McLean
6862 Elm Street, Suite 800A
McLean, VA 22101

MedStar Washington Hospital Center (MWHC)
106 Irving St NW
Washington, DC 20010

                   Contact                            Phone Number
     Plastic and Reconstructive Surgery                 202-444-8751
      Department of Anesthesiology                      202-444-6680
          Anesthesiologist, Dr. Joe Myers       joseph.myers@gunet.georgetown.edu
       Fax – Plastic Surgery Clinic                      866-990-5516
   MGUH Presurgical Testing Department                   202-444-2746
   MWHC Presurgical Testing Department                   202-877-7169
   MGUH Hospital Inpatient Unit: 3 Bles                  202-444-2311
   MGUH Hospital Inpatient Unit: 7 Bles                  202-444-2351
         MGUH Surgery Center                             202-444-4218
                                                         202-444-7243
                  After Hours                     (ask for the plastic surgery
                                                        resident on call)
        MGUH Outpatient Pharmacy
                                                        202-444-3772
         (Ground Floor PHC Building)
        MWHC Outpatient Pharmacy
                                                        202-877-6309
   (First Floor Physician’s Office Building)
  Georgetown Hotel and Conference Center                888-902-1606
          MGUH Parking Assistance                       202-444-3802
          MGUH Interpreter Services                     202-444-1588
          MedStar Billing Questions                     410-933-2424

                                                                                    3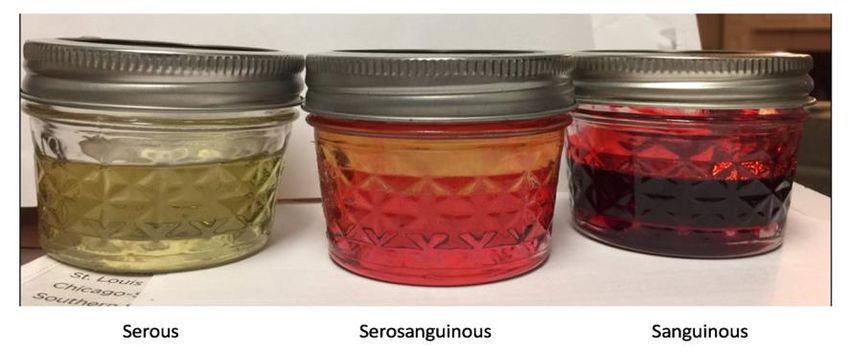
Table of Contents
Contact Information .............................................................................................................. 3
What is ERAS? ....................................................................................................................... 6

Your Checklist ........................................................................................................................ 7
Before Your Surgery............................................................................................................... 8
Preparing for Surgery .......................................................................................................... 13
1-2 Days Prior to Surgery ..................................................................................................... 14
The Day of Surgery .............................................................................................................. 15
Fluid Intake – Day of Surgery ............................................................................................... 16
Your Hospitalization ............................................................................................................ 17
After Surgery ....................................................................................................................... 18
Care of your Jackson-Pratt (JP) Drains .................................................................................. 22

Introduction to Breast Reconstruction .................................................................................. 26
Prosthetic-Based Reconstruction .......................................................................................... 28
Postoperative Expander/Implant Discharge Instructions ...................................................... 33
Oncoplastic Reconstruction.................................................................................................. 34
Postoperative Oncoplastic Reconstruction Discharge Instructions ........................................ 36
LIFT Reconstruction ............................................................................................................. 37
Postoperative LIFT Discharge Instructions ............................................................................ 39
Free Flap Reconstruction ..................................................................................................... 40
Free Flaps – What to Watch for When You Get Home ........................................................... 44
Postoperative Free Flap Discharge Instructions .................................................................... 46
Free Flap “Must Calls” ......................................................................................................... 47
Free Flap Drain and Flap Check ............................................................................................ 48
Revision of Reconstructions ................................................................................................. 50

                                                                                                                                       4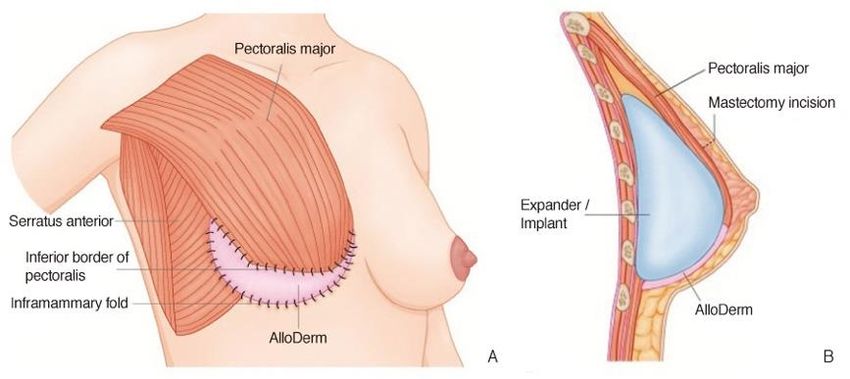
MedStar eVisit..................................................................................................................... 51
MedStar eVisit Patient Experience Guide ............................................................................. 52
Insurance Coverage for Breast Reconstruction ..................................................................... 54
The Women’s Health and Cancer Rights Act of 1998............................................................. 54
Where Can I Learn More? .................................................................................................... 56
Notes .................................................................................................................................. 57
References........................................................................................................................... 58
Campus Map – MedStar Georgetown University Hospital .................................................... 60
Campus Map – MedStar Washington Hospital Center .......................................................... 61

                                                                                                                                         5
What is ERAS?
Enhanced Recovery After Surgery (ERAS)

Enhanced recovery is a way of improving the experience of patients who need major surgery. It helps
patients recover sooner so life can return to normal as quickly as possible. The ERAS program focuses on
making sure that patients are actively involved in their recovery.

There are four main stages:
   1. Planning and preparing before surgery – giving you plenty of information so you feel ready
   2. Reducing the physical stress of the operations.
   3. A pain relief plan that focuses on giving you the right medicine you need to keep you
        comfortable during and after surgery
   4. Early feeding and moving around after surgery – allowing you to eat, drink, and walk around as
        soon as you can.

It is important that you know what to expect before, during, and after your surgery. Your care team will
work closely with you to plan your care and treatment. We hope to make you an active participate in
your recovery. By working together, we hope to keep your hospital stay as short as possible.

                                                                                                      6
Your Checklist
Use this summary checklist as a guide to what you need to do in order to prepare for your surgery and
recovery after surgery.
AS EARLY AS POSSIBLE BEFORE SURGERY
Gather outside medical records to be sent to Presurgical Testing and our office
Meet with Presurgical Testing to discuss surgery during your Preadmission Testing (PAT)
appointment. You will review your medical history and will be told if you need to stop or change
any medication before surgery. This appointment may be over the phone, o r you may be asked
to come in.
Complete bloodwork, EKG, radiology as needed with your primary care physician or with Pre-
Anesthesia Testing.
A DAY OR TWO BEFORE SURGERY
You will receive a phone call from the hospital reminding you what time to arrive for your
surgery, review medications to take the day of surgery, and ask last-minute questions
Call your surgeon’s office at 202-444-8751 and schedule a post-operative appointment for one
to two weeks after surgery, depending on procedure.
MORNING OF SURGERY
Take medications as instructed.
Follow your guide for fluid intake (located on page 14 of this packet).
AFTER SURGERY
If you are having an ONCOPLASTIC RECONSTRUCTION or an IMPLANT-BASED REVISION
RECONSTRUCTION, you will go home the same day as your procedure.
If you are having IMMEDIATE RECONSTRUCTION WITH IMPLANTS OR TISSUE EXPANDERS, you
will go home the day after your procedure.
If you are having FLAP-BASED RECONSTRUCTION, plan to go home on the third or fourth day
following your procedure.
Before you leave the hospital, you should have:
Hospital discharge instructions
An outpatient appointment with your surgeon within one to two weeks of discharge
Prescription for pain medication and any other medications you need. Be sure you and someone
that will be with you understand the plan for taking pain medications. At Georgetown, the
Outpatient Pharmacy is located on the Ground Floor of the Pasquerilla Healthcare Center (PHC
Building). At Washington Hospital Center, the Outpatient Pharmacy is located on the first floor
in the Physician Office Building (POB Building).
7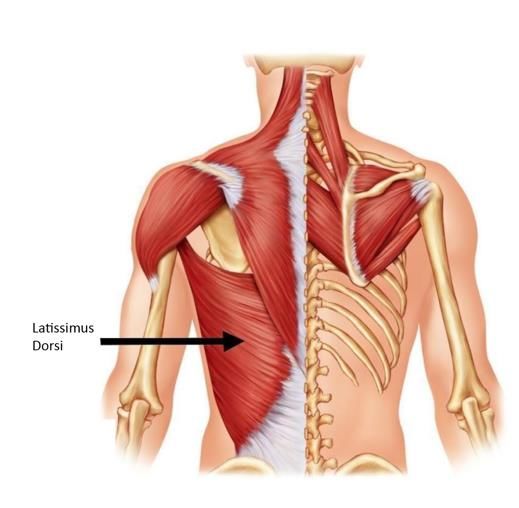
Before Your Surgery
Office Visit:

During your first visit, we will evaluate to see if you need surgery, and what type of surgery we
recommend. You will work with our entire team to prepare for surgery, including:
    • Your surgeon
    • Fellows, residents, and medical students who will participate in your care while you are in the
        hospital
    • Nurse Practitioners who will participate in your care during office visits
    • Executive Assistants
    • Medical Assistants
During your clinic visit, you will:
    • Answer questions about your medical history
    • Have a physical exam
    • Discuss surgical options
    • Decide surgical plan
You will also receive:
    • Instructions on preparing for surgery
    • Special instructions for what to do before surgery (e.g.: if you are on any blood thinners or other
        medications)

You will meet with a surgical coordinator during your clinic visit to schedule the date of your procedure
and any additional appointments as needed.

PLEASE NOTE: The time of your procedure is subject to change up until the day prior to surgery, and is
dependent on availability in the OR and potential for emergency surgeries being added to the OR
schedule. For this reason, our department cannot give an accurate surgery start time until one week
prior to surgery, nor can we accommodate special requests for surgery start times. You will be called by
a nurse in the pre-op department one to two days before your surgery to confirm your start time.

                       Write any special instructions here:
                       _______________________________________________
                       _______________________________________________
                       _______________________________________________
                       _______________________________________________
                       _______________________________________________
                       _______________________________________________
                       _______________________________________________

                                                                                                       8
Presurgical Testing

After your office visit, you will need to see a primary care physician and have tests done before your
surgery. This may occur at your own primary care physician’s office, or at the Presurgical Testing
Department, a clinic located at MedStar Georgetown University Hospital

Presurgical testing is a process that ensures that all preoperative requirements are completed and
reviewed before the day of surgery. If the Presurgical Testing Center cannot complete this process,
your surgeon and/or anesthesiologist may be required to cancel or delay your surgery.

Special note on medication:

Please let us and presurgical testing know if you are on a blood thinner due to a stent (e.g.: Plavix,
Aspirin) or a clot (e.g.: Warfarin, Lovenox, Xarelto). This increases the incidence of bleeding.

If you are taking Tamoxifen, hormone replacement medication, or hormonal birth control, ask your
surgeon if you should stop the medication four weeks prior to surgery. These medications increase the
incident of clots.

Please ask your presurgical testing providing and our office if you have further questions about
medications to stop prior to surgery. If you take medication for diabetes, please check with your
primary care physician the dosage recommended when you are fasting. It typically is half the required
dose.

PRESURGICAL TESTING CHECKLIST (TO BE COMPLETED BY SURGEON’S OFFICE)

       Plan to see your Primary Care Provider to be cleared for surgery. Please schedule an
       appointment with your primary care provider one month prior to surgery. A tear-out clearance
       request for your primary care physician is located on the following page.

       All patients will need an H&P (history and physical) and basic lab work prior to surgery.

          Write any notes for presurgical clearance here:
          ____________________________________________________________________
          ____________________________________________________________________
          ____________________________________________________________________
          ____________________________________________________________________
          ____________________________________________________________________
          ____________________________________________________________________
          ____________________________________________________________________

                                                                                                        9
This page intentionally left blank

                                     10
Patient:_____________________________________
DOB:______________________________________
MedStar Plastic and Reconstructive Surgery
3800 Reservoir Rd., NW
1st Floor, PHC Bldg.
Washington, DC 20007
PRIMARY CARE CLEARANCE REQUEST
This patient is scheduled for a surgical procedure and requires a letter stating they are
medically cleared for surgery.
Date of surgery: ________________________
Surgeon: ______________________________
Location of surgery: __________________________________________________________
CPT codes: __________________________________________________________________
Please evaluate the patient pre-operatively. Check the labs/studies indicated below, and add
anything you deem necessary for medical clearance.
We have asked the patient to have lab results and clearance statement sent to us 2 (two)
weeks prior to their surgery date.
Fax all results and letter stating the patient is cleared for surgery to 866-990-5516, ATTN: PRE-
OP. If you have any questions, call us at 202-444-8751.
Please check:
H&P CBC BMP PT/INR LFTs Nicotine/Cotinine
EKG (age >50) Echocardiogram CXR Cardiac Clearance
Mammogram Other: ______________________
11This page intentionally left blank
12Preparing for Surgery
You should expect to be in the hospital for about 1-3 day(s), depending on the type of surgery you are
having. Please see page 16 for discharge guidelines. When you leave the hospital after your surgery, you
will need some help from family or friends. It will be important to have help with meals, taking
medications, and other activities for daily living.
You can do a few things before you come in to the hospital to make things easier for you when you get
home:
Clean and put away laundry
Put clean sheets on the bed
Put the things you use often between waist and shoulder height to avoid having to bend down
or stretch too much to reach them
Bring the things you are going to use often during the day to the place where you will be
recovering for the first week or two
Buy the foods you like and other essentials, since shopping may be challenging when you first
get home.
Arrange for someone to get your mail and take care of pets and loved ones, if necessary. Pets
need to stay away from your surgical wounds, as they harbor infection.
Special note on medication:
Please let us and presurgical testing know if you are on a blood thinner due to a stent (e.g.:
Plavix, Aspirin) or a clot (e.g.: Warfarin, Lovenox, Xarelto). This increases the incidence of
bleeding.
If you are taking Tamoxifen, hormone replacement medication, or hormonal birth control, ask
your surgeon if you should stop the medication four weeks prior to surgery. These
medications increase the incident of clots.
Stop taking medications that increase bleeding two weeks before surgery. You may resume
these medications two weeks after surgery. This includes:
Aleve, Advil, Alka-seltzer, Anacin, Anaprox, Bayer, Aspirin tablets, BC powder and tablets,
Bufferin Butalbital, Darvon, Dristan, Duragesic, Ecotrin, Excedrin, Florinol, Goody’s, Ibuprofen,
Indocin, Midol Motrin, Naprosyn, Norgesic, Nuprin, Pamprin, Peptobismol, Percodan, Supac,
Triaminicin, Voltaren, Zomax, Vitamin E, Vitamin A, Vitamin E, St. John’s Wort, gingko biloba,
grape seed extract, fever few and beta carotene
If you smoke, you will need to STOP ALL NICOTINE at least four weeks prior to surgery and six
weeks after surgery. Nicotine will significantly impact your wound healing. Ask your primary
care physician for assistance prior to surgery, if necessary. Continuing to smoke may cause
your surgeon to cancel or delay your surgery. This includes e-cigarettes, vaping, cigars,
cigarettes, and nicotine gum, patches, or other replacements.
131-2 Days Prior to Surgery
Please shave 48 hours before surgery. Do not shave with a sharp razor within 48 hours at the
surgical site as this may increase chances of surgical site infection.
Use a nonfragranced antibacterial soap (Lever, Dial) the week before surgery with showering.
[Breast expander or implant patients]: Please use Hibiclense (4% chlorhexidine) to wash the
surgical site 48 hours before surgery. This may be purchased at your local CVS or on Amazon.
Shower at least twice with this wash in addition to the antibacterial soap. Make sure to scrub
the armpit area, under the breast, and between the breasts very well.
If you take medication for diabetes, please check with your primary care physician the dosage
recommended when you are fasting. It typically is half the required dose.
When showering the night before surgery, use antibacterial soap and/or Hibiclense and scrub
your armpit, groin, and underneath your breasts diligently. These areas need to be adequately
scrubbed to reduce bacterial count.
You may have solid foods up to 6 hours before surgery and clear liquids (Gatorade) up to 2
hours before surgery.
14The Day of Surgery
What you SHOULD bring to the hospital:
A list of your current medications
Any paperwork given to you by your doctor
A copy of your Advance Directive form, if you have completed one
A book or something to do while you wait
A change of comfortable clothes for discharge
Any toiletries that you may need
Your Guide to Breast Reconstruction (this book!)
Insurance card and photo ID
Payment for any deductible or copayment
What you SHOULD NOT bring to the hospital:
Large sums of money
Valuables, such as jewelry or non-medical electronic equipment
If you take daily medication such as that for blood pressure or cholesterol, please take them as
scheduled before surgery with a very small sip of water to swallow them.
Do not apply lotions, creams, or makeup on the day of surgery.
Remove all nail polish prior to arriving at the hospital
Do not wear contact lenses, hairpieces, or hair pins. Wear loose, comfortable clothing. Do not wear any
jewelry – this includes wedding rings, earrings, and any other body piercings. If body piercings cannot
be removed, please ask your piercing specialist to replace them with completely plastic replacements to
prevent burns.
Remind the team of any concerns. If you are prone to nausea vomiting, please let the anesthesiologist
so that steps can be taken to pre-emptively treat such cases.
Please arrive two hours prior to your scheduled surgery. A nurse will call you the day before your
surgery to remind you what time to arrive. If your surgery is on a Monday, you will be called the Friday
before. There is a space on page 2 of this handbook to write your arrival time.
At Georgetown, you will report to the Surgery Center, accessible via Entrance 2 off of Reservoir Road.
Valet parking is available at the entrance to the surgery center. Valet and self parking are also available
in Garage 1. There is a map on page 59 of this handbook.
At Washington Hospital Center, you will report to the Admissions Desk (Room 1228). Park in the
Hospital Parking Garage and enter through the Main Hospital Entrance. There is a map on page 60 of
this handbook.
Please refer to page 14 of this handbook for your instructions on fluid intake on the day of surgery.
15Fluid Intake – Day of Surgery
Your surgery is scheduled for __________ at ________am/pm.
Please arrive at the hospital no later than __________am/pm.
The start time of your surgery is subject to availability in the operating room. We are able to
provide an estimate of your surgical start time one week prior to surgery. However, the
operating room reserves the right to change the start time of surgery to accommodate
emergencies up to and including one day prior to surgery. If your start time has changed you
will be notified by the hospital.
If you are having breast reconstruction in conjunction with a lumpectomy or mastectomy,
please consult with your breast surgeon to see if you need to arrive any earlier for additional
procedures prior to surgery, such as needle localization or lymph node injection.
You may have solid foods up to 6 hours before surgery.
You may have clear liquids up to 2 hours before surgery.
NO SOLID FOODS AFTER __________am/pm
CLEAR LIQUIDS ONLY BETWEEN __________am/pm and __________am/pm
NOTHING TO EAT OR DRINK AFTER __________am/pm
16Your Hospitalization
You will awake from anesthesia in the recovery room where nurses will administer medication to assure
that any discomfort you have is tolerable. They will ask you to rate your pain on a scale of one to ten,
one being minor discomfort and ten being the highest level of pain. Realistically, you can’t expect zero
pain after surgery, but it should always be tolerable.
If you are going home same-day (oncoplastic reconstruction or revision reconstruction), you will be
discharged from the PACU to go home. A responsible adult over the age of 18 must be present to
receive your discharge instructions, drive you home, and stay with you for the first 24 hours after
surgery.
If you are going home next-day (immediate implant or tissue expander reconstruction), you will be
moved to an inpatient room in the hospital once there is a bed available for you. If you had surgery at
Georgetown University Hospital, you will generally be admitted to 7 Bles. If you had surgery at
Washington Hospital Center, you will be admitted to the surgical unit. Patients are admitted after
surgery for pain control. During the first evening of surgery, you will be able to eat or drink. You may
experience muscle spasms, which we will provide muscle relaxants for. You are encouraged to walk as
much as you can. However, it is critical you do not use your chest muscles with a 4-wheeled walker as it
may disrupt your reconstruction. Usually by day one or two patients feel well enough to go home.
If you are having flap-based reconstruction you should plan to stay in the hospital for three to four
days after surgery. If you had surgery at Georgetown University Hospital, you will be admitted to 7 Bles.
If you had surgery at Washington Hospital Center, you will be admitted to the ICU. During the first
evening after surgery, you cannot have anything to eat or drink, in case there is an issue with the vessels
that requires a return trip to the operating room. You will have a urinary catheter in place to help you
urinate. After we see you in the morning on the first day after surgery and assess your flap, you will be
able to resume your diet. You will be able to get out of bed and move into a chair (with help). Your
urinary catheter will be removed at this point. By day two, most of our patients are able (and
encouraged!) to walk. You may require assistance early on. We do not encourage patients to support
themselves with a 4-wheeled walker as that may pinch the blood vessels supplying the flap
reconstruction. Instead, have someone support your arm. By day three or four, you may be discharged
from the hospital.
17After Surgery
It is common to feel discomfort after having breast reconstructive surgery. You will most likely have
surgical drains in place regardless of the type of reconstruction you receive. See pages 20-23 for a guide
to caring for your surgical drains. Your drains may cause you discomfort, particularly where the drains
exit the skin. They will usually be removed in 2-3 weeks depending on how much volume they put out.
Drains are placed to draw excess fluid away from the surgical site so that fluid does not build up under
the skin or within the tissues.
Activity after prosthetic-based reconstruction
You may feel soreness, pain, and tightness in your chest if you have implant or tissue expander-based
reconstruction. This is to be expected. You may also experience muscle spasms, which can be relieved
with muscle relaxant medication. After surgery you are encouraged to walk, with assistance, as soon as
you are able. However, for the first 2 weeks, limit activity to that which does not increase your heart
rate >100 beats per minute. Heavy lifting greater than 10 lbs must be limited for 6 weeks. Any physical
trauma (including sex) must be avoided for 4-6 weeks. Most people are able to return to light duty in 2
weeks. This is also when patients feel comfortable driving. You may not drive if you take muscle
relaxant or opioid medications.
Activity after flap-based reconstruction
If you have flap-based reconstruction, your abdomen may be in discomfort due to pain in your core
muscles and at your surgical drains. Most patients are able to move around and to ambulate slowly, but
sometimes will need assistance for the first week. For the first 2 weeks, limit activity to that which does
not increase your heart rate >100 beats per minute. Heavy lifting greater than 10 lbs must be limited for
6 weeks. Any physical trauma (including sex) must be avoided for 4-6 weeks. Most people are able to
return to light duty in 3 weeks. This is also when patients feel comfortable driving. You may not drive if
you take muscle relaxant or opioid medications. Do not place your seatbelt directly over your chest
area.
For the first few weeks, you may not sleep on your side. Most patients find comfort in sleeping on several
pillows, or in a recliner chair. Do not place pressure on your reconstructed breasts. This includes seat
belts or placing items on your chest. Keep animals away from your wounds at all times.
Activity after LIFT procedure
After the LIFT procedure, your back may be sore due to the surgical operation and the drains in place.
Most patients are able to ambulate without difficulty, and we encourage doing so. However, for the first
2 weeks, limit activity to that which does not increase your heart rate >100 beats per minute. Heavy
lifting greater than 10 lbs must be limited for 6 weeks. Any physical trauma (including sex) must be
avoided for 4-6 weeks. You may resume normal range of motion of your shoulder so long as there is not
pain at your incision site. We encourage this as well, as nursing your shoulder may result in stiffness and
a frozen shoulder. Most people are able to return to light duty in 2-3 weeks. This is also when patients
feel comfortable driving. You may not drive if you take muscle relaxant or opioid medications.
18Activity after Oncoplastic Reconstruction
After oncoplastic reconstruction, your chest may be sore in the incision lines and where the drain is in
place. Most patients are able to ambulate without difficulty, and we encourage doing so. However, for
the first 2-3 weeks, limit activity to that which does not increase your heart rate >100 beats per minute.
Heavy lifting greater than 10 lbs must be limited for 6 weeks. Any physical trauma (including sex) must
be avoided for 4-6 weeks. Most people are able to return to light duty in 1-2 weeks. This is also when
patients feel comfortable driving. You may not drive if you take muscle relaxant or opioid medications.
Diet
You may resume your normal diet as tolerated. Adequate protein and vitamin intake is important to
ensure proper wound healing. We recommend a diet rich in meats and leafy greens. If you are
vegetarian, please ensure you have protein built into your diet. Ensure supplements are also beneficial
to boost calorie intake for those who struggle. Please consult your primary care provider for
recommendations to optimize your nutrition in order to promote healing after surgery.
What is the pain like after surgery?
Modern medical practice emphasizes
Enhanced Recovery After Surgery (ERAS) and
opioid-sparing strategies to keep you as
comfortable as possible while preventing
nausea and over-sedation. This allows you to
eat, walk, rest, and recover. Guided by the
ComfortSafe Pyramid® you will begin taking
non-opioid pain medication. You will have
some before surgery, we will give more
before you awaken from anesthesia, and
you will continue to take these non-narcotic
pain medications around-the-clock for about
one week. If you have pain that the non-opioid medications do not relieve, opioids will be available. Try
to limit the opioids that you take but always take your scheduled dose of non-opioid pain medication to
help prevent pain and discomfort before it happens.
Most patients report 3-4/10 pain in their surgical and drain sites. This is normal, and often taking opioids
will not relieve this pain. The side effects of opioids are nausea, vomiting, constipation, sedation,
addiction, and a decreased breathing rate.
Please visit https://www.medstargeorgetown.org/our-services/general-
surgery/treatments/comfortsafe-pyramid/ for more information.
Medications
All medications should be taken as prescribed and/or instructed by your surgeon. We practice the
Enhanced Recovery After Surgery (ERAS) protocol and ComfortSafe Pyramid® where we limit the
amount of opioids given. Opioid pain medications can cause constipation, decrease cognitive awareness,
19increase nausea significantly, and often do not break the pain feedback loop. They may also cause
cognitive impairment and be ineffective in treating pain. We recommend a high fiber diet, lots of liquids,
and possibly an over the counter stool softener if taking opioids in order to prevent these issues.
You should be given a regimen of Tylenol 1000mg by mouth every 8 hours, gabapentin (Neurontin)
300mg every 8 hours, and celecoxib (Celebrex) 200mg every 12 hours. Take these medications even if
you are not in pain. Continue this for at least one week.
It is not unusual to have nausea after surgery. Nausea and/or vomiting may increase your blood
pressure and cause bleeding from your surgical sites. If necessary, you should take Zofran, as prescribed,
to minimize nausea, postoperatively. If you were given a prescription for any antibiotics, please
complete the entire course. Valium may have been prescribed for muscle spasms, which you may take
to minimize discomfort at the surgical site as needed.
Your throat may be sore following general anesthesia. You may try over the counter throat lozenges. No
alcoholic beverages while taking opioid pain medication.
Follow-up
You should follow-up with your surgeon within 1 week after discharge from the hospital. Please call the
office at (202) 444-8751 to arrange and/or confirm your appointment with your surgeon.
Postoperative Wound Care
You may shower with gentle (non-fragranced) soap and water beginning the following day after your
operation. Gently massage soap over your skin and pat dry with a clean towel. Do not scrub or rub
vigorously over incision sites, as this may cause irritation and/or wound separation. Do not
soak/submerge incisions for 4 weeks, as this may increase your risk for infection. A dissolvable skin glue
and/or mesh bandages have been placed over your incisions; allow them to fall off on their own over
the course of 1 to 2 weeks. Do not apply ointments, creams, or lotions to your incision sites unless
instructed by your surgeon.
Postoperative Drain Care
During your surgery, 1 or more drains
may have been placed to help facilitate
the removal of excess fluid from under
the skin. Please empty and record the
amount of fluid from each drain twice
daily, or as needed. You will be sent
home with a log to record the daily
output from each drain, which your
surgeon will use to determine the
timing of drain removal.
Drain bulbs should be kept compressed from side to side (i.e., not bottom up) at all times. As fluid
collects in the drain bulb, it will expand. Drains should be emptied if they fill 50% or more. After
emptying the drain, squeeze the bulb to recompress it and replace the plug at the top of the drain to
20maintain suction. Milking or stripping the drain should also be done to ensure the tubes do not become
clogged. To do this, secure the tube to the body using your thumb and pointer finger of one hand. Using
your other hand, squeeze the tube while sliding your fingers away from your body towards the bulb. It is
normal if the tube appears collapsed after doing this. Apply antibiotic ointment such as Bacitracin to the
drain sites prior to showering and if the drain site appears red or irritated. The normal color of the fluid
should be red, pink, or clear yellow (See Photo). Call if the drainage becomes foul smelling or cloudy.
There are additional details on the JP drain system as well as a drain log for use after your surgery on
pages 20-23.
You should notify your surgeon if you experience any of the following symptoms:
Fevers > 101.5
Chills
Pain, redness, pus or foul smelling drainage from surgical site
Excessive swelling, bruising, or bleeding from surgical site
Sudden increase or change in the character of drain output (i.e., excessive bloody or foul smelling
drainage)
Continued nausea/vomiting
Inability to tolerate oral intake
Chest pain or shortness of breath
For free flaps, please see the “Must Calls” postoperative information sheet.
If during business hours, please call the Plastic Surgery Office at (202) 444-8751. If you need
to reach someone after hours, you may call (202) 444-7243 and ask for the plastic surgery
resident on call.
21Care of your Jackson-Pratt (JP) Drains
The Jackson-Pratt drain system is made up of a soft plastic
bulb with a catheter at the top of the bulb, and a drainage
outlet with a stopper. The other end of the catheter tubing is
inserted near your incision to collect drainage. When the
bulb is compressed with the stopper in place, a vacuum is
created. This causes a constant gentle suction, which helps
draw out fluid that otherwise would collect under the
incision. To achieve the best healing results, the bulb should
be compressed at all times, except when you are emptying
the drain. The amount of time you will have the drain
depends on your surgery and the amount of drainage you
are having, which is very individual. Your doctor will decide
when to remove the drains based on the amount of
drainage that has accumulated, so please be sure to bring
the JP Drain Output Record with you to all of your follow-
up appointments.
You may also use the “Drain IQ” app and email your provider your logs through the app. Please see
https://itunes.apple.com/us/app/drain-iq/id1100445683?mt=8 for detail.
Utility belts to hold your drains are readily available on Amazon.com.
CARING FOR YOUR JP DRAIN SYSTEM
Caring for your JP drain at home will involve the following:
A. Emptying the drain 2 or more times a day and recording the amount of drainage
B. Caring for your insertion site (where the catheter enters your skin)
C. Stripping the tubing before emptying the drain, and when necessary to move a clot
D. Recognizing when there is a problem
22A. HOW TO EMPTY YOUR DRAIN AND RECORD THE DRAINAGE
Empty your JP drain every morning and every evening or when the drain is more than 50% full.
1. Unplug the stopper on top of the JP drain. This will cause the bulb to expand.
2. Do not touch the inside of the stopper or the inner area of the opening on the bulb.
3. Turn the JP bulb upside down, gently squeeze the bulb, and pour the contents into the
measuring container you are given at discharge.
4. Turn the bulb right side up.
5. Squeeze the bulb from side to side (not from bottom up!) until
you have removed as much air from inside as possible.
6. Continue to squeeze the bulb while re-plugging the stopper.
7. Check periodically to see that the bulb remains fully
compressed to assure constant gentle suction.
8. Attach the loop of your JP bulb securely to a belt loop, put in
pockets or fanny pack, camisole with pouches, or around your
neck on a lanyard. Do not allow the drains to dangle.
9. Check the amount of drainage in the measuring container and
record on the Drain Record.
10. Empty the drainage down the toilet, and rinse the measuring container with soap and water.
11. At the end of each day, add the total amount of drainage for the 24-hour period and record it on
the output record.
12. If you have more than one drain, measure and record each separately
B. CARING FOR THE INSERTION SITE
Check the area around the catheter insertion site. Sometimes, the drain causes redness the size of a
dime at the insertion site. Usually, a Biopatch disc covered with a clear dressing (Tegaderm) has been
placed over the drain site. If the Tegaderm comes loose after getting wet, you may remove it. Then,
apply antibiotic ointment around the drain site and cover with a Band-Aid or other bandage.
C. STRIPPING THE TUBING
These steps will help move clots through the tubing and promote the flow of drainage. Do this before
you empty and measure your drainage.
1. At the point closest to the insertion site, pinch and hold the catheter between the thumb and
forefinger of one hand.
2. Using rubbing alcohol or something to reduce friction, use the thumb and forefinger of your
other hand to pinch the tubing right below your fingers and slide them down the tubing as far as
they will go. Move each hand in the same fashion down the tubing and slide them down the
tubing in an “inch worm” fashion until you reach the bulb.
3. Repeat steps a few times or as necessary to push clots from the tubing into the bulb.
23D. PROBLEMS YOU MAY ENCOUNTER WITH THE JP SYSTEM
Problem: The bulb will not stay compressed completely
Solution:
• Squeeze the bulb from side to side (not bottom up!) fully
• Check that the stopper is inserted tightly
• Inspect the tubing for leak or tear
• If the bulb remains expanded after following the above steps, notify the office
Problem: There is an abrupt decrease in the amount of drainage or leaking of fluid at the insertion site
Solution:
• Follow the instructions for stripping the tube and repeat a few times
• Make sure the bulb is as flat as possible and has good suction
• Monitor the incision site for increase in size, change of skin color, or increased pain – if any of
these are present, notify the office
Problem: The JP drain catheter falls out from the insertion site
Solution:
• The drains are sutured in place, so this is rare
• Cleanse the site gently with soap and water, dry off, and apply Aquaphor to where the drain had
been inserted. Cover with a thick gauze or the soft side of a maxi pad in case fluid begins to leak
from the drain site.
• Notify the office
How do I shower with the drains?
• Find something you can hang around your neck and attach the drain bulbs to it. You can use a
ribbon, lanyard, old necklace, or chain
• Alternately, use a fabric belt and loop the drain tabs through them and wear in the shower
• It is important that the drains not dangle in the shower, but that you do have your hands free
for washing
What do I report to my doctor?
• Increased redness, swelling, or leaking around the area where the tube enters the body
• Inability to flatten the drainage bulb
• The tube falls out, or the suture attaching the tube to your body falls out
• Change in what is coming out of the draining, including foul smells or discharge
• A fever of 101F or higher
24DATE Time: CC’s: Time: CC’s: Time: CC’s: Time: CC’s:
_____ _____ _____ _____ _____ _____ _____ _____
_____ _____ _____ _____ _____ _____ _____ _____
24 HR total = cc 24 HR total = cc 24 HR total = cc 24 HR total = cc
DATE Time: CC’s: Time: CC’s: Time: CC’s: Time: CC’s:
_____ _____ _____ _____ _____ _____ _____ _____
_____ _____ _____ _____ _____ _____ _____ _____
24 HR total = cc 24 HR total = cc 24 HR total = cc 24 HR total = cc
DATE Time: CC’s: Time: CC’s: Time: CC’s: Time: CC’s:
_____ _____ _____ _____ _____ _____ _____ _____
_____ _____ _____ _____ _____ _____ _____ _____
24 HR total = cc 24 HR total = cc 24 HR total = cc 24 HR total = cc
DATE Time: CC’s: Time: CC’s: Time: CC’s: Time: CC’s:
_____ _____ _____ _____ _____ _____ _____ _____
_____ _____ _____ _____ _____ _____ _____ _____
24 HR total = cc 24 HR total = cc 24 HR total = cc 24 HR total = cc
DATE Time: CC’s: Time: CC’s: Time: CC’s: Time: CC’s:
_____ _____ _____ _____ _____ _____ _____ _____
_____ _____ _____ _____ _____ _____ _____ _____
24 HR total = cc 24 HR total = cc 24 HR total = cc 24 HR total = cc
DATE Time: CC’s: Time: CC’s: Time: CC’s: Time: CC’s:
_____ _____ _____ _____ _____ _____ _____ _____
_____ _____ _____ _____ _____ _____ _____ _____
24 HR total = cc 24 HR total = cc 24 HR total = cc 24 HR total = cc
DATE Time: CC’s: Time: CC’s: Time: CC’s: Time: CC’s:
_____ _____ _____ _____ _____ _____ _____ _____
_____ _____ _____ _____ _____ _____ _____ _____
24 HR total = cc 24 HR total = cc 24 HR total = cc 24 HR total = cc
DATE Time: CC’s: Time: CC’s: Time: CC’s: Time: CC’s:
_____ _____ _____ _____ _____ _____ _____ _____
_____ _____ _____ _____ _____ _____ _____ _____
24 HR total = cc 24 HR total = cc 24 HR total = cc 24 HR total = cc
DATE Time: CC’s: Time: CC’s: Time: CC’s: Time: CC’s:
_____ _____ _____ _____ _____ _____ _____ _____
_____ _____ _____ _____ _____ _____ _____ _____
24 HR total = cc 24 HR total = cc 24 HR total = cc 24 HR total = cc
25Introduction to Breast Reconstruction
Breast reconstruction is performed by plastic surgeons to restore form and function to your breast after
cancer removal. The process involves close coordination with your breast surgeon to provide the best
chance of an ideal outcome.
The amount of breast tissue excised during surgery is dependent on the cancer diagnosis. The amount of
tissue we plan to remove will categorize you into one of two pathways: breast conservation therapy
versus mastectomy.
Breast conservation therapy is ideal for patients with small, single location tumors, patients who have
larger breasts, and patients who can tolerate radiation after surgery. Plastic surgeons are often involved
to internally rearrange tissue if more than 10% of the total volume of breast tissue is excised.1
Otherwise, severe asymmetry and dimpling after the recovery period is over may occur. See page 32 for
detail.
Mastectomy is suitable for patients with larger tumors, and those who would rather not have radiation
after surgery if they do not have to. Some patients who have genetic risk factors may elect to have a
prophylactic mastectomy to limit future chance of having breast cancer. When having a mastectomy,
the reconstruction options available are based on your body’s anatomy. Generally speaking,
reconstruction is either prosthetic-based or autologous (from your own tissues). Prosthetic based
reconstruction may be with an implant, or with a tissue expander. A tissue expander is a temporary
device, that is replaced by an implant at a later date. See page 26 for detail. Autologous reconstruction
(from your own tissue) may take tissue from your back, abdomen, or your inner thighs to recreate the
breast. See pages 35 and 38 for detail.
Reconstruction options are influenced by factors including but not limited to:
- Body shape
- Surgical history
- Overall health status
- And importantly, patient preference
Timing of Reconstruction
Your reconstruction may be either immediate or delayed. Immediate reconstruction refers to any breast
reconstruction performed immediately after the breast cancer or breast tissue is removed, during the
same operation. Immediate breast reconstruction reduces the number of trips to the operating room.
Immediate breast reconstruction may result in a better cosmetic result.2 Patients also experience less
psychological trauma in the immediate postoperative period, as they wake up with reconstructed
breasts immediately after surgery and do not see themselves without breasts. However, it increases
overall surgical time and hospital stay, as opposed to electing no reconstruction or delayed
reconstruction.
Delayed reconstruction is performed in a separate trip to the operating room at a point in time after
your mastectomy. Patients undergoing delayed reconstruction will have a flat chest for the time
between mastectomy and reconstruction. It is rare for delayed reconstruction to be the only available
option to a patient. In certain situations, the breast skin may have poor blood supply that do not
26support reconstructive options. Some patients may elect to have delayed reconstruction to reduce
recovery time or to give them time to consider all reconstructive options. While the initial surgical time
and hospital stay is decreased with delayed reconstruction, recreating cosmetically ideal breasts later on
is more challenging.
How many operations does immediate reconstruction entail?
Studies show implant reconstruction require more surgeries compared to reconstructions using your
own tissue.3,4 Replacement of the implant will be necessary at some point – the FDA reports the lifespan
of implants are 10 years. If tissue expanders are inserted at the time of mastectomy, a second surgery is
required to remove the expanders and replace them with permanent implants.
With reconstruction based on your own tissue (flaps), no further surgery is usually necessary.3 Some
patients, although not all, may require additional surgery for symmetry or contour defects.
Please ask your surgeon to clarify your situation.
Do I need to have breast reconstruction?
Breast reconstruction is not a requirement. Some patients may choose to not proceed with surgical
reconstruction. If they desire, and in order to better fit their clothes, a breast prosthesis is used. These
devices are worn under clothing to give the appearance of a breast mound. This prosthesis can be used
starting 6 weeks after cancer excision; after all surgical wounds have healed. The following websites are
excellent resources for patients interested in external prosthesis rather than surgical reconstruction:
https://www.cancercare.org/publications/290-prostheses_resources
https://shop.nordstrom.com/content/breast-prosthesis-program
27Prosthetic-Based Reconstruction
Prosthetic (implants and/or tissue expanders) based reconstruction has become the most commonly
performed reconstruction since 2002. The aesthetic result in the properly selected patient is excellent.
Expander/Implant Based Reconstruction versus Direct to Implant Reconstruction
There are two pathways for prosthetic based reconstruction: expander/implant based or direct to
implant reconstruction.
Expander/Implant Based Reconstruction
Surgery 1:
In office Surgery 2:
Mastectomy + expansion Implant
Expander Placement
(2-3 months)
Placement
The first surgery involves placement of a temporary expander device that remains for 2-3 months after
surgery. These devices stretch breast skin to give room for an implant to be placed. This type of
reconstruction is typically necessary for patients who desire a final breast size larger than their original
breast, patients whose breast after cancer excision will not be of adequate size, or patients who do not
have good blood flow to the breast skin after surgery.
One to two weeks after surgery, you will begin coming to the office for filling of the device with either
saline or air. This expansion process usually is once or twice a week for 3-4 weeks, depending on the
desired size of the final implant. Two stage expander to implant reconstruction remains the most widely
performed method of breast reconstruction, accounting for 70.3% of all breast reconstructions in 2017.5
At MedStar Georgetown, we are using a new AeroForm AirXpander which allows patients to perform
their expansion at home via a remote that triggers slow release of pressurized CO2. This allows for fewer
office visits and faster expansion. Please ask your surgeon if you are a candidate.
Direct to Implant Reconstruction
Direct to implant based reconstruction can be performed in certain circumstances. In this scenario,
implants are placed during the same surgery as the mastectomy. Blood flow to your breast skin must be
good in order for implants to be placed immediately after mastectomy. Patients who desire the same or
smaller final breast size are good candidates. An advantage to direct to implant reconstruction is
reduction in the number of surgeries. Studies have also reported improved sexual wellbeing in patients
who undergo this type of breast reconstruction, because a final reconstruction is present immediately
after surgery.6 Large multicenter studies have indicated that direct to implant reconstructions may
(although not definitively proven) may have increased complications and infections compared with
expander/implant based reconstruction.6 Please ask your surgeon if you are a candidate.
28Where are the implants placed anatomically?
Classically, expanders have been placed under the pectoralis major muscle and the serratus anterior
fascia for total muscular coverage. This approach is reliable and was the “workhorse” operation for
breast reconstruction before improved technology became available.
Around 15 years ago, the introduction
of a new product on the market,
acellular dermal matrix (ADM), has
allowed for the development of partial
submuscular coverage. Please see the
next section on information regarding
ADM. Partial submuscular coverage
refers to when the top half of the
prosthetic device is placed under the
muscle, and the bottom half is placed
under ADM. Compared to total muscle coverage, partial submuscular coverage allows for increased
expansion volume(greater size), better cosmesis, and reduced pain after surgery.7 The disadvantage of
total muscular coverage and partial submuscular coverage device placement is referred to as “animation
deformity”. Performing certain actions with your arms that engage your chest muscles will cause your
implants to displace. While this may be disturbing to some women who are very active, other women
may not mind. Total muscular and partial submuscular placements are the two most common methods
of device-based reconstruction.
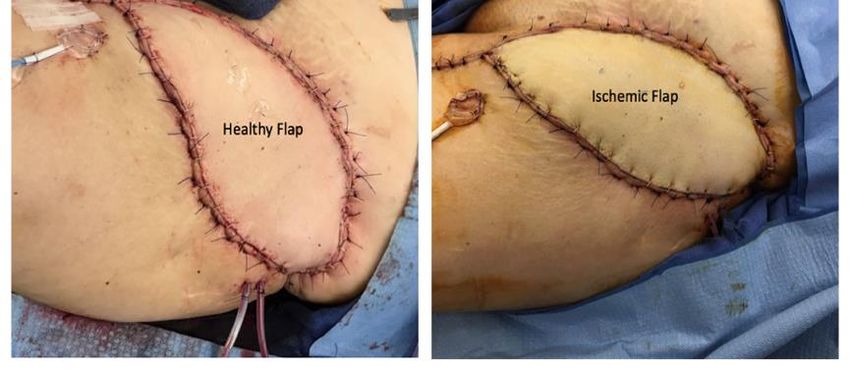
In the last 5 years, placing prosthetic devices in front of the
pectoral muscle, also known as prepectoral placement, has been
the latest surgical development. In this technique, the device is
placed on top of the muscle and completely wrapped in ADM.
Minimal muscle manipulation occurs. As a consequence, patients
report much less pain and improved recovery. Furthermore, the
complete implant coverage of ADM may limit the amount of
capsular contracture, especially after radiation.8 This technique is
much more sensitive to issues with blood flow to your
mastectomy flaps, infection, and may result in loss of
reconstruction in the poor candidate. Due to the thin soft tissue
over the implant (no muscle coverage), women may be prone to
“rippling”. This is when implant ridges are visible, most commonly at the upper inner aspect of the
breast, especially when leaning forward without a supportive bra. This may be disguised but not
completely eliminated with additional procedures, such as fat grafting. Only certain patients are
candidates for this latest technique. Please speak with your surgeon for details.
What is Acellular Dermal Matrix (ADM)?
Acellular Dermal Matrix (ADM) (brand names: AlloDerm, DermACELL, FlexHD) is harvested cadaver skin
that has been processed to remove all residual cells and any diseases to leave behind a collagen
architecture. The terminal sterility assurance level on these products are 10-3 to 10-5, meaning there is
one-in-one-thousand to a one-in-one-million chance of the tissue having any contaminants. These same
tissue banks provide cornea and tendon grafts. While smaller, older studies have shown an increased
29rate of infection and seroma (fluid around the implant and matrix), larger, more recent studies have
indicated that this rate is low and comparable to that of reconstructions not using any acellular dermal
matrix as our experience with this material has improved.9,10
Acellular dermal matrix (ADM) is used to recreate the breast shape. It has allowed for larger implants
and faster expander fill. There is also less pain during filling sessions and better cosmetic outcome.7
ADM has also allowed surgeons to place the implant on top of the muscle instead of under (prepectoral
reconstruction).8 Acellular dermal matrix was used in 56.2% of all breast reconstructions in 2017.5
When does radiation fit in?
Patients may require radiation as part of their cancer treatment, or have had previous chest radiation
and are seeking reconstructive options after the fact.
Patients that already have had previous chest radiation in the past are not ideal candidates for
reconstruction with prosthetic (artificial) devices alone. Failure rates may be 14-50% in this population.
Instead, bringing in healthy tissue from elsewhere in your body, such as flaps from your back or
abdomen, reduces complication rates by up to 72%.11
Patients who have to have radiation as part of their oncologic therapy also present challenges in
immediate prosthetic based reconstruction. Often times, it is not known until after the mastectomy and
sentinel node biopsy if radiation is necessary. Unfortunately, radiation significantly increases
reconstructive failure. If tissue expanders are irradiated, the chance of failure is approximately 30% over
6 years.12 If implants are irradiated, the chance of failure is less at approximately 16-20%. However,
there is increased incidence of capsular contracture and worse aesthetic outcome in total submuscular
and partial submuscular.
If you require radiation, please discuss with your surgeon all of the reconstruction options that are
available to you. You may be a candidate for flap-based reconstruction.
What is Indocyanine Green?
Indocyanine green angiography uses a substance that binds to protein in the blood stream to detect
blood flow at the near infrared light spectrum. At MedStar Plastic and Reconstructive Surgery, we use
the FDA approved Spy Elite Imaging System to visualize issues with blood flow. We apply this cutting-
edge technology to assess blood supply of breast skin to help us determine intraoperatively which
reconstruction will be successful. We also use this technology in lymphedema surgery. Generally,
indocyanine green is well tolerated, with the exception of patients with iodine allergy. Please alert your
surgeon of all allergies, particularly to seafood or iodine.
What is capsular contracture?
Capsular contracture is your body’s defense against foreign material. With any foreign device, your body
natural response is to “wall it off” by forming a capsule around it. Most capsular contracture occurs by 1
year post-implantation. Capsular contracture is inevitable even with current technologies, but can be
reduced in severity by certain practices. Studies show that even low levels of bacterial infection may
increase rates of capsular contracture. We practice the utmost sterility when performing your surgery,
following guidelines as outlined by the latest research.13 However, the incidence of capsular contracture
30You can also read