9 The Platinum/Palladium Process - OVERVIEW AND EXPECTATIONS
←
→
Page content transcription
If your browser does not render page correctly, please read the page content below

9

      The Platinum/Palladium Process

      OVERVIEW AND EXPECTATIONS
      In the majority of the classes and workshops that I’ve taught over the years, “the
      platinum/palladium process” is the answer that surfaces first when I ask the question, “What
      process do you want to learn the most?” In this chapter you will learn how, and, as in previous
      chapters, I begin with a little history. Then you will learn the chemistry and sequence of the various
      stages to a finished print. This chapter gives you alternatives to traditional platinum/palladium
      chemistry and provides you with a simple sensitizer “drop chart” that is based on the type of
      negative you are working with, rather than the print you would like to make. I also provide the
      beginnings of a trouble-shooting list to assist in hunting down problems that may be showing up
      in your work. Finally, you’ll get some brief alternative ideas for combining platinum/palladium
      with other techniques such as Van Dyke and gum bichromate.

      A LITTLE HISTORY
      Like most refined non-silver and alternative photographic processes, the art of platinum/palladium
      printing was developed in pieces over time by a number of dedicated artists and scientists. In 1830,
      Ferdinand Gehlen recorded the action and effects of light on platinum chloride, noting that UV
      light would alter the color of platinum salts and cause the ferric salts to precipitate out into a
      ferrous state. At around the same time, Johann Wolfgang Dobereiner (1780–1849) observed the
      decomposition of ferric oxalate on exposure to UV light and scientifically defined its sensitivity.
      Dobereiner also recorded the light-sensitivity of platinum salts, manganic oxalates (containing
      manganese), and tincture of iodine. His scientific observations are relevant here in that they
      form a foundation on which many non-silver processes have been built.

164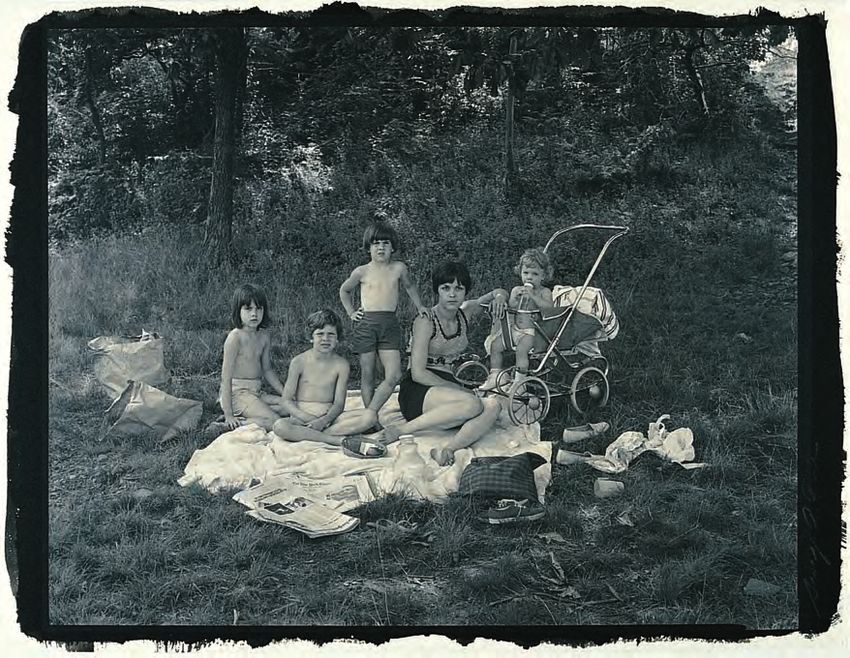
Figure 9–1
Christopher James, Market, Cairo, Egypt, 1992
(Plastic camera platinum)
This image was made in an open-air Cairo market with a plastic camera (a modified Holga) while following this angel-like
chicken on its way to a butcher. An internegative was generated on SO-132 film and used to make this platinum/palladium print.
(Courtesy of the author)

                                                                                                                                 165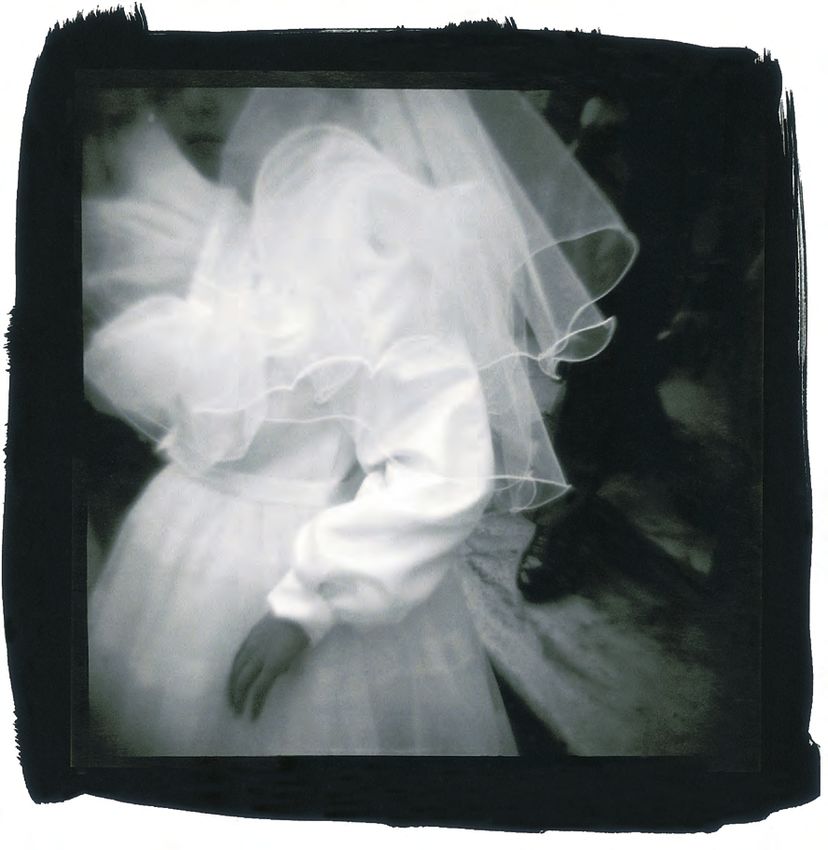
Figure 9–2
                                                 Frederick Evans (1853–1943), Portrait of Aubrey Beardsley, 1895
                                                 (Platinum print)
                                                 Frederick Evans was a photographic purist; some would say a zealot, who
                                                 scorned any artist who strayed from the truth and essence of the medi-
                                                 um. His subject in this 1895 platinum print was Aubrey Beardsley
                                                 (1872–1898), a self-taught illustrator influenced by Japanese woodcuts,
                                                 the silhouette simplicity of Greek vase painting, and the flamboyance of
                                                 French Rococo. Beardsley enjoyed a brief career with his erotically deco-
                                                 rative, monochromatic, illustrations and died of tuberculosis at the age of
                                                 27. The confluence of personalities between Beardsley and Evans is why
                                                 this image has always been one of my favorites.
                                                 (Courtesy of the George Eastman House, Rochester, NY)

                                                     In 1831, Sir John Herschel noticed that when he acid-                         In 1859, C. J. Burnett was the first to demonstrate a
                                                 ified platinum salts with hydrochloric and nitric acids,                      semi-controlled adaptation of these previous experiments
                                                 mixed them into solution with calcium hydroxide, and                          using sodium chloroplatinate. His platinum-based exper-
                                                 then placed them in a dark environment, nothing at all                        iments were not, according to Burnett, entirely success-
THE BOOK OF ALTERNATIVE PHOTOGRAPHIC PROCESSES

                                                 happened. But when he exposed them to sunlight, a pre-                        ful. However, his prints with palladium salts were, and
                                                 cipitate was formed. Robert Hunt (1807–1887), a Her-                          Burnett happily got to exhibit his work—the first palla-
                                                 schel contemporary, did some experiments in the early                         dium prints. Then in the early 1870s, William Willis
                                                 1840s using platinum chloride on silver iodide coated                         (1841–1923), ardently looking for a way to make a more
                                                 papers. Later on he mixed platinum chloride with a solu-                      stable print, conducted an involved series of experiments
                                                 tion of potassium cyanate that, on exposure to sunlight,                      using platinum salts. Willis was successful in reducing the
                                                 yielded a faint latent image. He then placed the paper in                     ferrous salts, following UV exposure, to a more stable
                                                 a solution of mercury salts that gave him a lovely image,                     metallic platinum by incorporating a potassium oxalate
                                                 which, like most everyone else’s experiments, faded away                      developer. He was granted several patents for his research
                                                 over time, and which meant that it could not be consid-                       and founded the first commercial platinum paper enter-
                                                 ered a platinum print. Hunt is also remembered for his                        prise, the Platinotype Company.
                                                 discovery of ferrous sulphate as a developing agent (1844),                       In the late 1880s, Captain Giuseppe Pizzighelli
                                                 his work on the influence of the spectrum on light-sensi-                     (1849–1912) and Baron Arthur Von Hübl (1852–1932)
                                                 tive materials, and for being one the founders of the Royal                   expanded and modified Willis’s work. They created an
                                                 Photographic Society.                                                         emulsion that incorporated sodium ferric oxalate into the
                                                                                                                               sensitizer, humidifying the paper prior to exposure, and

           166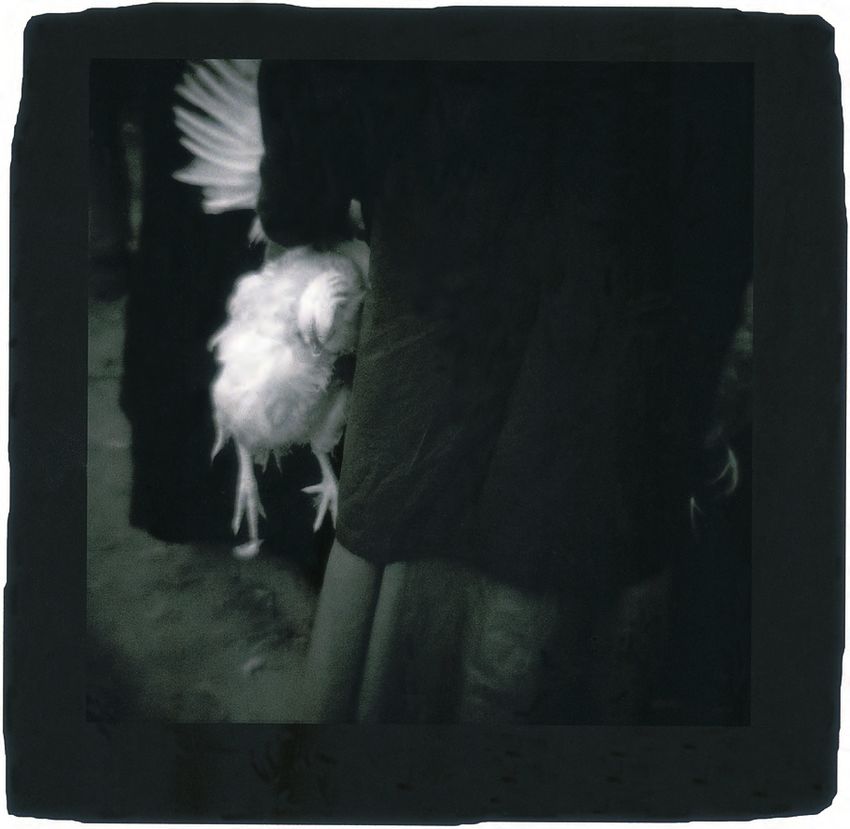
Pictorialism
Beginning with Hill and Adamson’s Calotypes of the mem-
bers of the newly formed Free Church of Scotland (1843–
1847), there have been photographers who approached
the medium with more artistic intentions than those
founded on practical science or curious discovery. The
first scientist to officially make the break was Peter Henry
Emerson (1856–1936) who, by virtue of his revisionistic
views of art history and demonstrative ego, was able to
spawn a movement in photography that led away from the
virtues of science to the less-defined virtues of fine art.
    Emerson made up a lot of rules for photography; cen-
tralized subject matter, sharp focus, natural settings, and
candid posing, and in 1889 Emerson published his theories
on artistic photography in a book entitled Naturalistic
Photography. The following year, Emerson changed his
mind about everything he had written due to Hurter and
Driffield’s research (Chapter 6), and self-published a sec-
ond book titled The Death of Naturalistic Photography. It
was too late, however, because the influence of Natural-
istic Photography had gripped the imaginations of many
influential image makers and critics.
     Shortly after Emerson’s first book, more than a few
photographers began to think of themselves as pure
                                                                Figure 9–3
artists and their respective efforts often mirrored the         Gertrude Käsebier (1852–1934), Blessed Art Thou Among Women, 1900
styles and ideas of Impressionist painters. Groups of pho-      (Platinum print )
tographers formed together to ensure that their voices          Gertrude Käsebier was a prominent member of England’s The Linked Ring
                                                                (its first American woman) and one of the primary influences in the
would be respected and established “clubs” such as the
                                                                Pictorialist movement. Steiglitz was a fan of hers, publishing her in
Linked Ring Brotherhood (London, 1892) and the legendary        Camera Work (1903–1917) and exhibiting her work in his 291 Gallery. Like
Photo-Secession (New York, 1902) that achieved its              the majority of the pictorialists, she was devoted to ideal, romantic, and

                                                                                                                                               CHAPTER 9 THE PLATINUM/PALLADIUM PROCESS
strength through the personality of Alfred Steiglitz and his    nostalgic visions of life.
                                                                (Courtesy of the George Eastman House, Rochester, NY)
magazine, Camera Work (1903–1917). These groups were
the strongest advocates for alternative and non-silver
processes and the concept that it was appropriate for           eliminating the need for the potassium oxalate liquid
photographers to have hands as well as eyes.                    development. During the process, the platinum salt was
     Ironically, the rebellious nature of the pictorialists     reduced to the ferrous state and converted into a metal-
became pedantic with an assortment of inflexible “new           lic state during the exposure. Following a brief water clear-
rules” as to what a proper image should be, and the photo-      ing bath, the image was immersed in an acidic solution
secessionist movement underwent a transformation with a         (hydrochloric acid) for clearing and then washed. The
far more conservative and visual theology. This visual “reli-   process was marketed as Dr. Jacoby’s Platinum Printing-
gion” made a home for itself in camera clubs and generic        Out-Process (POP). Can you see how these ideas are
competitions. In modern nomenclature, the word pictorial        beginning to fit together?
most often describes, positively or negatively, depending on         Pizzighelli continued to experiment with other “dou-
who is speaking, a work of art that is “painterly,” handmade,   ble salt” formulas and discovered that with the addition
romantic, trite, a cliché, and personal.
                                                                                                                                             167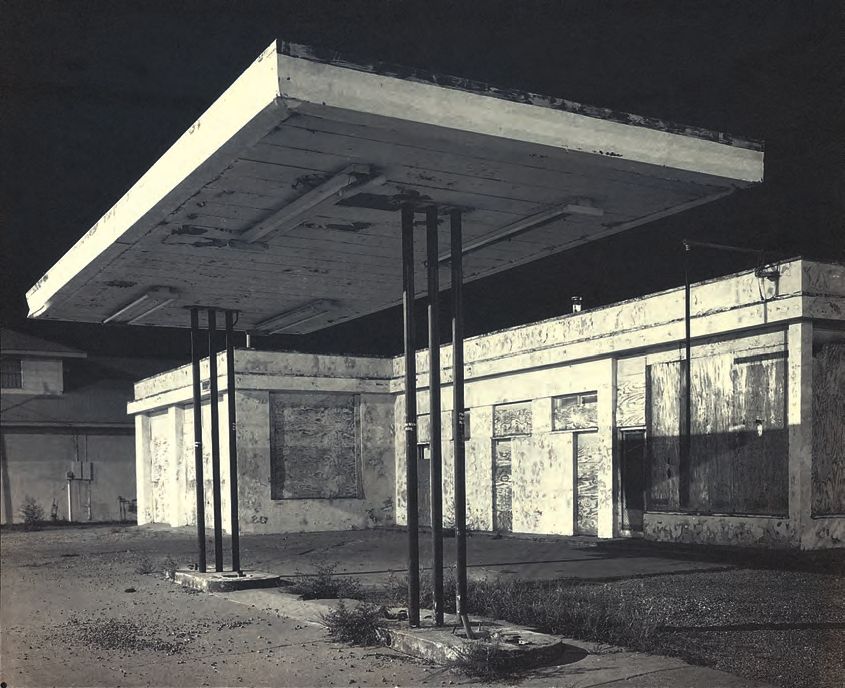
Figure 9–4
                                                 Marie Leon, Portrait of Henry and William
                                                 James, London, c. 1905
                                                 (Platinum)
                                                 A rare portrait of William and Henry James
                                                 together, taken in Marie Leon’s Regent Street
                                                 studio in London in 1905.
                                                 (Courtesy of the author)

                                                 of either sodium ferric oxalate, potassium ferric oxalate,     intentions partially replaced the classical pictorialism,
                                                 or ammonium ferric oxalate, he could alter the sensitiv-       which was perceived by many as a privileged and elitist
                                                 ity and color of his print. Several years ago, Pizzighelli’s   view of the medium. In addition, significant changes in
                                                 POP research was expanded and refined through the              conceptual and perceptual thinking in the arts, that is, the
                                                 efforts of Dr. Michael Ware and Dr. Pradip Malde, who          Bauhaus, put an aesthetic dagger into the once hardy pic-
                                                 developed an ammonium method of printing by substi-            torialist heart. At that point in history, the use of platinum
                                                 tuting Pizzaghelli’s potassium chloroplatinite with ammo-      and palladium declined but has experienced rejuvenation
                                                 nium chloroplatinite. More recently, Dick Sullivan, with       in recent years through the work of contemporary artists,
                                                 testing collaboration by Carl Weese, began working on all      academic electives in the process, and the booming busi-
                                                 of the previously assembled POP data and developed a           ness of workshops in alternative process disciplines.
                                                 user-friendly, palladium-based process that he called the
                                                                                                                The Process Explained
THE BOOK OF ALTERNATIVE PHOTOGRAPHIC PROCESSES

                                                 Ziatype, which is discussed in Chapter 10.
                                                     Beginning in the early 1900s, commercially produced        In the platinum/palladium process (Pt/Pd), there are three
                                                 platinum and palladium papers were available in Europe         primary and separate solutions.
                                                 and the United States (even Kodak made them) and were          u Platinum variation

                                                 very popular due to the beauty of their tonalities and per-        Solution 1: Part A: ferric oxalate
                                                 manence. The palladium process, which is essentially the
                                                                                                                    Solution 2: Part B: ferric oxalate with potassium
                                                 same as platinum, with the principal exceptions of cost
                                                                                                                                chlorate
                                                 and color, was introduced during World War I. Hand-
                                                 coating techniques were a nonissue because of the com-             Solution 3: Part C: potassium       chloroplatinite/
                                                 mercial availability of the papers, and the process became                     sodium tetrachloroplatinate (ll)
                                                 the way to make prints by both photographic artists and        u   Palladium variation (note: a different Part C)
                                                 amateurs and stayed popular until the 1920s primarily due          Solution 1: Part A: ferric oxalate
                                                 to the popularity of the “pictorialist” aesthetic.
                                                                                                                    Solution 2: Part B: ferric oxalate with potassium
                                                     With the advent of smaller format cameras, photog-
                                                                                                                                chlorate
                                                 raphy became a democratic reality, and social documen-
                                                 tation, photojournalism, and work with commercial                  Solution 3: Part C palladium (ll) chloride/sodium
                                                                                                                                chloropallidite
           168
Figure 9–5
                                                                                            Nancy Marshall, Deer Offering, 1995
                                                                                            To make the negative for this haunting
                                                                                            palladium image, Nancy used an
                                                                                            8˝210˝ Derdorff camera and a Taylor
                                                                                            Hobson variable softness portrait
                                                                                            lens. For other work with the Derdorff,
                                                                                            Nancy has used a zoneplate pinhole
                                                                                            lens.
                                                                                            (Courtesy of the artist)

                                                                                                                                        CHAPTER 9 THE PLATINUM/PALLADIUM PROCESS
    These solutions are mixed together in a shot glass, in
precise droplet based formulas, to form a light-sensitive
emulsion (see the drop chart). The droplet mixture is                             Once the paper is coated, it is allowed to
then gently swirled together and deposited in the center                          sit for a minute and then cool air-dried.
of the paper (if you are coating with a hake brush) or along                      The coated paper is then placed in your
the edge of a Puddle Pusher (if you are glass rod coating).    hinged back contact printer along with your negative and
Once the sensitizer is on the paper it is necessary to exe-    exposed to UV light. Again, a hinged back contact printer
cute your coating quickly and efficiently. You are work-       is a solid frame with a glass insert and is used to hold a
ing with a very small amount of sensitizer, and it is          negative in contact with a sensitized paper by means of a
imperative that you cover your entire printing area with       split back. This split back is vital to allow you to check on
what you have made up in the shot glass. Also, an uneven       your exposure on one side of the print without losing the
and sloppy coating will certainly make itself evident in       negative’s registration to the print sensitized paper.
your final print.

                                                                                                                                      169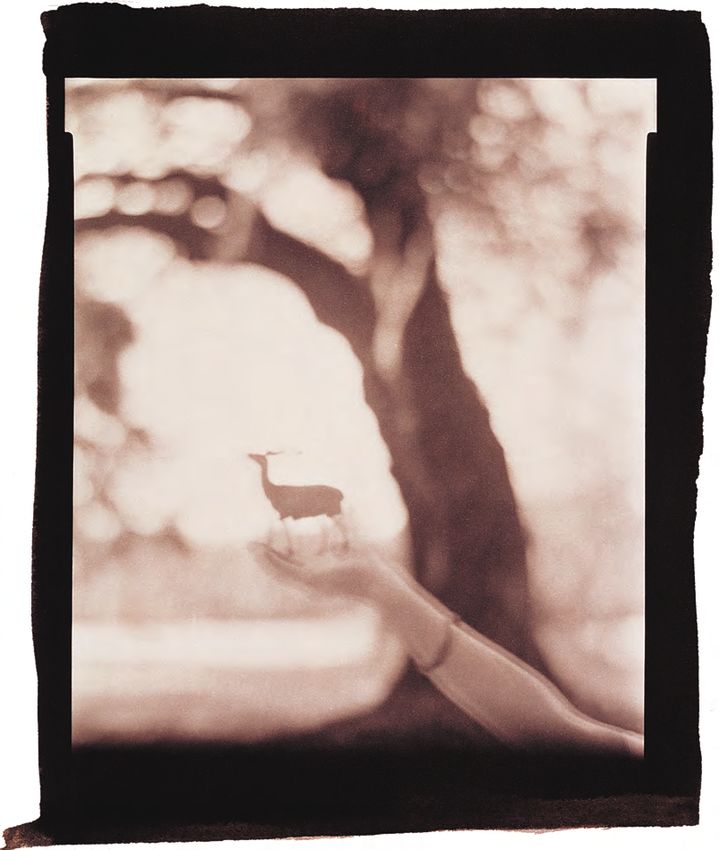
an odd exposure characteristic called “self masking” that
                                                    The Dropper
                                                                                                                   occurs in most POP iron-based processes. Self masking
                                                    There is a common misperception that glass droppers            is a term that describes what happens during long expo-
                                                    will provide a more consistent drop volume than a plas-        sures when light continues to expose highlights after the
                                                    tic dropper. In fact, only the plastic droppers are            shadows have reached a degree of exposure that essentially
                                                    approved lab ware by the Food and Drug Administration.         functions as a filter, slowing down additional exposure in
                                                    The reason is that glass droppers are inconsistent as          the thinner portions of the negative.
                                                    they are “drawn” in their manufacturing. Plastic drop-             Similar in many respects to the Kallitype, the Pt/Pd
                                                    pers are molded and therefore maintain a consistent            process is far more consistent and easier to work with.
                                                    opening at the open-end drop point.                            Platinum/palladium color ranges from cool to warm and
                                                                                                                   is controlled by a number of factors, including developer
                                                                                                                   selection, developer temperature, additions to the sensi-
                                                                                                                   tizer formulas such as gold chloride, and mixing the two
                                                     Once you begin to expose your negative and sensitized
                                                                                                                  different Part 3 Pt/Pd sensitizers. Palladium is warmer
                                                 paper to UV light, a chemical reaction occurs that con-
                                                                                                                  than platinum, but their tonal range is nearly identical.
                                                 verts the ferric salts in the formula to a ferrous state. The
                                                                                                                  Both “noble” metal variations are as permanent as your
                                                 image at this point would be visible even if no metal were
                                                                                                                  attention to good technique, fresh chemicals, and the
                                                 present in the solution. This image, unlike other iron-
                                                                                                                  paper they are printed on.
                                                 based processes, cannot be evaluated easily in a printing-
                                                 out manner. The ideal state when the print is properly
                                                 exposed is a “whisper-image” of your intended finished           Supplies and Materials
                                                 print. This means that the image is simply an undistin-          You will need quite a few low-cost items to perform this
                                                 guished hint of what you are hoping for following the            process.
                                                 development stage. If you can see the image clearly prior
                                                                                                                  u   The sun (summer is best) or a UV light printer/light-
                                                 to development, you have overexposed your paper and it
                                                                                                                      box for winter in the colder climates and overcast days.
                                                 will be necessary to rethink the way that you will develop
                                                                                                                      The sun is the better option because it is free and many
                                                 your print. In most cases this will involve a water or glyc-
                                                                                                                      feel it provides a little more contrast in the image.
                                                 erin development rather than a chemical development.
                                                                                                                  u   Long tonal range negatives with contrast. Generally, if
                                                     Following the exposure, the exposed paper is devel-
                                                 oped in one of many developers (in this case ammonium                you can make a lovely silver gelatin print from your
THE BOOK OF ALTERNATIVE PHOTOGRAPHIC PROCESSES

                                                 citrate), where it is instantly reduced to a metallic plat-          negative it will be too flat for Pt/Pd. The negative
                                                 inum, or palladium, state to the degree that the negative            should have a high contrast density range between 1.4
                                                 has permitted exposure. At first, the image you will see is          and 2.0 and would be appropriate for a 1 or a 0 grade
                                                 iron based but will convert to platinum or palladium                 paper if you were printing it on conventional silver gel-
                                                 metal in the developer. The developed print is then cleared          atin based papers.
                                                 in an acid bath sequence (in this case EDTA) to remove           u   A hinged contact printing frame to check on exposure
                                                 any leftover and unexposed iron ferric salts, leaving a              (see Appendix E).
                                                 print made entirely of platinum or palladium. The print          u   Five clean plastic trays, one of which is used exclusively
                                                 is then washed for permanence.                                       for the development of the exposed paper. The other
                                                     The Pt/Pd process has a potentially long tonal range,            trays will be for the three clearing baths and the single
                                                 which many practitioners feel is significantly able to ren-          washing tray. Personally, I prefer a set of labeled trays
                                                 der values well beyond the abilitity of a traditional silver         that are only used for this process.
                                                 gelatin paper. It is also able to provide incredible depth and
                                                                                                                  u   A heavy duty, nontourist variety shot glass for mixing
                                                 detail in the shadows. These very long tonal ranges, regard-
                                                                                                                      the drop formulas of the sensitizer. By nontourist vari-
                                                 less of lengthy exposure times, are partially the result of

           170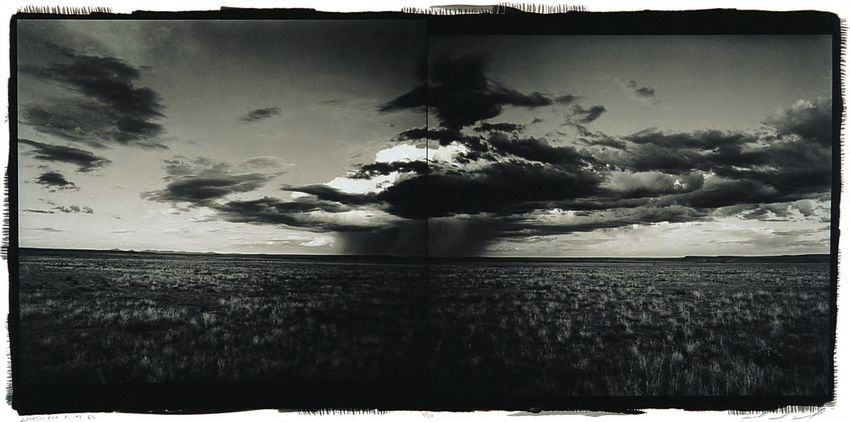
Figure 9–6
                                                                                                                 George Tice,
                                                                                                                 Picnic on Garrett
                                                                                                                 Mountain,
                                                                                                                 Paterson, NJ, 1968
                                                                                                                 George Tice, to his
                                                                                                                 profound surprise,
                                                                                                                 is now considered
                                                                                                                 one of the “old
                                                                                                                 masters” in the
                                                                                                                 medium. A serious
                                                                                                                 photographer
                                                                                                                 since he was 14
                                                                                                                 years old, George
                                                                                                                 has demonstrated
                                                                                                                 a lifelong commit-
                                                                                                                 ment to photogra-
                                                                                                                 phy and to teach-
                                                                                                                 ing others the
                                                                                                                 beauty of the plat-
                                                                                                                 inum/palladium
                                                                                                                 process.
                                                                                                                 (Courtesy of the
                                                                                                                 artist)

    ety, I mean a real shot glass with a heavy, thick base that   u   A hairdryer, with a cool air setting.
                                                                  u
    is made for mixing and drinking rather than one that              A supply of distilled water for brush cleaning, mixing
    is used for display on a knick-knack shelf.                       dry ferric oxalate A and B chemistry if you don’t pur-
u   Several clean plastic dropper caps for the little bottles         chase it in solution, and for rinsing your plastic
    of Parts A, B, and C that you purchase from an alter-             droppers.
                                                                  u
    native chemical supply such as Bostick & Sullivan or              You will need a sink with running water and low, non-
    Photographer’s Formulary. These can be easily pur-                fluorescent light. Humidity is a plus in the process and
    chased at a pharmacy or a chemical supply house. Be               necessary when working in the dry air of winter and

                                                                                                                                         CHAPTER 9 THE PLATINUM/PALLADIUM PROCESS
    sure that you are using plastic droppers that all are the         associated central heating. You can buy a humidifier or
    same type so the drops are the same, that they fit the            run hot water for a bit to add a little humidity to your
    bottles with the chemcals, and that you have one for              working space.
    each of the solutions you will be using.
                                                                  u   A dual filter respirator is vital if you do not have an ade-
u   One clean hake brush without a metal ferrule. You may             quate ventilation system, when drying your sensitizer
    also use a glass rod, that is, Puddle Pusher, for a more          with a hairdryer.
    economical and smoother coating.
                                                                      It is critical that you purchase fresh platinum or pal-
u   You will need a coating surface that is absolutely clean      ladium chemicals from a reputable supplier. Freshness is
    and dry. It is imperative that your coating area is totally   essential for the Part A (ferric oxalate) and Part B (ferric
    free of contaminants and/or moisture.                         oxalate/potassium chlorate), and, without question, it
u   A pencil to mark negative edge area and formula infor-        makes a great deal of sense to purchase your ferric oxalates
    mation on your paper.                                         from a chemical supplier who makes it for a living rather

                                                                                                                                       171
Figure 9–7
                                                                Suzanne Solis, Susquehanna, Harrisburg, 1998
                                                                Suzanne provides a fine example of the beauty that can be created when combining a pinhole negative with the platinum/palladium
                                                                process.
                                                                (Courtesy of the artist)

                                                 than making it yourself. Making your own may be roman-                   The Negative
THE BOOK OF ALTERNATIVE PHOTOGRAPHIC PROCESSES

                                                 tic but hardly worth the time and effort. In a dry state,
                                                                                                                          A contact negative is essential for printing due to the slow
                                                 and in a tightly covered dark glass bottle, these chemicals
                                                                                                                          emulsion speed, as in all of the non-silver iron-based
                                                 will be good for years. In a liquid solution, the ferric
                                                                                                                          processes. Negatives can be made in camera through an
                                                 oxalate Parts A and B will be past their prime in 6 months
                                                                                                                          internegative process using direct duplicating film or an
                                                 at most. The Part C solution, the precious noble metal
                                                                                                                          interpositive to negative multistage duplicating film.
                                                 salts, will last in liquid form for years.
                                                                                                                              Ideally, the finest quality negatives will be produced in
                                                     I suggest the purchase of wet pack (premixed) or dry
                                                                                                                          camera but they can also be generated in a film recorder or
                                                 pack (you add the distilled water and wait 24 hours) kits.
                                                                                                                          Photoshop using a desktop printer or a service bureau for
                                                 These packaged kits generally come with the developer
                                                                                                                          output. You may also use a copy machine or you can make
                                                 (ammonium citrate), a clearing bath (EDTA), and the
                                                                                                                          up a negative on glass or acetate as in the case of a cliché-
                                                 three solutions in amber bottles. Sometimes they come
                                                                                                                          verre. It is, however, likely that you have a perfect print on
                                                 with droppers, but, again, I suggest purchasing a good set
                                                                                                                          your mind if you have decided to indulge in the plat-
                                                 from your local pharmacy. Remember that plastic eye-
                                                                                                                          inum/palladium process. Because of this, your negative will
                                                 droppers are preferable to glass because their drop size is
                                                                                                                          probably come directly from a large format or pinhole cam-
                                                 more consistent. In most cases you may also order special
                                                                                                                          era or it will follow the complex route to the perfect digi-
                                                 Pt/Pd printing papers from the same suppliers.
                                                                                                                          tal negative made to your specifications by a service bureau.

           172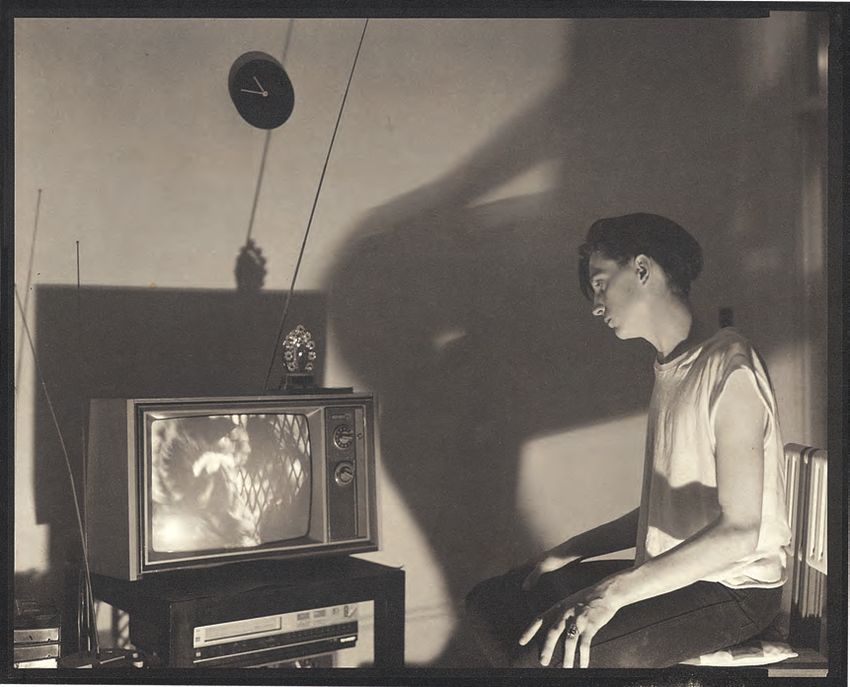
Figure 9–8
Judy Natal, The Nature of Rage, 1998                                        Figure 9–9
This palladium on silk brocade by Judy Natal was generated from a digital   Ernestine Ruben, Nude with Crossed Arms, 1999
negative and is based on her examination of Darwin’s The Expressions of     Ernestine Ruben made this compelling nude study in platinum on a very
Man and Animals, and the roots of human nature.                             fragile handmade paper.
(Courtesy of the artist)                                                    (Courtesy of the artist)

    Negatives for Pt/Pd should be “contrasty.” Again, if                    Papers and Sizing
you can make a really nice-looking print from your neg-
                                                                            The bottom line is: cheap papers will frustrate you. Always
ative on a conventional silver gelatin paper, your print will
                                                                            purchase the best quality printmaking or watercolor paper.

                                                                                                                                                      CHAPTER 9 THE PLATINUM/PALLADIUM PROCESS
be flat in Pt/Pd. The negative should show a long linear
                                                                            It must be free of impurities and with a surface that is com-
range of highlight and shadow detail and have an average
                                                                            patible with your intentions. Often, you will find a lovely
overall density in the 1.5 to 1.7 range. Please refer to
                                                                            handmade paper that will simply not hold up under the
Chapter 2, “The Negative: Traditional and Alternative
                                                                            lengthy wet stages in the process, or that will have com-
Options,” for an explanation of what this means. Obvi-
                                                                            ponents accidentally blended in (metallic bits) that are
ously, a single-step contact negative exposed in a view cam-
                                                                            incompatible with the Pt/Pd process. Be careful not to use
era would be ideal, because it would eliminate the possible
                                                                            a metal utility knife or paper cutter when cutting paper
degradation of the image through a translation sequence.
                                                                            to size because the metal shavings from the cutting process
In my workshops, we often use Polaroid Type 55 Posi-
                                                                            may be on the paper. For this process, it is best to tear the
tive/Negative sheet film, exposed in 4˝25˝ pinhole or
                                                                            paper using a heavy ruler. This will give you a deckled
conventional camera. This type of film allows for instant
                                                                            edge, which, if you object to it, can be trimmed off after
inspection of the negative’s qualities and gets each student
                                                                            the process is completed.
in the class into the process without delay or lab time.

                                                                                                                                                    173
Paper is an individual choice. Personally, I use Arches chase the optional 1% gold chloride in solution, paper,
Platine and have had success with Crane’s Platinotype but bottles, and droppers at the same time.
feel the Platine surface is a better support for darker val-
ues in my imagery. My friends Craig Stevens and Phoebe Developer
McCormick swear by Bienfang 360, and Wendy MacNeil During exposure, the ferric oxalate is converted to a fer-
prints on tracing tissue. Others print on Crane’s stationery rous oxalate state. In the development stage, which is
AS 8111, Parchment Wove, Strathmore’s Artists Drawing, always an instantaneous and exciting event, the ferrous
and Fabriano Artistico. Obviously, the quality and type of oxalate functions as a reducer, removing platinum or pal-
paper you select is of great importance and should be ladium from the salted sensitizer compound and precip-
decided on with care. itating those metals into the paper as pure platinum or
I have found that the majority of papers do not require palladium. This conversion begins in the exposure step but
a sizing step for the platinum/palladium process. You will requires the developer to complete the process.
know that sizing may be necessary when you examine your One of the traditional developers for this technique
image and it looks like it is lying slightly below the sur- was potassium oxalate, a rather toxic chemical that is not
face of the paper. Another option is to double coat with particularly user friendly to work with. Other developer
heavy pressure using a glass rod coating method when you options have included sodium acetate and ammonium cit-
opt for a paper that is less tight in its surface texture. In rate. For these notes we are using ammonium citrate
the event your heart is set on printing on an esoteric, or (ammonium carbonate neutralized with citric acid), which
difficult, paper, there are sizing formulas in the paper is a bit more amiable than potassium oxalate. Each of these
preparation chapter. developers provides a slightly different color to the print,
that is, ammonium citrate and sodium acetate yield a
cooler print color than potassium oxalate. You may also
The Chemistry cool the color of a print by working with a cooler devel-
As mentioned, there are three basic ingredients in the plat- oper. Conversely, warming the developer will warm the
inum/palladium sensitizer. In this chapter we are using an print color.
ammonium citrate developer and EDTA for our clearing Many Pt/Pd printers will keep the same base developer
bath chemistry. stock for a very long time and refresh it with new devel-
The Sensitizer oper when the volume invariably drops due to paper
Part A: ferric oxalate absorption and evaporation. You may wish to remove the
THE BOOK OF ALTERNATIVE PHOTOGRAPHIC PROCESSES
Part B: ferric oxalate and potassium chlorate (contrast sludge that will eventually collect on the bottom of the
control) developer container. If you find it necessary to decant the
Part C: potassium chloroplatinite (Pt) or palladium developer, simply pour it into a new nonmetallic container
chloride (Pd) through a coffee filter sitting in a plastic funnel. Never
throw out your developer: it gets better with age. Although
Optional: a few drops of a 1% gold chloride solution
this is the conventional wisdom, there is evidence that
The primary differences in the platinum and palla- developers, like everything else, go bad with advanced age.
dium chemistry are the price of the noble metal and the You will know when your developer is not behaving well.
color of the finished print—palladium being warmer in Until then, keep recycling, decanting, and adding fresh
tone while the platinum yields a colder black and white developer as the volume drops.
image. The combination of the ferric oxalate solutions will
be slightly different depending on which Part C (platinum Emergency Platinum/Palladium Developer
or palladium) you select. The best thing about the pre- According to Dick Sullivan, whom I trust on these mat-
pared kits is that the proportions have been worked out ters, you can make an emergency developer (in case you
for you and the ferric oxalates are fresh. You can also pur- spill the whole bottle during a printing session) by going
to the supermarket and buying sodium bicarbonate and
174Figure 9–10
Eric Janes, Kelly, 1995
Eric made this platinum print photo-sculpture while at the Art Institute of
Boston. It is a composite portrait of a young woman named Kelly with the
modular sections of the whole suspended within the frame.
(Courtesy of the artist)
white vinegar. First you mix the sodium bicarbonate (for The Clearing Baths
upset stomachs) with water to make a strong solution.
The traditional Pt/Pd clearing bath was a dilute solution
Then begin to add the white vinegar, at a slow pace, until
of hydrochloric acid. A gentler variation was citric acid.
the bubbling in the beaker stops. You will want a com-
We are using EDTA (ethylenediaminetetraacetic acid
pletely saturated solution (meaning that the water can no
tetrasodium salt), a preservative often found in commer-
longer dissolve any more of the chemical), so make sure
cially processed foods and agricultural use. EDTA is sig-
that there is some bicarbonate sludge in the bottom of
nificantly less hazardous than hydrochloric acid, whose
your mixing container when you are done. After the
fumes will wreak havoc on any person or thing that is
sludge has been decanted, my best guess is that you will
around it too long. Hydrochloric acid also makes fibers
CHAPTER 9 THE PLATINUM/PALLADIUM PROCESS
have just made sodium acetate, which will work quite
in the paper brittle. The clearing stage is critical, because
nicely as a platinum/palladium developer.
it is vital to remove the unconverted ferric salts from the
print. The EDTA clearing formula is not compulsively
Two Pt/Pd Developer Formulas exact and should be set up in three separate and consec-
If you do not have prepared developers, try these formulas: utive 5-minute baths.
AMMONIUM CITRATE DEVELOPER
Formula for EDTA Clearing Bath
250 g ammonium citrate
1 liter distilled water
This is the basic kitchen version.
1 heaping Tbs EDTA
POTASSIUM OXALATE DEVELOPER Water to make 1 quart
1
250 g potassium oxalate ⁄2 tsp sodium sulfite (not mandatory, but it helps)
1 liter distilled water
175Figure 9–11
Sandy Rosenberg, British Museum, 1996
(Platinum/palladium contact print)
(Courtesy of the artist)
Emergency Clearing Bath PLATINUM/PALLADIUM PART A (FERRIC OXALATE)
In an out-of-clearing-bath emergency, you can go to the 55 ml distilled water at 120˚F
supermarket and buy 7 Up® soda or Lime Away® tile 16 g ferric oxalate
cleaner (which is used to remove calcium) and see if it 1 g oxalic acid (optional)
works for you.
PLATINUM/PALLADIUM PART B (FERRIC OXALATE AND
POTASSIUM CHLORATE [YOUR CONTRAST CONTROL])
Another Clearing Option
55 ml distilled water at 120˚F
Another emergency solution would be Kodak Hypo-
16 g ferric oxalate
Clearing Agent. I know of one platinum/palladium
0.3 g potassium chlorate (for platinum)
printer who clears his prints by giving them a short fresh
THE BOOK OF ALTERNATIVE PHOTOGRAPHIC PROCESSES
or 0.6 g potassium chlorate (for palladium)*
water rinse and then immersing them in a standard hypo-
1g oxalic acid (optional)
clearing bath (sodium sulfite/sodium bisulfite and water)
Some time ago, I recall George Tice recommending
for 5 minutes. I suppose this would work well enough but
using ferric ammonium oxalate in place of ferric oxalate.
I continue to recommend EDTA as your first option.
This, he said, resulted in a warmer image with a bit more
contrast and required a longer than normal exposure time.
The Sensitizer Formula Mike Ware, responding to this idea, expressed the thought
Again, I recommend that you purchase the premeasured that there was a risk of ferric potassium oxalate crystalliz-
and fresh chemistry kit preparations that are on the mar- ing out of the sensitizer if you just substitute with the
ket. This would allow you to spend more time making ammonium salt. This was the primary reason for the “all
beautiful prints rather than rambling around in your lab ammonium” formula in the Ware-Malde version of the
area weighing and compulsively mixing chemicals with Platinotype.
gloves on your hands and a respirator on your face. How- Another formula modification that you might also
ever, if that kind of thing makes you happy, here is the tra- wish to explore is Willis’s addition of lead oxalate to the
ditional formula for platinum and palladium. formula. Willis’s mix: 0.44 g of lead oxalate to each 60 ml
*Please note that the amount of potassium chlorate changes in the Part B mix depending on whether you are making a platinum or palladium image.
176Figure 9–12
George Tice, Men’s Room, Hotel Shelborne,
Atlantic City, NJ, 1975
George made this platinum print as part of his
extensive portfolio documenting his home
state of New Jersey.
(Courtesy of the artist)
of A and B sensitizer. Platinum images with this formula inexpensive, and simple to use. The ammonium citrate
are cooler, show more contrast, have crisper edge defini- can be shipped in a wet state without a problem, but the
tion, and are richer in tonality. Be careful with lead oxalate EDTA should be kept dry until you’re ready to mix it.
if you decide to experiment. Store your mixed chemicals, except for the developer
and EDTA, in a dark and cool place to extend their shelf
PLATINUM PART C
life. Some texts have recommended the refrigerator as a
50 ml distilled water at 100˚F fine place for the storage but I strongly advise against this,
10 g potassium chloroplatinite especially if there are children in your home. Aside from
If you are making palladium prints, following are two dif- the obvious lethal danger of an ingestion accident with fer-
ferent recipes: ric oxalate, this chemical may also form into insoluble
chunks due to the cold environment of the refrigerator. If
PALLADIUM PART C - #1 you are going to refrigerate your chemicals, go buy a small
dorm-room-size unit and keep it in your lab.
CHAPTER 9 THE PLATINUM/PALLADIUM PROCESS
51 ml distilled water at 100˚F
9 g sodium chloropallidite The emulsion formulas in the following Pt/Pd “drop
chart” are dependent on the density and contrast of your
PALLADIUM C - #2
negative. This is an important distinction because the
50 ml distilled water at 100˚F majority of published drop charts are formatted to achieve
5 g palladium chloride the contrast of the print you desire and hope to finish
3.5 g table salt (sodium chloride) with. They assume that your negative will always be appro-
Mix all of the individual solutions, put them in brown bot- priate for the process, which is seldom the case in a class
tles with dropper tops, label them with contents and the or workshop environment. It has been my experience, in
letters A, B, and C, and let them sit for at least 12 hours. class and workshop situations, that the reading of the
As for the developer and clearing bath, I recommend negative is more relevant than wishful thinking about
buying the prepared ammonium citrate developer and what kind of print you would like. By setting up the drop
EDTA clearing bath crystals. They are essentially safe, chart for in-the-hand negative variations I am allowing for
177in your formula the more “grainy” your print will look. It
Platinum / Palladium Sensitizer Drop Chart is Part B that will function as a primary control of changes
to the contrast in your final print; the more B in the for-
425 527 8210
mula, the more contrast in the print.
Extremely Soft Negatives You may elect to add 1 or 2 drops of a 1% to 5% solu-
A 0 drops 0 drops 0 drops tion of gold chloride to your formulas. This change will
B 5 drops 11 drops 22 drops slightly elevate the contrast and will have a slight effect on
C 6 drops 12 drops 24 drops
the color of the final print. As an additional technique,
after you really fall in love with this process, you may wish
Soft Negatives
to experiment with sensitizing formulas that incorporate
A 1 drop 4 drops 8 drops both Pt/Pd salts. This decision will change both the color
B 4 drops 7 drops 14 drops and the contrast of your image. A good way to begin
C 6 drops 12 drops 24 drops thinking about this alteration is to learn the Ziatype
Average Negatives
Process first, where these changes are a normal part of the
process.
A 2 drops 7 drops 14 drops
Drop chart tables have been around for a while.
B 3 drops 4 drops 8 drops Nearly every text I’ve read uses formulas based on the
C 6 drops 12 drops 24 drops print desired. I had suspected that the proportional rec-
Contrasty Negatives ommendations in the chart published here originated
A 4 drops 9 drops 18 drops
with Paul Anderson, who was the accepted authority on
non-silver and special processes in the early part of the
B 1 drop 2 drops 4 drops
century. In fact, the concept goes back to Pizzighelli and
C 6 drops 12 drops 24 drops Hübl. To my contemporary knowledge, only Nancy
Very Contrasty Negatives Rexroth, in her great pamphlet The Platinotype 1977,
A 5 drops 11 drops 22 drops constructed her chart as the following one does, based on
B 0 drops 0 drops 0 drops
the type of negative that the artist will be working with
(see Figure 9-13).
C 6 drops 12 drops 24 drops
Preparing the Formula
THE BOOK OF ALTERNATIVE PHOTOGRAPHIC PROCESSES
Figure 9–13 and Coating the Paper
Platinum/Palladium Drop Chart
Prepare an area in your lab with subdued light and be sure
that it is absolutely clean and dry. Put on your favorite
flexibility in the learning process. I am also assuming that music, get used to the light, and prepare yourself for some
not everyone who wants to print platinum or palladium moderately compulsive behavior.
has the ability to fine tune each of their negatives for the
precise and perfect recommended average density. In addi-
tion, most people do not have a densitometer sitting Set up a coating board or area, and nearby,
around the house. have a good quality shot glass (for swirling
In the drop chart, notice how the proportion of Part the drops together) with a short and heavy
A and Part B change to deal with contrast. Also note the barrel. The short barrel type shot glass is important so that
total percentages of A and B to C and how they are con- you don’t leave too much solution behind when you dump
stant in all formulas. Be aware that the greater the con- it on the paper for coating. Also, you need a pencil for
centration of Part B (ferric oxalate - potassium chlorate) marking the area of the paper that these drops will have
178Figure 9–14
Dick Sullivan,
Tucumcari, New
Mexico, 2000
(Ziatype)
This Ziatype is one of
Dick Sullivan’s recent
images from a portfolio
of Tucumcari, New
Mexico. Dick is the cre-
ator of the Ziatype, and
along with Melody
Bostick, is the co-owner
of Bostick & Sullivan.
(Courtesy of the artist)
to cover and to write your formula on that same paper. your precious noble metal salt. You will notice that it
For coating you will need a hake brush without a metal appears that you do not have enough solution to coat the
ferrule. This brush, once it is used for coating plat- paper, but with a little practice you will discover that the
inum/palladium, should be labeled accordingly and not amount is quite adequate. In the beginning, if you find
be employed for any other process. An alternative to the that this is not the case, simply work with a drop count
brush, especially if you feel brush impaired, is a glass rod that is proportionately greater.
coater, that is, Puddle Pusher. You will also need paper
CHAPTER 9 THE PLATINUM/PALLADIUM PROCESS
towels, two glasses of distilled water; one for wetting your
brush prior to coating and the other for cleaning it after- Wet your hake brush in the distilled water
wards. You may also want a hairdryer set on a cool setting. and shake it out with a snap of your wrist
Finally, you will need your labeled A, B, and C for- (being sure to avoid spraying friends and
mulas in their individual brown bottles with droppers and materials) or blot it lightly so that it is cool to the touch
a quality paper to coat on. Under low light, add the drops but not wet. This step is done to prevent the brush from
of Part A to your shot glass. Replace the top before it spills. completely absorbing the emulsion, to add a little mois-
Then take Part B’s dropper and add the drops from bot- ture to the paper, and to give you a decent chance of apply-
tle B to the shot glass. This is the part of the formula that ing a smooth coating with a very small quantity of mixed
will function as your primary contrast control. Replace solution. Be careful that your brush is not too damp
this top as well. To complete the formula, take Part C’s because it will show up as streaking in the final print. A
dropper and add drops from C to the shot glass. Part C is little practice will show you the way.
179Swirl the solution around in the shot glass and do one glass, take your hairdryer, put it on a cool setting, and gen-
of two things. Pour the shot glass solution into the cen- tly blow-dry the back of your paper. If you are blow-dry-
ter of the marked-out print area and begin to coat by ing in a space without excellent ventilation, wearing a dust
lightly brushing over the entire area with complete hori- mask is a sane idea due to the ferric oxalate in the formula
zontal coverage followed immediately with complete ver- that will become airborne during the blow-drying.
tical coverage of your negative area. Quickly repeat this
sequence until your coating is smooth and free of obvi-
Exposure
ous brush strokes. Do not be concerned if your brush
strokes exceed the dimensions of your negative area. Those When your paper is dry, take your negative and place it
roughly painted edges are the “signature” look of the on the dry sensitized paper so that the final print will be
hand-coated print. In addition, do not fuss over any hairs “right-reading.” Put the negative and the coated paper into
from the hake brush that might fall out of your brush dur- a hinged back contact printing frame so that you can mon-
ing the coating. These hairs can be easily removed during itor the exposure and get ready to go sit in the sun or, less
or after the drying stage with a flick of your fingernail. romantically, to put the negative and paper into a UV
Please refer to the instructions for preventing the hake exposure unit. If you are using a UV printer, do not look
brush hairs from shedding in Chapter 6, “The Cyanotype at the light source during the exposure (it is like a tanning
Process.” Be sure to be light and delicate with your brush- booth) and turn the unit off before checking on the expo-
ing technique or you may damage the surface fibers of the sure. Printing times will be dependent on the negative’s
paper. contrast, density, and the formula you made. A higher
contrast emulsion may require as much as a 50% increase
in exposure. Try to control your contrast via formula
rather than exposure time.
Your other coating option is to use
a glass rod or Puddle Pusher. Go Best Advice
out and purchase a nice heavy Expose your paper until you see a “whisper” of detail in
1
piece of ⁄4˝ plate glass that will be larger than your paper. the print. This process does not have the same personal-
Lay down several sheets of newsprint from a drawing pad ity in its printing-out stage as do many other iron-based
on the glass and tape them down to prevent them from processes. This is why keeping track of your progress with
moving during the coating procedure. Take your glass rod notations on the paper is so important. I advise my stu-
THE BOOK OF ALTERNATIVE PHOTOGRAPHIC PROCESSES
or Puddle Pusher and pour the contents of your shot glass dents to write all pertinent information on the bottom
along the top edge of the area you will be coating. Quickly front of their prints so that evaluations, in a lab or critique,
slide the glass rod lengthwise from side to side in the solu- are easily made. These notations are written in the fol-
tion until it is evenly distributed along the Puddle Pusher’s lowing order: Part A, Part B, Part C, any additional drops
surface edge. Slightly raise the rod and place it along the such as gold, time of day, month of the year, and weather
back edge of the solution. Then drag or push the solution, conditions. It should look something like this:
with pressure, across the paper. Repeat this single stroke
in the opposite direction if there is an obvious abundance 7-4-12 2/1% gold 1:30PM July sun 85˚F humid
of solution left after the first pass. This is the best way to This information tells me by looking at the formula
avoid roughing up and disturbing the smoothness of your that the negative was an average one for the process. I also
paper. Unfortunately, you don’t get to have the romantic know that 2 drops of a 1% gold chloride solution have
brush strokes. been added. I know that the exposure took place in July,
Finally, let the solution sit quietly in the paper for 2 in sunlight, and that the weather was hot and humid—a
to 5 minutes in very subdued light. After this waiting perfect Ziatype printing day if your Pt/Pd session is not
period, while you are cleaning your brush and the shot going well.
180Figure 9–15
David Michael Kennedy, Looking for Route 66, May 1997
David Michael Kennedy is well known for his platinum/palladium images, workshops, and documentation of his native Southwest. This illustration is a
16.5”235.5” palladium diptych.
(Courtesy of the artist)
Any hesitation in this step may result in uneven develop-
ment that will show itself as a distinct flaw in the image.
You may also have uneven development if you stop to
Developing the
admire the image before the paper is completely covered
Platinum/Palladium Image with the developer. Development is nearly instantaneous.
After the UV exposure, take your closed contact frame You may leave the paper in the developer for up to 2 min-
into the lab. Have a very clean and very dry tray waiting utes if you want, but it really isn’t necessary. Examine the
for you that is used only for development of platinum and print and you will notice that your highlights are yellow.
CHAPTER 9 THE PLATINUM/PALLADIUM PROCESS
palladium prints. I want to emphasize the importance of This indicates that it is time to go on to the next step: the
an exclusive tray for development, because chemicals from prewash and clearing bath.
other photographic procedures may be present no mat-
ter how well you wash your trays, especially in a com-
Prewashing and Clearing
munal lab.
Take the exposed paper from the contact frame, place I like to put the developed paper into a bath of fresh water
it face up in the bottom of the dry tray, and notice the for a minute before going into the clearing bath sequence.
very pale yellow whisper of the image. If you can see the This provides me with an opportunity to evaluate whether
image clearly, and if it is fully defined and dark, then you I want to bother going through the 15 minutes of clear-
may want to forget about the ammonium citrate devel- ing bath stages. It also gives me an idea of what I will
opment and begin to think about using distilled water as change with a subsequent formula that I’ll be making
a developer instead. If your predeveloped image looks cor- while my print clears. Also, the water bath gets some of
rect, immediately, with complete coverage, pour the the developer and residual ferrous salts out of my print
ammonium citrate developer on the surface of the print. and keeps my clearing baths fresher.
181Figure 9–16
Catherine Harris,
Fresno, 1986
Catherine made this
palladium print while
a student of mine at
Harvard University in
1986.
(Courtesy of the
artist)
Preparing Three Trays another 5 minutes. You should clearly begin to see the
with the EDTA Clearing Bath highlight and shadow definition at this stage, and the yel-
The casual clearing bath mix is 1 heaping tablespoon to low tint in the highlights should be nearly gone. After
about 1 quart of water; you may add the 1⁄2 tsp of sodium another 5 minutes, place the print in the final clearing
sulfite if you like but this is an addition that I rarely think bath #3 for an additional 5 minutes. After every 6 to 8
THE BOOK OF ALTERNATIVE PHOTOGRAPHIC PROCESSES
about. I provide this formula in nonmetric measure prints, make a new #1, place it in the #3 position, and
because most of my students forget about the gram scale move #2 to position #1 and #3 to position #2. Rotate the
at this point in the procedure and just guess at the trays in this manner through the duration of your lab time.
amounts. Fortunately, the EDTA clearing bath formula is If you find that you are still having problems with yel-
very flexible and anything close to this mixing suggestion lowing in your highlights following the third EDTA bath,
will be satisfactory. EDTA comes in a few different forms, you might want to try this recommendation. Make up a
and the best way to obtain it is to go to a source that sells tray with a 4% solution of sodium sulfite (4 g to 100 ml
it specifically for platinum/palladium clearing purposes. of water) and set it in your sink. Following the third
Place the print into clearing bath #1 and periodically EDTA bath, rinse your print for 2 minutes in water and
rock it gently for 5 minutes. During this first bath clear- then put it in the sodium sulfite solution for 5 minutes.
ing time, pour your developer back into its bottle (never Then follow the final wash instructions.
throw your developer away!). Also, because you have the Finally, wash the print for 20 to 30 minutes and hang
time, wash and thoroughly dry your development tray so it on a line to dry. As with any non-silver, or alternative
that it is ready for the next print or person who uses it. process, screen drying is just asking for trouble because
After 5 minutes, place the print in clearing bath #2 for other people in the lab may not have your same cleanli-
182ness and washing concerns. If you intend to make another u If you radically overexpose your print, you may develop
print from the same negative it would be a good idea to it in distilled water. You may also eventually add a lit-
force dry the first one so that you can adequately evalu- tle of your developer to this water to see if it changes
ate what you did. Dry down on Pt/Pd is significant (15% anything or to “punch” it up at the end. There is a tech-
to 20%), and trying to evaluate the formula you used, nique, covered in several texts on this subject, con-
without this step, will be difficult without experience. cerning localized brush development with glycerin. If
you’re interested in glycerin development, some of the
historical texts describe it, and there is also a good
Some Points to Consider:
description of the technique in Nancy Rexroth’s The
Trouble-shooting Platinotype, 1977.
u It’s a good idea to print coated paper very soon after it u Never allow your coated paper to experience a lot of flu-
is dry. The hydroscopic nature of paper means that it orescent light because this type of light does emit a
will collect moisture from the air, and this may result degree of UV light and may contribute to fogging.
in foggy tonal values in your print. A little humidity is
u If your print appears fogged, it may have been dried at
fine, so don’t get too compulsive about it. Cold and dry
too hot a temperature. Allow the paper to sit for a few
weather will often have a less-than-pleasing effect on
minutes after you coat it, and then when it’s time to fin-
your printing. In the winter, humidify your working
ish the drying stage, be sure that the hairdryer is set on
space to about 55% to 60% humidity. Light Impres-
a cool setting and to dry from the back of the print first.
sions sells an inexpensive hydrometer to measure the
humidity level in your workspace (see Appendex E). In u Never throw your developer away. You can filter it with
addition, if your image looks great in the developer but a coffee filter when it gets too “sludgy,” and you can add
looks weak following the washing and clearing baths, fresh developer to it anytime to keep the container full
there may have been too much humidity in the lab, and prevent evaporation.
which caused a drying time that was too slow. Try to u Never expose your sensitizer solutions to any metal
coat and dry within a 10 minute time period—includ- utensils. Use a hake brush or glass Puddle Pusher for
ing the 2 minutes you let your print meditate after the coating. Tear your paper to size with a plastic ruler
coating step. rather than a knife or paper cutter. Use plastic trays and
u Longer printing times, out of direct sunlight, will store your chemicals in glass bottles. Designate one
increase contrast. One of the best demonstrations I ever brush for this process alone and label it. Also, designate
gave was in a dense fog at the Maine Photographic and label one tray for Pt/Pd development and try not
Workshops, where I teach this material each summer, to use it for another purpose.
CHAPTER 9 THE PLATINUM/PALLADIUM PROCESS
that lasted nearly a half-hour. u You do not have to be married to the formulas: alter
u Cold developer is appropriate whenever you have over- them to suit your needs but keep the proportions of A
exposed your print. Cold developer will give more con- and B to C the same no matter how much sensitizer
trast to your image than a warm developer as well as a you’re mixing up. Keep meticulous notes; it will save
cooler tonality. Warm developer is appropriate when- you time and money.
ever you have underexposed your image. It was not u If you have foggy or muddy highlights in the print,
unusual, according to Pizzighelli and Hübl, to place an these might be some of the reasons: the paper was
underexposed print into boiling developer to make up fogged by strong light before exposure; the ferric oxalate
for an inadequate exposure time. A warm developer will went bad (buy kits and use them within 6 months);
give a slightly warmer image. A warm developer may your negative was too thin and your exposure was too
also help with any staining problems you may be hav- long for it; the formula you selected was an incorrect
ing; somewhere around 100°F will work well. analysis of what your negative required; there was mois-
183Figure 9–17
Katie Miller, Spiritual Waters #3, 1999
Katie Miller, a former workshop student of
mine, made this platinum/palladium print
from a greatly enlarged digital negative fol-
lowing the recommendations in Dan
Burkholder’s book, Making Digital Negatives
for Contact Printing.
(Courtesy of the artist)
THE BOOK OF ALTERNATIVE PHOTOGRAPHIC PROCESSES
ture in the paper; your hairdryer setting was too hot; your developing tray was not completely washed or dry;
cold and dry weather dominated your lab space—or, you may have used contaminated brushes; there may
bad karma. have been impurities in Part C of your formula; you
u If your image is too weak and thin it might be because: may have been working next to others who think
the paper was too damp when you made your exposure; extravagant gesture is a standard requisite for brush
your chemicals were not fresh; you made an incorrect coating; your developer technique was too slow or hes-
evaluation in your Part B concentration; you used an itant—or, bad karma.
exposure time that was too short; you used a negative u If you have a yellow-stained print it is the result of an
that was either too flat or too dense—or, bad karma. active pH flux due to the formation of an iron com-
u If you have black spots, streaks, and blemishes, some plex. The stains might be there because: you forgot the
of the causes may be: that there were fingerprints on clearing bath; your clearing bath may be exhausted;
the paper, before and after coating, or that your print your developer has become too alkaline; small amounts
experienced metal contamination from a metal ferrule of citric acid can slightly adjust the developer back to
on the brush, mat knife, or paper cutter; moisture or an acidic state or remix it and start over; your times in
chemicals may have contaminated your working area; the clearing bath were too short; you didn’t take my rec-
184Figure 9–18
Edward Steichen, The Little Round Mirror, 1902
(Platinum and gum)
Edward Steichen had one of the most outstanding careers in the history
of photography and made his first photograph in 1879 at the age of 17.
A member of the Linked Ring and one of the founders of the Photo-
Secession in 1902, Steichen went on to become Director of Photography
at the Museum of Modern Art and curated the landmark exhibition, The
Family of Man. This image is a platinum and gum bichromate print.
CHAPTER 9 THE PLATINUM/PALLADIUM PROCESS
(Courtesy of the Royal Photographic Society)
ommendation of revolving your clearing bath trays Cyanotype, Gum, and
and adding a new bath every 6 to 8 prints; your EDTA-
to-water concentration is way off. Karma has very lit-
Van Dyke with Pt/Pd
tle to do with a yellow stain. Some days, everything seems off, and on these special
occasions you might want to take your less-than-success-
There are exceptions and explanations to most every ful prints and experiment with them after they are washed
problem one might encounter with the platinum/palla- and dried. Try other alternative processes in combination
dium process, but sometimes, even the best Pt/Pd print- with the platinum/palladium; most can be applied on top
ers have bad days and can’t explain them. Sometimes you of a Pt/Pd print, and it was quite common, throughout
just have bad karma—so relax and try the print again. its popular history, to apply a light gum bichromate print
185You can also read