ACADEMIC TECHNOLOGY SUPPORT - D2L Introduction: Beginners guide to D2L version 9.4.1
←
→
Page content transcription
If your browser does not render page correctly, please read the page content below
ACADEMIC TECHNOLOGY SUPPORT

         D2L Introduction:
     Beginners guide to D2L version 9.4.1

            ats@etsu.edu | 439-8611
                www.etsu.edu/ats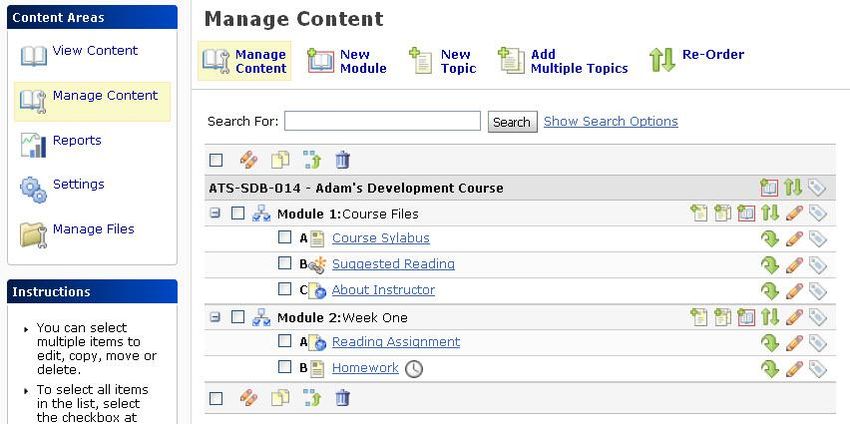
Table of Contents:
   D2L Introduction .................................................................................................. 1
   Introduction ........................................................................................................... 1
   Objectives .............................................................................................................. 1
   My Home ............................................................................................................... 2
   Pager ....................................................................................................................... 8
   Course Home ...................................................................................................... 10
   Edit Course .......................................................................................................... 11
   Groups ................................................................................................................. 15
   FAQ ..................................................................................................................... 19
   Checklist............................................................................................................... 21
   Classlist................................................................................................................. 24
   Calendar ............................................................................................................... 26
   News Widget ....................................................................................................... 27
   Content ................................................................................................................ 31
   Calendar ............................................................................................................... 38
   Extra Resources................................................................................................... 39

Introduction
This workshop is designed to offer an introduction to ETSU’s online learning environment,
Desire2Learn. Participants will be introduced to the tools and capabilities of the system.
Objectives
x How to Login to the D2L learning environment
x Personalize settings
x Post a news item within your course
x Email participants using the Classlist
x Send and receive messages using the Pager
x Begin creating Course Content
Logging in to D2L
You will login to D2L using the same login you use to login to your office computer and check your email at
ETSU. Remember, the D2L system is not related to your Banner ID or password.
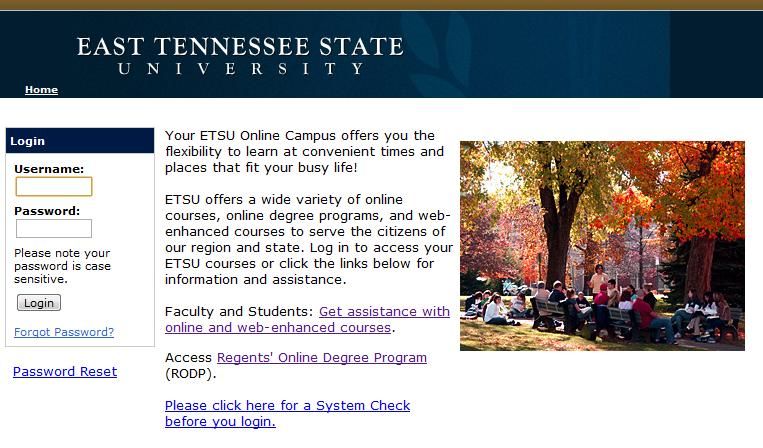
To login to D2L go to the URL address: https://elearn.etsu.edu . Don’t forget to put the “S” after
http. The “S” indicates you are connecting to a secure server. You will not be able to login otherwise.
Support Contact: Specialist Adam Greever (greever@etsu.edu; 439-8616) 1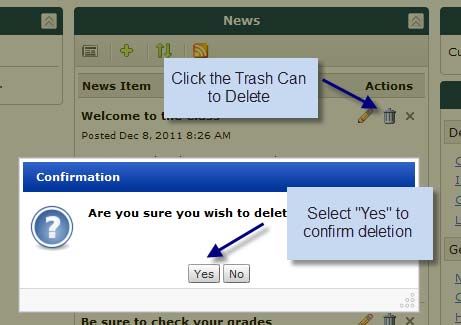
From the D2L home you will be able to access the Password Reset page should you forget your password, by
clicking the “Password Reset” link located below the Login box. You can also run a System Check to make
sure your computer has all the necessary components to run D2L. By selecting the System Check, your
computer will be checked to make sure your Java version, browser, cookie settings, and display settings are
correct for using D2L.

My Home
Upon entering D2L you will be taken to your My Home page in D2L. Each user has a customized
Homepage based on individual settings and class assignments. You should see a personal greeting and the
date in the top right of the screen.

From My Home you can change your preferences and create your online profile using the Welcome
Widget, access your courses with the My ETSU Courses Widget, and view D2L related announcements in
the News Widget.

Welcome Widget
The Welcome Widget allows you to change your personal preferences for D2L and also create your online
profile that other users in D2L can view. The Welcome Widget is located on the left of the screen below the
top navigation.

2
Preferences
Changing your preferences allows you to customize many of your viewing options within D2L. Remember,
the preferences you set are personal and will not affect the way your students see your course. Upon
selecting the Preferences link from the Welcome Widget you will be taken to the Preferences
Homepage. Your Preferences in D2L are broken up into 5 tabs, simply click the tab for the preferences you
want to set.

General Preferences

    x   Online Status – A green dot will appear next to the name of anyone online in D2L. You can change
        your online status if you prefer that students not know you are online in D2L. The setting will revert
        back the next time you login to D2L. Students do not have this option.
    x   CD-Rom Drive – Allow you to specify your CD-Rom drive in case you have links to materials
        located on a CD in your computer.

Appearance & Accessibility

    x   Font Settings - Change the font settings in D2L to make text more readable for instructions and
        navigation bars. This will not affect content viewing. Also, if you increase the font size past 18 your
        navigation bars may disappear.

Support Contact: Specialist Adam Greever (greever@etsu.edu; 439-8616)                                             3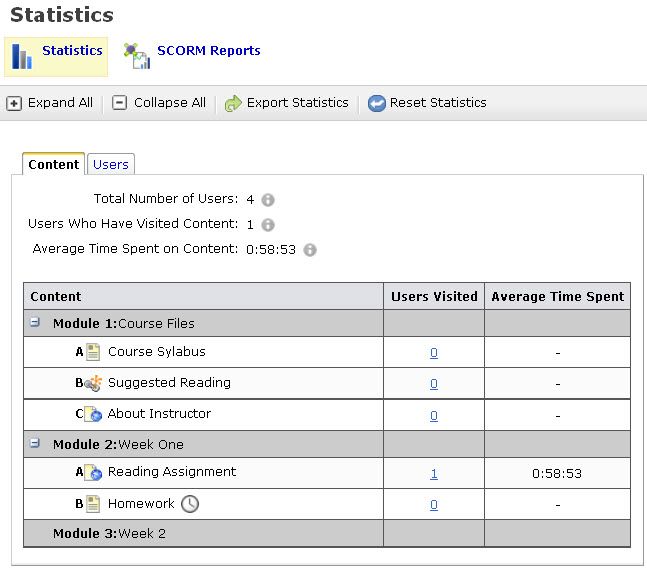
x   Dialog Settings – Allows you to set the way secondary windows open in D2L.
    x   HTML Editor – Allows you to turn off the Rich Text Editor and view HTML source code.
    x   Math Display Settings - Choose whether to display Math using Java or MathML.

Language & Region

    x   Language and Region Settings – Allows you to set your preferred language and also the first day of
        the week for your D2L Calendar.
    x   Time Zone - You can set the Continent and time zone of your calendar.

Discussions

    x   Personal Settings– Change the default view, display settings, list style, and reply settings for
        Discussion Boards, settings can also be changed in Discussion Tool.

Email

    x   Email Options – Create email signature and choose whether to send a copy of outgoing mail to your
        ETSU assigned email address.

Metadata

    x   Metadata options - Set default options for viewing Metadata of objects in D2L.

Pager

    x   Pager Options – Change incoming page sound and Pager display notification.

Profile
D2L makes it very easy to control your online persona. You can include any information you would like to
put up about yourself but remember that other D2L users (students, faculty, and staff) will be able to view
this information. Any information you put under profile will be viewed by anyone who can view your
Classlist. Only reveal what information you are comfortable revealing.

4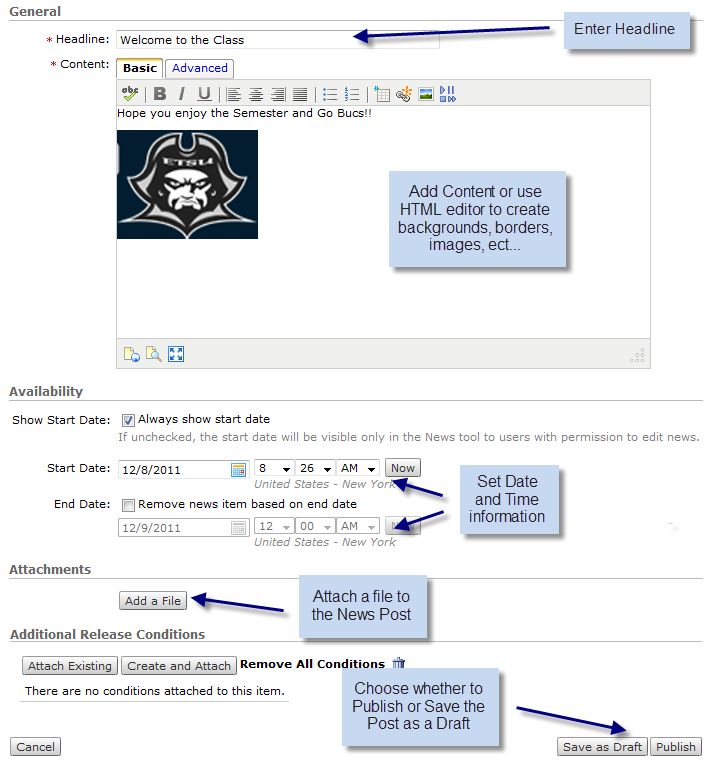
Your students can also setup their Online Profiles and this is a great tool to learn a little more about your
students before classes even begin.

To access your Profile click the Profile link in the Welcome Widget to be taken to the Profile Homepage.
To change your online persona or picture select the "Change Picture" button and select a web friendly
graphic on your computer. You can use a jpg, gif, or png. You can now fill in any information you want to
reveal to other users in D2L.

You can also add different Social Networks that you may use, such as Facebook, Twitter, Google+, or
LinkedIn. Just add the information for your account to the account boxes and your Social Media accounts
will show up on your D2L profile.

Support Contact: Specialist Adam Greever (greever@etsu.edu; 439-8616)                                           5
News Widget
From My Home you will also be able to access the News Widget. This Widget is available and viewable by
all users in D2L. The Office of eLearning will post D2L related information here from time to time. Server
related issues such as outages and upgrades but also important information that may be relevant to all D2L
users. You can minimize this widget from your My Home page but it cannot be removed.

ETSU Favorites
From My Home you will also be able to access the ETSU Favorites Widget. This Widget will contain links to
useful ETSU websites. This Widget is created by the D2L administrators and cannot by removed but it can
be minimized.

My ETSU Courses Widget
The My ETSU Courses Widget is where you will be able to enter your courses in D2L. This widget obtains
its information from the Banner Student Information System and any courses assigned to you using this
system will appear here. Courses are listed by Semesters and then Departments. If you are enrolled in
courses by different roles, such as Instructor and Student, your courses may be listed under separate tabs at
the top of the widget. Just select the course by clicking it to enter it.

6
The "Pencil" button will allow you to enter the Course Offering Information page. From this page you can
set the start and end date for your course, set the class to active or inactive, and also change the default colors
of the course.

Support Contact: Specialist Adam Greever (greever@etsu.edu; 439-8616)                                             7
Pager
The Pager is a great tool that allows anyone in D2L to get in touch with anyone else who uses D2L at ETSU
in a format more immediate than email. The Pager works almost like an instant message where you can send
another user a page and they can respond back to you using the Pager tool. The Pager will also display your
online status so other D2L users can know when you’re online.

Receive a Page

If you hear a beeping sound upon logging into D2L it probably means you have a new page. Click on the
"Pager" icon to check your pages. A page in D2L will look like this:

You will be able to reply to a page and the user will instantly receive your reply by the

8
flashing pager icon in the top right of their D2L.

Send a Page

To send a page, simply click the "Pager" icon and the Pager tool will pop-up in a new window.

In order to get full functionality from the pager tool you may want to add some contacts. You can do this
from the classlist or you can do it from anyone’s username you may know.

    1.   Click the Add button
    2.   Type the username if you know it or
    3.   Select the second option “Add Classmates” and choose your course
    4.   Select the specific student you want to add

Support Contact: Specialist Adam Greever (greever@etsu.edu; 439-8616)                                       9
Course Home Upon clicking a course from your My ETSU Courses Widget you will be taken to your Course Home. The Course Homepage is where you will access all the information and content of your course. It contains navigation bars and widgets that you can use to create and edit your course. It will also allow you to determine specific settings for your course using Edit Course. Navigation Bars - Give you access to the various tools in D2L. 10
Widgets - Widgets are other tools that you can set on your Course Homepage. They provide other relevant
information for your course such as News, Updates, and Events.

Edit Course
The link to Edit Course can be located on the top navigation bar at the bottom right, beside the link to
Logout of D2L. You will use Edit Course to make administrative changes to your courses.

Edit Course - is broken down into three sections for editing your course; design general, tools, and
administration.

Support Contact: Specialist Adam Greever (greever@etsu.edu; 439-8616)                                      11
General
Course Offering Information

Under Course Offering Information you will be able to edit the course offering name or code, change the
colors used for the course, change the location where files are stored, change the start and end date to the
course, and set the course to active or inactive.

The Availability dates will be pulled from the Banner Student Information System but you may choose to set
your own dates. Students will not be able to see the courses before the start date or after the end date that is
specified here. You can also set the course to Inactive to not allow students to see the course should you
want to make updates to the class in the middle of the semester.

You can also change the highlight colors of widgets and navigation bars by clicking the colored boxes and
choosing different colors for Dark, Light, and Soft Colors. To reset to default colors you can select the arrow
beside each option should you not like what you have chosen.

Navigation
Change the links to tools that appear on your Courses NavBars or change the colors and background
image. For more detailed information please check the D2L Navigation handout
at: http://docs.google.com/View?id=dfgnj9s5_813hn2tmndg

12
To Change the Default NavBar for your Course:

   1. The NavBar is laid out in Four Sections: The Top Left, Top Right, Bottom Left, and Bottom Right,
      which correspond to the Four Sections of the NavBar
   2. Select which Section of the NavBar you want to add Tools to and then click the "Add Links" button
      in the corner of that Section.
   3. Check the box to the left of the Tool you want to Add and then click the "Add" button in the
      bottom right corner.
   4. To reorder Links, click the arrow in the right corner of the Tool Link. You can choose to move the
      Tool Right, Left, or Remove from the NavBar.
   5. The Links will automatically Update and you can then move to another Page in D2L.

The Following Tools are available in D2L but are not on the NavBar by default:

Articles, Attendance, Blog, Competencies, Chat, Course Feedback, Course Name, FAQ, Glossary, LiveRoom,
News, Rubrics, Self Assessments, and Surveys.

Support Contact: Specialist Adam Greever (greever@etsu.edu; 439-8616)                                 13
Tools Import / Export / Copy Components Allows you to move course components, such as quizzes, news items, course content, discussion forums, etc., from one course to another org unit. You can also import course components from a file or export course components to a zip file. To Copy Components from another Org Unit 1. Select the first option Copy Components from another Org Unit 14
2.      Choose the course you want to copy components from in the drop down menu called Existing Offerings.
        A list of all the components of the course will appear. Select what components you want to copy or select
        Copy all to copy over the entire course components.

     Groups
     The Groups tool allows you to create group work areas for users to work on projects or assignments
     together. Students can be assigned to multiple groups for each project/assignment in the course. Each
     group category created can have its own discussion forums and dropbox folders for students to work in.

     The Groups tool can be accessed from the top left of the NavBar in your D2L course or by going under
     "Edit Course" located near the "Logout" button.

     Support Contact: Specialist Adam Greever (greever@etsu.edu; 439-8616)                                     15
Create Group Category
Groups are organized by building a "Group Category" for each project/assignment in the course. Students
can then be assigned to multiple Group categories over the course of the semester.
Click the "New Category" button to create a new group category and follow these steps.
1. Enter a name for the Group Category
2. Type in a description of what this Group Category is for, this helps students if the "Self Enroll"
option is selected in a future step
3. Choose Enrollment type
o # of Groups - No Auto Enrollments - The specified number of groups is created and
you can then manually add students to the Groups
o # of Groups - Auto Enrollments - The specified number of groups are created and
students are automatically distributed randomly
o Groups of # - Creates the minimum number of groups needed to place students into
groups of the specified size
o Groups of # Self Enrollment - The minimum number of groups needed to place
students into groups of the specified size, students are able to select their group
o # of Groups Self Enrollment - The specified number of groups are created, students are
able to select their group
4. Set the # of Groups or Group of # size
5. Set Advanced Properties options
16Auto Enroll New Users - if a student is added to your course late they will be added automatically to a group
Randomize users in Group - this option will randomize students when they are added to a group, otherwise
they are assigned to a group by last name
6. Under Additional Options choose whether you want to D2L to automatically build
"Discussion Areas" and Dropbox Areas" for each group, just check the box to have
D2L automate this process
7. Once finished click "Create”
Once you have created your groups you will be taken to the next pages depending on what
you selected under "Additional Options". If you selected both "Setup Discussion Areas" and
Setup Dropbox" you will be taken to pages to setup those options.
Discussion Setup
Support Contact: Specialist Adam Greever (greever@etsu.edu; 439-8616) 17Dropbox Setup Managing Groups Once your groups have been created you can go to the groups tool, either by accessing it from the NavBar or under "Edit Course". Here you will be able to change the Group names, Add/Remove users from groups, and access the Groups Discussion and Dropbox areas. 18
FAQ
The FAQ (Frequently Asked Questions) tool allows you to list answers to questions
commonly asked about the course in an easy place for students to find. Questions will be
grouped into categories to help organize the FAQ. The FAQ is not part of the NavBar for the
Course by default, you will have to add it if you want to use the FAQ.
Create Categories
You will have to create categories in order to add questions and answers.
1. Once you have added FAQ to your NavBar select FAQ from the top navigation
2. Click New Category. A category is a title that will be used to manage the FAQ
questions. You must create a category in order to create questions.
3. Add Category name and optional description which will appear below the category
name on the main FAQ page and at the top of the category’s page.
4. Click Save once you are finished creating your category.
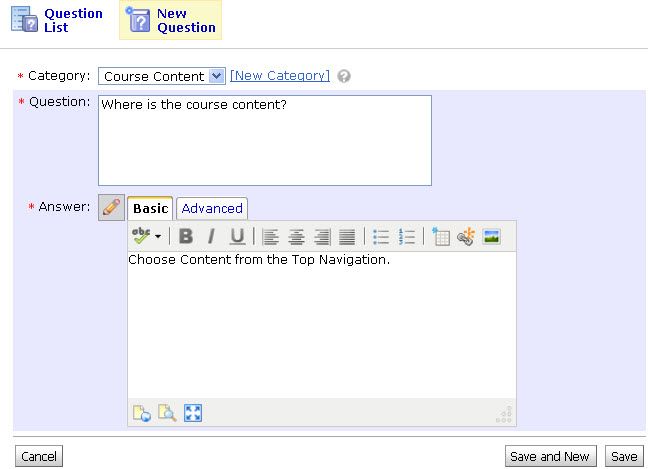
Support Contact: Specialist Adam Greever (greever@etsu.edu; 439-8616) 19Create Questions and Answers
Once you have created your Categories you will be able to add questions and answers.
1. Click New Question
2. Select the Category you want the question and answer to be listed under.
3. Enter your Question and Answer in the dialog boxes provided.
4. Click Save once you are finished to add the Q/A to your FAQ.
This is how your students will view the FAQ:
20Checklist
The Checklist allows you to create checklists that you can use to highlight important aspects
of your course and make student accountable for completing certain tasks. You can setup
multiple checklists with many different categories and items.
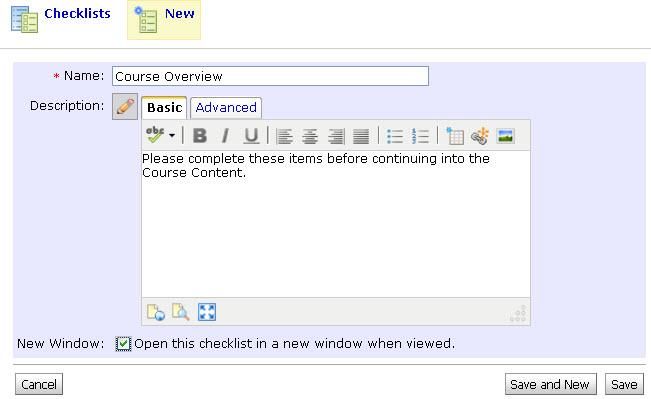
Create a New Checklist
You may choose to make multiple Checklists for your course and you can create as many as
you feel you need.
1. Select Checklist from the top NavBar
2. Select New to create a new Checklist
3. Enter a Title and Description for your Checklist. You can also choose to have the
Checklist open in a new window by checking the box at the bottom of the dialog
window.
4. When finished select Save to create the Checklist.
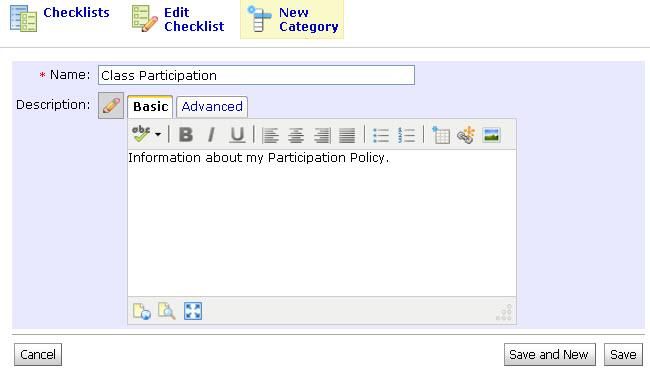
Support Contact: Specialist Adam Greever (greever@etsu.edu; 439-8616) 21Create Checklist Categories
After you create your Checklist you will need to create categories that you will assign your
Checklist Items too.
1. Click the Checklist you want to edit
2. Click the New Category button
3. Enter a Category Name and optional Description
4. You may re-order or delete categories
5. Be sure to Save when finished
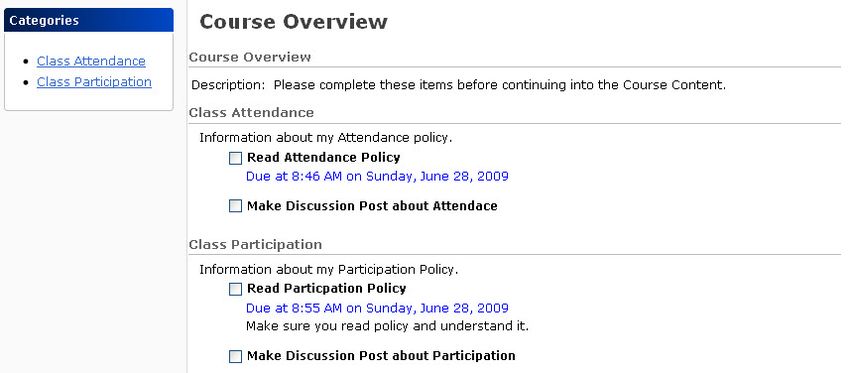
22Create Checklist Items
After you create your Checklist Categories you will be able to add your individual Checklist
Items.
1. Click the Checklist you want to edit
2. Click the New Item button
3. Select Category the Checklist Item will fall under
4. Provide Name and optional description
5. Set Due Date and Calendar display options
6. Be sure to Save when finished
This is what the Checklist will look like to your Students:
Support Contact: Specialist Adam Greever (greever@etsu.edu; 439-8616) 23Classlist
The Classlist is the best place for keeping track of your students. You can view their
profiles, course progress, print a classlist, add participants to your course, and email your
students.
How to email/page Students
1. Upon clicking the Classlist you will be given a list of all the students currently
enrolled in your course.
2. Check the box next to the names of the students you wish to email or page
3. Click the Mail or Page button located above the names list
4. This will open a new window with either the new message pane or the pager tool
5. Any message you send from the Classlist will also send a copy to your ETSU email
account by default
24Add Participants through the Classlist
Students who are registered for your course through the Banner Student Information
System will be automatically added to your classlist but you may choose to add another
instructor, a teaching assistant, grader, or even another student to your course.
1. Click the Add Participant button
2. Type any part of the name or username in the search field and Click Search
3. Check the box next to the user you want to add to your course
4. Choose the role from the drop down list
5. Click the Enroll Selected Users button
Support Contact: Specialist Adam Greever (greever@etsu.edu; 439-8616) 25To Remove Users from the Classlist
1. Check the box to the left of the Users name you want to remove
2. Click the "Unenroll" button that is located above the Classlist. It looks like the
profile of a person with a red minus sign over their head.
Note: You will be unable to change someones Role once they have been added. In order to
change a role you will need to remove them from the Classlist and then add them back as
the role you wish them to be.
Calendar
Instructors can use the calendar to post important course related events, such as
assignment due dates, exams, or virtual classroom meetings. The dates and events that
appear on the Course Calendar are visible to all students registered in the course. Users
may also post events to their own personal calendar, which only they can view.
Adding Course Events
Course Events can be viewed by all class participants. Personal events may only be viewed
by the individual that created the event.
261. Access the Calendar by either clicking the Calendar link in the top navigation or
from the Course Homepage you can click the Calendar widget
2. Click the Create Event button
3. Enter a Title for the Event , optional Description, and Location
4. Choose the date and time information for the Event
5. The Restriction information is where you will set the access to the Event. You can
set it as a personal event and it will only appear on your Calendar or set as a Class
Event so all Classlist users will have the Event added to their Calendar
6. When finished be sure to Save
News Widget
The News Widget is located in the center of your Course Home. This is the best place to
post reminders, announcements, and updates. The html editor allows you to draw attention
to a news item or post images. The five most current news items will appear in the News
Widget unless you change the display options.
Support Contact: Specialist Adam Greever (greever@etsu.edu; 439-8616) 27Adding a News Item
1. Click the Add button at the top of the News Widget
2. Add a Headline for your News Post
3. Add Content to your post. You can also use the HTML editor to add backgrounds,
images, etc…
4. Set the News Post Availability by setting a Start and End Date
5. Add Attachment. You can attach images here to have them show up in the News
Post
6. Add Release Condition. If you would like the News Post to show up after some
other condition is met you can set a Release Condition
7. Choose whether to "Publish" the Post so that students can see it or "Save as Draft"
to work on it later
28Re-Order News Items
You can re-order your News Items if you would like to bring something back to the front
that has fallen below the 5 newest news posts.
1. Click the Re-Order button from the News Widget
2. The Sort Order is shown in the far right column
3. The Sort Order will start with 1 and go to the number of posts you have, simply
change the sort order through the drop down menus
Support Contact: Specialist Adam Greever (greever@etsu.edu; 439-8616) 294. Be sure to Save when finished
Delete News Items
You can also Delete News Items should you choose you no longer want to display that
particular post.
1. Each news post will have a trash can icon next to the post, click the Trash Can to
Delete
2. A pop-up will ask you to confirm the News Item Deletion
30Content
Content is where you will store all the course documents for your course such as your
assignments and syllabus. You can upload various file types to content such as HTML, .doc,
.ppt, .pdf, etc. It is important to note that even though you can upload these file types to
D2L your students will need to software to open them. Either make sure you list links to
free software packages for the file types you upload or use HTML which is the most
commonly used file type of the web, but choose what is appropriate for your material.
The Content section is arranged into Modules, which act as larger subject headings that you
can list your course documents under. You will list your course documents as topics which
are contained within each Module.
All content uploaded to D2L is kept in the File Manger. Whether you create topics within
content or upload files from your computer when creating topics, those files will be stored in
the File Manger. You may also upload files directly to the File Manager and then link them
to the topics as you create the course content. The File Manager is an essential part of D2L
and is covered in more detail in the Managing Content Workshop.
Adding Modules
Modules will act as course headers for each section of your D2L course. You must create
Modules in order to add topics inside them.
1. From the Content page in D2L, click the New Module button
2. Giver your Module a Title and optional Short Title
Support Contact: Specialist Adam Greever (greever@etsu.edu; 439-8616) 313. To set Restriction options select the second tab, “Restrictions
4. When finished be sure to Save
Adding Topics
Topics are contained within your course Modules. Topics can be created using D2L’s HTML
editor, from a file you upload from your computer to the D2L File Manager, or as a link to
another place within your course or on the web.
Clicking the New Topic button will give you a page asking what Source you would like to add
a Topic from; which includes Create a New File, Course File, Upload New File, and QuickLink.
32Create a topic using the HTML editor
1. Click New Topic
2. Choose “Create New File”
3. Select the appropriate parent module from the drop down menu of Modules
4. Enter content in the HTML editor
5. Click “Save” or “Save and New” to add another piece of content
Create a topic using a file previously uploaded to the File Manager
1. Click New Topic
2. Choose “Course File”
3. Select the appropriate parent module from the drop down menu of Modules
4. Give your topic a Title
5. Browse the File Manager for the file you want to create a topic with
6. Click “Save” or “Save and New” to add another piece of content
Create a topic from a file on your computer
1. Click New Topic
2. Choose “Upload New File:
3. Select the appropriate parent module from the drop down menu of Modules
4. Give your topic a Title
5. Browse your computer for the file you want to upload
6. Click “Save” or “Save and New” to add another piece of content
Support Contact: Specialist Adam Greever (greever@etsu.edu; 439-8616) 33Create a topic using a QuickLink
1. Click New Topic
2. Choose “QuickLink”
3. Select the appropriate parent module from the drop down menu of Modules
4. Give your topic a Title
5. Enter the URL of the website or select another section of your Course
6. Click “Save” or “Save and New” to add another piece of content
7. Once you have finished creating the topic you can set your options for that piece
of content by selecting the appropriate tab at the top.
Restrictions Tab
This tab will allow you to hide the topic so that it cannot be seen by course participants, set
availability dates so the topic can only be viewable when you want it to be, and also choose
to display the topic in the course Calendar.
Discussions Tab
This tab will allow you to associate your topic with specific discussion boards using the
Discussion Tool. This tool will be discussed in the advanced D2L workshop.
Editing a Topic
Once you have created a Topic you may need to go back and change some of the settings
you set when you originally created the Topic.
341. Find the Topic you wish to edit in the Manager Content window
2. On the far right of the Topic there will be a small pencil icon, click this to edit the
Topic
3. Be sure to Save once you have finished editing the Topic
Collapsing Content
After you have setup your Content you may wish to view your Content only by the section
you are currently working on. This feature will allow you to view more or less of your
materials as you prefer. This feature is especially useful for courses that contain
complicated content structure trees or any course that contains numerous Modules.
To Collapse Content
1. Locate the Module you wish to collapse
2. Click the “Minus” sign to the left of the Module Title
To Expand Content
1. Locate the Module you wish to expand
2. Click the “Plus” sign to the left of the Module Title
Support Contact: Specialist Adam Greever (greever@etsu.edu; 439-8616) 35Statistics/Reports Another great feature located in Content is the Statistics and Reports Tool. This tool lets you check your student’s progress through the course. You have the ability to see what the students are viewing and have viewed, when they logged in to your course and how long they stayed, as well as other useful information. To view the Statistic/Reports click the "Reports" button from the Content Area: This page will give you a breakdown of how many users have viewed each piece of content and how long they spent on each individual topic. You also have the ability to export this information to a .csv file. 36
To view Reports and Statistics for individual users, select the Users tab from the top and
then select the individual student you would like to view to receive another window with
their information.

Content Features
You also have the ability to move, rename, copy, and delete content from within the Manage Content
window.

To Rename Content

      1. Place a check beside the name of the item or items you wish to rename
      2. Click the edit icon which is represented by the double pencils

      3. Rename the items as desired
      4. Be sure to Save when finished

Support Contact: Specialist Adam Greever (greever@etsu.edu; 439-8616)                                37
To Move Content to another Location
1. Place a check beside the name of the item or items you wish to move
2. Click the Move icon which is represented by this icon
3. Select the location you would like to move the content
4. Be sure to Save when finished
To Copy Content to another Module
1. Place a check beside the name of the item or items you wish to copy
2. Click the Copy icon which is represented by this icon
3. Select the location you would like to copy to
4. Be sure to Save when finished
To Delete Content
1. Place a check next to the item or items you wish to delete
2. Click the Trash Can icon represented by this icon
3. Confirm whether you’d like to delete the content displayed and/or the underlying
course file
4. Be sure to Save when finished
Calendar
Instructors can use the calendar to post important course related events, such as
assignment due dates, exams, or virtual classroom meetings. The dates and events that
appear on the Course Calendar are visible to all students registered in the course. Users
may also post events to their own personal calendar, which only they can view.
Adding Course Events
Course Events can be viewed by all class participants. Personal events may only be viewed
by the individual that created the event.
1. Access the Calendar by either clicking the Calendar link in the top navigation or
from the Course Homepage you can click the Calendar widget
2. Click the Create Event button
3. Enter a Title for the Event , optional Description, and Location
4. Choose the date and time information for the Event
385. The Restriction information is where you will set the access to the Event. You can
set it as a personal event and it will only appear on your Calendar or set as a Class
Event so all Classlist users will have the Event added to their Calendar
6. When finished be sure to Save
Extra Resources
x Office of eLearning Help Page can be located at: http://www.etsu.edu/d2l
x Desire2Learn Community website: http://community.desire2learn.com
x Call the Office of eLearning at: 423-439-8611 or email ats@etsu.edu
x Contact D2L Help at: d2lhelp@etsu.edu
Support Contact: Specialist Adam Greever (greever@etsu.edu; 439-8616) 39You can also read