Activate User Guide for Brand Owners - Instructions for Brand Owners to use Activate offered by the Global Office (GO) - GS1
←
→
Page content transcription
If your browser does not render page correctly, please read the page content below
Activate User Guide for Brand Owners
Instructions for Brand Owners to use Activate offered by the
Global Office (GO)
Release 1.0, 01 June 2018
GS1 Activate User Guide for Brand Owners

Document Summary
Document Item                                   Current Value

Document Name                                   Activate User Guide for Brand Owners

Document Date                                   01 June 2018

Document Version                                1.0

Document Issue

Document Status                                 Candidate

Document Description                            Instructions for Brand Owners to use GS1 Activate offered by the Global
                                                Office (GO)

Contributors
Name                                            Organisation

Cameron Green                                   GS1 AISBL, Global Office

Steven Zegas                                    Technical writer, Global Office

Log of Changes
Release          Date of Change            Changed By                   Summary of Change

1.0              01 June 2018              Cameron Green                First published

Disclaimer
THIS DOCUMENT IS PROVIDED “AS IS” WITH NO WARRANTIES WHATSOEVER, INCLUDING ANY WARRANTY OF
MERCHANTABILITY, NONINFRINGEMENT, FITNESS FOR PARTICULAR PURPOSE, OR ANY WARRANTY OTHER WISE ARISING
OUT OF THIS SPECIFICATION. GS1 disclaims all liability for any damages arising from use or misuse of this document,
whether special, indirect, consequential, or compensatory damages, and including liability for infringement of any
intellectual property rights, relating to use of information in or reliance upon this document.
GS1 retains the right to make changes to this document at any time, without notice. GS1 makes no warranty for the use of
this document and assumes no responsibility for any errors which may appear in the document, nor does it make a
commitment to update the information contained herein.
GS1 and the GS1 logo are registered trademarks of GS1 AISBL.

Release 1.0, 01 June 2018                          © 2018 GS1 AISBL                                           Page 2 of 28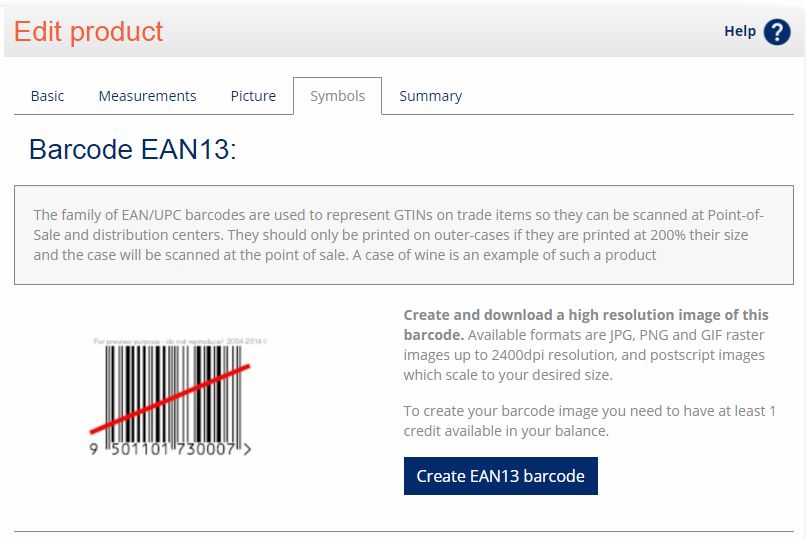
GS1 Activate User Guide for Brand Owners

                                           Table of Contents
1    Getting started in Activate ............................................................................ 4
     1.1     Logging in ....................................................................................................................... 4
     1.2     Agreement to Terms & Conditions ...................................................................................... 4

2    Account dashboard ....................................................................................... 5
     2.1     Part 1 – The Navigation Menu ............................................................................................ 5
     2.2     Part 2 – Active Prefix ........................................................................................................ 6
     2.3     Part 3 – Add Product ........................................................................................................ 7
     2.4     Part 4 – View Products ...................................................................................................... 7
     2.5     Part 5 – Global Company Prefixes and GTIN Ranges ............................................................. 7

3    The product catalogue dashboard ................................................................. 9
     3.1     How to choose an active (default) prefix ............................................................................. 9
     3.2     Search and view products in a catalogue ............................................................................ 10
     3.3     The search tool ............................................................................................................... 11
             3.3.1 The OK and the Reset button ................................................................................... 11
             3.3.2 Using the “Starred” option with the search tool........................................................... 11
             3.3.3 Search parameters and steps ................................................................................... 12

4    Add and edit products in the product catalogue.......................................... 15
     4.1     Activating barcodes and managing product details .............................................................. 15
     4.2     The “Update” and “Activate barcode/GTIN” buttons ............................................................. 15
     4.3     Add new product ............................................................................................................. 16
             4.3.1 Select the Packaging Level ....................................................................................... 16
             4.3.2 Select Package Type ............................................................................................... 17
             4.3.3 Product Identification and additional sections ............................................................. 17
     4.4     Choosing to Save a Draft or to Activate a product ............................................................... 19
     4.5     Edit products .................................................................................................................. 20
             4.5.1 Choose to Update the draft product or to Activate the product ...................................... 20
     4.6     Add new products (subproducts) in a hierarchy ................................................................... 20
     4.7     Print product summary .................................................................................................... 21

5    Generate and download barcode images .................................................... 22
     5.1     Gather Printing Requirements ........................................................................................... 22
     5.2     Create barcode images .................................................................................................... 22
     5.3     Download barcode image files for printing .......................................................................... 25

6    Glossary of terms and acronyms ................................................................. 28

Release 1.0, 01 June 2018                                 © 2018 GS1 AISBL                                                       Page 3 of 28
GS1 Activate User Guide for Brand Owners

1         Getting started in Activate

1.1       Logging in
          ■   Go to www.GS1.org/activate
          ■   Type in your username and password from your welcome email

1.2       Agreement to Terms & Conditions
          At the first login, you are asked to agree to the Terms and Conditions.
          ■   Select the checkbox next to “I agree to the Terms and Conditions”
          ■   Click Submit

Release 1.0, 01 June 2018                      © 2018 GS1 AISBL                                      Page 4 of 28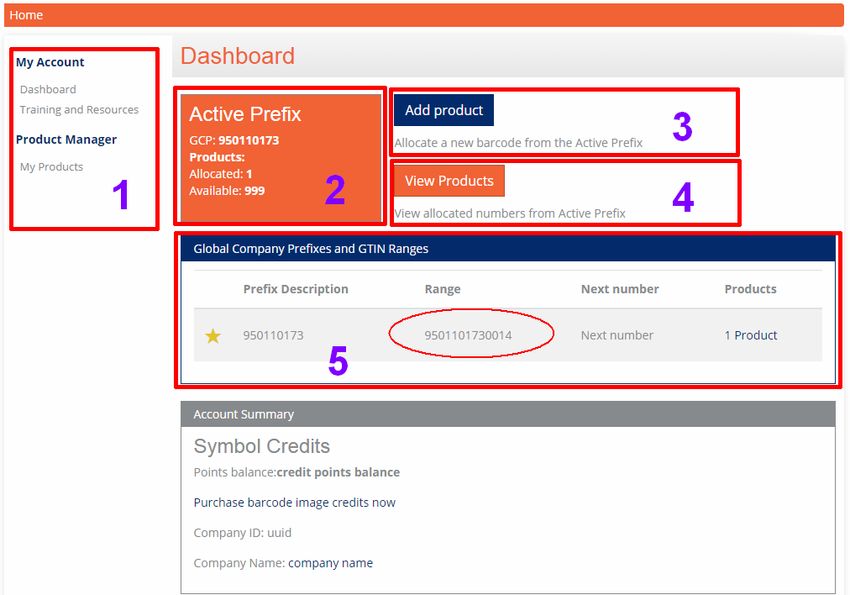
GS1 Activate User Guide for Brand Owners

2         Account dashboard
          In this section, the account dashboard is described in five parts.
              1. Navigation Menu
              2. Active Prefix
              3. Add Product
              4. View Products
              5. Global Company Prefixes (GCPs) and Global Trade Item Number (GTIN) Ranges
          Note: The design and appearance is subject to change.

2.1       Part 1 – The Navigation Menu
          The navigation menu is displayed on all screens. It provides three options:
          ■   Dashboard
          ■   Training and Resources
          ■   My Products

Release 1.0, 01 June 2018                       © 2018 GS1 AISBL                                      Page 5 of 28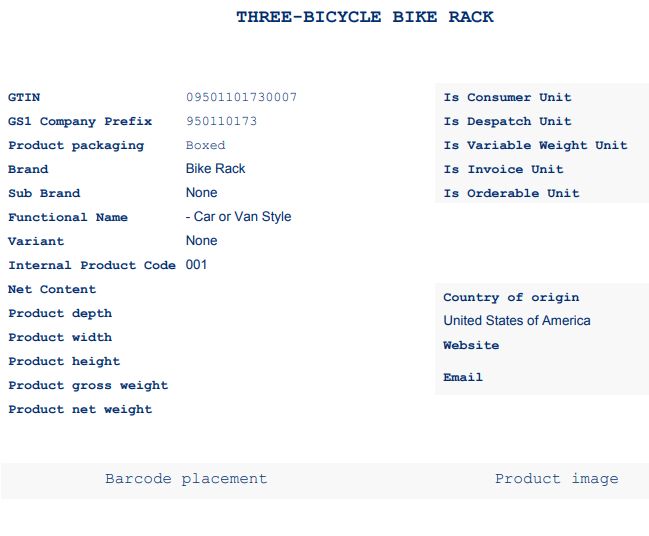
GS1 Activate User Guide for Brand Owners

          (Account) Dashboard
          ■   Dashboard – The account dashboard, illustrated above

          Training and Resources
          ■   Provides links to documentation and other resources

          My Products
          ■   My Products – View and Search Catalogue
              The product catalogue screen allows you to:
              □   View your product catalogue and “bookmark” favourite products
              □   Use the Search tool to search, filter, sort and view products
          ■   My Products – Edit and Manage Product Data
              Additional screens allow you to select any product to Edit including:
              □   Required attributes and additional data such as: Package Level; Brand; Sub-brand;
                  Product Type; Description; GTIN, Barcode and more
              □   Measurements: weight, dimensions and contents
              □   Images: products pictures for identification
              □   Barcodes: generate and manage barcode images
              □   Product summaries: print product attribute, data, images and barcodes

          NOTE: When you “Activate” a product, some required attributes become a permanent record, and
              cannot be edited. Other attributes (that describe a product) may be added or edited after a
              product is activated. See section 4.1 for more information.

2.2       Part 2 – Active Prefix
          Brand owners typically have many prefix (or, Global Company Prefix – GCP) numbers. At any given
          time, Activate can display, edit and manage GTINs that belong to only one prefix. One prefix must
          be selected to see the associated GTINs. This is called the “active” (or, default) prefix.
          See, section 2.5.1, How to choose an active (default) prefix.
          Part 2 of the account dashboard displays the prefix (GCP) that is active. It also displays the number
          of used (“allocated”) and number of available GTINs.

Release 1.0, 01 June 2018                      © 2018 GS1 AISBL                                       Page 6 of 28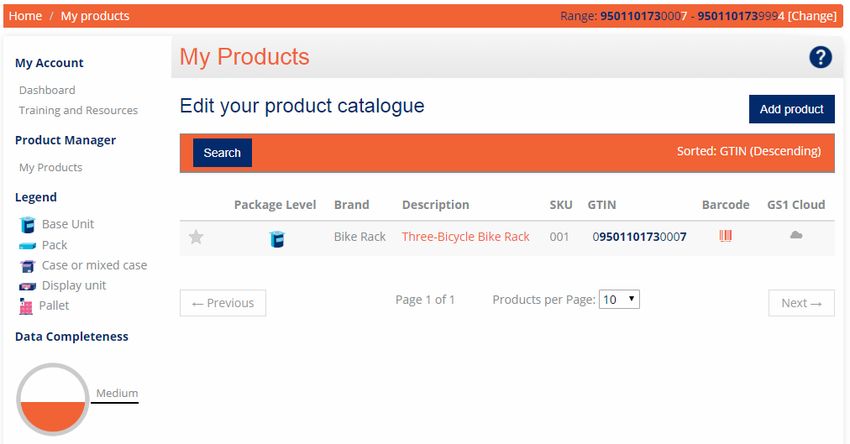
GS1 Activate User Guide for Brand Owners

          NOTE: If you need additional GTINs to identify products, you can purchase additional prefixes (with
              a block of GTINs) at https://gs1.wufoo.eu/forms/m13dthfz1e5j2ge/

2.3       Part 3 – Add Product
          Products can be added to Activate by entering information manually.
          Use the Add Product tool to manually add products (one at a time) including all product attributes,
          descriptions and data, to manage product barcodes, and more.
          See, section 4, Add and edit products in the catalogue.

2.4       Part 4 – View Products
          Note: View Products is the same as “My Products” as explained in section 2.1. In summary, use this
          option to:
          ■   View and search the product catalogue
          ■   Edit and manage product data, including
              □   Required Attributes and additional data such as: Package Level; Brand; Sub-brand;
                  Product Type; Description; GTIN, Barcode and more
              □   Measurements: weight, dimensions and contents
              □   Images: products pictures for identification
              □   Barcodes: generate and manage barcode images
              □   Summaries: print product attributes, data, product images and barcodes

2.5       Part 5 – Global Company Prefixes and GTIN Ranges
          This section of the account dashboard provides a list of the GCPs (prefixes) assigned to the account.
          For each Prefix Description, summary information is provided:
          ■   Range: This is the GTIN range of numbers that is being allocated from your Active GCP
          ■   Next Number: This is the next GTIN number that will be allocated once you Activate a new
              product
          ■   Products: The number of products that are in the catalogue for this GCP

Release 1.0, 01 June 2018                      © 2018 GS1 AISBL                                      Page 7 of 28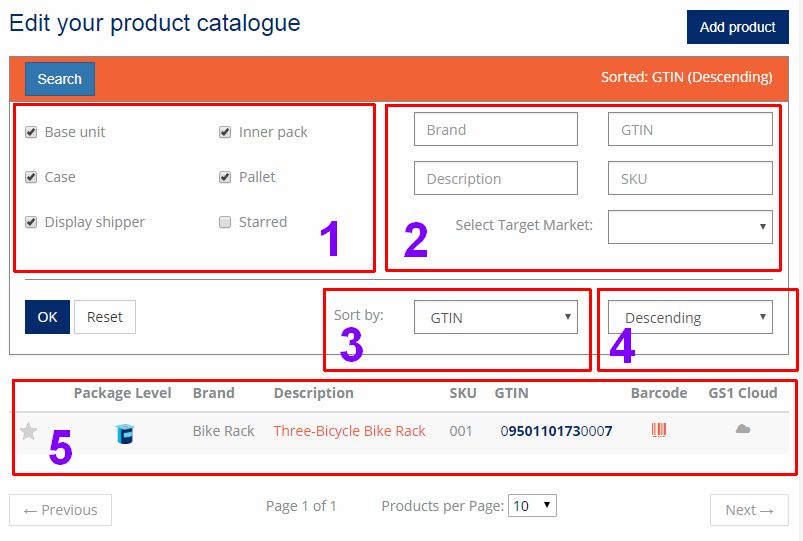
GS1 Activate User Guide for Brand Owners

Release 1.0, 01 June 2018   © 2018 GS1 AISBL                               Page 8 of 28
GS1 Activate User Guide for Brand Owners

3         The product catalogue dashboard
          Click My Products in the navigation menu to see the product catalogue dashboard.
          From this screen, you can:
          ■   Search for a product (see section 3.1)
          ■   Add a new product (see section 4.3)
          ■   Start to edit an existing product (see section 4.5)

3.1       How to choose an active (default) prefix
          To add, view, manage or edit products, it is required to select a prefix to make it “active.” (An active
          prefix is also called the default prefix.)
          An active prefix is required to:
          ■   Add a product (every product must be added to a selected prefix “catalogue”)
          ■   Search for a product (you can search for a product in only one prefix “catalogue” at a time)
          To select or to make a specific prefix the active prefix:
          1. Open the account dashboard. Click Dashboard.

          2. In the list called Global Company Prefixes and GTIN Ranges, select the “star” for the “prefix
              description” (number) to make it the active prefix.

Release 1.0, 01 June 2018                       © 2018 GS1 AISBL                                      Page 9 of 28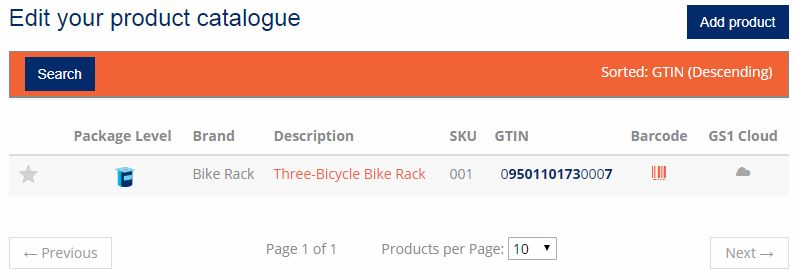
GS1 Activate User Guide for Brand Owners

          3. A Prefix activation confirmation request opens. Click Confirm choice of prefix. Note that is
              says: “You have chosen a default prefix. Next time you click on "Add a new product" this prefix
              will be used for GTIN allocation.” In addition, this prefix is used by default with the search tool.

3.2       Search and view products in a catalogue
          This section describes how to search and/or view products in a catalogue. There are several reasons
          to view products:
          ■   To review all products in a list format
          ■   To search for a particular product or range of products
          ■   To check if products are already in the catalogue
          ■   To search for products to edit
          There are two ways to start the view and search features:
          1. From the account dashboard, click View Products.

          2. From any page, in the navigation menu, click My Products.

          From either of the options above, the Edit your product catalogue page opens.

Release 1.0, 01 June 2018                       © 2018 GS1 AISBL                                      Page 10 of 28
GS1 Activate User Guide for Brand Owners
On the product catalogue page, there are three primary options:
■ Click Add product to add a product or sub-product
■ Click a product description, a barcode symbol, or the cloud symbol to edit product
information
■ Click Search to open the search tool
3.3 The search tool
The search tool provides the ability to search for products using several standard search features,
including:
■ Search by - Product Level, Brand, Description, GTIN, or SKU
■ Sort search results by – GTIN, SKU, Description, Created (date), Updated (date)
■ Sort search results by – Ascending or Descending
3.3.1 The OK and the Reset button
In the search function, there are two buttons: OK and Reset.
■ Use OK to conduct a search after you select the search parameters
■ Use Reset to clear all previous search parameters and results. Use Reset as follows:
□ After you click OK to conduct a search, and there are no results
□ After you click OK to conduct a search, and the results are not as desired. Try a new search
with different search parameters
3.3.2 Using the “Starred” option with the search tool
Activate provides a way to bookmark or “favourite” some products, to make them easy to find. To
“Star” an item, open the product catalogue and click a grey star to highlight a product.
Release 1.0, 01 June 2018 © 2018 GS1 AISBL Page 11 of 28GS1 Activate User Guide for Brand Owners
The starred feature in the search tool works only if some products have been previously “starred.”
For more information, see section 4.5.
■ The starred option provides a way to filter the results that are achieved as a result of selected
product level(s) and/or product identification
■ When you select (the check box for) starred in the product level options, the final search result
includes only those products that match the product level(s) selected, AND that are also starred
■ You can NOT select starred only. (If you select starred only, there are no search results, even if
there are products that are starred in the catalogue)
■ You must select at least one product level, and starred, together
■ If there are no products that are starred within the product level that you selected, the search
results are empty
■ It is not possible to exclude starred items from the search result; it is possible only to include
starred items in the search result
3.3.3 Search parameters and steps
This section provides explanations and instructions for using the search tool.
Note: The following numbers correspond to the numbers used in the illustration. “Steps” or
instructions are included in bulleted items.
1. Product level
Product level field(s) are required. Select the product level(s) to include in the search:
Base unit - the item is the lowest level in the Hierarchy
Case - an outer packaging or transport case
Display shipper - an outer packaging or higher packaging containing a multiple of the lowest
level / several lower levels ready for the shop to be displayed
Release 1.0, 01 June 2018 © 2018 GS1 AISBL Page 12 of 28GS1 Activate User Guide for Brand Owners
Inner pack - an inner packaging or a multiple of the lowest level
Pallet - a GTIN coded pallet or a homogeneous pallet
□ You can select any number of product levels
□ You MUST select at least one product level (or the search result will be null)
□ All items matching the selected product level(s) are included in the search results (however,
the final display may be filtered further by using the STARRED option, or by Product
Identification)
□ After you provide product level search parameters, optionally select other search
parameters (as described below) or click OK to search
2. Product identification
Product identification fields are optional. Product identification fields are: Brand, GTIN,
Description and SKU.
□ Product identification options work in addition to (must be used with) product level search
options
□ To use this feature, first select product level options
□ Next, include identification information in any of the fields: Brand, GTIN, Description or SKU
□ You CAN use a partial (character or number) search, for example: “But” for Butter in the
description field, or “376” or “0045” in the description, GTIN or SKU field
□ You can NOT search a range or multiple “and/or” parameters, such as “Butter OR Jam” or
“123 to 789”
□ After you provide product identification search parameters, optionally select other search
parameters (as described below) or click OK to search
3. Sort order
‘Sort by’ provides a list of sort options to apply to search results.
□ The default sort order is GTIN (number) in Ascending order
□ You can select only one option to sort search results
□ The five sort order options are: GTIN, SKU, Description, Created and Updated
□ GTIN, SKU and Description are columns displayed in the search results
□ Created and Updated (dates) are not displayed in the search results, however these search
parameters are used in the search
4. Sort direction
□ ‘Sort by’ allows the search results to be ordered in either ascending or descending order
□ Sort direction works on all searches; the default direction is ascending
5. Search results list
After selecting all desired search parameters, click OK to search.
The results list includes the products that meet the search parameters.
□ Click the description of any product to edit the product information (see section 4, Add
and edit products in the catalogue).
The results list includes three symbols:
□ Package Level – A symbol is displayed that indicates the package level (see section 4.3)
Release 1.0, 01 June 2018 © 2018 GS1 AISBL Page 13 of 28GS1 Activate User Guide for Brand Owners
□ Barcode – Click the barcode icon to edit or manage the barcode
□ GS1 Cloud – The GS1 Cloud icon shows that a specific item listing is “Activate” and the core
product attributes have been made available for other GS1 Cloud services.
Release 1.0, 01 June 2018 © 2018 GS1 AISBL Page 14 of 28GS1 Activate User Guide for Brand Owners
4 Add and edit products in the product catalogue
4.1 Activating barcodes and managing product details
To activate barcodes, you need to assign item reference information to the Global Company Prefix
(GPC) number you received from GS1. This will give you a Global Trade Item Number (GTIN) which
is a unique number that uniquely identifies your product for retailers anywhere in the world.
This number is then registered to GS1 once it is made “active” in the system. To do this there is
some minimum product information that must be collected (the mandatory fields). This information
will be available to retailers via GS1 Cloud services and will help your products to be found. This also
allows retailers to know that your products are active in the market (available for sale).
The GTIN is the number that is represented by the white and black lines of a barcode and in some
cases you will need to get your barcode/GTIN number and create a barcode symbol before the
product has been made available in the market. In these situations you can save your product as a
draft, but please be sure to come back and activate the product when it is available in the market so
that retailers can find it.
4.2 The “Update” and “Activate barcode/GTIN” buttons
When adding new products, or editing existing products, the process is completed with either the
Update or Activate barcode /GTIN button.
GS1 Activate is integrated with the GS1 Cloud. The GS1 Cloud combines brand-sourced product data
from existing GS1 databases (such as GDSN, GEPIR and local product catalogues maintained by
individual GS1 Member Organisations) and it also collects product data directly for products not
currently maintained in an existing source. This centralised database is intended to house more than
100 million Global Trade Item Numbers (GTINs), along with six additional core product attributes
that will deliver trusted product information that consumers demand. The 7 core product attributes
include:
■ GTIN
■ Brand
■ Label description
■ Medium resolution image URL
■ Target market
■ Company name
■ Product classification
The 7 core product attributes once Activated (with both the interface or bulk update function) are
automatically shared for other GS1 Cloud services.
“Update” means that a product has been previously activated but some optional fields were left
blank. Update is the brand owner’s opportunity to complete the product listing information.
“Activate barcode” means that when a new GTIN (product) is entered in Activate (and available
for sale in the market) the core attributes are made available to other GS1 Cloud Services such as
Check.
To finalise an activation, agree to the product activation confirmation: click OK.
Release 1.0, 01 June 2018 © 2018 GS1 AISBL Page 15 of 28GS1 Activate User Guide for Brand Owners
4.3 Add new product
To add a new product use the “wizard” - a series of screens that request the required information to
add a new product.
1. From the Dashboard, click Add Product.
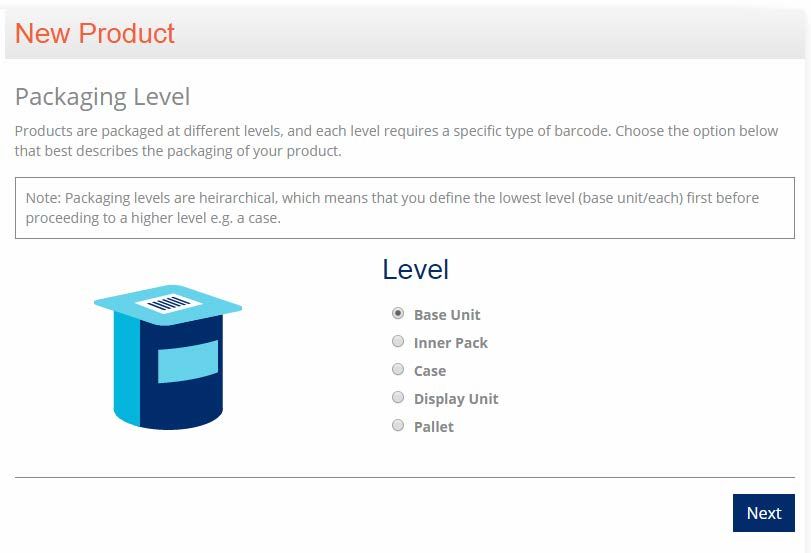
4.3.1 Select the Packaging Level
2. Read the explanation about packaging levels. All products are part of a hierarchy. Select the
appropriate packaging level for the product. Start with the lowest hierarchical level that is
appropriate.
3. Select a level. A symbolic image of the level is displayed for each option.
Release 1.0, 01 June 2018 © 2018 GS1 AISBL Page 16 of 28GS1 Activate User Guide for Brand Owners
4. Click Next.
4.3.2 Select Package Type
5. The Package Type selection is a drop-down list of items. Each item is illustrated and described,
for example:
6. Select the package type, and click Next.
4.3.3 Product Identification and additional sections
This step includes eight sections; in each part there are several fields that request specific
information. The parts are:
■ Product Identification
■ Unit Qualifiers
■ Location Information
■ Weights
■ Dimensions
■ Net Content
■ Product Image
■ Sub-product
Required information
Some of the fields (approximately 10 – in Product Identification, Unit Qualifiers, and Location
Information) are required: information must be provided. Other fields are optional (in Weights,
Dimensions, Net Content, Product Image and Sub-product.)
Required fields are identified: Fields marked with (*) are required.
Release 1.0, 01 June 2018 © 2018 GS1 AISBL Page 17 of 28GS1 Activate User Guide for Brand Owners
On-screen help
For help to fill in Product Identification and additional sections, use the on-screen information. Select
the symbol to read a description of the information requested in each field. For example:
7. Enter all of the required and any of the optional information in Product Identification and
additional sections.
Important: Read and understand section 4.4, Saving a draft or activating a product, before you
continue.
Release 1.0, 01 June 2018 © 2018 GS1 AISBL Page 18 of 28GS1 Activate User Guide for Brand Owners
4.4 Choosing to Save a Draft or to Activate a product
After all of the required (and any of the optional) information for a new product is entered in the
system, chose one of the following two options.
Save as a Draft
1. Save as a draft: save the product information in the product catalogue to edit and activate at
another time (and do not activate the product now.)
Click Update
The “Update” button changes to “Saved as a draft.”
When you choose this option, at a later time you:
□ Can edit “required” product information
□ Can edit “optional” product information
□ Save the product information again as a draft or,
□ Activate the barcode / GTIN
Activate Barcode/GTIN
When a product is added to Activate, the final step of adding the product is to click “Activate
barcode / GTIN.” This action registers the product data (with required attributes and additional
information) with the GS1 Cloud. When a product is registered in the Cloud, it cannot be deleted,
and the required attributes can not be edited. These are stored as a “permanent record” and the
product is “Activated” – which means the product information is available in the marketplace.
2. Activate barcode/GTIN: save the product information in the product catalogue AND upload
the information to the GS1 Cloud. Click Activate barcode / GTIN
The “Update” and “Activate barcode / GTIN” buttons change to “Saved” and “Activated.”
Note that the Activated button is grey, because this button cannot be used. After a product is
activated, it cannot be deactivated (or activated again.)
When you choose this option, at a later time you:
□ Can edit “optional” product information
□ Can not edit “required” product information
□ Can not save the product information again as a draft
Release 1.0, 01 June 2018 © 2018 GS1 AISBL Page 19 of 28GS1 Activate User Guide for Brand Owners
□ Can not de-Activate the barcode / GTIN
4.5 Edit products
Products that are already in the product catalogue can be edited. The reason to edit a product, and
the information that can be edited varies, depending on:
■ The status of the product (either Draft or Activated)
■ The specific information (field)
The Status of the Product - Activated
If a product is Activated, the “Activated” button is grey and can not be used. For activated products,
limited information can be edited or added.
Follow instructions in section 4.3.3, Product Identification and additional sections.
The Status of the Product – Draft (or, Non-Activated)
If a product has been saved as a draft, the “Activated” button is blue and can be used. For non-
Activated products, most of the information can be edited or added.
Follow instructions in section 4.3.3, Product Identification and additional sections.
4.5.1 Choose to Update the draft product or to Activate the product
Important: See, section 4.4, Choosing to Save a Draft or to Activate a product
After you edit a draft (non-Activated) product, you have two options:
■ Click Update to ensure that the new information is stored in Activate. The product is stored
again in draft status.
■ Click Activate barcode/GTIN to activate the product.
After you edit an Activated product, you have one option:
■ Click Update to ensure that the new information is stored in Activate. The product is stored
again in Activated status.
4.6 Add new products (subproducts) in a hierarchy
Products are typically sold in various configurations of packaging, ranging from a single unit, to a
box or a retail display unit, to a pallet of boxes. All products “of a single type” are classified
according to a hierarchy in Activate, such as: one container of yogurt, one pack of 4 containers, one
box of four packs (12 containers), one carton of four boxes (48 containers / 12 packs), et cetera.
Each configuration has a separate GTIN and barcode.
When any product is sold in multiple configurations (any number of configurations more than two)
Activate does not require these products to be “consecutive” in a hierarchy. For example, it is
possible to create one product of 4 yogurt containers (one pack), and one product of one carton of
four boxes (12 packs), and no other configuration.
The relationship between two or more products (of a type) is always hierarchical. Moving up the
hierarchy, each product is a “subproduct” to the next product.
Release 1.0, 01 June 2018 © 2018 GS1 AISBL Page 20 of 28GS1 Activate User Guide for Brand Owners
The process to add product(s) to the catalogue that are subproducts/hierarchical is almost exactly
the same as adding an initial, or – standalone, product.
The difference in the process is that to create a relationship between products, when you add a new
product that is based on (a hierarchy of) an exiting product, you must select the existing product as
the “base” product of the new product. For example, when you create a new product of one carton
of four boxes (12 packs) of yogurt, you must select the product “one pack of 4 containers” as the
base / subproduct.
4.7 Print product summary
The Print product summary feature creates a PDF file of one product at a time. The PDF file includes
the following information:
■ To print the product summary, open the edit product summary tab and click Print product
summary.
Release 1.0, 01 June 2018 © 2018 GS1 AISBL Page 21 of 28GS1 Activate User Guide for Brand Owners
5 Generate and download barcode images
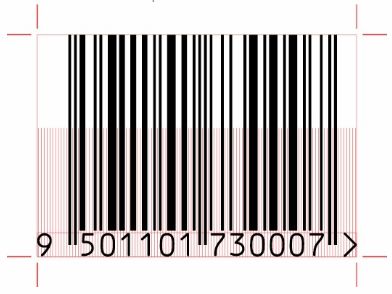
The barcode is a set of white and black lines with varying spaces that represents the GTIN to a
barcode scanner. To ensure that a scanner can read the image, you must generate quality (clear)
images to be included in the product (package) design.
5.1 Gather Printing Requirements
Before you generate barcode images (files), you should know the following information. Discuss
these questions with your graphic designer and/or your printing service.
■ What type of file is needed? (JPG, Postscript/EPS, PNG, GIF)
■ What is the printing system? (Windows, MAC or other LINUX?)
■ What is the printer resolution? (300, 600, 1200, 2400 DPI)
■ What magnification is needed?
■ Does the printer need an image generated with “bar width reduction” (BWR)?
■ Should the barcode image include a “right quiet zone indicator”?
■ Should the barcode image include “printing marks” (cut marks)?
Read the instructions in this section for more information about the requirements. When you know
the requirements, follow the instructions to create and download the image files.
5.2 Create barcode images
1. Open the product catalogue, and ensure that the product you need is displayed. (Use the search
tool if needed, see section 3.2 The search tool.)
2. Click the Barcode Symbol.
3. The Edit Product screen opens.
Note the information provided on-screen:
□ The family of EAN/UPC barcodes are used to represent GTINs on trade items so they can be
scanned at Point-of-Sale and distribution centres. They should only be printed on outer-
cases if they are printed at 200% their size and the case will be scanned at the point of sale.
A case of wine is an example of such a product
□ Create and download a high resolution image of this barcode. Available formats are JPG,
PNG and GIF raster images up to 2400dpi resolution, and postscript images which scale to
your desired size.
Release 1.0, 01 June 2018 © 2018 GS1 AISBL Page 22 of 28GS1 Activate User Guide for Brand Owners
4. Click Create EAN13 barcode. The Barcode EAN13 tool opens.
5. For more information about the image types (raster, Postscript {EPS}, and PDF), click Tell me
more about image types.
6. Click Image Options. The image options selector opens.
Release 1.0, 01 June 2018 © 2018 GS1 AISBL Page 23 of 28GS1 Activate User Guide for Brand Owners
7. Select the image options you need, as described in the following table:
Image Option Description
Magnification The magnification is the size of your symbol and ranges from 80% to
200%. Please bear in mind that the optimal recommended size is a
magnification of 1.0 (equals 100%) for most scanning environments and
that no symbol should be generated below the minimum size of 80%.
The magnification corresponds to the so-called X-Dimension (X-Dim),
which defines the width of the narrowest bar or space in your symbol.
The X-Dim ranges from 0.264mm (80%) to 0.660 (200%) for EAN-13
symbols for “Trade items scanned in general retail POS and not general
distribution” (GS1 General Specifications, Symbol Specification Table 1,
chapter 5). The X-Dim minimum, target and maximum size can be
different depending on the scanning environment and should be
selected in accordance to chapter 5 of the GS1 General Specifications.
BWR The “Bar Width Reduction” (BWR) is required where your printer
environment causes so-called bar gain.
Usually there shouldn’t be any need for amending this value. However,
if you have printers that print on a fixed dpi of 600 or 300 and a
verification indicates issues with the bar gain, changing the BWR may
help in improving the scan rate of your barcode symbol.
Please refer to chapter 5.9.4.2 Barcode master image production of the
GS1 General Specifications for further details.
Right quiet zone indicator By default this option is activated.
This is the closing angled bracket “>” at the end of the GTIN printed
beneath your bar code symbol.
The tip of this bracket indicates where the required free space after the
last bar ends. There should be no printing or design feature in the free
space between the last bar and the perpendicular of this tip.
The free space is called “Quiet Zone” (QZ).
The left QZ is indicated by the beginning of the first digit of your GTIN.
Printing marks Printing marks are short red lines that indicate the outside borders of
the barcode symbol. They may be requested by packaging designers or
print houses for proper alignment in the overall packaging layout.
Calibration (debug) This option is for technical use only. A calibration barcode is printed with
red lines and can not be used on products.
Release 1.0, 01 June 2018 © 2018 GS1 AISBL Page 24 of 28GS1 Activate User Guide for Brand Owners
8. Click Update in the image options selector. An updated image (using your selected image
options) is displayed for you to review.
In the following example, all three options are selected.
Notice the calibration red lines, the printer cut marks, and the right quiet zone indicator in the
first example. In the second example, these options are not used.
5.3 Download barcode image files for printing
1. In the Barcode EAN13 tool, select the type of image to download.
You can select any option at any time, one time or many times. Click the name of the image
type to open the options selector for each image type.
2. If you need a raster image, click Download raster image to open the options selector. Select
the options that you need.
File type - select the raster image file type to download:
□ PNG - The Portable Network Graphics file format supports lossless data compression and
was created as an improved version for the GIF file format, it is mainly used for the internet
□ GIF - The Graphics Interchange Format is a bitmap format that is widely supported. It is
well suited for barcode images. This file format is also lossless compressed.
□ JPG - Also known as JPEG (Joint Photographic Experts Group) is most commonly used for
lossy compression of digital images.
Release 1.0, 01 June 2018 © 2018 GS1 AISBL Page 25 of 28GS1 Activate User Guide for Brand Owners
Printer Resolution - select the dpi (dots per inch) for the printer resolution (where the image
will be printed.) It is usually safe to select a dpi that is higher than the printer resolution.
However, a dpi that is higher than the printer resolution does not result in better optical clarity.
□ 300 dpi
□ 600 dpi
□ 1200 dpi
□ 2400 dpi
Click Download raster image to download the file.
3. If you need a raster image, click Download Postscript (eps) image to open the options
selector. Select the options that you need.
PostScript is a page description language used in electronic and desktop publishing business.
The Encapsulated PostScript (EPS) file format is intended to be used as the related graphics file
format. Graphic designer and print shops may refer to this file as a Vector Graphic or Vector
Image file. This file does not have any compression and for that reason is usually a much larger
file size (not image size).
File type - select the EPS file type to download.
□ Windows
□ Mac (use this also for BeOS, Linux, Unix or their derivatives)
Click Download Postscript (eps) image to download the file.
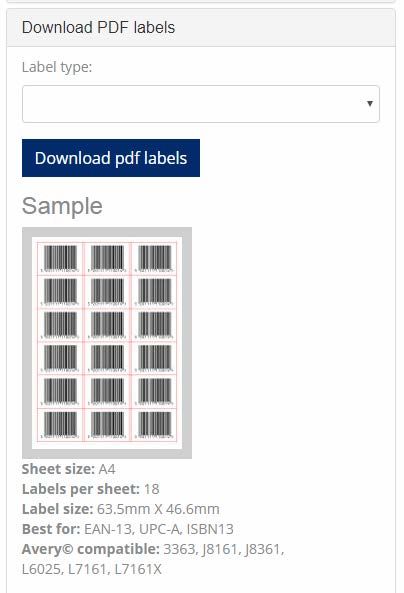
4. If you need a sheet of barcodes to print labels, select Download PDF labels to open the
options selector. Select the options that you need.
You can create a PDF file with either 16, 18 or 24 labels per page.
The downloaded file will only contain one selected GTIN on each label (on the whole sheet.) It is
not possible to create a sheet with different (multiple) GTINs.
Release 1.0, 01 June 2018 © 2018 GS1 AISBL Page 26 of 28GS1 Activate User Guide for Brand Owners
Label type – In the drop-down list, select the label type that you plan to use. (See the brand,
size and type on the package of labels.)
Under the sample (image), information about the label type is provided.
Click Download PDF labels to download a PDF file to print.
Release 1.0, 01 June 2018 © 2018 GS1 AISBL Page 27 of 28GS1 Activate User Guide for Brand Owners
6 Glossary of terms and acronyms
The following are the abbreviations and terms used in this guide, or are relevant to GS1 Activate.
Note: Refer to the GS1 glossary at www.gs1.org/glossary for the latest version.
Term Definition
Application A set of routines, protocols, and tools for building software applications. An API
Programming expresses a software component in terms of its operations, inputs, outputs, and
Interfaces (APIs) underlying types. An API defines functionalities that are independent of their
respective implementations, which allows definitions and implementations to vary
without compromising the interface.
Brand owner The organisation that owns the specifications of a trade item, regardless of where
and by whom it is manufactured. The brand owner is normally responsible for the
management of the Global Trade Item Number (GTIN).
Check digit A final digit calculated from the other digits of some GS1 identification keys. This
digit is used to check that the data has been correctly composed. (See GS1 check
digit calculation on http://www.gs1.org/check-digit-calculator)
Global Data A repository of the data elements defined across all GS1 standards
Dictionary (GDD)
Global Electronic A web-browser interface and a machine to machine set of protocols for GS1
Party Member Organisation (MO) membership databases to communicate company
Information information for selected GS1 keys including information about the allocation of the
Registry GS1 Company Prefixes used to create GS1 keys and/or individually assigned GS1
(GEPIR®) keys. Created in 1997 as a tool for MO staff, GEPIR's initial scope was to provide a
search engine for member addresses and phone numbers using MO GS1 Company
Prefix (GCP) databases as the source of information. In more recent versions,
GEPIR also provides a very limited set of information on parties (GLNs) and trade
items (GTINs).
Global Location The GS1 identification key used to identify physical locations or parties. The key
Number (GLN) comprises a GS1 Company Prefix, location reference, and check digit.
Global Trade The GS1 identification key used to identify trade items. The key comprises a GS1
Item Number® Company Prefix, an item reference and check digit.
(GTIN®)
GS1 Company Also called the GCP – Global Company Prefix.
Prefix (GCP) A unique string of four to twelve digits used to issue GS1 identification keys. The
first digits are a valid GS1 Prefix and the length must be at least one longer than
the length of the GS1 Prefix. The GS1 Company Prefix is issued by a GS1 Member
Organisation. As the GS1 Company Prefix varies in length, the issuance of a GS1
Company Prefix excludes all longer strings that start with the same digits from
being issued as GS1 Company Prefixes. See also U.P.C Company Prefix.
GS1 Member A member of GS1 AISBL. A GS1 MO is responsible for administering the GS1
Organisation system in its country. This task includes, but is not restricted to, ensuring user
(GS1 MO) companies make correct use of the GS1 system, have access to education,
training, promotion and implementation support and have access to play an active
role in GSMP.
GS1 Prefix A unique string of two or more digits issued by GS1 Global Office and allocated to
GS1 Member Organisations to issue GS1 Company Prefixes or allocated to other
specific areas.
GS1 system The specifications, standards, and guidelines administered by GS1.
U.P.C. Company A GS1 Company Prefix starting with a zero (‘0’) becomes a U.P.C. Company Prefix
Prefix by removing the leading zero. A U.P.C. Company Prefix is used to issue GTIN-12.
Release 1.0, 01 June 2018 © 2018 GS1 AISBL Page 28 of 28You can also read