Albury Telephone Systems Body Temperature Measurement System Quick Installation & User Guide - ACSA
←
→
Page content transcription
If your browser does not render page correctly, please read the page content below
Albury Telephone Systems
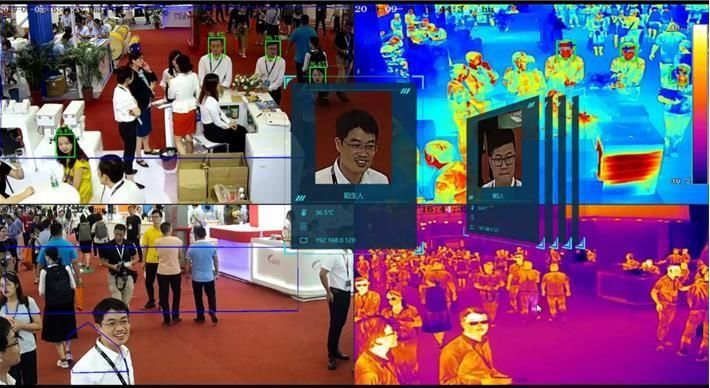
Body Temperature
Measurement System
Quick Installation & User
Guide
27-03-2020 - Albury Telephone Systems - www.ats.net.au - p 02 6041 2255
Installation

                Ceiling Mount                                                            Installing on the
                                                                                           Security Gate

               27-03-2020 - Albury Telephone Systems - www.ats.net.au - p 02 6041 2255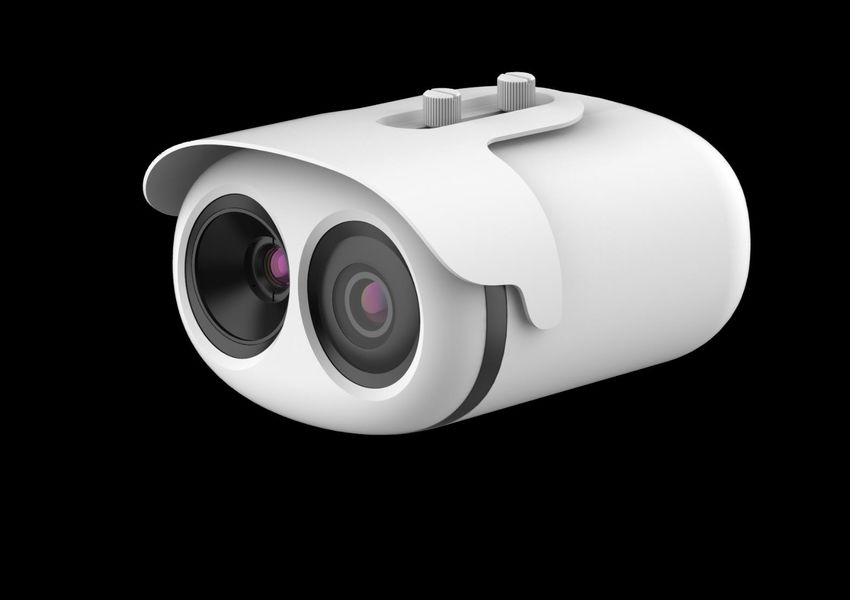
Installation

                        Wall Mount                                                       Pedestal Mount

               27-03-2020 - Albury Telephone Systems - www.ats.net.au - p 02 6041 2255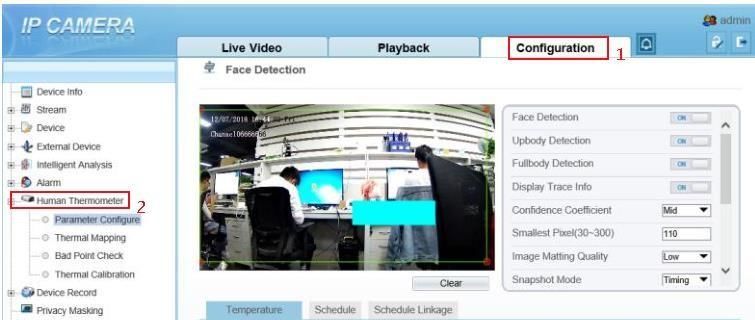
Installation

                                                                         Due to the significant
                                                                         influence the outdoor
                                                                         environment, please
                                                                         deploy a tent as an
                                                                         enclosed condition to
                                                                         ensure accuracy.

        Outdoor Installation

                    27-03-2020 - Albury Telephone Systems - www.ats.net.au - p 02 6041 2255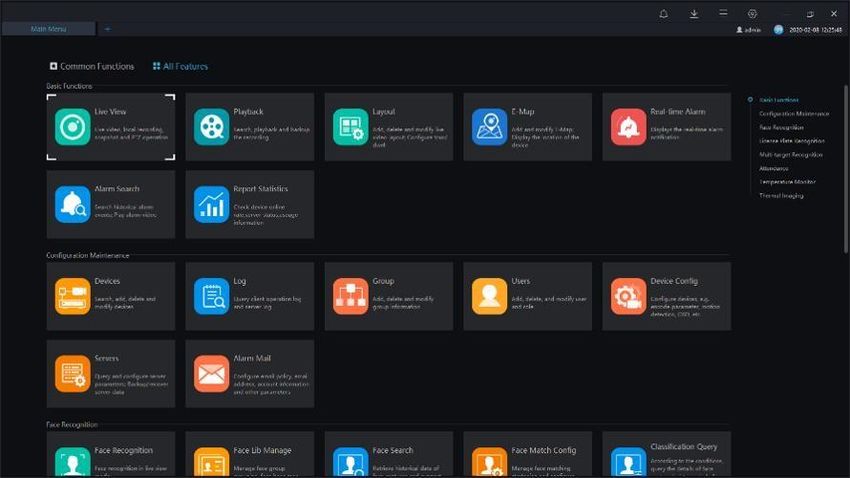
Attentions
1. The camera can be accessed via the IE browser. Please set the parameters according to the actual scene.
2. The default IP address is 192.168.0.121, and default account and password are both admin.
3. The camera is POE supported.
4. The recommended installation environment is an airless aisle, please ensure the monitoring field is far away from any objects that
   could produce airflow, high temperature, reflection, please do not install opposite to a door, air conditioner or any place in
   sunshine. To ensure the accuracy and ensure the measure result closer to the real temperature, please install the camera indoor
   or in stable environment. The measurement might diverge from the actual temperature if the camera is installed in an open-air
   environment.
5. Please put up a tent or build a closed environment to ensure the accuracy if outdoor installation is inescapable.
6. Due to the principle of infrared thermal imaging, it is necessary to perform body temperature measurement within a preset
   temperature measurement range, otherwise there will be deviations. The best horizontal distance from a face to the camera is 4m,
   recommended distance should be 3-5m.
7. Blackbody should be installed opposite to the camera (where the camera can see it). The best horizontal distance is 4m,
   recommended 3-5m.
8. For camera, the vertical installation height is 2-2.3m, to ensure the depression angle to a face is less than 25°.
9. Install the camera straightly to human face to have the best effect (ensure the side face angle is less than 35°on both side).
10.Please keep any objects that could cause reflect and high temperature away from the camera monitoring field.
Plugin Installation

1. Enter the web page and download the newest plugin first. If the newest plugin is not installed correctly,
   you are not able to configure the parameter even if you can see the video.
2. Before installing the plugin, it is recommended to temporarily exit the anti-virus software and close the
   browser.
3. If you have already installed the old version plugin, please cover the previous plugin and install again.
Parameter Configuration

1. Parameter configuration interface: Configuration (Mark 1)->Human Thermometer(Mark 2).
2. Three main configuration parameters,“parameter configure, thermal mapping, and thermal calibration”.
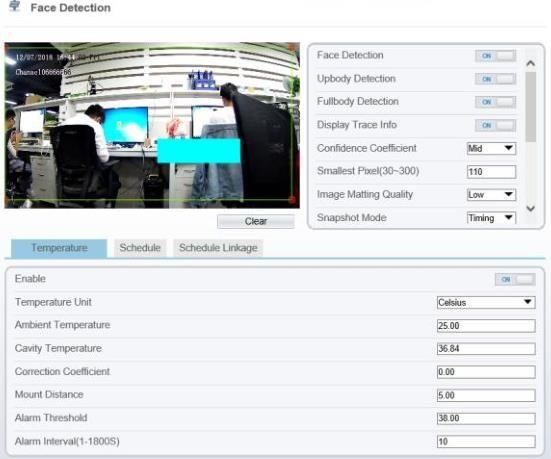
Face Parameter Configuration
                         1. Clicking “parameter configure” to enter the
                            interface.
                         2. The face detection parameter configuration area
                            in on the left side, and the temperature detection
                            parameter configuration in below area.
                         3. Firstly, open the face detection and display
                            detection area in the face detection function area.
                         4. Confidence Coefficient: the default value is
                            recommended.
                         5. While being used, we can set up to 8 detection
                            areas according to actual situation. The area ID
                            is the number of detection area. Generally, we
                            only need to set one detection area. Specially,
                            when we need multiple areas, the setting
                            method is to draw a frame by several dots in the
                            video.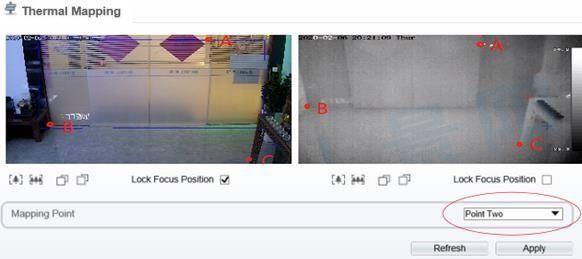
Face Parameter Configuration
                         6. Smallest pixel: the default value is
                            recommended.
                         7. Image Matting Quality: It refers to the quality of
                            the face image that needs to be uploaded, and
                            different values can be selected according to the
                            real situation.
                         8. Snapshot mode:
                             a. Timing: Means to upload a certain number of
                                images in a certain time .
                             b. Optimal : Means uploading one or more images
                                with good picture quality within 5 seconds.
                         9. Leave other options at their default values.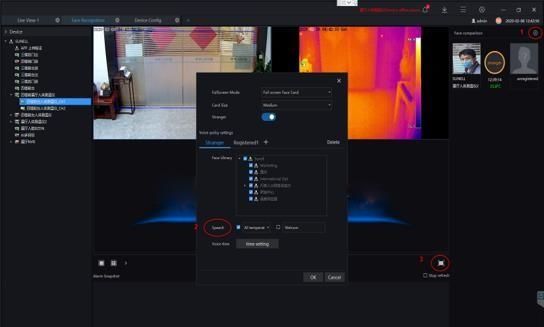
Detection Parameters
                       1. Enable: on.
                       2. Temperature Unit: Celsius is default.
                       3. Ambient temperature: only need to be set in
                          extreme scenario.
                       4. Cavity temperature : Keep defaults .
                       5. Correction coefficient : Keep defaults.
                       6. Mount Distance: the horizontal distance between
                          the device and the target area, which is set
                          according to the actual situation.
                       7. Clicking “Apply "to save settings.
Thermal Mapping 1. The purpose is to overlap the visible image and thermal image, which directly determines the accuracy of temperature detection. 2. During mapping, three obvious points A, B and C can be found in thermal imaging, and the three points can be selected in turn by selecting the drop-down list "point 1, point 2 and point 3" and then the three points can be found in the visible image, they also can be selected in turn by selecting "point 1, point 2 and point 3". Finally, click "apply" in the lower right corner to save. 3. These three points is recommended to be selected by the largest triangle in the video, and the X and Y coordinates of any point cannot coincide. It is recommended to stand three people in the row on the left, middle and right until the face frame in the thermal image can accurately locate the face.
Thermal Calibration
                      Note: When using the blackbody, it necessary to
                      configure here.
                      1. Firstly, enable this function.
                      2. Display Area Info: It means displaying the
                         temperature of blackbody.
                      3. Target Temperature: temperature set on the
                         blackbody (VS temperature).
                      4. Emission Rate: the thermal radiation emissivity of the
                         blackbody. The default value is 0.98.
                      5. Distance: the distance from the blackbody to the
                         device.
                      6. Draw a square to cover the radiation mission surface
                         of blackbody in the thermal image.
                      7. Click “Apply "to save settings.
System Installation
1. Right-click on the installation file and select ‘Install as administrator’.
Then the installation window shown in Diagram 1 will pop up.
2. SunView has one-click installation and custom installation. After
checking and agreeing to the terms of service, you can choose
according to your needs.
3. It is recommended to choose a custom installation. It is not
recommended to install it on the C drive.
4. In the case of single point deployment or only one server, three
modules: the central management server, media distribution server,
and intelligent analysis server can be installed and run on the same
server. And the client can be installed on the same server.
5. When deploying on multiple servers in a large project, the media
distribution server and intelligent analysis server can be installed on
multiple servers. The central management server is installed on the
Diagram 1 Diagram 2 central management server. Through the central management
server module, media distribution server and intelligent analysis
server will be managed.
6. Click to start the installation. Then configure the system.Client Login 1. Both default account and password are admin. 2. Default IP address: 127.0.0.1,or enter the IP address of central management server. If the central management server is deployed in another server, please input the server IP address. 3. You can choose to remember the password or log in automatically according to the user's preference. Then press the login to enter the platform interface.
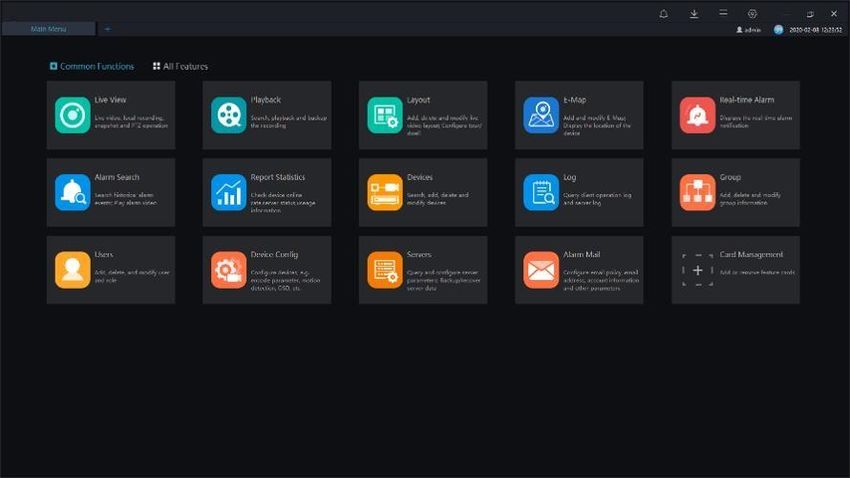
Client Login

1. CMS is a comprehensive platform. Human body temperature measurement is one of the functions. You
   can use card management to set temperature-related functions to the ‘common functions’ page.
2. Click ‘Card Management’ to manage all the functions.
3. Click the ‘face recognition’ to enter the temperature measurement interface.
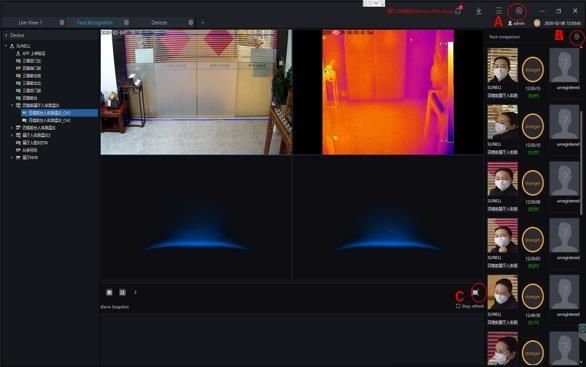
Interface Brief
                       1. The left side of the Diagram 1 is the device list, the
                          upper middle area is the live video window, the
                          lower middle is the capture area, and the right side
                          is the face comparison and temperature display
                          area.
                       2. The button “A” in the Diagram 1 is use for turn on
                          the pop-up window of the over-temperature alarms,
                          and the button “B” in the Diagram 1 is use for turn
                          on the voice broadcast setting function menu.
                       3. The button “C” in the Diagram 1 is use for switched
                          to the full screen mode. In the full screen mode,
                          the face temperature measurement method is
           Diagram 1      displayed by a rolling card swipe method, and the
                          measured personnel information and temperature
                          information are broadcasted by voice.
Add Device
1. On the function page, click the device
management card to enter the device add
interface, as shown in Diagram 1.
2. At the 2 position in the Diagram 1, click the
automatic search to pop up the device search
interface.
3. In position 3 in the Diagram 1, select the Body-
Temp Detector.
4. At the 4 position in the Diagram 1, click to start
searching for the Body-Temp Detector. After the
device is found, select it.
5. Then at the 5 position in the Diagram 1, click Add
Diagram 1
to complete the equipment addition.Temperature Configuration 1. On the function page, click the temperature configuration card to enter the temperature configuration interface, as shown above. 2. In the temperature configuration, there are 4 items of data that need to be filled in according to actual needs. The low temperature threshold value is the lowest temperature measurement threshold. Body temperatures below this temperature value are considered invalid body temperature and will not be recorded or displayed. The default value is 35℃. 3. The high temperature threshold is the upper limit of the temperature measurement. A body temperature higher than this temperature value is regarded as an invalid body temperature and will not be recorded or displayed. The default is 45℃. 4. Alarm interval, which is the interval between two consecutive alarm times, the default is 60 seconds. 5. Normal temperature is the normal body temperature interval. The temperature in this interval will not be alarmed. If the temperature exceeds this interval, an alarm will be issued. The default normal body temperature is 36.5℃ to 37.8℃. 6. After configured each value, click Apply to save.
Over Temperature Alarm Pop-up Configuration
                         1. Click the button 1 in the diagram 1, enter the
                            system configuration interface, then set the alarm
                            pop-up window and alarm sound.
                         2. At position 2 in the diagram 1, tick the auto
                            popover function, then It can realize the function
                            of auto popover prompt when alarm.
                         3. At position 3 in the figure, this function is only
                            useful when the camera has a sound playback
                            function. There are three options. If you choose
                            ignore, there will be no voice prompt for alarm.
                            When you choose voice broadcast,
                            corresponding voice prompt will be played,
         Diagram 1          Broadcast content can be customized When
                            selecting the buzzer, the alarm sound is beeping.
                         4. Click the save button in the lower right corner to
                            save the configuration.
Full Screen Card Display and Voice Broadcast
Diagram 1 Diagram 2
1. Click on the mark 1(on Diagram 1), go to full screen face card mode configuration.
2. At mark 2(Speech)position to set voice broadcast in full screen mode. Report all the temperatures, broadcast only the over
temperature information, and broadcast with a custom greeting 3 modes can be chosen as you need. Click OK to Save Settings.
3. Click the button in mark 3 on Diagram 1, Go into full screen card mode, as shown in the Diagram 2.Note:1. The installation methods provided in this document are for reference only. Please select the best installation method according to
the actual situation according to the project environment.
2. The equipment and SunView system provided in this document are fast-use methods. For reference only, project deployment and
commissioning, please read the instruction manual in detail.
More details please access to the website: www.ats.net.auYou can also read