BPS Regional Science, and Engineering Fair Student Handbook 2020-2021 - Make sure to check out the virtual fair addendum for this school year ...
←
→
Page content transcription
If your browser does not render page correctly, please read the page content below
2020-2021
BPS Regional Science,
and Engineering Fair
Student Handbook
(Make sure to check out the virtual fair addendum for this school year
as it modifies some of the rules included in this book.)
Table of Contents                                                 page

Understanding Your Regional Science and Engineering Fair                                        3
   ➢ What is the Regional Science and Engineering Fair?
   ➢ Categories for the Regional Science and Engineering Fair
   ➢ Requirements for All Projects
   ➢ Projects that are NEVER Allowed in BPS Elementary Science and Engineering Fairs
   ➢ Display Requirements

Science Division                                                                                7
   ➢ How to Complete a Science Project
   ➢ Student Science Checklist
   ➢ Judging Criteria

Engineering Division                                                                            17
   ➢ How to Complete an Engineering Project
   ➢ Student Engineering Checklist
   ➢ Judging Criteria

Computer Science Division                                                                       24
   ➢ How to Complete a Computer Science Project
   ➢ Engineering Process Graphic
   ➢ Student Computer Science Checklist
   ➢ Judging Criteria

Additional Resources                                                                            34
   ➢ Risk Assessment, Safety Considerations, Proper Disposal
   ➢ Sample Interview Questions

              Brevard Public Schools Elementary Regional Science and Engineering Fair- updated 2020   2
Understanding Your Regional Science and Engineering Fair
What is the Regional Science and Engineering Fair?
The Regional Science and Engineering Fair is a showcase of student projects in three divisions:
● Science
● Engineering
● Computer Science
You can choose the category in which you will compete, but you can only submit one project to the
fair. For example, you cannot enter a coding project and also be a team member on an engineering
project.
You will compete in a category with all other projects in that category, regardless of grade. For
instance, a fourth grade student with a coding project will compete against fourth, fifth, and sixth
grade students in the coding category.
Team projects consist of two students. Team projects will compete in the category against individual
projects. Team members do not have to be in the same grade level, but both must be in grades 4-6.
Both members of the team will need to complete separate logs and most of the required forms
for the project.
Special Note for Grade 6 Students: Sixth graders are n
o longer able to enter the Secondary
Regional Science and Engineering Fairs.
Categories for the Regional Science and Engineering Fair
There are 10 categories for the Regional Science and Engineering Fair: six in science, two in
engineering, and two in computer science.
Science Division
● Animal Sciences
● Plant Sciences
● Microbiology
● Earth and Environmental Sciences
● Chemistry
● Physics and Astronomy
Engineering Division
● Environmental Engineering
● Engineering Mechanics
Computer Science Division
● Robotics and Intelligent Machines
● Coding
Brevard Public Schools Elementary Regional Science and Engineering Fair- updated 2020 3Project Requirements
These are the project requirements for all divisions. Please see the BPS Elementary Science website
for additional resources.
Use the SEF Student Checklists (1 for each division, at the end of each How-To section) to
ensure your project meets the requirements for the Brevard Science and Engineering Fair.
1. Student projects, research plans, and testing procedures MUST be reviewed and approved by
their teacher before any testing begins. Students and parents should work together to
complete and review these forms.
2. Entered projects MUST be completed during the current school year (August through March).
3. Exhibits should be constructed and developed by the student(s) entering them. Help must be
limited to supervision and guidance.
4. Students MUST BE PRESENT on Judging Day for face-to-face project interview - no
exceptions (tapes, videos, Facetime, Skype, etc.). If a student is not present, the project will
still be judged on the quality of the project, display, and log book, but will not receive the
interview points.
Projects that are NEVER Allowed in BPS Elementary Science and Engineering
Fairs
Students are never allowed to do projects that are clearly dangerous.
● Testing involving firearms, knives or other items that could be considered weapons in a school
setting (e.g. a paintball gun, BB gun, bow and arrow, etc.) is not allowed.
● Testing involving fireworks or other explosives is not allowed.
● Testing involving controlled substances, prescription drugs, alcohol, and tobacco is not
allowed.
● Microbial experimentation (involving microscopic organisms such as bacteria, fungi, etc.) using
samples/organisms collected from the environment for the purpose of isolating, using for
growing, and/or culturing is not allowed.
● NO projects involving mold or that produced mold, even if it was unintentional or
inadvertent, is allowed.
● Any project that could cause pain, distress, or death to the vertebrate is not allowed.
Brevard Public Schools Elementary Regional Science and Engineering Fair- updated 2020 4Display Requirements
1. Displays must meet all size requirements. Exhibits will be confined to table space which must
not exceed 3 feet (91 cm) high, 4 feet (122 cm) from side to side, and 24 inches (61 cm)
front to back. Headers may be used, as long as the complete display fits within these size
requirements. Projects larger than size limitations will be disqualified until changes are
completed.
2. Backboards must be able to fold and lay flat. Two-dimensional paper, photos, pictures,
lettering, designs, and borders should be used on the backboard. Three dimensional items are
acceptable as long as the board folds and lays flat.
3. Students MAY use photographs that include their faces. Photo credit must be provided. One
statement, such as, “All photographs taken by parents of Jeffrey.” or “All photographs taken by
Johanna.” will suffice for documentation. Last name must not be included.
4. Items used from the Internet must be credited (articles, graphs, charts, pictures, etc.).
5. Student’s last name or school name must n ot be visible on either side of the display or log
book. Project numbers will identify participants.
ot be visible on clothing during judging.
6. Students’ last names or school names must n
7. Research involving live specimens should be displayed through the use of drawings, charts,
photographs, graphs, or original models.
8. Items prohibited on the display include, but are not limited to, the following:
● Live animals, preserved animal bones, feathers, or other parts
● Live or dead plants (flowers, fruits/vegetables)
● Soil, sand, rocks, seashells, chemicals, liquids
● Sharp objects (metal cans, nails, screws, pins, glass, etc.)
● Battery-operated lights
● Any food or drink item
● Any other potentially dangerous substance or item that may be hazardous in a public
display
● Any items that stop the board from folding and laying flat.
9. Only log books may be displayed in front of the exhibit/backboard prior to and after judging.
Brevard Public Schools Elementary Regional Science and Engineering Fair- updated 2020 510. If the student wishes to display a 3-dimensional student-created model, engineering design
prototype, laptop, tablet, robot, etc., it should only be brought on the day of judging and is
the sole responsibility of the student.
● Display items must fit in the space allowed on the table top and within the height
requirements of the display area. Items may not be demonstrated on the floor or in the
air.
Entrants should make every effort to secure his/her/their exhibit. The Fair Committee will
safeguard all boards and log books, but the responsibility for the security of any additional
components (laptop, drone, robot, prototype, etc.) rests on the participants.
11. Access to electrical outlets will not be provided or allowed.
Brevard Public Schools Elementary Regional Science and Engineering Fair- updated 2020 6How to Complete a Science Project
What is a Science project?
A science project is an independent study of a particular topic that uses the scientific method in order
to answer a specific question about how or why something is being impacted in our world.
A science project is a science experiment. An experiment is a very specific type of science
investigation. In an experiment, the researcher tests just one condition and sees what effect it will
have on a test subject. The researcher can only make changes to that one, specific condition.
Everything else in the experiment has to stay exactly the same for every trial, or else the experiment
is not valid (fair).
1. Get an Idea for Your Science Project
Science is all around you. You use force and motion concepts when you ride your bike to school. You
are impacted by the weather. Eating is a part of life processes. A science project is hiding inside
everything that you do in your life. Start by asking “What if?” questions. For example, as you are
riding your bike, think about what would happen if you had a bike with larger wheels, or smaller
wheels. How would that change the speed you could go? That’s the start of a science project. Look
around your world. Think about the things that you enjoy. Then start researching your favorite science
topics to help you find a question that interests you. Talk over the list with your family, teacher or
friends.
There are six categories in the science division of the Science and Engineering Fair:
● Animal Sciences - This category addresses the study of all aspects of animals (including
humans) and animal life, animal life cycles, and animal interactions with one another or with
their environment. It also includes the study of the thought processes and behavior of
humans and other animals in their interactions with the environment. Many scientists work in
the field of animal sciences. Some of them include:
○ physiology
○ mammalogy (mammals)
○ entomology (insects)
○ ichthyology (fish)
○ ornithology (birds)
○ herpetology (reptiles and amphibians)
○ neurobiology (brain research)
● Plant Sciences - This category includes any project dealing with plants and how they live. If
plants interest you, these are some of the careers you might choose:
○ agriculture/aquaculture
○ ecology
○ genetics/breeding
○ physiology
Brevard Public Schools Elementary Regional Science and Engineering Fair- updated 2020 7● Microbiology - The microbiology category covers the study of microorganisms, including
bacteria, fungi, prokaryotes, and simple eukaryotes, as well as antimicrobial substances.
Microbiologists might study some of the following fields:
○ antimicrobial
○ bacteriology
○ environmental microbiology
○ microbial genetics
● Earth and Environmental Sciences - This category focuses on Earth and the environment. It
also includes meteorology and climate sciences. Possible fields in this category are:
○ atmospheric science and meteorology (weather)
○ climate science
○ environmental effects on ecosystem
○ geosciences
○ water science
● Chemistry - Studies exploring the science of the composition, structure, properties, and
reactions of matter not involving biochemical systems are included in the Chemistry category.
Chemistry careers include:
○ environmental chemistry
○ inorganic chemistry
○ organic chemistry
○ physical chemistry
● Physics and Astronomy - Physics is the science of matter and energy and of the interactions
between the two. Astronomy is the study of anything in the universe beyond the Earth. This
category would also include studies of renewable energy structures (wind or hydroelectric
turbine, photovoltaic cell, etc.) and/or processes, including energy production and efficiency. In
this category, some possible career fields are:
○ electrician
○ astronomy, cosmology, and astrophysics
○ biological physics
○ magnetics and electromagnetics
○ mechanics
○ optics, lasers
2. Start a Scientist’s Log Book
A detailed scientist’s log book with accurate records allows scientists to describe their investigations
so others can repeat it and try to replicate the results. A bound notebook (such as a “composition
notebook”) is the best for a log book because it is a “legal document”. A scientist’s log book can be
used to show timelines and dates. This could help the scientist prove that the results are not copies
from someone else. For this reason, the book should be written in ink and mistakes should not be
Brevard Public Schools Elementary Regional Science and Engineering Fair- updated 2020 8erased. Don’t worry about mistakes. Just put one line through it so they can still be read. This
information could possibly be used at another time.
Setting Up Your Scientist’s Log Book: Divide the log book into two sections:
● In the Daily Work section, write down all the things you do or think about concerning your
project each day. Make sure you date every entry. Think of it as a daily blog post:
○ What did you do today for your project?
○ Did you discuss the project with anyone?
○ Did you consider how to gather materials?
○ What issues did you run into today?
○ What did you research? Make sure to add the bibliography information for each source
as you come to it.
○ Give details! Each day’s entry should show the progress on your project.
● In the Data section, make charts before you start testing. The data section of your log book
should have all the data and observations from your testing. If you make a mistake, draw a line
through it and rewrite it. Do not erase or white out a mistake.
○ Record all measurements, in ink, as you measure them during your testing.
○ Make observations during your testing. Observations help the scientist explain the
data. For example, in one trial there may be a significant difference in the measurement
from another trial. Through close observation, a scientist may notice something, such as
wind changing direction, during a trial. These careful observations can help in explaining
differences in trials.
3. Complete the Project Approval Form - 2 pages
This form lets your teacher know what you’ve chosen for your project. It gives an overview of your
project with enough detail that anyone who reads it can get a pretty good idea of what you will be
doing. Once your teacher approves the project, he/she will give this form back to you. It will have a list
of other forms you will need to complete for your project. Make sure you keep this signed form and
all forms you complete--they are required to be turned in with your project.
4. Become an Expert on Your Problem
The research phase of your project is very important. This is where you learn everything you can
about the topic of your project. Spend some time getting background information. Good research will
help you become an expert on your topic. Remember to write down the bibliographic information
about each source you read, consult, or try to contact. Some ideas for places to go for research are:
● library
● internet--Make sure it is a reliable source of information (talk to your school media specialist
about this).
● experts in the field
● Write to companies involved in your field.
Brevard Public Schools Elementary Regional Science and Engineering Fair- updated 2020 95. Complete Ethics Agreement and Risk Analysis and Designated Supervisor Form
By signing the Ethics Agreement, you are saying that you won’t copy someone else’s work. You can
refer to someone else’s work, but you have to cite it in your log book and on the bibliography.
Copy-and-pasting images, words, etc., from the internet is considered plagiarism. If you identify
where you got each part of what you copied (cite the source), you have done your job.
The Risk Analysis and Designated Supervisor Form is used to state all the risks in your project. Risks
might include:
● the tools and materials you are using. How can you stay safe when you use them?
● the location you are testing in. Is it close to a road or body of water?
● the science safety tools you will be using.
In this handbook, the Risk Assessment and Safety Considerations section will help you complete this
form.
6. Identify Your Variables
In an experiment, scientists call the conditions in their experiment “variables.” It is very important to
identify and control variables.
There are 3 types of variables:
● independent variable - This is the one thing you are changing in your experiment.
● dependent variable - This is what changes as a result of changing the independent variable.
This is what you will measure to collect data.
● controlled variables - This is everything else in the experiment. These must be kept exactly
the same in all your trials, or else it’s not fair.
In your experiment, what are you changing? For example, if you are doing an experiment about
whether adults or students are better at shooting basketballs, the thing that you are changing is the
age of the test subjects (adults or students). That’s your independent variable.
How are you going to measure your experiment? In the example above, you’d measure it by counting
how many shots each person made successfully. That’s your dependent variable. The dependent
variable is the data you will record for your experiment.
his is everything else in your project. Go back to the
The final variable is the controlled variables. T
basketball example. Would it be fair to let the adults shoot from right under the basket, but the
students have to shoot from the half-court line? NO! The controlled variables keep the experiment
fair.
Brevard Public Schools Elementary Regional Science and Engineering Fair- updated 2020 107. State the Problem in a Question Form
The Question asks what you are trying to find out or solve by testing. Make sure your question is a
testable question. It should not be a demonstration, survey, or collection. Two common formats used
for writing a question are:
How will salt affect the boiling temperature of liquids?
What are the effects of salt on the boiling temperature of liquids?
Be careful when using the words “affect” and “effect” because they are often confused and
misused.
● “Affect” is a verb that means “to influence”. In the example above, the student is asking if salt
will “influence” or affect the boiling of water.
● “Effect” is usually used as a noun that means “a result, or something brought about by a
cause.” In the second example above, the student is asking what the “results” or “effects” will
be when they add salt to boiling liquids.
● “Effective” is an adjective meaning “producing an expected result.” It is also sometimes
misused. A correct example would be, “Which of the tested air filtering systems is most
effective?”
Some other formats that can be used are:
● “What happens to the stability of a boat when the pontoon design is changed?”
● “Is there a relationship between light color and the growth of bean plants?”
● “Which of the tested materials provides the best insulation?”
Your variables can help you write your Question. In the examples above, see if you can identify the
independent variable (what the researcher is changing) and the dependent variable (what the
researcher is measuring). Here are a few:
● How will salt (independent variable) affect the boiling temperature (dependent variable) of
liquids?
● Is there a relationship between light color (independent variable) and the growth (dependent
variable) of bean plants?
8. Identify Your Control Group and Experimental Group
It is very important to have a Control Group. This is the group that is treated in the “normal” way so
you can compare them to the Experimental Group. The Experimental Group is the one that gets the
independent variable. Let’s look at an example:
How will salt affect the boiling temperature of liquids?
Salt is the independent variable, so the Experimental Group is the group that gets the salt
added to the liquid. The group without the salt is the “normal” group--the Control Group.
Brevard Public Schools Elementary Regional Science and Engineering Fair- updated 2020 11If your Question is based on a “What if…” question, you do have a Control Group--the situation
that made you start wondering. If you were pitching a softball and started wondering, “What if it
was raining and the softball was wet?” Your Control Group would be testing with dry softballs
and your Experimental Group would be testing with wet softballs.
9. Research
Scientists need to get a full picture of the problem they are addressing before they start testing. That
is where research comes in. You may want to start by researching to find out what other scientists
have found about your topic in the past. Research will help you to fully understand your topic and help
you to come up with a way to design your experiment.
For the Science and Engineering Fair, at least 3 sources are required for the research phase. These
sources must be documented in both the log book and on a bibliography. Interviewing an expert in
the field of your project is an acceptable source.
10. State Your Hypothesis
The hypothesis is a prediction of what you think will happen during your experimentation. Use
background information to help you prepare the prediction. Be sure to write your hypothesis before
you start your experiment. Write it as an “If…, then…” statement.
In the example about the basketball experiment, a hypothesis might be, “If adults and
students shoot 50 free-throws each, then the students will shoot an average of 5 baskets
more than the adults.
A note about the Hypothesis: T he results of the tests you will do later do not have to support the
hypothesis in order for the experiment to be a success. It is important to note that your hypothesis will
NOT be “proved” or “disproved.” Hypotheses are either “supported by the data” or “not supported by
the data.” They aren’t proved; they aren’t right; they aren’t wrong.
11. Design the Experiment and Write a Procedure
The Procedure is the method you will use to test your hypothesis. The Procedure should explain the
steps to be followed in order to find the answer to your question or problem. This is where you write
how you will control all the variables. It is also where you write how you are going to control the risks
you identified in your Risk Assessment.
It is very important that your Procedure is very specific and detailed, like a recipe in a cookbook.
Other scientists should be able to pick up your Procedure, conduct your experiment and get very
similar results. This is called a “replicable experiment.” Replicable means repeatable. All scientists
work very hard to have a replicable experiment--if it’s not replicable, it’s not considered valid. One
way to check if you’ve added enough detail is to have someone else take your Procedure and try to
walk through the experiment (without actually using the materials). As that person tries to follow your
Procedure, watch for steps you forgot to write.
Brevard Public Schools Elementary Regional Science and Engineering Fair- updated 2020 12Repeated trials should be part of your Procedure. Be sure to follow this very important part of the
scientific method. In order for results to be considered valid, the experiment must be conducted
multiple times and yield consistent results. There must be at least 3 or more trials. The results will be
more valid if you repeat the experiment as many times as possible.
After you’ve written your Procedure, go step by step and pull out the materials you will need to gather
for your project. Be very specific about the amount of each material you will need.
Make sure that both the Procedure and Materials are written in your log book.
12. Conduct the Experiment
Follow your Procedure carefully to ensure valid scientific testing. While testing, record all data, in ink,
directly into your log book. Be accurate and exact as you observe, measure, describe, count, and/or
photograph. If necessary, make changes in your Procedure and document them in your log book.
However, if you do make changes, you have to start your testing again. It wouldn’t be valid to do half
of the tests with one Procedure and the rest of the test with a different Procedure.
It’s important to also write your observations during your testing. Your observations can help you
make sense out of your data. Did you have one trial that had a different result from the others? What
did you observe during that trial?
3. Analyze the Data (Results)
Look closely at the measurements you recorded in your log book. Think about the data and decide
what the results mean. Try to find explanations for your observations. If possible, examine your
results mathematically using percentages, mean, median, range, and mode. Be sure to know the
meanings of these words if you use them. Also, in your results, identify data that is unusual or
unexpected and try to explain it in your conclusion.
Graphs are used to make the data, trends, and patterns easy to understand, but you have to select
the correct kind of graph. If you use a computer program to make your graph, you have lots of
options. However, not every graph is appropriate for every project. The graph you choose should be
easy to understand--just because it looks really interesting doesn’t mean it’s the best graph. The
charts or graph will also go in your log book and on your display board. Make sure you include a key
to help others read your graph.
14. Make Conclusions
Conclusions are statements telling what you found out or learned during your investigation. This is a
very important part of your project since you have likely learned a great deal. The conclusion is based
on the results of your experiment. You will explain how the data you collected either does or does not
support your hypothesis. Explain what further testing might be done to further answer your original
question. Tell how people might apply your findings to everyday life. If you were to repeat this project,
what changes would you make?
Brevard Public Schools Elementary Regional Science and Engineering Fair- updated 2020 1315. Communicate Your Results/Construct a Display
An important part of the scientific process is to share results with others. It is good to let others know
what you have learned. You should be able to fully explain all parts of your project. The Sample
Interview Questions section of this handbook can help you prepare to share your project with others.
This is a sample of a science project display board. Your board does not have to match this exactly,
but it MUST have your problem and tell the story of your project.
Brevard Public Schools Elementary Regional Science and Engineering Fair- updated 2020 14SEF Student Checklist
Science Division
Student Name__________________________________________
Congratulations on completing your project! Use your SEF Student Handbook and this checklist to
check
be sure you have completed all of the required parts and that you stayed within the rules for your
each
project. In order to be safe and fair, if you don’t follow the rules, your project will not be
box
permitted in the Regional Science and Engineering Fair.
Check the box if you have completed and signed all of the necessary forms for your
project. Look on page 2 of your Project Approval Form for what you need.
Check the box if your testable question is on the board or in your log.
Check the box if your hypothesis is on the board or in your log.
Check the box if your materials list is on the board or in your log.
Check the box if your procedure is on the board or in your log.
Check the box if your results/data are on the board and in your log.
Check the box if your bibliography is complete, with at least t hree sources, and with your
project.
● If your project uses a non-human vertebrate, one of the sources must be about how
to care for the animal.
Repeated trials are important for a valid experiment. Check the box if you did at least 3
trials. Any project with less than 3 trials will not be entered in the Regional Science
and Engineering Fair. The more trials you do, the more valid your results.
A log book is required for each student scientist (team projects require a log book for each
student). Check the box if your log book is complete and with your project.
You can use photographs, ( even ones that show your face), but you have to tell who took
the photos. If the same person took them all, just put one label that says, “All photos taken
by _______.” But only use first names. You can also say, “Scientist’s mom took this photo,”
or “Photo taken by scientist.” Check the box if you have labeled your photographs.
Items used from the Internet (articles, graphs, charts, pictures, etc.) need to have labels to
cite the source. For example, “This chart was from (URL of website).” Check the box if
you’ve labeled your Internet sources (if this applies to you).
Check the box if your display board is able to fold and lay flat and does not contain
prohibited objects (such as lighting, soil, rocks, liquids, living or dead organisms, sharp
objects, plastic bottles, etc.).
Check the box if your project meets all of the rules and requirements outlined in the SEF
Student Handbook.
Brevard Public Schools Elementary Regional Science and Engineering Fair- updated 2020 15Judging Criteria: Science Division
________________________/__________________________________________________
Project Number Category
Project Problem _____________________________________________________________
Superior Very Good Good Poor Notes
Research Question
● clear and focused 10 8 4 2
● testable using scientific methods
● real-world application
Design and Methodology
● well-designed plan (easily replicated) 15 10 5 2
● variables identified and controlled
Data Collection/Analysis
● systematic data collection
● sufficient repeated trials to ensure 15 10 5 2
data validity
● conclusion supported by data
Representation of Data
● accurate application of mathematics
for analysis 10 8 4 2
● clarity of graphs/charts
● appropriate representation of
graphs/charts
Log Book
● detailed observations/entries
● sketches/diagrams 15 10 5 2
● dated entries
● evidence of research
● bibliography (at least 3 sources)
Interview
● clear, concise, thoughtful response to
questions
● understanding of science concepts
● degree of independence 15 10 5 2
● lessons learned
● ideas for future research
● If team, both members demonstrated
significant contribution to project
Display
● logical organization of project content 10 8 4 2
● tells story of project
● shows student learning
Creativity
● project demonstrates imagination and
inventiveness 10 8 4 2
● project opens up new possibilities or
new alternatives
**Form to be printed in green for the Regional Science and Engineering Fair.
Total _____________
Brevard Public Schools Elementary Regional Science and Engineering Fair- updated 2020 16How to Complete an Engineering Project
What is an engineering project?
An engineering project uses design and engineering processes to find a practical solution to a
problem that addresses a need that exists.
Engineering Graphic: If you are doing an engineering project, make sure you use the Engineering
Design Process diagram to guide you work through completing an engineering project. It is located on
page 23.
1. Get an Idea for Your Engineering Project
Like a science project, an engineering project starts with a problem, but the problem is a bit different.
In science, you might be asking a “What if?” question, such as “What will happen if I add food coloring
to saltwater before I evaporate the water?” Engineering, on the other hand, looks at the real world,
sees a problem or a condition that may not be working the best, and tries to solve the problem. In
other words, what do you see in the real world that you think you can fix, change, or improve?
There are two categories in the Engineering division of the Science and Engineering Fair.
● Environmental Engineering includes developing a prototype or process that solves an
environmental problem. Environmental Engineering covers many careers in the real world,
including:
○ bioremediation
○ land reclamation
○ pollution control
○ recycling and waste management
○ water resources management
○ invasive species management
● Engineering Mechanics focus on the science and engineering involved in movement or
structures. Some engineering fields connected to this category include:
○ aerospace and aeronautical engineering
○ circuits
○ civil engineering
○ ground vehicle systems
○ industrial engineering/processing
○ mechanical engineering
○ naval systems
2. Start an Engineer’s Log Book
A detailed engineer’s log book with accurate records allows engineers to describe their design
process so others can follow the process. Your log should be a bound notebook (such as a
composition book). It should be done fully in ink. That’s because it can be used as a “legal document”
to prove your invention is your creation. In the real world, the engineer’s log book is used as proof for
Brevard Public Schools Elementary Regional Science and Engineering Fair- updated 2020 17patents and copyright. It can even be used as evidence in lawsuits over who was the first person to
come up with a new idea. That’s a pretty powerful book!
Don’t worry about making mistakes or making a messy drawing. Mistakes are part of the process of
learning and discovering. If you make a mistake, just draw one line through the mistake and keep
going. Don’t tear out pages or scribble out anything. It’s possible that a design you thought wouldn’t
work early in the process turns out to be the solution to your problem.
Setting Up Your Engineer’s Log Book: Divide your log book into two sections.
● In the Daily Work section, write down all the things you do or think about concerning your
project each day. Make sure you date every entry. Think of it as a blog post each day:
○ What did you do today for your project?
○ Did you write your testing procedure?
○ Did you build your prototype?
○ Did you change your prototype today?
○ What issues did you run into today?
○ Who did you talk to about your project?
○ What did you research? Make sure to add the bibliography information for each source
as you come to it.
○ Give details! Each day’s entry should show the progress on your project.
● In the Data section, make charts before you start testing. The Data section of your log book
should have all the data and observations from your testing. If you make a mistake, draw a line
through it and rewrite it. Do not erase or white out a mistake.
○ Record all measurements in ink as you measure them during your testing.
○ Make observations during your testing. Observations help the engineer explain the
data. For example, on one test cycle, a trial ends up much lower than all the other trials.
The engineer observes that the prototype wheel was wobbling on that trial. So, the
observation explains the data and both parts are very important. Sometimes, it’s the
unexpected observation that leads to a new idea for improving the prototype.
3. Complete the Project Approval Form - 2 pages
This form lets your teacher know what you’ve chosen for your project. It gives an overview of your
project with enough detail that anyone who reads it can get a pretty good idea of what you will be
doing. Once your teacher approves the project, he/she will give this form back to you. It will have a list
of other forms you will need to complete for your project. Make sure you keep this signed form and
all forms you complete--they are required to be turned in with your project.
4. Become an Expert in Your Problem
The research phase of your project is very important. This is where you learn everything you can
about the topic of your project. If you are trying to solve a problem, you need to understand the
problem. Spend some time getting background information. Good research will help you become an
Brevard Public Schools Elementary Regional Science and Engineering Fair- updated 2020 18expert on your topic. Remember to write down the bibliographic information about each source you
read, consulted, or tried to contact. Some ideas of places to go for research are:
● library
● internet--Make sure it is a reliable source of information (talk to your school media specialist
about this).
● experts in the field
● Write to companies involved in your field.
5. Complete Ethics Agreement and Risk Analysis and Designated Supervisor Form
By signing the Ethics Agreement, you are saying that you won’t copy someone else’s work. You can
refer to someone else’s work, but you have to cite it in your log book and on the bibliography.
Copy-and-pasting images, words, etc., from the internet is considered plagiarism. If you identify
where you got each part of what you copied (cite the source), you have done your job.
The Risk Analysis and Designated Supervisor Form is used to state all the risks in your project. Risks
might include:
● the tools and materials you are using. How can you stay safe when you use them?
● the location you are testing in. Is it close to a road or body of water?
● the science safety tools you will be using.
In this handbook, the Risk Assessment and Safety Considerations section will help you complete this
form.
6. State the Problem in a Question Form
Your problem is what you are trying to fix with your prototype. The problem should be a practical
need. Are you building a completely new item or are you modifying (changing) an existing item to
make it work better in certain conditions? Whatever it is you are trying to do, your final prototype
should be a solution to the problem you identified. Your problem should also be very specific. For
instance, if you want to design a tool that can collect litter, be very specific about where the tool would
be used (on the beach, in the water, on grass?). Also ask yourself, “What is the real-world application
for my prototype?”
7. Research
Engineers need to get a full picture of the problem they are addressing before they start building their
prototypes. That’s where research comes in. If you are building a bridge, find out about different
bridge designs and the uses, strengths, and weaknesses of each design. If you are designing a tool
to solve an environmental issue, become an expert on the issue and on what other people have done
to try to solve the problem. You don’t want to duplicate something that has already been done; you
want to come up with an original design. Research helps you to fully understand the problem and
possible solutions before you start your design.
Brevard Public Schools Elementary Regional Science and Engineering Fair- updated 2020 19For the Science and Engineering Fair, at least 3 sources are required for the research phase. These
sources must be documented in both the engineer’s log and on a bibliography. Interviewing an
engineer or other expert in the field of your project is an acceptable source.
8. Brainstorm Ideas
Your initial design should start as a brainstorm of several designs. Don’t stop at just one. Brainstorm
alternative designs that might solve the problem. All of your designs should be in your log book, with
detailed labels, materials needed, and measurements. Another engineer should be able to take your
diagram and make an exact replica of your prototype, based only on your diagrams.
9. Choose Your Engineering Goal
Once you have multiple designs to choose from, select the one that you think best fits the specifics of
your project. In science, we call this part the “hypothesis.” In engineering, it is called the engineering
goal. The engineering goal is a written description of the design you choose to build, test, and modify.
Make sure you document in your log your rationale for choosing that design. At judging time, you
might be asked about different ideas you brainstormed and why you thought your design was the best
design.
10. Design the Testing Procedure
Your testing Procedure should mirror the real-world conditions, as much as possible, that the
prototype will face. If you aren’t able to test your prototype in the real world (due to safety
considerations), come up with an “analogous” or simulated situation. For example, if your prototype is
meant to be used in the Indian River Lagoon, but Science and Engineering Fair rules don’t allow you
to test in the actual Indian River Lagoon, where else could you set up a safe testing environment?
Perhap a bathtub, child’s pool, or other area would provide a suitable place. If your project is
addressing the collection of invasive species, could you test it on toys instead? These
not-quite-real-world conditions are used to simulate the real world and can be used for data
collection.
Your testing Procedure should be very specific, as it describes the steps to be followed every time
you test your prototype. It should include how you will measure the effectiveness of the prototype.
Think about all necessary safety precautions and include them in the Procedure.
Your testing should also include repeated trials. If you only test your prototype once in each cycle,
your results may not be reliable.
11. Build a Prototype of Your Initial Design
As you build a prototype of your initial design, make sure you are following the design plan in your
log. If you find you have to change the design as you build it, make sure to show that in your log.
Brevard Public Schools Elementary Regional Science and Engineering Fair- updated 2020 20Changing a prototype is called “modifying,” and it is extremely important to document all modifications
in engineering. As you finish your prototype, it might be helpful to take a photo of it for documentation.
However, photos are NOT a substitute for detailed diagrams in the log. Remember, another engineer
should be able to build the same prototype out of just your diagram.
12. Testing, Analysis, and Modification
The Engineering Process is a loop of repeated testing (according to your Procedure), analysis of the
results of the testing, then modification of the prototype, based on the analysis. The analysis should
include the following questions:
● What on the prototype worked well?
● What parts of the prototype didn’t work as well as expected?
● What parts of the prototype failed? It’s okay if a part failed--that shows a part that definitely
needs modification.
During testing, it’s critical to record not just the measurement data, but also observations made as the
prototype was performing. You might observe something that is causing the prototype to
underperform. An example:
● You are testing your prototype for distance, but your prototype doesn’t go as far as you
expected (measurement). You observe that one gear is not spinning as well as the others
(observation). That one gear could be a starting point for modifications.
Once you’ve analyzed your test results, it’s time to modify your prototype to address the issues
identified in testing. Document your changes with a new detailed and labeled sketch for each testing,
analysis, modification cycle. Also, give a rationale for each change to your design, basing it on your
testing and analysis. You should be modifying your Initial Design, not starting over with a new
design each time.
The Testing - Analysis - Modification cycle of the Engineering Process should continue until you
have a prototype that completely solves the problem you identified for your project.
A note about “perfect prototypes”: If your prototype works perfectly the first time, consider if you
have made the test requirement too lenient. In other words, did you account for all the different
factors in the process? Engineers test their products and processes “to failure.” How can you tell how
much stress your device can take if you don’t keep going until it fails? Once you know where it fails,
you know the limits of your device. Then you can also engineer ways to increase what your device
can do.
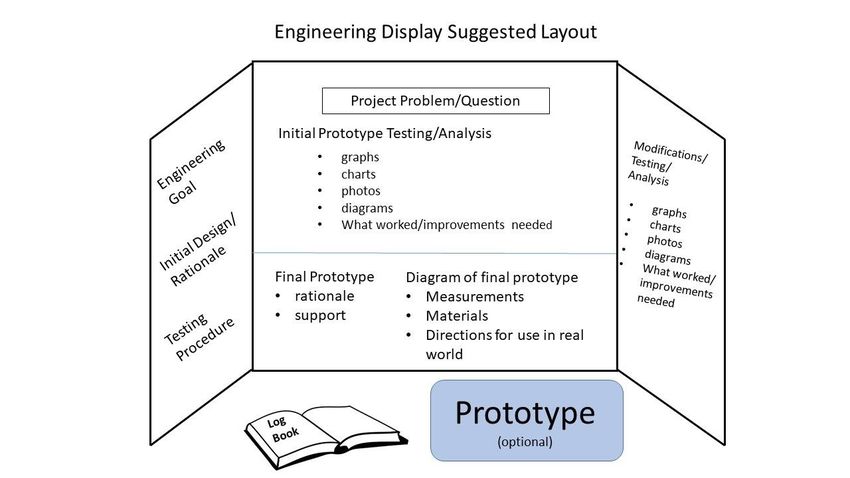
13. Final Prototype
Once you have a prototype that solves the problem, you are ready for your final prototype. Your
rationale (conclusion) for this being your final prototype should be supported by your data and
analysis. You should also have a detailed diagram of your final prototype. Remember to include:
● measurements
Brevard Public Schools Elementary Regional Science and Engineering Fair- updated 2020 21● specific materials used
● specific directions for the use of your prototype in the real world
14. Communicate Your Results/Construct a Display
Engineers share their findings with others. If your prototype solves a problem, it is good to let others
know about it! You should be able to fully explain all parts of your project:
● How did you come up with the problem?
● What alternative design ideas did you develop?
● Why did you settle on your initial prototype design?
● How did you test your prototype?
● How did you analyze your results?
● What modifications did you make? Why did you make them?
On the next page is a sample of an Engineering Project Display Board. Your board does not have to
match this exactly, but it MUST have your problem and tell the story of your project.
Brevard Public Schools Elementary Regional Science and Engineering Fair- updated 2020 22Brevard Public Schools Elementary Regional Science and Engineering Fair- updated 2020 23
SEF Student Checklist
Engineering Division
Student Name__________________________________________
Congratulations on completing your project! Use your SEF Student Handbook and this checklist to
check
be sure you have completed all of the required parts and that you stayed within the rules for your
each
project. In order to be safe and fair, if you don’t follow the rules, your project will not be
box
permitted in the Regional Science and Engineering Fair.
Check the box if you have completed and signed all of the necessary forms for your
project. Look on page 2 of your Project Approval Form for what you need.
Check the box if your problem/question is on the board or in your log.
Check the box if your engineering goal is on the board or in your log.
Check the box if your initial prototype design/rationale is on the board or in your log.
Check the box if your testing procedure is on the board or in your log.
Check the box if you have evidence of testing, analysis and modification to your initial
prototype on the board. Any project with no evidence of modifications will not be
entered in the Regional Science and Engineering Fair.
Check the box if your bibliography is complete, with at least t hree sources, and with your
project.
Check the box if you have a detailed diagram of your final prototype with directions for
how to build it and how to use it in the real world.
A log book is required for each student engineer (team projects require a log book for each
student). Check the box if your log book is complete and with your project.
You can use photographs, ( even ones that show your face), but you have to tell who took
the photos. If the same person took them all, just put one label that says, “All photos taken
by _______.” But only use first names. You can also say, “Scientist’s mom took this photo,”
or “Photo taken by scientist.” Check the box if you have labeled your photographs.
Items used from the Internet (articles, graphs, charts, pictures, etc.) need to have labels to
cite the source. For example, “This chart was from (URL of website)” Check the box if
you’ve labeled your Internet sources (if this applies to you).
Check the box if your display board is able to fold and lay flat and does not contain
prohibited objects (such as lighting, soil, rocks, liquids, living or dead organisms, sharp
objects, plastic bottles, etc.).
Check the box if your project meets all of the rules and requirements outlined in the SEF
Student Handbook.
Brevard Public Schools Elementary Regional Science and Engineering Fair- updated 2020 24Judging Criteria: Engineering Division
________________________/__________________________________________________
Project Number Category
Project Problem______________________________________________________________
Superior Very Good Good Poor Notes
Research Problem
● clear and focused
● description of practical need or problem 10 8 4 2
to be solved
● real-world application
Design and Methodology
● well-designed plan for prototype and
testing 15 10 5 2
● explanation of limitations
● explanation of alternatives
Testing/Modifications
● systematic data collection
● evidence of testing, analysis, and 15 10 5 2
modification of prototype
● rationale for modifications
● final design is supported by data
Representation of Data/Design
● accurate application of mathematics for
analysis 10 8 4 2
● clarity of graphs/charts/diagrams
● appropriate representation of
graphs/charts
Log Book
● detailed observations/entries
● sketches/diagrams 15 10 5 2
● dated entries
● evidence of research
● bibliography (at least 3 sources)
Interview
● clear, concise response to questions
● understanding of science concepts
● understanding of design process
● degree of independence 15 10 5 2
● lessons learned
● ideas for future research
● If team, both members demonstrate
significant contribution to project
Display
● logical organization of project content 10 8 4 2
● tells story of project
● displays student learning
Creativity
● project demonstrates imagination and
inventiveness 10 8 4 2
● project opens up new possibilities or
new alternatives
**Form to be printed in blue for the Regional Science and Engineering Fair.
Total _____________
Brevard Public Schools Elementary Regional Science and Engineering Fair- updated 2020 25How to Complete a Computer Science Project
What is a computer science project?
A computer science project uses coding language to develop information processes or programs to
demonstrate, analyze, or control a process/solution. Sometimes robots or intelligent machines are
used to use the coding language and perform tasks.
1. Get an Idea for Your Computer Science Project
Like a science fair project, a computer science project starts with a problem, but the problem is a bit
different. In science, you might be asking a “What if?” question, such as “What will happen if I add
food coloring to saltwater before I evaporate the water?” Computer science, on the other hand, looks
at the real world, sees a problem, and uses coding language to try to solve the problem. In other
words, what do you see in the real world that you think you can fix, change, or improve? Examples
could include developing an application, designing a game, writing a program for a robot, or
programming a microcontroller (Raspberry Pi, Arduino, AdaFruit Circuit).
There are two categories in the Computer Science division of the Science and Engineering Fair.
● Robotics and Intelligent Machines projects use machine intelligence to complete a task or
reduce the reliance on human intervention. If you have an interest in computer science, you
might look at a career in:
○ biomechanics
○ cognitive systems (artificial intelligence)
○ robot kinematics (how robots move)
● Coding focuses on the study or development of software, information processes or
methodologies to demonstrate, analyze, or control a process or solution. Learning to code
could lead to a career in many fields, including:
○ algorithms
○ cybersecurity
○ databases
○ programming languages
○ operating systems
○ machine learning
○ application development
2. Start Programmer’s Log Book
A detailed programmer’s log book with accurate records allows programmers to describe their coding
processes and reflections on program development and debugging so others can follow the process.
Your log should be a bound notebook (such as a composition book). It should be done fully in ink.
That’s because it can be used as a “legal document” to prove your code is your creation. In the real
world, the programmer’s log book is used as proof for patents and copyright. It can even be used as
evidence in lawsuits over who was the first person to come up with a new idea. That’s a pretty
powerful book!
Brevard Public Schools Elementary Regional Science and Engineering Fair- updated 2020 26Don’t worry about making mistakes or making a messy drawing. Mistakes are part of the process of
learning and discovering. If you make a mistake, just draw one line through the mistake and keep
going. Don’t tear out pages or scribble out anything. It’s possible that a string of code you thought
wouldn’t work early in the process turns out to be the solution to your problem.
Setting Up Your Programmer’s Log Book
● You will only have one section in your log book so it is very important that you record detailed
notes about the work you complete on your project each day. Each entry will have two parts:
Daily Work and Daily Reflection. Be sure to label each part for every entry that you make.
● If you make a mistake, draw a line through it and rewrite it. Do not erase or white out a
mistake.
● In the Daily Work part of each entry, write down all the things you do or plan concerning your
project each day. Make sure you date every entry. Think of it as a blog post each day:
○ What did you do today for your project?
○ Did you record any ideas for your program (sketches of characters, tasks for your robot,
story ideas for your game, input/output for your microcontroller)?
○ Did you change any of your code today? Did you take screenshots before and after you
made changes to your code?
○ Who did you talk to about your project?
○ What did you research? Make sure to add the bibliography information for each source.
○ Give details! Each day’s entry should show the progress on your project.
● In the Daily Reflection part of each entry, think about what you learned today:
○ What roadblocks or obstacles did you run into today?
○ What resources did you use to solve your problem (tutorials, asking a teacher for help,
looking up code)?
○ If you made changes to your code, what did you learn from it? How will your new
learning help you be successful next time?
○ What new ideas or questions have come about as a result of working through the
roadblock or obstacle?
○ What successes did you have today?
○ Did your successes spark new ideas for your code/program?
○ Why do you think what you learned is important?
○ Do you notice any patterns or repeated structures in your code?
3. Complete the Project Approval Form - 2 pages
This form lets your teacher know what you’ve chosen for your project. It gives an overview of your
project with enough detail that anyone who reads it can get a pretty good idea of what you will be
doing. Once your teacher approves the project, he/she will give this form back to you. It will have a list
of other forms you will need to complete for your project. Make sure you keep this signed form and
all forms you complete--they are required to be turned in with your project.
Brevard Public Schools Elementary Regional Science and Engineering Fair- updated 2020 274. Become an Expert in Your Problem
The research phase of your project is very important. This is where you learn everything you can
about the topic of your project. If you are trying to solve a problem, you need to understand the
problem. Spend some time getting background information. Good research will help you become an
expert on your topic. Remember to write down the bibliographic information about each source you
read, consulted, or tried to contact. Some ideas of places to go for research are:
● library
● internet--Make sure it is a reliable source of information (talk to your school media specialist
about this).
● experts in the field
● Write to companies involved in your field.
5. Complete Ethics Agreement and Risk Analysis and Designated Supervisor Form
By signing the Ethics Agreement, you are saying that you won’t copy someone else’s work. You can
refer to someone else’s work, but you have to cite it in your log book and on the bibliography.
Copy-and-pasting images, words, etc., from the internet is considered plagiarism. If you identify
where you got each part of what you copied (cite the source), you have done your job.
The Risk Analysis and Designated Supervisor Form is used to state all the risks in your project. Risks
might include:
● the materials and programs you are using. How can you stay safe when you use them?
● the location you are testing in. Is it close to a road or body of water?
● the tools you may use if building a robot or other intelligent machine.
In this handbook, the Risk Assessment and Safety Considerations section will help you complete this
form.
6. State the Problem in a Question Form
Your project problem is how you will develop a program using a coding language to solve a problem.
The problem should be a practical need. Are you coding a completely new program or are you
modifying (changing) existing code to make it work better in certain conditions? Whatever it is you are
trying to do, your final program should be a process/solution to the problem you identified. Your
problem should also be very specific. For instance, if you want to design a game, be very specific
about which coding language and tasks your program will perform. For example, you might ask, “How
can I use Scratch to design a chase style game?” Also, be sure to consider real world applications of
your program.
7. Research
Computer scientists need to get a full picture of the problem they are addressing before they start
developing their programs.That’s where research comes in. For example, if you are programming a
robot, find out the coding languages that are compatible with that robot. If you are using a
microcontroller to program circuits, research what you will need to build the circuits, how the parts of
the microcontroller operate, and the most efficient coding language for the microcontroller. Research
helps you to fully understand the problem and possible solutions before you start your design.
Brevard Public Schools Elementary Regional Science and Engineering Fair- updated 2020 28You can also read